
In this chapter, we will see how to present a user with a pop-up dialog window. We can then put all we know into the first phase of our first app, Note To Self. You will learn about new Android and Java features in this chapter and the next five chapters as well, and we will use your newly acquired knowledge to enhance the Note To Self app each time.
In each chapter, we will also build a selection of mini apps that are separate from this main app. So, this chapter holds the following in store for you:
- How to implement a simple app with a pop-up dialog box
- How to add
DialogFragmentsto start the Note To Self app - How to add resources such as Strings and graphics to a project
- How to use Android naming conventions for the first time to make our code more readable
- How to implement more complex dialog boxes to capture input from the user
Let's get started.
Often, we will want to show the user some information or perhaps ask for confirmation of an action in a pop-up window. This is known as a dialog window. If you quickly scan the palette, you might be surprised to see no mention of dialogs whatsoever.
Dialogs in Android are more advanced than a simple widget or even a layout. They are classes that can contain layouts and widgets of their own.
The best way to create a dialog window in Android is to use the
Fragment class. Fragments are a wide and vital topic in Android, and we will spend much of the second half of this book exploring and using them.
Creating a neat pop-up dialog for our user to interact with, however, is a great introduction to fragments and not too complicated at all.
We previously mentioned that the best way to create a dialog in Android is with the Fragment class. In Android, there is another way to create dialogs that is arguably a little bit simpler. The problem with this slightly simpler Dialog class is that it is not as well supported in the Activity lifecycle. It is even possible that Dialog could accidentally crash the app.
If you were writing an app with one fixed orientation layout that required one simple pop-up dialog, it could be argued that the simpler Dialog class should be used. However, as we are aiming to build modern, professional apps with advanced features, we will benefit from ignoring this class. More specifically, we will be using the DialogFragment class.
To start the mini project, create a new blank project in Android Studio and call it Dialog Demo. As you have come to expect, the completed code for this project is in the Chapter 12/Dialog Demo folder of the download bundle.
Create a new class by right-clicking on the folder with the name of your package that contains the MainActivity.java file. Select Java class under New and name it MyDialog. Click on OK to create the class.
The first thing to do is to change the class declaration in order to extend DialogFragment. When you have done so, your new class will look like this:
public class MyDialog extends DialogFragment {

…
}
Now, let's add code to this class, a bit at a time, and see what is happening at each step.
First, we override the onCreateDialog method that will be called when we later show the dialog window via code from MainActivity.
Then, inside the onCreateDialog method, we get our hands on a new class. We declare and initialize an object of the AlertDialog.Builder type that needs a reference to MainActivity that is passed in its constructor. This is why we use getActivity() as the argument. The getActivity method is part of the Fragment class (and therefore, DialogFragment too), and it returns a reference to the Activity that created DialogFragment. In this case, it is our MainActivity class. Add this code to get the builder reference variable ready for use, and then we will see what we can do with it:
@Override
  public Dialog onCreateDialog(Bundle savedInstanceState) {

   // Use the Builder class because this dialog has a simple UI
   AlertDialog.Builder builder =
    new AlertDialog.Builder(getActivity());
Now, we can use our builder object to do the rest of the work. There is something slightly odd in the next three blocks of code. If you quickly scan the next three blocks, you will note that there is a distinct lack of semicolons, ;. This indicates that these three blocks of code are in fact just one line to the compiler.
What is going on here is something that we have actually seen before in a less pronounced situation. When we create a Toast message and we add a .show() method to the end of it, we are chaining, that is, we are calling more than one method, in sequence, on the same object. This is equivalent to writing multiple lines of code; it is just clearer and shorter this way.
In the first of the three blocks that uses chaining, we call builder.setMessage that sets the main message the user will see in the dialog box. Note also that it is fine to have comments in between parts of the chained method calls, as these are ignored entirely by the compiler.
Then, we add a button to our dialog with the .setPositiveButton method, and the first argument sets the text on it to OK. The second argument is an anonymous DialogInterface.OnClickListener class that handles clicks on the button. Note that we are not going to add any code to the onClick method.
Add this code, without any semicolons, of course:
// Dialog will have "Make a selection" as the title
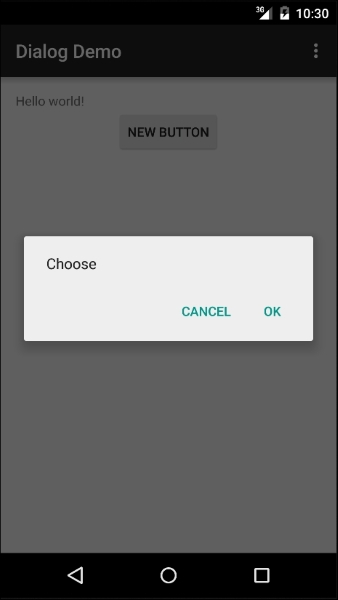
builder.setMessage("Make a selection")
// An OK button that does nothing
.setPositiveButton("OK", new DialogInterface.OnClickListener() {
public void onClick(DialogInterface dialog, int id) {
// Nothing happening here
}
})Next, we call yet another method on the same builder object. This time, it's the setNegativeButton method. Again, the two arguments set Cancel as the text for the button and an anonymous class to listen for clicks. For the purpose of this demo, we are not taking any action in the overridden onClick method.
After the call to setNegativeButton, we finally see a semicolon marking the end of the line of code. We then code return builder.create(). This has the effect of returning to MainActivity (which called onDialogCreate in the first place), which is our new, fully configured, dialog window. We will see this calling code quite soon.
Add the following code directly after the previous block of code and within the onCreateDialog method:
// A "Cancel" button that does nothing
.setNegativeButton("Cancel", new DialogInterface.OnClickListener() {

  public void onClick(DialogInterface dialog, int id) {

    // Nothing happening here either

  }

});

// Create the object and return it
return builder.create();

}// End onCreateDialog
Now, we have our MyDialog class that extends FragmentDialog; all we have to do for this is declare an object of MyDialog, instantiate it, and call its createDialog method.
Let's add a button to our layout. Navigate to the layout_main.xml tab and then switch to the Design tab. Drag a button onto the layout and make sure that its id property is set to button.
Now, go to the MainActivity tab, and we will handle a click on this button using an anonymous class. As we only have one button in the layout, it seems sensible to do things this way.
Note that in the next code, the anonymous class has exactly the same type as that of the class for which we implemented an interface in Chapter 10, Everything's a Class. Add this code to the onCreate method.
Just before you do, note also that the only thing that happens in the code is that the onClick method creates a new instance of MyDialog and calls its show method, which, unsurprisingly, will show our dialog window as we configured it in the MyDialog class. The show method requires a reference to FragmentManager (which we get with getFragmentManager); this is the class that tracks and controls all Fragment instances for an Activity. We also pass in an ID (we pass 123). More details about FragmentManager will be revealed when we look more deeply at Fragments, discussed in Chapter 18, Design Patterns, Fragments, and the Real World:
/*
   Let's listen for clicks on our regular Button.
   We can do this with an anonymous class.
*/

Button button = (Button) findViewById(R.id.button);

button.setOnClickListener(
  new View.OnClickListener() {

    @Override
    public void onClick(View v) {
      // We only handle one button
      // So no switching required
      MyDialog myDialog = new MyDialog();
      myDialog.show(getFragmentManager(), "123");
      // This calls onCreateDialog
      // Don't worry about the strange looking 123
      // We will find out about this in chapter 18
    }
  }
);
Now, we can run the app and admire our new dialog window that appears when we click on the button in the main layout. Note that clicking on either of the buttons in the dialog window will close it. This is the default behavior. This next screenshot shows our dialog window in action:
Next, in this chapter, we will make two more classes that implement dialogs as the first phase of our Note To Self app. We will see that a dialog window can have almost any layout we choose, and we don't have to rely on the simple layouts that the Dialog.Builder class provided us with in this mini app.