Distributed File System (DFS) is a technology included with Windows Server 2016 that enables multiple file servers to share a single Namespace, enabling end users to access files and folders from a single network name. Those accessing the files don't have to worry about which physical server they are currently in contact with; they simply utilize the namespace of the DFS environment and let the servers do all the grunt work in making sure that all files and folders are available to the users, no matter where those files happen to be physically sitting. Another way to think of it as a collection of network shares, all stuck together under the same umbrella that is the DFS Namespace. Users access folders and files via the Namespace, and have access to everything in one place. It helps to think of DFS Namespaces sort of like CNAME records in DNS. They essentially allow us to virtualize the file resources.
Let's work together to get a basic DFS environment up-and-running, with a single Namespace created so that we can test browsing to it without having to specify the name of our file server. We will also be taking steps during this recipe to prep our DFS server for replication, synchronizing files between two file servers. The actual configuration of replication (DFSR) will be accomplished in our next recipe, but when we build out the FILE1 server, we are prepping it for that role as well.
We are working inside a domain environment, and the actual work today will be accomplished from our new file server. This is called FILE1, and is running Windows Server 2016. It has been joined to the domain, but nothing else has yet been configured.
Follow these steps to configure this new file server for DFS:
- Log in to FILE1 and launch Server Manager. Click on the Add roles and features link.
- Click Next a few times until you reach the Select server roles screen.
- Navigate to File and Storage Services | File and iSCSI Services.
- Check the box for DFS Namespaces. When prompted to install additional required features, click Add Features.
- Also check the box for DFS Replication. You should now have File Server, DFS Namespaces, and DFS Replication checked on your Roles screen:

- Click Next, Next, then Install. This will place the necessary roles onto FILE1.
- Now open Server Manager's Tools menu and launch DFS Management:

- First we are going to create a Namespace that will be published in our domain. Right-click on Namespaces and choose New Namespace….
- Enter the name of the server that is going to be your Namespace server. We are going to use the primary file server,
FILE1:
- On the next screen, Namespace Name and Settings, input a name for this new Namespace. My first share is going to be for IT purposes, so I'm calling mine
IT. Then click on the Edit Settings… button. - The wizard is going to create a new share for my Namespace storage location. If you would like this share to be created in a particular place on the hard drive, specify it here. I am also going to choose the option for Administrators have full access; other users have read and write permissions so that users without administrative rights can still save into this Namespace:

- Click OK, then click Next.
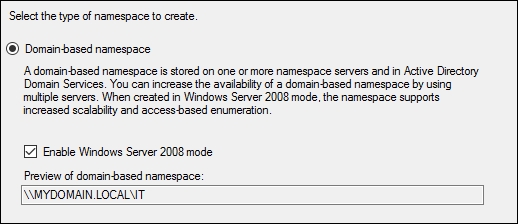
- Typically, you want to choose the default options on the Namespace Type screen. It should be pre-selected as Domain-based namespace, which is great, together with Enable Windows Server 2008 mode. You can also see here a preview of the final Namespace name listed for your review. Just go ahead and click Next on this screen:

- Review the settings you have chosen on the final screen and then click the Create button in order to create your Namespace.
- Your new Namespace is now visible in the left window pane of DFS Management. Let's go ahead and create a folder inside this Namespace. Right-click on the new Namespace and choose New Folder…:

- Input a name for your new folder in the Name field; this is the name that will be displayed inside the DFS Namespace when users access it. Then click the Add… button to specify a share that this new folder is going to link to. I am specifying a folder that happens to be sitting here on FILE1, but you could even specify a network share that is on another server:

- When you click OK, if the share that you entered doesn't already exist, you will be asked whether or not you want the wizard to create it for you. I chose Yes, so that it could create this new share for me.
- After choosing Yes in order to create the new shared folder, I have another screen that allows me to specify permissions on this new folder. Go ahead and choose the permission setting that is appropriate for the kind of information you are planning to place in this folder. You must also now specify the physical location of this share on the hard drive:

- Now that we have a DFS Namespace created and a folder within that Namespace, let's test this out! Log in to a client computer and try browsing to
\mydomainit:
In this recipe, we took a new file server and turned it into our first DFS box. The new Namespace that we created now contains a folder where users are able to store documents, and is published on the domain so that these files and folders can be accessed via the DFS Namespace name, rather than needing to know the name of our specific file server. DFS is a great tool for centralizing data and creating ease-of-use for employees in your company when they need to access their data. It is also a great tool for redundancy via replication, and we'll discuss that in more depth in just a minute.
