Once you have some virtual machines up and running, the majority of the configuration that you do to these servers will be from within the operating system running inside the VM. In the case of a VM running Windows Server, you would typically interact with that operating system through either the Hyper-V Connect function, such as the one we have already looked at, or perhaps enable RDP on that new server so you can utilize the Remote Desktop Connection client on your desktop computer to log into this new server. However, whether you are running VMs or physical servers there are some instances where you have to make changes, or configurations to those servers, which cannot be accomplished from inside the operating system: for example, if you need to exchange a hard drive, or add more memory, or add a NIC and plug it into a new network. These are all valid use-case scenarios for both physical servers and virtual servers. The difference is that you don't have a physical piece of hardware to walk up to when using VMs. So how do you make all of these changes? This is where the Hyper-V Settings screens come into play.
We are working inside the Hyper-V Manager console of my Hyper-V host server, where I have a handful of virtual machines up and running.
Follow these steps to open the core settings for one of our virtual machines (we will also discuss some of the more important options listed inside this interface):
- Once inside Hyper-V Manager, right-click on a VM and take a look at the options available to us in this menu. We will be heading into the Settings… menu in just a second, but first note that right-clicking on a VM is a very quick and easy way to do such things as shutting down or powering up VMs. You can even use your Ctrl or Shift keys to select multiple VMs at the same time, then right-click and start up or shut down a whole batch at once!

- Click on Settings… and let's bounce around in this screen a little bit to cover some of the options.
- We land first upon the Add Hardware screen. This is the place where you can add components to be connected to your VM. The most common item that I have seen admins select here is Network Adapter. There are many reasons why a virtual machine might need more than one NIC, and this screen is exactly the place to accomplish that. You'll notice that some of these options are grayed out; this is because some changes that you want to make to a VM require that the machine be shut down and turned off prior to making those changes. In fact, for Generation 1 VMs you must shut them down before you can add new network cards. Fortunately, I created DC3 as a Generation 2 virtual machine, so we can add new NICs to this VM even while it is running! I will click on the Add button right now to test that, and you will see a second Network Adapter show up in the list.

- This brings us right into another useful and commonly accessed part of the settings interface, the Network Adapter screens. Each virtual NIC connected to your VM is listed separately here, and by clicking on each one you have the ability to choose which Virtual switch that NIC is plugged into by using the drop-down menu near the top of the screen. I have plugged one of my NICs into the Corp LAN, and my other NIC into the Internet.
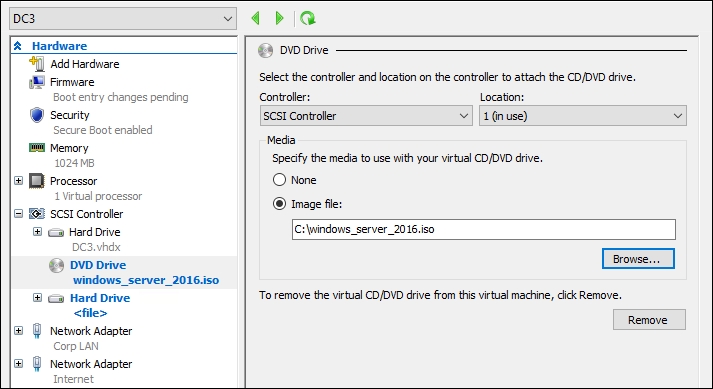
- A little further down in the list you can see the disk controller options. These settings will be different depending on whether you are running a Generation 1 or Generation 2 VM. Gen1 VMs have IDE controllers listed in settings, but Gen2 VMs have SCSI controllers. In either case, this is the place where you can tap additional hard drives into a VM, and this is also the place you visit in order to plug an ISO file into the virtual DVD drive, which is a very common task when you are building new servers. Over time you will also notice here that Gen2 VMs are much easier to work with. You can add new hard drives to a system on-the-fly, while it is in the running state. With Gen1 VMs, you have no choice but to shut the system down in order to connect a new drive.

- As you would expect, you also have the ability to slap additional Processors onto a VM. Changing these settings requires that the VM is shut down, whether you are running either Gen1 or Gen2.
- There are other options in here that are fairly self-explanatory, but one last piece that I wanted to point out is the Memory category. While this in itself isn't anything special or fancy (it's just the spot where you define the amount of RAM the system has), we are talking about it here because Windows Server 2016 brings some new functionality to this setting. Historically, we always had to shut VMs down in order to change the amount of RAM they were using. No longer! We can now change this setting and apply it while the VM is running. As you can see in the following screenshot, I just moved my DC3 server from 1 GB to 2 GB of RAM, clicked the Apply button, and the change is immediately reflected inside System properties of DC3.

- The last item that I want to mention inside the Settings screen is the drop-down menu at the very top. When you right-click on a VM and head into Settings... you are obviously looking at the settings for the virtual machine that you clicked on. Too often I watch people making changes to multiple VMs at the same time, but after each change they click OK, which closes the Settings window, and then right-click on the next VM and go right back into that screen. Instead, if you simply click on this drop-down menu near the top, you can navigate between the Settings pages for any of the VMs running on your Hyper-V server. If you have the need to make adjustments on multiple servers, this can definitely save you some time and mouse clicks.

As you start administering your Hyper-V servers, the settings screen for your virtual machines is likely the most common place that you will visit on a daily basis. Adjusting hardware and plugging in NICs are tasks that need to be done quickly and easily, so it is important that you are familiar with navigating this portion of Hyper-V Manager. If you are new to the Hyper-V world, I hope this recipe has helped to make this portion of the interface more comfortable for you as you move forward.
