Most RDS implementations start out with a single server or at least a single RDSH. Once you have the roles established for successful connectivity here, it is a natural next step to add additional RDSH servers to accommodate more users. Or perhaps you want to segregate different types of users (and their applications) onto different RDSH servers. Whatever your reasoning, chances are that at some point you will want to add additional servers into your RDS environment. Let's add a second server to ours so that you can see how this process works.
We have a single RDS server online, running Windows Server 2016. It is named RDS1 and is already performing the roles of RD Connection Broker, RD Session Host, and RD Web Access. We will now use the management interface on RDS1 in order to add a second RDSH server to our infrastructure. The name of our new server is RDS2, and it is already joined to our domain.
Follow these steps to add a new RDSH server to our existing RDS environment:
- On the existing RDS server, RDS1, open up Server Manager.
- Click on the Add other servers to manage link.

- Type in the name of the new server that you intend to turn into an RDSH. For our example, the server name is RDS2. Then click the arrow to add this server into the Selected list and click on OK.
- Now back on the main page of Server Manager, go ahead and click on the listing for Remote Desktop Services in the left window pane. This will bring us into the management interface for RDS. Take a look at the DEPLOYMENT OVERVIEW, which is a self-generated diagram of what your current RDS deployment looks like. Since we are only testing with our current servers and not accessing them from outside the network, we see plus symbols next to RD Gateway and RD Licensing. This simply means we have not yet configured these roles, and we could click on those pluses and follow the prompts if we intended to do so. We have no requirement for these services at the present time, so we will ignore this for now.

- To add a new RDSH server, head over to the top right of this window and click on the link that says Add RD Session Host servers.

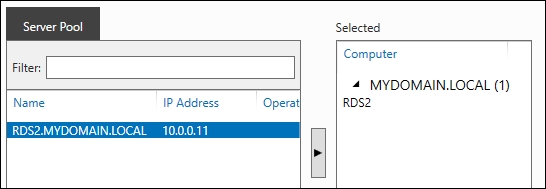
- Since we added it into Server Manager earlier in the recipe, we should now be able to see in this list the new server available to select. Select the new RDS2 server and click the arrow to move it into the Selected column. Then click Add.

- Click the Next button, and you will need to check the box that says Restart remote computers as needed on the Confirmation screen. Then click on Add.
In this recipe, we used the Remote Desktop Services management console on our primary RDS server to take a new server that we had running and turn it into a Remote Desktop Session Host (RDSH) server. This RDSH is now part of our RDS infrastructure, and can be managed right from this centralized management platform. In an RDS environment, this is typically the way that new roles are added onto servers that are being brought into the environment. Using the centralized management console to perform many tasks in RDS makes a lot of sense, because it is easy to see the big picture of your RDS infrastructure as you make changes or updates.
