Let's say you just installed a new network printer in the office. You have installed it on a few computers to make sure it works properly, but now you are staring down the rows and rows of computers that would like to print to this printer occasionally. The prospect of logging in to every computer in order to launch and walk through the printer creation wizard isn't sounding like the way you would like to spend your Friday night. Let's see if we can once again make use of Group Policy to save the day. We will utilize a new GPO that will be configured to automatically install this new printer on the client desktops.
We are assuming you have already created the new GPO and have linked it accordingly so that only computers that need this new printer are going to receive these GPO settings. Now we are going to use Group Policy Management Console on our primary domain controller, which is running Windows Server 2016.
To configure your new GPO for a new printer creation, follow these steps:
- Open Group Policy Management Console from the Tools menu of Server Manager.
- Right-click on the new GPO that is going to be used for printer creation and click Edit….
- Navigate to User Configuration | Preferences | Control Panel Settings.
- Right-click on Printers and choose New | TCP/IP Printer.

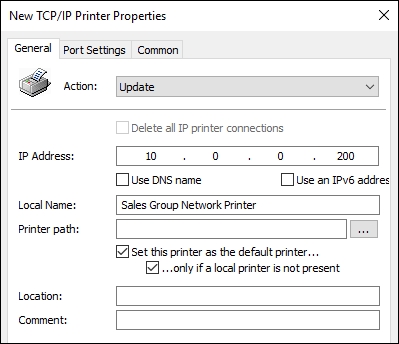
- Input the information that is necessary for the printer connection. Since we chose to set up a new TCP/IP Printer, we need to input something in the IP Address and Local Name fields for users to be able to see this new printer in their list. I am also going to choose Set this printer as the default printer… only if a local printer is not present.

- Click OK, and this printer will be distributed to those users you filtered the GPO to.
