Storage Spaces is an incredibly cool technology that isn't flaunted or marketed on its own; it just does its job and does it well. How many times have you caught yourself stuck between a rock and a hard place because you are running out of room on a single hard drive on one of your servers? I have plenty of times, especially working with technologies like RDS, which may contain a lot of user data all stored on the system drive. In most current server hardware, it is easy to add multiple hard drives, but not always easy to decide how to partition and volume those drives so you don't run out of space on C: while having 200 GB of free space on D:.
These kinds of situations are where Storage Spaces can save a lot of time and headaches. What if you didn't have to worry about what size hard disks you were running as your primary drive, secondary drive, and so on? What if you could lump them all together and utilize the storage out of one big bucket, or pool, as you will? This is exactly what we can accomplish with Storage Spaces in Windows Server 2016. You combine multiple physical hard disks into a storage pool, and then within that pool you can create one or many volumes to consume that storage space. The multiple disks combine storage to behave as one large drive, with options for RAID-style redundancy built into the storage pool configuration. Let's work together to combine a few hard drives together and create a new single volume to be used by the operating system.
We are going to configure Storage Spaces on our FILE2 server, which is running Windows Server 2016.
To enable Storage Spaces on your server use the following steps:
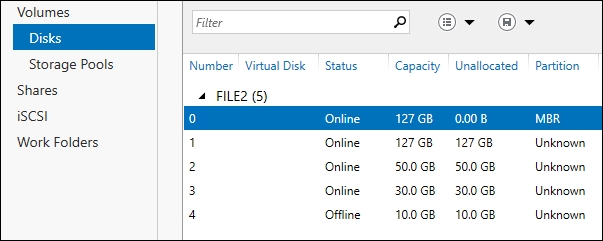
- Make sure you have hard drives connected that you intend to utilize for your storage pool. On our FILE2 server, I have added three new drives, all of various sizes.
- Launch Server Manager and click File and Storage Services from the left window pane.
- First, click on Disks and make sure that we can see the new drives that we are going to combine together to make a storage pool:

- Now that we have confirmed our disks our visible within Windows, go ahead and click on Storage Pools.
- Open the Tasks menu and choose New Storage Pool…:

- Enter something in Storage Pool Name and click Next.
- Select the physical disks that you want to be included in this pool. I am going to add all three unused drives on my system:

- Click Next, then click Create. Once finished building, you will be taken back to the Storage Pools section of Server Manager, where you can now see the new pool listed. The disks are now grouped together in a pool, but are not yet usable by the operating system.
- Click on the name of your new storage pool in order to select it.
- Now, down in the Virtual Disks section, drop down the Tasks menu and choose New Virtual Disk….
- Select the storage pool from which you want to create a volume and give it a virtual disk name.
- On the Storage Layout screen, you need to choose the method that will be used for storing data on this new virtual disk. Depending on how many physical disks you have in the pool, you may have different options here. For our example, we need as much data storage space as possible and are not worried about redundancy across disks. So I will choose Simple:

- I am going to dedicate the full amount of this storage space to the virtual disk right away, so I will leave the Provisioning screen selected for fixed provisioning.
- On the Size screen, it will indicate how much free space exists in the pool. Simply size your new virtual disk to a number that is equal to or below that number. I am going to consume the full space of the pool, so I can either enter 87 GB as indicated, or choose the radio button for maximum size:

- Finish up the wizard and your new virtual disk will be created! When you finish this virtual disk creation wizard, you will be automatically placed inside New Volume Wizard. Walk through these steps or utilize a regular tool such as disk management in order to create your new volume, format it, and assign it a new driver letter. Then you can start using the new volume as you would with any regular volume inside Windows:

By combining these three small hard drives into one storage pool, we can build a single volume that is larger than any one of the hard drives on their own. Storage Spaces can be used like this, or in a myriad of other ways, creating multiple pools and volumes at will, simply by bundling together groups of physical drives on the system.
Hard disk space utilization is something that we have traditionally planned very hard for. What size drives to get? Do they need to match? How large does each of my volumes need to be? Should I use RAID? Should I use dedicated hardware for that RAID? Storage Spaces is a way to bring many of those questions together, package them up, and throw them in the trash can.
If you're interested in Storage Spaces, make sure to check out Storage tiers as well. On a Server 2016, if you combine SSD drives with regular mechanical drives, you can create a storage tier, which is sort of like those hybrid hard drives that come in laptops occasionally. The drives are combined into a single storage unit, but Windows will keep the most commonly accessed items on the SSD, making them faster to access. Here's a link to get you started with looking further into using storage tiers with Storage Spaces:
Expanding on the idea of Storage Spaces and the way that they enable the sharing of hard drives connected to a single system, Storage Spaces Direct is brand new in Windows Server 2016 and enables shared storage across multiple server nodes! In order to utilize Storage Spaces Direct, you need to employ Failover Clustering and will need a cluster of at least two servers. Each of those servers can contain multiple hard drives that can be utilized by Storage Spaces. The beauty of Storage Spaces Direct is that it enables you to utilize directly-connected drives, so we are not limited to expensive, complicated JBOD enclosures. Got a server with a few SATA drives plugged into it? This can be a node in your Storage Spaces Direct cluster! By using Storage Spaces Direct, you can join together up to 16 server nodes containing more than 400 drives in your centralized storage pool! The real beauty to a working Storage Spaces Direct environment is that expanding storage is as easy as adding additional drives into an existing server, or even by adding additional servers into your cluster. As soon as you add new capacity at either the drive or server node level, the storage pool that you have created with Sotrage Spaces Direct will automatically start expanding to include this new storage.
A primary goal for Storage Spaces Direct is to create a very resilient atmosphere for running Hyper-V virtual machines. By utilizing technologies such as SMB3 and the ReFS file system, you can configure Hyper-V to store its virtual machines on top of Storage Spaces Direct to ensure that you always have at least three copies of your data resident and available within the cluster.
The actual configuration of Storage Spaces Direct is not overly complicated, but it does involve more complexity than my simple test lab and the short pages of a cookbook recipe are able to contain. You will interface with Storage Spaces Direct via PowerShell and Failover Cluster Manager, though for best results those of you running SCCM will have the easiest time setting up and managing this new technology, as it is specifically integrated into System Center. Even though we aren't setting it up in this recipe today, if this is a topic that falls into your area of influence, make sure to continue reading with the following link:
Another new storage technology in Windows Server 2016 is Storage Replica. Contrary to Storage Spaces Direct, which is all about sharing storage between nodes, Storage Replica's job is to make sure that data is replicated quickly and securely between servers or clusters of servers. Storage Replica touts the ability to offer synchronous replication across multiple sites, with zero data loss. Another neat feature of Storage Replica is that you can swing workloads from one site to another prior to a disaster event, such as a severe storm warning in the city where your primary datacenter is located, when you want to swing connections to a backup datacenter before the storm hits.
There are three scenarios where Storage Replica can be utilized. First, if you are stretching a cluster across multiple physical sites, you can utilize Storage Replica to keep your cluster synchronized. Second, you can employ Cluster to Cluster replication to keep data up-to-date between two separate clusters that need to replicate together. Third, and perhaps the most important one to the SMB customer, is the Server to Server mode of Storage Replica. This enables synchronous and asynchronous replication between two servers, not necessarily in any kind of cluster scenario.
Given the robust capabilities of Storage Replica, there is a good chance that it may someday replace DFSR as the server administrator's tool of choice for replicating data between servers. One requirement that is important to point out, which does not apply to DFSR, is that we need some pretty low latency between datacenters in order to utilize Storage Replica. As I write this, the current recommendation is under 5ms between the sites. As with any brand new technology, some time will have to pass before large production environments will choose to move over to Storage Replica for handling all of their sensitive and critical data, but I encourage you to look over this additional information and start making use of it now:
