If you remember, we installed our first instance of Server Core in Chapter 3, Security and Networking but we didn't do much of anything with that server. In one of the screenshots, we displayed how you can flip the default command prompt over to PowerShell, and then run some commands such as the Rename-Computer cmdlet in order to set the hostname of the server to CORE1. Beyond that, nothing has been configured and our CORE1 server isn't performing any functions in our network yet. Let's walk through the standard items you can accomplish on any server when you bring it up for the first time in a domain network. Our hostname is already set, but we still need to configure an IP address and join it to our domain before we can really start doing anything with this new server.
I have a new server and have run through the installation of Windows Server 2016. During that install I chose the default selection for the Core version of Windows Server. Following installation, with the same process we used in Chapter 3, Security and Networking, I am now sitting at the console screen of my new server, wondering what to do next.
Here are some steps we can take to prepare our new Server Core machine for use in the corporate network:
- Let's set ourselves an IP address on CORE1. I have decided that 10.0.0.15 is going to be the IP address used by this system. Now we simply need to figure out how to put that IP address into place on the NIC. Since PowerShell is available to us within Server Core, we could spend some time digging around in these cmdlets to figure out what our NIC ID is and set the IP address using purely PowerShell, but fortunately Server Core has a special interface which makes this process a little bit easier.
- From the Command Prompt in the Server Core console, type
sconfig. You will now be presented with a special set of tools running within the Command Prompt window that allow you to configure various aspects of the operating system.
- Take note that you can even Shut Down or Restart your server from here. This is important to know, because otherwise there is not a clearly defined way to perform these functions in a Server Core. You could of course use the
shutdowncommand, or theRestart-Computercmdlet, which is the way I typically do it, but relying onsconfigfor these kinds of administrative tasks can make your life a lot easier. We could have even used this to rename our server to CORE1 in the first place! - Press the number 8 on your keyboard, and then press Enter, in order to enter Network Settings.
- Now type the Index# of the network card that you want to manipulate. If your server, like mine, only has one NIC, then you simply press the number 1.
- You will be presented with the current configuration of that NIC. Now choose option 1 in order to Set Network Adapter Address.

- Press S in order to set a Static IP address.
- Type your new static IP address. I will type
10.0.0.15, and press Enter. - Continue with the steps to populate your Subnet Mask and your Default Gateway.
- Your NIC has now been reconfigured with your new IP address! If you also need to set static DNS server addresses, go ahead and continue on with option number 2 from the prompt. Otherwise, press 4 in order to return to the main sconfig menu.

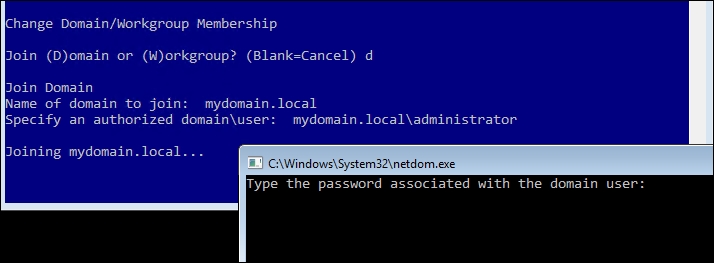
- Now that you are getting comfortable with sconfig, let's also use it in order to join our CORE1 server to the domain. Back at the main sconfig menu, choose option 1) Domain/Workgroup.
- Press D, which tells the server you want to join it to a domain.
- Enter the name of your domain and press Enter.
- Type a username. Then type the password into the command window that opens.

- You will be prompted to restart the computer. Go ahead and click on Yes, and our CORE1 server is now successfully joined to the domain!

There are a variety of ways that you can interface with and manage a Server Core instance, and we will talk about some more of them in upcoming recipes. However, there are certain core—no pun intended—functions that need to be accomplished first, right from the console, before you can start thinking about doing any remote management of your new servers. The sconfig tool is quick to open, very easy to use, and contains some powerful functionality for these initial configuration steps that we all must take on each of our new servers.
