Distributed File System Replication (DFSR) is a piece of DFS that enables automatic file replication between multiple servers. In the first recipe of this chapter, we added the roles and created a DFS Namespace, so we have access to files and folders that are sitting within our DFS environment. So far, though, it is all sitting on a single file server. Follow along to enable the R part of DFSR, Replication. We will set up DFSR between the two file servers in our environment, FILE1 and FILE2, and test it to make sure that data is being synchronized between the two.
We already have a DFS server online, FILE1. It is hosting a DFS Namespace with a folder inside. A new file server, FILE2, is online and joined to the domain. This recipe expects that you have already installed the necessary roles for using this server with DFS. The procedure for installing these roles is outlined in our previous recipe, Enabling Distributed File System and creating a Namespace. Add the roles to the new FILE2 exactly the same way that you did for FILE1, and then continue on with this recipe to configure the replication.
To set up DFSR between the two file servers in our environment, follow these steps:
- On FILE1, our primary file server, launch Server Manager and then open the DFS Management Console from inside the Tools menu.
- In the left window pane, right-click on Replication and choose New Replication Group…:

- Choose Multipurpose replication group and click Next.
- Enter a name for your new replication group. Then click Next.
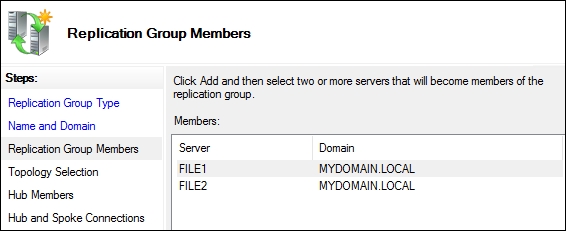
- On the Replication Group Members screen, click the Add… button and choose both of your file servers that you want to be part of this group:

- Leave the topology set to Full mesh and click Next.
- Use the Bandwidth screen to throttle the connection if you need to; otherwise just click Next again.
- Choose the Primary member from the list. For our example, it is FILE1:

- Now on the Folders to Replicate screen, use the Add... button in order to add all folders that you want to replicate. For our example, I'm going to replicate the new
Installersfolder, which we configured inside our DFS Namespace:
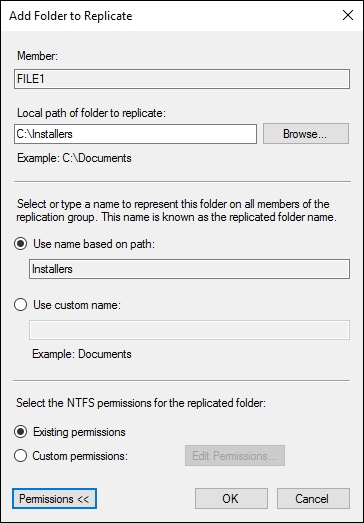
- You now have to specify the local path for the
Installersfolder to exist on the other member server, FILE2. Click on the Edit… button and configure it as follows:
- Take a look at the summary of settings that are about to be put into place, and once satisfied go ahead and click on the Create button.
- Now back at the main DFS Management screen, click on the name of your new replication group listed in the left tree. You should see both member servers listed here, indicating that replication is configured!

- Now let's test this thing out. From a client computer, open up File Explorer and navigate to
\mydomainitinstallers. - Create a few test files in this folder.
- Give it a little bit of time for replication to happen, then check inside the
C:Installersfolder on each file server. You should see that there are copies of your new files now located on both servers' hard drives!
In this recipe, we took our DFS environment and expanded its capabilities a little by adding in replication. DFSR is a great tool to use for distributing files around to your branch offices, while keeping the user experience and drive mappings similar no matter where everyone happens to be accessing the files from. Historically speaking, Microsoft's Distributed File System has a bad reputation, because of some issues in older Windows Server operating systems. Those days are gone, and if you haven't tried out this technology in your own environment yet, you've got no reason to wait!
