Accessing data from wherever you happen to be is becoming more and more important with today's mobile workforce. Given this, it makes sense that more and more technologies are being designed to allow access to this data from more locations, and more device types. This is what Work Folders in Windows Server 2016 is all about. It is a way to publish access to files and folders to multiple device types that the users may be logging in to. These files are accessed via a web listener that is configured on the Work Folders file server, which enables this data to be accessed from inside or outside the corporate network, from both domain-joined and non-domain-joined systems.
Configuring a full-fledged Work Folders environment with all its moving parts and components is far too much data to be contained in a single recipe. Today we will focus on the steps that need to be taken on the file server itself in order to make it ready for hosting Work Folders. Make sure to check out the link provided at the end of this section in order to continue gaining knowledge on this subject. Once you get started with Work Folders and realize the benefits that it can provide, I have no doubt that you will also be tapping into Group Policy in order to roll some of these settings around, and working with a reverse proxy solution like the Web Application Proxy (WAP) in order to further enhance the capabilities that Work Folders can bring to the table.
Our work today is happening on a Windows Server 2016 that we use as a file server. Specifically, I am using the FILE1 server in the lab that we have been working with throughout this chapter. To fully configure Work Folders, you will also need the ability to acquire a valid SSL certificate and access to your public DNS environment in order to create a record.
Follow these steps to enable Work Folders in your environment:
- Log in to your file server and launch Server Manager.
- Choose the link for Add roles and features. Walk through the role installation wizard until you get to the Select server roles screen.
- Navigate to File and Storage Services | File and iSCSI Services. Then check the box next to Work Folders. When you receive a pop-up message about adding the additional IIS feature required, make sure to click on the Add Features button.
- Finish the wizard in order to install the Work Folders role on this server.
- Once the role has finished installing, head back to Server Manager and navigate to File and Storage Services | Work Folders.
- Drop down the TASKS menu and choose New Sync Share…:

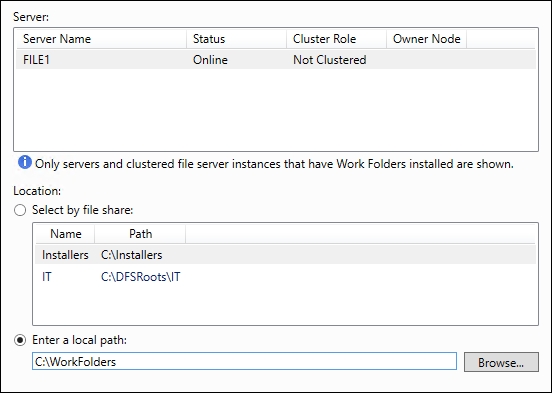
- Choose or enter a path where you want the new Work Folders to be stored. This is the location on our file server that will be populated by folders that are named after our users. If you have already set up a folder and shared it, you will see it in the list to choose from. I have not yet set up any such folder, and so I am going to type in the location where I want the wizard to create a new folder for me:

- Click Next, and if you entered the location of a folder that did not yet exist, you will be prompted with a confirmation box asking whether you want the new folder to be created. Go ahead and click OK on that message.
- On the User Folder Structure screen, you choose how the user's folders will be named within our Work Folders sync share. Each user that utilizes Work Folders will get their own folder set up inside our share. These individual username folders will be named via either their username alone, or by their
username@domain. In a lot of environments, you can get away easily enough with only the username alias. If you have users that will be accessing Work Folders from multiple domains, then you have the potential for conflict between usernames and should choosealias@domain. Additionally, on this screen, you can opt to sync only a particular subfolder for the users. For example, if you want theirDocumentsfolder to be synced across all of their devices but don't care about the other folders such asPicturesandMusic, you could specify onlyDocumentson the line here. - Specify a name for Sync Share and click Next again.
- For the Sync Access screen of the wizard, we need to define which users and groups have access to use this sync. I created an Active Directory Security Group called WorkFolders and placed my users inside that group. So on this screen, I will simply specify my WorkFolders group:

Tip
Note the checkbox near the bottom of this screen. If you leave the box enabled for Disable inherited permissions… then users will be granted exclusive rights to each of their folders. This means that even administrators will not have access to these folders. If you would like to change that behavior and let the normal file system inherited rights persist, simply uncheck this box.
- Click Next, Next, and then Create, and your new WorkFolder Sync Share will be created and ready for use.
- Client devices will connect to Work Folders on this file server via HTTPS. In order to make that happen successfully, we need to configure a DNS record that points at this file server, and an SSL certificate to be bound to the web listener on the server.
- On your public DNS, set up the name
workfolders.<yourdomain>and point it at the IP address that will flow to this file server. For example, the best way to do this is to publish the web listener with a reverse proxy server of some kind; let's say that proxy server is running on the internet IP address 1.1.1.1. You would configure a DNS record forworkfolders.contoso.comand point it at 1.1.1.1, then let the reverse proxy server bring that traffic inside the network and submit it to the file server where we have Work Folders running. - Install an SSL certificate that contains the appropriate
workfolders.contoso.comname - replacing contoso.com with your domain name, of course - and bind it to the default web site on the Work Folders server. Since the full IIS Management Console is not installed with the Work Folders role, you can utilize the IIS Management tools from another server in your network in order to bind the certificate onto the default website. Alternately, you can use the following netsh command in order to bind the certificate to the site:netsh http add sslcert ipport=<IP address>:443 certhash=<Cert thumbprint> appid={CE66697B-3AA0-49D1-BDBD-A25C8359FD5D} certstorename=MY. - Now WorkFolders is configured and listening on our file server. The next step is to configure our client computers to tap into this WorkFolders sync share. The process for accomplishing this is different depending on what client devices you are connecting, but the starting point for Windows 10 and 8.1 machines is Control Panel | System and Security | Work Folders.
It is pretty easy to overlook Work Folders at first glance, thinking it is just another way to access the same data in a similar way as the folder sharing options that we have had around for years. However, looking more closely shows us that the ability to publish access to files and folders to both domain-joined systems and non-domain-joined systems, working from either the corporate network or from home, can be of enormous advantage. You could utilize Work Folders as a way to grant access to corporate data without needing to issue a company laptop. You could also grant access to file level details without the need to incorporate some form of VPN, which may give more access to a home computer than you are comfortable with handing out. There are numerous situations where a technology such as Work Folders could increase productivity for your users and the security of information within your IT infrastructure. One of the pain points of Work Folders in previous versions of Windows Server was that client computers were not notified of file changes for roughly 10 minutes after the changes were made. This is finally resolved in Windows Server 2016. As long as you are using 2016 on the server side and Windows 10 on the clients, file changes are now reflected as soon as they are generated. Make sure to check it out!
Take a look at the following link for even more detailed information on setting up Work Folders:
