If you haven't worked within Hyper-V Manager before, you are probably chomping at the bit to get your first virtual machine created and running! There are a number of options that you must declare during the virtual machine creation process. Let's take a few minutes and walk through it together so you understand what those options mean and what benefits they can bring to the table.
We are using a Windows Server 2016 with the Hyper-V role and management tools installed. That is the only requirement for this recipe.
Let's walk through the steps to create a brand new virtual machine and install an operating system on that VM:
- Open Hyper-V Manager from the Tools menu of Server Manager, or directly from the Administrative Tools folder.
- Right-click on the name of your Hyper-V server near the top-left portion of the screen, and choose New | Virtual Machine….
- This launches the New Virtual Machine Wizard,; go ahead and click Next to take us into the actual configuration.
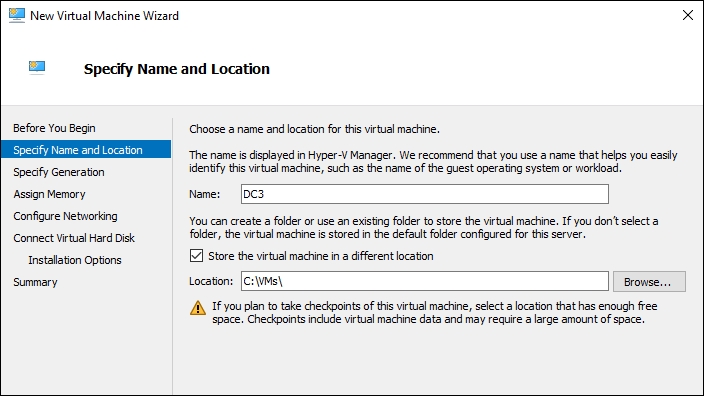
- Specify a Name for your new VM. This name does not have anything to do with the actual hostname of the server you are going to build; it is simply the descriptive name that will be visible inside Hyper-V Manager. Whatever name you give the VM here will also be reflected in the folder that is created to house the virtual machine files on the hard drive of our Hyper-V host server.
- Still on the naming page, make sure to also choose a location within which Hyper-V should store this new virtual machine. Each VM consists of some metadata-type files as well as the virtual hard disk file, and they need to be stored somewhere. I find it is a good practice to specify something other than the default setting here. If you allow Hyper-V to bury these files inside
C:ProgramData, that is fine, but it can be confusing to track them down later. I typically have a dedicated drive for my VMs to reside on, and simply create a folder calledVMs. For example, in the following screenshot I am naming my new virtual machine DC3, and I am going to store its file insideC:VMs. The wizard will then create a folder inside that location, giving me a final destination ofC:VMsDC3for this virtual machine.
Tip
My new virtual machine could technically serve any purpose within my network, but as you can tell from the name, this guy is going to turn into a domain controller once it is up and running. It is important to note that, when you use virtual machines as domain controllers, there is one special configuration you will probably want to put into place. After building the VM, head into its Settings page and disable Integration Services | Time synchronization. If you leave time sync enabled, the DCs will get their time from the Hyper-V host, rather than being the time provider themselves, and this can cause problems if time falls out of sync. When using virtual DCs it often works best to disable time sync and push the timekeeping responsibilities elsewhere.
- Click Next and we are now presented with an option to create our virtual machine as a Generation 1 or Generation 2 VM. Typically, when you are building VMs on a Hyper-V server, those VMs will also be running a copy of Microsoft Windows Server. Since the last couple of iterations of the Windows Server operating system have only supported 64-bit installations, you will more than likely want to choose Generation 2 VMs for these servers. This will provide you with all of the latest functionality on the VMs, including the ability to replicate those VMs over to a secondary Hyper-V server. But in case you need to implement a virtual machine that is running a 32-bit operating system, you are still provided with the capability here to choose Generation 1 and make that possible.
- Next we have to assign an amount of RAM to the VM. It is quite common for administrators to specify a specific amount that correlates to a real amount of physical RAM, such as 1024 MB, 2048 MB, 4096 MB, and so on. But there is no real reason to do this. You can type any number in here that you want. Take note of the checkbox listed on this screen as well. If you check Use Dynamic Memory for this virtual machine, the VM will only consume what it actually needs in order to perform. As an example, my DC1 server that is running on here right now is consuming 1583 MB of RAM. While it seems good in theory to always have lower amounts being utilized than are assigned, when a VM needs to expand dynamic memory it consumes some CPU cycles to do so. This means that if you setup all of your VMs to have dynamic memory you might lower your RAM requirements a little bit, but you'll be working the host server harder in order to keep up with all of the shifting memory requirements.
- Onwards and upwards. We are now presented with a screen that allows us to Configure Networking. This screen is simply a drop-down menu where you can choose to plug your new VM's virtual NIC into one of the virtual switches that we created earlier. If you open that list, you should see each of them available to choose from. I am going to plug DC3 into my Corp LAN.

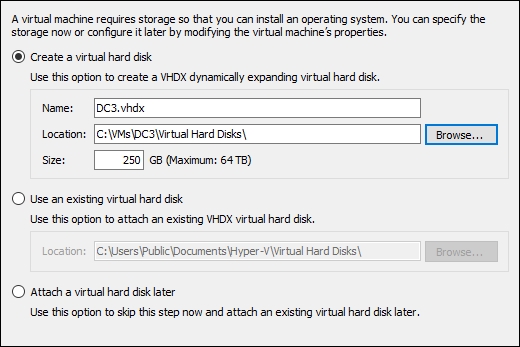
- Now we find ourselves on one of the more important screens: the virtual hard disk specification. As you can see, the default location places the hard disk in a subfolder of
C:VMsDC3, and much of the time this is an appropriate location because it keeps all of theVMsfiles together. The most important aspect of this screen, assuming that you are asking the wizard to create a new virtual hard disk for you, is giving it a size. The default is set to 127 GB, which isn't very big compared to today's physical disk size standards. It is a fairly common misconception by new Hyper-V admins to assume that the higher you set this number, the larger the VHDX file is going to be; therefore, if you are only using 50 GB on a 300 GB drive, then you will be wasting 250 GB of your physical disk space. But this is not true!
Tip
After finishing the VM creation wizard, if you seek out the actual VHDX file that was created you will notice that, even though we specified 250 GB, the actual size of this file is only 4 MB! That will grow, of course, as we start to install an operating system onto our new server, but it is important to know that the drive does not automatically consume 250 GB as soon as you create it. Note that it is possible to create a fixed-size virtual disk, which would consume the full amount of space right away, but the default option when using the wizard does not force that to happen.
- After determining the size of your drive, you need to make a choice on how you plan to lay down an operating system on this drive. For my purposes, I will be installing Windows Server 2016 onto this new VM, and so I can point my new VM at the installation ISO file that I have placed on my Hyper-V server's hard drive. What this does at the VM level is build a virtual DVD drive onto the VM, and then plug this ISO into it as if you were inserting an actual installation DVD. This insures that, when we boot this VM for the first time, it can proceed with the installation of Windows Server 2016.

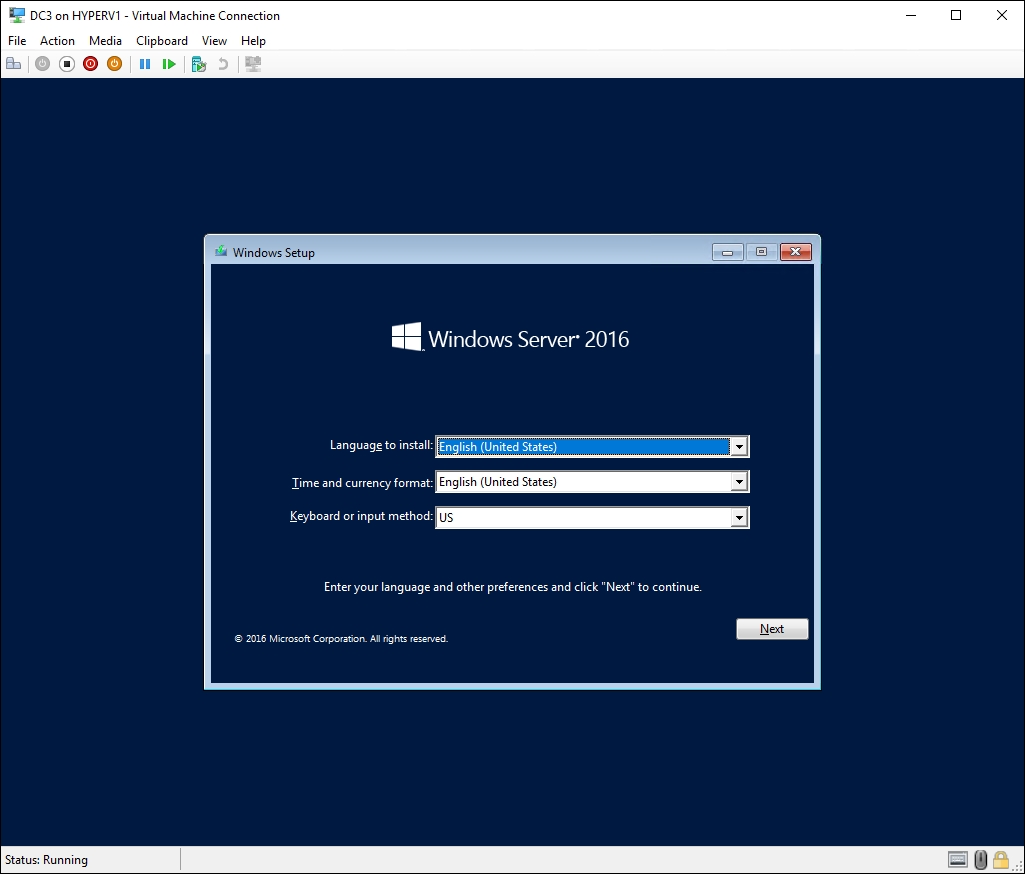
- After pressing Next and then Finish, your brand new DC3 virtual machine has been created and is ready to be started. Right-click on DC3 from inside Hyper-V Manager, and choose Connect…. This will open a window that shows you the console of DC3, just like you were sitting in front of a physical monitor plugged into a physical server.
- In the top toolbar click on the Start button, and watch as your new virtual machine comes to life!

- It is also possible to spin up a new virtual machine by using PowerShell! Take a look at the following command as an example. As you can see, the parameters specified in our command reflect the options we just walked through in the wizard.
- Before you run this command, browse to the location on your drive where the VMs are stored. For me, that is
C:VMs.New-VM -Name "DC4" -NewVHDPath .DC4.vhdx -NewVHDSizeBytes 250gb - MemoryStartupBytes 1024mb

- After the command completes, your new VM is ready to go! As you can see, we did not specify which virtual switch to plug into, or which ISO to attach to the virtual DVD drive in order to boot to installation media. These items are easily accomplished from inside the VM's Settings window, which we will discuss further in our next recipe.
Building virtual machines is one of the core tasks that you will need to accomplish regularly on your Hyper-V servers. There are a number of options to select from as you move through the configuration of your new VMs, so we wanted to take a look at them and explain some of the different options. Having the ability to create VMs from inside PowerShell can be an incredibly powerful tool, especially if you need to create multiple VMs at the same time. Think about the possibilities of automating this so that you simply launch a script and have a dozen new servers running within seconds!
