DirectAccess is designed so that you always get a single server environment up-and-running first before you start tinkering with arrays or load balancing. This way you can validate that all of the environmental factors are in place and working and that you can successfully build DA tunnels from your client computers before introducing any further complexity into the design. Once established, however, it is a common next step to look into turning up another new server and creating some redundancy for your new remote access solution.
While joining two similar servers together to share the load is commonly called clustering, and sometimes I hear admins refer to it as such in the DirectAccess world, load balancing DA servers together actually has nothing to do with Windows Clustering. When you install both the remote access role and the Network Load Balancing feature onto your remote access servers, you have already equipped them with all the parts and pieces they need in order to communicate with each other and run an Active/Active sharing configuration. The operating system will make use of Windows NLB to shuttle traffic to the appropriate destinations, but everything inside NLB gets configured from the remote access Management Console. This gives you a nice visual console that can be used to administer and manage those NLB settings right alongside your other remote access settings.
Once DirectAccess is established and running on a single server, there really are just a couple of quick wizards to run through to configure this NLB. However, the verbiage in these options can be quite confusing, especially if you're not overly familiar with the way that DirectAccess transmits packets. So let's take some time to walk through creating an array from our existing DA server and adding a second node to that array.
We are going to use our existing RA1 server, which is already running DirectAccess. This, and our new server, RA2, are both running Windows Server 2016. They both have the Remote Access role and the Network Load Balancing feature installed. Both are joined to our domain and have their required certificates (SSL and IPsec) installed for use with DirectAccess. The same SSL certificate has been installed to both servers; since they are going to be sharing the load and all requests to both systems will be coming in from the same public DNS name, they are able to share that certificate.
If your DirectAccess servers are virtual machines, there is one very important prerequisite. You must go into your VM's NIC settings and choose the Enable spoofing of MAC addresses option. Without this box checked for each of the NICs, your network traffic will stop working altogether when you create a load balanced array.
For the purposes of this recipe, we are going to assume that RA1 has been configured for use with Teredo, meaning that it has two public IP addresses assigned on the External NIC. We are using this as an example because it is the most complex configuration to walk through when setting up NLB. The same procedure applies for a single IP on the External NIC; it would simply mean that you are only configuring one Virtual IP (VIP) instead of two.
- First, we need to have a clear understanding of which IP addresses are going to be used where. This is critical information to possess and understand before trying to start any kind of configuration. The current RA1 IP addresses are as follows:
- External IPs: 1.1.1.10 and 1.1.1.11
- Internal IP: 10.0.0.7
- These three IP addresses that are currently running on RA1 are going to turn into our Virtual IPs (VIPs). These are the IP addresses that are going to be shared between both DirectAccess servers. Since we are changing the roles of these IPs, this means that we need to dedicate new Dedicated IPs (DIPs), both internally and externally, to both RA1 and RA2.
- New IP address assignments are shown as follows:
- External VIPs (shared): 1.1.1.10 and 1.1.1.11
- Internal VIP (shared): 10.0.0.7
- RA1 External DIP: 1.1.1.12
- RA1 Internal DIP: 10.0.0.8
- RA2 External DIP: 1.1.1.13
- RA2 Internal DIP: 10.0.0.9
- So, to summarize, when using Teredo (dual public IPs) and creating a two-node DirectAccess server load balanced array, you will need a total of four public IP addresses and three internal IP addresses.
- On RA1, we are going to leave the VIPs in place for now. The DirectAccess wizards will change them for us later.
- On the new RA2 server, set its final DIP addresses on the NICs. So in our example, the External NIC gets 1.1.1.13 and the Internal NIC gets 10.0.0.9.
- There are only four steps to take on a DirectAccess array node server such as RA2, or any additional DA server that you want to add to the array in the future:
- Assign IP addresses.
- Join it to the domain.
- Install the certificates.
- Add the Remote Access role and Network Load Balancing feature.
- The remainder of its configuration is accomplished from the Remote Access Management Console on RA1.
- On RA1, your primary DirectAccess server, open Remote Access Management Console.
- In the left window pane, navigate to Configuration | DirectAccess and VPN.
- Now, over in the right-hand Tasks pane, down at the bottom, choose Enable Load Balancing.

- Click Next.
- Choose Use Windows Network Load Balancing (NLB). You can see there is also an option for using an external load balancer, if you have one available to you. I find that the majority of customers utilize the built-in NLB, even when hardware load balancers are available.
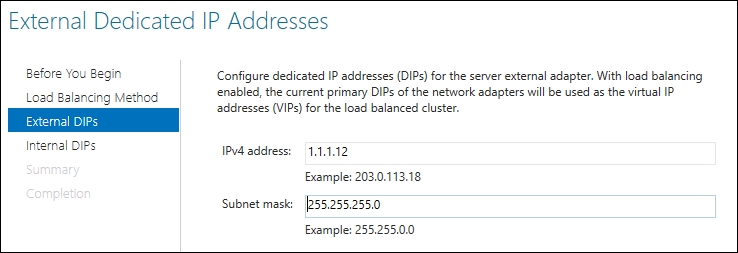
- The next screen is External Dedicated IP Addresses. This is where things start to get confusing and mistakes are often made. If you read the text on this screen, it is telling you that the current IP addresses assigned to the NICs are now going to be used as VIPs. You do not need to specify anything about the VIPs on this screen. Instead, what we are doing on this screen and the next is specifying what new DIPs are now going to be assigned to the physical NICs on this server. First, since this is the external screen, we specify our new public IP that will be used by RA1:

- On the following screen, do the same thing but this time for the Internal NIC. The current IP address of
10.0.0.7is going to be converted over into a shared VIP, and so we need to specify the new Internal DIP that is going to be assigned to RA1's Internal NIC.
- Click Next, then if everything looks correct in the Summary screen, go ahead and click on the Commit button. This will roll the changes into the GPO settings and apply the changes to our RA1 server. Remember, nothing has been done to RA2 yet as we haven't specified anything about it in these screens. We now have an active array, but so far there is only one member, RA1.
- Now that you are back inside the main Configuration screen, go ahead and navigate to Load Balanced Cluster | Add or Remove Servers.

- Click on the Add Server… button.
- Input the FQDN of your second server. Mine is
RA2.MYDOMAIN.LOCAL. Then click Next. - If you have appropriately configured your second remote access server with correct IP address information and the certificates that it needs, the Network Adapters screen should self-populate all of the necessary information. Double-check this info to make sure it looks correct and click Next.

- If the Summary page all looks correct, click on the Add button.
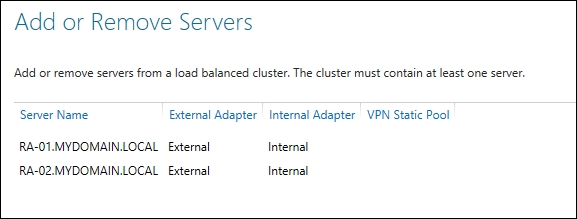
- Click Close. Then back in the Add or Remove Servers screen, you should now see both of your remote access servers in the list. Go ahead and click on the Commit button to finalize the addition of this second node.

Following the addition of the second node, I always go back into the NIC properties of both NICs on both servers and make sure that all of the expected IP addresses got added correctly. Sometimes I find that the wizard is not able to successfully populate all of the VIPs and DIPs, and that I have to add them manually afterwards. Each NIC now has a specific DIP, as listed at the beginning of this recipe. In addition to those DIPs, the External NIC on each server should also list both External VIPs, and the Internal NIC on each server should list the Internal VIP. The TCP/IPv4 properties of the NICs sure look to be overly-populated with IP addresses, but this is all normal and well for a successfully load-balanced DirectAccess array.
The ability to load balance DA servers together right out of the box with Windows Server 2016 is an incredibly nice feature. Redundancy is key for any good solution, and configuring this array for an Active/Active failover situation is a no-brainer. While the wizards for enabling NLB are centralized right alongside all the other DirectAccess settings, they can certainly be confusing when running through them for the first time. As with any system whose job is to shuttle network traffic around, planning correctly for IP addressing and routing is key to the success of your DirectAccess NLB deployment. Hopefully, this recipe helps to clear up questions surrounding this commonly requested task on our remote access servers.
Following the creation of your array, you will notice that navigation through some of the screens inside the Remote Access Management Console has changed slightly. When you access screens such as Configuration to make changes, Operations Status to check on the status of your servers, or Remote Client Status to see what clients are connected, you will now notice that the nodes are listed separately. You can now click on the individual node name to see information on those screens that is specific to one particular server in the array, or you can click on the words Load Balanced Cluster in order to see information that is shared among all of the array members.
One other important note. Now that we have a load balanced array up-and-running, it is easy to add a third node to this array as well! Your DirectAccess array can grow as your company grows, up to eight node servers if required. Simply add additional servers to this array by navigating to Load Balanced Cluster | Add or Remove Servers task.
