Let's dive back into our stage and start replacing our placeholder objects. Start by double-clicking on the World 1 node. So now we're back to seeing our stage for World 1. If you hover your mouse over the character (the little yellow truck with a ball on it), you can use your mouse wheel to zoom in. Click on the Activate Connection Mode button at the top-right of the stage, and zoom in so that Buildbox looks like the following screenshot:
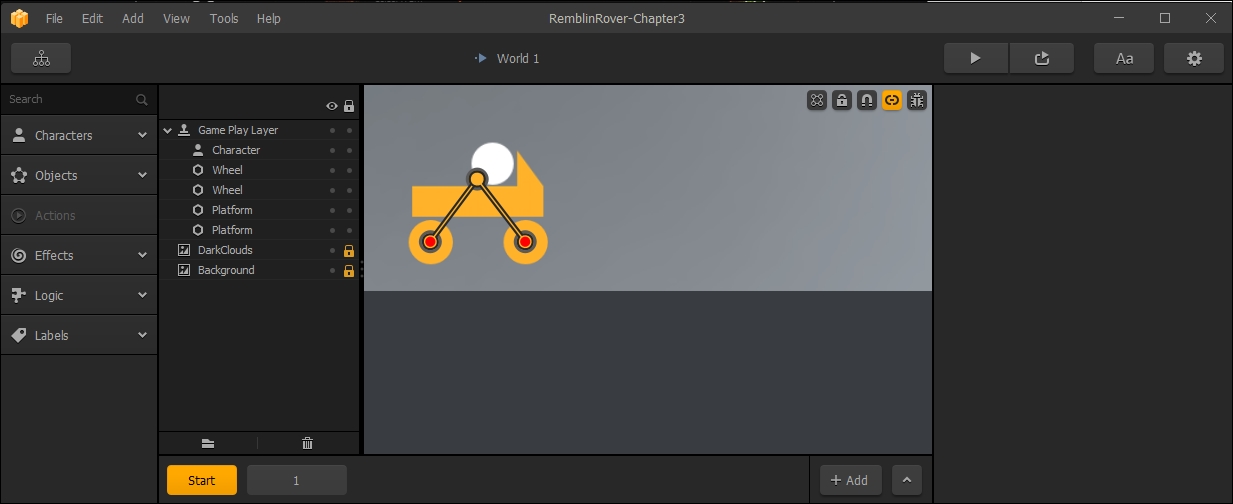
Connections can be used for multiple purposes. The image above shows that the wheels are connected to the car. Unlike our other basic platformer game, a motocross game uses the wheels to propel the character across the ground (rather than the character directly moving).
When you've activated your connection mode, each object appears to have an orange circle in the center of it. This is the connection point. Connections are always drawn by dragging from one orange circle to the next. The order is pretty simple...always draw from the parent to the child. In this case, if the connections weren't already drawn, we would go from the character to the wheel. The child's orange circle then turns red to indicate that it is a child.
So, that's how the car drives. The wheels have controls assigned to them to make them motors, and because the wheels (our actual character) are attached to the body, it moves with them, just like a real car.
We'll be using connections in a more advanced way in a later chapter, but for now, let's make this game look better.
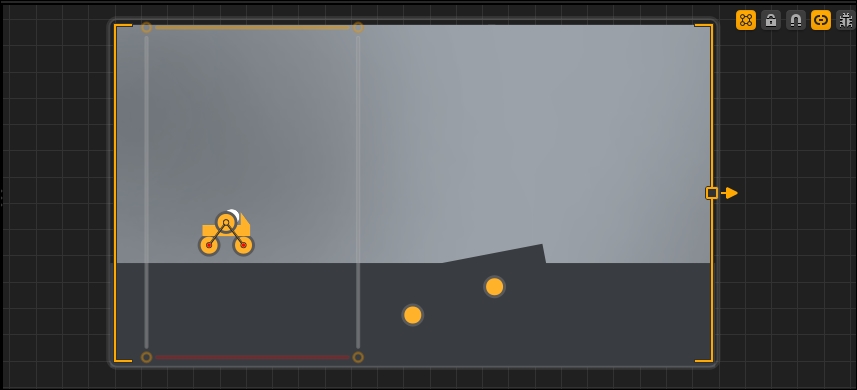
Turn on the Show Game Frame button (top right of the stage). The game frame is basically the area where your character is restricted to, and how it is restricted. You should see a box appear on the left side of the visible stage. It currently has all-gray borders. This means that the character can travel up, down, left, and right and the game will scroll to keep the character within that box. We want to set up some restrictions on that border.
By clicking on any of the gray lines that make up the box, we change that line to orange. What this means is that the character cannot travel beyond that point. Do this to the top line of the game-frame. Now, our character can't jump off the area we're creating.
Next, click twice on the line that makes up the bottom of the box. You'll see that line turn red. This means that if the character touches this line, the character will be destroyed. Now, we can set up pits that if the character falls into them, the character explodes and dies.
Finally, on the corners of the box, you'll see little orange circles. These are handles that let you change the shape of the box. Using one of these handles on the left side of the box, let's move the left side in a bit so that if the rover backs up, the screen begins to scroll before the character reaches the edge. The results will look like the following screenshot: