7
Interactions with the Keyboard and Mouse for Dynamic Graphics Programs
For computer games, graphics applications, and mobile applications, the mouse is a key way of interacting with graphics windows. In this case, by mouse, I also include finger touches as they are processed in almost the same way. The mouse is a pointer that moves across the screen and represents a pixel location (usually at the tip of the arrow if that is the cursor you are using). This location is represented as an (x, y) coordinate in the 2D plane, that is, the graphics window.
Although technically you could create graphics applications without the need for interaction, having these peripherals available becomes useful when testing out an application, moving around in the virtual world, and interacting with models and user interface objects. Hence, I’m adding this chapter early to allow the ability to explore graphics concepts in later chapters with such input. This knowledge will also serve you well as you go forward to make your own custom applications. As such, this chapter is composed of two sections:
- Working with mouse interactions
- Adding keyboard commands
Technical requirements
In this chapter, we will be using Python, PyCharm, Pygame, and PyOpenGL, as used in the previous chapters. Before you begin coding, create a new folder in the PyCharm project for the contents of this chapter called Chapter 7.
The solution files containing the code can be found on GitHub at https://github.com/PacktPublishing/Mathematics-for-Game-Programming-and-Computer-Graphics/tree/main/Chapter07in the Chapter07 folder.
Working with mouse interactions
The position of the mouse on the screen is recorded as a pixel location based on the screen coordinate system. As you discovered in earlier chapters, the screen coordinate system by default has its origin in the upper-left corner of the graphics window.
The actions that can be taken with a mouse include the following:
- Pressing down any of the mouse buttons with a finger, including the left, right, and middle buttons
- Releasing a finger press on any of the mouse buttons
- Moving the mouse without pressing any buttons
- Dragging, which is moving the mouse while a button is being held
- Scrolling, in which the user’s finger turns the mouse wheel, or on a touchpad or touch mouse, gliding the finger over the surface either vertically or horizontally
The mouse can be used for selecting objects, moving objects, clicking on buttons or input fields, moving the camera, and drawing on the screen. Many of these functions will be explored throughout the book, with the key ones investigated here.
As revealed in Chapter 1, Hello Graphics Window: You’re On Your Way, one way to capture mouse events is to use code like the following:
for event in pygame.event.get():
        elif event.type == MOUSEBUTTONDOWN:
            #do this
Pygame can recognize the following mouse events, besides MOUSEBUTTONDOWN:
- MOUSEBUTTONUP
- MOUSEMOTION
- MOUSEWHEEL
The best way to get to know these is to implement them. We used MOUSEBUTTONDOWN in Chapter 1, Hello Graphics Window: You’re On Your Way, for drawing lines and polygons in the window, so let’s look at the others.
Let’s do it…
Before you begin, ensure you make a new folder in PyCharm for this code, then follow these steps:
- Create a new Python script called MouseDrawing.py and start with the following code:
import pygame
from pygame.locals import *
pygame.init()
screen_width = 800
screen_height = 800
screen = pygame.display.set_mode((screen_width,
screen_height))
done = False
white = pygame.Color(255, 255, 255)
while not done:
for event in pygame.event.get():
if event.type == pygame.QUIT:
done = True
elif event.type == MOUSEBUTTONDOWN:
pygame.draw.rect(screen, white,
(pygame.mouse.get_pos(),
(5, 5)))
pygame.display.update()
pygame.quit()
When run, this script will allow you to draw a small square at the location of the mouse when you click a mouse button.
- Modify the code to only draw squares when the left mouse button is pressed with the following:
elif event.type == MOUSEBUTTONDOWN:
if event.button == 1:
pygame.draw.rect(screen, white,
(pygame.mouse.get_pos(),
(5, 5)))
Be sure to add an indent after checking for the button value. In this case, you’ll be checking for a left-click.
- You can also check for other buttons using the values from 2 to 5, as follows:
- 1: Left-click
- 2: Middle-click
- 3: Right-click
- 4: Scroll up
- 5: Scroll down
Try it out for yourself.
- We will now modify the code to draw when the mouse is moved and the left mouse button is pressed down. Change your code like this:
mouse_down = False
while not done:
for event in pygame.event.get():
if event.type == pygame.QUIT:
done = True
elif event.type == MOUSEBUTTONDOWN and
event.button == 1:
mouse_down = True
elif event.type == MOUSEBUTTONUP and
event.button == 1:
mouse_down = False
elif event.type == MOUSEMOTION and
mouse_down is True:
pygame.draw.rect(screen, white,
(pygame.mouse.get_pos(),
(5, 5)))
pygame.display.update()
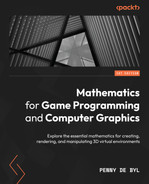
In the preceding code, a Boolean is created to keep track of the state of the mouse button. Then, the if-else statement is expanded to set the mouse_down value to True when the mouse button is pressed down and then to False when it is released. When you run this, you will be able to draw in the window with the mouse. Notice, though, that if you draw quickly, there will be large gaps between the squares, as shown here:
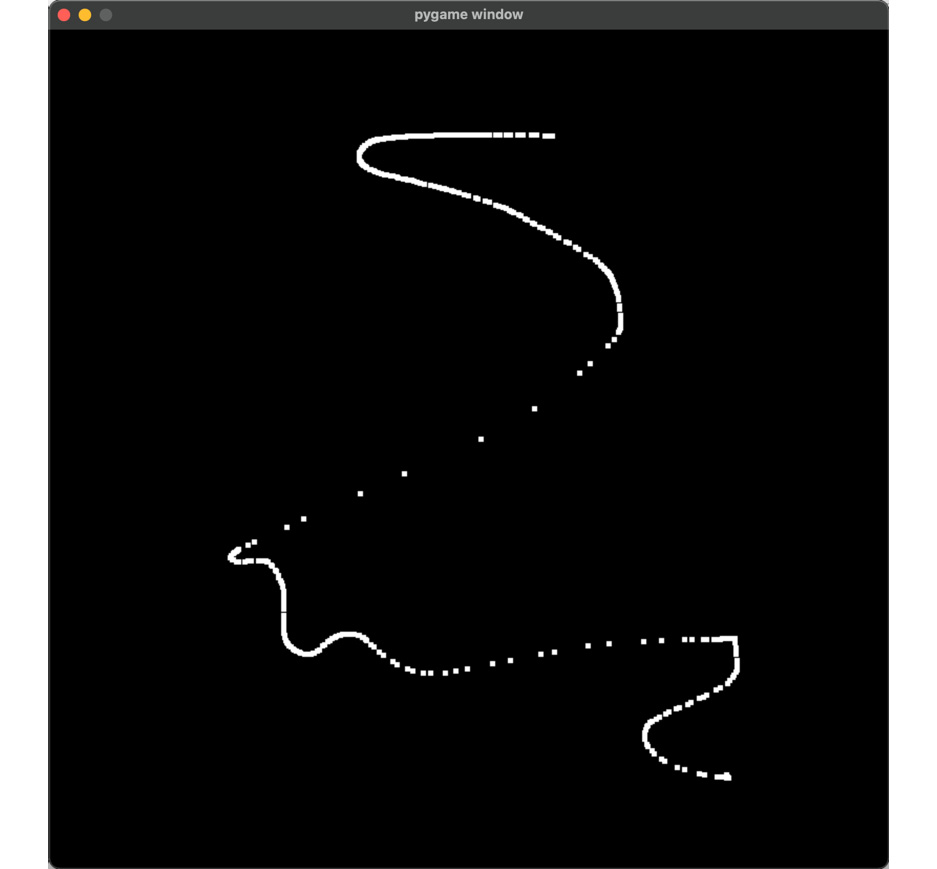
Figure 7.1: Gaps between mouse-drawn pixels
The reason for the large gaps is that you can update the position of the mouse faster than the main loop can keep up with your movements.
Note
Before we continue, it is also interesting to note that the exact logic we discussed in this section is used with finger touches and drags on a mobile device to track the user’s finger.
- To draw a continual line in the window, instead of single squares, we need to draw a line between the last position of the mouse and the next position of the mouse. This will then draw the line to bridge any gaps if the mouse moves too fast for the main loop. This means storing the position of the mouse in the last loop and then drawing a line from the last position of the mouse to the position of the mouse in the current loop. You can do it like this:
last_mouse_pos = (0, 0)
while not done:
for event in pygame.event.get():
..
elif event.type == MOUSEBUTTONDOWN and
event.button == 1:
mouse_down = True
last_mouse_pos = pygame.mouse.get_pos()
..
elif event.type == MOUSEMOTION and
mouse_down is True:
pygame.draw.line(screen, white,
last_mouse_pos,
pygame.mouse.get_pos(),
5)
last_mouse_pos = pygame.mouse.get_pos()
pygame.display.update()
Instead of drawing the square as a point under the mouse, a line is created with the pygame.draw.line() function. It takes as parameters the screen, line color, starting pixel position, ending pixel position, and line width.
You will now have the ability to scrawl in white on the window, as shown in Figure 7.2:
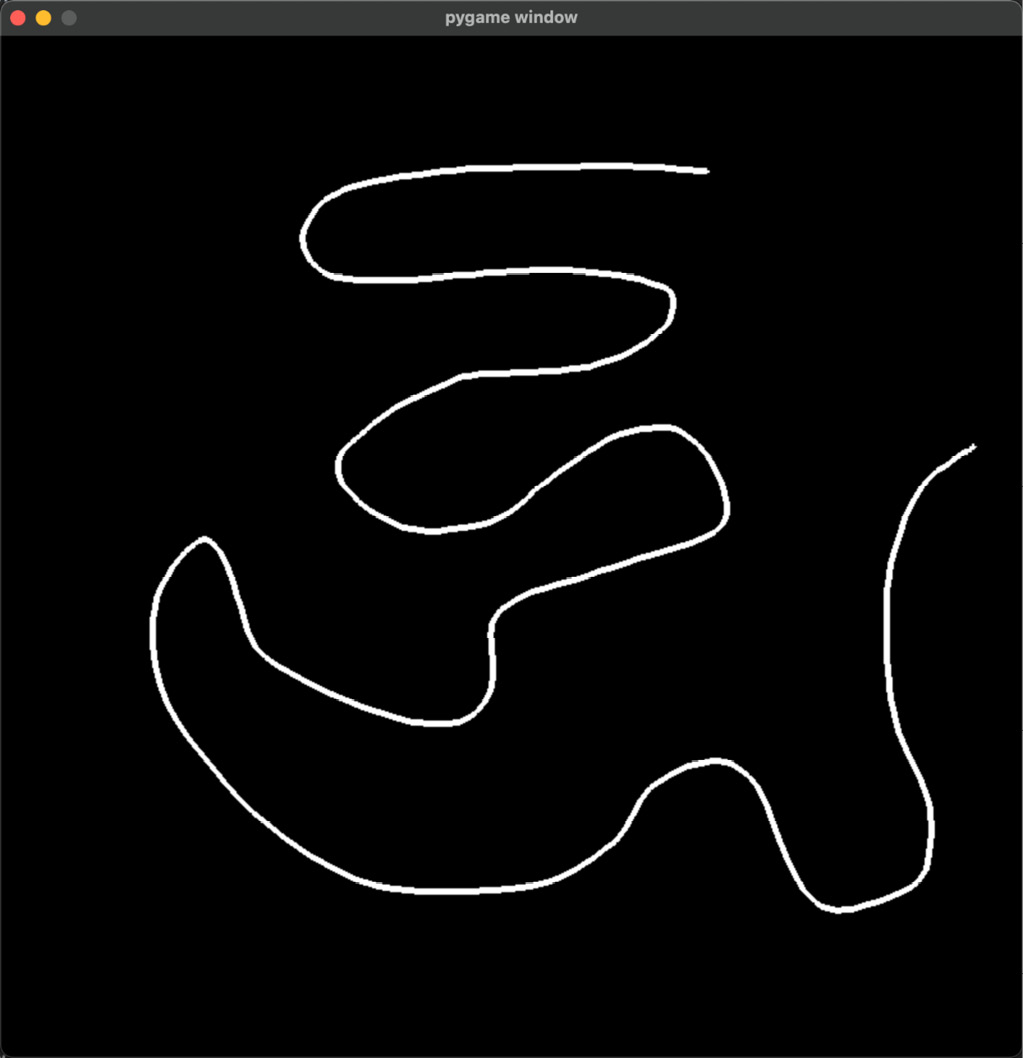
Figure 7.2: No gaps between mouse-drawn pixels
Often, when using a mouse in a graphics environment, the user will want to click on a button or object. This involves calculating whether the mouse position is inside the visual boundaries of the object. For a button, which is basically a rectangle, the mouse position must be inside the range of the button’s top-left and bottom-right coordinates, as shown in Figure 7.3:
Figure 7.3: The coordinates of a button and a mouse
Given these values, the logic to determine whether the mouse is inside the button boundaries is as follows:
if x < mx < (x + width) and y < my < (y + height)
Your turn…
Exercise A: Create a green rectangle and add it to the upper-left corner of the window that you have been drawing in. You can do this with the following code:
pygame.draw.rect(screen, green, button)where green = pygame.Color(0, 255, 0) and button = (0, 0, 100, 30).
Program the preceding if statement into the existing if-then-else statement inside the main loop to print out Mouse Over when the mouse moves over the button.
Hint
To retrieve the mouse position, use mpos = pygame.mouse.get_pos().
You will then be able to set the values of mx and my, as follows:
mx = mpos[0]
my = mpos[1]
Combining 2D and 3D environments
In the previous section, we worked purely with Pygame and a 2D rectangle in 2D space, but what happens if you want to combine a 2D and 3D view? Working with OpenGL means melding an orthographic view for the 2D on top of a perspective view for 3D objects. This can be done by ensuring the correct objects are split to be drawn between projection modes. The best way to explain this is through its application.
Let’s do it…
In this exercise, you will learn how to combine a 2D and 3D environment into the same window. Follow these steps:
- Create a new Python script called AddingButton.py and add the following code:
from Object import *
from Cube import *
from pygame.locals import *
from OpenGL.GL import *
from OpenGL.GLU import *
pygame.init()
screen_width = 800
screen_height = 600
pygame.display.set_caption('OpenGL in Python')screen = pygame.display.set_mode((screen_width,
screen_height),
DOUBLEBUF | OPENGL)
done = False
white = pygame.Color(255, 255, 255)
objects_3d = []
objects_2d = []
To begin the code, we first create a window in the usual manner. Then, to hold the 2D and 3D objects, two arrays are set up, called objects_2d and objects_3d:
cube = Object("Cube")
cube.add_component(Transform((0, 0, -5)))
cube.add_component(Cube(GL_POLYGON,
                   "images/wall.tif"))
objects_3d.append(cube)
clock = pygame.time.Clock()
fps = 30
Next, a cube object is created and added to the array holding 3D objects before setting up the clock:
def set_2d():
    glMatrixMode(GL_PROJECTION)
    glLoadIdentity()  # reset projection matrix
    gluOrtho2D(0, screen.get_width(), 0,
               screen.get_height())
    glMatrixMode(GL_MODELVIEW)
    glLoadIdentity()  # reset modelview matrix
    glViewport(0, 0, screen.get_width(),
               screen.get_height())
def set_3d():
    glMatrixMode(GL_PROJECTION)
    glLoadIdentity()
    gluPerspective(60, (screen_width / screen_height),
                   0.1, 100.0)
    glMatrixMode(GL_MODELVIEW)
    glLoadIdentity()
    glViewport(0, 0, screen.get_width(),
               screen.get_height())
    glEnable(GL_DEPTH_TEST)
Then, differing methods are created to handle the different OpenGL setups required to draw 2D and 3D objects:
while not done:
    for event in pygame.event.get():
        if event.type == pygame.QUIT:
            done = True
    glPushMatrix()
    glClear(GL_COLOR_BUFFER_BIT | GL_DEPTH_BUFFER_BIT)
    set_3d()
    for o in objects_3d:
        o.update()
    set_2d()
    for o in objects_2d:
        o.update()
    glPopMatrix()
    pygame.display.flip()
    clock.tick(fps)
pygame.quit()
To run this, you will need the Python scripts from the previous chapter for Cube.py, Object.py, Mesh3D.py, and Transform.py.
The lines you need to take note of in the preceding code are the two new methods, set_2d() and set_3d(). Each of these sets its own projection matrix. The set_2d() method needs a call to gluOrtho2D() to create an orthographic projection of the same width and height as the display window, whereas the set_3d() method uses the perspective projection we used before. Basically, the 2D objects will make up the graphical user interface (GUI) and operate in a different space from those in the 3D world. We want GUI items to sit on the screen. In both of these methods, you will find glLoadIdentity() used after setting the projection modes. This just reinitializes the views. If you don’t do that, every time the projection mode is changed, any settings will compound on what came before.
In addition, in this code, there are two object arrays: one for 3D objects and one for 2D objects. This is to ensure that the correct projections are called before drawing the respective items.
Run this script to find a single cube in the middle of the screen. The translations and rotations that we had in the main script previously have been removed so as to not confuse how things are being drawn, and thus the cube will no longer rotate.
- It’s time to create a button. Make a new Python file called Button.py and add the following code:
from OpenGL.GL import *
class Button:
def __init__(self, screen, position, width,
height, color,
o_color, p_color):
self.screen = screen
self.position = position
self.width = width
self.height = height
self.normal_color = color
self.over_color = o_color
self.pressed_color = p_color
def draw(self):
glPushMatrix()
glLoadIdentity()
glBegin(GL_POLYGON)
glVertex2f(self.position[0], self.position[1])
glVertex2f(self.position[0] + self.width,
self.position[1])
glVertex2f(self.position[0] + self.width,
self.position[1] + self.height)
glVertex2f(self.position[0],
self.position[1] + self.height)
glEnd()
glPopMatrix()
In this code, the button class is defined. It takes multiple arguments about the screen, the button position, dimensions, and a variety of colors for the button states. The glVertex2f() method is used with a GL_POLYGON setting to draw a rectangle representing the button.
- Add the following lines to AddingButtons.py:
from Button import *
..
cube.add_component(Cube(GL_POLYGON,
"../images/wall.tif"))
objects_3d.append(cube)
white = pygame.Color(255, 255, 255)
green = pygame.Color(0, 255, 0)
blue = pygame.Color(0, 0, 255)
button1 = Object("Button")button1.add_component(Button(screen, (0, 0), 100, 50,
white, green, blue))
objects_2d.append(button1)
clock = pygame.time.Clock()
fps = 30
..
- Also, amend Objects.py like this:
def update(self, events = None):
glPushMatrix()
for c in self.components:
if isinstance(c, Transform):
pos = c.get_position()
glTranslatef(pos.x, pos.y, pos.z)
if isinstance(c, Mesh3D):
c.draw()
if isinstance(c, Button):
c.draw(events)
glPopMatrix()
At this point, you can run the AddingButtons script. You will get the cube in the middle of the screen as before and a button in the bottom-left corner, as shown in Figure 7.4:
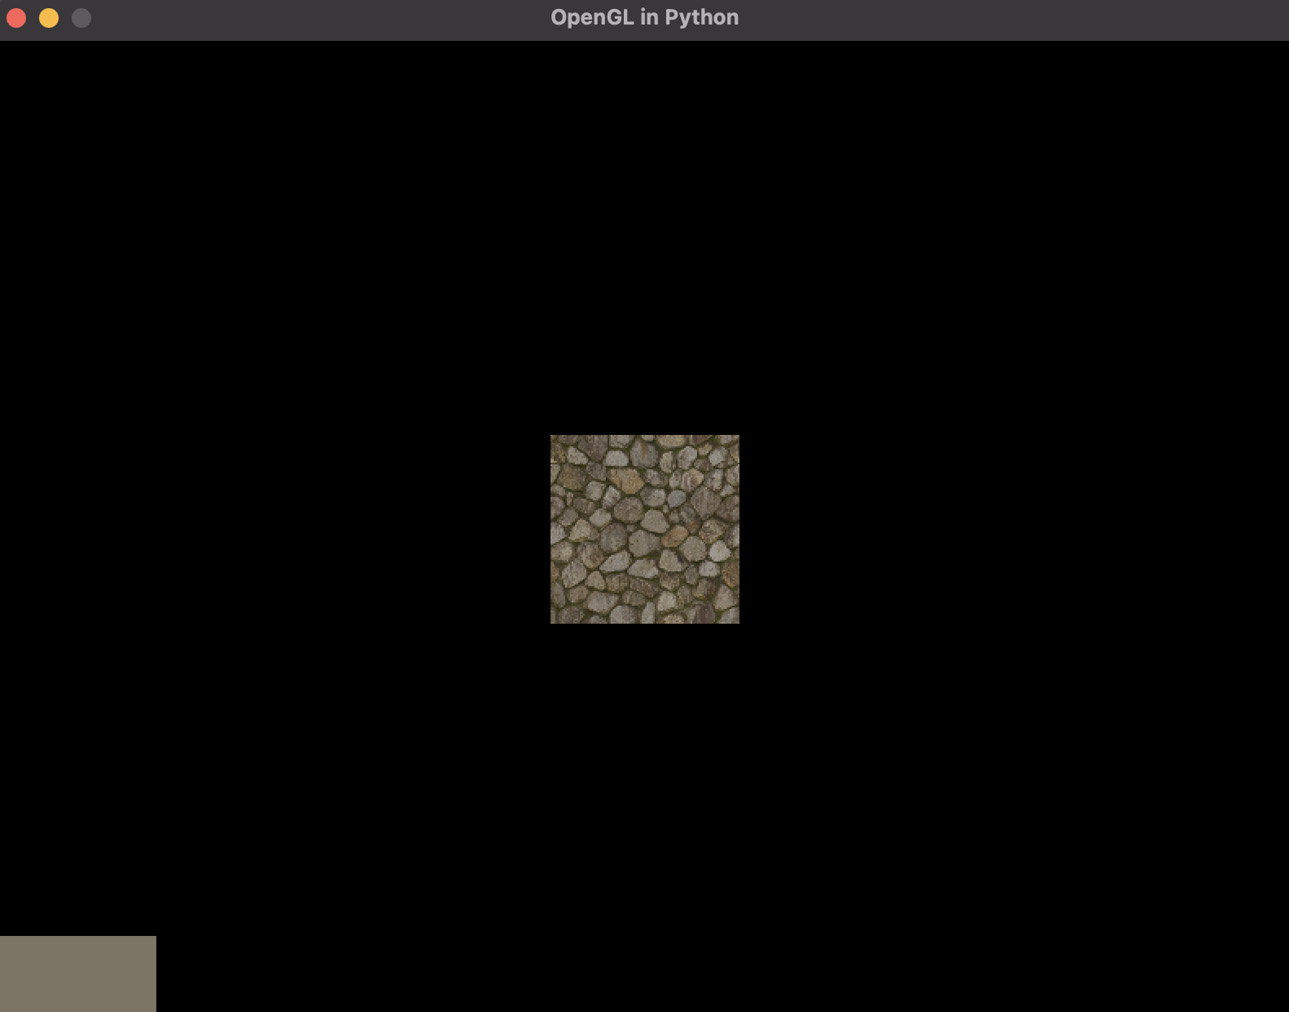
Figure 7.4: A 2D view over the top of a 3D view
You might be wondering two things at this point: Why isn’t the button white? and Why is the button at the bottom left of the screen? I thought (0, 0) was at the top left. Well, the answer lies in the use of the projection view functions.
gluOrtho2d() defined
For the gluOrtho2d() method call, the parameters are specified in the following order (as can be found at https://www.khronos.org/registry/OpenGL-Refpages/gl2.1/xhtml/gluOrtho2D.xml):
void gluOrtho2D(GLdouble left, GLdouble right, GLdouble bottom, GLdouble top)
In the setup_2d() method, both the left and bottom of the window are set to 0, meaning we’ve flipped the y axis. Therefore, anything drawn with this setting will assume the origin of the world is at the bottom left of the window. Hence, the button is drawn there.
As for the color of your button, it might not be the same as mine, but it will be a color taken from the texture you have on the cube. Why? Because you added a texture to the cube by turning on OpenGL’s texturing mode, but it was never turned off. Therefore, anything drawn afterward will have the same texture, if the texture isn’t set to something else.
- To fix this, go into the Mesh3D.py code and add the following:
def draw(self):
glEnable(GL_TEXTURE_2D)
glTexEnvf(GL_TEXTURE_ENV, GL_TEXTURE_ENV_MODE,
GL_DECAL)
glBindTexture(GL_TEXTURE_2D, self.texID)
for t in range(0, len(self.triangles), 3):
glBegin(self.draw_type)
..
glEnd()
glDisable(GL_TEXTURE_2D)
Run this. The button will now be white. This might not be the default color you wanted for the button but that’s okay as we haven’t set it yet.
- To use the color, specified as the button’s normal color when drawing it, modify the button code to the following:
def draw(self):
glPushMatrix()
glLoadIdentity()
glColor3f(self.normal_color[0],
self.normal_color[1],
self.normal_color[2])
glBegin(GL_POLYGON)
This will draw the button in the color passed through as the normal color. If you are still getting white, then check in AddingButtons.py that white isn’t the first color you are using in the button creation.
This exercise has demonstrated how to mix 2D and 3D objects in the same scene. As you will have noticed, it’s straightforward to switch between different camera projections to achieve the results required when creating 3D applications that have a 2D interface. Of course, now that buttons have been drawn in the window, we will want to add the ability to click on them.
Converting the mouse to projection coordinates
If you put print(pygame.mouse.get_pos()) into the while loop of the application and move the mouse around, you will notice that the projection view settings in OpenGL have had no effect on the mouse coordinates being read by Pygame. Therefore, we need to do a few calculations to determine whether the mouse pointer is over any object we are interested in.
Let’s start by looking at the issue in 2D. To ensure we get a full understanding of the task at hand, let’s modify the gluOrtho2D() call in the setup_2d() method to the following:
gluOrtho2D(0, 1600 0, 1200)If you make this change and run the application, the button will be half the size it was before as you have now doubled the resolution of the window without changing the actual size of the window. This gives us the situation illustrated in Figure 7.5:
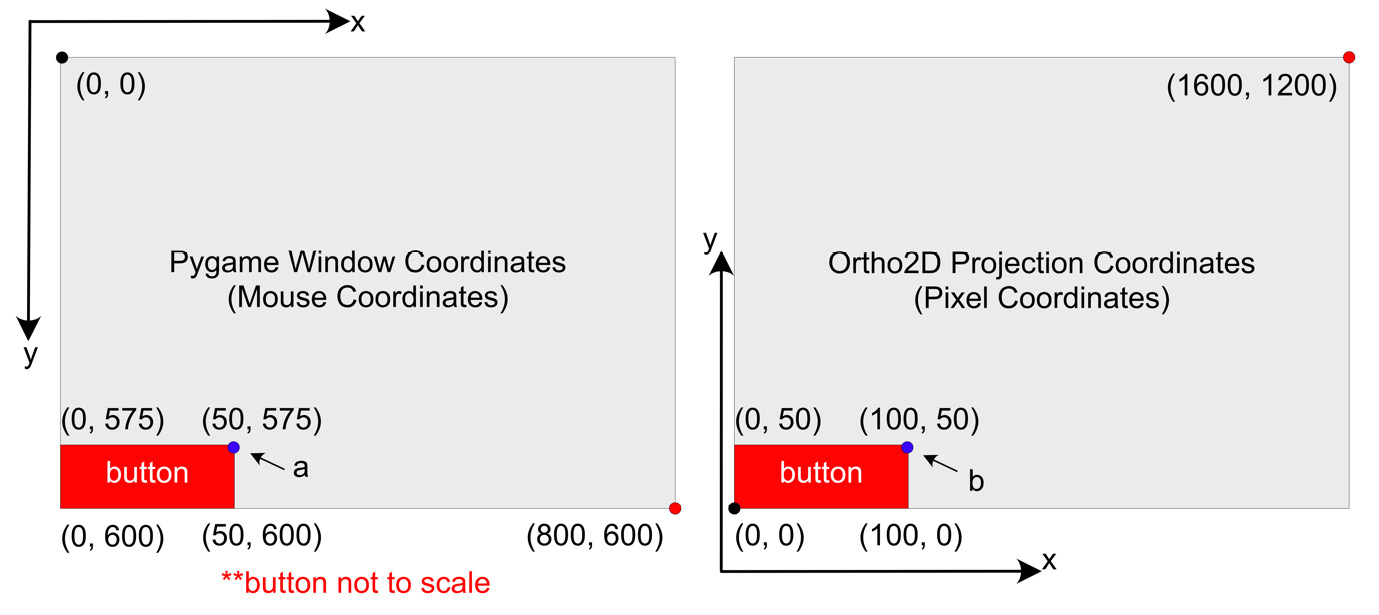
Figure 7.5: The different coordinate systems used in the same window – one for Pygame coordinates and one for OpenGL Ortho2D
Now, let’s see the code that is added to display the button in Figure 7.5:
button1.add_component(Button(screen, (0, 0), 100, 50,
                      white, green, blue))
When the button is now displayed, the coordinates specify for it to start at the origin and be 100 wide by 50 high, position it in the Ortho2D window on the right of Figure 7.5. However, these coordinates with respect to the system the mouse lives in are very different, as seen on the left of Figure 7.5. This means that before we can determine whether the mouse is over the button as we did earlier, we must either convert the mouse coordinates into Ortho2D space or the button coordinates into the Pygame window space. This is straightforward using a mapping function.
Take points a and b in Figure 7.5, where a is in mouse space and b is in ortho2d space. The proportions of the x and y values of a with respect to the width and height of the mouse window are equal to the proportions of the x and y values of b with respect to the width and height of the ortho2d window.
This relationship for the x values can be expressed as follows:

This relationship for the y values can be expressed as follows:

Given these relationships, we can devise a mapping function to transform points from one coordinate system into another, as follows:
def map_value(current_min, current_max, new_min, new_max,
              value):
    current_range = current_max - current_min
    new_range = new_max - new_min
    return new_min + new_range * ((value-
           current_min)/current_range)
Here, current_min and current_max are the extreme values for the mouse window, for example, the window the mouse coordinates are taken from, and new_min and new_max are the extremes of the ortho2d window.
Let’s look at how you might use this function, which can be used to map values between any two scales. In the case of the current problem, we have a mouse window that has a height extreme of 0 and 600 and an ortho2d window with extremes of 1200 and 0. Note that when specifying the minimum and maximum values, you ensure you are taking the corresponding values. For these two windows, the y value for the top of the mouse window is 0, and for the top of the ortho2d window, it is 1200.
To use this in the function to determine the value of b.y, given a.y, it would be written as follows:
b.y = map_value(0, 600, 1200, 0, a.y)The same process is required for b.x:
b.x = map_value(0, 800, 0, 1600, a.x)Now that we have a method to convert the mouse pointer coordinates into the ortho2d space, we can integrate this into our application to program a mouse-over color change for the button.
Let’s do it…
Here, we will create a utility script to hold regularly used and helpful methods:
- Create a new Python script called Utils.py. We will be using this script to store utility functions as we learn about them. They are useful methods that don’t belong to just one class. To this file, add the code for the map_value() function discussed in the previous section.
- For the Button class to process a mouse over, it needs access to the events picked up in the main script. Therefore, it needs to be passed through the Object class. To do this, begin by making the following changes to AddingButtons.py:
while not done:
events = pygame.event.get()
for event in events:
if event.type == pygame.QUIT:
done = True
..
set_3d()
for o in objects_3d:
o.update(events)
set_2d()
for o in objects_2d:
o.update(events)
- Next, Objects.py should be updated as follows:
def update(self, events = None):
glPushMatrix()
for c in self.components:
..
if isinstance(c, Button):
c.draw(events)
glPopMatrix()
- Last but not least, Button.py is updated with the following:
from OpenGL.GL import *
from Utils import *
class Button:
..
def draw(self, events):
mouse_pos = pygame.mouse.get_pos()
mx = map_value(0, 800, 0, 1600, mouse_pos[0])
my = map_value(0, 600, 1200, 0, mouse_pos[1])
glPushMatrix()
glLoadIdentity()
# if mouse over button
if self.position[0] < mx < (self.position[0] +
self.width) and
self.position[1] < my < (self.position[1] +
self.height):
glColor3f(self.over_color[0],
self.over_color[1],
self.over_color[2]);
else:
glColor3f(self.normal_color[0],
self.normal_color[1],
self.normal_color[2]);
glBegin(GL_POLYGON)
Most of the preceding code passes through events from the main script in AddingButtons.py. The color change of the button then uses the map_value() function in Utils.py to convert the mouse coordinates in ortho2d space and then sets the color using the same if statement to determine whether the mouse is over a rectangle (in this case, the button).
At this point, your project will now successfully mix the 2D view of a simple interface with the 3D environment rendering a cube.
Your turn…
Exercise B: In the drawing application we created earlier in this chapter, we captured a mouse-click event. As it stands, the Button class has a property called pressed_color that defines the color the button should turn if clicked on. It’s time to implement that functionality now in this challenge. Update the draw() method of the Button class to display pressed_color when the button is clicked on; otherwise, show normal_color.
Hint of the code
from pygame.locals import *
def draw(self, events):
...
if self.position[0] < mx < (self.position[0] + self.width) and
self.position[1] < my < (self.position[1] + self.height):
# Enter code here
# Check the left button is pressed then set mouse_down to True.
# If it's released then set to False
# Check mouse_down is True then set pressed_color
# otherwise set over_color
else:
# set normal color
If you get stuck, remember that the answers are at the end of this chapter.
Exercise C: There have been some hardcoded values placed in all the code we’ve been developing, specifically the dimensions of the screen (width and height) and the gluOrtho2d() method. As this isn’t best practice, create another Python script file called Settings.py and create variables in there for the dimensions of both window spaces. Then, adjust everywhere in the code that will require the use of these variables. Remember to import Settings.py at the top of each script that uses these variables.
It wouldn’t be much of a button if it didn’t do anything when it was clicked. In later chapters, we will link up buttons to do more exciting things, but for now, we will just hook the existing one up to a simple function that prints a statement.
Let’s do it…
In this exercise, we will add the ability to make a button clickable:
- In AddingButtons.py, add a new function, as follows:
objects_3d.append(cube)
def button_click():
print("Hello Button")white = pygame.Color(255, 255, 255)
- Pass this new function to the add_component() method when creating a button:
blue = pygame.Color(0, 0, 255)
button1 = Object("Button")button1.add_component(Button(screen, (0, 0), 100, 50,
green,
white, blue, button_click))
objects_2d.append(button1)
- Now, in the Button class, accept the passing through of this function pointer with the following:
class Button:
def __init__(self, screen, position, width,
height, color, ocolor, pcolor,
on_click):
self.position = position
..
self.on_click = on_click
- Then, call this function when the button is clicked on, like this:
for e in events:
if e.type == MOUSEBUTTONDOWN and e.button == 1:
self.mouse_down = True
self.on_click()
elif e.type == MOUSEBUTTONUP and e.button == 1:
self.mouse_down = False
This is an easy way to create a pointer to a function. At this point, you can try it out to see Hello Button appear in the console each time the button is pressed.
Thus far, we’ve examined clicking on a 2D button, but what about a 3D object? This is a somewhat more complicated scenario. What is required is a line projected from the camera’s near plane into the 3D world and then determining whether the line hits an object. This functionality requires knowledge of vectors and colliders, which we are yet to cover, so it will be left until Part 2, Essential Trigonometry.
With the basics of mouse interactions dealt with, it’s time to work on keyboard input.
Adding keyboard commands
Once you’ve worked with mouse events, keyboard events are a breeze. In fact, key presses have fewer events associated with them than a mouse, though you can use multiple keys at a time for complex commands. But basically, a key possesses the down and up events. With respect to graphics environments, keys are used to influence what is going on in the scene. The most common keys in games, for example, are the arrow keys or WASD for moving an object and the spacebar for jump or fire. An example of combination keys would be holding down the Shift key while using the arrows to make the object move faster.
In the following exercise, you will program keys to move an object in the 3D environment.
Let’s do it…
To move a 3D object, we can use the Transform class and modify the position of the model when a key is pressed. To achieve this, follow these steps:
- In the Transform class, we will be adding a new function that will move an object that has that transform as a component. Add the following function:
def move_x(self, amount):
self.position =
pygame.math.Vector3(self.position.x +
amount, self.position.y,
self.position.z)
- When a key is pressed, we want this move_x() function to be called. In this case, we will make the left and right arrow keys call it. Add the following lines to AddingButtons.py:
while not done:
events = pygame.event.get()
for event in events:
if event.type == pygame.QUIT:
done = True
elif event.type == pygame.KEYDOWN:
if event.key == pygame.K_LEFT:
trans: Transform =
cube.get_component(Transform)
if trans is not None:
trans.move_x(-0.1)
glPushMatrix()
glClear(GL_COLOR_BUFFER_BIT | GL_DEPTH_BUFFER_BIT)
- The preceding code now requires another function to get hold of the Transform component attached to an object. We, therefore, add such a method to the Object class like this:
def get_component(self, class_type):
for c in self.components:
if type(c) is class_type:
return c
return None
This function will take a class type and then look for it in the component list, returning it to the caller. In this way, the main script can then use the move_x() function to add -0.1 to the object’s x position, which in this case is the cube.
- Run this to see how pressing the left arrow key will move the cube to the left.
The movement, rotation, and scaling of an object will, as we progress through the book, be handled by the Transform class. This class will also handle the mathematical functions required by each, whether they be instigated by a keyboard command or automated.
Your turn…
Exercise D: Add the ability to move the cube to the right when the right arrow key is pressed. For a list of keycodes, see https://www.pygame.org/docs/ref/key.html.
Exercise E: Program the use of the up and down arrow keys to move the cube up and down.
Besides a single press of a key to call a command in the application, keys can also be held down to repeat a command over and over until the key is released. The way we are currently moving the cube is a little cumbersome and often when an object is being moved with the arrow keys, the user prefers to hold the keys down while the object keeps moving until the key is released. Achieving this is very similar to using the mouse to draw a line in that pressing the key down puts the application into a certain state and releasing the key resets that. We can program this in the same way as for holding a mouse button down with a Boolean.
However, a far simpler way is to use the Pygame built-in get_pressed() method, as you are about to discover.
Let’s do it…
In this task, we will reprogram the key presses to respond when a key is held down using these steps:
- Modify the AddButtons.py file’s while loop, as follows:
..
trans: Transform = cube.get_component(Transform)
while not done:
events = pygame.event.get()
for event in events:
if event.type == pygame.QUIT:
done = True
keys = pygame.key.get_pressed()
if keys[pygame.K_LEFT]:
trans.move_x(-0.1)
if keys[pygame.K_RIGHT]:
trans.move_x(0.1)
if keys[pygame.K_UP]:
trans.move_y(0.1)
if keys[pygame.K_DOWN]:
trans.move_y(-0.1)
glPushMatrix()
glClear(GL_COLOR_BUFFER_BIT | GL_DEPTH_BUFFER_BIT)
..
The get_pressed() function returns a dictionary of all the keys that are being held down at any one time, allowing for checking multiple key presses. The index in this dictionary is the keycode. In the preceding code, note that the cube’s Transform component is set only once (before the while loop). This is more efficient than setting it repeatedly inside the loop. Also, the keys, beginning with the line keys = pygame.key.get_pressed() are checked after the event for loop and not inside it.
- Run this and see the cube move around the screen when the arrow keys are held down.
In this section, we’ve covered two methods in the Pygame API that allow for the capture of key events. The first can detect a single key press or release, whereas the second returns all the keys that are pressed during any one main loop. Which one you choose to use will depend on the application.
Summary
In this chapter, we have focused on using the mouse and keyboard to interact with a graphics application. The basic functions available in Pygame have been explored to assist you in getting up and running with these commands. While not all principal components are required to understand mathematics in graphics, knowing these input methods does make the programs we can create to investigate mathematics more engaging. As you progress through the chapters, you will find that the mouse and keyboard will come in handy to demonstrate various key aspects presented in this book. As we move forward, other ways of using these input devices will be explored.
In the next chapter, the mathematics will step up a gear as we start getting into the fundamental concepts underlying most of the mathematics in graphics and games: vectors.
Answers
Exercise A:
..
green = pygame.Color(0, 255, 0)
mouse_down = False
last_mouse_pos = (0, 0)
button = (0, 0, 100, 30)
while not done:
    pygame.draw.rect(screen, green, button)
    for event in pygame.event.get():
        ..
        elif event.type == MOUSEMOTION:
            mpos = pygame.mouse.get_pos()
            if button[0] < mpos[0] <
                     (button[0] + button[2]) and
                button[1] < mpos[1] < (button[1] + button[3]):
                print("Mouse Over")
    pygame.display.update()
pygame.quit()
Exercise B:
class Button:
    def __init__(self, screen, position, width, height,
                 color, ocolor, pcolor):
        ..
        self.pressed_color = pcolor
        self.mouse_down = False
..
def draw(self, events):
    ..    # if mouse over button
    if self.position[0] < mx < (self.position[0] +
                                self.width) and
       self.position[1] < my < (self.position[1] +
    self.height):
        for e in events:
            if e.type == MOUSEBUTTONDOWN and e.button == 1:
                self.mouse_down = True
            elif e.type == MOUSEBUTTONUP and e.button == 1:
                self.mouse_down = False
        if self.mouse_down:
            glColor3f(self.pressed_color[0],
                      self.pressed_color[1],
                      self.pressed_color[2])
        else:
            glColor3f(self.over_color[0],
                      self.over_color[1],
                      self.over_color[2]);
    else:
        glColor3f(self.normal_color[0],
                  self.normal_color[1],
                  self.normal_color[2]);
    glBegin(GL_POLYGON)
Exercise C:
Settings.py
# the actual size of the window in pixels
# left, right, top, bottom window_dimensions = (0, 800, 0, 600)
# the resolution of an Ortho2D projection used for drawing a GUI
# left, right, top, bottom
gui_dimensions = (0, 1600, 1200, 0)
Button.py
def draw(self, events):
    mouse_pos = pygame.mouse.get_pos()
    mx = map_value(window_dimensions[0],
                   window_dimensions[1],
                   gui_dimensions[0], gui_dimensions[1],
                   mouse_pos[0])
    my = map_value(window_dimensions[2],
                   window_dimensions[3],
                   gui_dimensions[2], gui_dimensions[3],
                   mouse_pos[1])
AddingButtons.py
import math
..
pygame.init()
screen_width = math.fabs(window_dimensions[1] –
                         window_dimensions[0])
screen_height = math.fabs(window_dimensions[3] –
                          window_dimensions[2])
pygame.display.set_caption('OpenGL in Python')
..
def set_2d():
    ..
    gluOrtho2D(gui_dimensions[0], gui_dimensions[1],
               gui_dimensions[3], gui_dimensions[2])
    ..
..
Exercise D:
while not done:
    events = pygame.event.get()
    for event in events:
        if event.type == pygame.QUIT:
            done = True
        elif event.type == pygame.KEYDOWN:
            if event.key == pygame.K_LEFT:
                trans: Transform =
                       cube.get_component(Transform)
                if trans is not None:
                    trans.move_x(-0.1)
            if event.key == pygame.K_RIGHT:
                trans: Transform =
                       cube.get_component(Transform)
                if trans is not None:
                    trans.move_x(0.1)
Exercise E:
Add these lines to Transform.py:
def move_y(self, amount):
    self.position = pygame.math.Vector3(self.position.x,
                                  self.position.y + amount,
                                  self.position.z)
Add these lines to AddingButtons.py:
if event.key == pygame.K_RIGHT:
    trans: Transform = cube.get_component(Transform)
    if trans is not None:
        trans.move_x(0.1)
if event.key == pygame.K_UP:
    trans: Transform = cube.get_component(Transform)
    if trans is not None:
        trans.move_y(0.1)
if event.key == pygame.K_DOWN:
    trans: Transform = cube.get_component(Transform)
    if trans is not None:
        trans.move_y(-0.1)