1
Hello Graphics Window: You’re On Your Way
Students new to games and computer graphics fall into two camps: ones that think mathematics is a real bore and of no real use, and others that realize it is akin to breathing. The fact is that if you want to be successful (and stay alive) in the domain, then you can’t deny the importance of mathematics. This doesn’t mean that learning about it should be a grind. What we find most exciting about teaching and learning about mathematics in the computer games and graphics space is that the equations and numbers come alive through visual representations that remain otherwise unseen in other fields. Throughout this book, you will learn the essential mathematics in games and graphics by exploring the theory surrounding each topic and then utilizing it in real-world applications.
To this end, throughout this book, you will not only gain an understanding of the essential mathematics that is used throughout games and graphics, but also apply its principles in one of today’s hottest programming languages: Python.
Note
As the content of this book relates to both computer graphics and computer games, rather than continually typing out the laborious phrase “computer graphics and computer games,” we will endeavor to refer to both collectively as graphics.
“Why Python?” we hear you ask. “Why not some fancy game’s engine?” Well, besides having Python programming as a great skill under your belt when it comes to applying for a job, Python with the assistance of PyCharm (our Integrated Development Environment – IDE), Pygame (a graphics interface), and PyOpenGL (a Python/OpenGL API) reveals much of the underlying technical processes hidden by game engines and brings you face to face with direct calls to the graphics APIs that access OpenGL and DirectX. It’s a more challenging way to learn about mathematics if you remove all the high-level methods available to you that hide how your applied mathematics programming skills are working.
Learning about the mathematics of computer games and graphics at this level is essential in your learning journey. In this ever-changing domain, as technology progresses, your theoretical level of the how’s and why’s of the topic can remain constant and make you a highly skilled and adaptive programmer. A deep-seated knowledge of the algorithms and equations running the APIs of contemporary games and graphics engines is critical and transferable knowledge that developers can take from one platform to another and from one API to another. It not only provides extra insight while troubleshooting and debugging, but also gives a programmer an intuitive understanding of what functionality an API might contain without actually knowing that API. It’s akin to understanding all the tools in Adobe Photoshop and being able to perceive what tools will be available in Affinity Photo without ever using it. Having good math skills blurs the line between what is possible and what is not.
Now that you know why you are learning about mathematics in the way presented throughout this book, it’s time to dive into getting your own development environment set up and exploring the anatomy of a simple graphics window that will become the basis of all our exercises moving forward. We will begin with a guided exercise in getting your own development environment setup using PyCharm. This will allow you to jump right into coding with as little fuss as possible. It removes the need to manually download and install packages and plugins that usually require knowledge of command-line install procedures, which can become laborious and vary between desktop machine setups. This means more time spent on coding to start using Python to open windows and explore the range of fundamental graphics drawing methods that will set you up for graphics development success.
In this chapter, we will cover the following topics:
- Getting Started with Python, PyCharm, and Pygame
- Creating a Basic Graphics Window
- Working with Window and Cartesian Coordinates
Technical requirements
As mentioned in the introduction, we will be using the programming language, Python, along with an editor called PyCharm and a plugin/graphics library called Pygame. You should be a programmer to embark on the content of this course but not necessarily a Python programmer, as someone with working knowledge in any procedural language will pick up Python quickly enough.
These are all cross-platform tools and can be used on Windows, macOS, and Linux. We’ll leave it up to you to find the relevant versions of the software for your machine, however, to get you started, download Python from python.org. As shown in Figure 1.1, under the Downloads tab, you can get the latest version of the software. At the time of writing, it is Python 3.10.0. It is highly recommended that you follow along with the exercises in this book using the versions shown in the book to reduce any errors you may come across in replicating the code. If you are reading this and there is a later version of Python available, you can find version 3.10.0 under the All releases option as follows:

Figure 1.1: The Downloads tab at python.org
Thus, the steps to get Python installed on your machine are as follows:
- Visit python.org and download a version of Python relevant to your operating system.
- Run the downloaded file and follow the directions to install the software.
In order to code and compile with Python, we require an editor; for this, we will be using PyCharm. The same advice stands for version numbers of this software. At the time of writing this book, PyCharm is on version 2021.3. There is a Profession and a free Community version of PyCharm, but we will only require the free version for this book. To install PyCharm on your machine, do as follows:
- Visit www.jetbrains.com/PyCharm/download.
- Download a version of the installer relevant to your machine.
- Run the installer to set up PyCharm.
Now that you have the fundamental software installed, we will proceed to create a basic graphics window before learning how to draw on the screen.
Getting Started with Python, PyCharm, and Pygame
In this section, we will go through the process of setting up PyCharm and rendering a graphics window on the screen. To do this, follow these steps:
- Open PyCharm. The first window will appear as shown in Figure 1.2.

Figure 1.2: The opening PyCharm screen on an Apple Mac (the screen on other platforms will look similar but not the same)
You may want to take some time to look at the Customize section. This will allow you to set up colors, fonts, and other visual components. There are also many different settings and customizations you can make within PyCharm, and if you ever want to explore these, then we recommend a visit to the manual at www.jetbrains.com/help/PyCharm/quick-start-guide.html.
- Next, select the New Project button on the Projects page of the startup window. A window like what is shown in Figure 1.3 will appear.

Figure 1.3: PyCharm’s New Project window and settings
- Next, we need to set up our new project as follows:
- For Location (1), create a new folder for your files. Unlike a single source file such as what you might get with a Word document, a Python project can consist of many files. Therefore, instead of specifying a single file name, you must specify a folder. Call it Mathematics.
- In the field for Base interpreter (2), ensure that you select the version of Python that you downloaded and installed. It’s possible to have more than one version of Python installed on your machine. This is useful if you are working on different projects for clients as you can set the version when you create a new project.
- When you first open the New Project window, the Create a main.py welcome script tickbox (3) will be ticked. We don’t require a default main.py script and therefore you should untick it.
- Once the project settings have been entered, click on the Create button.
- As shown in Figure 1.4, after PyCharm opens the new project window, it will display a column on the left with the folder structure (1). By clicking on Python Packages at the bottom of the window (2), a new section will be revealed where you can search and install packages. In the search section (3), type Pygame. This will bring up a list of packages below the search area. Select the one at the top that says Pygame, and then on the right, click the Install button (4). Once Pygame has been installed, you can close the packages section (5).
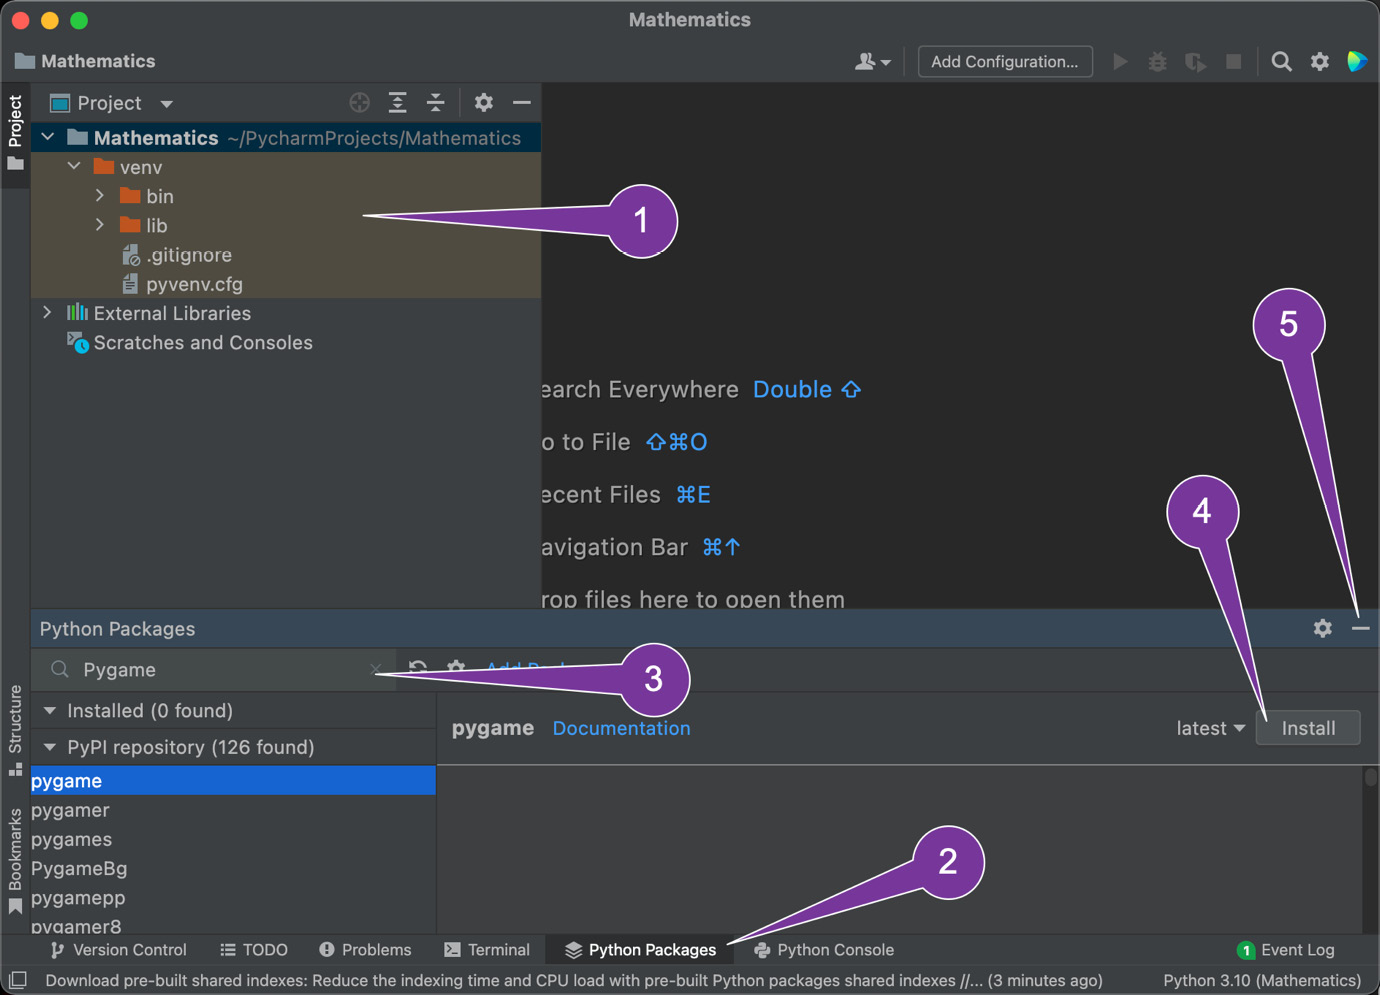
Figure 1.4: The PyCharm interface and package installation window
Python, PyCharm, and Pygame are now set up, and you are ready to create your first graphics window.
For those new to Python
If you are new to Python but not programming, it is a straightforward language to pick up. To get up to speed quickly, any newbies are encouraged to read over the beginner’s documentation at https://wiki.python.org/moin/BeginnersGuide.
Creating a Basic Graphics Window
It’s time to create your first basic graphics window in PyCharm. To do this, perform the following steps:
- Right-click on the project folder (1), as shown in Figure 1.5.

Figure 1.5: Creating a new Python script file (steps 1-5)
- Select New > Python File (2).
- In the popup window, enter the name of your new Python script (3). In this case, it will be HelloWindow.py. There’s no need to add the .py suffix as PyCharm will add this for you. Hit the Enter/Return key.
- Once the file has been created, you will see it in the Project section of PyCharm (4).
- The file will also be open and displayed on the left as a tab title (5). The window below the tab is where you will type in your code as follows:
import pygame
pygame.init()
screen_width = 1000
screen_height = 800
screen = pygame.display.set_mode((screen_width,
screen_height))
The preceding code imports the Pygame library, so you can access the methods provided by Pygame to set up graphics windows and display images. The specific method used in this case is set_mode(), which creates and returns a display surface object.
Tool tip
There are no semi-colons at the end of lines in Python. Although, if you accidentally use one because it’s second nature to you as a programmer, then it’s very forgiving and ignores them.
The editor will also insist on variables and methods being written in snake_case (www.codingem.com/what-is-snake-case/) where separate works are joined by a delimiter, such as an underscore. You can see this format in the previous code in the variable named screen_width.
When complete, the window will look like Figure 1.6.
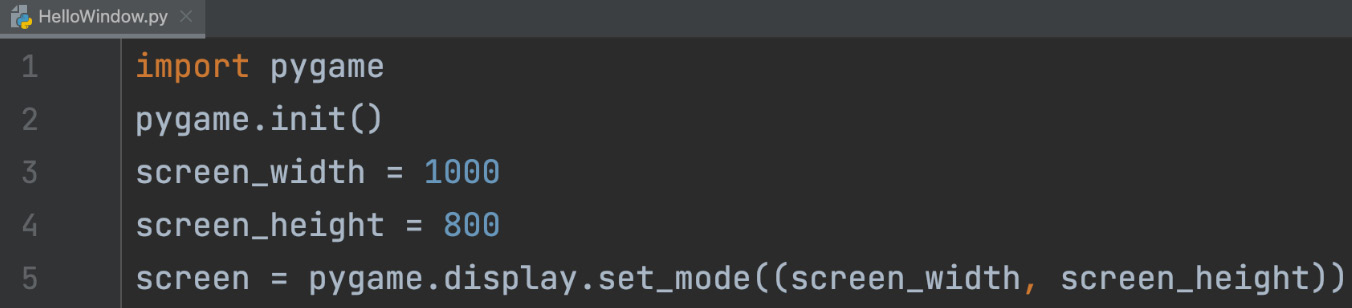
Figure 1.6: Code entered into PyCharm to generate a basic graphics window
It is not the aim of this book to teach you Python or the ins and outs of the Pygame library as we want to focus on mathematics; however, short explanations will be given as we add new features. In this case, the first line ensures that the functionality of the Pygame package is included with the code, which allows us to use the methods embedded inside Pygame. Next, we initialize the Pygame environment on line 2. Finally, we create a screen (a graphics window or surface also known as a display). The width of this window is 1,000 pixels by 800 pixels in height.
If you are unsure of what the parameters of a method are, simply mouse over/hover your cursor the method and PyCharm will pop open a hint box with more information about the method.
- The code can now be run. To do this, right-click on the HelloWindow.py filename in the Project window and then select Run ‘HelloWindow’, as shown in Figure 1.7:

Figure 1.7: Running code for the first time
If you’ve typed in the code correctly, a window with dimensions of 1,000 x 800 will pop open and then immediately close. It might be too fast to see, so try running it again. You will know the program has been completed without error as the console now visible at the bottom of the PyCharm window will display an exit code of 0, as shown in Figure 1.8:

Figure 1.8: When a program runs without error, it will return an exit code of 0
Note that once you’ve run code for the first time, it becomes available as a run option in the top toolbar and can be easily run again using the green play button at the top of the PyCharm window. Ensure that the filename next to the button is the one you want to run, as shown in Figure 1.9:

Figure 1.9: Running the previous code again
- In its current state, the graphics window isn’t much help to us if it won’t stay open. Therefore, we need to force it to stay open. You see that as the code executes line by line, once it reaches the end, the compiler considers the program to be finished. All graphics windows need to be forced to stay open with an endless loop that runs until a specific condition is reached. Game engines inherently have this built in and call it the main game loop. As you will discover in Chapter 6, Updating and Drawing the Graphics Environment, the main loop is the heartbeat of all graphics programs. In this case, we must create our own. To do this, modify the code by adding the highlighted text to your program as follows:
import pygame
pygame.init()
screen_width = 1000
screen_height = 800
screen = pygame.display.set_mode((screen_width,
screen_height))
done = False
while not done:
for event in pygame.event.get():
if event.type == pygame.QUIT:
done = True
pygame.display.update()
pygame.quit()
Tool tip
Instead of relying on braces, for example, ‘{‘ and ‘}’ to segment code blocks, Python relies on indentation, and at the end of a line with a Boolean expression, you will always find a full colon (:).
You’ve just created an endless loop that will keep running until the window is manually closed by the user. The done variable is initially set to false, and only when it becomes true can the loop end. pygame.event.get() returns a list of events the window has received since the last loop. These can be keystrokes, mouse movements, or any other user input. In this case, we are looking for pygame.QUIT to have occurred. This event is signaled by the attempted closing of the window. The final pygame.quit() method safely closes down all Pygame processes before the window closes.
- Run the program again. This time, the graphics window will stay open. It can be closed using the regular window closing icons that appear on the top bar of the window (on the left in Mac OS and on the right in Windows).
- Because code will be reused and updated from chapter to chapter, the best way to organize it all would be to place all the code for a chapter into its own folder. So, let’s create a folder for Chapter One. To do this, right-click on the Mathematics project folder at the top and then select New > Directory, as shown in Figure 1.10. Name the folder Chapter_One.
- Drag and drop HelloWindow.py into the new folder. PyCharm will ask you to refactor the code and it’s fine to go ahead and do so. You can now keep all the code from any chapter in one place even when the same script names are used.

Figure 1.10: Creating a new directory inside PyCharm
And that’s it. Your first basic graphics window. Keep a copy of this code handy as you will need to use it as the basis of all projects from this point forward. Whenever we ask you to create a new Python file in PyCharm, this code will be the jumping-off point.
Hints
To further help you with creating a window, consider the following points:
- If you haven’t used Python before but are familiar with other programming languages, the absence of brackets and braces for the sectioning of code will feel a little odd at first. Instead of brackets, Python uses indentation. You can read more about this at www.geeksforgeeks.org/indentation-in-python/.
- Python does not need semicolons at the end of lines.
- Whenever you encounter methods or properties used in the code that you are unfamiliar with, it is a good exercise for your own independent learning to investigate these in the Python and Pygame API listings as follows:
- For Pygame, see www.pygame.org/docs/genindex.html.
- For Python, see docs.python.org/3/library/index.html.
- As you may have noticed as you were typing out the code, Python can be fussier than other programming languages when it comes to formatting and syntax. PyCharm will give you suggestions for most formatting issues by showing warning symbols at the end of problem lines or drawing a rippled line under methods and variables. A right-click on these will reveal suggestions for fixes. For a more extensive list, however, see www.python.org/dev/peps/pep-0008/.
This section has been a whirlwind of an introduction to opening a basic graphics window. Knowing how to achieve this is fundamental to the exercises in the remainder of this book or the start of your own graphics or game projects, as it is the key mechanic that supports all these types of applications. In the next section, we will expand on your knowledge of the graphics window by exploring its coordinates and layout.
Working with Window and Cartesian Coordinates
Remember drawing an x- and y-axis on paper in school and then plotting a point based on its x and y value? This was the beginning of your journey into the Cartesian coordinate system. You likely use it every day to locate positions on maps, in drawings, or on your computer screen. Fundamentally, it is a way of uniquely representing a location with a single value on a line, a pair of numerical coordinates on a plane (2D), or with a triplet of values in 3D. In fact, Cartesian coordinates even extend into four, five, and upward dimensions, though they aren’t relevant here.
The axes of the system have evenly spaced measurements, much like a ruler, and are used to determine where a location made up of coordinates is placed. For example, in one dimension there is only one axis, and going with popular convention, we will call this x. To plot x = 5 is to locate the value of 5 on the axis and place a point there. In two dimensions with the axes, x and y, and the coordinate (2, 3) where x is the first value and y is the latter, a point is placed where these values intersect. These examples are illustrated in Figure 1.11.

Figure 1.11: Cartesian plots of x = 5 in one dimension (a) and (2,3) in two dimensions (b)
The majority (if not all) of graphics applications work in two and three dimensions and as such we will reduce our discussion in this book to those with most applications in 3D. While the computer screen is 2D, it is also used to fake 3D; however, the mathematics applied still occurs within 3D calculations with the x-, y-, and z- axes. In working with graphics, we must therefore be aware of different ways of viewing Cartesian coordinates. In the next exercise, we will show the plotting of points in 2D and how Cartesian coordinates work in graphics.
Let’s do it…
To create a window with some plotted points defined by Cartesian coordinates, we perform the following steps:
- Create a new Python script called PlotPixel.py and add the following code (the differences between HelloWindow.py and this script are shown in bold):
import pygame
pygame.init()
screen_width = 1000
screen_height = 800
screen = pygame.display.set_mode((screen_width,
screen_height))
done = False
white = pygame.Color(255,255,255)
while not done:
for event in pygame.event.get():
if event.type == pygame.QUIT:
done = True
screen.set_at((100, 100),white)
pygame.display.update()
pygame.quit()
- The set_at() method will plot a single pixel point in the color of your choosing; in this case, the pixel will be white at the coordinates x = 100, and y = 100. To see this in action, run the script. Remember that you will need to right-click on the filename in the Project window and select Run before you’ll be able to run it from the little green icon at the top-right of the window. Now, try plotting another point at (200, 200). You can do this with a second set_at() call, for example, as follows:
screen.set_at((200, 200),white)
The resulting screen image is shown in Figure 1.12 (note that the pixel locations have been enhanced with white squares so you can see them in print).
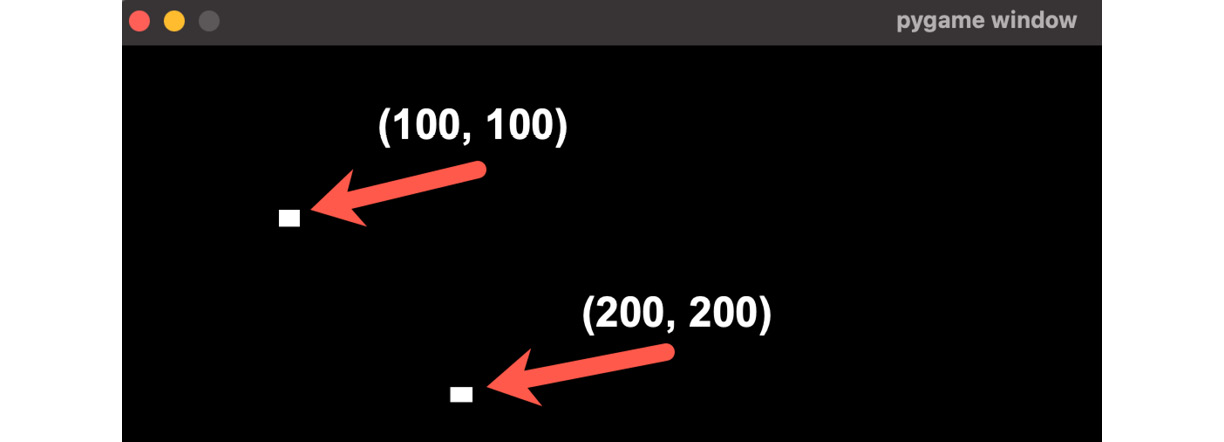
Figure 1.12: Pixel locations when plotted in a default window
What did you notice about the location of the pixels? Based on their position, where would you conclude the origin (0,0) of the window to be?
If you said the upper-left corner of the window, you would be correct. We all learn in school that the positive Cartesian coordinate system runs for positive x values to the right along the page and for positive y values up the page. However, in computer graphics, this isn’t true, and the coordinate systems will follow different conventions depending on the platform and tools. In this case, the x coordinates run as you would expect but the y values are inverted with positive y values going down the page.
Why? Because early graphics displays used physical, electron scan lines beginning in the upper-left corner of the display, scanning across, and then down. It doesn’t need to be like this anymore, but it just is.
Most game engines transform these coordinates so that the y-axis faces up.
However, as the astute computer graphics programmer that you are, it’s always best to figure out which way is up according to the coordinate system you are working with, either through the documentation or by running a few experiments of your own.
- If you would prefer the origin of the coordinate system to be shown in the lower left-hand corner, then you can modify the coordinates with a simple method as follows:
import pygame
pygame.init()
screen_width = 1000
screen_height = 800
screen = pygame.display.set_mode((screen_width,
screen_height))
done = False
white = pygame.Color(255, 255, 255)
def to_pygame_coordinates (display, x, y):
return x, display.get_height() - y
while not done:
for event in pygame.event.get():
if event.type == pygame.QUIT:
done = True
screen.set_at(to_pygame_coordinates
(screen, 100,100),
white)
screen.set_at(to_pygame_coordinates
(screen, 200,200),
white)
pygame.display.update()
pygame.quit()
In the preceding code, the new to_pygame_coordinates() method flips the y coordinate based on the screen height and returns a new set of (x, y) values for plotting the pixel basing the origin of the screen in the lower-left corner of the window. Though, after you’ve worked with graphics for a while, you’ll get used to the upper-left origin and as such we will assume the origin of the coordinates (0,0) to be the upper-left of the graphics window, unless stated otherwise.
Drawing rectangles
In the preceding figure, we used rectangles to enhance the size of the pixels to make them visible. To draw a point in a location in the window that is larger than a single pixel, we can draw a small rectangle or square instead. To do this, the code is as follows:
import pygame
pygame.init()
screen_width = 1000
screen_height = 800
screen = pygame.display.set_mode((screen_width, screen_height))
done = False
white = pygame.Color(255, 255, 255)
def to_pygame_coordinates(display, x, y):
return x, display.get_height() - y
while not done:
for event in pygame.event.get():
if event.type == pygame.QUIT:
done = True
position = to_pygame_coordinates
(screen, 100, 100)
pygame.draw.rect(screen, white,
(position[0],position[1],
10, 10))
pygame.display.update()
pygame.quit()
The definition of pygame.draw.rect can be found at https://www.pygame.org/docs/ref/draw.html#pygame.draw.rect. In short, a rectangle requires a screen, color, a starting location (identified by position in the code), and a width and height (we are using 10 in this example).
This task has shown you how to work with a window and the coordinates used within it. It’s a valuable skill as pixel-by-pixel is how every graphics application is written. It’s the nature of the display devices we use.
Your Turn…
Note
After most code-along exercises in the Let’s do it… sections of this book, you will find a section like this that encourages you to apply the skills you’ve learned thus far. The answers to these exercises can be found at the end of the chapter.
Exercise A.
Find an image of the constellation representing the Leo star sign and draw those series of stars on the screen. An example of its layout is shown in Figure 1.13. Notice that we have also included a size factor for each star based on its relative brightness, where we used rectangles of different sizes to draw each one.

Figure 1.13: The constellation of Leo
When you have completed this and reviewed the answer at the end of the chapter, why not try and recreate your own star sign?
Summary
You are now an expert at opening graphics windows and have new-found skills at plotting pixels in that window using Cartesian coordinates. This skill is the essential underpinning of everything that gets drawn on a computer screen; it’s through the understanding of mathematics that you will gain throughout this book that you will be able to expand that single pixel into a world of complex 3D structures, colors, and animations. Some of these basic graphics primitives will be explored in the following chapter.
Answers
Exercise A:
import pygame
pygame.init()
screen_width = 900
screen_height = 500
screen = pygame.display.set_mode((screen_width, screen_height))
done = False
white = pygame.Color(255, 255, 255)
def draw_star(x, y, size):
  pygame.draw.rect(screen, white, (x, y, size, size))
while not done:
  for event in pygame.event.get():
    if event.type == pygame.QUIT:
      done = True
  draw_star (121, 320, 15)
  draw_star (327, 324, 15)
  draw_star (691, 431, 20)
  draw_star (697, 317, 10)
  draw_star (626, 246, 30)
  draw_star (343, 212, 10)
  draw_star (653, 165, 10)
  draw_star (773, 102, 10)
  draw_star (822, 153, 10)
  pygame.display.update()
pygame.quit()