
Chapter 10: Adding Lighting and Atmospheric Visual Effects in UE5
In the previous chapter, you learned how to build your own virtual 3D movie set of an alien planet's surface.
In this chapter, we will take the 3D movie set that you made in Chapter 9, Building a Virtual 3D Movie Set in UE5, and go through the step-by-step process of lighting and adding various atmospheric visual effects to it.
Lighting is a really important aspect of any scene. It can make or break a 3D movie set since lighting contributes so much in terms of the overall atmosphere and the viewer's emotional response to the environment.
Atmospheric effects such as Fog, Lens Flares, Light Bloom, and Light Shafts can also help to add a lot of mood to a 3D movie set, similar to how weather can influence your emotions in a traditional movie scene.
This tutorial is aimed at beginner-level UE users. I will focus on lighting and atmospheric visual effect for the 3D movie set by using the most basic settings and techniques. While it is certainly possible to create much more detailed and realistic lighting and atmospheric effects in UE5 (using more advanced features), that is beyond the scope of this tutorial.
In this chapter, we're going to cover the following main topics:
- The fundamentals of lighting in 3D graphics
- Using Lumen in your UE5 projects
- Lighting your 3D movie set
- Adding atmospheric visual effects
By the end of this chapter, you will know how to light and add atmospheric effects to your own custom 3D movie sets. Let's get started!
Technical requirements
To complete this chapter, you must have UE5 installed. Even if your version of UE is newer, the examples should still work without any problems. You will need the following to complete this chapter:
- A computer that can run basic 3D animation software.
- Unreal Engine 5.0.1. You can download it from https://www.unrealengine.com/en-US/download.
- You must have completed Chapter 6, Exploring Unreal Engine 5, to understand the basics of UE5's UI.
We will start this chapter's tutorial with an introduction to lighting fundamentals in 3D graphics. Then, we will go over five of the light types that are available in UE5.
The fundamentals of lighting in 3D graphics
To begin, let's start with the fundamentals of what lighting is in 3D computer graphics.
What is lighting in 3D graphics? It is the use of computer graphic techniques to simulate real-world lights inside a virtual 3D world.
What do we mean when we say we are lighting a scene? Lighting is the act of creating, placing, and editing lights in your scene to create the mood or visual style that you are after.
Lighting helps to convey a story in an image or movie. Lighting can be used to separate your subject, foreground, and background elements in a scene. The lighting in 3D movies can also be animated, which opens up new possibilities. For example, you could use animated lights to change the focus from one subject to another in a 3D movie.
Realistic and stylized lighting
Lighting can be realistic or stylized. Think of all the stylized lighting examples in the 3D animated movies from Pixar or DreamWorks, where style and mood are much more important than simply adhering to what real-world lighting looks like. This method of lighting is widely used in the 3D movie, film, and TV show production industry.
When the aim is realistic lighting, we can use new features in UE5, such as Lumen, for real-time Global Illumination (GI), to achieve this goal. We will cover Lumen in the next section.
Even when your scene is supposed to be photorealistic, you can still use additional custom lights to achieve the look that you are after.
You can mix GI and custom lighting whenever you want to. For example, just think of all the Hollywood movies or photography studio photoshoots where they use custom lighting for their real-world sets and actors.
The following screenshot shows an example of how I have used lighting and atmospheric visual effects to add mood to the scene. This helps to convey the story of an alien world.
In the following screenshot, in the top image, the scene has been lit by the default lighting, but it looks very plain, while in the bottom image, the same scene has been lit with custom lighting and I have added atmospheric visual effects to it:
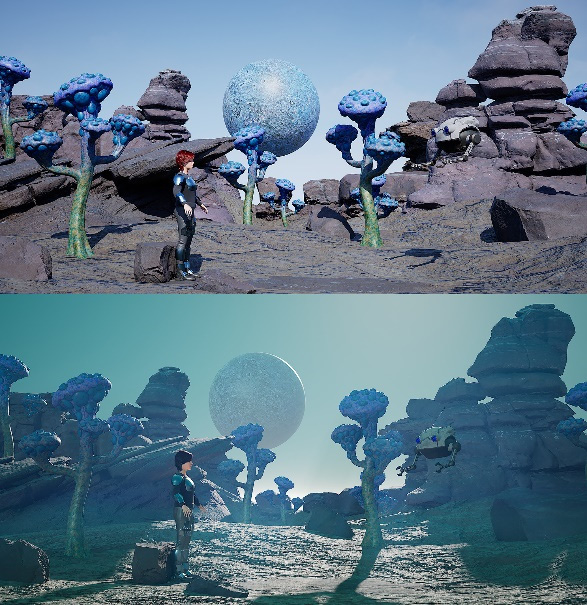
Figure 10.1 – (Top) The scene with the default lighting and no effects; (Bottom) The scene with custom lighting and atmospheric visual effects added
You've just learned about the fundamentals of lighting and how it is used in 3D graphics. In the next section, we will explore the three traditional lighting techniques.
The three traditional lighting techniques
Three traditional lighting techniques are commonly used in 3D animated movies, films, TV, photography, fine art paintings, and stage performances. These are Key light, Fill light, and Rim light.
When you want to use any of these three lighting techniques, you need to create custom lights in your scene. You can use any of the following light types in UE5 for your lighting techniques: Directional light, Point light, Spot light, and Rect light. We will cover these light types in the next section.
You can use these traditional lighting techniques in combination with realistic lighting methods, such as Lumen, or you can use them by themselves.
Let's go over these three traditional lighting techniques now.
Key light
The Key light is your main light source. All the other lights are complementary to the Key light. Generally, this light will be pointing at your subject. The following screenshot shows a model of a monkey head (this model is the Suzanne Monkey head model that is available inside Blender). The model is lit with a single Key light (the light type is a Directional light):
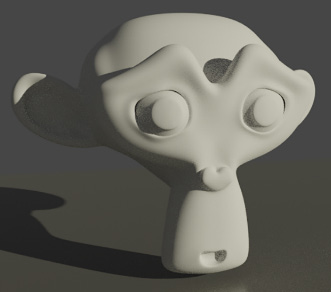
Figure 10.2 – Using a Key light
Fill light
The Fill light is a light that fills in or brightens up shadowed areas. It represents the bounced (indirect) light in your scene. It is used to soften the contrast of the Key light. If your Key light is colored, then the Fill light will usually also be colored (with a complementary color to the Key light).
Another type of Fill light is ambient light. This is a natural light that fills the scene from all angles, such as the lighting of an overcast sky. In Figure 10.3, part B, you can see the Suzanne Monkey head model that is lit with a Fill light, plus a Key light (the light types that are being used here are Directional lights):
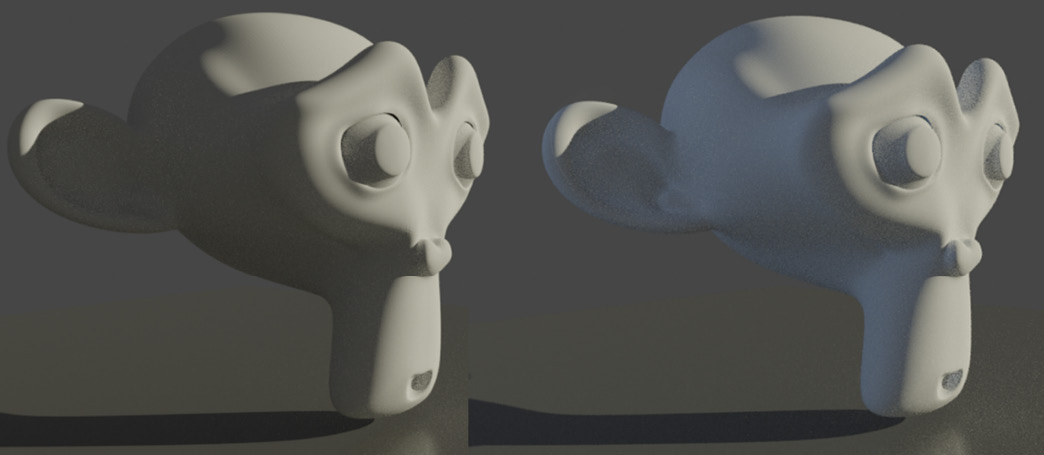
Figure 10.3 – (A) The model is lit with a Key light; (B) The model is lit with a Fill light plus a Key light
Let's move one to the next lighting technique, Rim light.
Rim light
Rim lights are used to separate the subject from the background. Rim lights are usually more intense than your Key or Fill lights, and they create sharper transitions from the lit to the unlit areas on the model's surfaces.
In Figure 10.4, part A, you can see the model that is lit with a Key light plus a Fill light. In Figure 10.4, part B, the model is lit with a Key light, a Fill light, and a Rim light:
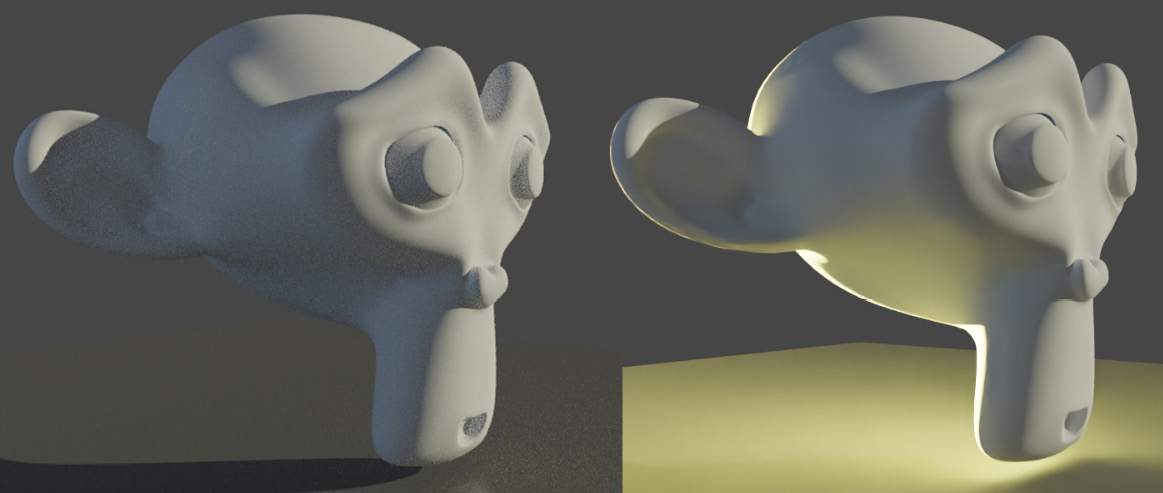
Figure 10.4 – (A) The model is lit with a Fill light and a Key light; (B) The model is lit with a Fill light, a Key light, and a Rim light
You've just learned about the three basic lighting techniques that are used in 3D graphics to add custom lighting to your scene.
In the next section, we will go over the light types (light sources) that can be used in UE5.
Types of light sources in UE5
There are a few light types that are available in UE5. In Figure 10.5, you can see that I have highlighted the five light types that we will discuss in this section.
To add any of these light types to your scene, in the toolbar, click on the create icon (the icon of a cube with a + sign). This icon is highlighted near the top of Figure 10.5.
In the drop-down menu that opens, navigate to Lights and then select any of the light types that you want to add:
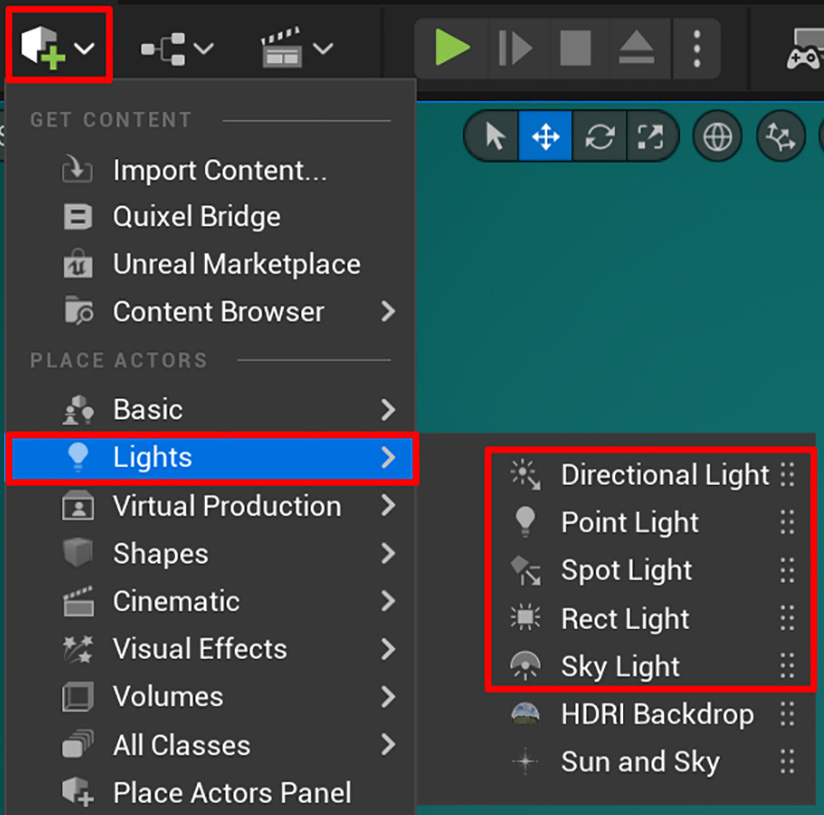
Figure 10.5 – The light types that are available in the Lights menu highlighted on the right-hand side
Now that you know how to find the Lights menu, I will go through the five types of lights that are highlighted in the preceding screenshot:
- Directional light: This kind of light source simulates light that is being emitted from infinitely far away. The light rays from this light source are parallel to each other. The Sun is an example of this kind of light. You can read more about Directional lights by going to the official UE5 documentation, here: https://docs.unrealengine.com/4.27/en-US/BuildingWorlds/LightingAndShadows/LightTypes/Directional/.
- Point light: This is a light source that emits light rays in all directions. An electric light bulb is an example of this kind of light. You can read more about Point lights by going to the official UE5 documentation, here: https://docs.unrealengine.com/4.27/en-US/BuildingWorlds/LightingAndShadows/LightTypes/Point/.
- Spot light: This is a light source with light rays being emitted from a single point. The light forms a cone shape. This kind of light has two cone angles – an inner cone angle and an outer cone angle. The inner cone angle has full brightness. The brightness of the light falls off toward the edge of the outer cone angle. A handheld torch is an example of this kind of light. You can read more about Spot lights by going to the official UE5 documentation, here: https://docs.unrealengine.com/4.27/en-US/BuildingWorlds/LightingAndShadows/LightTypes/Spot/.
- Rect light (short for rectangular light): This kind of light is emitted from a rectangular plane. The Rect light has a source width and a source height setting (Y and Z axes). Computer monitors and television screens are examples of this kind of light. You can read more about Rect Lights by going to the official UE5 documentation, here: https://docs.unrealengine.com/4.27/en-US/BuildingWorlds/LightingAndShadows/LightTypes/RectLights/.
- Sky light: This light captures distant parts of your scene and then uses that captured result as a light source. When real-time capture is enabled for this light, the Sky light will update automatically as you move lights in your scene. You can read more about Sky Lights by going to the official UE5 documentation, here: https://docs.unrealengine.com/4.27/en-US/BuildingWorlds/LightingAndShadows/LightTypes/SkyLight/.
You've just learned about the five types of lights that you can use to light your 3D movie sets. You've also learned how to add any of these lights to your scene in UE5.
In the next section, we will briefly explore Lumen, a lighting system that will help you to create amazing lighting in UE5.
Using Lumen in your UE5 projects
Lumen is a Global Illumination (GI) lighting system that's built into UE5. Lumen is already activated for all new UE5 projects.
Lumen provides realistic and dynamic real-time indirect lighting (bounced lighting) in your scene. It does all of these GI lighting calculations without the need for lots of tweaking to get great results. Most of the heavy lifting of the GI calculations is done under the hood, so to speak.
But if you need manual control over the final gather and reflection quality, you can increase the sample counts of these by visiting the Post Process Volume settings in the Details panel.
Lumen uses software ray tracing by default but can achieve higher quality when hardware ray tracing is enabled.
Note
For hardware ray tracing, you will need a supported video card (such as an Nvidia RTX Series video card).
Things to keep in mind when using Lumen
You need to keep the following in mind while using Lumen:
- Lumen's software ray tracing currently only works on static meshes, instanced static meshes, hierarchical instanced static meshes, and landscape terrain. If you want to use Lumen with skeletal meshes, you will need to have Hardware Ray Tracing enabled.
- Avoid an Albedo value of pure white or pure black. This is because Lumen uses GI to calculate how much light will bounce off a material. In the real world, there are no pure white or pure black materials, so it will cause unrealistic results if your materials are using an Albedo value of pure white or black.
- Transparent materials are ignored in Lumen while masked materials are treated as opaque.
- Emissive materials on surfaces contribute to the GI calculation. Keep the size of the emissive surfaces large and relatively dim. Small and very bright emissive surfaces are problematic.
- The maximum range of the Lumen's GI solution is up to 200 meters away from the camera.
- Lumen works much faster with Nanite-enabled meshes. Change all your static meshes so that they use the Nanite system.
You can read more about Lumen here: https://docs.unrealengine.com/5.0/en-US/lumen-global-illumination-and-reflections-in-unreal-engine/.
You can read about Lumen's technical details and limitations here: https://docs.unrealengine.com/5.0/en-US/lumen-technical-details-in-unreal-engine/.
For this tutorial, we will be using Lumen (Lumen's settings have been set to their defaults).
Because we want to have creative control of the lighting in our scene, we will combine our realistic Lumen GI lighting with some of the traditional lighting techniques.
You've just learned about Lumen, its limitations, and some useful tips to remember when using Lumen in your projects. You also know that it's already being used in your project without you needing to change anything.
In the next section, we will start this chapter's practical tutorial. The first thing you need to do is prepare your project. Let's get started.
Preparing your project
To start this tutorial, load the project you created in Chapter 9, Building a Virtual 3D Movie Set in UE5. We will continue this chapter's tutorial by using this project.
Select Atmospheric Fog and Sky Sphere in the World Outliner panel and then press the Delete key to delete these two items from your scene. As soon as they are deleted, the sky in your 3D movie set will turn completely dark (since we deleted the Sky Sphere asset). Don't worry – this is all part of the steps in this tutorial.
The reason we've deleted the Atmospheric Fog asset is that, later, we will replace it with a more advanced type of fog: Exponential Height Fog.
The reason we've deleted the Sky Sphere is that we will use the Sky Atmosphere system instead.
Your World Outliner panel should now only list the following assets: multiple Rock assets, ForeGround, BackGround, multiple AlienPlant static meshes, Planet1, SciFiGirl, 16 armor pieces, RobotDrone, Light Source, PostProcessVolume, and SkyLight.
You've just completed the initial preparation stage for this tutorial by deleting the items from the scene that you won't need.
In the next section, we will learn how to add and adjust the Sky Atmosphere system for your 3D movie set.
Adding a Sky Atmosphere system
The Sky Atmosphere system is a physically-based sky and atmosphere-rendering technique inside of UE5.
With this system, you can create realistic Earth-like or alien-like atmospheres with adjustable time-of-day settings. This allows you to create many different lighting scenarios, such as midday, sunset, or sunrise. One of the unique features of the Sky Atmosphere system is that it approximates the scattering of light through the atmosphere to simulate atmospheric density.
You can read more about the Sky Atmosphere system here: https://docs.unrealengine.com/5.0/en-US/sky-atmosphere-component-in-unreal-engine/.
Let's add a Sky Atmosphere system to your scene:
- In the toolbar, click on the Create icon. Then, navigate to Visual Effects | Sky Atmosphere. Click on Sky Atmosphere to add it to your scene, as shown in the following screenshot:
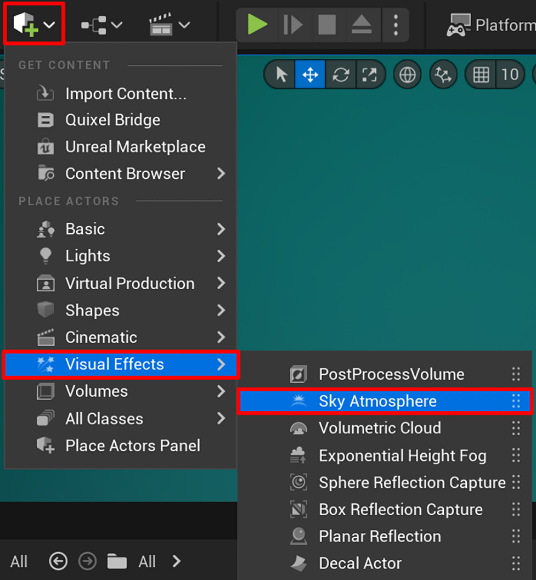
Figure 10.6 – Adding a Sky Atmosphere to your scene
- Take a look inside your Viewport – you will see that your scene now has a clear blue sky with a horizon level. In the World Outliner panel, you will now see that Sky Atmosphere has been added to it. Now, let's go through the process of customizing the Sky Atmosphere system for your 3D movie set.
- Select Sky Atmosphere in the World Outliner panel. In the Details panel, navigate to Planet | Ground Radius. Change Ground Radius to 1. This will move the horizon line downwards. The sky will now be a more uniform blue color.
- In the Details panel, navigate to Atmosphere | MultiScattering and change MultiScattering to 2.
- In the Details panel, navigate to Atmosphere - Rayleigh | Rayleigh Scattering and click on the color bar. In the Color Picker menu that opens, set R: 0.045, G: 0.41, and B: 0.43. Then, click on OK to close the Color Picker menu. This will change the color of your sky from a typical bluish sky color to a more alien-like turquoise color.
You have just learned how to add a Sky Atmosphere system to your scene, adjust the horizon level, and change the color of your sky.
In the next section, you will learn how to adjust the lighting that you currently have in your scene.
Lighting your 3D movie set
You are now ready to start the lighting process for your 3D movie set. You will begin by adjusting the light named Light Source that is already in your scene.
Here are some notes regarding Light Source:
- Light Source is included in every new UE5 project.
- This light type is a Directional light.
- The Sky Atmosphere system uses Light Source as the Sun in your scene.
- Light Source is the Key light in this tutorial.
Before we start creating and placing the lights, I want to give you a quick overview of how the lights will be placed in your 3D movie set.
Take a look at Figure 10.7. This diagram represents a top-down view of your 3D movie set and it acts as a reference guide for the light's placement in your scene. All the necessary steps to place these lights will be covered later in this tutorial.
Here, you can see how I've positioned two lights in the scene – Light Source (the Sun) and a Directional light:
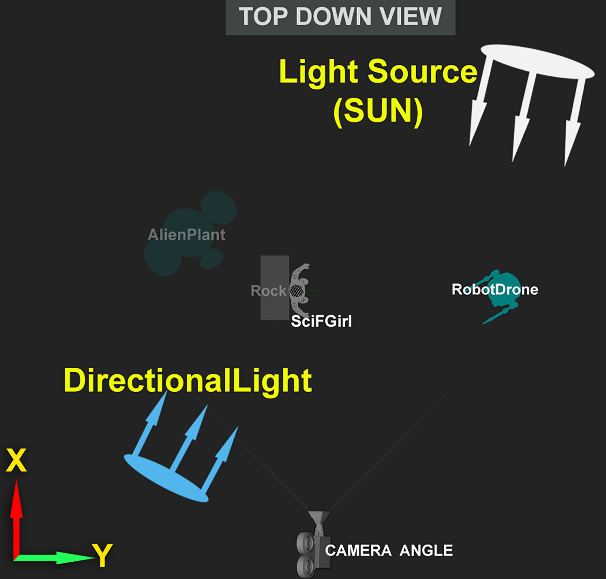
Figure 10.7 – Top-down view of the lighting placement in the 3D movie set
Note
The preceding diagram doesn't show you the placement of SkyLight (because the light from SkyLight represents the sky surrounding your 3D movie set).
You've just had an overview of the planned placement of your lights in the scene. In the next section, you will start to adjust your Key light – that is, Light Source.
Adjusting your Key light (Light Source)
Follow these steps to adjust Light Source:
- In the World Outliner panel, select Light Source. In the Details panel, navigate to the Transform section. (Use the axes shown in Figure 9.2 of Chapter 9, Building a Virtual 3D Movie Set in UE5, as a reference.)
- Set the Transform value for Light Source to the following:
- Location:
- X-Axis: 100,
- Y-Axis: -225
- Z-Axis: 600
- Rotation:
- X-Axis: 56
- Y-Axis: -21
- Z-Axis: -174
- Location:
- Set all three axes of Scale to 2.5. This setting will change the angle of your Sun so that it is now placed just above the rocks in your 3D movie set.
- In the Details panel, navigate to Transform | Mobility and make sure that Mobility is set to Movable.
- Now, let's adjust the brightness of Light Source. In the Details panel, navigate to Light | Intensity and set it to 5 lux.
- Let's change the size of the Sun (Light Source). This will help make the 3D movie set look more alien-like since the Sun will appear much larger than our Sun in the real world. In the World Outliner panel, select Light Source.
- In the Details panel, navigate to Light | Source Angle and set it to 3. By increasing the Source Angle value of Light Source, you have changed two important things in your scene:
- It scaled up your Sun (Light Source) to appear much larger in the sky.
- By scaling up the Source Angle view, your shadows now have soft edges. The shadows will be softer the further away they are from the shadow-casting object and shadows will be harder-edged the closer they are to the shadow-casting object.
- Now, let's adjust the Sun's (Light Source) light's color temperature, which is measured in Kelvin (K). In the Details panel, navigate to Light | Use Temperature and tick the checkbox to enable this feature.
- In the Details panel, navigate to Light | Temperature and set it to 5500. This number controls the light's color temperature. A lower number will give the light a warmer color, while a higher number will give it a cooler color.
- Now, let's adjust the indirect light (bounced light) in your scene. In the Details panel, navigate to Light | Indirect Lighting Intensity and set it to 12. This setting will brighten up the shadowed areas on the landscape and rock assets since this number makes the indirect lighting more intense.
- In the Details panel, navigate to Light | Volumetric Scattering Intensity and set it to 10000.
You've just learned how to adjust various settings to customize the look and light qualities of your Sun (Light Source). In the next section, you will learn how to adjust the SkyLight to lighten the shadows in your scene.
Adjusting your first Fill light (SkyLight)
You will notice that the shadowed areas in your scene are still quite dark at the moment, even though we increased the indirect lighting in the previous section.
One of the ways to lighten the shadow areas in your scene is to use the SkyLight. The SkyLight emits lighting from multiple directions, so your shadowed areas will receive more lighting (and thus appear brighter). The SkyLight is one of the two Fill lights that you will use in this tutorial.
Let's make some adjustments to this SkyLight:
- In the World Outliner panel, select SkyLight.
- In the Details panel, navigate to Transform | Mobility and make sure that Mobility is set to Movable.
- In the Details panel, navigate to Light | Real Time Capture and tick this checkbox to enable this feature. As soon as you've enabled Real Time Capture, your scene's shadow areas will become a bit lighter.
- In the Details panel, navigate to Light | Intensity Scale and set it to 6. You will now notice that all your previously dark shadowed areas have been lightened considerably. By adjusting the Intensity Scale value, you have increased the amount of light that your scene receives from the sky, and this lightened your shadows.
You've just learned how to use the SkyLight to lighten your shadow areas, and also know how to change this light so that it updates dynamically when the lighting in your scene is changed.
In the next section, you will learn how to add a new custom light source to your scene. This new light will be your second Fill light.
Adding a second Fill light (DirectionalLight)
Let's add a second Fill light to your scene. The light type to use for the Fill light is a Directional light.
Note
This new Directional light is not linked to your Sky Atmosphere system.
We will use this new Fill light to add a low intensity of blue light to the shadowed side of your scene. This light will be positioned on the opposite side of the Key light, as shown on the top-down map shown in Figure 10.7.
Let's create this new Fill light now:
- In the toolbar, click on the Create icon and navigate to Lights | Directional light. Click on Directional light to add this light to your scene, as shown in the following screenshot. The light from this Directional Light will immediately lighten your scene with intense white light:
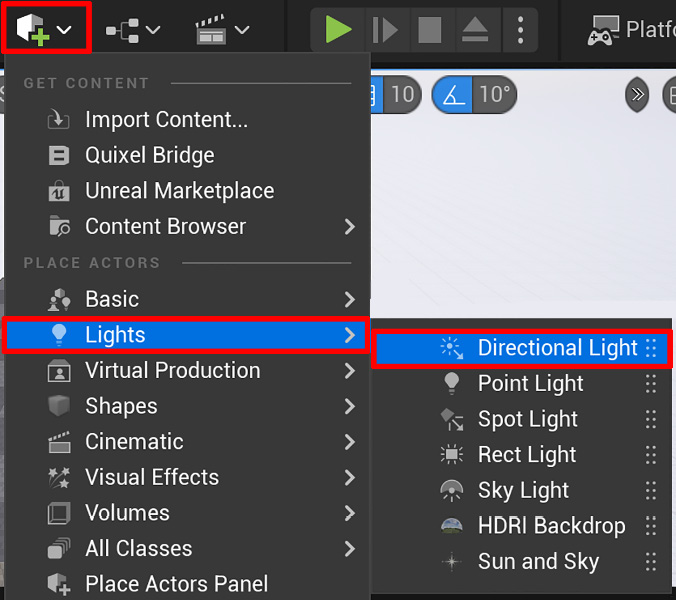
Figure 10.8 – Adding another Directional Light to your scene
- In the Details panel, navigate to Light | Intensity and set it to 0.8. You will notice that your Fill light (DirectionalLight) has been dimmed.
- Let's adjust the settings for this Directional light. In the World Outliner panel, select DirectionalLight. In the Details panel, navigate to the Transform section and change the Rotation value of Y-Axis to -18 and the Rotation value of Z-Axis to 25. Leave Location and Scale as-is.
- In the Details panel, navigate to Transform | Mobility and make sure that Mobility is set to Movable.
- In the Details panel, navigate to Light | Light Color and click on the white color bar to open the Color Picker menu. In this menu, change the following values: R: 0.25, G: 0.5, and B: 0.5. This will change your Fill light's color to a dark turquoise color. I chose this color because it fits better with the blue theme of your scene.
- In the Details panel, navigate to Light | Cast Shadow and uncheck the checkbox. We are removing the shadow casting function of this light because it is not a light that is supposed to be physically correct, since we are just using it to fill in the dark shadowed areas of your scene. Figure 10.9, part A shows the scene with the Fill light tuned off, while Figure 10.9, part B, shows the scene with the Fill light turned on:
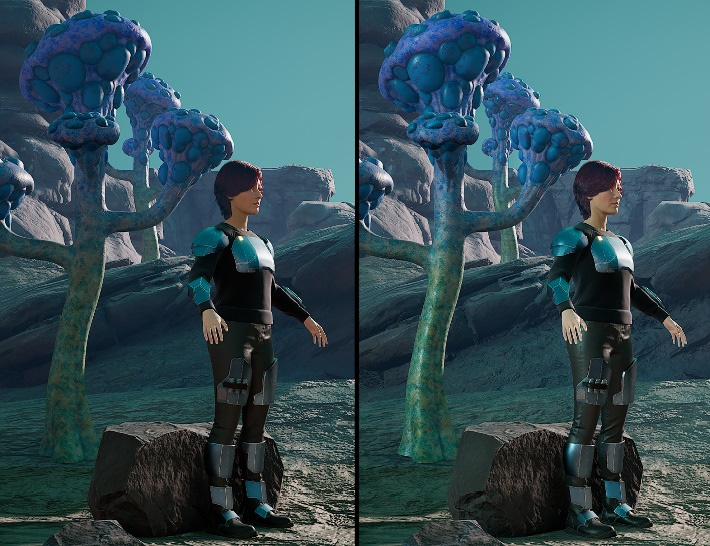
Figure 10.9 – (A) Without the Fill light; (B) With the Fill light turned on
The following screenshot shows the Key light and Fill light on the main subject (SciFiGirl):
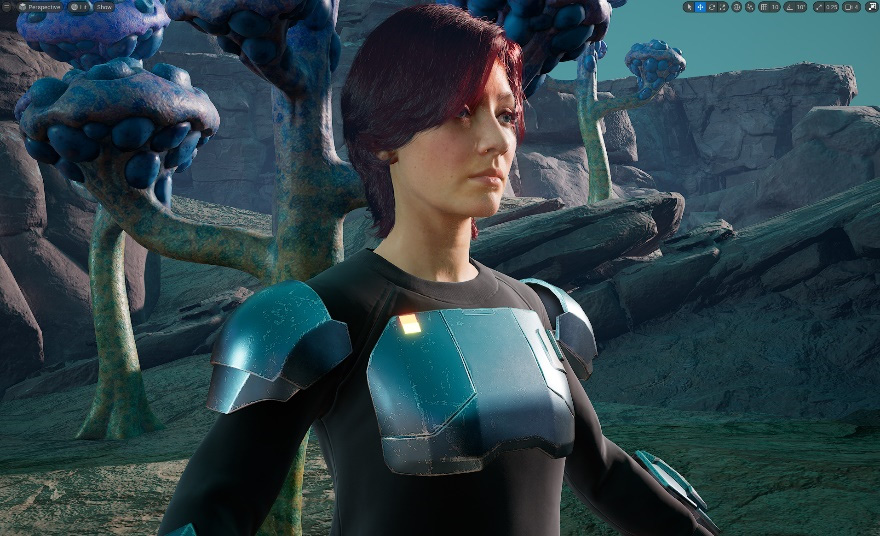
Figure 10.10 – Close up of SciFiGirl showing the Key light and Fill light on your subject
You have just learned how to add a new custom Fill light to your scene. The Light type for your additional Fill light is a Directional light, but you can use any of UE5's light types as a Fill light.
This concludes the lighting part of this tutorial. In the next section, we will explore the various atmospheric visual effects that you can utilize in your 3D movie set to give it that extra bit of atmosphere, mood, and polish.
Adding atmospheric visual effects
We will start this section by going through the process of adding fog to your scene.
Adding Fog
Fog in the world of 3D graphics is based on how fog appears to us in the real world. The most basic type of fog can be applied everywhere in the scene, but for this tutorial, I want to show you how to use a type of fog with a layered density, which is called Exponential Height Fog in UE5.
This is a type of fog that gets denser the closer it is to ground level, and gradually becomes less dense the further the fog is from ground level. This helps with the realism of the fog and also makes it look much more interesting.
You can read more about the individual settings inside Exponential Height Fog here: https://docs.unrealengine.com/5.0/en-US/exponential-height-fog-in-unreal-engine/.
Let's add Exponential Height Fog to your scene now:
- In the toolbar, click on the Create icon. Then, navigate to Visual Effects | Exponential Height Fog.
- Click on Exponential Height Fog to add it to your scene, as shown in the following screenshot. You will notice that your sky has suddenly turned very bright near the horizon level and that the landscape is also appearing lighter. This is because of the fog that has just been added to your scene:
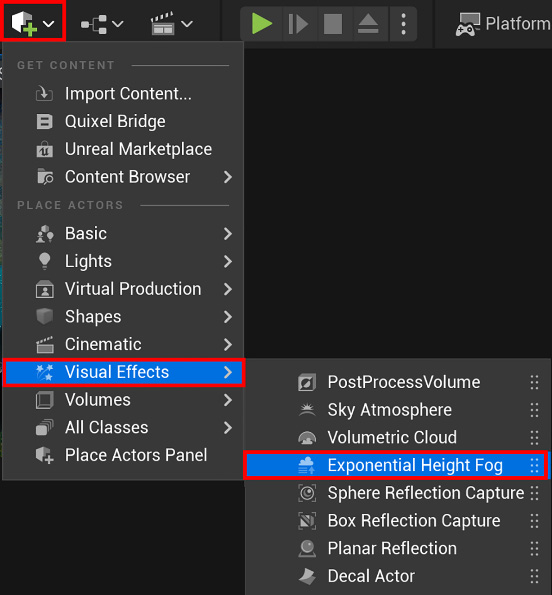
Figure 10.11 – Adding Exponential Height Fog to your scene
- In the World Outliner panel, select ExponentialHeightFog.
- In the Details panel, navigate to Transform | Mobility and make sure that Mobility is set to Stationary.
- In the Details panel, navigate to Exponential Height Fog Component | Fog Density and change it to 0.012. This will change the fog's density so it is slightly less dense. Your sky will also be slightly darker now.
- In the Details panel, navigate to Exponential Height Fog Component | Fog Height Falloff and change it to 2. This will change the Falloff range of the fog. The result of changing the Falloff range is that the fog will be denser around the horizon level, but gradually become thinner the further it is from the horizon level.
- In the Details panel, navigate to Directional Inscattering | Directional Inscattering Start Distance and change it to 5000.
You've now finished setting up Exponential Height Fog in your scene. We used a low-density setting for the fog so that the effect of the fog is very subtle.
This fog effect adds some atmospheric perspective to your scene to make it look more atmospheric.
Note
Atmospheric perspective is when faraway objects take on some of the colors of the atmospheric haze since you are seeing them through a volume of the atmosphere. Closer objects will have less atmospheric perspective. An example of atmospheric perspective in the real world is when you look at mountains that are far away in a landscape – these mountains will take on some light blue color from the sky.
In Figure 10.12, part A, you can see a view of the 3D movie set with Exponential Height Fog set to disabled.
In Figure 10.12, part B, you can see the same view, but this time Exponential Height Fog is enabled.
This is a good example of how fog can add atmospheric perspective to your scene:
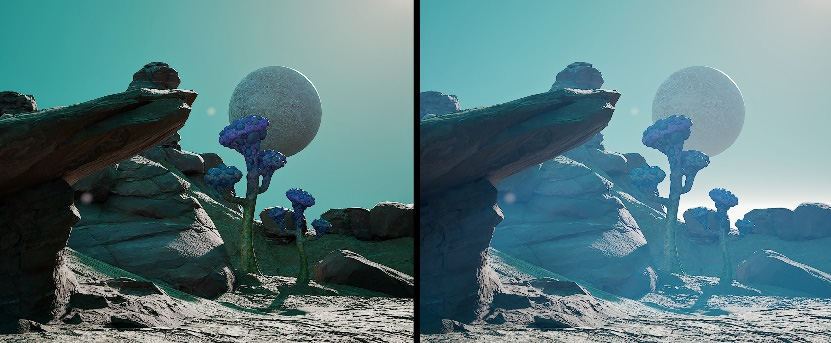
Figure10.12 – (A) Fog is disabled; (B) Fog is enabled
You've just learned how to add Exponential Height Fog and customize it. This fog helps build the overall mood of your 3D movie set.
In the next section, we will use a function that is inside Exponential Height Fog that allows you to create Light Shafts that will be shining through your fog.
Light Shafts
The Light Shafts are also commonly referred to as volumetric lights or God rays in 3D graphics, and they are created when rays of light are shining through a volume of fog. In Figure 10.13, you can see an example of Light Shafts that are visible in my scene.
To create Light Shafts, you need to use the Volume Fog function that is inside Exponential Height Fog. This will cause your Directional lights to create Light Shafts that will shine through the fog.
You can read more about Light Shafts here: https://docs.unrealengine.com/5.0/en-US/using-light-shafts-in-unreal-engine/.
Let's add Light Shafts to your 3D movie set:
- Select Exponential Height Fog. Then, in the Details panel, navigate to Volumetric Fog | Volumetric Fog and tick the checkbox to enable this feature. Your whole scene will now turn white but don't worry – we will fix this now.
- In the Details panel, navigate to Volumetric Fog | Scattering Distribution and change it to 0.22.
- In the Details panel, navigate to Volumetric Fog | Albedo and click on the white color bar to open the Color Picker menu. In this menu, change the following values: R: 0.168 G: 0.558, and B: 1. This will change the fog so that it's slightly blue, although you won't be able to notice this yet.
- In the Details panel, navigate to Volumetric Fog | Extinction Scale and change it to 0.065. This will make the fog a lot less dense. Now, you will notice the blue tint in the fog's color that you assigned in the preceding step.
- In the Details panel, navigate to Volumetric Fog | View Distance and change it to 1000. Now, your fog will look much more realistic because it is less dense the closer it is to your point of view.
- Now, let's add a function called Light Shaft Occlusion that creates volumetric shadows inside the volumetric fog. Light Shaft Occlusion adds shadows that are created when objects occlude Directional lights inside a volume of fog.
- In the World Outliner panel, select Light Source (the Sun).
- In the Details panel, navigate to Light Shafts | Light Shaft Occlusion. Tick the checkbox for Light Shaft Occlusion. You will notice that there are now shadow areas (volumetric shadows) behind objects that occlude the Sun's light. This effect is very subtle, so to notice it, you need to pan your view from side to side. The following screenshot shows that there is a volumetric shadow behind the Alien Plant:
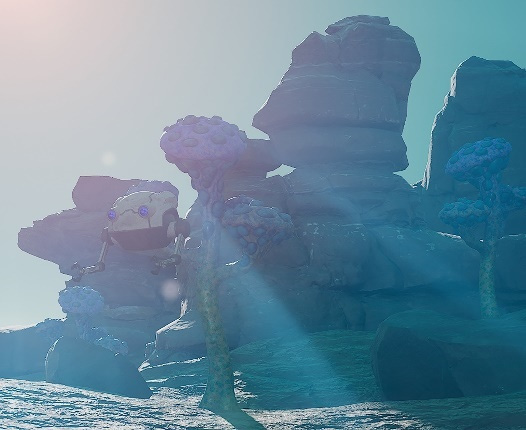
Figure 10.13 – Light Shafts with Light Shaft Occlusion are now visible in your scene
You have just learned how to add Light Shafts and Light Shaft Occlusion to your scene by changing the settings in Exponential Height Fog and Light Source.
In the next section, you will add the final polish to your 3D movie set, which will be to add Light Bloom, Lens Flare, and a glowing effect for the female sci-fi character's armor.
Lens Flare and Light Bloom
Now that your lighting is complete and you've added Exponential Height Fog, Light Shafts, and a Sky Atmosphere system, we can continue by adding the final polish to your scene.
Let's start by making the Sun's light appear more realistic. To achieve this, you will use a Light Bloom effect so that your Sun will have a glowing effect around it. The Light Bloom effect will also cause the illuminated buttons on the sci-fi armor to glow.
Light Bloom (also known as Light Glow) is the light that extends from the borders of bright lights.
You can read more about the Light Bloom effect here: https://docs.unrealengine.com/5.0/en-US/bloom-in-unreal-engine/.
Follow these steps:
- In the World Outliner panel, select PostProcessVolume.
- In the Details panel, navigate to Lens | Bloom | Method. Tick the checkbox for Method. In the drop-down menu, select Standard.
- In the Details panel, navigate to Lens | Bloom | Intensity. Tick the checkbox for Intensity. Change the amount to 0.03.
You will notice that your Sun (Light Source) now has a Light Bloom effect (glowing effect) around it, as well as a Lens Flare that is emanating from the Sun's direction toward the bottom of the screen, as shown in Figure 10.14.
- At the moment, the Lens Flare effect is a bit too intense. Let's scale the intensity down a bit. In the Details panel, navigate to Lens | Lens Flares | Intensity. Tick the checkbox for Intensity and change the amount to 0.2. You will notice that the Lens Flare that's emanating from the Sun is much subtler now. The following screenshot shows the Lens Flare:
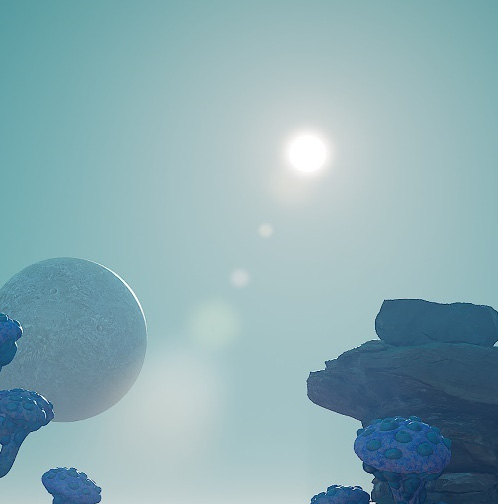
Figure 10.14 – Lens Flare added to the Sun
- Let's modify the Sun's Bloom effect to make it look more interesting. In the World Outliner panel, select Light Source (the Sun).
- In the Details panel, navigate to Light Shafts | Light Shaft Bloom. Tick the checkbox for Light Shaft Bloom. Your Sun's Bloom effect will be far too intense when you've enabled this option. We will fix this in the next few steps.
- In the Details panel, navigate to Light Shafts | Bloom Scale. Change this to 0.04. The Bloom effect will be slightly dimmer now.
- In the Details panel, navigate to Light Shafts | Bloom Threshold. Change this to 0.9.
- Let's add a red-orange color tint to the Sun's Bloom effect. This will make it look more interesting and alien-like. In the Details panel, navigate to Light Shafts | Bloom Tint. Click on the white color bar to open the Color Picker menu. In this menu, change the following values: R: 0.5, G: 0.05, and B: 0. This will change your Sun's Bloom color to a red-orange color tone.
In the following screenshot, you can see what the Sun looks like with Lens Flare and Light Shaft Bloom enabled:
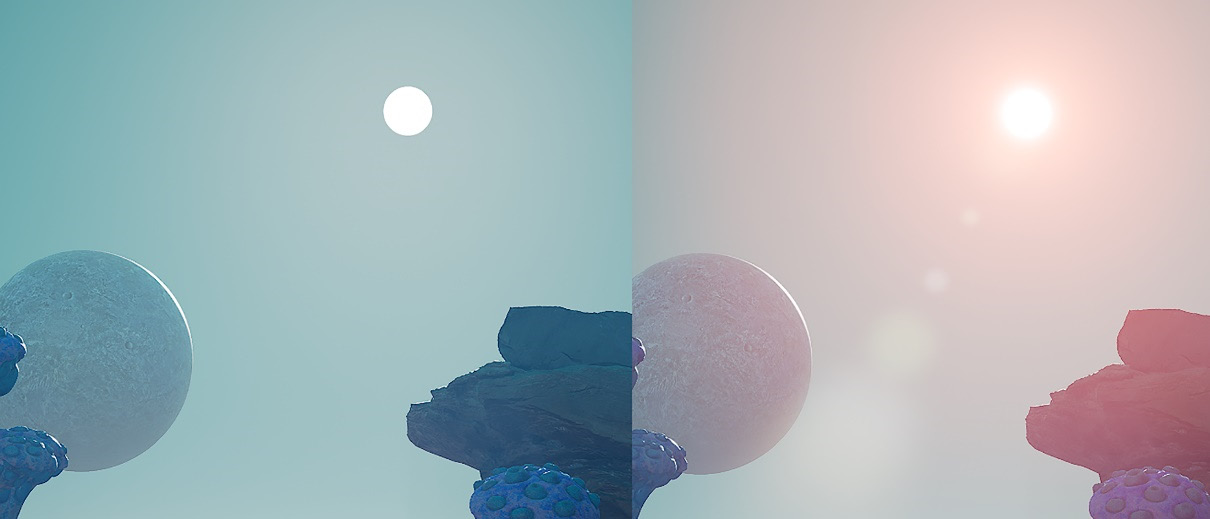
Figure 10.15 – (A) The Sun with no Bloom effect and no Lens Flare; (B) The Sun with a Bloom effect and Lens Flare enabled
Adjusting the Bloom inside PostProcessVolume in Step 2 and Step 3 of this section caused the illuminated buttons on the sci-fi armor to glow, as shown in the following screenshot. In the top left, I have added a close-up of the forearm armor with its glowing buttons:
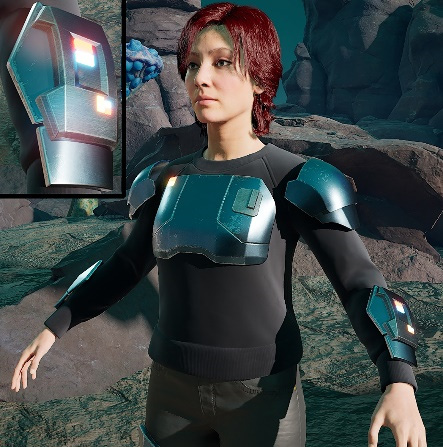
Figure 10.16 – The button lights on the armor are now glowing
Your 3D movie set is now complete and should look similar to the scene shown in the following screenshot, although your scene will be laid out differently than mine:
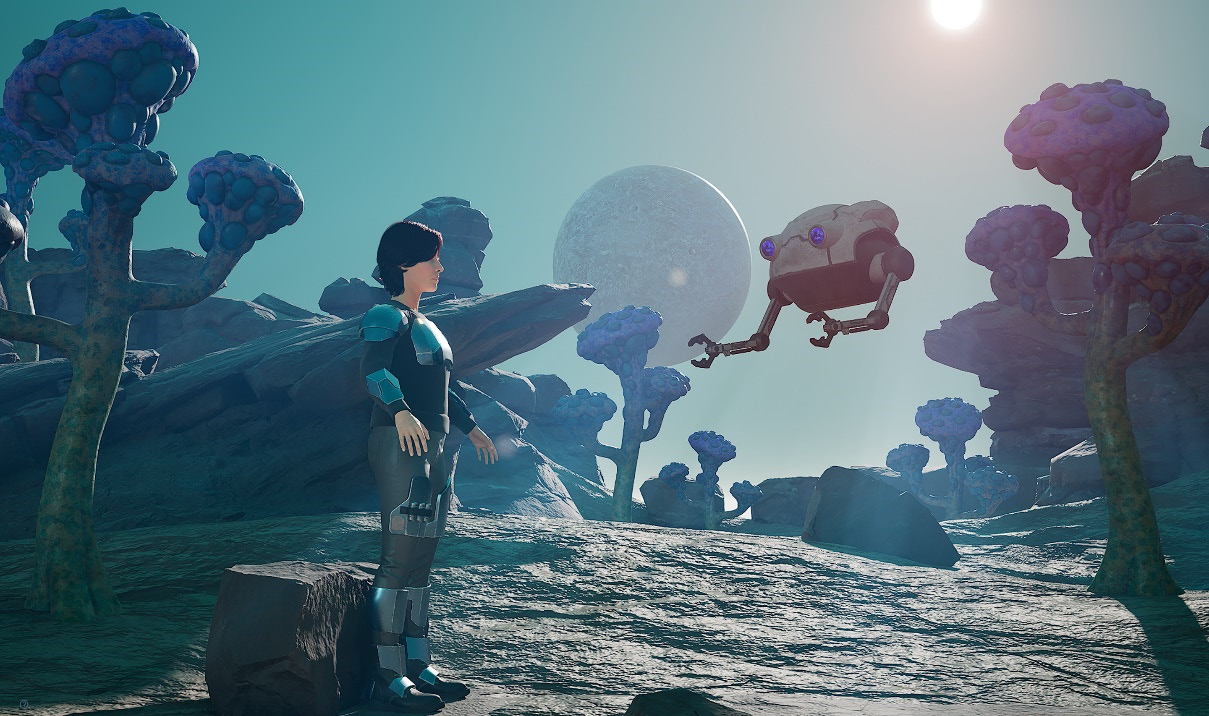
Figure 10.17 – The final 3D movie set
You have now completed the entire lighting process and learned how to use Fog, Light Shafts, Lens Flares, and Light Bloom to add atmospheric visual effects to your 3D movie set.
This concludes the practical lighting and atmospheric visual effect tutorial.
Summary
In this chapter's tutorial, you learned how to light and add atmospheric visual effects to your 3D movie sets. You can use this knowledge for your own future 3D movie productions.
Throughout the past 10 chapters, we've focused on the process of 3D asset creation, as well as how to use these assets in UE5.
In the next chapter, we will explore the rigging process for the Alien Plant model. You will learn how to add a skeleton to a mesh so that you can create some animation to bring the Alien Plant to life.
Further reading
To learn more about the topics that were covered in this chapter, take a look at the following resources:
- Post Process Effects in Unreal Engine: https://docs.unrealengine.com/5.0/en-US/post-process-effects-in-unreal-engine/
- Complete the Post Processing Essentials (free) course for UE5: https://dev.epicgames.com/community/learning/courses/GKm/post-processing-essentials/dZL/introduction-to-post-processing-essentials
- Lumen: Complete the Lumen Essentials (free) course for UE5: https://dev.epicgames.com/community/learning/courses/2Wo/lumen-essentials/dL16/introduction-to-lumen-essentials
- Watch this overview of Lumen from Unreal Engine's YouTube channel: https://youtu.be/Dc1PPYl2uxA