
Chapter 18: Importing Motion Capture onto the MetaHuman Control Rig
In the preceding chapter, we animated our Robot Drone with some Inverse Kinematics (IK). In this chapter, we will work with Motion Capture (MoCap) on the MetaHuman we created in Chapter 8, Using MetaHuman to Create a Photorealistic Human for UE5.
MoCap, as it is referred to by people in the industry, is just realistic motion captured from real human actors in special MoCap suits that can record all their movements, including the subtleties in 3D animation software. It's then converted to keyframes on a skeleton, like the ones we created for our Alien Plant and Robot. The only difference in this case is that the skeleton is human-like.
MoCap normally has a keyframe on every frame because it captures the full subtlety of organic human motion. If you have a realistic-looking human, like the one we created in MetaHuman, it's good to use something like MoCap.
It's hard and very time-consuming to animate as realistically as real captured motion from real actors, so MoCap has changed the amount of quality content in games and films. I started being a professional animator before MoCap was used. When MoCap started to become accessible to studios, animators thought that they would be replaced by this new technology.
This was not the case. Studios simply started creating more content. MoCap needs a lot of editing and tweaking by people with a good eye for motion, like animators. I spent a large part of my career working with MoCap, editing it, combining different MoCap takes together, and directing cutscenes shot with actors.
In the next two chapters, I will give you an introduction to how to use and edit MoCap in UE5.
In this chapter, we will cover the following:
- Getting MoCap animations from Mixamo
- Getting MoCap animations from the UE Marketplace
- Retargeting MoCap animations to a MetaHuman skeleton
Technical requirements
In this chapter, we will need to work with UE5 and the Mixamo website. You will need the following to complete this chapter:
- A computer that can run basic 3D animation software.
- You need to have installed UE5. You can download it from https://www.unrealengine.com/en-US/download.
- Internet access to visit the free MoCap library at https://www.mixamo.com/ (optional).
- A basic understanding of how to navigate the UE 3D user interface. If you skipped ahead, this was covered in Chapter 6, Exploring Unreal Engine 5.
You can download the complete project from the GitHub repository of this book at https://github.com/PacktPublishing/Unreal-Engine-5-Character-Creation-Animation-and-Cinematics/tree/main/FullFinalUE5Project.
The files related to this chapter are placed at https://github.com/PacktPublishing/Unreal-Engine-5-Character-Creation-Animation-and-Cinematics/tree/main/Chapter18
Getting MoCap animations from Mixamo
Mixamo is a free-to-use online MoCap tool and MoCap library. The Mixamo library is subject to change, so I included the downloaded .fbx files from Mixamo in the file source for this chapter. Mixamo is incredibly easy to use. The aim here is to get some free-to-use MoCap and there're lots of different free resources out there if you search for them. Mixamo is just one of them. I hope to teach you more generally about how to work with MoCap. For UE, we preferably want our MoCap source file to be in the .fbx format.
Before we proceed to Mixamo, let's have a think about what MoCap we need for our final sequence. Our female character is going to be in a sitting idle animation, then stand up, and maybe stand there for a moment before walking a few steps forward, stopping, pressing a button on her arm (then the Robot Drone activates), and will then go back to a standing idle animation.
What follows is an example of how I found the MoCap we will use in this chapter on Mixamo. It's probably better to use the files I provided with the chapter since many MoCap files in Mixamo have similar names and later in the chapter, we want to make sure we're using the same source files as the ones I provided. The source FBX files can be found here: https://github.com/PacktPublishing/Unreal-Engine-5-Character-Creation-Animation-and-Cinematics/blob/main/Chapter18/MixamoMocapSource.zip.
You can execute the following steps – just discard the downloaded files afterward:
- Use your internet browser and go to https://www.mixamo.com/.
- Click on Sign Up.
- Create an account like any standard website where you need an account.
Once you sign up for a free account, you will have access to the https://www.mixamo.com/ website and its resources.
- Click on the Characters tab at the top.
- In the search bar, search for xbot, select it, and download it by clicking the DOWNLOAD button on the right of the screen, as shown in Figure 18.1.

Figure 18.1 – Download standard skinned female character
This is simply their standard female character skinned to a skeleton without any animation on it. To use MoCap in UE, it's better to have a skinned character without any animation on it. This is so that you can have one skinned character file that you can play multiple animations on. It's like our Robot Drone has one skinned skeleton and animation rig but we can play multiple animations on it.
- Click on DOWNLOAD to go into the DOWNLOAD SETTINGS pop-up window. Select Format as FBX Binary(.fbx) and Pose as T-pose. Next, click on DOWNLOAD as shown in Figure 18.2.

Figure 18.2 – DOWNLOAD SETTINGS for standard female skinned character
This will download the xbot.fbx file to your computer. We will include this same file in the files accompanying this chapter.
- Next, look for sitting idle MoCap animations.
- Click on the Animations tab at the top, and search for sit. Select the Sitting Rubbing Arm animation as shown in Figure 18.3:

Figure 18.3 – Search and find the Sitting Rubbing Arm MoCap
- Click on DOWNLOAD on the right of the screen and select the following settings:
- Format as FBX Binary(.fbx)
- Skin as Without Skin
- Frames per Second as 30
- Keyframe Reduction as none
- Click DOWNLOAD to download the .fbx as shown in Figure 18.4.

Figure 18.4 – Sitting Rubbing Arm MoCap download settings
Since we already downloaded the skinned skeleton in Step 6, for the animations, we don't need it again. By selecting, in the options in Step 9, Skin as Without Skin, it downloaded only the skeleton with the MoCap animation on it and not the skinned 3D model too.
- Next, search for a Stand Up MoCap animation in Mixamo. The one I liked was on a male model. This is not a problem since Mixamo will map it intelligently to the female skeleton for preview once you select it as shown in Figure 18.5.
- On the right of the Mixamo interface, under DOWNLOAD, there are some sliders as shown in Figure 18.5 where you can adjust MoCap animations. Different MoCap animations in Mixamo have different sliders sometimes and it's worth playing around with them, to customize the MoCap if needed.
For example, I changed the Seat slider from 50 to 40 since that lowered her sitting position, changed the Rate slider from 50 to 60 to make it a bit faster, changed Overdrive from 50 to 60 to exaggerate the movement a bit; and Character Arm-Space from 50 to 58 to make it a bit wider since they were clipping the legs. See the sliders in Mixamo as shown in Figure 18.5.

Figure 18.5 – Slider adjustment for the Stand Up MoCap in Mixamo
- Download the Stand Up MoCap .fbx file using the same settings as Step 9.
- Search for and select the Standing Idle MoCap animation and download it using the same settings as Step 9.
- Search for and select the Female Stop and Start MoCap animation where she stands still, then starts walking forward for a few steps, and then stops again. I downloaded it using the same settings as Step 9.
- Lastly, I found the Button Pushing MoCap animation and set Character Arm-Space from 50 to 62, as shown in Figure 18.6, before downloading it using the same settings as Step 9.

Figure 18.6 – Button Pushing MoCap
I hope this is a useful guide on how to get some free MoCap animations from Mixamo. As I said, all these files I downloaded are available in the chapter files at https://github.com/PacktPublishing/Unreal-Engine-5-Character-Creation-Animation-and-Cinematics/blob/main/Chapter18/MixamoMocapSource.zip.
Now that we know how to get free MoCap animations from an external source such as Mixamo, next, let's see how to get MoCap animations from the UE Marketplace itself.
Getting MoCap animations from the UE Marketplace
The UE Marketplace is a vast resource of UE-compatible content. Some of it is free, but some of it is paid for since it was created by external content creators that then sell on the UE Marketplace.
Since you have already installed UE, it will have installed the Epic Games Launcher app with it. We can find the UE Marketplace in the Epic Games Launcher software application:
- If you're unsure how to open the Epic Games Launcher, search for it in the Microsoft Windows Search tab at the bottom left of the Windows desktop and open it from there by clicking on Epic Games Launcher App as shown in Figure 18.7.

Figure 18.7 – Open Epic Games Launcher from the Windows desktop
- In the Epic Games Launcher app, on the left panel, if you select Unreal Engine and then Marketplace at the top, you can search for motion capture in the search bar. It will come up with lots of free and paid-for MoCap content. You can also search for something such as animation or any related keywords to find an animation or MoCap content as shown in Figure 18.8.

Figure 18.8 – Search for UE Marketplace MoCap animation content
- Let's download some free MoCap/animation content from the Marketplace. As an example, in the UE Marketplace, search for animation starter pack and select it as shown in Figure 18.9.
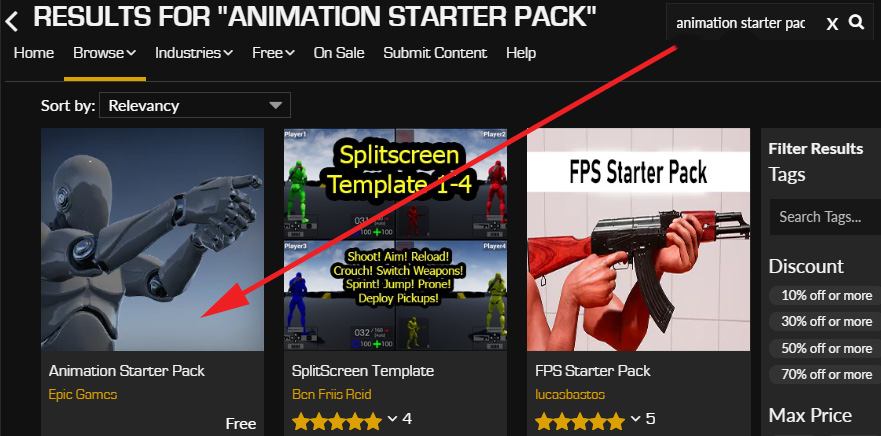
Figure 18.9 – Search for animation starter pack
- In the next window, after selecting Animation Starter Pack, click on Free to get it and it will be added to your UE Library as shown in Figure 18.10.

Figure 18.10 – Get Animation Starter Pack
- You can access this newly added Animation Starter Pack in the library, on the tab at the top, next to Marketplace, under VAULT. From there, you can select Add To Project to add these resources and files to your own project as shown in Figure 18.11. This will bring up the next window to select the project you want to add it to.

Figure 18.11 – Add Animation Starter Pack to a project
- Select the project you want to add this content to and click on Add To Project.
- Now, if you open the project you added Animation Starter Pack to, in the project's Content Drawer, you'll see an AnimStarterPack folder under Content consisting of a collection of MoCap animations as shown in Figure 18.12:

Figure 18.12 – Animation Starter Pack in the project's Content Drawer
- If you want to find the Skinned Skeleton character that these animations in the pack can play on, it's in the Content | AnimStarterPack | UE4_Mannequin | Mesh folder in the project Content Drawer as shown in Figure 18.13.

Figure 18.13 – Skinned Skeleton character for Starter Animation Pack folder
You have now learned how to add MoCap and animation content from the UE Marketplace to your project. Next, we will learn how to use this MoCap on the MetaHuman we created in Chapter 8, Use MetaHuman to Create a Photo-Realistic Human for UE5.
Retargeting MoCap animations to a MetaHuman skeleton
In UE, there's a way to retarget or share animations between character skeletons. Retargeting an animation is like converting it to work and be playable from one skeleton to a different skeleton. So, for example, you can use the MoCap we downloaded from Mixamo on their standard female skeleton and retarget it to play on our MetaHuman skeleton.
These two skeletons have different bones and bone names, and even proportions and sizes, but UE has a built-in way to cleverly map (retarget) and interpret animations between them. But for UE to do that, we need to set it up first.
However, first, let's import the Mixamo MoCap .fbx files into UE.
Importing Maximo MoCap into UE
Here's the process to import Maximo MoCap FBX files into UE:
- In the top left of the Content Drawer, while in the Content folder, click on + ADD | New Folder. Name it MoCap_From_Mixamo as shown in Figure 18.14.

Figure 18.14 – Add New Folder
- Open the new MoCap_From_Mixamo folder and click on Import on the top bar of the Content Drawer to import content into this folder as shown in Figure 18.15.

Figure 18.15 – Import MoCap content
- Select xbot.fbx in the next pop-up window after browsing to the location it is stored in and then click Open.
- After clicking Open, the FBX Import Options dialogue window will appear. Make sure Import Mesh is checked and Import Animations is unchecked as shown in Figure 18.16.
We want to make sure there's no animation on this import since this will be the clean Skinned Skeleton Mesh that the MoCap animations can play on.
- Click on Import All at the bottom of the FBX Import Options to import.

Figure 18.16 – Import Skinned Skeleton Mesh FBX
If there is a Message Log window that appears after the import with some warnings, most of the time you can ignore this. It is normally minor things UE could not resolve in the FBX file from an external source. Most of the time, it has no bearing on the visual result of the import.
- Now, inside the MoCap_From_Mixamo folder, add another folder called MoCap as shown in Figure 18.17.
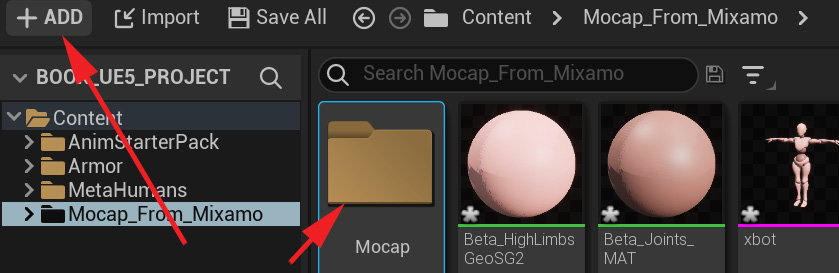
Figure 18.17 – Add MoCap folder
This is just to keep the animations organized in their own folder, so they're easier to find later.
- While inside the MoCap folder, on the top bar, click Import to import the animations into this folder. In the next pop-up window, browse to their location folder and select all the Mixamo MoCap .fbx files to import them all at the same time.
After clicking Open, the FBX Import Options dialogue window will again appear, but this time, the settings look slightly different because UE can detect that there's no skinned mesh included with the skeleton. UE detects that these are probably animations on the skeleton only. We need to define what skinned mesh we want these animations to play on in UE. We need to select the Mixamo xbot skeleton we imported in Step 2 and Step 3.
- In the FBX Import Options dialogue window, under MESH, next to Skeleton, click on None. From there, you can select xbot_Skeleton as shown in Figure 18.18. Click Import All at the bottom of the FBX Import Options to import.

Figure 18.18 – MoCap animation FBX import settings
The imported animations will appear in the MoCap folder, and they will be represented on the skinned xbot_Skeleton mesh as shown in Figure 18.19.

Figure 18.19 – Imported MoCap in Content Drawer
Now, with our Mixamo xbot Skinned Skeleton Mesh and MoCap imported, we can move on to setting up the retargeting setting for the Mixamo skeleton.
Setting up retargeting on the Mixamo skeleton
In the next steps, we will set up the retargeting settings on the Mixamo skeleton. The biggest part of this is to confirm to UE which skeleton bone is which body part. UE can then do its clever calculations in the background to map the motion from one skeleton to another.
In the full UE5 release, the way retargeting works has changed significantly from previous versions of UE. Two new Animation Node types are used to achieve retargeting and they are the IK Rig node and the IK Retargeter node.
Let's set up our first IK Rig node on our Mixamo xbot skeleton:
- In UE, add a new folder under the Content folder and name it Mocap_Retarget.

Figure 18.20 – Create a new folder
- Open the new Mocap_Retarget folder in the Content Drawer and right-click on an empty spot in the folder to bring up the right-click menu. Then, under Animation, select IK Rig as shown in Figure 18.21.
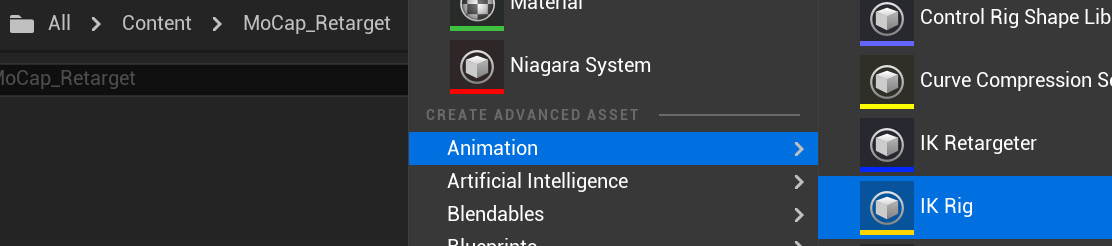
Figure 18.21 – Create an IK Rig node
- Select xbot Skeletal Mesh from the list as shown in Figure 18.22.

Figure 18.22 – Select xbot Skeletal Mesh

Figure 18.23 – IK Rig node name
- Double-click the NewIKRig_xbot node to open the IK Rig interface.

Figure 18.24 – IK Rig interface
In the IK Rig interface, you can define different body parts by their bone chains. This is a very open system compared to the old way of doing retargeting in UE where it only really worked well on humanoid characters. With this new system, it is much more open and much more powerful, but the user has to use much more of their own common sense to get good results.
Since we're retargeting MoCap from one humanoid character to another, we need to define the main separate body parts that we want to retarget. On a humanoid character, this will typically be Head, Neck, Spine, LeftArm, RightArm, LeftLeg, RightLeg, and Hips.
Now, let's define these body parts by starting with Head.
- Select the Head bone, then right-click and select New Retarget Chain from Selected Bones as seen in Figure 18.25.

Figure 18.25 – New Retarget Chain from Selected Bones

Figure 18.26 – Add New Retarget Chain
The new chain will appear in the IK Retargeting list tab as seen in Figure 18.27.
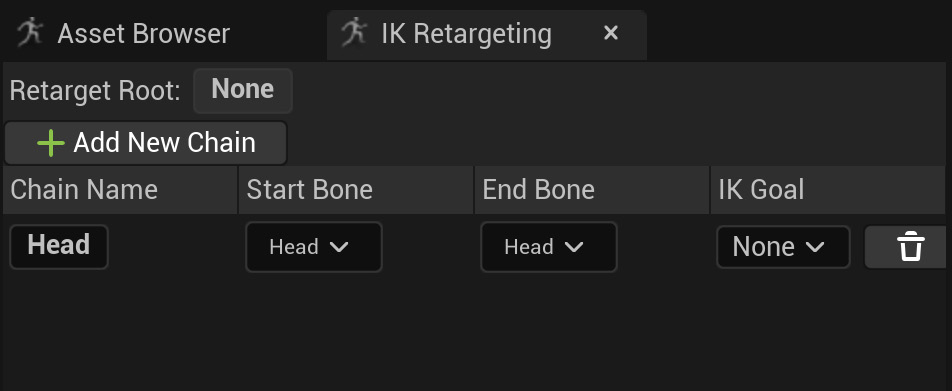
Figure 18.27 – New IK Retargeting chain
- Select the Neck bone, then right-click and select New Retarget Chain from Selected Bones as seen in Figure 18.28. Also, keep Chain Name as Neck and click OK. The Neck bone chain will appear in the IK Retargeting list.

Figure 18.28 – Add Neck chain
- Next, for the spine, select the following bones in this order: Spine, Spine1, and then Spine2 as seen in Figure 18.29. Then, right-click and select New Retarget Chain from Selected Bones. Keep Chain Name as Spine and click OK.
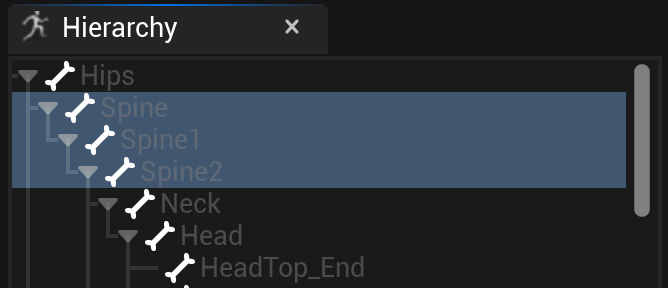
Figure 18.29 – Spine chain
- For the left arm, select LeftShoulder, LeftArm, LeftForeArm, and LeftHand as shown in Figure 18.30. Then, right-click and select New Retarget Chain from Selected Bones.

Figure 18.30 – Left arm chain
- However, in this case, change Chain Name to Left_Arm as shown in Figure 18.31. This is so the name is more descriptive and consistent.

Figure 18.31 – Chain Name Left_Arm
- Repeat this process on the corresponding right arm bones and change Chain Name to Right_Arm.
- For the left leg, we select the LeftUpLeg, LeftLeg, and LeftFoot bones, then right-click and select New Retarget Chain from Selected Bones and set Chain Name as Left_Leg as seen in Figure 18.32.
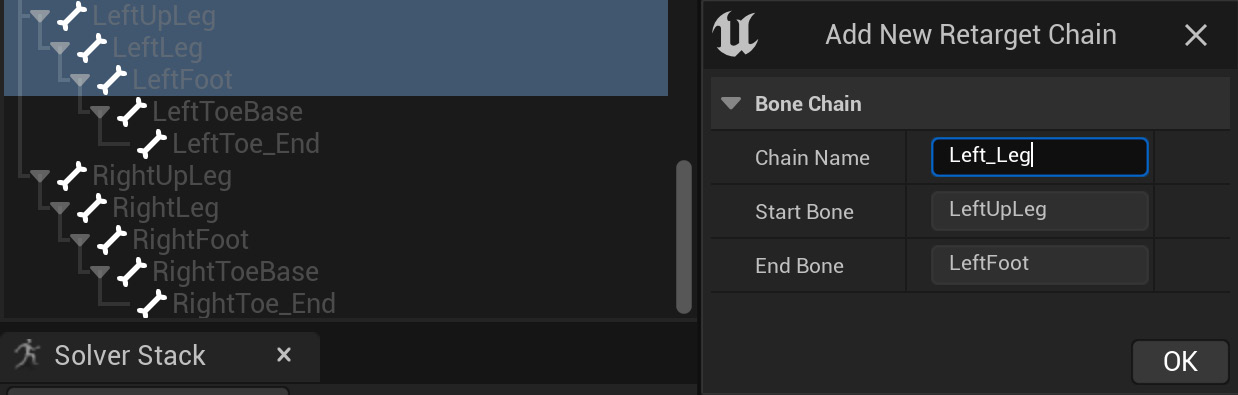
Figure 18.32 – Left_Leg Chain Name
- Repeat this process on the corresponding right leg bones and set Chain Name to Right_Leg.
- Finally, select the Hips bone and right-click, then select Set Retarget Root as shown in Figure 18.33.
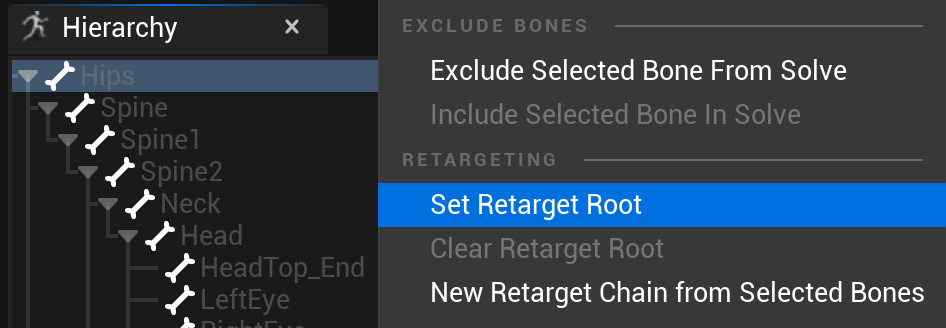
Figure 18.33 – Set Retarget Root
The resulting IK Retargeting list should look as in Figure 18.34.

Figure 18.34 – IK Retargeting list final result
- Save this IK Rig node setup by clicking Save at the top left of the interface.
Congratulations! You've set up your first IK Rig node.
You have probably noticed that we only selected the main bones of every chain. This is roughly in line with the main universal IK or FK chains in these kinds of body parts.
For the arms, we left out things such as fingers, but we included what would be the clavicle joint. The clavicle joint is not normally included in an IK chain, but it has a big influence on the arm in general, so it is better to include it. For the legs, we left out the ball and toe joints since things such as toes and fingers might just complicate things for a simple retarget like this.
Next, we will set the IK Rig node up for the MetaHuman skeleton.
Setting up retargeting on the MetaHuman skeleton
To set up the IK Rig node on the MetaHuman skeleton, the basic process is almost the same as the Mixamo xbot setup. However, because the MetaHuman rig is a far more complex rig with multiple skeletons linked via complex rigging, we just need to make sure we set the retargeting up on the correct asset in the first place.
If the MetaHumans and SciFiGirl assets you created in Chapter 8, Use MetaHuman to Create a Photo-Realistic Human for UE5, are not already in your project file, you can migrate them into your current project using the instructions in Chapter 20, Using Sequencer to Construct Your Final Scene, in the Migrating UE content between projects section. Alternatively, you can download the final example project and get it from within that at https://github.com/PacktPublishing/Unreal-Engine-5-Character-Creation-Animation-and-Cinematics/tree/main/FullFinalUE5Project.
To find the correct skeleton asset, do the following:
- In the Content Drawer, Content | MetaHuman | SciFiGirl folder where our female MetaHuman is saved, find the BP_SciFiGirl blueprint and drag it into the viewport as shown in Figure 18.35.

Figure 18.35 – Drag the MetaHuman blueprint into the level
- Select it in the viewport so that there's an orange selection line around it. In the Details panel on the right, select Body (Inherited). Then, under MESH | Skeletal Mesh, double-click on the box to the right of it. That will open the asset in UE as shown in Figure 18.36.

Figure 18.36 – Find the MetaHuman skeleton asset
Once open, this may visually look weird and broken with just some polygons showing. Don't worry about this, we're still not at the skeleton asset itself. This is the f_med_nrw_body (female med) skinned model. This might be different depending on the style of MetaHuman we created.
- To get to the skeleton asset itself, click on the skeleton asset icon in the top bar as shown in Figure 18.37.
Figure 18.37 – Open the MetaHuman skeleton asset
Next, we want to make sure we apply Preview Mesh to our skeleton, so we can see our animations clearly when we retarget them.
- In the Preview Scene Settings tab on the right, under MESH, set Preview Mesh to f_med_nrw_preview. Make sure to click Apply To Asset as shown in Figure 18.38.
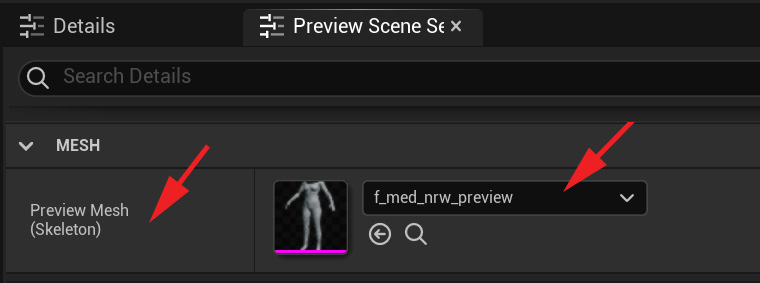
Figure 18.38 – Apply the preview asset to the MetaHuman skeleton
She will unfortunately have no head. This is normal since, on the MetaHuman, the facial skeleton is separate.
Now, let us set up the IK Rig node on the MetaHuman skeleton.
- In the Mocap_Retarget folder, right-click on an empty spot in the folder to bring up the right-click menu. Then, under Animation, select IK Rig. Select f_med_nrw_preview as shown in Figure 18.39.

Figure 18.39 – Select the MetaHuman skeleton
- Name the new IK Rig node NewIKRig_meta as shown in Figure 18.40.
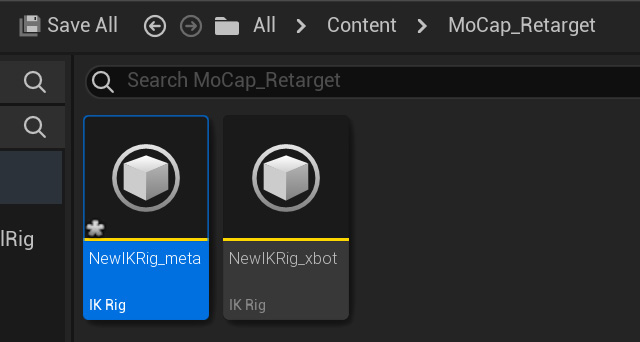
Figure 18.40 – NewIKRig_meta node
- Double-click the NewIKRig_meta node to open the interface.
Just like we did in the Setting up retargeting on the Mixamo skeleton section, we will define the body parts of this skeleton. We will use the same naming convention so it's easier for UE to match up the different limbs.
- Select the head bone, then right-click and select New Retarget Chain from Selected Bones and change Chain Name to Head with a capital letter, just like the previous setup for the NewIKRig_xbot node.
- Next, select the neck_01 and neck_02 bones, then right-click and select New Retarget Chain from Selected Bones and change Chain Name to Neck, just like the previous setup for the NewIKRig_xbot node.
- Select the spine_01, spine_02, spine_03, spine_04, and spine_05 bones, then right-click and select New Retarget Chain from Selected Bones and change Chain Name to Spine.
Note
You will notice that in this skeleton, the number of neck and spine bones is different from the NewIKRig_xbot IK Rig node. This doesn't matter; UE can still interpret this and retarget the animations.
- On the left arm, we select the clavicle_l, upperarm_l, lowerarm_l, and hand_l bones as seen in Figure 18.41, then right-click and select New Retarget Chain from Selected Bones and change Chain Name to Left_Arm.

Figure 18.41 – Left arm bone selection
You will notice that I ignore all the extra bones in the arm chain and only select the main arm bones.
- Repeat this process for the corresponding right arm bones and change Chain Name to Right_Arm.
- Next, for the left leg, select the thigh_l, calf_l, and foot_l bones, then right-click and select New Retarget Chain from Selected Bones and change Chain Name to Left_Leg.
- Repeat this process for the corresponding right leg bones and change Chain Name to Right_Leg.
- Select the pelvis bone, right-click, and select Set Retarget Root.
The result should look like Figure 18.42:

Figure 18.42 – MetaHuman IK Retargeting list results
- Save this IK Rig node setup by clicking Save at the top left of the interface.
Retargeting is now set up on both our Mixamo and MetaHuman skeletons. Now comes the fun part. Let's retarget some MoCap animation from the Mixamo source to our female MetaHuman
Retargeting Mixamo MoCap animation to the MetaHuman
All the hard work in the retargeting setup has been done now. Compared to the setup, the retargeting itself is the easy part.
To retarget the animations, we need the second kind of node called IK Retargeter. Let's create one:
- Still in the Mocap_Retarget folder, right-click on an empty spot to bring up the right-click menu and select IK Retargeter.
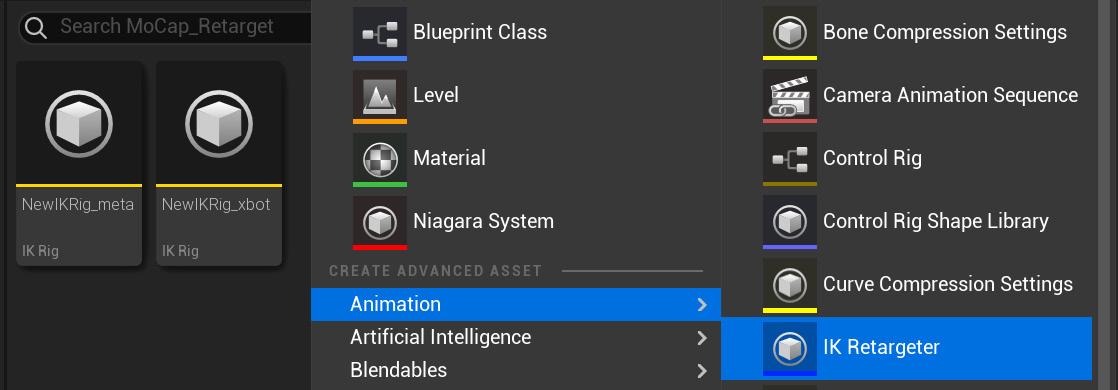
Figure 18.43 – Creating an IK Retargeter
- In the next window, it will ask you to Pick IK Rig To Copy Animation From. Since we're retargeting animations from the xbot to the MetaHuman, we need to select NewIKRig_xbot as shown in Figure 18.44.

Figure 18.44 – Selecting NewIKRig_xbot
The new IK Retargeter is now created. Name it xbot_retargeter (see Figure 18.45).

Figure 18.45 – Naming the new IK Retargeter
- Double-click the xbot_retarget asset to open the IK Retargeter interface.
- In the IK Retargeter interface, on the Details tab, find Target IKRig Asset. Expand the drop-down menu and select NewIKRig_meta as the target asset, as shown in Figure 18.46.

Figure 18.46 – Select target rig
The MetaHuman rig will appear next to the xbot rig. There's also an Asset Browser tab that lists all the animations associated with the xbot.

Figure 18.47 – Play Button_Pushing animation
You will notice that the animation is being retargeted to the MetaHuman rig, but the arms look incorrect. The first thing to check is Chain Mapping. Next to the Asset Browser tab is the Chain Mapping tab.
- Open the Chain Mapping tab as shown in Figure 18.48.

Figure 18.48 – Chain Mapping tab
In the Chain Mapping tab, you can see how UE matched up the body part IK chains we set up on the respective IK Rig assets. Sometimes, UE doesn't get it right, especially if the naming was not the same or close enough. If it is mismatched, you can fix it in the Chain Mapping tab by using the drop-down menus on the Source Chain side and selecting the correct match.
So, we know now that Chain Mapping is not the problem. The other thing it could be is the retarget pose. This is the initial pose UE uses to determine where the limbs are. However, if these poses are too different between the two rigs it is trying to retarget, it can cause problems.
To check and edit these poses, do the following:
- Click on the Edit Pose button on the top menu as shown in Figure 18.49.

Figure 18.49 – Edit retarget pose
Here is our problem. The base retarget poses are too different. The xbot is in a T-pose (looks like a T) and the MetaHuman is in an A-pose (looks like an A) when it comes to the arms. No wonder UE is having problems calculating the retarget. Let's fix that.
- With Edit Pose on, select the arm bones in the viewport and try to match the MetaHuman rig arm pose to that of the xbot by rotating them with the rotate tool as shown in Figure 18.50.

Figure 18.50 – Edit retarget pose
- When you are finished editing the retarget pose, toggle Edit Pose off. Go back to the Assets Browser tab and select animations from the list by double-clicking on them, and see the results when you play them.

Figure 18.51 – Test retarget pose edit
As you can see, it is already much better, but you can go back and forth between Edit Pose and testing until you get the best possible results.
Bear in mind that what you are seeing in this editor is just a preview of the retargeting. Once you're happy with the retargeting preview, you can finalize the retarget by exporting the animations to the MetaHuman rig.
- Select the animations you want to finally retarget in Asset Browser and click Export Selected Animations as shown in Figure 18.52.

Figure 18.52 – Export retargeted animations
- UE will then ask you to specify a folder. Export to the MoCap_Retarget folder to make sure you don't overwrite existing content.
You can follow the same process to set up retargeting on the UE Marketplace assets using the Mannequin skeleton or any other skeleton rig for that matter. You can even map a human arm motion to that of a spider leg if you get creative with this kind of retarget setup, so feel free to experiment.
Congratulations, you just retargeted a whole set of Mixamo MoCap animations to the MetaHuman skeleton.
Summary
In this chapter, we learned how to export free MoCap animations from the Mixamo library and import them into UE. We learned how to find some animation and MoCap assets on the Unreal Engine Marketplace and import them into our project. We then learned how to set up retargeting on both the Mixamo xbot skeleton and the MetaHuman skeleton. Finally, we retargeted a whole set of MoCap animations to the MetaHuman skeleton.
With this knowledge, you can find and share MoCap and other animation assets between different humanoid characters and you can let your creativity run free. Next, we will learn how to combine and edit this MoCap content on our female MetaHuman.