
Chapter 17: Creating Three Simple Animations for the Robot in UE5 Sequencer
In the previous chapter, we animated a subtle swaying animation cycle for our Alien Plant on the animation rig that only uses Forward Kinematics (FK). In this chapter, we will animate three animation cycles for our Robot Drone. Our robot has Inverse Kinematics (IK) controllers on its arms. This will give us a chance to get used to animating with IK controllers. You'll see for yourself how useful this kind of controller is for your animation workflow.
We will also learn how to save and load poses onto our Control Rig. Poses in animation are like a snapshot recording of all the transform values on all your controllers on your Control Rig. This is useful if you want your animations to start or end at exactly the same pose so they can seamlessly play from one to another.
In this chapter, we will cover the following:
- Animation A: idle cycle
- Animation B: movement cycle
- Animation C: action animation
Technical requirements
In this chapter, we will only need to work in Unreal Engine 5. You will need the following to complete this chapter:
- A computer that can run basic 3D animation software.
- You need to have installed Unreal Engine 5. You can download it from https://www.unrealengine.com/en-US/download.
- A basic understanding of how to navigate the Unreal Engine 3D user interface. If you skipped ahead, this was covered in Chapter 6, Exploring Unreal Engine 5.
- You should have completed the tutorials in Chapter 16, Creating a Simple Swaying Animation Cycle in UE5 Sequencer, for basic knowledge of how to set keyframes and edit animation curves in UE5.
The files related to this chapter are placed at https://github.com/PacktPublishing/Unreal-Engine-5-Character-Creation-Animation-and-Cinematics/tree/main/Chapter18
Animation A: idle cycle
In computer game animation, it is very common to have an idle cycle for a character. This is the kind of animation where the character does almost nothing. Typically, in a computer game, this is where the player is not pressing any buttons on the gamepad or keyboard and the character is just standing there. You'll notice during these times in games that the character normally has something like just a subtle breathing animation.
This is an idle cycle. It is an animation that repeats so the character still looks alive while doing nothing. If there was no animation the character would look like a statue and not alive. In some games, if you leave the character standing there long enough, it might scratch its head or look around. These animations are normally called fidget animations.
We will only need an idle cycle animation since the final sequence we will put together at the end of this book will be short, so there's no need for fidget animations.
However, before we start to animate our idle cycle, let's learn how to use the Poses tool in UE5.
Using the Poses tool in UE5
In this section, we will create and save a pose for our Robot Drone as its default pose before we start animating it. This is useful since if we want to return the robot to the default pose without any transforms applied, we can do that by loading this pose.
Sometimes you start an animation and don't like the result. This way, you can reset all the controllers and start afresh. Let's get started:
- Open the UE5 project in which you saved the Robot Drone Control Rig that we created in Chapter 15, Creating a Control Rig with Basic IK Controls for the Robot in UE5.
We also provide the completed Robot Drone Control Rig in the final project file, which can be downloaded here with installation instructions: https://github.com/PacktPublishing/Unreal-Engine-5-Character-Creation-Animation-and-Cinematics/tree/main/FullFinalUE5Project.
The Robot Drone Control Rig is under: Content/RobotDroneControlRig.
- Select Cinematics | Add Level Sequence to open a new level sequence in Sequencer.
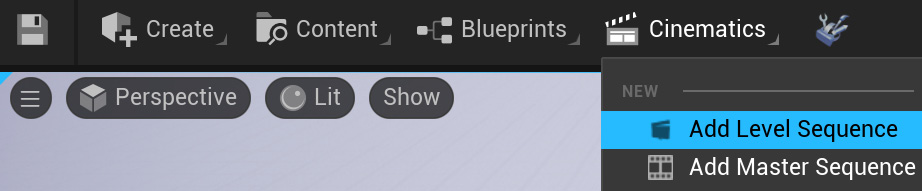
Figure 17.1 – Adding a level sequence
- Name the sequence RobotAnim01_IdleCycle and click on SAVE.

Figure 17.2 – Saving the sequence
- Left-click, hold, and drag the robot Control Rig from Content Drawer to the TRACK window in Sequencer to add it to the Sequencer timeline as shown in Figure 17.3.
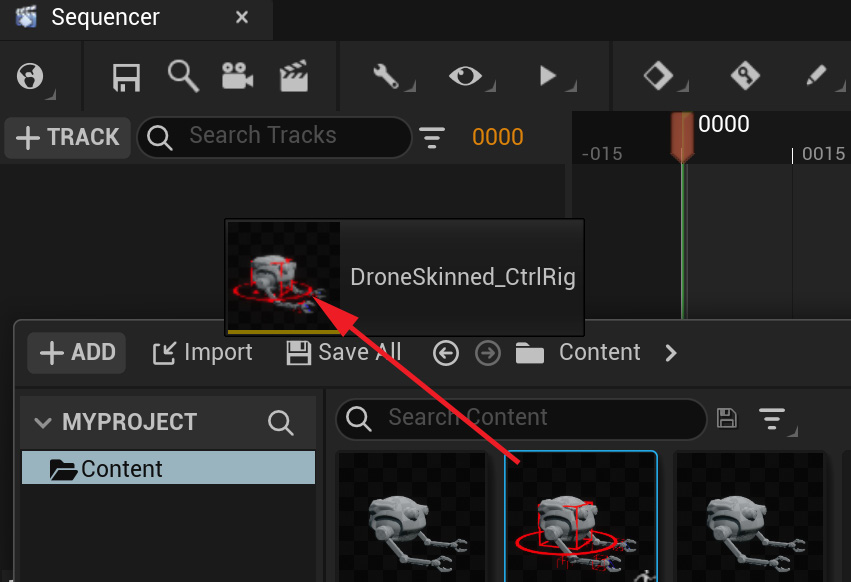
Figure 17.3 – Adding the robot Control Rig to Sequencer
- In the main UE interface, tidy up your workspace by moving the floor if needed and anything obstructing your view. If the default UE grid floor is in the way, click the visibility eye icon on the Outliner tab to make it invisible in the viewport as seen in Figure 17.4.

Figure 17.4 – Opening the Animation window
- In the Sequencer timeline, set the overall and timeline workspace from -010 to 0070. Set the active range from 0000 to 0060 as seen in Figure 17.5. If you need a reminder on how to do this, refer to the Setting keyframes on the Alien Plant Rig section in Chapter 16, Creating a Simple Swaying Animation Cycle in UE5 Sequencer.

Figure 17.5 – Setting the timeline workspace
- In the Animation window, select all the controllers in your Robot Drone Control Rig in Animation Outliner, then click on Poses in the Animation tab. Click Create Pose at the top left of the Control Rig Pose window, name it default_pose and click Create Asset to add this pose to your new library of poses:
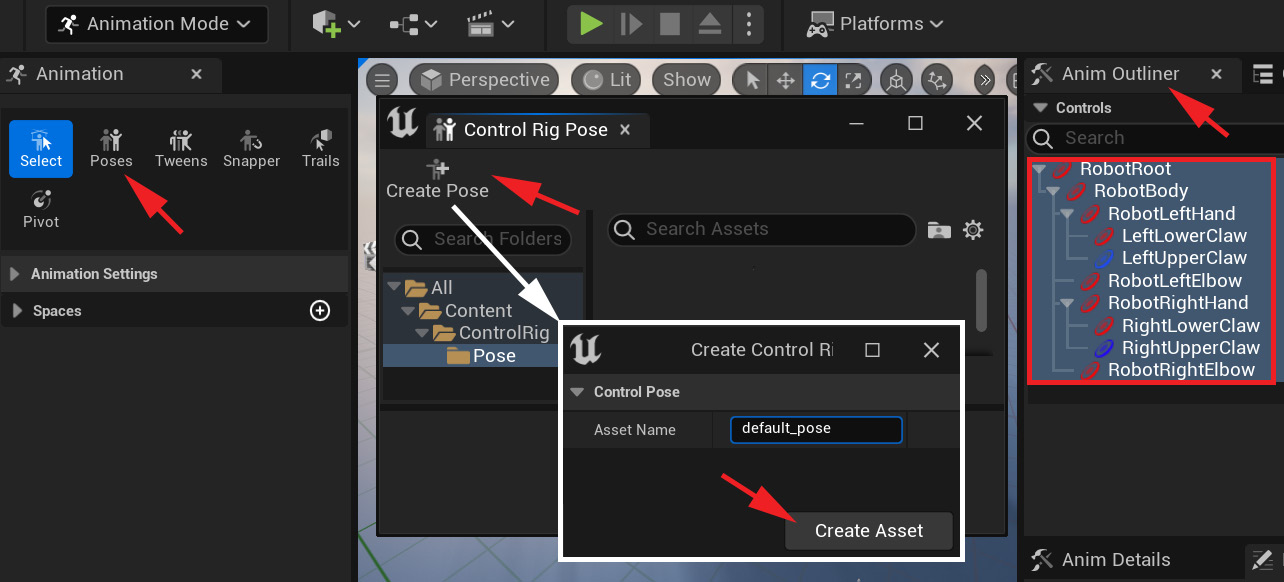
Figure 17.6 – Adding the default pose
- Now let's test the Poses tool. In the main viewport, move the controller of your Robot Drone, including the controller for the main body – in my case, RobotBody – till it's in a random position. It does not matter what the pose is, as long as it's very different from the default pose as shown in Figure 17.7:

Figure 17.7 – Random pose
- Select only the controller controlling the main body – in my case, RobotBody – in either the viewport, the Animation window, or Sequencer. In the Control Rig Pose window, with the default_pose pose item selected, click Paste Pose as shown in Figure 17.8.
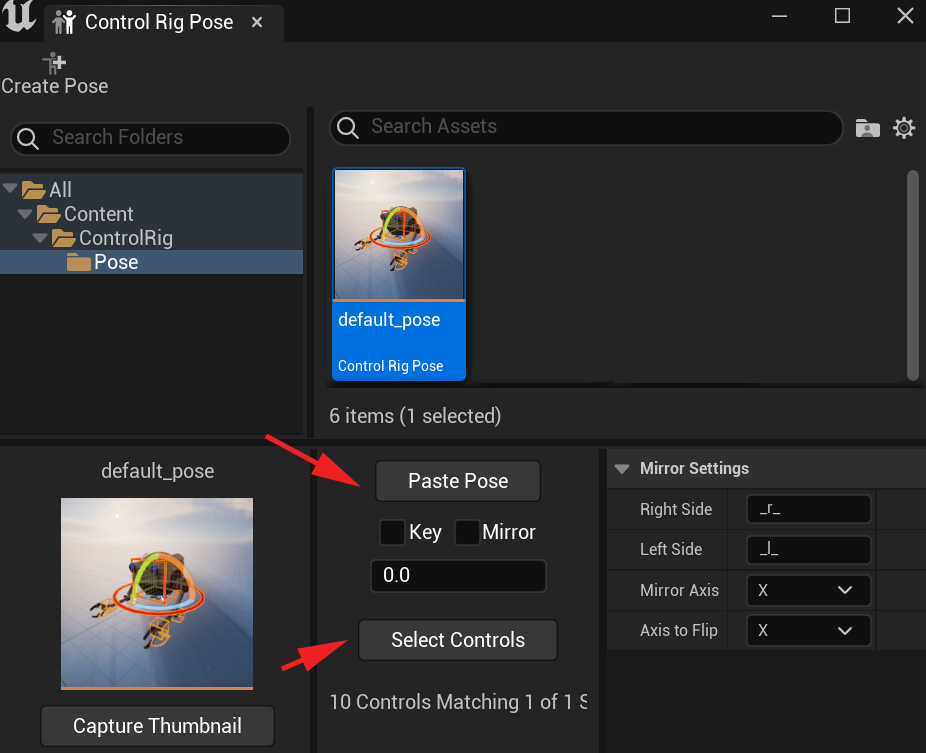
Figure 17.8 – Paste Pose
The RobotBody will return to its original position, but the rest of the controllers will still be offset as shown in Figure 17.9.
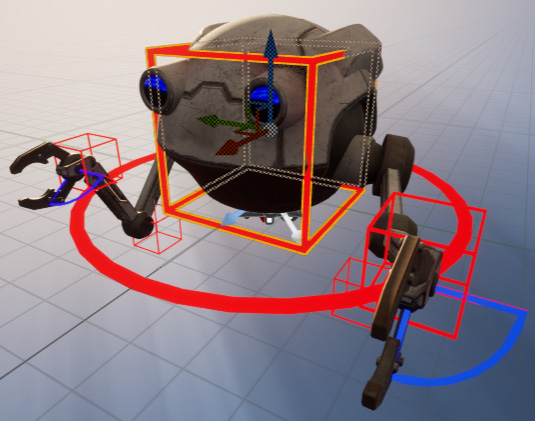
Figure 17.9 – RobotBody returning to default pose
- Now, as shown in Figure 17.8, in the Control Rig Pose window, click on Select Controls. This will select all the controllers that were originally selected when creating the pose. Now select Paste Pose. All the selected controllers will now return to the default pose.
Note
With the Poses tool, the Paste Pose option will only paste the pose to the selected controllers. When creating a pose, it will only save the pose of the controllers selected at the time. This is actually very useful since we might be happy with the body and left arm pose we created, but unhappy with the pose we created for the right arm.
In this case, we can just select the right arm controllers and select Paste Pose. This will return just the right arm controllers to the default pose without losing the work we did on the body and left arm. Additionally, when saving a pose, it creates a thumbnail screenshot for us as a visual reference to the pose. If you don't like the thumbnail, you can reposition the character on the screen to something you like and change it by clicking Capture Thumbnail as shown in Figure 17.8.
We have now learned how to save poses to the Poses library and then how to paste them back to our Control Rig. Next, we can start animating the idle cycle.
Animating the idle cycle
When animating an idle cycle, we want to make sure our main pose is interesting but neutral. Also, in character animation, generally, we want to avoid poses that are perfectly symmetrical, where the left and right sides are mirror images of each other. It just makes for very uninteresting visuals and makes it feel too mechanical.
Technically, our robot is mechanical, but we want to give it some personality, so it's better to give it a more interesting idle start pose. Typically, a lot of animations in computer games flow from the idle cycle base pose so this is also why we want something a bit more interesting here. At the same time, it is an idle pose, so it can't be too over the top.
Let's set our starting pose for our Robot Drone:
- First, we can move the left- and right-hand controllers closer to the body and then move the right-hand controller up a bit and the left-hand controller down a bit to break the symmetry. Notice how our IK controllers in our animation rig do their job perfectly while the elbow bends as seen in Figure 17.10.
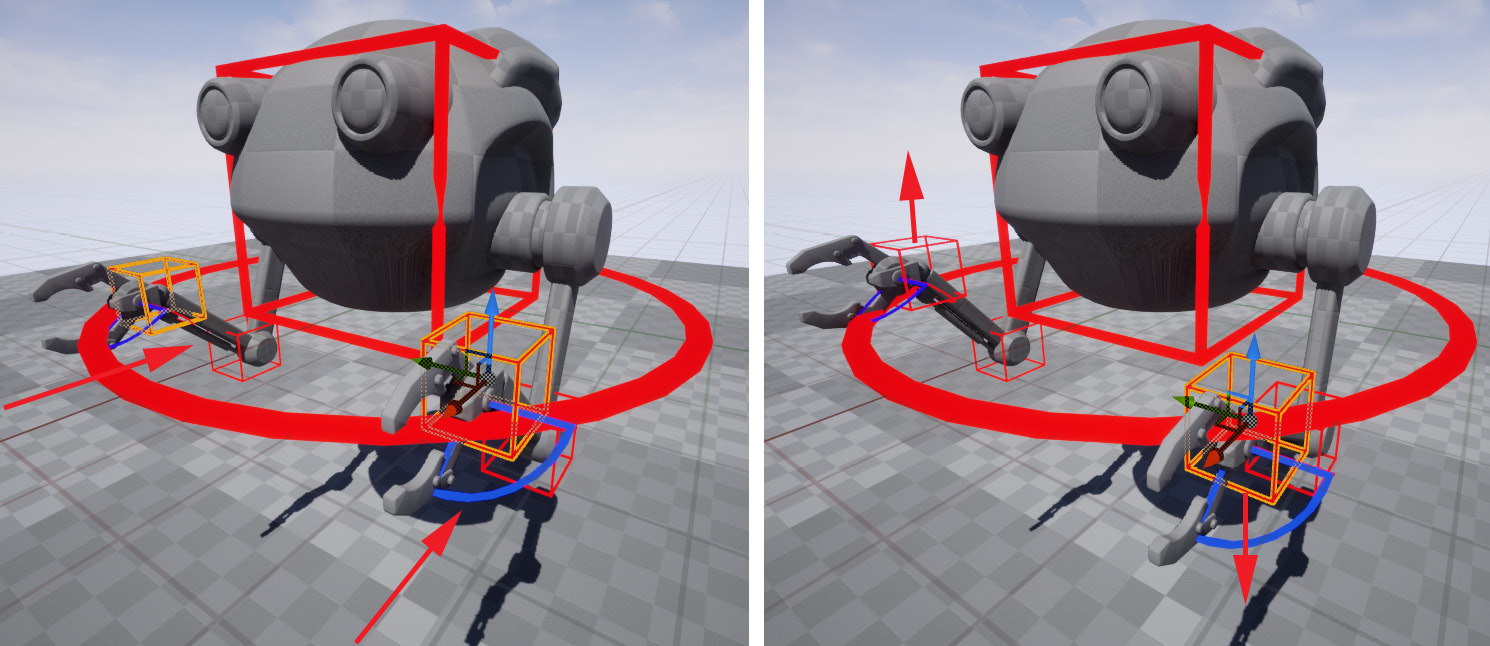
Figure 17.10 – Idle pose moving hand controllers
- Select the elbow/pole vector controllers and move them back and down so the elbows can point towards them. Move the elbows outwards a bit.
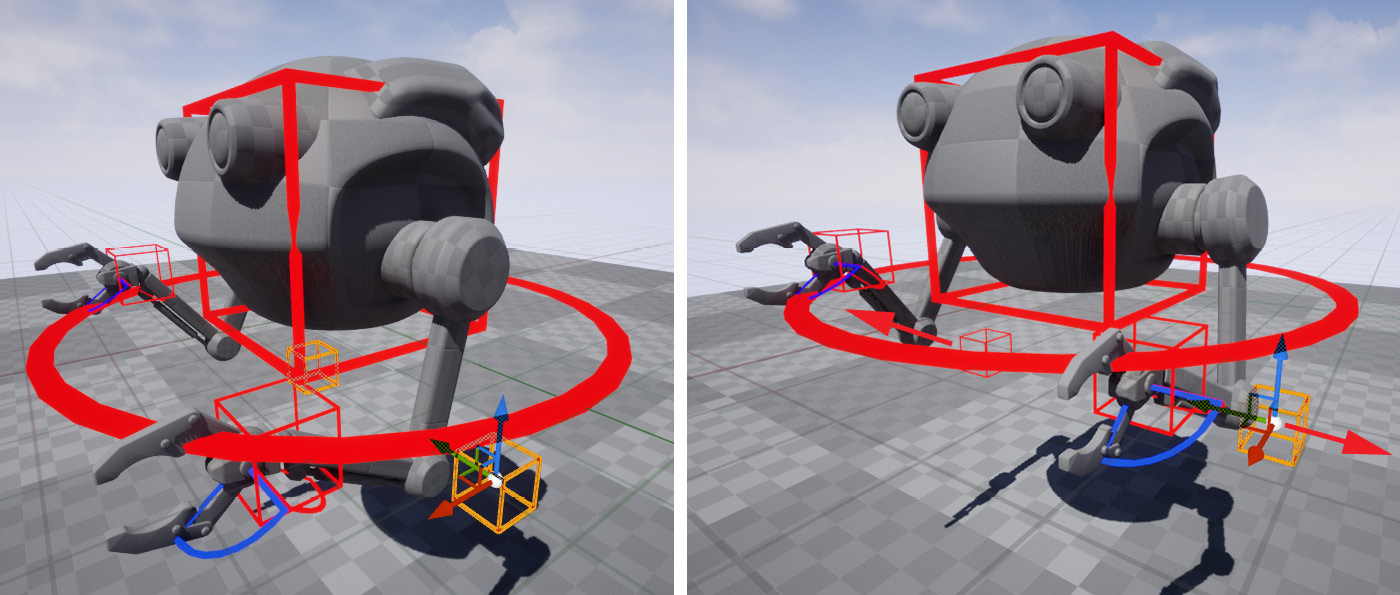
Figure 17.11 – Idle pose moving elbow/pole vectors
- Finally, rotate to angle the hands slightly. Rotate the claw controllers to close the claws on the left hand a little and open the claws on the right hand a little as seen in Figure 17.12.
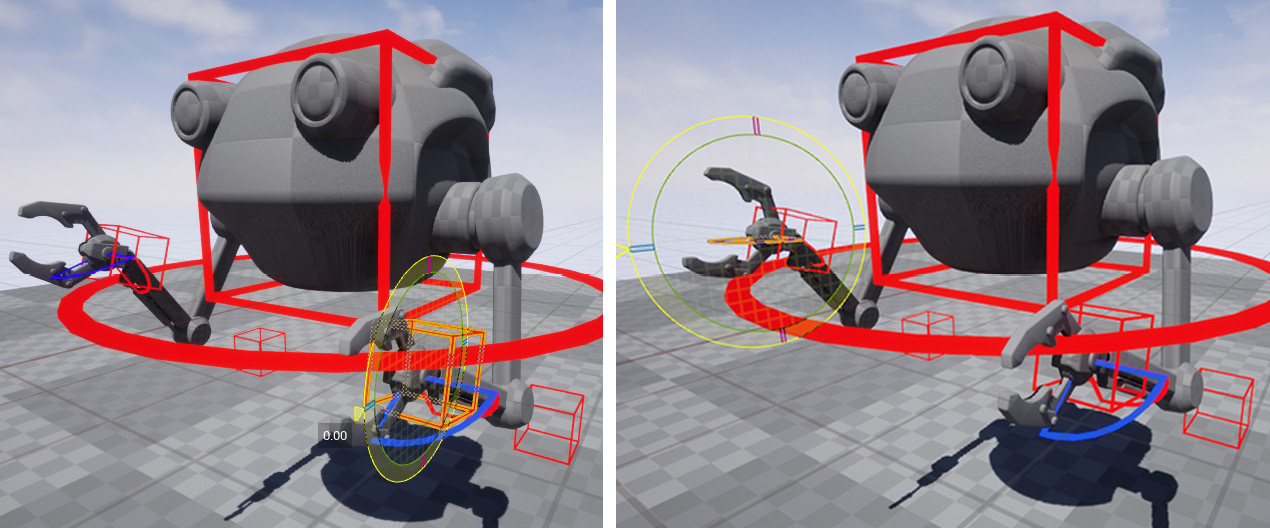
Figure 17.12 – Idle pose moving hands and claws
Now we have a nice pose that is not perfectly symmetrical, and the Robot Drone is starting to come to life. We can now save this pose to our pose library in the Poses tool.
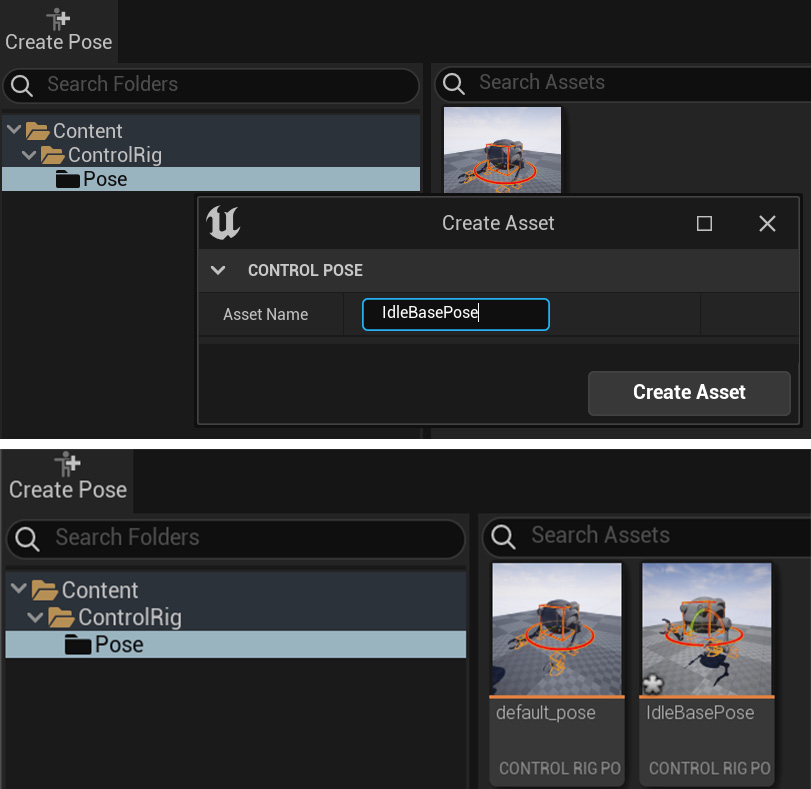
Figure 17.13 – Saving the idle pose
Note
We now have our base idle pose saved, so if we load a fresh sequence and start a new animation with our Robot Drone Control Rig, this pose will be accessible to us if we want to start or end the new animation with this pose.
- Scrub to frame 0000 in the Sequencer timeline and keyframe this pose for all the controllers by clicking + in the TRACK window on the parent of the controllers.
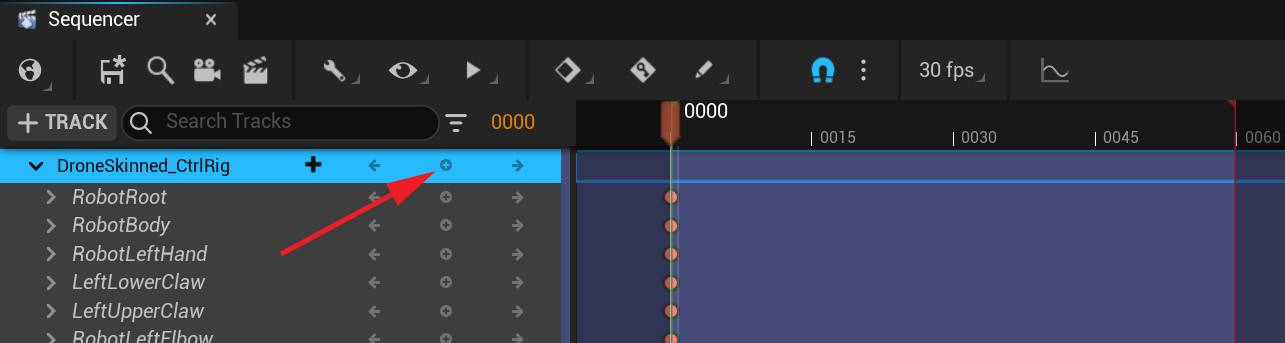
Figure 17.14 – Setting the keyframe at frame 0000
- Now scrub to frame 0060 in the Sequencer timeline and keyframe all the controllers by clicking + in the TRACK window on the parent of the controllers. We now have keyframes for this pose at the start and end of the animation.
- In the Sequencer window, at the top, turn on the Automatic Keyframe by clicking on it so it creates keyframes when we make changes automatically as seen in Figure 17.15.

Figure 17.15 – Auto Keyframe on
- Scrub to frame 0030 in the Sequencer timeline (halfway between frames 0 and 60) and select the controller called RobotBody.
Note
At this point, you have three ways you can select the controller called RobotBody – in the main UE viewport itself, in the Sequencer TRACK window, or in the Anim Outliner window. It doesn't matter what method you use to select it. They all do the same thing.
- In the viewport, using the Move transform tool, move the RobotBody controller up about 2 cm. Then rotate the RobotBody controller so the front angles upwards a little bit more than 2 degrees as seen in Figure 17.16.
- Because we have Automatic Keyframe on, it will create a keyframe for the RobotBody controller at frame 0030 for the move and rotate channels automatically.
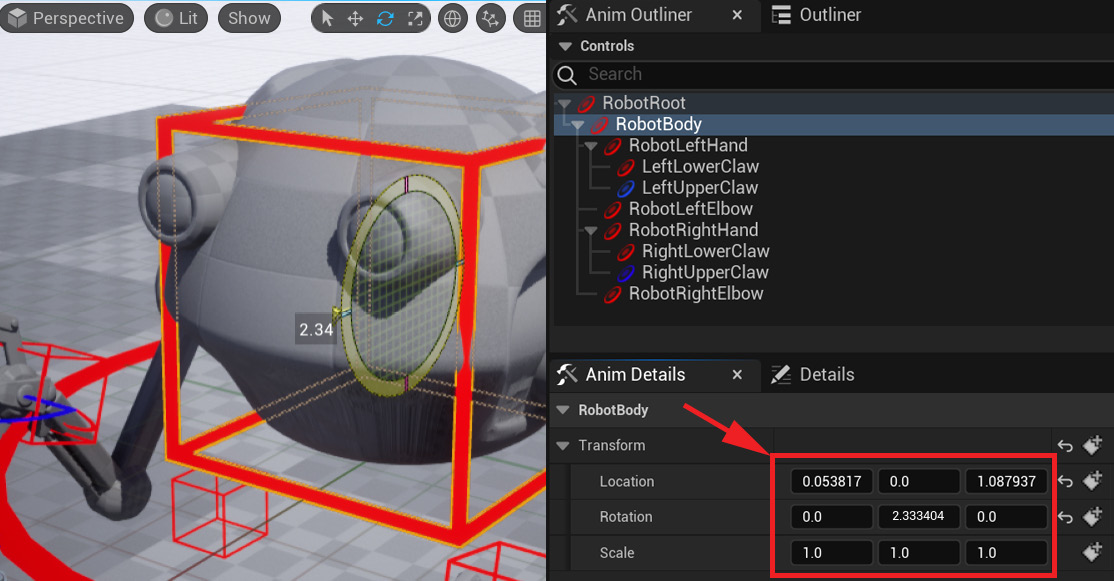
Figure 17.16 – Keyframe 0030 values
- In the Anim Details window, with the RobotBody controller still selected, you'll notice that you can see the current Location, Rotation, and Scale values at frame 30 under Transform. I pointed this out with the red arrow in Figure 17.16.
The three boxes with the values are ordered: the X axis value in the first box on the left, then Y in the middle, and Z on the right.
So, looking at that, at frame 30 (on mine, since yours will probably be a little different), Location Z = 0.053817 and Rotation Y = 1.087937.
I just roughly moved and rotated the RobotBody controller, and that is fine if the resulting animation looks good when you play it back, but for the purpose of this exercise, let us change those values.
- Make sure you are still on frame 0030 in the Sequencer timeline. Double-click on the Location Z value field. That will select and highlight the value and you can change it to 2.0. In the same way, change Rotation Y to 1.5 and the rest to 0.0 as shown in Figure 17.17.
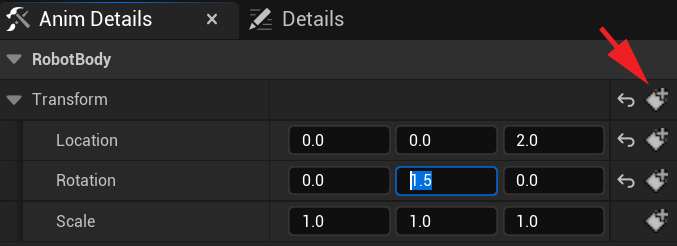
Figure 17.17 – Changing the values in CHANNELS
This will change the Location and Rotation value of the RobotBody controller keyframe on frame 0030. But to be safe, let us place a keyframe on all the RobotBody controller channels.
In the Setting keyframes for the Alien Plant Rig Control section in Chapter 16, Create Simple Swaying Animation Cycle in UE5 Sequencer, we set keyframes in the Sequencer TRACK window using the + keyframe. We can also set keyframes in the Anim Details window and they will appear as usual in our Sequencer timeline, just like doing it in the Sequencer TRACK window.
- With BodyRobot still selected, add a keyframe on all the transform channels at frame 0030 using the Add Keyframe button in the Anim Details window under Transform. I Indicated this button in Figure 17.17 with the red arrow.
Now let us animate the arms of the robot.
If you look at frame 0000 and the ldle Cycle start pose, the right-hand controller is higher than the left-hand controller, so in the next step I'll be animating it down. I'll do the opposite and animate the left hand upwards, so they do the opposite in the animation cycle.
- Still at frame 0030, select the controller called RobotRightHand, move it down about 6 cm and rotate it a little bit upwards, maybe 3 degrees or so. Just like in Step 13, set a keyframe on all the channels on this controller also.
- Still at frame 0030, select the controller called RobotLefttHand, move it upwards about 4 cm and rotate it a little bit downwards, maybe 3 degrees or so. Just like in Step 13, set a keyframe on all the channels.
On frame 0000 in the ldle Cycle start pose, the claws on the right hand are more open and the claws on the left hand are more closed. Let's do the opposite during the animation cycle.
- Still at frame 0030, select the claw controllers on the right hand and close them a bit, but not completely closed. Select the claw controllers on the left hand and open them a bit, but not completely open by rotating the controllers as seen in Figure 17.18. Set a keyframe on all the channels for the claw controllers.
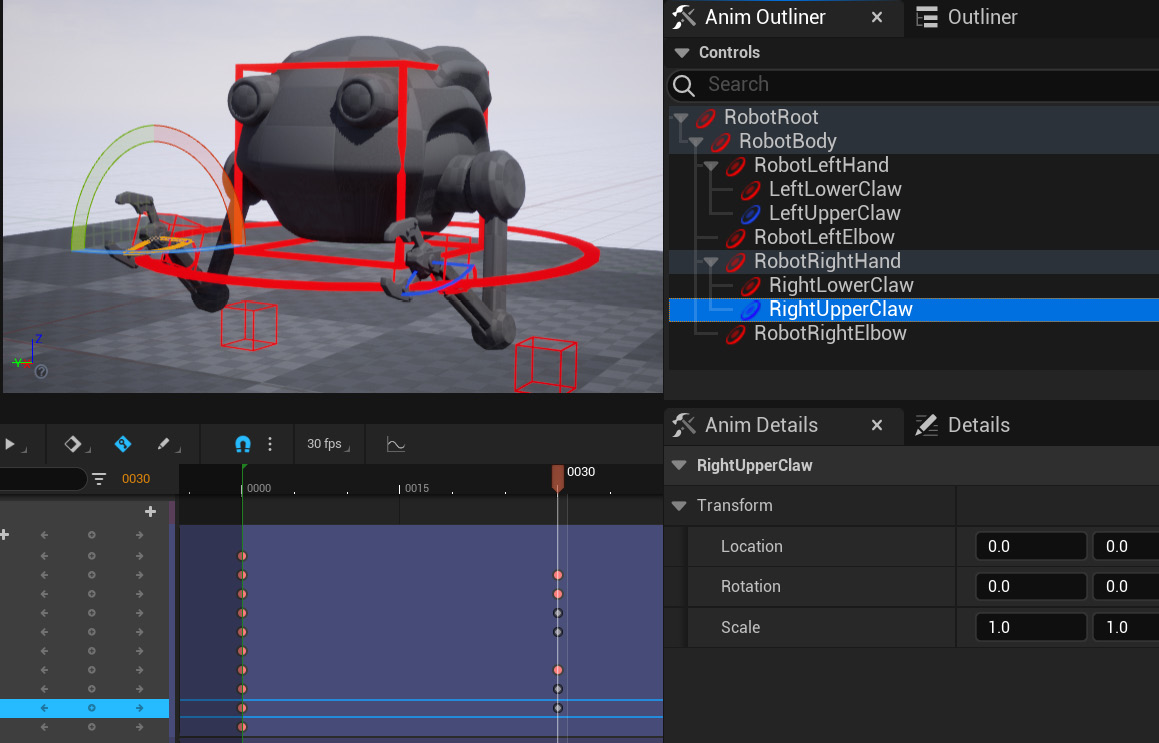
Figure 17.18 – Mid-cycle pose
We now have set the pose and keyframes for the middle of the idle cycle animation. You can now press play on the Sequencer timeline to see the animation cycle play. Hopefully, the cycle looks okay at this point.
If not, you can edit the animation curves as we did in the Editing keyframes and animation curves section in Chapter 16, Creating a Simple Swaying Animation Cycle in UE5 Sequencer.
However, we can improve our new idle cycle a little bit by offsetting the arm animation keyframes to create what we call an overlap (things not moving at the same time in the animation).
- Select the RobotLeftHand, LeftLowerClaw, and LeftUpperClaw keyframes at frame 0030 in the Sequencer timeline together by left-clicking, holding, and dragging, to box selecting them, or holding Shift + clicking on them.
- Move the keyframes for these controllers from frame 30 to frame 25 by clicking, holding, and dragging them to the left as shown in Figure 17.19.

Figure 17.19 – Offset left hand and claws minus 5 frames
- Select the RobotRightHand, RightLowerClaw, and RightUpperClaw keyframes at frame 0030 in the Sequencer timeline. Move the keyframes for these controllers from frame 30 to frame 35.

Figure 17.20 – Offset right hand and claws plus five frames
Advanced Note
This is just a simple offset in the middle of the cycle to create some overlap with the arms, but we could do a complete offset by putting pre- and post-infinity on the curve channels for the arm controllers and offsetting all the arm controller keyframes. But that would mean a longer process and having to resave the start pose. For the purposes of this exercise, what we have done by just offsetting the keys in the middle of the cycle is good enough.
If you expand RobotLeftHand in the Sequencer TRACK window to see all the transform channels, you'll see that by moving the single keyframe on the collapsed view of the RobotLeftHand controller in the TRACK window, it moved all the transform channel keyframes at that frame.
It is like the keyframe on the un-extended view of the controllers in the TRACK window is the parent of the other keyframes on the transform channels that are on the same frame as shown in Figure 17.21.
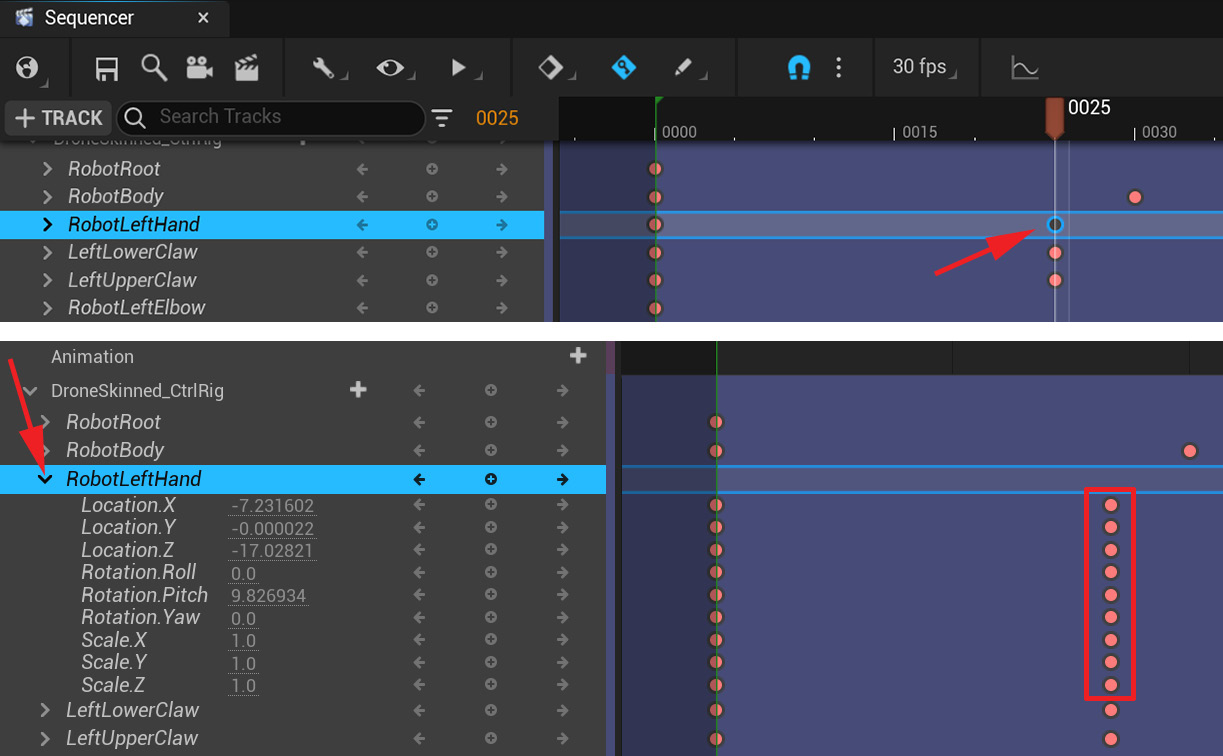
Figure 17.21 – Extended controller view
Sometimes this just makes it easier to move keys around if we have lots of controllers and we don't want to extend them all to move the keys on all the channels. Also notice that when you extend the controller to show the channels, the parent keyframe stops displaying in the timeline. When you collapse (un-extend) the channels, it displays again.
If you're happy with your idle cycle after playing it back, you can export it as its own UE animation to be used later together with other animations.
- In the Sequencer TRACK window, right-click on the overall parent of the Control Rig. In my case, it is Drone Skinned. Click Bake Animation Sequence to export it as a regular UE animation with a keyframe on every frame.

Figure 17.22 – Bake Animation Sequence
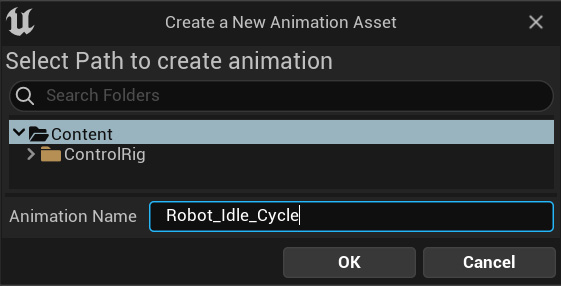
Figure 17.23 – Naming the animation
The default export settings are good.
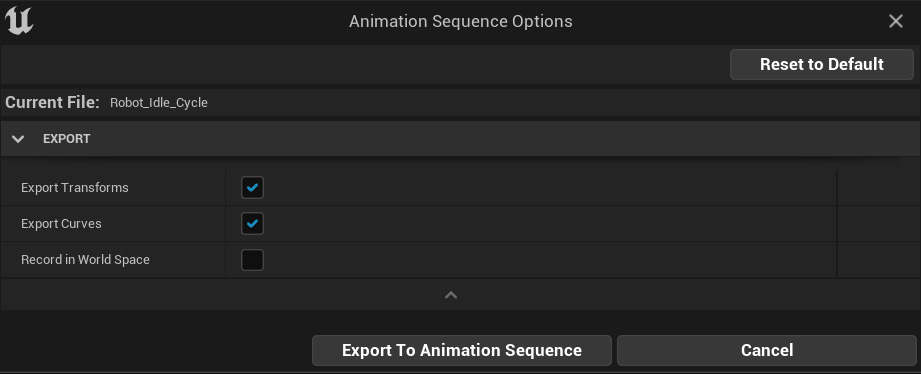
Figure 17.24 – Export settings
We have now finished our first animation idle cycle for our Robot Drone. Next, we will animate a movement cycle for the robot.
Animation B: movement cycle
During the tutorial in this section, after completing the idle cycle in the previous section, I will teach you how to repurpose the idle cycle animation and adapt it to a movement cycle. This is a great way to reuse what we have already done and at the same time, you can learn a few ways to edit existing animations.
I call it a movement cycle, but in reality, it will be animated on the spot and the Robot Drone won't be moving forward for now, during the creation of this animation cycle. This movement cycle is a bit like an idle cycle but looks more like the character is flying forward while doing it.
We will play this movement cycle in our final sequence when our Robot Drone is moving around the scene and will then put actual forward movement in. So, during our final scene in this book, when the robot is hovering in the same spot, we will play the idle cycle, but when it starts moving, we will play the movement cycle.
We can start by duplicating the Idle Cycle LEVEL SEQUENCE so we can make it into something else:
- In the Content Drawer, right-click on the RobotAnim01_IdleCycle LEVEL SEQUENCE and select Duplicate as shown in Figure 17.25.
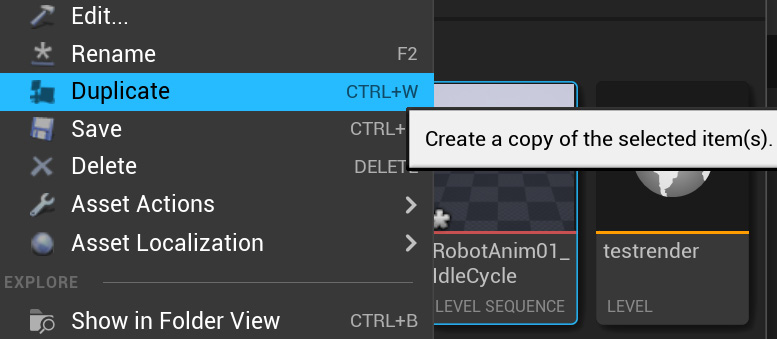
Figure 17.25 – Duplicating idle cycle level sequence
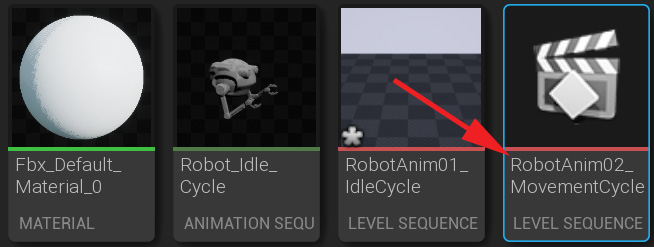
Figure 17.26 – Renaming the duplicate
- Double-click the RobotAnim02_MovementCycle LEVEL SEQUENCE to open it in Sequencer.
During the movement cycle, we want to keep the motion of the Robot Drone's body and arms, but we want it a bit faster while moving forward, so let's make it faster by reducing the length of the cycle from 60 frames to 40.
- Set Active Range (thin red and green lines) from the current 0000-0060 to 0000-0040 in the Sequencer timeline as shown in Figure 17.27.
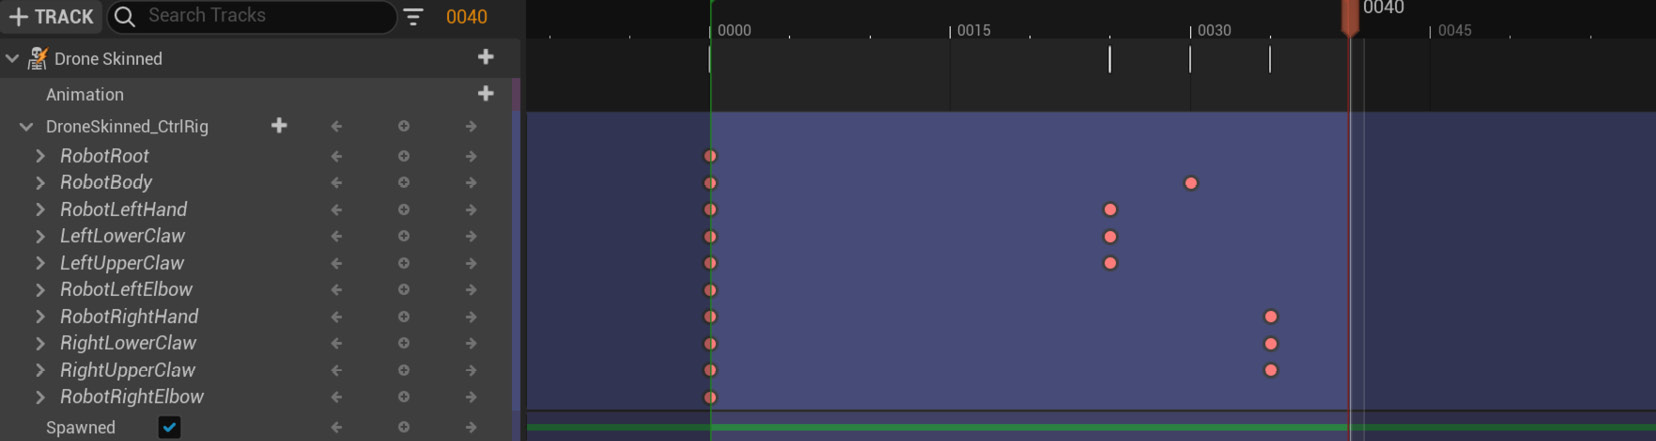
Figure 17.27 – Setting new Active Range 0-40
- Now select and move the RobotLeftHand, LeftLowerClaw, and LeftUpperClaw keyframes from 0025 to 0015. Move the RobotBody keyframe from 0030 to 0020. Move the RobotRightHand, RightLowerClaw, and RightUpperClaw keyframes from 0035 to 0025. Finally, move all the keyframes that were on 0060 to 0040 as shown in Figure 17.28.

Figure 17.28 – Moving keyframes
When you now press play in Sequencer, you'll see it is still almost exactly like the idle cycle, only it plays about one-third faster.
Now let's adjust the animation further with an Additive layer of keyframes. Additive layers are simply a way in UE5 (and most good 3D animation software packages) to keep the existing underlying animation and add extra values on top of it without losing the original animation.
A practical example of this is what we will do next on our robot. We want to keep the body and arms bobbing up and down in the idle cycle, but we want everything to lean forward as it flies forward through the air.
Let's set up an additive layer for our Robot Drone Control Rig.
- In the Sequencer TRACK window, click on + on the parent of all the controllers – in my case, DroneSkinned_CtrlRig – and select Additive:

Figure 17.29 – Adding an Additive animation layer
This will seem to duplicate the Robot Drone controllers, but when you hover with the mouse over the blue bar next to them in the Sequencer timeline window, it will display Additive as shown in Figure 17.30.
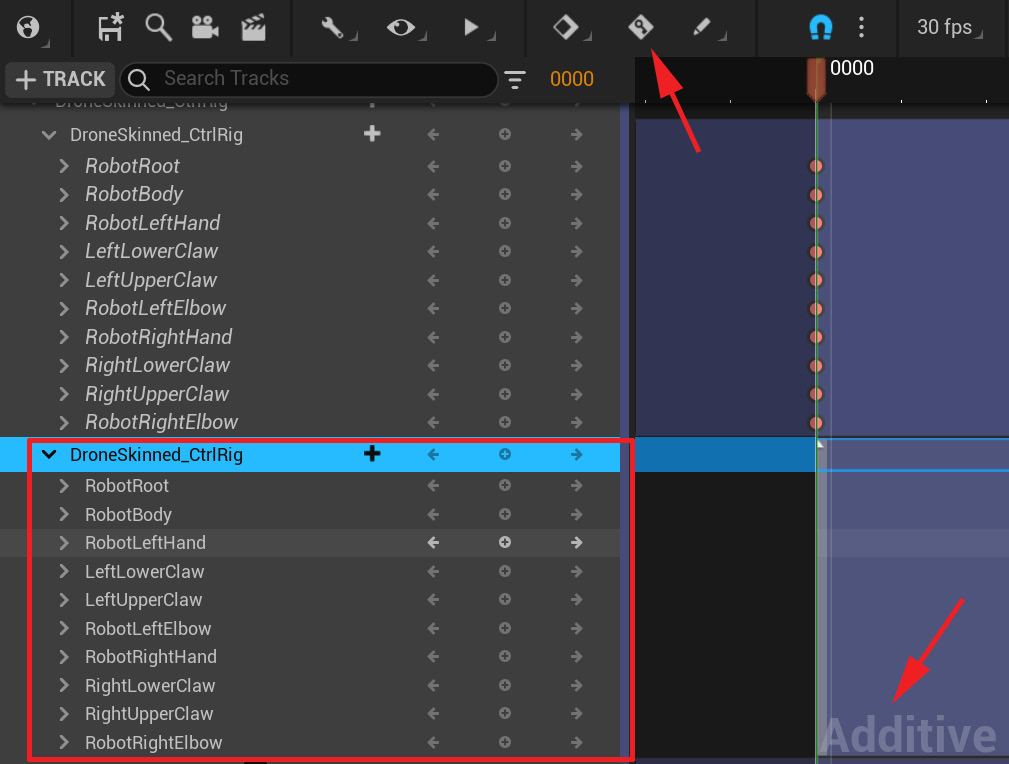
Figure 17.30 – Additive controller and Automatic Keyframe off
- Turn off Automatic Keyframe.
This is particularly important since we now want exact control over what channel we set the keyframes on. With Automatic Keyframe on, it will record changes on all the channels and sets of controllers as we make changes. This is not what we want. We want to only set keyframes on the new Additive controllers, so it needs to be off.
As an additional tip, when working with Additives in Sequencer, don't select the controllers in the viewport since it will select both the regular and additive controller and it might get confusing.
- Select them in the Sequencer TRACK window instead so you know the selected one is the one you should + keyframe once you have made a change. This is just until you get used to setting keyframes on the right controllers with additives.
- Set a keyframe on all the controllers at frame 0000 with the + keyframe on the additive version of the DroneSkinned_CtrlRig parent of the controllers as shown in Figure 17.31.

Figure 17.31 – Setting a keyframe on frame 0000 of the additive layer
- On frame 0000, select the additive controller called RobotBody in the TRACK window and rotate it about -16 degrees in the viewport, to angle the front of the robot downwards, and click the + keyframe in the TRACK window. Make sure you set a + keyframe for the Additive version of the controllers (see Figure 17.32).

Figure 17.32 – Keyframe Additive forward leaning
Now when you click play in Sequencer, the entire animation plays leaning forward. You applied your first Additive animation. To make the movement animation more distinctive, let's change the arms too.
- Sill on frame 0000, pose your Robot Drone arms as in Figure 17.33. Each time you move a controller to pose it, since Automatic Keyframe is still off, remember to set a + keyframe on all the Additive arm controllers on frame 0000 to key the pose. Once again, remember to set it on the Additive set of controllers.

Figure 17.33 – Movement Additive arms pose
Play the animation in Sequencer, and if you're happy with the result, it's time to export it.
- As in the Animating the idle cycle section, Step 21, Figure 17.22, right-click on Drone Skinned in the Sequencer TRACK window and then select Bake Animation Sequence. Name it Robot_Movement_Cycle. It should appear in the Content Drawer as shown in Figure 17.34.

Figure 17.34 – Exported/baked movement idle
We have now completed our second animation for our Robot Drone. Now let's do our third.
Animation C: action animation
For the third animation, we will do an activation. In this activation, the robot turns on, then performs a greeting gesture, and then ends with the idle cycle pose. Here, you can let your creativity run wild and do what you want. At the end of the book, we will put together a final sequence in Sequencer where we will use all the assets we created while working through this book.
Our MetaHuman character will at some point push a button on its suit to activate the drone. The drone will activate, then acknowledge/greet them and then go to the idle cycle pose we saved before so it can blend seamlessly back into the idle cycle animation that we animated here.
How the Robot Drone activates and how it greets the character is up to you. The only thing we must do is end with the IdleBasePose pose (see Figure 17.13) that we can load from our pose library at the end frame of the animation.
Here, you will use everything you have learned so far about animating your Control Rig in Sequencer. I realize this might be a daunting assignment if you haven't done a full custom animation from scratch before. To help you, I'll briefly run you through the process I followed to complete this task.
I decided to do a salute after the Robot Drone activates. I hope it will serve as a good example of the basic process. The animated RobotAnim03_ActionAnimation LEVEL SEQUENCE will also be in the UE project at https://github.com/PacktPublishing/Unreal-Engine-5-Character-Creation-Animation-and-Cinematics/tree/main/FullFinalUE5Project accompanying this chapter so you can examine it if needed:
- Add a new level sequence for this animation by selecting Cinematics | Add Level Sequence. Name it RobotAnim03_ActionAnimation.
- Left-click, hold, and drag the robot Control Rig from the Content Drawer to the TRACK window in Sequencer (see Figure 17.3).
- Activate Automatic Keyframe (see Figure 17.15).
- Set the first pose to look like the robot is inactive at frame 0000 and set + keyframe on all the controllers (see Figure 17.14).
- On frame 0010, I set exactly the same keyframe so from frame 0000 to frame 0010, the robot is perfectly still in the inactive position as seen in Figure 17.35.
This will be helpful later if we want to export this part as an un-activated cycle to extend the playback for as long as we need in our final sequence.
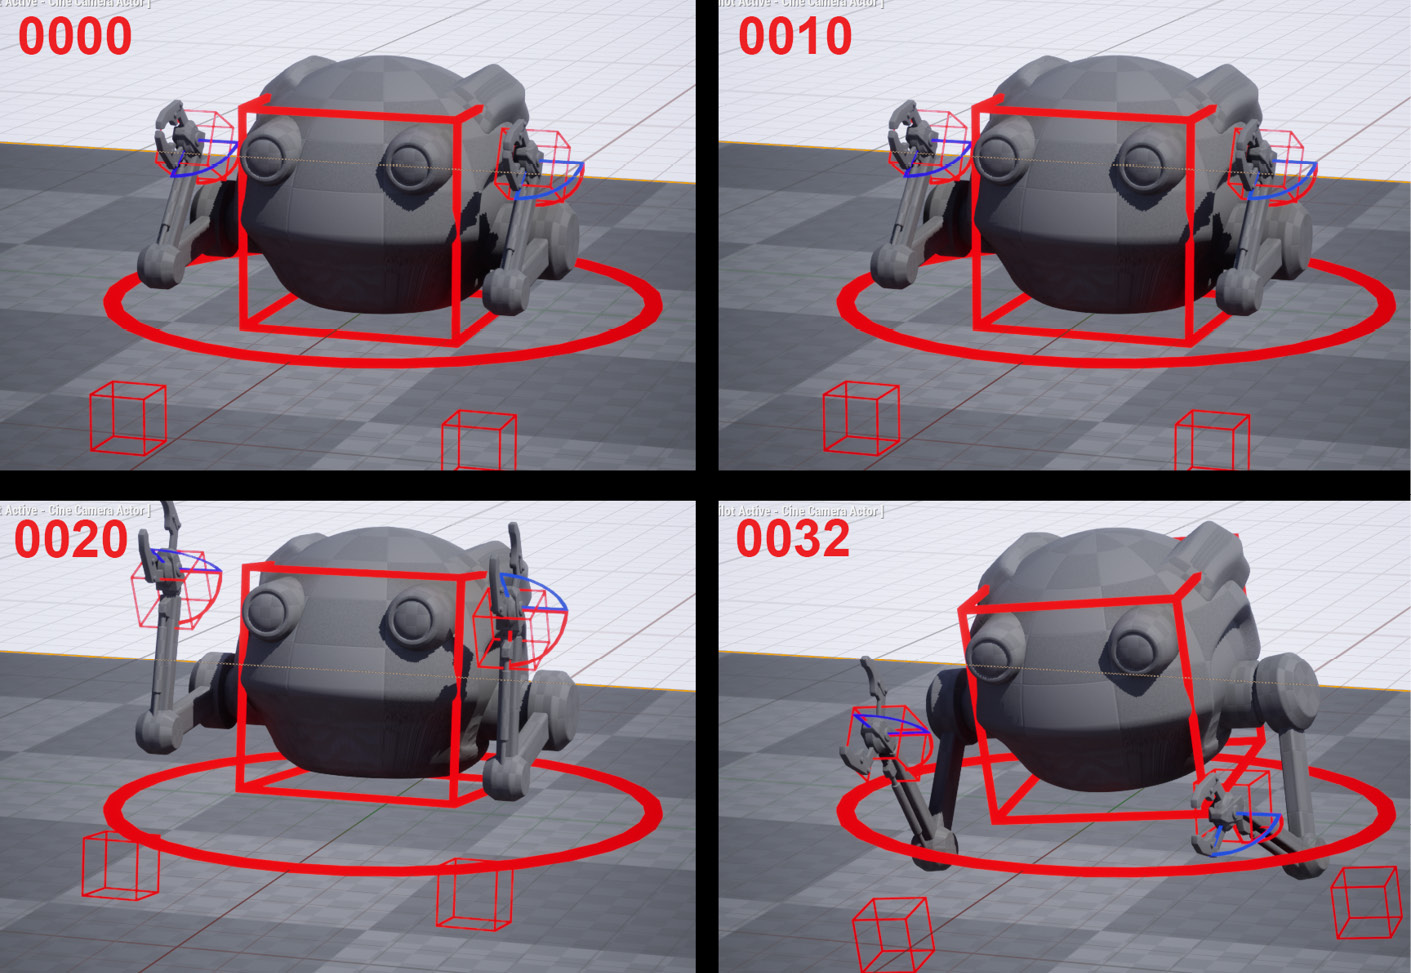
Figure 17.35 – Keyframes 0000 to 0032
- On frame 0046, we will keyframe the right hand in the lower position before the salute. On frame 0057, we will set another similar keyframe with the lowered hand position, but a bit different so there's a little movement between the two keyframes as shown in Figure 17.36.

Figure 17.36 – Keyframes 0046 to 0057
- From keyframe 0057 to 0062, the right hand goes to the salute position, and we then set another keyframe at 0080 that is very similar (just slightly different to keep some subtle movement in the character) to hold the salute till then.
- From frames 0080 to 0086, the hands come back down from the salute as shown in Figure 17.37.

Figure 17.37 – Keyframes 0062 to 0096
- Frame 0096 is an in-between frame before we load the idle cycle pose at frame 0110 as shown in Figure 17.38.

Figure 17.38 – Keyframes 0110
If you have trouble remembering how to paste a pose from the Poses tool, have a look at Figure 17.8 in the Using the Poses tool in UE5 section of this chapter.
- Select the IdleBasePose we saved earlier in this chapter under the How to use the Poses Tool in UE5 section. Select controllers and then select Paste Pose at frame 0110. Set a keyframe on all the controllers.
- Set your active frame range (thin green and red lines in the timeline) from frame 0000 to 0110.
- As in Figure 17.22, right-click on Drone Skinned and then select Bake Animation Sequence. Name it Robot_Action_Animation.
- Set your active frame range from frame 0000 to 0010.
- Right-click on Drone Skinned and then select Bake Animation Sequence. Name it Robot_Action_Unactivated.
I hope you have great fun animating this last animation for the Robot Drone. It does take a bit of practice and experimenting to get animations to look good so don't worry if you found this difficult.
Summary
In this chapter, we learned how to use the animation tools in Sequencer and the Animation window better. We learned about saving specific poses in the Poses tool and pasting them back into our animations. We animated an idle cycle, then repurposed it to create a movement cycle, and finally, we animated a specific action with a few parts to it from scratch. We saw how useful and easy it is to animate with IK after the somewhat complicated process to set it up in the first place. We saved the animations we created for later use in the final scene we will construct.
In the next few chapters, we will explore how to use motion capture on our MetaHuman in UE5.