
Chapter 12: Alien Plant Skinning in Blender
In the preceding chapter, we created a skeleton armature for our Alien Plant. Using a skeleton with a 3D model, you need to tell the 3D software what part of the model needs to follow which joints. You also need to tell the 3D software how much it influences that part of the model, particularly the blend between different joints. This process is called skinning. It is much like the way your forearm skin follows your forearm bone and the elbow skin is a blend between your forearm and upper arm bones. Skinning is also commonly called skin deformation.
All this might sound very complicated to do. Indeed, to do the skinning of a full human or animal character, for example, can be very challenging and time-consuming. However, in this lesson, we will start with the very basics, which are easy to master and will enable you to achieve a lot in your 3D scenes. In this chapter, we will cover the following:
- Introduction to skinning in Blender
- Skinning the Alien Plant mesh to its skeleton
Technical requirements
You need to have Blender installed, which can be installed for free from https://www.blender.org/ (at the time of writing). The Blender version in this chapter is 3.1.2, but some older and newer versions will also work.
You will also need a basic understanding of how to navigate the 3D user interface. If you skipped ahead, this was covered in Chapter 1, An Introduction to Blender's 3D Modeling and Sculpting Tools. If you want further in-depth tutorials on how to use Blender, https://www.blender.org/support/tutorials/ is a great resource.
The files related to this chapter are placed at https://github.com/PacktPublishing/Unreal-Engine-5-Character-Creation-Animation-and-Cinematics/tree/main/Chapter12
Introduction to skinning in Blender
As I explained in the introduction to this chapter, skinning is where we tell the 3D model how to deform and follow the bones. We need a way to tell the 3D software what part of the 3D model we want to follow, which bones, how much, and how to blend between them. We call this skin deformation, generally. Skinning is applied to the vertices of the 3D model. Editing the amount a vertex is deformed by a bone is called editing its weights.
There are mainly two kinds of skin deformations:
- Rigid, where the vertices follow the bone at 100%.
- Blended, in which two main areas of the 3D model meet and are deformed by two different bones. The blend is to have a smooth transition between them, such as an elbow or a knee.
It is the blended deformations where things can get tough in certain circumstances where one vertex can be influenced by not just two, but three, four, or even five bones at the same time. A typically difficult area to skin is around the clavicle area of the human body. There, a vertex can be influenced by the clavicle, upper spine, upper arm, and sometimes, even the neck bone.
However, the basics are simple, and we will learn how to do it with some easy examples. Advanced skinning is beyond the scope of this book, but with some extra research and practice, you too can become good at skinning 3D characters.
Painting skin weights
Most 3D animation software has skin weight editing tools, but perhaps the most common are skin weight painting tools. Blender also has the ability to paint skin weights. Let's look at a basic example that will teach you how to use this tool.
Applying or parenting a 3D object to a skeleton
First, let's learn how to apply the skin modifier to our model in Blender. I pre-prepared a simple file for you that you can load from the files provided: https://github.com/PacktPublishing/Unreal-Engine-5-Character-Creation-Animation-and-Cinematics/blob/main/Chapter12/AlienPlant_Skinning_Introduction.blend
- Open AlienPlant_Skinning_Introduction.blend, as shown in Figure 12.1.
.
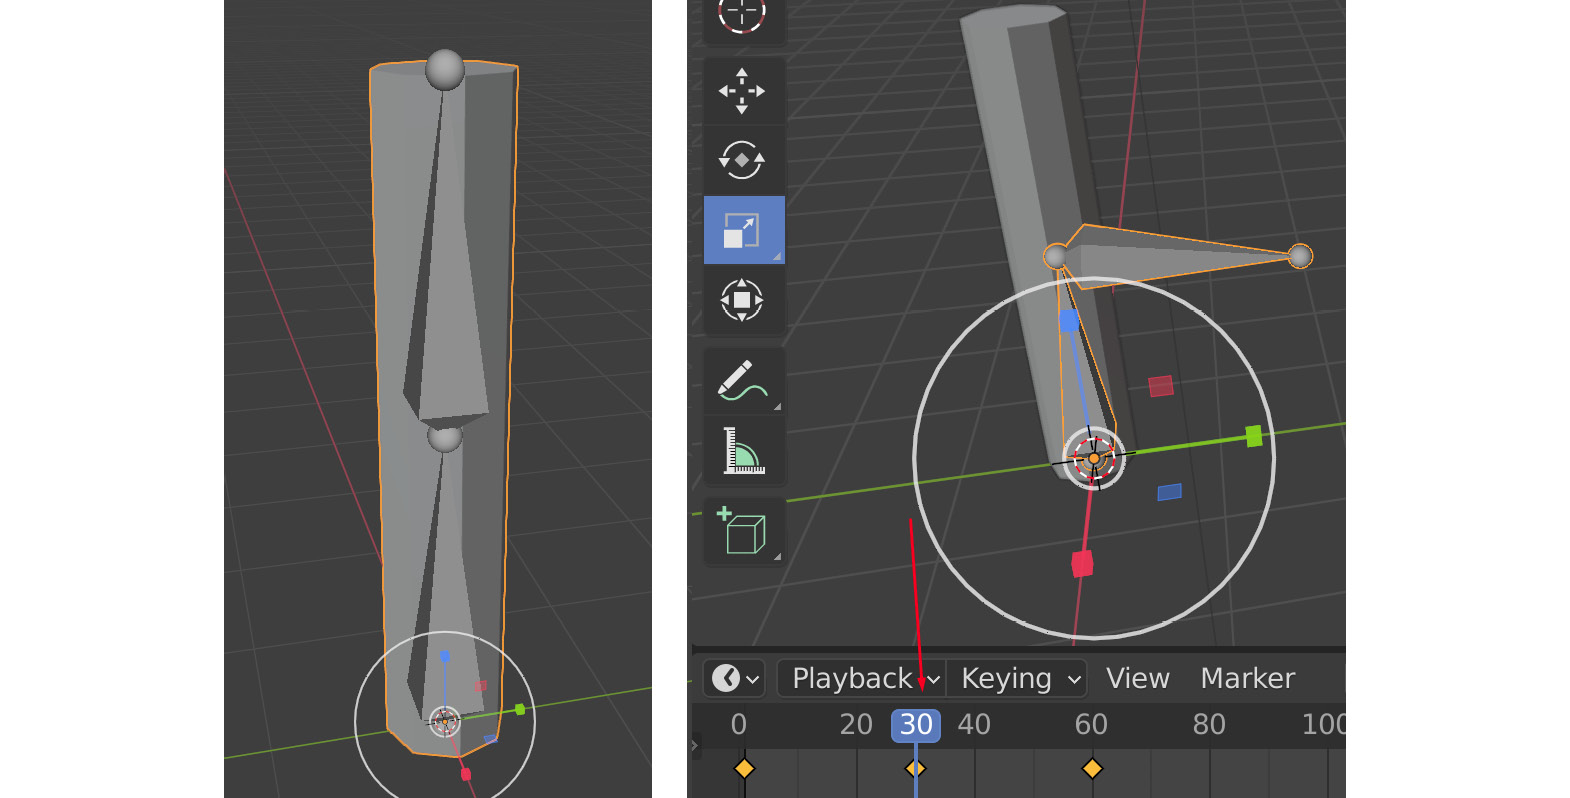
Figure 12.1 – Skinning example file
In this file, there is just a simple cylinder with a simple joint chain. Imagine it being an elbow or a knee. If you drag the blue animation timeline at the bottom, the bone also has a very simple bending animation, but the cylinder's skin doesn't follow it yet.
- The next step is to skin it to the bones. To do this, make sure you are in Object Mode in Blender, select the cylinder (your skin) first, and then a bone (the parent). Hold Shift on the keyboard to select more than one object in the viewport. The selection order is important since the last selected will be the parent. Select Object | Parent | With Automatic Weights as shown in Figure 12.2:

Figure 12.2 – Parent skin weights
You will see that the cylinder's skin now deforms with the bone when we drag the animation timeline. Blender did most of the work for us by using automatic weights, as shown in Figure 12.3:
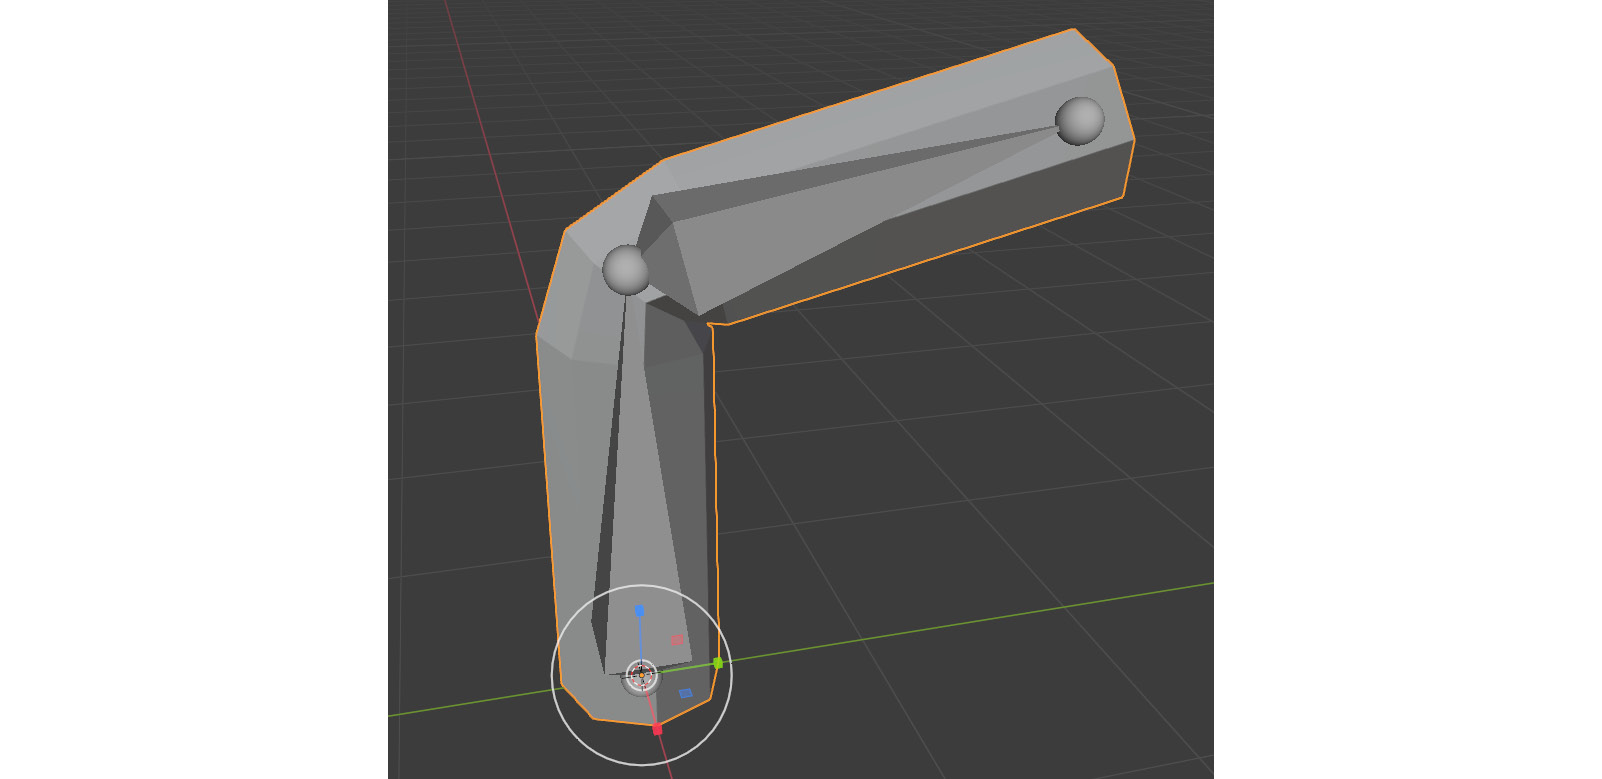
Figure 12.3 – Skinning results
However, we can edit this using weight paint if the automatic weight results are not good. Next, we will see how it works.
How does it work?
To edit the skin or see the weights in the viewport, while the cylinder is selected, switch to Weight Paint mode, as shown in Figure 12.4:

Figure 12.4 – Weight Paint mode
Now, let's explore the basic Weight Paint setting on the Properties menu; under Active Tool, you will see the Weight Paint tool settings, as shown in Figure 12.5:
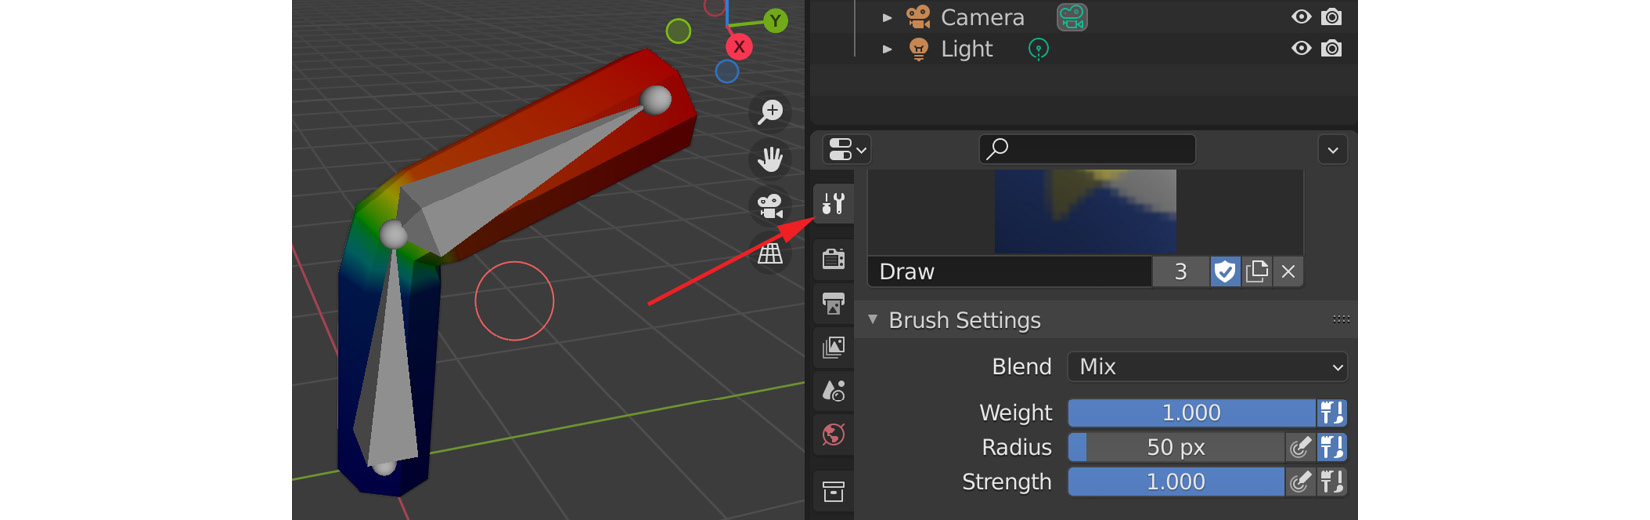
Figure 12.5 – Weight Paint settings
There are lots of Weight Paint settings but for the scope of this book, we will just get started on the essentials that are used the vast majority of the time.
The most important is Brush Settings:
- Make sure Blend is set to Mix.
- Weight is a more advanced setting, and you don't need to worry about it for now. You can just leave that at 1.000 for the vast majority of cases.
- Radius is important since that controls the size of the Weight Paint brush in the viewport. That is the orange circle you can see next to the bent 3D model in the viewport of Figure 12.5.
- Strength is important since that controls how much weight you're painting to the vertex from the selected bone.
If you look at the 3D model, you'll see it is rainbow-colored. The colors represent the weights of a selected bone (the amount it follows a selected bone) and its vertex group (the vertices assigned to it).
In simple terms, this is what the colors mean:
- Red means it's 100% weighted to the bone.
- Green means it's 50%/50% weighted between two bones.
- Blue means it's 0% weighted to the bone.
- The in-between values are a mix of those colors.
If you look at the Blender documentation, it gives you a chart, as shown in Figure 12.6. This is how the colors and weights are laid out:

Figure 12.6 – Weight Paint colors in the Blender documentation
However, to really understand this in practice, let's do an exercise.
Painting the weights
Follow these steps to edit skin weights with painting:
- While in Weight Paint mode, on the Properties menu, under Active Tool, you will see the Weight Paint tool settings. Open the Options dropdown and check Auto Normalize as shown in Figure 12.7. This will give you more predictable weight painting results.

Figure 12.7 – Weight Paint settings
- In Scene Collection, expand the hierarchy Cylinder | Vertex Groups to see your Bone vertex groups. You can select the bone and the weights you want to paint here, as shown in Figure 12.8:
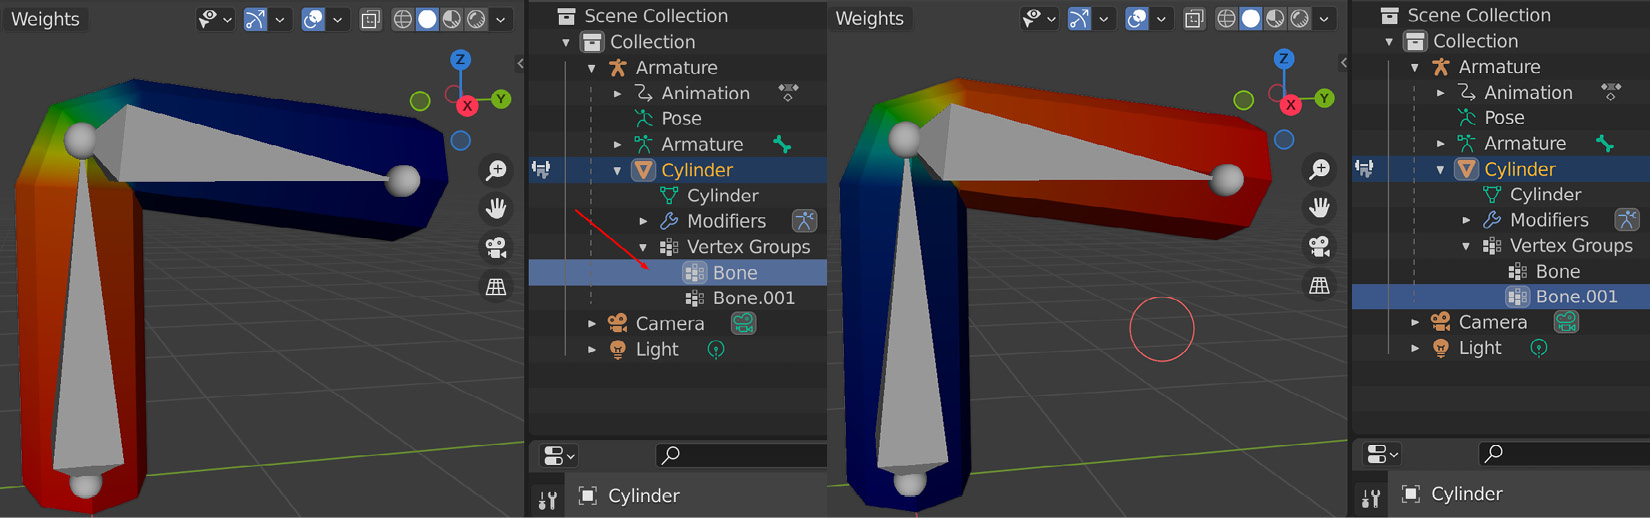
Figure 12.8 – Weight paint vertex group selection
You'll notice that when you select Bone (the root bone), the bottom is red, and the top is blue to reflect the weight. The root bone on the world floor is influencing the bottom part of the cylinder 100% (red) and the top of the cylinder 0% (blue).
Now, if you select Bone.001 (the top bone), the top is red and the bottom is blue. This is the opposite of the previous. The top part of the cylinder follows the top bone 100% (red) and the bottom 0% (blue).
Notice that the middle stays green in both cases because it's a mix between the two bones.
Let's do some weight painting:
- To make the process a bit easier, let's turn on Wireframe in the shaded view to see where the vertices are that we're going to paint, as shown in Figure 12.9:
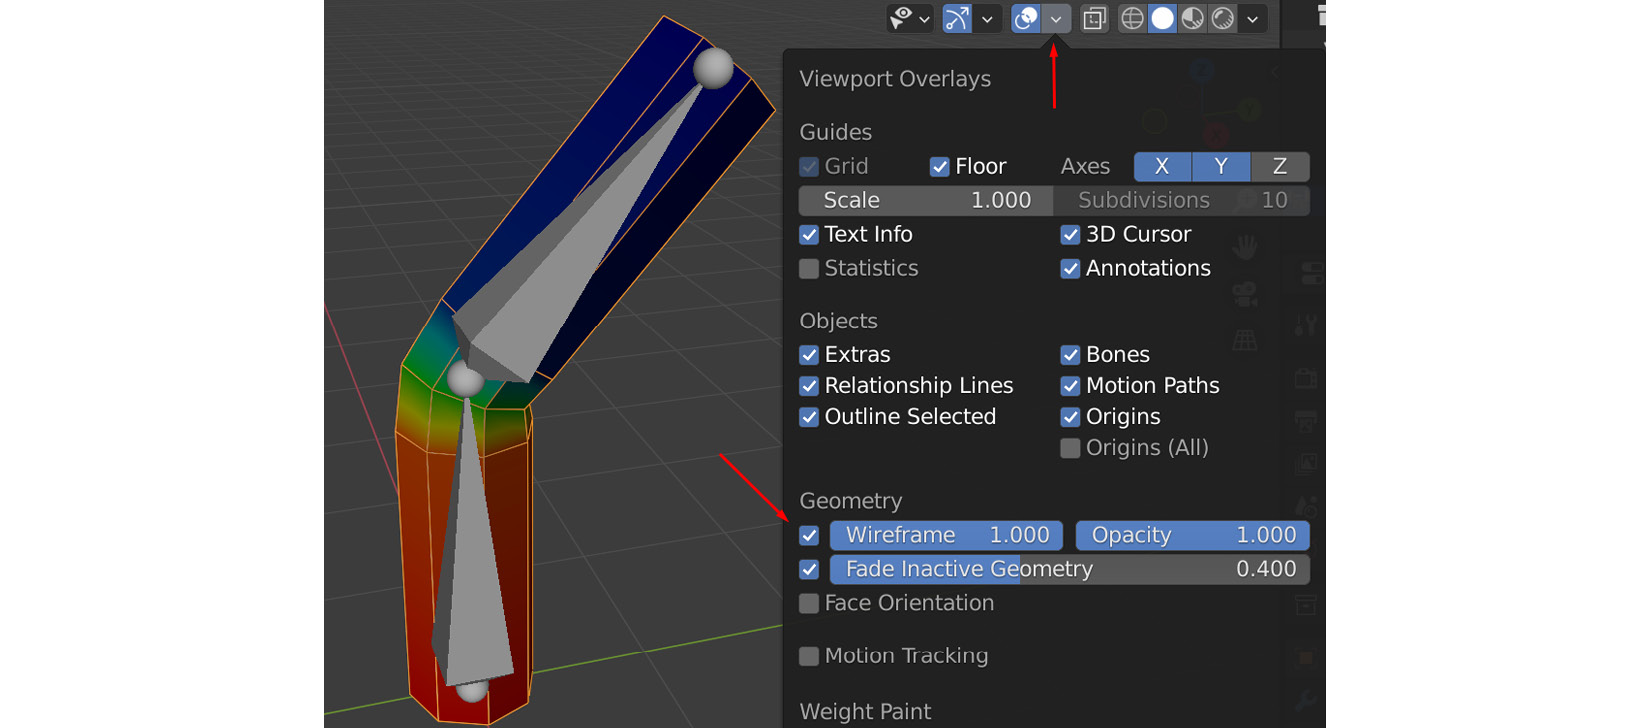
Figure 12.9 – Weight paint display wireframe
- Drag the animation timeline to around frame 14 so the joint has about a 40-degree angle in it. This is so it's easier to see the effect of the weight painting.
- With the first root Bone vertex group selected and the brush Radius set at 50 px and Strength set at 1.000, left-click and drag the orange brush circle across the middle part of the cylinder where it bends, repeatedly releasing the mouse button between strokes and pressing it again for the next stroke.
You'll see the vertices move. As you do this, the vertices will become solid red as the weight you are painting builds up with every stroke of the brush. Keep doing this while navigating around the cylinder to paint all sides of the middle vertices till they're all solid red, as shown in Figure 12.10:
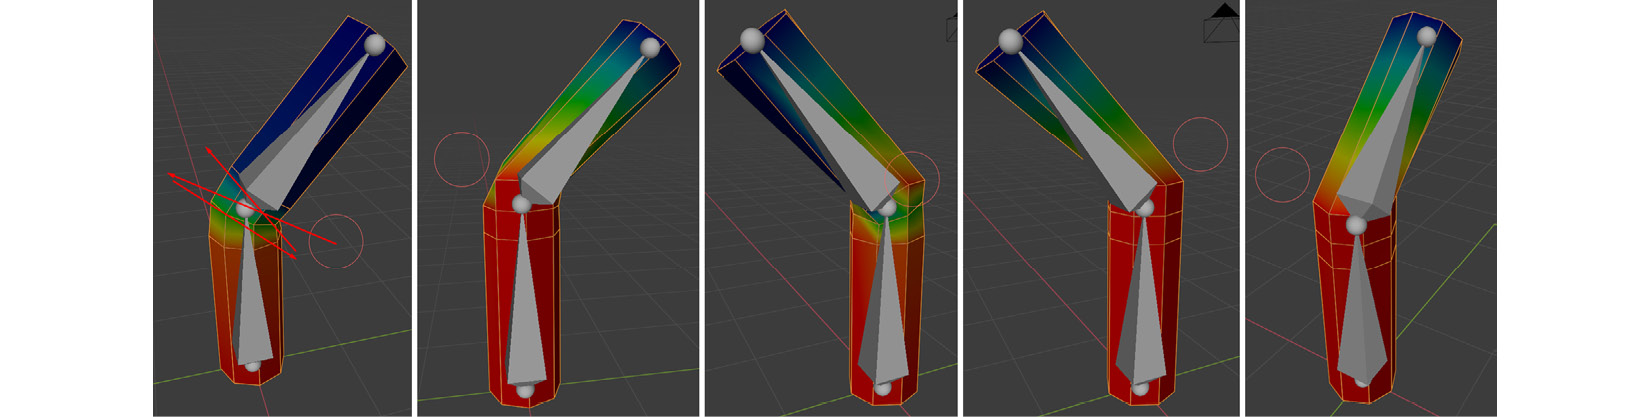
Figure 12.10 – Weight painting
- With all the middle vertices painted red, they now stay with the Bone joint 100% and stop following Bone.001. You can see this more clearly if you scrub the Playback timeline to see the animation.
So, now we've painted the weights, the only problem is that if we drag the animation timeline to frame 30, the bend doesn't look very good anymore because all the vertices in the middle bend part are rigidly weighted to the root bone, as shown in Figure 12.11:
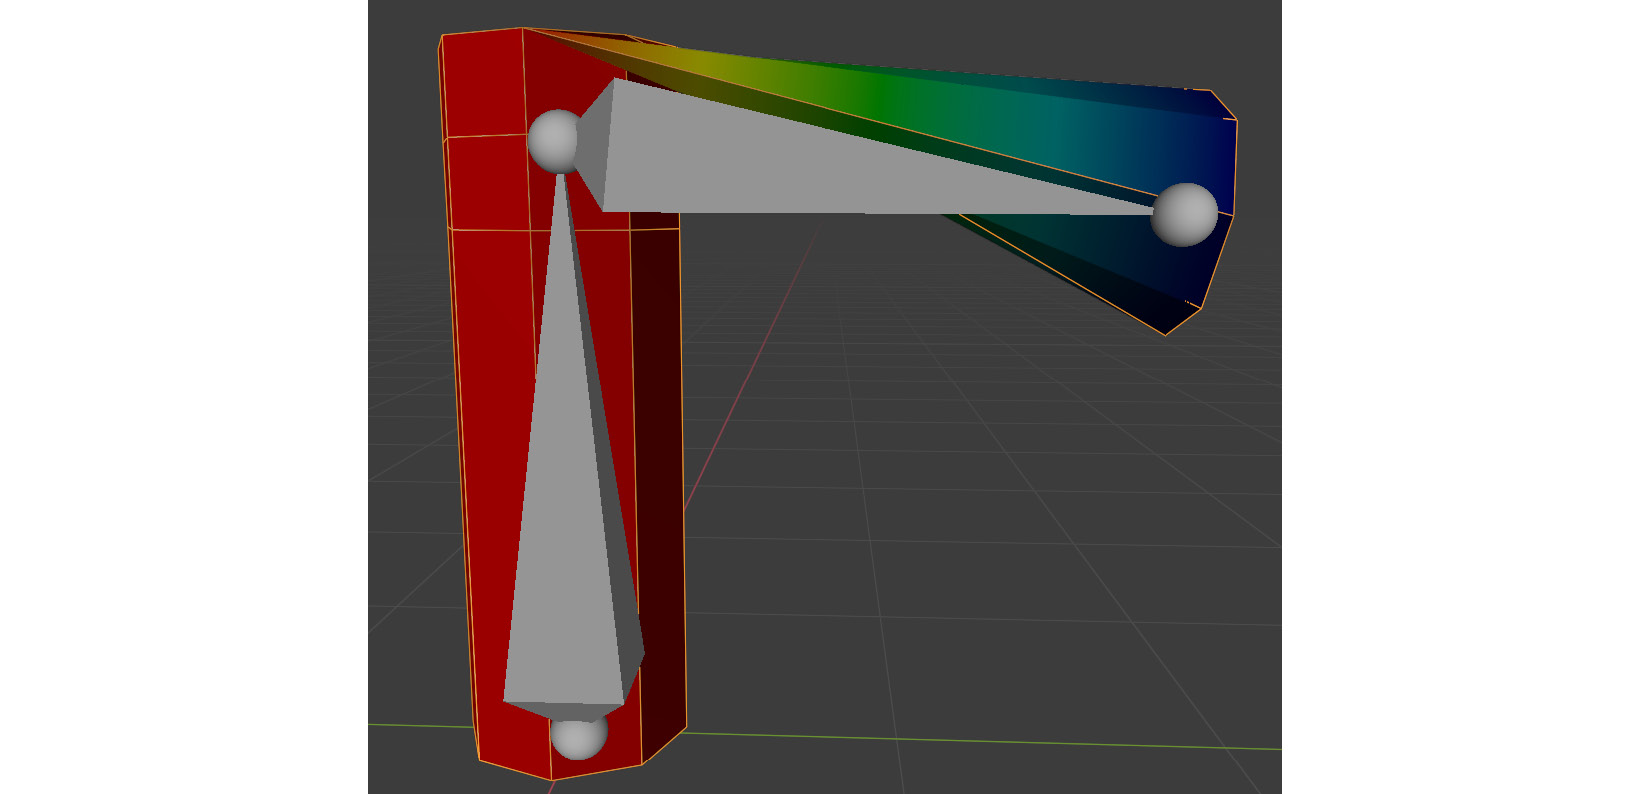
Figure 12.11 – Weight painting result
Let's paint some of the weights back to Bone.001 for a more natural bend.

Figure 12.12 – Weight Paint settings
- This time, paint with single left-clicks over the vertices you want to paint as you navigate around the cylinder. See whether you can end up with something like this in Figure 12.13. It is not great, but let's now try to make it better:
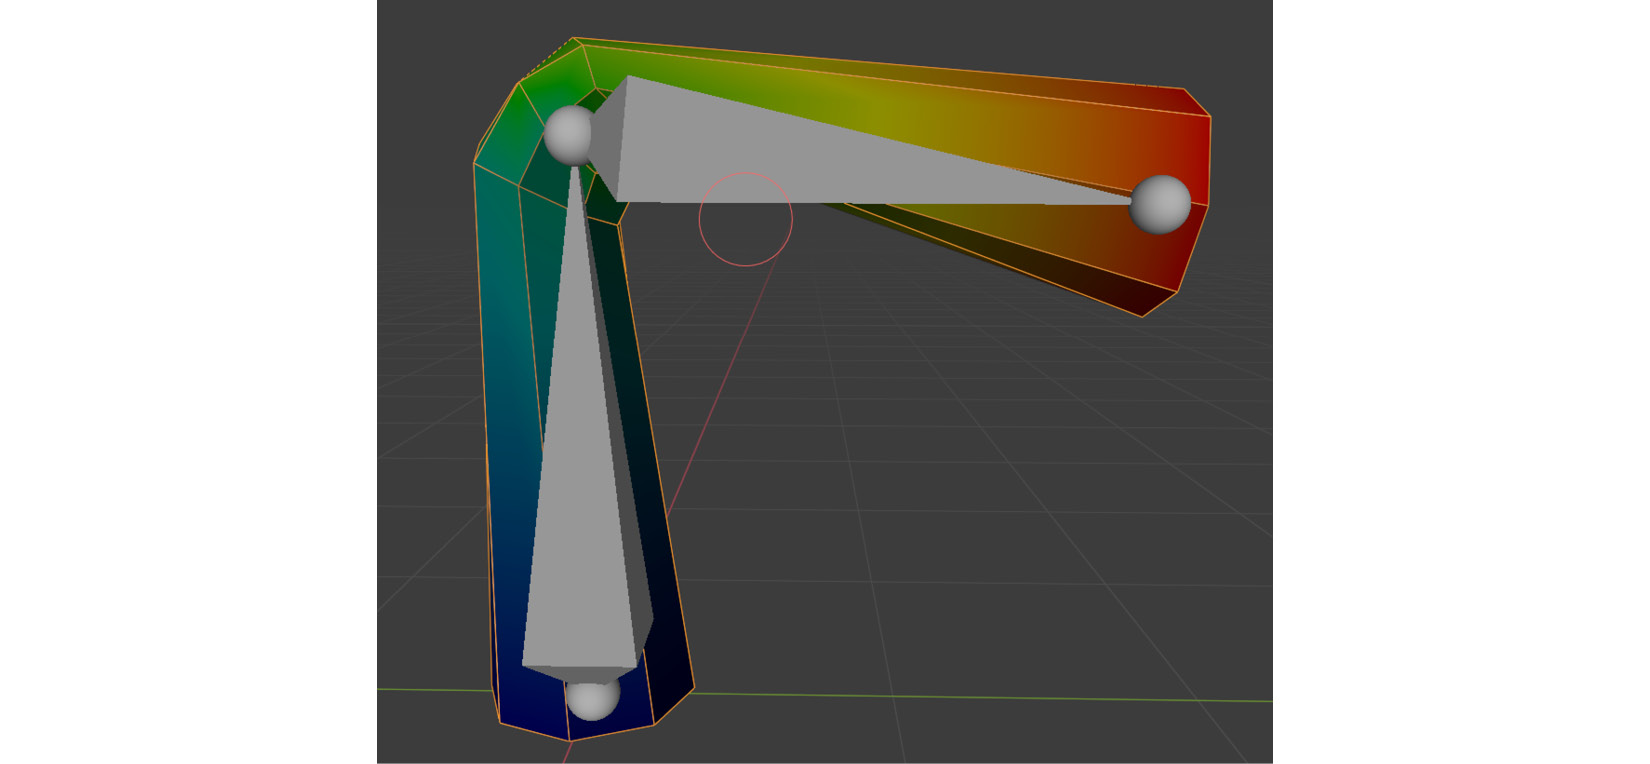
Figure 12.13 – Weight painting edit
- In the top-left corner of the viewport, select the Blur tool instead of the default paintbrush. Using strokes and dabs, left clicking and releasing the mouse button between strokes, use this tool. This tool just evens out the weights for a smoother and cleaner transition. Keep doing this till the whole middle area has a nice and even bend, as shown in Figure 12.14:
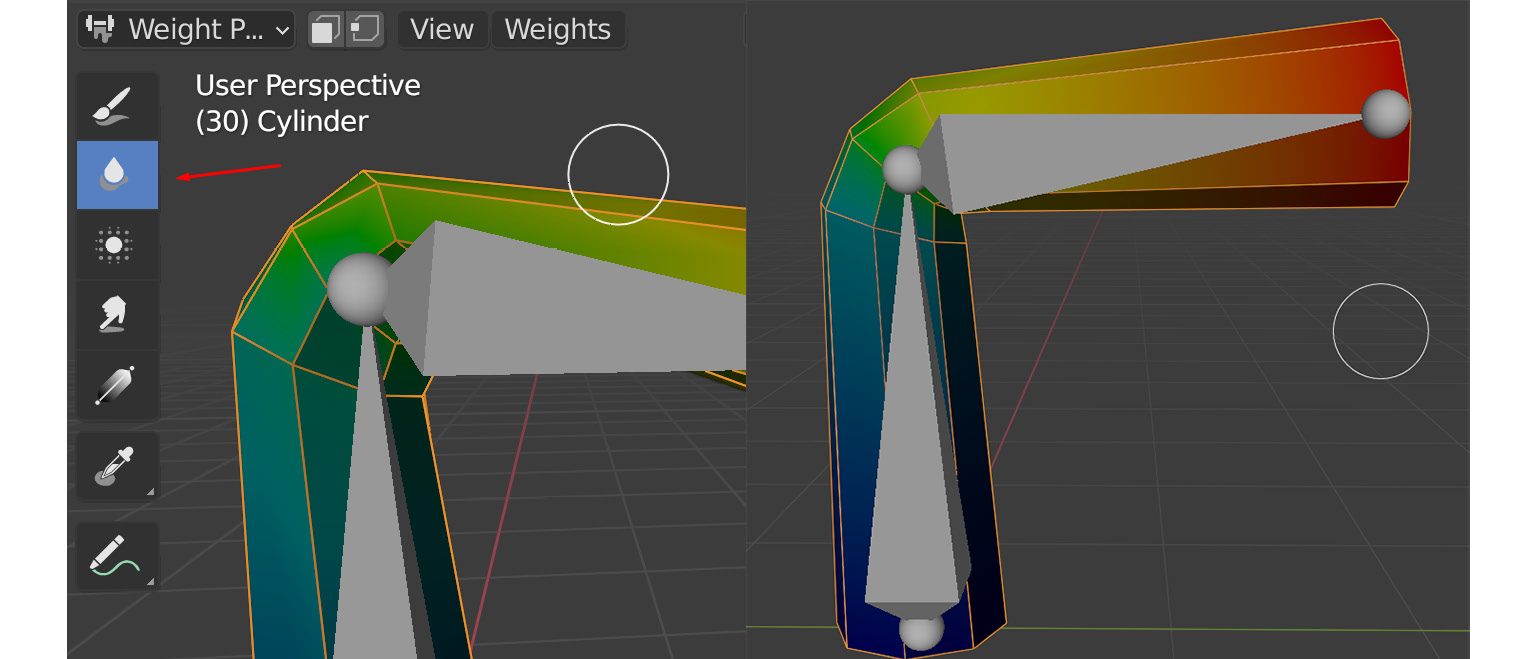
Figure 12.14 – Weight painting Blur tool results
Note
Even though the skinning is better now, you'll notice that we're losing some volume towards the bend as it narrows towards it, which we didn't get when Blender did the automatic weights originally. Losing volume on the bends is a common issue with painting skinning. The quick fix is to switch between vertex groups and paint 100% weight on the two edge loops that maintain the volume (as shown in Figure 12.15). This is followed by blur painting the middle edge till it's even between the two outer loops.
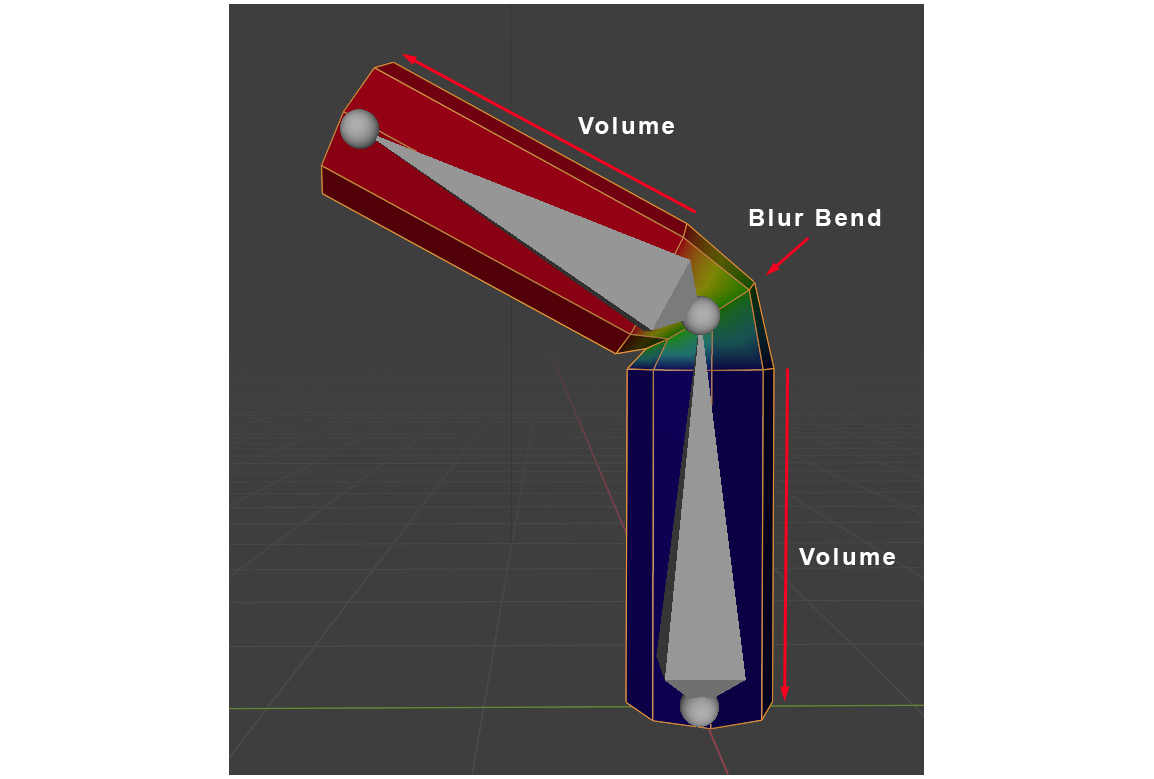
Figure 12.15 – Weight painting keeping volume
Here are some additional notes to further improve the skinning:
- It's very useful to have a temporary animation covering the extremes of the likely amount the joint will bend so you can just drag the animation timeline to see it at those extremes and everything in-between – a bit like this example we've been working on in the tutorial. Alternatively, rotate the joints often to test the skinning as you paint the weights.
- Make the brush size smaller when needed so as not to paint vertices you don't want to move, or bigger if you want to smooth over a bigger area.
- Keep switching between the vertex groups to pull the vertex weights towards the selected bone. If you weight it too much to one bone, select the other bone and paint the weight the opposite way.
- Switch between painting weights and smooth blurring regularly.
To get the skinning perfectly right is sometimes a long and laborious process on a more complex model. To experiment and practice is the best way. There are also other skinning tools available that are outside the scope of this book, but there are many resources available to learn more. However, with this basic set of skills, you can do a decent job of skinning most 3D models.
Now that you have a basic understanding of how skinning works, let's skin our Alien Plant.
Skinning the Alien Plant mesh to the skeleton
Now, for the final part of this chapter, we'll finally get to skin our alien plant. Your plant might be different from mine if you modeled it yourself in the previous chapters. Your skinning results might be different from mine and might require more editing. Since you have learned the basics of skin weight painting in this chapter, you should be able to fix any problems that come up. If not, load the file provided (https://github.com/PacktPublishing/Unreal-Engine-5-Character-Creation-Animation-and-Cinematics/blob/main/Chapter12/EndOffChapter11_Results_AlienPlant_withSkeleton.blend)
so you can proceed with the rest of the instructions.
Skinning the Alien Plant
We'll use the skeleton we created earlier and skin our Alien Plant to it. To do so, follow these instructions:
- Load the file you saved earlier with the Alien Plant and the skeleton.
- Once the file is loaded, just like in the previous section, we will parent the Alien Plant mesh to the skeleton by selecting the Alien Plant 3D model first and then the skeleton. Click Object | Parent | With Automatic Weights.
- Now that the skinning is applied to the Alien Plant, let's test it and see whether there's anything that needs fixing. Place Blender in Pose Mode, select the bones one by one, and test the deformation by rotating them as shown in Figure 12.16:
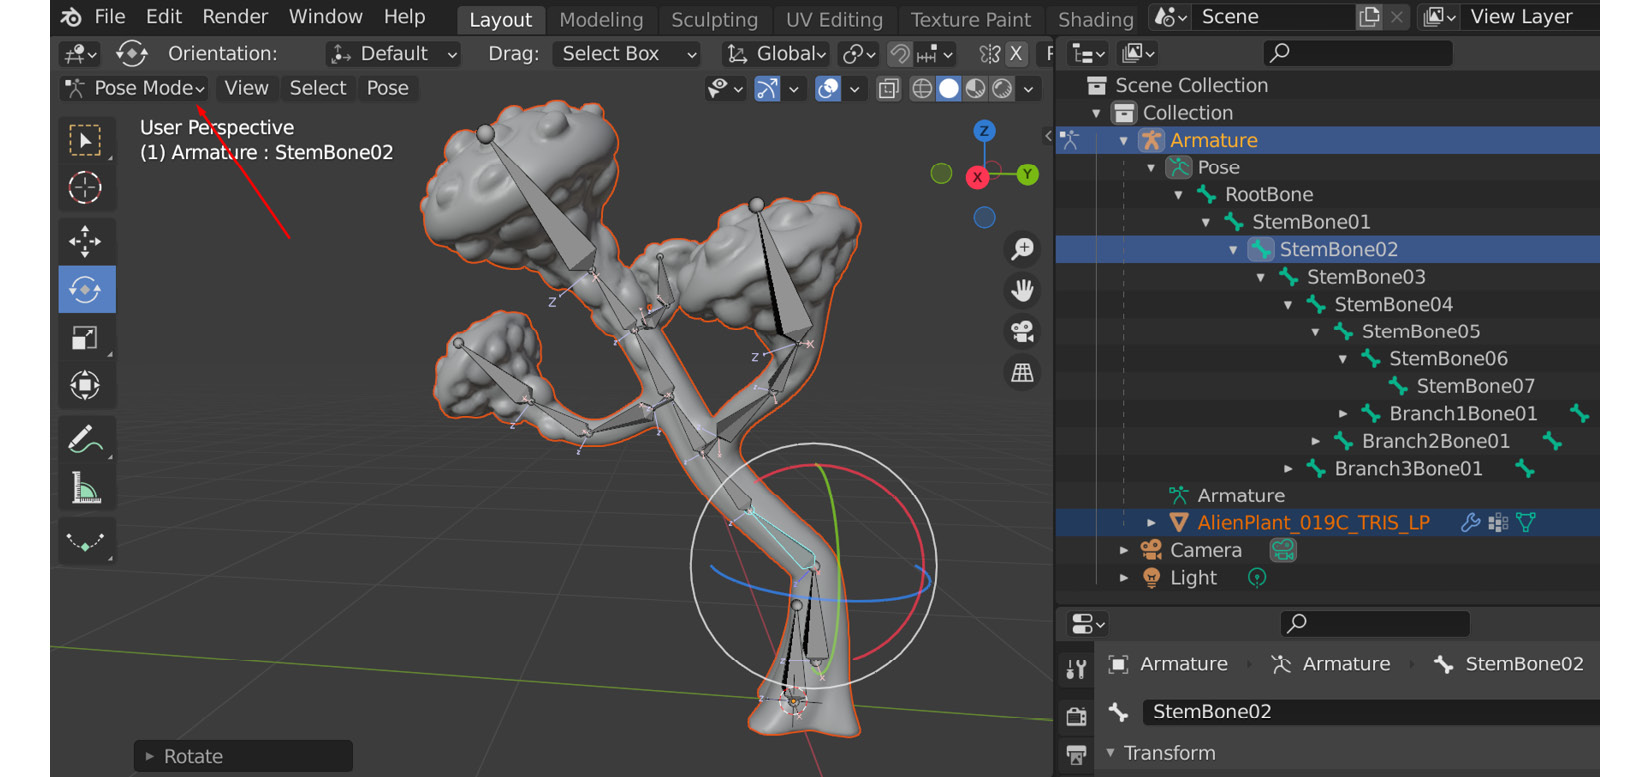
Figure 12.16 – Skinning test
- Undo (Ctrl + Z) after each rotation or after testing to get the bone back to the default pose it was skinned in. Alternatively, you can achieve the same by selecting all the bones (default keyboard shortcut A) and then using Pose | Clear Transform | All, as shown in Figure 12.17:

Figure 12.17 – Resetting pose after testing
- You can also put Blender in Object Mode, select the plant model, and then vertex Paint to inspect each vertex group individually by selecting them in Scene Collection. Make sure to expand the hierarchy if you don't see the vertex groups at first glance as shown in Figure 12.18:
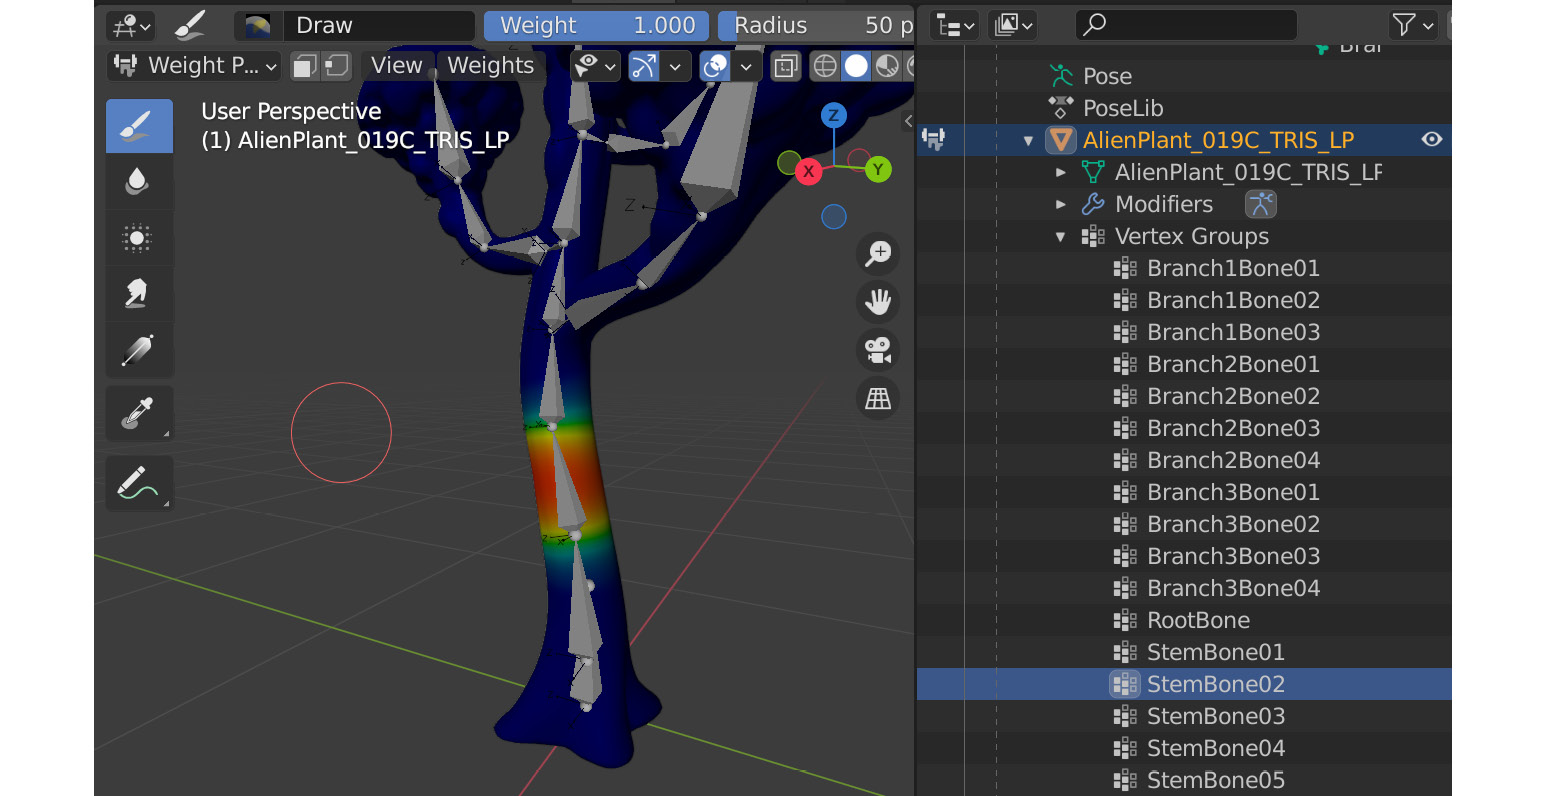
Figure 12.18 – Vertex group inspection
- Use the Paint Skin Weights tools if you need to fix any problems with the skinning.
- Save the Alien Plant Blender file for use in a later chapter with a descriptive name in a convenient location.
Congratulations, you have successfully skinned your Alien Plant! This is a big step forward in your journey through this book.
Summary
In this chapter, you've learned how to do skinning and how to edit skinning with weight painting, and finally, you have skinned your Alien Plant to your skeleton. If you enjoyed this process, this is the very first step in becoming what they call a character rigger in the industry, a specialized job for people who enjoy skinning and rigging characters for games and movies. Even if this process is not one of your favorites, it's important to learn how to do it if you want to create new animated content on your own as a generalist.
In the next chapter, we will use what we have learned so far and create a skeleton and skin for our robot character.