
Chapter 9: Building a Virtual 3D Movie Set in UE5
In the previous chapter, you learned how to create a custom MetaHuman and then added your character to your UE5 project.
So far, we've focused on creating actors (the female sci-fi character and the Robot Drone) and environment props (the Alien Plant) for your 3D movie. In this chapter, we will change our focus to the 3D environment that forms the basis of your virtual 3D movie set.
First, we will go through the step-by-step process of importing meshes for the ground and adding more assets to the 3D movie set. Then, we will jump into the Quixel Bridge plugin that is integrated into UE5. In Quixel Bridge, we will collect free 3D rock assets and some material assets for your 3D movie set.
I will show you how to send these assets to UE5, as well as how to customize them for use in your 3D movie set of an Alien Planet's surface.
This tutorial is aimed at beginner-level UE users. I will focus on creating a 3D movie set by using the most basic settings and techniques. While it is certainly possible to create much more detailed and realistic 3D movie sets in UE5, that is beyond the scope of this chapter's tutorial.
In this chapter, we're going to cover the following main topics:
- Setting up the basic elements of your 3D movie set
- Customizing your Material Instances
- Building the 3D movie set
By the end of this chapter, you will know how to create your own custom 3D movie sets.
Technical requirements
To complete this chapter, you must have UE5 installed. Even if your version of UE is newer, the examples should still work without any problems. You will need the following to complete this chapter:
- A computer that can run basic 3D animation software.
- Unreal Engine 5.0.1. You can download it from https://www.unrealengine.com/en-US/download.
- You should have read Chapter 6, Exploring Unreal Engine 5, to understand the basics of UE5's UI.
Let's start this chapter's tutorial by preparing the scene. This scene will form the basis for your 3D movie set.
The files related to this chapter are placed at https://github.com/PacktPublishing/Unreal-Engine-5-Character-Creation-Animation-and-Cinematics/tree/main/Chapter09
Setting up the basic elements of your 3D movie set
Your 3D movie set is the scene where all your actors, background elements, and props are placed.
In this tutorial, we will build a 3D movie set of an Alien Planet's surface. The landscape will be made up of the ground layer (base ground meshes) populated with rock formations and Alien Plants. In the sky, you will place a Sun and an Alien Planet.
I have prepared three models for you to download from this book's GitHub repository that you will need to use in this tutorial:
- The first two models are the foreground and background base ground meshes. I created these two meshes by using Blender's 3D sculpting tools. In the future, you can create base ground models by using the 3D sculpting techniques that you learned in Chapter 3, Let's Sculpt an Alien Plant!. For now, download the ForeGround.fbx and BackGround.fbx files from GitHub: https://github.com/PacktPublishing/Unreal-Engine-5-Character-Creation-Animation-and-Cinematics/tree/main/Chapter09.
- The third model I have provided for this tutorial is the Alien Planet model. This model is in UE's .uasset format. Download the Planet.zip file and extract the contents of Planet.zip to a folder named Planet on your hard drive. You can download the Alien Planet model from GitHub: https://github.com/PacktPublishing/Unreal-Engine-5-Character-Creation-Animation-and-Cinematics/tree/main/Chapter09.
Now that you've downloaded these three assets and extracted Planet.zip, you are ready to start creating the 3D movie set:
- Launch UE and create a new Film/Video Live Events project, as you did in the Setting up your project section of Chapter 6, Exploring Unreal Engine 5.
- In the World Outliner panel, select Floor, Player Start, and SphereReflectionCapture. Press the Delete key to delete these items since we won't be using them in our tutorial.
- Go to your Content Browser window's sources view area and click on the Content folder. Create a new folder and name it Terrain_models.
- Open the Terrain_models folder, then drag and drop the ForeGround.fbx and BackGround.fbx static meshes into the asset view area of the Content Browser window. The FBX Import Options window will appear. Use the same static mesh Import settings that you used in the previous UE chapters, but this time, tick the checkbox for Build Nanite under the mesh section. This will enable Nanite during import so that you don't have to enable it manually later. This will add the two base landscape meshes to the Terrain_models folder.
- Copy and paste the MetaHumans, AlienPlant, and RobotDrone folders from your previous UE project's Content folder to this new project's Content folder.
- Copy and paste the Planet folder (including its three sub-folders) inside your project's Content folder.
- Because we copied these folders into the Content folder of your new project, UE will give you a message stating Changes to source content files have been detected. Would you like to import them?. Click on Import to have UE process all these source file changes.
- You will see that the AlienPlant, MetaHumans, Planet, and RobotDrone folders are in the Content Browser's sources view area:
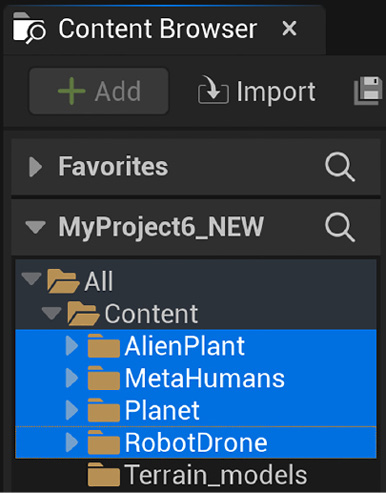
Figure 9.1 – The Content Browser window will now show the folders that you've placed in your project's Content directory
- Now, simply drag and drop ForeGround (static mesh) and BackGround (static mesh) from the Terrain_models folder into the Viewport. This will place them inside the scene.
Note
The following screenshot serves as a reference to show which axes are where in the Transform section (the number values shown are the default values and are not part of this tutorial).

Figure 9.2 – The Transform section in the Details panel
- Now that these static meshes are in the scene, we need to adjust their positions by using the Transform section in the Details panel. The axes mentioned in the following steps are shown in the preceding screenshot. In the Transform section, set ForeGround (static mesh) Location to X-Axis: 0, Y-Axis: 0, and Z-Axis: 20. Leave Rotation and Scale as-is.
- In the Transform section, set BackGround (static mesh) Location to X-Axis: 0, Y-Axis: 0, and Z-Axis: 22. Leave Rotation and Scale as-is.
- We want to add the female sci-fi character to the scene to serve as a scale and position reference. In the sources view area of the Content Browser window, navigate to MetaHumans | SciFiGirl. In the asset view area of Content Browser, find the BP_SciFiGirl Blueprint file and double-click it. This will open the blueprint in a new Editor window. A message with a progress bar will pop up saying that UE is compiling shaders. Wait for this process to finish.
- More message windows will pop up to inform you about missing plugins and missing project settings. Just click on Enable Missing in all these message windows. Once all the missing plugins and project settings have finished updating, a message will appear saying Restart required to apply new settings. Click on the Restart Now button to restart UE5.
- Drag and drop BP_SciFiGirl (the Blueprint file) into the Viewport. In the Transform section, set Location to X-Axis: 0, Y-Axis: 0, and Z-Axis: 22. Leave Rotation and Scale as-is.
- Navigate to MetaHumans | SciFiGirl | Armor | Armor_models, hold down Shift, and select all 16 armor pieces.
- Drag and drop all 16 of the sci-fi armor pieces from the Armor_models folder into the Viewport. In the Transform section, set their Location to X-Axis: 0, Y-Axis: 0, and Z-Axis: 22. Leave their Rotation and Scale as-is. This will make sure that the armor pieces are in the female sci-fi character's current location.
- Right-click on an empty spot in the World Outliner panel and select the Create Folder option. Name this folder Armor.
- Drag and drop the 16 armor pieces into the Viewport and add them to the Armor folder. Select all 16 armor pieces and match their Location with the Location setting of SciFiGirl.
- Drag and drop Planet1 into the Viewport. In the Transform section, set its Location to X-Axis: 96656, Y-Axis: -12354, and Z-Axis: 14629. Leave Rotation as-is. Set its Scale to X-Axis: 600, Y-Axis: 600, and Z-Axis: 600. This will place the rocky Alien Planet in the sky to make a good scene composition.
Note
This Alien Planet is not physically correct, so it lacks proper parallax perspective. If you ensure that the camera won't move around too much, it works well enough. Don't worry if the Alien Planet doesn't look very realistic at this stage – in Chapter 10, Adding Lighting and Atmospheric Visual Effects in UE5, the Alien Planet will be modified and it will look great for your 3D movie set.
- Now, let's add the Robot Drone character to the scene. Drag and drop RobotDrone (static mesh) into the Viewport. In the Transform section, set its Location to X-Axis: 3.32, Y-Axis: 348.73, and Z-Axis: 180. Set its Rotation to X-Axis: 9.3, Y-Axis: 1.78, Z-Axis: 150. Leave Scale as-is.
- Drag and drop AlienPlant (static mesh) into the Viewport. Then, in the Transform section, set its Location to X-Axis: 82.68, Y-Axis: -164.24, and Z-Axis: 37.22. Set its Rotation to X-Axis: 0, Y-Axis: 0, and Z-Axis: -71. Leave Scale as-is.
With that, you have placed the first seven 3D assets of your 3D movie set: SciFiGirl, Armor, ForeGround, Background, RobotDrone, AlienPlant, and Planet.
The following screenshot shows what your scene should look like at this point.
Note
The ForeGround and BackGround static meshes are currently untextured, which is why they are displayed with a noisy checker pattern.
The view shown in the following screenshot is the camera angle that we will use in Chapter 20, Using Sequencer to Construct Your Final Scene, when we set up the Cine Camera Actor in UE5:
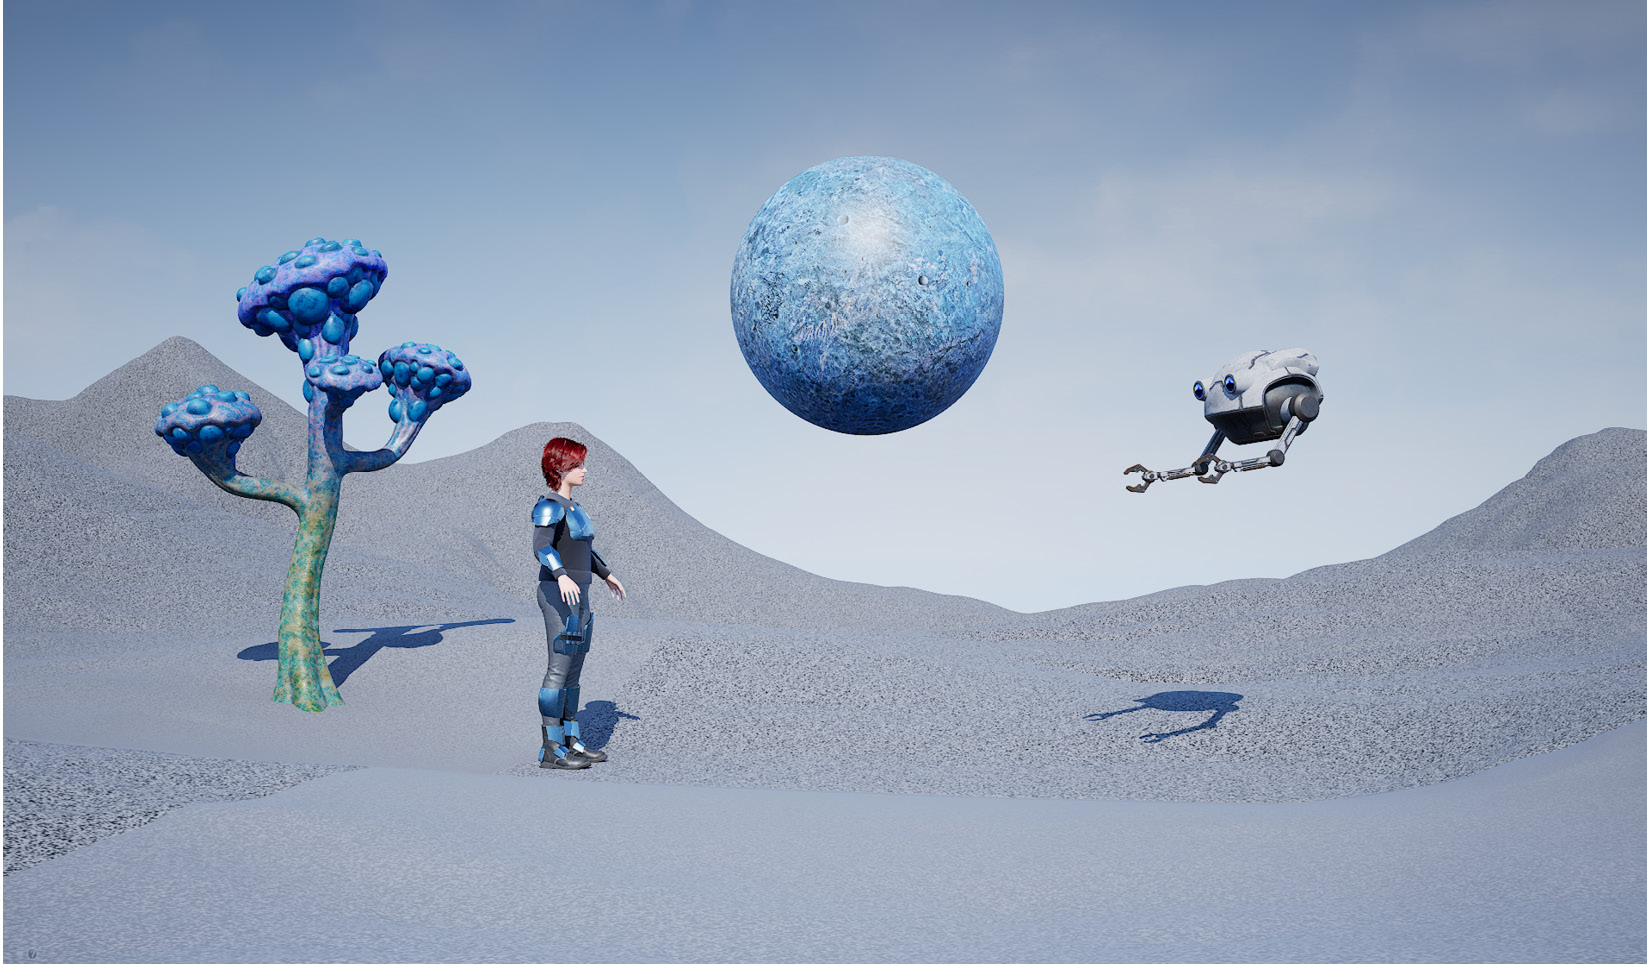
Figure 9.3 – The basic elements of your 3D movie set in their correct positions
You have just learned how to place the first seven 3D assets in your 3D movie set and how to use the Transform section of the Details panel to adjust their Location, Rotation, and Scale.
In the next section, we will go over some basic settings that we need to set for our scene. The first of these settings is the exposure of your Viewport display.
Adjusting the scene's exposure
UE has a feature called Auto Exposure that is enabled by default. This automatically adjusts the exposure of the current scene view so that it becomes brighter or darker as your view changes.
While this feature adds a lot of realism to video games, it is not a feature that you want to have enabled when you are making a 3D movie. It is far better to have manual control over your scene's exposure.
Let's change the default setting of Auto Exposure to Manual Exposure:
- In the toolbar, click on the Create icon and navigate to Visual Effects | PostProcessVolume, as shown in the following screenshot. This will create an item called PostProcessVolume inside your scene. You will see a wireframe box inside your scene that represents PostProcessVolume:

Figure 9.4 – Adding a PostProcessVolume to the scene
- In the World Outliner panel, click on PostProcessVolume. Now, go to the Details panel. Find the Global Illumination section and make sure that you tick the Method checkbox and set it to Lumen.
- Next, go to the Post Process Volume section's setting and tick the Infinite Extent (Unbound) checkbox. This setting tells UE that Post Process Volume affects the whole scene, not just the area defined by the wireframe box.
- Go to the Lens section. Here, you will see another sub-section named Exposure. Tick the Metering Mode checkbox. In the drop-down list next to it, change it to Manual. This tells UE that you are manually controlling the exposure of your scene:
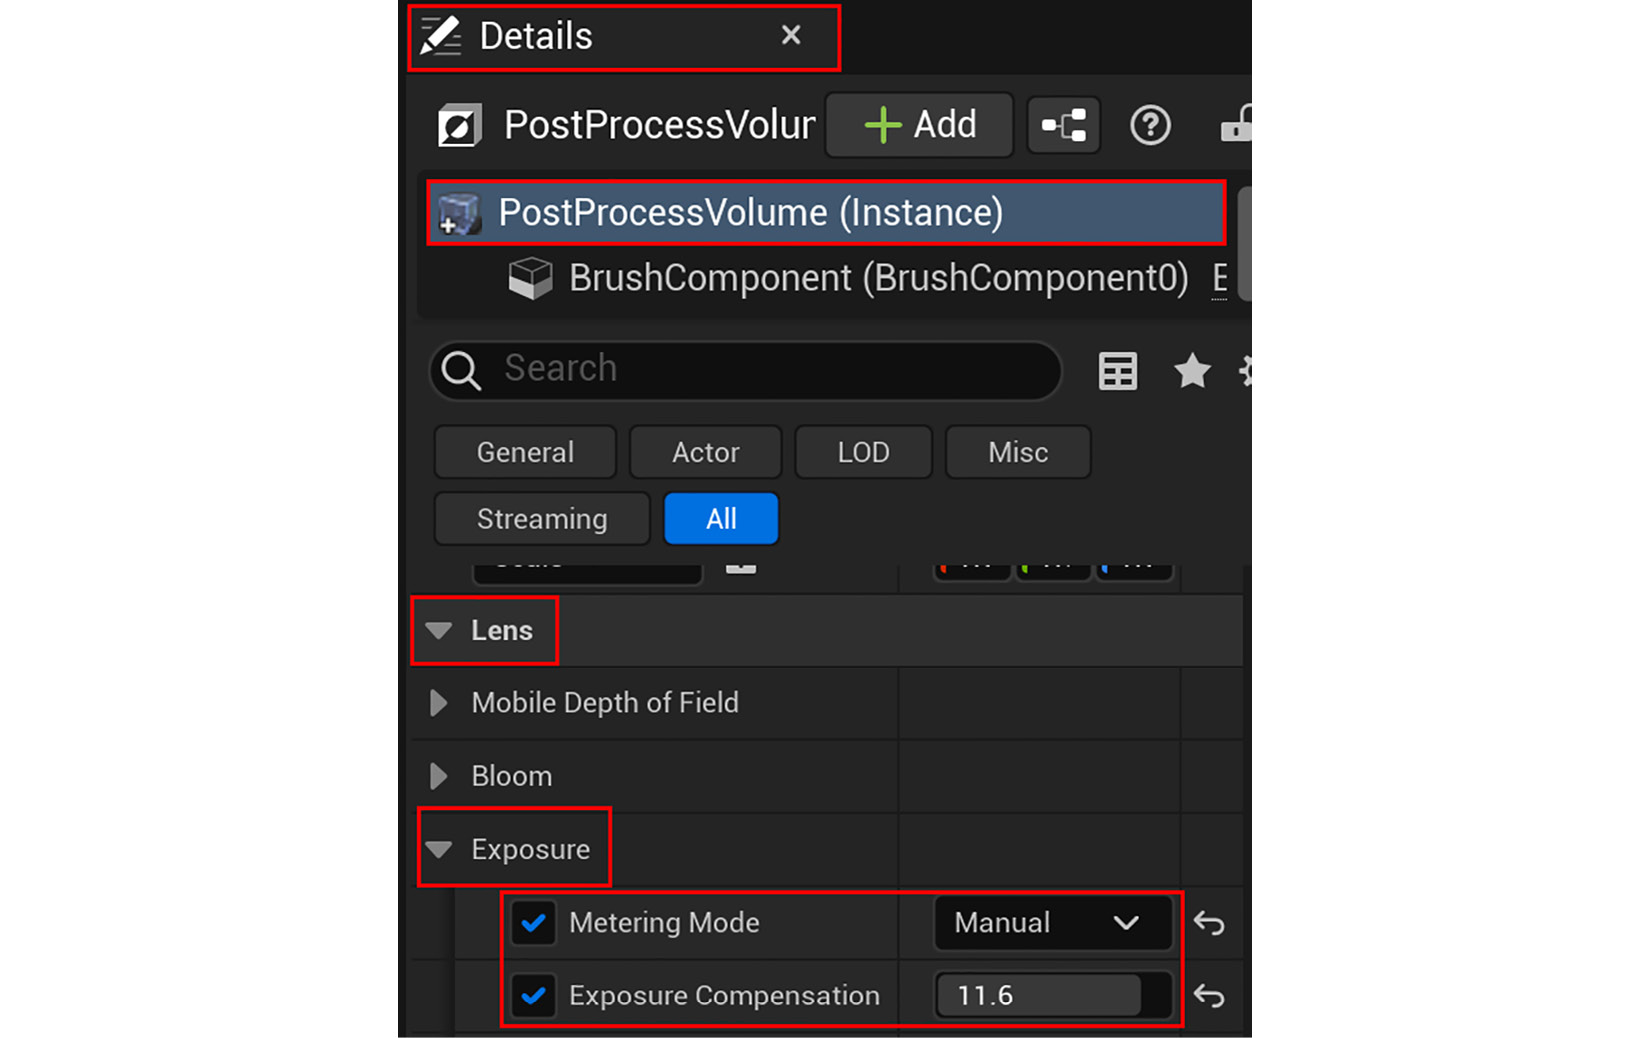
Figure 9.5 – Changing Exposure to Manual and adjusting the Exposure Compensation setting
- Still inside the Exposure section, tick the Exposure Compensation checkbox and set it to 11.6, as shown in the preceding screenshot.
Note
In Chapter 10, Adding Lighting and Atmospheric Visual Effects in UE5, you will adjust the Exposure Compensation setting again when you create the lighting for your scene.
You've just learned how to set Exposure to Manual Mode, how to adjust the amount of Exposure Compensation, and how to set the Post Process Volume size to Infinite so that it affects the entire scene.
In the next section, we will look at the Field of View of your Viewport and why it is important to adjust this setting while we are building our 3D movie set.
Adjusting the Viewport's Field of View
When you start to build your 3D movie set, you need to have your Viewport's Field of View (FOV) set so that it matches a typical real-world camera's lens FOV.
Note
FOV is the extent of the observable view and is typically measured as an angle. A typical 35 mm camera lens has a FOV of 63 degrees, while a 50 mm camera lens has a FOV of 46 degrees.
UE's Viewport has a default FOV of 90 degrees, which is good for games where you want to see more of your surroundings. However, this is not good for 3D movies because it distorts the edges of your view.
An appropriate FOV (without distortion around the edges) will help you place your 3D assets in your 3D movie set more accurately.
Let's adjust your Viewport's FOV. In the Viewport menu bar, click on the Viewport Options icon (I have highlighted this icon in the following screenshot). This will open a drop-down menu. In this menu, change Field of View (H) to 50:
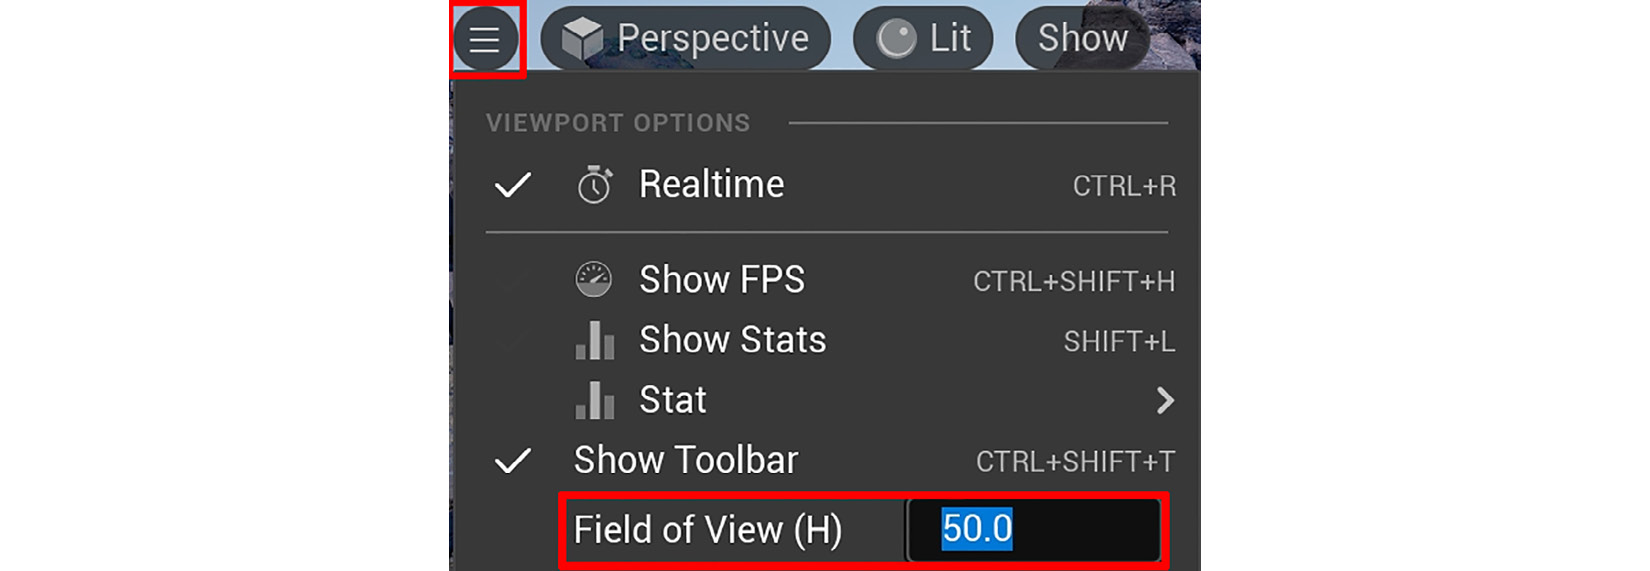
Figure 9.6 – Adjusting your Viewport's Field of View (H)
You've just learned how to adjust your Viewport's FOV so that it's closer to a real-world camera lens' FOV angle. This will help a lot when you start to populate your 3D movie set with 3D assets.
In the next section, we will explore how to use the Quixel Bridge plugin to acquire free 3D-scanned assets for your 3D movie.
Using Quixel Bridge to acquire free 3D assets
In this section, we will utilize UE5's built-in Quixel Bridge plugin to add 3D assets to our scene. In the case of this tutorial, you will find free 3D-scanned rock assets. These rocks have been scanned by using photogrammetry techniques so that they are photorealistic. Follow these steps:
- In the toolbar, click on the Create icon. This will open a drop-down menu. From this menu, select Quixel Bridge, as shown in the following screenshot:

Figure 9.7 – Selecting the built-in Quixel Bridge plugin in UE5
- The Quixel Bridge app will open automatically once you've clicked on the Quixel Bridge button mentioned in step 1.
- At the top right of the Quixel Bridge app's window, click on the little portrait icon to open the drop-down menu. From this menu, select Sign In and select SIGN IN WITH EPIC GAMES:
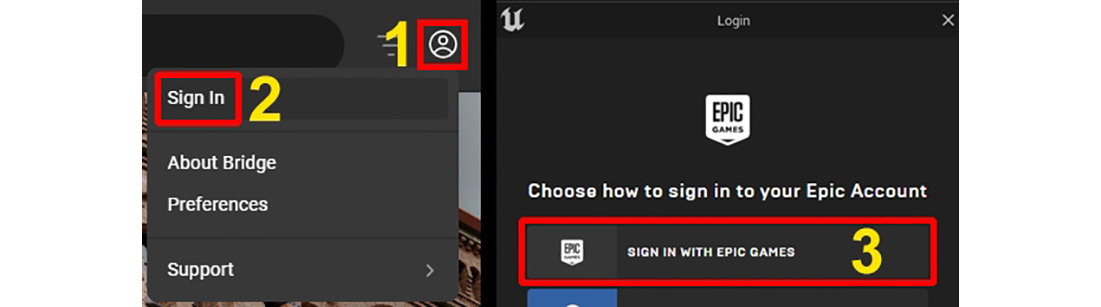
Figure 9.8 – (1) Clicking on the portrait icon; (2) Selecting Sign In; (3) Signing in with your Epic Games account
- Now, we are ready to browse for free 3D assets that we can use in UE5. Go to Collections | Environment | Natural | Canyons of Utah, as shown in the following screenshot:
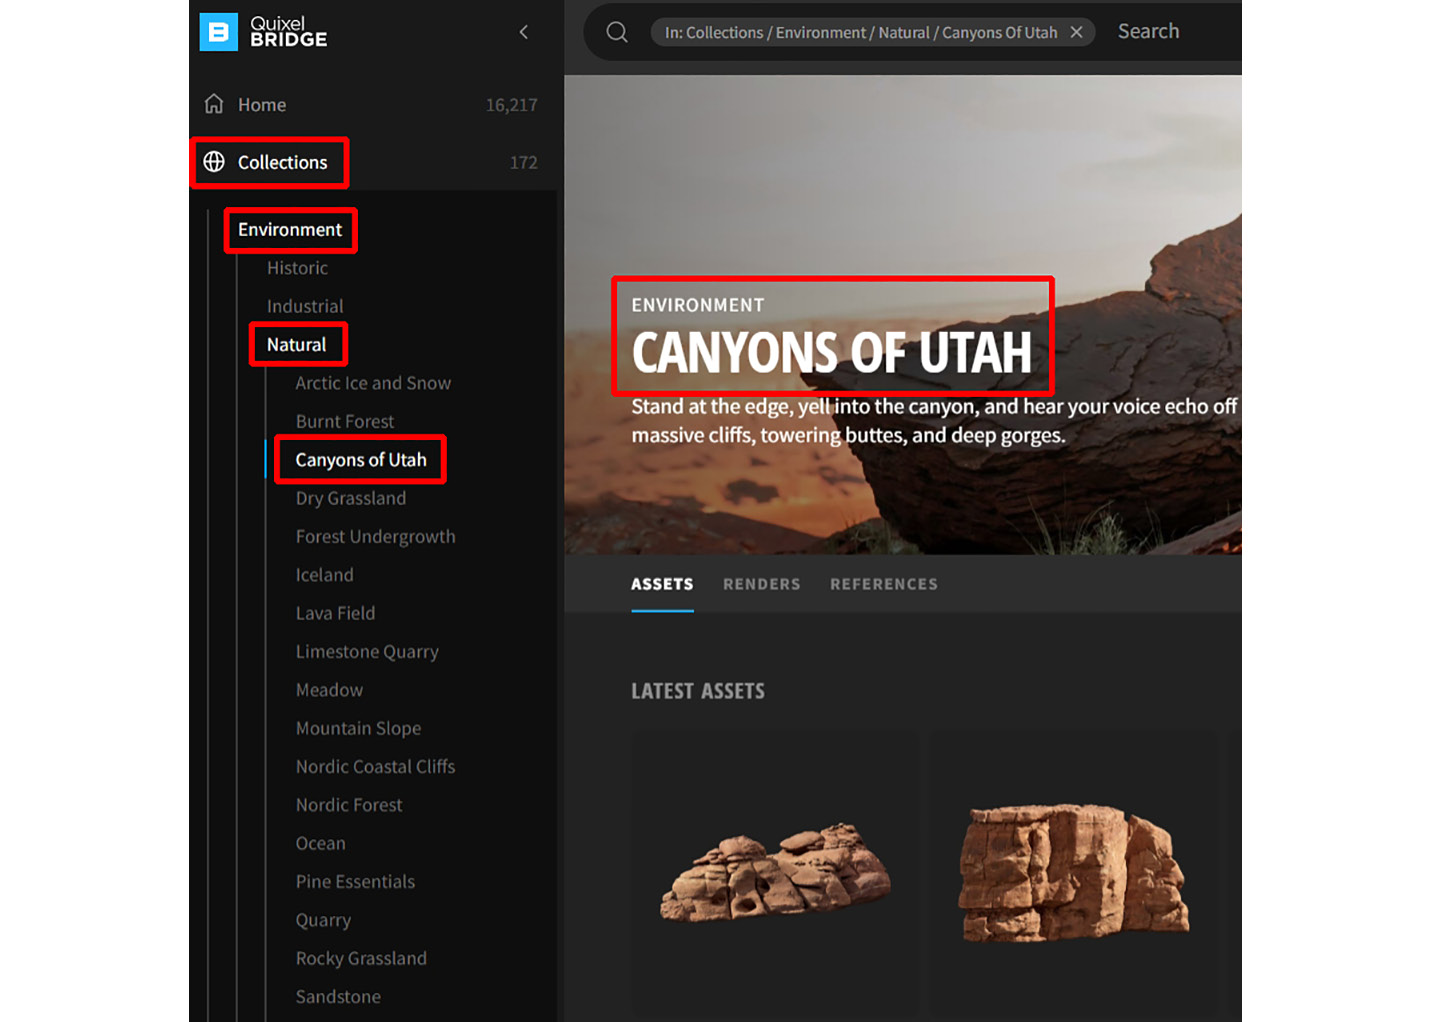
Figure 9.9 – Browsing the "Canyons of Utah" asset gallery in the Quixel Bridge app
- In the Canyons of Utah asset gallery, you will see a scrolling page full of icons of 3D rock environmental assets. But first, let's learn how to download these assets to your local hard drive. The following screenshot shows the three steps that you should perform to download an asset:
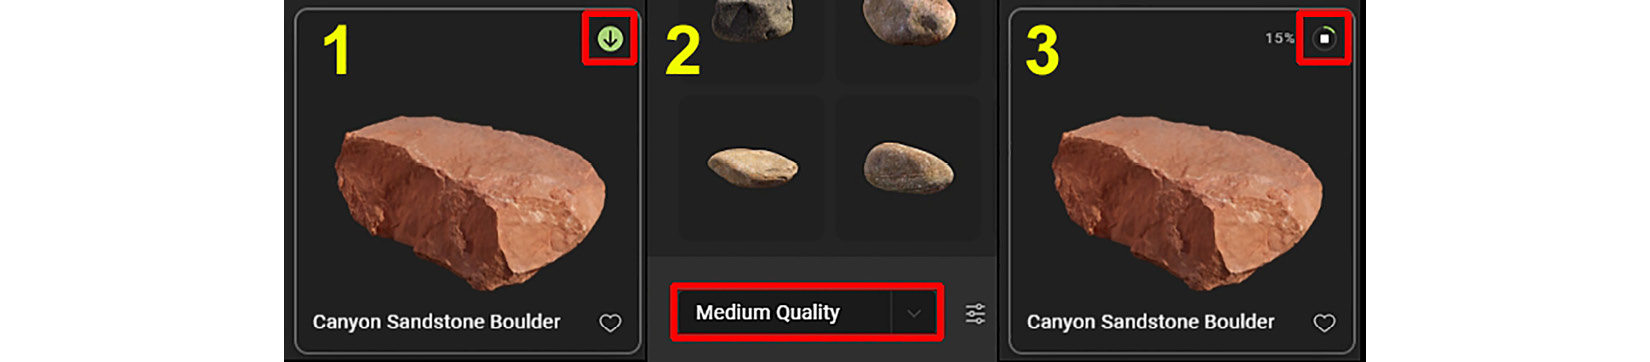
Figure 9.10 – (1) Select an asset; (2) In the panel that opens on the right-hand side, select Medium Quality; (3) Click on the downward pointing arrow to download it
- For this tutorial, download all the 3D assets shown in the following screenshot. All the filenames of these assets to download are also shown in Figure 9.14. Download all of these assets at a Medium Quality setting.
- On the left-hand side menu of the Quixel Bridge app window, you will see a small icon of a computer monitor named Local. Click on Local | Megascans to open a gallery displaying all the 3D assets you've downloaded to your local hard drive:
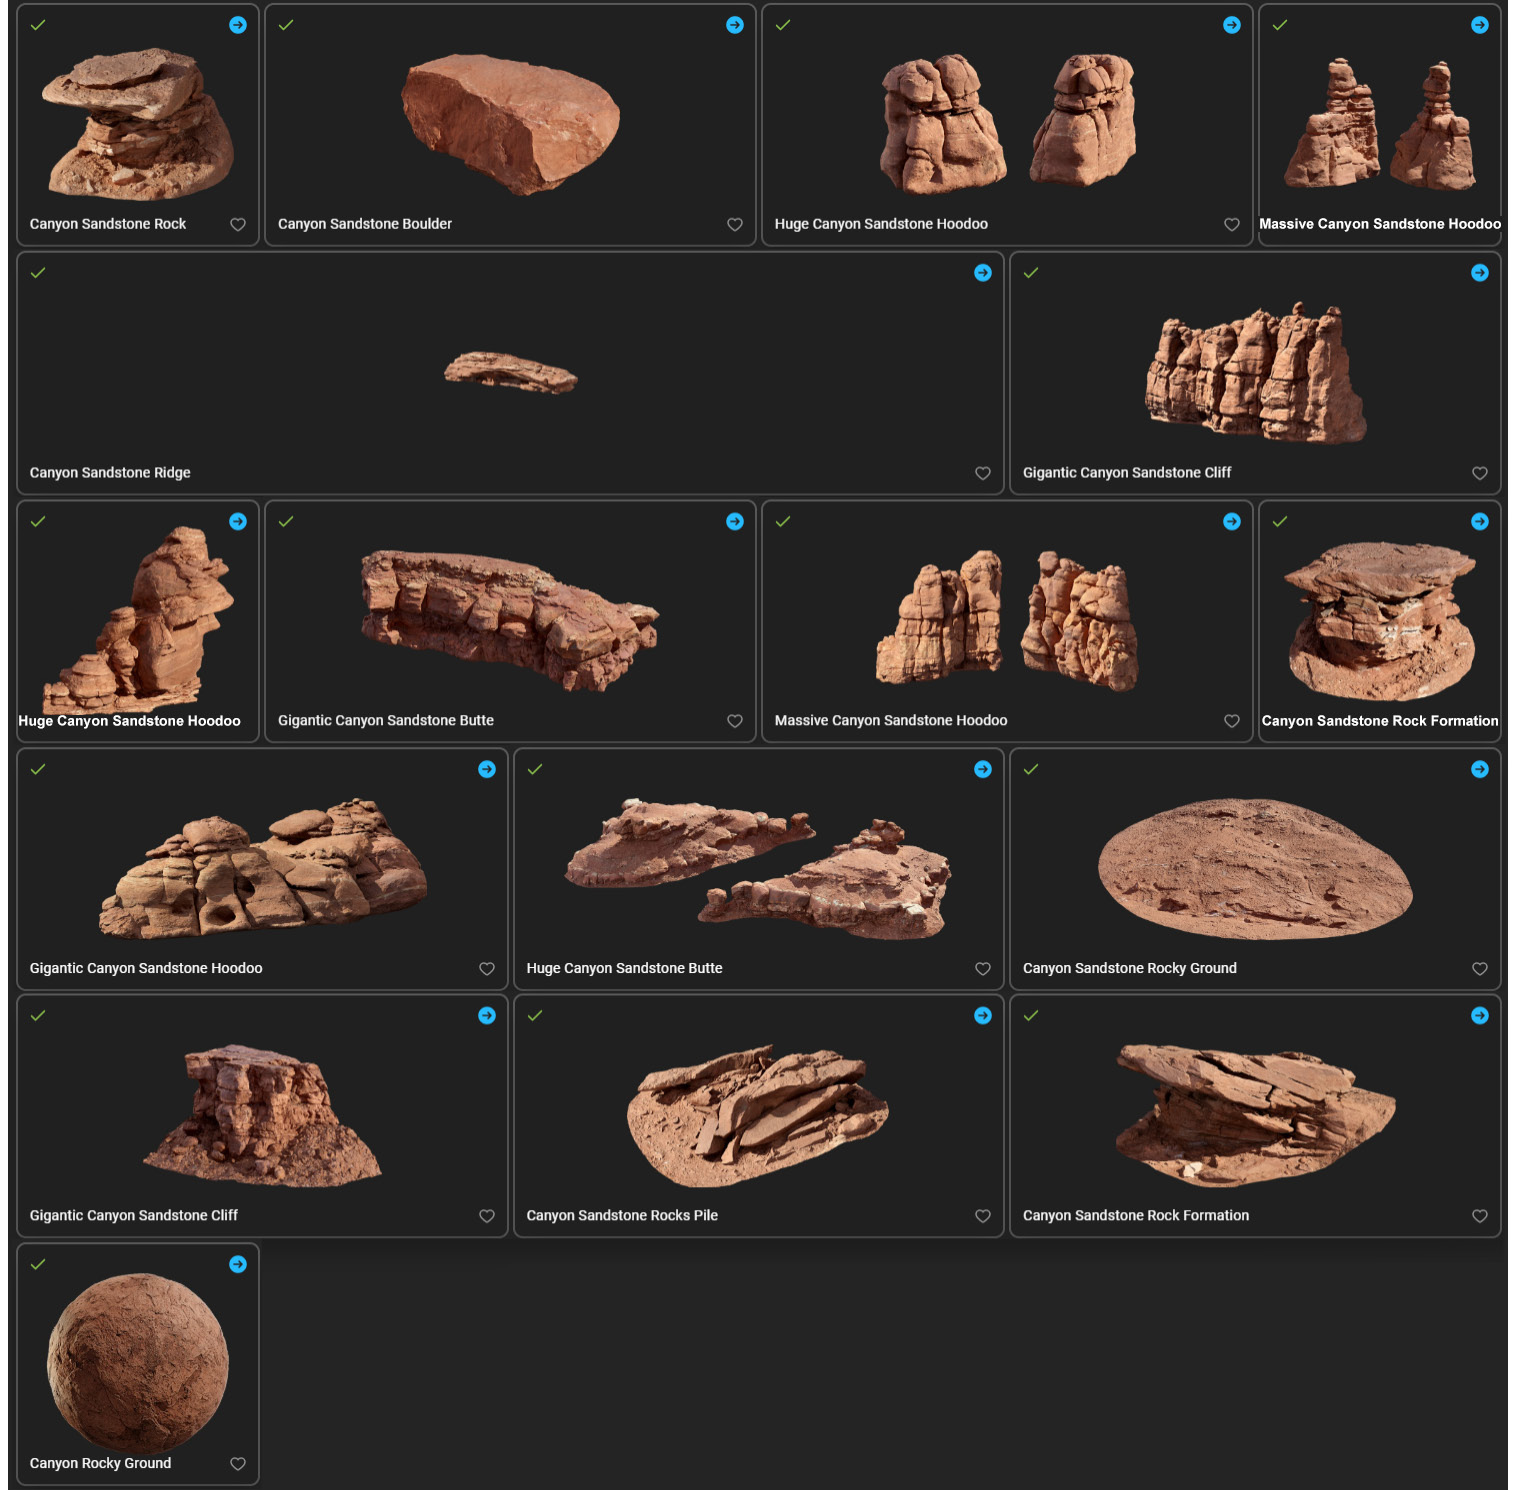
Figure 9.11 – Download all these 3D assets in the Quixel Bridge app
- When a 3D asset has been downloaded, the Download icon (the downward-pointing arrow in the green circle, as shown in Figure 9.10, step 1) will change to an Export icon (a right-pointing arrow in a blue circle). There will also be a green tick symbol on the left of the 3D asset's Gallery icon. The preceding screenshot shows that all the 3D assets now have green tick symbols and Export icons.
- Once you have downloaded all the 3D assets shown in the preceding screenshot, simply click once on the Export icon, as shown in the following screenshot, for each of the downloaded 3D assets in your local library. This will export your 3D asset at the quality setting that you have selected, as shown in Figure 9.10, step 2:

Figure 9.12 – Exporting a 3D asset from Quixel Bridge. The green tick symbol is highlighted on the left, while the Export icon is highlighted on the right
- Once all the 3D assets have been added, you can close the Quixel Bridge app window. Go back to UE5 – you will see that two new folders have automatically been created inside UE5 named Megascans and MSPreSets. (I have highlighted these folders in the following screenshot).
These folders contain your exported 3D assets. Your Content Browser view area should now look as follows:

Figure 9.13 – Your Content Browser's view area should now contain these folders
You've just learned how to find and download 3D assets from the Quixel Bridge app.
In the next section, I will show you how to customize your 3D-scanned rock assets so that you can blend them with the colors of the Alien Planet's surface.
Customizing your material instances
Now that you're back in UE5, let's take a look at all the 3D assets that you've exported from the Quixel Bridge app and have automatically been imported into UE5.
Click on the little arrow next to Megascans in your Content Browser view area to expand the folder structure. The list of all the imported 3D assets is shown in the following screenshot:

Figure 9.14 – Viewing the folders of the imported 3D assets
Note
A Material Instance is a material copy that is linked to the original material (called an instance in 3D graphics). This Material Instance is created from an existing material and is used to make material variations without them affecting the original. A Material Instance has an exposed set of parameters and does not have a node graph (node tree) like the original material.
Some of the benefits of using Material Instances in your 3D movies are as follows:
Material Instances allow you to make simple edits to selected parameters instead of dealing with a complicated node graph.
They allow you to make as many variations of your original material as you want by editing the Material Instance's parameters.
The Viewport update speed is much faster since Material Instances do not have to be recompiled every time you make changes to them in the Material Instance Editor.
Let's start by assigning a Material Instance to the ForeGround and BackGround landscape meshes:
- Hold down Shift and select both ForeGround and BackGround (static meshes) in the World Outliner panel so that they are both selected together.
- In the sources view area of the Content Browser window, navigate to Megascans | Surfaces | Canyon_Rocky_Ground_ulmiecglw. Inside this folder, you will see a Material Instance named MI_Canyon_Rocky_Ground_ulmiecglw_2K, as shown in the following screenshot.
- Drag and drop this Material Instance onto the Material Slot areas of ForeGround and BackGround in the Details panel. I have highlighted the slot with a dashed green outline in the following screenshot. This will apply the Material Instance to all the selected static meshes. This method of applying materials works with meshes that are in your Viewport/World Outliner:
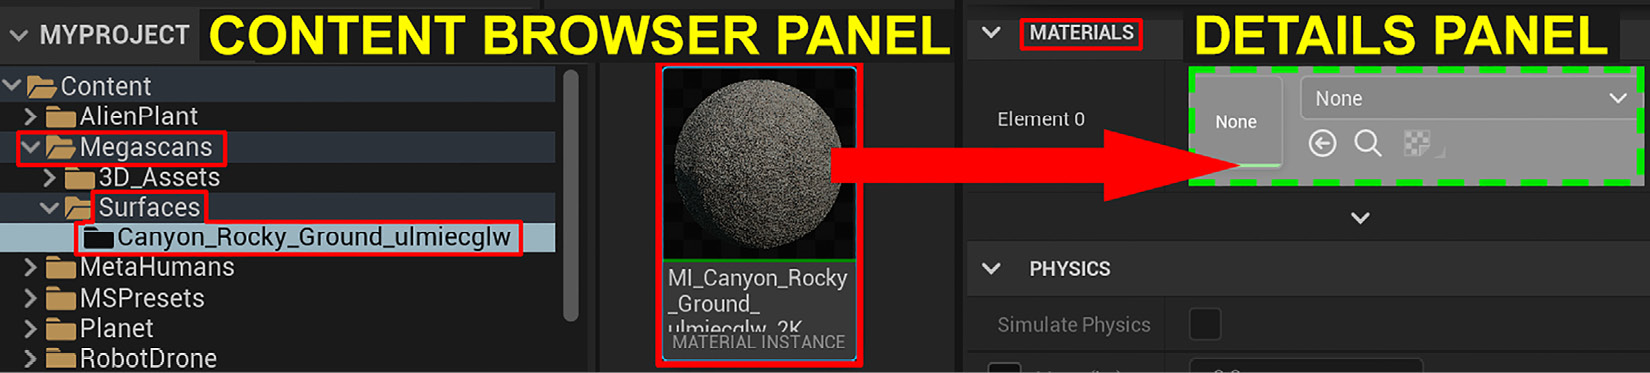
Figure 9.15 – Dragging and dropping the material into the ForeGround and BackGround's Material Slot areas
- The ForeGround and BackGround static meshes that are in your Viewport will now have a light brown rock material applied to them.
You have just learned how to assign a material/Material Instance to multiple meshes at once. In the next section, we will explore the UI of the Material Instance Editor.
The Material Instance Editor's UI
In this section, we'll look at the basic UI regions of the Material Instance Editor. The following screenshot shows the Material Instance Editor window:

Figure 9.16 – The Material Instance Editor's basic UI regions
I have added numbers and highlights to indicate the different UI regions for explanation purposes:
- Toolbar: Here, you will find the Save icon.
- Viewport: This is your view of the Material Instance that you are editing.
- Details panel: This is where you can change the parameters and view details of your Material Instance.
You've just learned about the three basic UI regions of the Material Instance Editor that we will use for this tutorial.
In the next section, you will use this knowledge to start editing your Material Instances.
Editing your Material Instances
Let's get started by customizing the Material Instance that you've applied to the ForeGround and BackGround static meshes:
- In the Content Browser window, navigate to the Canyon_Rocky_Ground_ulmiecglw folder.
- Double-click on the MI_Canyon_Rocky_Ground_ulmiecglw_2K Material Instance. This Material Instance is also highlighted in Figure 9.15. The Material Instance Editor will now open.
- In the Details panel of the Material Instance Editor, navigate to Parameter Groups | 00 – Global | Tiling/Offset. Now, click on the downward pointing arrow that's highlighted in the following screenshot. This will open the Tiling/Offset drop-down menu so that you can increase the tiling amount. First, tick the checkbox next to Tiling/Offset and set Tiling X to 10 and Tiling Y to 10. This will make the rock material look like it has finer details in your ForeGround and BackGround static meshes:
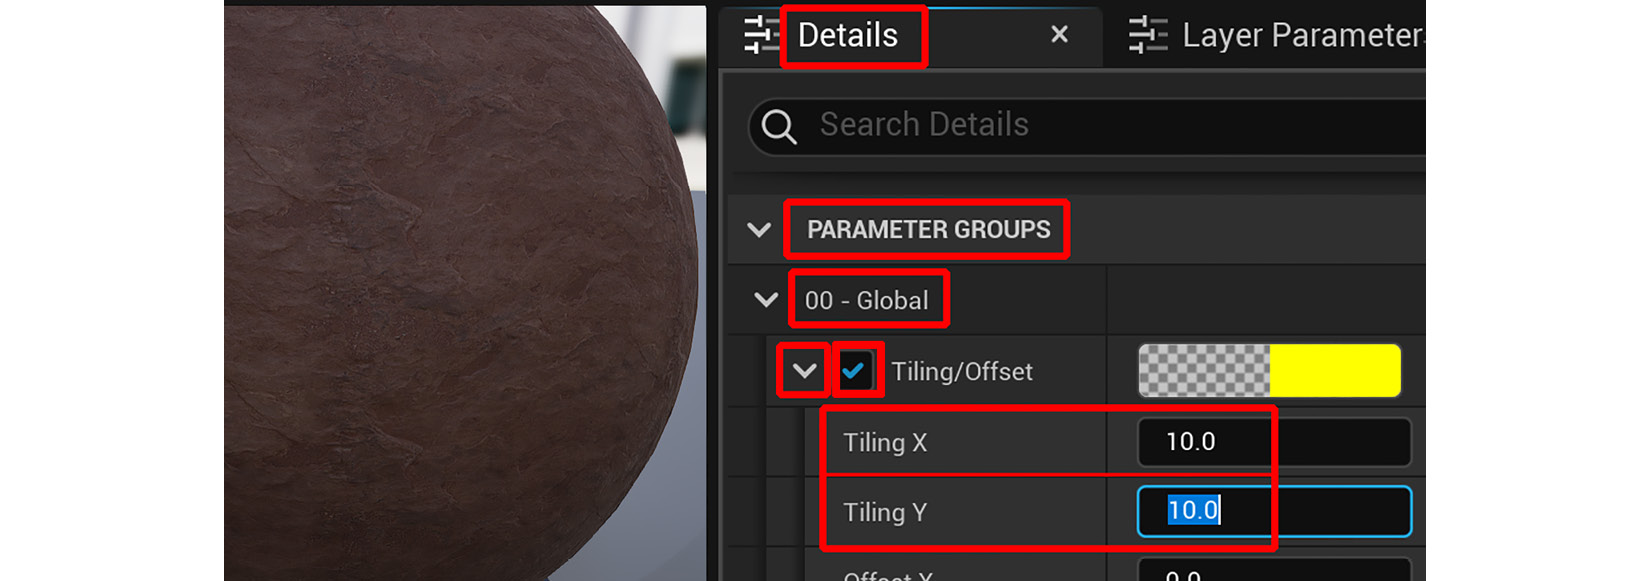
Figure 9.17 – Editing the Tiling properties of the Material Instance
- Next, we will adjust the color of the Material Instance. This is because we want to customize this material so that it fits the sci-fi theme better. In the Details panel, navigate to Parameter Groups | 01 - Albedo | Albedo Tint and tick the Albedo Tint checkbox. This will allow you to edit the tint color for this Material Instance. Click on the color selection bar next to Albedo Tint, as highlighted in the following screenshot. This will open the Color Picker panel. Use the color settings shown in the following screenshot. Save the Material Instance before you close the Editor window:
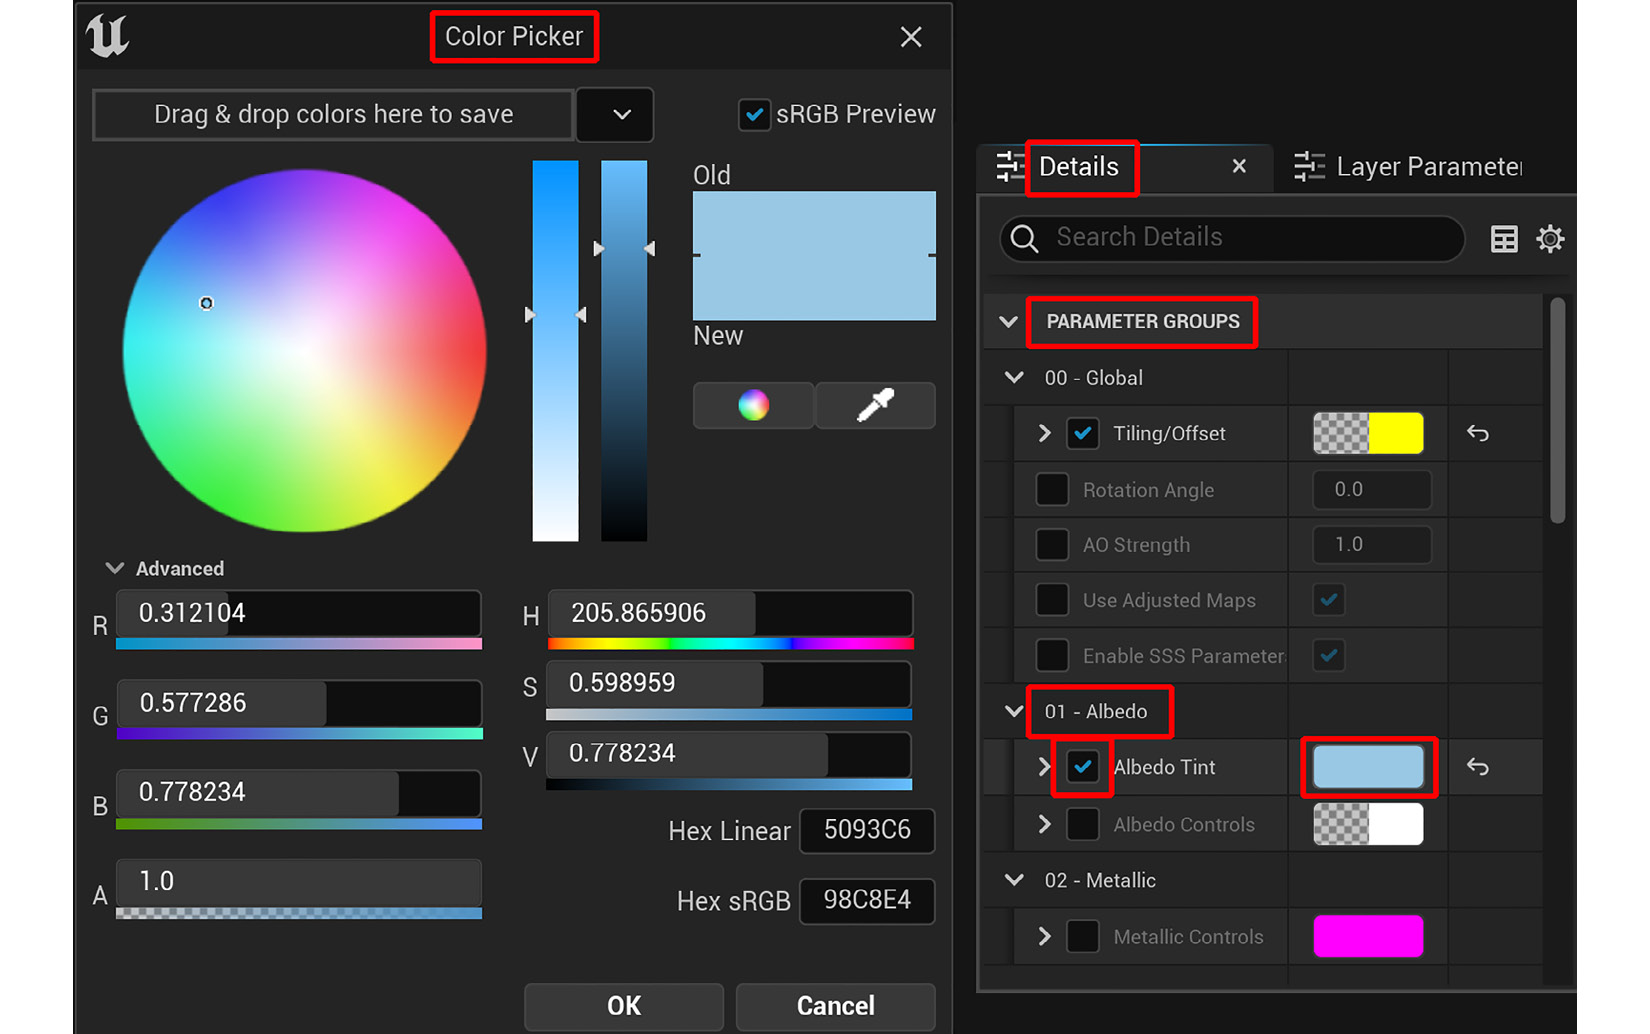
Figure 9.18 – Adjusting the Albedo Tint setting
- Now, let's enhance the fine details (bump details) of the rock material. To do this, increase the strength of Normal Map. In the Details panel, navigate to Parameter Groups | 05 – Normal | Normal Strength. Tick the Normal Strength checkbox and set it to 3.5.
You've just learned how to edit a Material Instance by changing its tiling amount and color, as well as how to enhance the details in the Normal Map.
In the next section, you will make color (Albedo Tint) changes to all the Rock assets that you've imported from Quixel Bridge. This will make them fit better with ForeGround and BackGround static meshes' material and their new subtle blue theme will help them fit better in your Alien Planet 3D movie set.
Using Albedo Tint for the Rock assets
Now that the ForeGround and BackGround static meshes have a slight blue tint, let's adjust all the Rock assets so that they match the theme:
- In the Content Browser content view area, navigate to Megascans | 3D_assets. Inside this folder, you will see all 16 folders of the Rock assets that you've imported from Quixel Bridge.
In each of these 16 folders, there is a static mesh, a Material Instance, and various texture maps. For us to match the colors (Albedo Tint), we need to temporarily drag and drop every static mesh (rock asset) from their folder's asset view area into the Viewport. Place them close together so that it is easier to match their colors by eye.
- Now that all 16 of the Rock assets (static meshes) are in your Viewport and resting on the ForeGround static mesh, we will use the View Modes in the Viewport menu bar to change the default Lit view mode to Unlit view mode, as shown in the following screenshot:
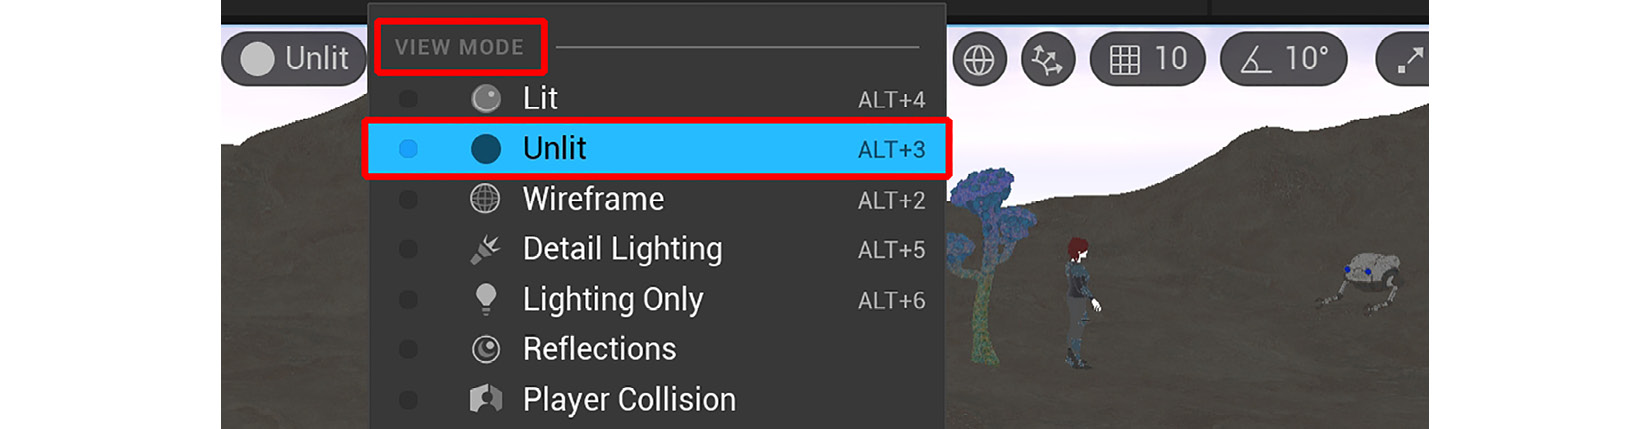
Figure 9.19 – Switch to the "Unlit" View Mode
- It is much easier to match colors (using Albedo Tint) when the View Mode is set to Unlit. You will notice that every rock asset (static mesh) has a different shade of light brown. To change a static mesh's color (Albedo Tint), you need to edit its Material Instance.
Handy Tip
The easiest way to find a static mesh's Material Instance is to select the static mesh and then right-click inside the Viewport. A menu will open. In this menu, click on Browse to asset. This will open the selected asset's folder in the Content Browser window. In this folder, you will find its Material Instance.
- Double-click on the selected static mesh asset's Material Instance to open the Material Instance Editor.
- Now that the Material Instance Editor is open with your selected Material Instance loaded inside, change its Albedo Tint in the same way as you did earlier in step 4 of the Editing your Material Instances section. Change the Albedo Tint property of the Rock asset to a slightly blue tone. The exact blue tone of the color you wish to use is up to you. Save the Material Instance before you close the Editor window.
- Do the same for all 16 Rock assets. All the rock assets will now have a slightly blue tone and they will match each other better. This will make them consistent with the blue color theme of the 3D movie set. In the Viewport menu bar, change the View Mode back to Lit.
- Delete the (temporary) rock assets from the Viewport by pressing Shift and selecting them all, then pressing the Delete key to delete them.
Note
When you delete assets in the Viewport or the World Outliner panel, it does not delete those assets from the Content Browser window.
You have just learned how to customize the color of a Material Instance by adjusting its Albedo Tint value.
In the next section, you will learn how to use UE5's new Nanite system on your rock assets.
Using Nanite on your rock assets
In this section, you will apply UE5's new Nanite system to your rock assets.
You will need to enable Nanite Support for each of the 16 rock assets (static meshes) separately. Follow these steps:
- First, simply double-click on a rock asset's static mesh in the Content Browser window. This will open the Static Mesh Editor area.
- Inside the Static Mesh Editor area, tick the Enable Nanite Support checkbox under the Nanite settings heading, as shown in the following screenshot. Make sure you click on Save in the toolbar panel after you make a change to an asset in the Editor:
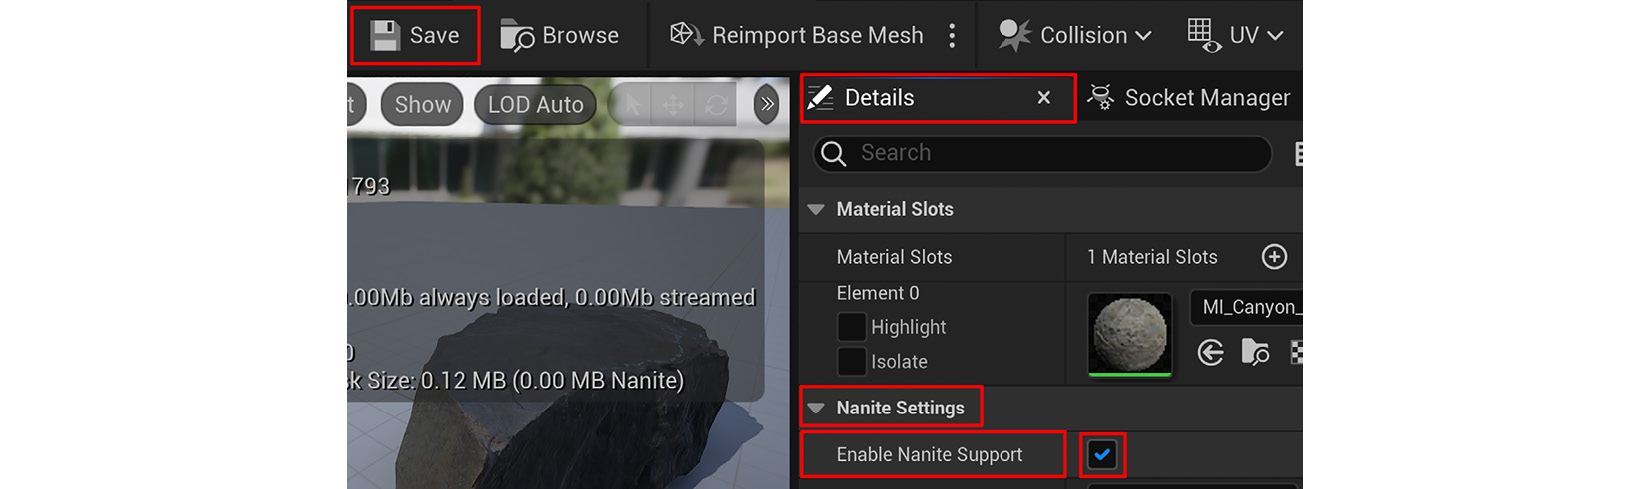
Figure 9.20 – Enabling Nanite for each rock asset in the Static Mesh Editor
Once you have enabled Nanite for every rock asset, UE5's performance speed will be increased drastically. UE5's Nanite system is so efficient that the engine can easily handle billions of faces (triangles) and still render your scene in the Viewport in near real time.
If you do not enable Nanite on the Rock assets, your Viewport and render performance will suffer.
You've just learned how to enable the Nanite system for your static mesh assets. In the next section, you will learn how to utilize content filters in the Content Browser window to speed up your workflow.
Using asset filters in the Content Browser window
Before you start placing your assets in the 3D movie set, I will quickly show you a very useful function of the Content Browser window. This involves using asset filters to view all your rock assets (in gallery view mode) in the asset view area of the Content Browser panel:
- In the Content Browser view area, navigate to Content | Megascans and click on the Megascans folder.
- In the asset view area of the Content Browser window, you will see an icon consisting of three stripes. This is the asset filter, which you can use to filter your view in the asset view area of the Content Browser window. Click on this icon now:
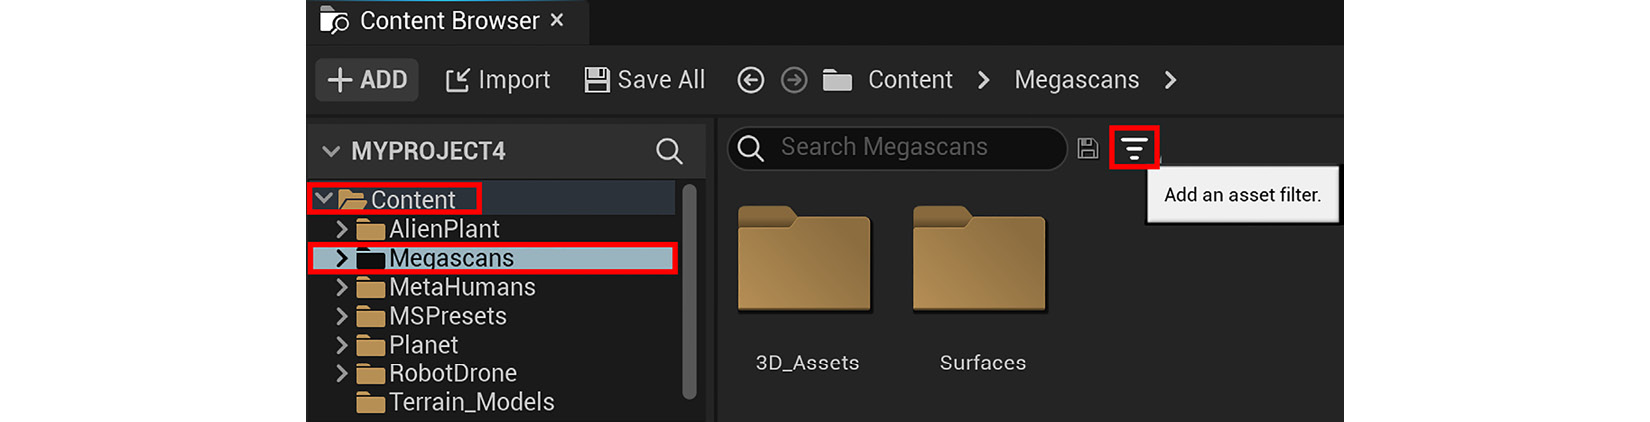
Figure 9.21 – Adding an asset filter to the asset view area of the Content Browser window
- A menu will pop up containing a list of different kinds of asset filters. Since all your rock assets are static meshes, select the Static Mesh filter. All the Rock asset static meshes will now be displayed next to each other in the asset view area of the Content Browser window, as shown in the following screenshot.
By using the asset filter feature in the Content Browser asset view area, it is very easy to choose an asset from a gallery list of available assets.
This saves you time by not having to browse through lots of folders to find assets. Keep this asset filter enabled so that you can use it in the next section:

Figure 9.22 – All of your rock assets are now displayed in the Content Browser's asset view area
Note
If you want to remove an asset filter, just right-click on the filter's name and select Remove.
Now that all your assets are within easy reach, you can visually decide what asset you want to place in your 3D movie set.
You've just learned how to use the content filters in the Content Browser window. In the next section, you will place your first 3D asset in your 3D movie set.
Building the 3D movie set
Now, you are finally ready to start building your 3D movie set.
The first rock asset that you will want to place in your 3D movie set is a very important one. This particular rock asset must be positioned in exactly the right place. This is because your female sci-fi character is going to be sitting on this rock asset later in this book. Let's get started:
- Select the Megascans folder. All of your Rock assets will be displayed in the asset view area of the Content Browser window since you still have the asset filter enabled. Select the Rock asset named S_Canyon_Sandstone_Boulder_uk4paev.
- Drag and drop this rock asset into your Viewport. I have highlighted this rock in the following screenshot.
- In the Transform section of the Details panel, copy the Location, Rotation, and Scale values that are shown in the following screenshot:
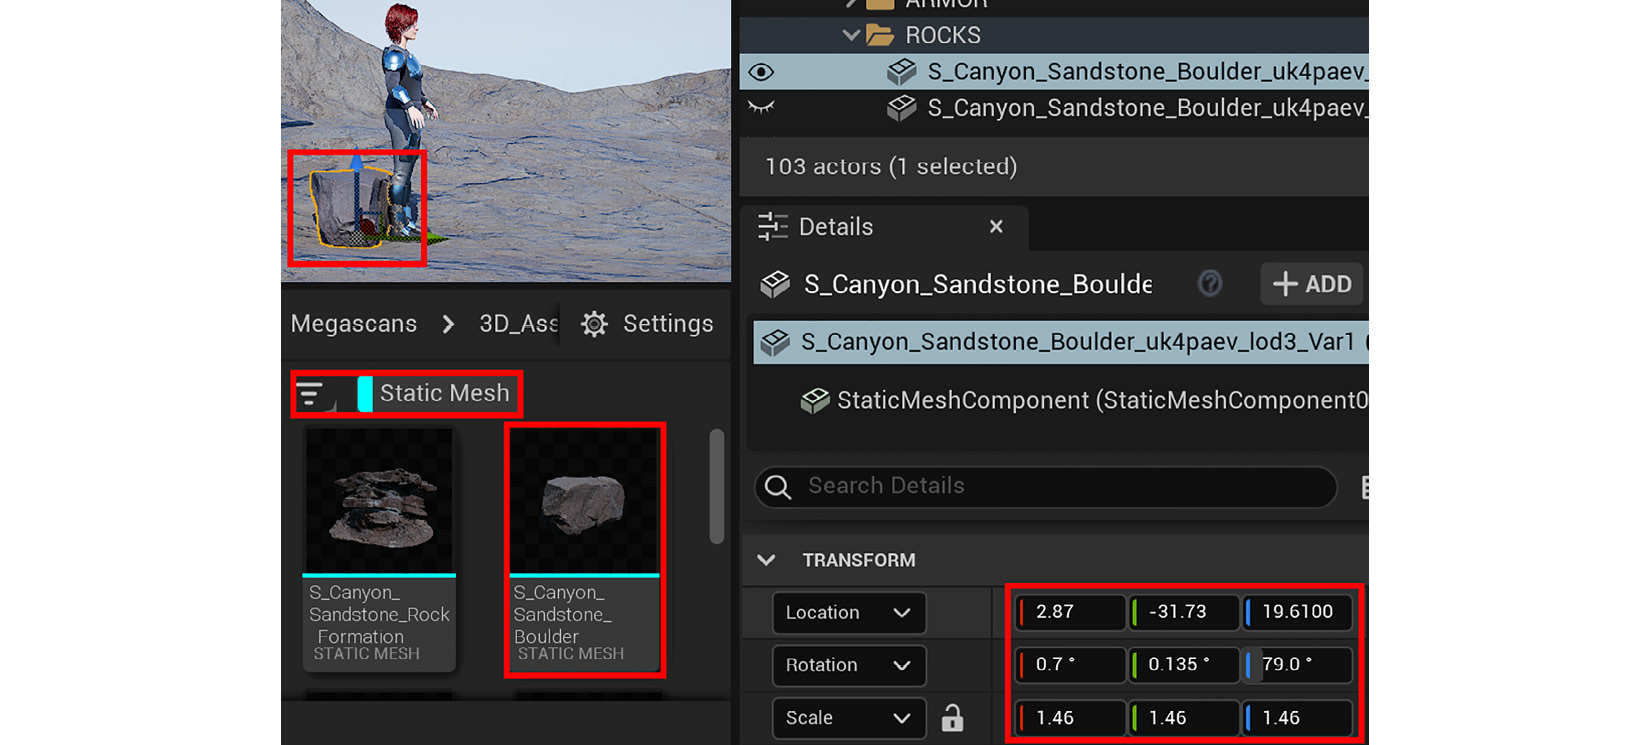
Figure 9.23 – Placing your first rock asset in your 3D movie set
- Now that the first Rock asset has been placed into your 3D movie set, you can start placing the rest of the Rock assets (static meshes) from your Megascans folder by dragging and dropping them from the asset view area of the Content Browser window into your Viewport. Place some Alien Plant models in the 3D movie set too. The placement and number of rock assets and Alien Plant models you put in your 3D movie set are up to you.
The following screenshot shows a map of what your current 3D movie set should look like:
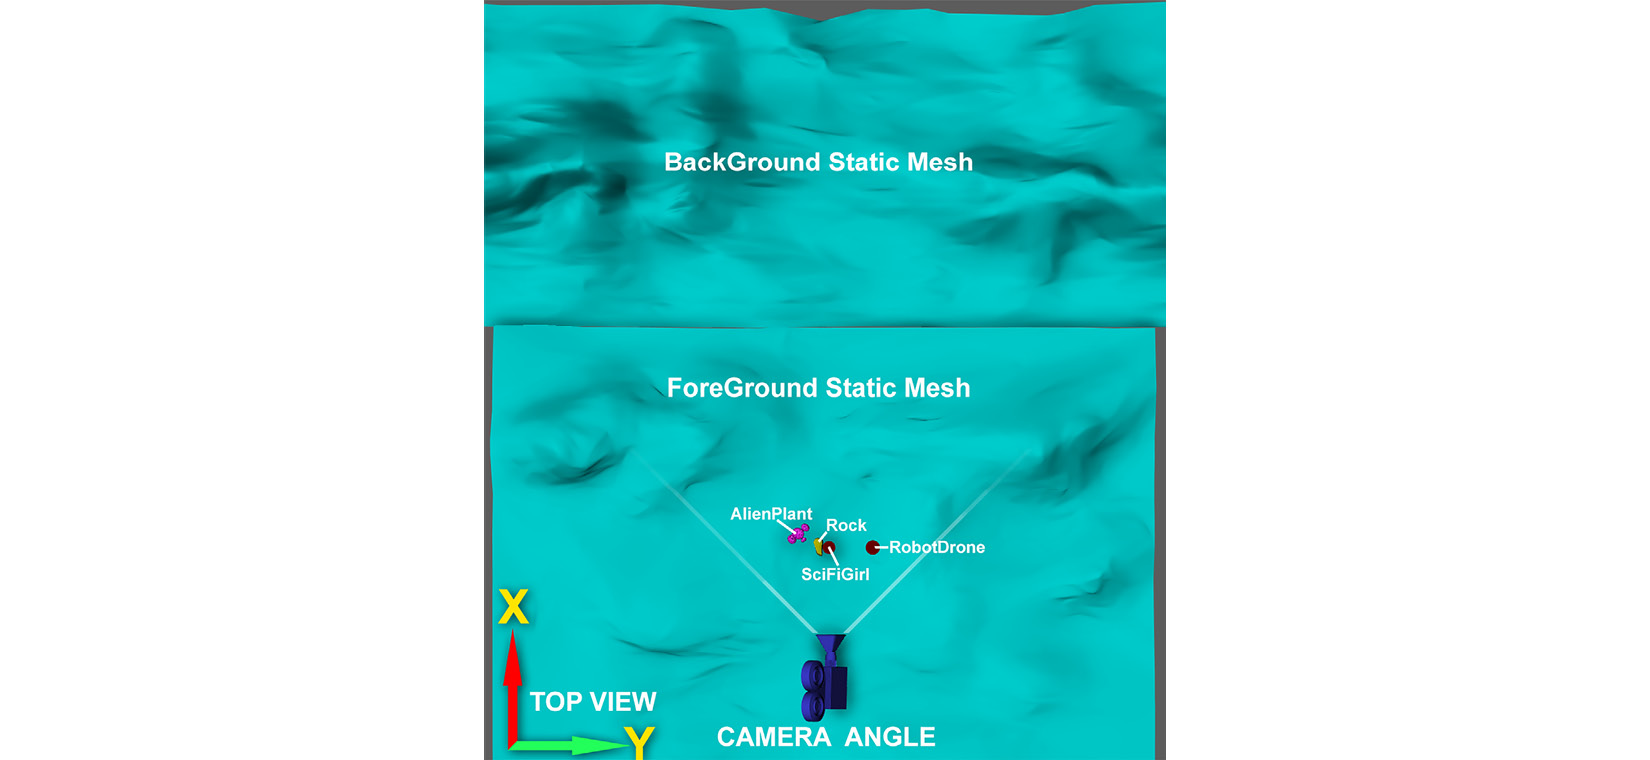
Figure 9.24 – Your current 3D movie set layout from a top view (the map has been rotated to match the camera angle)
Use your creativity with this step; however, there is only one rule when it comes to placing your assets and that is to keep an area clear from any rock and Alien Plant assets near SciFiGirl, AlienPlant, S_Canyon_Sandstone_Boulder_uk4paev (rock asset), and RobotDrone, as shown in the following screenshot.
You can place as many rock and Alien Plant assets as you want outside the red outline. This is because, later in this book, we will need an area that remains clear of any obstacles for the female sci-fi character to walk in and for the Robot Drone to fly in:
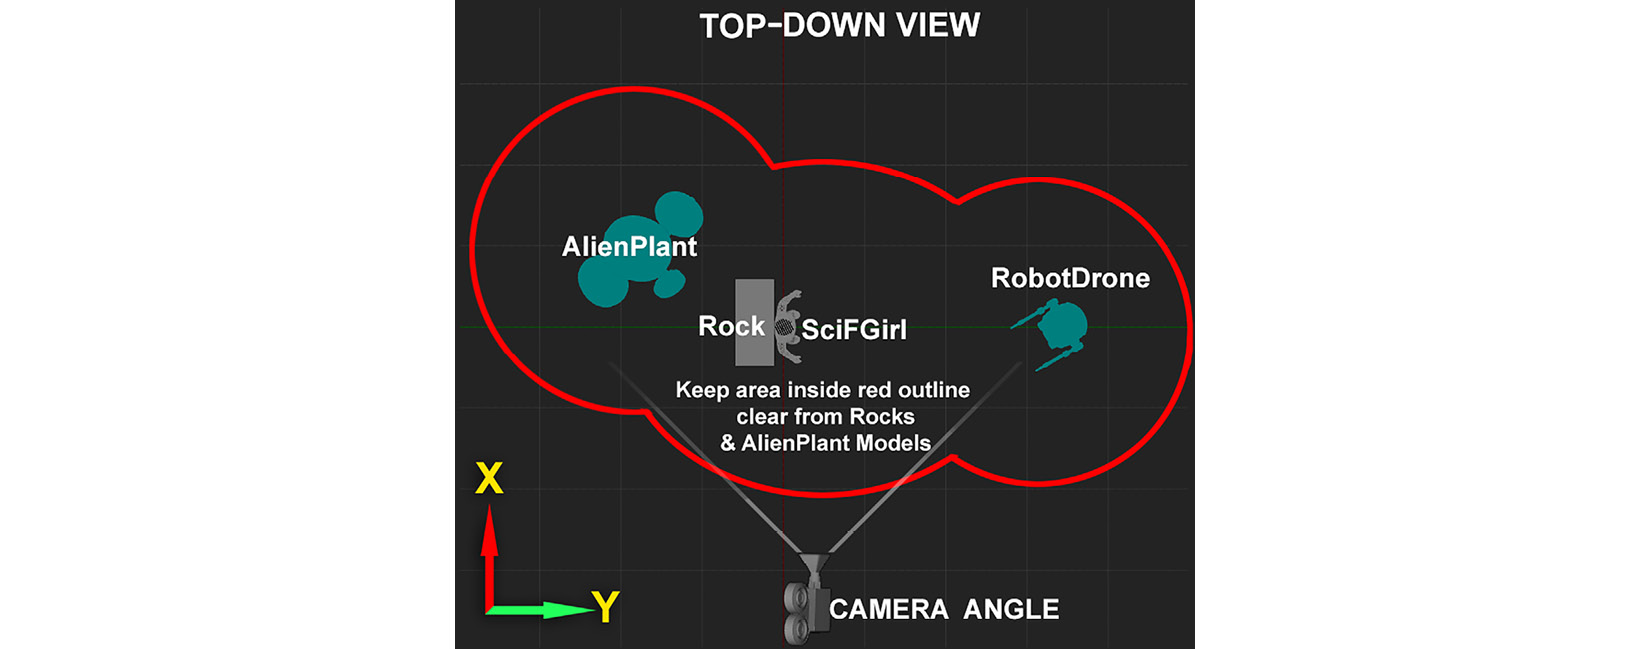
Figure 9.25 – Top-down view of the area that you need to keep clear from rock assets and Alien Plant models (the map has been rotated to match the camera angle)
Handy Tip
An easy way to clone (copy) an asset in the Viewport is to hold Alt + drag with the mouse. After you've cloned an asset, you can place it wherever you want to in your 3D movie set.
The following screenshot shows a map of how I've placed my assets (as an example only). You have total freedom to be creative with the placement of the assets in your 3D movie set:
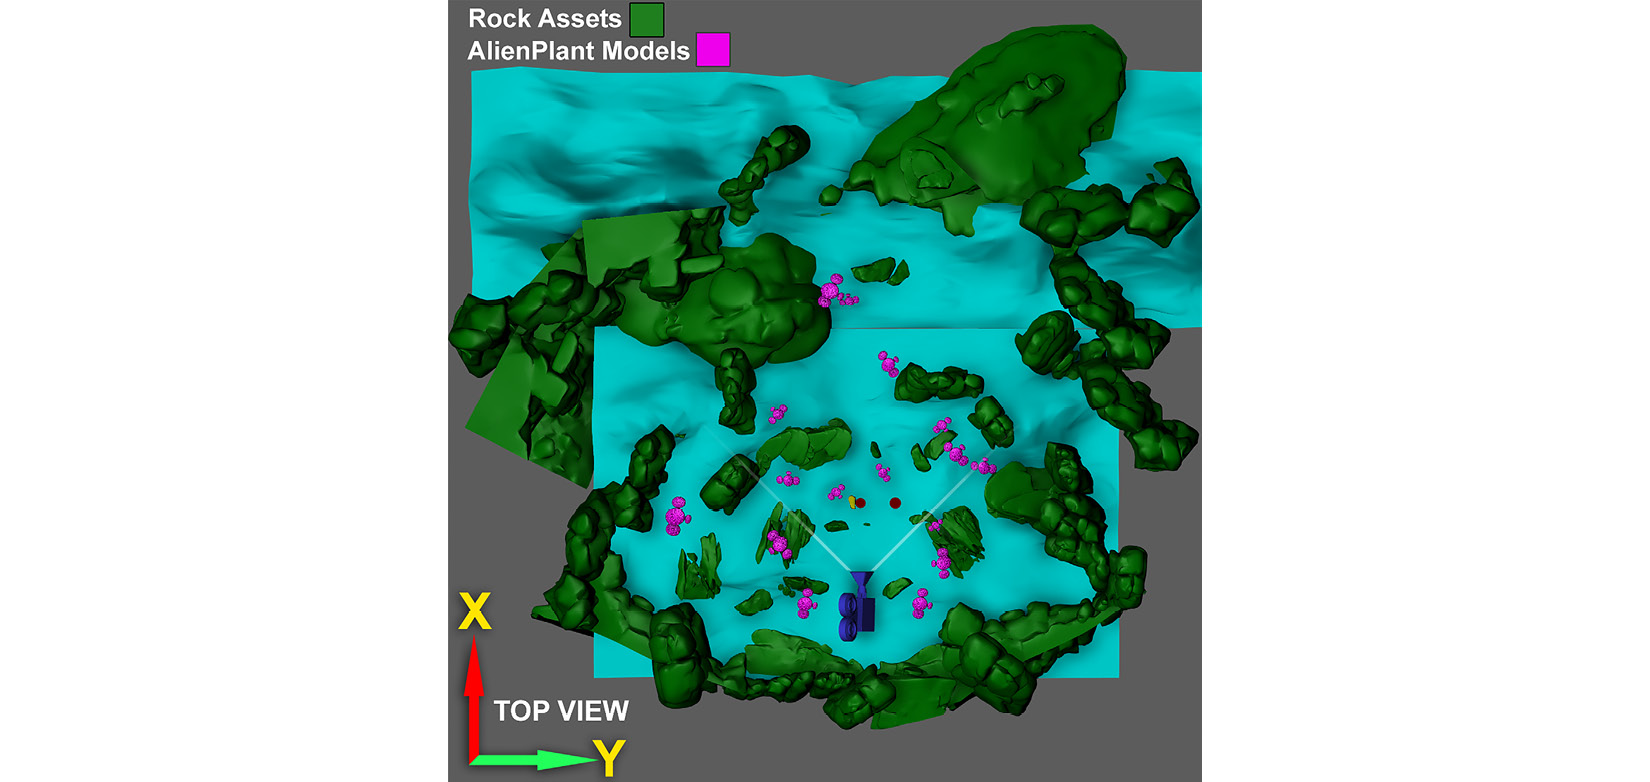
Figure 9.26 – My completed 3D movie set with the Rock assets and Alien Plant models added (the map has been rotated to match the camera angle)
The following screenshot shows another view of my completed 3D movie set:
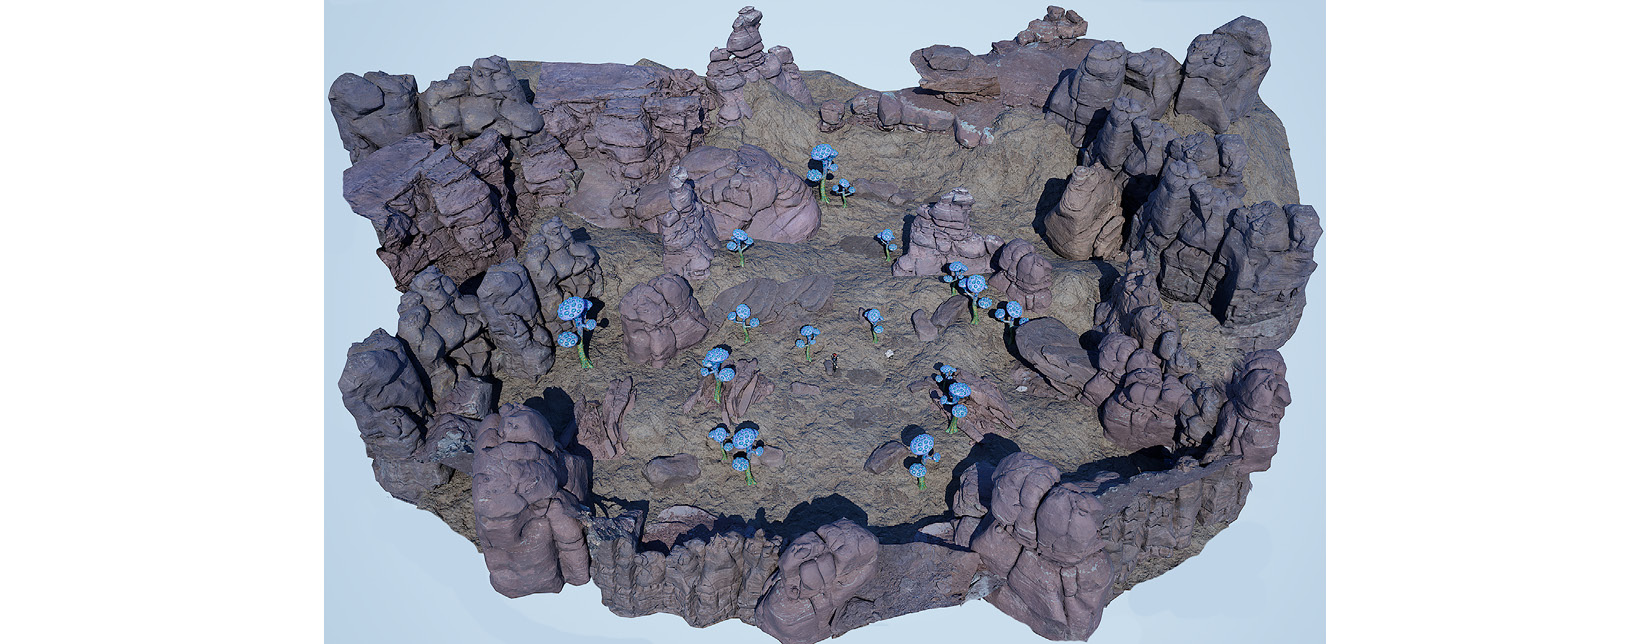
Figure 9.27 – An alternative view of my completed 3D movie set, populated with rock assets and Alien Plant models
Now, let's take a look at my 3D movie scene through the Camera View Angle that we will use later in this book:
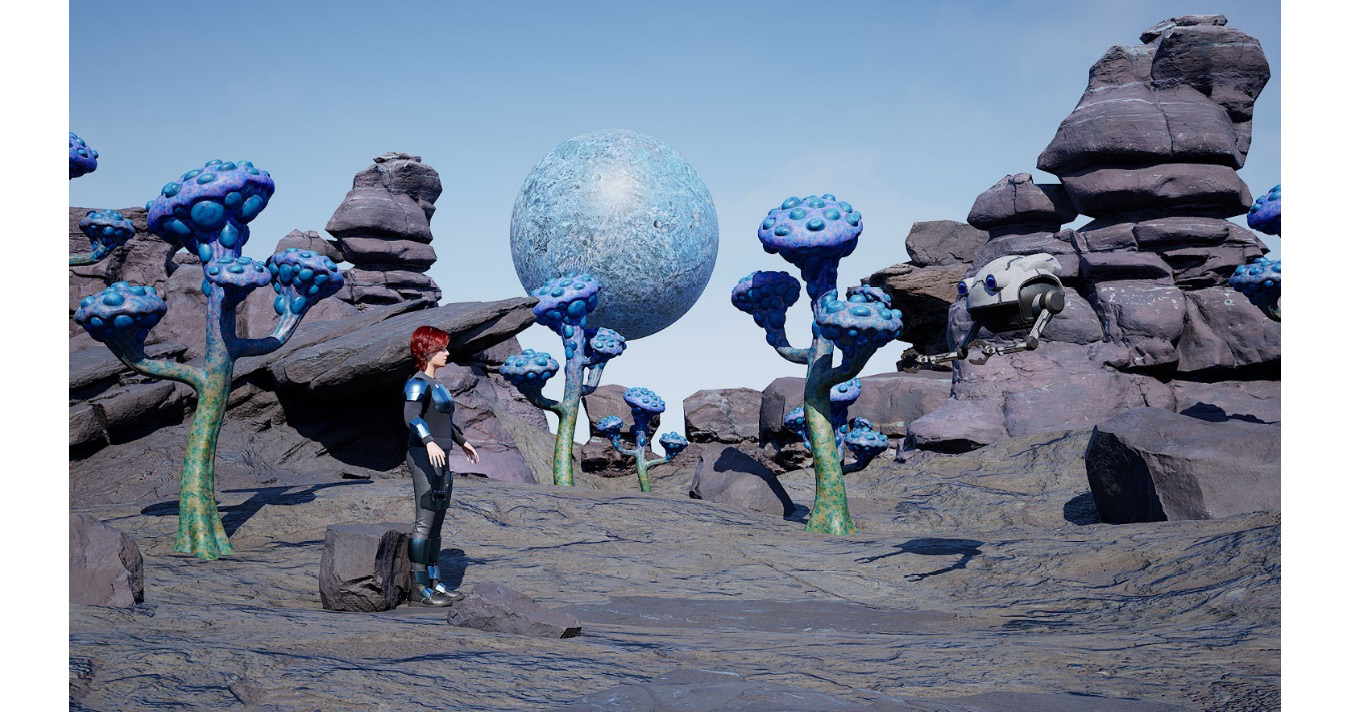
Figure 9.28 – My completed 3D movie set, viewed through the camera's viewing angle
Your 3D movie set is now complete and ready for the next stage – that is, adding lighting and atmospheric visual effects. In this section, you learned how to place 3D assets in the scene and how to clone (copy) these 3D assets directly in the Viewport. You've also gained valuable practical experience by using your creativity to place the 3D assets.
This concludes this chapter's tutorial.
Summary
Congratulations! You've completed this chapter's tutorial to build your own virtual 3D movie set.
You've also learned how to acquire free resources and modify them to suit the style that you are aiming to achieve in your 3D set. Finally, you learned how to populate your movie set with various props and environmental assets.
In the next chapter, you will take the 3D movie set that you've just created and learn how to light your scene. Then, you will add the final polish by adding atmospheric visual effects such as fog, lens flares, light bloom, and light shafts and add a glowing effect for the sci-fi armor.
See you in the next chapter!