
Chapter 11: Deploying DHCP in OPNsense
This final part of the book will go through some extra features you can add to your OPNsense system to go beyond the firewall. We will explore services such as Dynamic Host Configuration Protocol (DHCP) and Domain Name System (DNS), applying web-browsing controls and guest net authorization with a web proxy and a captive portal. We will see how to extend layer 4 firewalling with intrusion detection systems/intrusion prevention systems (IDSs/IPSs) and Zenarmor plugins and improve OPNsense availability by integrating two or more firewalls in a cluster.
Providing Internet Protocol (IP) addresses to network hosts is one possible firewall duty. In this chapter, we will understand DHCP concepts used by OPNsense and how to use them to perform dynamic IP address leasing. By the end of this chapter, we will be able to understand and set up DHCP using OPNsense, going through the following topics:
- DHCP concepts
- DHCP server
- DHCP relay
- Diagnostics
Technical requirements
This chapter requires a running OPNsense instance to follow some steps, but this isn't mandatory. Knowledge of IP addressing is required.
DHCP concepts
Let's suppose you are in charge of setting up a new small local network with 30 hosts, and let's assume IP version 4 (IPv4) addressing in this example. Now, think how much time setting up the IP address in each host will take. A lot, right? Setting it up in a server or gateway on the network will save a lot of time managing its IP address. So, to solve this problem, we can count on DHCP. OPNsense has a DHCP server that can be configured to deploy IP addresses to the network's hosts. DHCP works in a client/server manner, and it uses the User Datagram Protocol (UDP) to work, specifically on port 67. We will explore both IPv4 and IPv6 in this chapter. The process of a host taking a DHCP lease, which is how the IP addressing lease is named, is represented in the following diagram:
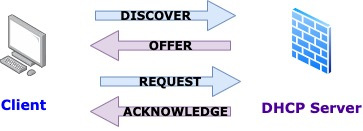
Figure 11.1 – DHCP addressing process
Next, we'll see how to configure the DHCP service on OPNsense for IPv4 addressing.
DHCP server
Each static IP-configured network interface can have a DHCP server configuration on OPNsense. To start configuring, go to Services | DHCPv4 | [Network interface name]; for our example, I will assume a previously configured interface local area network (LAN).
The following options will be shown on the DHCP server configuration page:
- Enable | Enable DHCP server on the LAN interface: Checking this option will enable the DHCP service on this interface (LAN in our example).
- Deny unknown clients: This option, when checked, will restrict DHCP leases to hosts added to the DHCP Static Mappings for this interface section. Using this option is a good way of preventing unknown hosts from getting a network address and talking with OPNsense, but it will not guarantee that if someone tries to set up a static IP address instead of using DHCP on a host, they won't start accessing other hosts on the network.
Important Note
Using a sniffer tool (such as tcpdump or Wireshark, for example), finding other hosts on the network will be possible. Enabling this option is an additional protection method but not a bulletproof one.
- Ignore Client UIDs: A unique identifier (UID) is used on DHCP for device tracking. Sometimes, a device can send multiple UIDs to the DHCP server, and you can check this option to avoid a host doing that to take multiple leases.
- Subnet, Subnet mask, and Available range labels: These labels will show information based on the network interface configuration. We can use this information to decide which DHCP range will be configured in the following options:
- Range: Provide here the first available address in the range in the from textbox and the last address in the range in the to textbox. In a 100% DHCP-based network, it will define how many DHCP-managed hosts the network can have.
- Additional Pools: In some networks, it may be necessary to split the DHCP range, for example, and in such cases, you can use this option to add a pool. Each additional pool will have its own options, which can be useful while setting a pool for specific hosts such as Voice over IP (VoIP) telephones.
- WINS servers: Old Windows versions (Windows eXPerience (XP) and earlier) may need the Windows Internet Name Services (WINS) protocol. This option allows us to configure up to two servers.
- DNS servers: If you need to send DNS servers' addresses differently from OPNsense-configured servers, fill the two textboxes in this option, each with a DNS server IP address for primary and secondary servers, respectively.
Important Note
In the Networking section, you can check which DNS servers are configured on OPNsense on System | Settings | General. Suppose your OPNsense system is receiving DNS server configuration through a DHCP configuration on a wide-area network (WAN) interface, for example. In that case, you can find which DNSs are in use by doing a DNS lookup on the Interfaces | Diagnostics | DNS Lookup page.
- Gateway: By default, OPNsense will send the IP address configured in this interface as the gateway to hosts. To not send any gateway address, just type none in the textbox. To change to another IP, fill it in with this option.
Important Note
While using a virtual IP address as a gateway, as we will see in Chapter 17, Firewall High Availability, you must set the gateway to the virtual IP address to avoid hosts losing connectivity if the master node fails.
- Domain name: The domain name provided to network hosts can be set in this option. If left blank, OPNsense will set its configured domain name as default. For example, if your host has a hostname of pc and the domain is example.com, this would result in a fully qualified domain name (FQDN) of pc.example.com.
- Domain search list: If your network uses more than one domain, you can set them here separated by a semicolon. Hosts will try to resolve short names using these domains first rather than querying the DNS server first.
- Default lease time (seconds): Set the time a DHCP lease will last before expiring when the host doesn't request the lease time. The default is 7,200 seconds (2 hours).
- Maximum lease time (seconds): Specify the maximum time a DHCP lease can last before expiring when the host asks for the expiration time. If you leave it blank, OPNsense will set it to the default: 86,400 seconds (1 day).
- Response delay (seconds): This will set a time delay expressed in seconds before the DHCP server will respond to a client trying to acquire an IP address. The default value is 0 seconds, which means without delay.
- Interface MTU: This will define the maximum transmission unit (MTU) size when the client requests it.
- Failover peer IP: While using a high availability (HA) setup, you must set the network interface address (real IP) on each HA node; on the primary node, set the secondary IP, and vice versa.
- Failover split: Using HA capabilities, you can set load-balancing clients between the primary and secondary nodes. The possible range is from 0 (no clients) to 256 (100% of clients) on the primary node. The default value is 128 (50% of clients on the primary node).
- Static ARP: If you check Enable Static ARP entries, only hosts added to the DHCP Static Mappings for this interface section will communicate with OPNsense.
Important Note
Proceed with caution with this option, as it will persist configuration even when the DHCP server service is stopped or disabled.
- Time format change: Checking the Change DHCP display lease time from UTC to local time option will change the default time zone displayed on the DHCP Leases page (Services | DHCPv4 | Leases) to the local time zone.
- Dynamic DNS: This option will register the DHCP client names in an external DNS server. To enable it, check the Enable registration of DHCP client names in DNS option. You have to fill in each option related to the dynamic DNS option as required (depending on your dynamic DNS service/server).
- MAC Address Control: It is possible to allow only specific hosts to use their media access control (MAC) address in the allow textbox or deny some hosts by adding them to the deny textbox. On both, you need to fill in comma-separated addresses. It is possible to specify just the organizationally UI (OUI) part of the MAC address. In this way, it will allow permitted hosts of a specific(s) vendor(s).
- NTP servers: Specify time servers (Network Time Protocol, or NTP) that will be set on hosts using the DHCP server.
- TFTP server: If some hosts on the network need a Trivial File Transfer Protocol (TFTP) server address, you can set their IP addresses in this option. Some devices use this combined with the Bootstrap Protocol (BOOTP) for the boot process.
- LDAP URI: Some systems may require the Lightweight Directory Access Protocol (LDAP) server's Uniform Resource ID (URI) from the DHCP server. This option will set this and send it to clients that ask for it.
- Enable network booting: Check the Enables network booting option to provide a network-booting service for devices on the network.
- WPAD: This tells OPNsense's DHCP server to tell the client where it can find the Web Proxy Auto-Discovery (WPAD) protocol file; so, the Uniform Resource Locator (URL) will be set to something like this: http://fw.example.com/wpad.dat. Please note that you also need a firewall rule and/or a reverse proxy in place to allow that access. Check the Enable Web Proxy Auto Discovery (WPAD) option to provide it through the DHCP service. It is also necessary to configure the WPAD file on the web proxy (Services | Web Proxy | Administration) to make it work.
- Enable OMAPI: Object Management Application Programming Interface (OMAPI) is an application programming interface (API) that allows automation between the DHCP server and other specialized systems. If using this integration, fill in the required options to enable it by checking the Enables OMAPI checkbox and filling in all the necessary following options.
- Additional Options: If some other option you will need isn't implemented on the web user interface (UI), you can specify it by adding the DHCP code and the required parameters in this option. You can check all the available options on this page: https://www.iana.org/assignments/bootp-dhcp-parameters/bootp-dhcp-parameters.xhtml.
We can add a static IP address based on the host's MAC address in the DHCP Static Mappings for this interface section. To do that, click on the + button. Adding a static lease will open a new page where you can fill in specific configurations for the host, as the following screenshot shows:

Figure 11.2 – DHCP static mapping entry example
After filling in the desired options, click on the Save button to add the static mapping new entry.
As we can see, the DHCP server options are compelling and allow us to have different pools with many configurations for each one. Based on our experience at CloudFence managing dozens of OPNsense systems, I can tell you that OPNsense is usually the preferred DHCP server in the network, even when a Windows server with these capabilities is present in the same network.
Now, let's explore the DHCP relay option present on OPNsense.
DHCP relay
While using a remote DHCP server (on another network segment), the DHCP relay service will need to be configured. This is required because the DHCP protocol works using broadcasting requisitions on the network, and as we already know, the broadcast domain is limited to the same network in which the hosts reside. OPNsense supports both DHCPv4 and DHCPv6 relaying.
Important Note
The DHCP relay service can only be used on an interface that has the DHCP server disabled.
To start configuring the DHCP relay service, go to Services | DHCPv4 | Relay or Services | DHCPv6 | Relay for the IPv6 protocol.
For both IP protocol versions, v4 and v6, the configuration options are the same. Here are descriptions of each one:
- Enable: Check this option to enable the DHCP relay service.
- Interface(s): Select each interface to be configured as the relaying service.
- Append circuit ID: Check this option to add a circuit ID—which means the OPNsense interface number—and the agent ID to the DHCP request.
- Destination servers: Fill in the DHCP server's IP address(es) (comma-separated) that requests are being relayed to.
As we can see, the DHCP relay service has only a few options to configure compared to the DHCP server. While running as a DHCP relay, OPNsense will forward configurations from the DHCP server it is relaying requests to.
In the following section, we will explore the diagnostics tools available in OPNsense to help troubleshoot DHCP-related issues.
Diagnostics
This section will explore some of the common issues related to the DHCP service and which tools OPNsense has to help us solve them.
Let's start by checking the online hosts on the DHCP Leases page. On this page, we can check the leases attributed by the DHCP server. To access the DHCPv4 leases page, go to Services | DHCPv4 | Leases, as illustrated in the following screenshot:
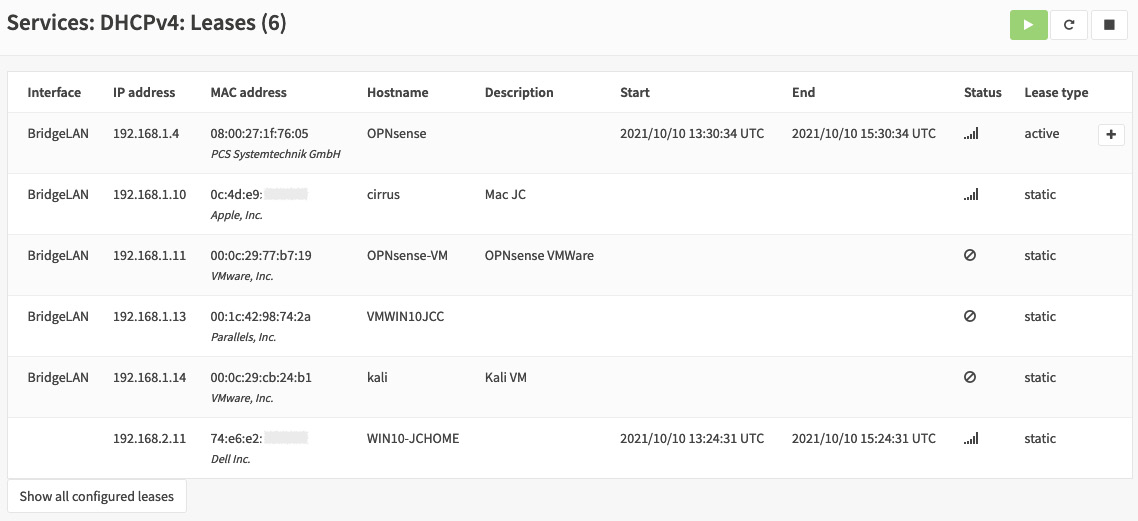
Figure 11.3 – DHCPv4 leases page
As the preceding screenshot shows, on the DHCP Leases page, we can check each lease with the following information: Interface, MAC address, Hostname, Description (if it is added in the static mapping), the Start and End time of the lease, Status, and Lease type. If you need to check expired leases, click on the Show all configured leases button at the bottom of the page. There is also a way to add a static mapping on this page. To do so, click on the + button that is placed at the end of each dynamic lease line.
The Leases page is a good starting point to solve DHCP issues. Once there, you can check which hosts are alive and get some additional information about them. Common issues you can check on this page are noted here:
- Check host's connectivity: Checking whether some host is grabbing an IP address from the DHCP server is a good starting point to check its connectivity.
- DHCP pool maximum limit: Sometimes, it is possible to check whether the number of hosts on the network is larger than the available DHCP pool limit by cross-checking the network subnet size and the pool's configured range.
- Inconsistent information: It isn't a rare occurrence while troubleshooting local network connectivity issues to get inconsistent information from the user while checking on the Leases page—for example, a user is telling you that their IP address is leased to another device. By comparing the device vendor (displayed on the MAC address column) and the MAC address, you can quickly check this.
Another valuable resource while solving issues related to the DHCP server is the Services | DHCPv4 | Log File page. On that page, you can check all information generated by the dhcpd daemon (which is the DHCP service). If something goes wrong with this service (such as an unexpected service stop), you will find relevant information on it.
As we explored, the DHCP service is quite simple to troubleshoot, and you may not have any major troubles with it on OPNsense. The webGUI has enough resources to help you find issues and solve them.
Summary
In this chapter, we started to explore services available on OPNsense that extend beyond a simple network firewall. We learned how to enable and configure a DHCP server and relay and check for issues related to them on the webGUI. You can now configure your OPNsense system as a DHCP server on a local network using all the powerful resources it supports. In the next chapter, we will explore DNS services that can be integrated with DHCP, making OPNsense an even more robust solution.