
Chapter 4: System Configuration
In this chapter, we will learn more about system configuration and administration, adding users and groups, authenticating on LDAP servers, managing certificates, changing some advanced operating system settings, and how to back up all system configurations.
As we already learned, OPNsense is a complete security platform with a great framework to manage the operating system it runs on – FreeBSD. We will continue exploring WebGUI and learn how to perform some system administration tasks on it. We are going to create users, groups, and certificates, see the steps to add an external authentication server, change some system settings for testing, and perform backup and restore tests. In this chapter, we will look at the following topics:
- Managing users and groups
- External authentication
- Certificates – a brief introduction
- General settings
- Advanced settings
- Configuration backup
Technical requirements
To follow this chapter, you will need to have a basic knowledge of digital certificates and how they work, an understanding of user and group privileges, LDAP and SSH usage and configuration, and logging concepts, and a running OPNsense to practice the proposed exercises.
Managing users and groups
Before we can start managing users and groups, it's important to understand the least privilege principle. It defines that a user must have only the privileges necessary to complete a task, so it isn't a good idea to have all firewall users as admins with full privileges or even to share the root password with a lot of users. This will break the least privilege concept.
A better approach is to define profiles and apply these profiles to users so that unnecessary privileges for some users can be avoided. A good way to do this is by creating groups and assigning the required privileges to each one. After that, you can add new users or assign existing ones to each group based on the least privilege principle.
Let's see how to create users and groups, and assign privileges to them.
Creating users and groups
Users created in WebGUI can be used for authentication in services such as Captive Portal, the proxy, IPsec, and OpenVPN and will be authenticated to log into OPNsense using the Command-Line Interface (CLI) or WebGUI.
The users can be managed using the System | Access | Users menu:

Figure 4.1 – System | Access | Users page
Some important properties are shown in the screenshot:

Figure 4.2 – User account properties
The following properties are depicted in the preceding screenshot:
- Disabled: This option will disable the user account.
- Username: The name that will identify the user.
- Password: The password that will be set for the user in the local database.
- Full name: The user's full name. This is optional.
- E-Mail: The user's email address. This is optional.
- Comment: An optional comment about the user.
- Preferred landing page: This will redirect the user to the configured page. This is optional, and privileges are required to access the page.
- Language: This is optional and can't be set to users individually yet. You can set it in System | Settings | General.
- Login shell: This will be the default shell for the user. This is optional.
- Expiration date: The date on which the user account will expire. This is optional.

Figure 4.3 – User account properties
- Group Memberships: Groups that the user can be associated with. This is optional.
- Effective Privileges: The user's WebGUI privileges, which are mandatory. We will explore these later in this chapter.
- User Certificates: User certificates that can be used in some OpenVPN setups, for example.
- API keys: The API keys and secrets are used to access the web API. We will explore it later in Chapter 20, API – Application Programming Interface. This is optional.
- OTP seed: Generate a One-Time Password (OTP) seed to be used by Two-Factor Authentication (2FA) such as Google Authenticator or the FreeOTP app, for example. This is optional.
- OTP QR code: If you selected the Generate new secret (160 bit) option, after clicking on the Save button, this option will be shown. To see the generated QR code, required by the OTP app, just click on the Click to unhide button and point your mobile camera to it to add it to your preferred OTP app.
- Authorized keys: This option is used for SSH access using a public key. This is optional.
- IPsec Pre-Shared Key: An optional IPsec pre-shared key used in an IPsec Road Warrior setup. This is optional.
Let's look at the user privileges.
User privileges
The user privileges are privileges related to WebGUI and define what a specific user can do or see while using it.

Figure 4.4 – Editing user privileges
After clicking on the pencil icon, a new page will show, as in the following screenshot:

Figure 4.5 – The System Privileges page
Now that we have learned how to create and manage users, it's time to see how to group users.
Proposed exercise – creating a new user and assigning privileges to them
To practice how to create a new user and assign WebGUI privileges, follow these steps:
- Go to System | Access | Users and click on the + Add button.
- Fill in the username and password, you can leave the other options with the default values, click on Save, and then click the back button.
- In the new user row, click on the pencil icon to edit the user.

Figure 4.6 – Editing the user
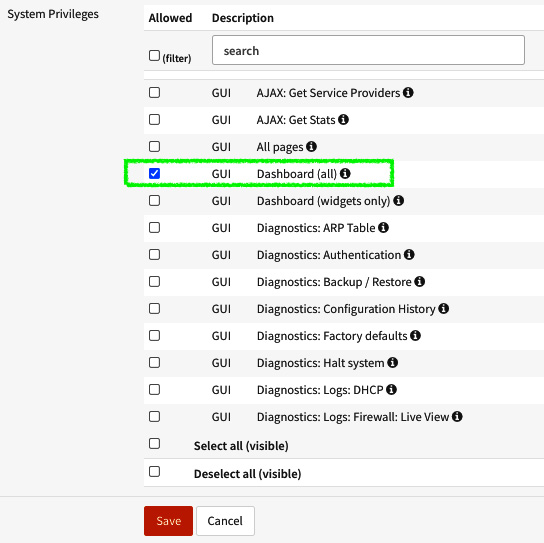
Figure 4.7 – Assigning user privileges
- Now try to log out and log in again with the new user we just created.
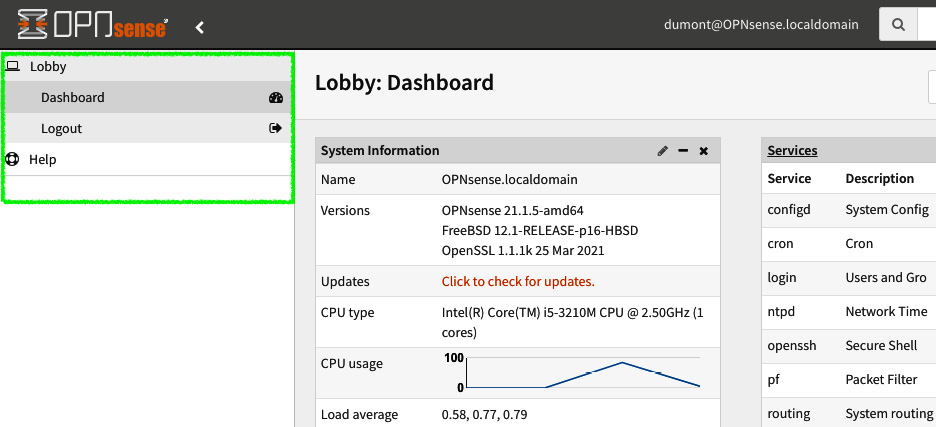
Figure 4.8 – New user dashboard access
Note that the new user only has access to the Dashboard screen. Now you can practice selecting other privileges.
Important Note
If you don't select any privileges, the user won't be able to log into WebGUI.
Adding groups
Groups, as the name suggests, will help us to group users and apply privileges to them, instead of defining each one individually. As with user privileges, we can only assign privileges to a group its users can access on WebGUI.
To add a new group, go to System | Access | Groups as shown in the following screenshot and click on the + Add button:

Figure 4.9 – Adding a new group page
The following are the options depicted in the preceding screenshot:
- Group name: This is the name of the group.
- Description: Enter a description of the new group.
- Group Memberships: Select which users will be part of this group.
As usual, when you finish creating the group, just click on the Save button. As you can see in the following screenshot, the new group is listed as Normal group:

Figure 4.10 – List of existing groups
This means that it doesn't have privileges to all WebGUI pages like the admins, for example. We need to give some privileges to this new group since it was created with no privileges assigned.
Assigning group privileges
To assign privileges to a group, you must click on the pencil icon on the Groups page. On the group editor page, now the Assigned Privileges option will be visible. Just click on the pencil icon to assign group privileges:

Figure 4.11 – Editing group privileges
In the system privileges, try selecting only All pages and click on the Save button and this will take you back to the group editor page. Click on Save again. As you can see in the following screenshot, the new group is shown as Superuser group, because we selected the All pages option:
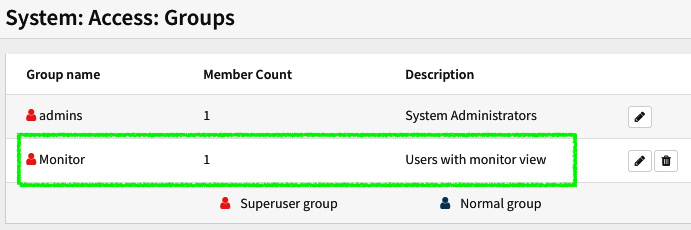
Figure 4.12 – Newly created group
We just did this as an example to show the difference between a normal group and a superuser group. Now you can go back and edit your new group with the privileges you want.
We have learned how to manage users from the local database. Now, let's see how to use external authentication services.
External authentication
Besides local database authentication, OPNsense also supports an external authentication backend, such as Microsoft Active Directory or OpenLDAP, for example. The currently supported protocols are RADIUS and LDAP. There is a special authentication backend that is only used for the Captive Portal service: Voucher Server, which we will explore in detail in Chapter 14, Captive Portal. You can combine these backends with a Time-Based One-Time Password (TOTP) using Google Authenticator, for example, to enable 2FA.
If you aren't familiar with any of these protocols, you might be asking, When do I need to use an external authentication backend? Let's start with one common example.
VPNs
Try to imagine the following scenario: You need to set up a new VPN tunnel that will be used by one of your customers. The IT team told you that they need to provide secure access to employees – a few hundred. Most of them will work from home, but they already access all network resources using their Microsoft Active Directory credentials and this must work in the same way with the new VPN access. Is there another option other than using the authentication backend? If you thought to suggest importing all the users from the Microsoft Active Directory server, this may appear to help at first glance, but the credentials would not be synced with the privilege groups and the password changes will be forgotten about! So, think twice and don't say a single word. Just nod and say to the customer, Consider it done! How can you meet the client's needs? By using OPNsense with external authentication, of course!
So, for the client to site tunnels, it will help a lot to use an external authentication service. In this way, IT support and administration teams without access to OPNsense can manage the users just by accessing the authentication server. Cool, huh? That means peace for you and you'll save time because you don't have to deal with support tickets such as please change the password of so-and-so user.
Currently, the VPN services that can use external authentication on OPNsense are OpenVPN and IPsec. Other services that can use the external authentication backend are Captive Portal, the proxy, and some plugins such as NGINX as well.
You can also use external authentication to manage users that will be allowed to log into WebGUI and SSH with limited access.
Enabling external authentication
To enable an external authentication server, go to System | Access | Servers and click on the + Add button.
The following fields will be available:
- Descriptive name: The name of the authentication server.
- Type: The options are LDAP, LDAP + Time-based One Time Password, RADIUS, Local + Time-based One Time Password, and Voucher. They are described in the following section.
- LDAP: Its server will use the LDAP protocol to authenticate the users. Common LDAP servers are Microsoft Active Directory, OpenLDAP, and Red Hat's 389 Directory Server.
LDAP options
The following are the available LDAP options:
- Hostname or IP address: Fill this with the IP address or hostname of the LDAP server.
- Port value: The LDAP port configured in the LDAP server. The default is 389. For security reasons, it's recommended to use LDAPS (LDAP over SSL), which uses TCP/ port 636.
- Transport: This is the protocol mode. It can be defined as TCP - Standard, which is used for unencrypted communication, or StartTLS and SSL – encrypted communications.
- Protocol version: This can be configured using version 2 or 3 of LDAP.
- Bind credentials: The user credentials used to authenticate queries on the LDAP server.
- Search scope: This can be configured as One Level or Entire Subtree in the LDAP tree.
- Base DN: This is the LDAP distinguished name. Usually, you will fill it with your internal domain configured in the LDAP server, for example, FQDN cloudfence.intranet becomes dc=cloudfence,dc=intranet in the base DN format.
- Authentication containers: This click-and-select option will list the existing Organizational Units (OUs) or the Common Name (CN) components from the configured server.
- Extended Query: This is a special syntax query that will limit the results for the LDAP server.
- Initial Template: Select which type of template your server is compatible with: OpenLDAP, Microsoft AD, or Novell eDirectory.
- User naming attribute: This may vary depending on the selected option in Initial Template. It will use cn if the selected options are OpenLDAP or Novell eDirectory and sAMAccountName for Microsoft Active Directory. You can also type a custom option in this field, which is only recommended if you know what you are doing.
- Read properties: This option will enable fetching the account details after a successful login.
- Synchronize groups: This option depends on the preceding option and will synchronize groups that are specified in the memberOf attribute on the server. Consider using it if you've already created a group with the same name in OPNsense to synchronize which users will be part of the synchronized group.
- Limit groups: This multi-selection option will define which groups will be used by the LDAP protocol to sync with local ones.
- Match case insensitive: This option will turn the case sensitivity off and will allow mixed case input while getting local user settings.
- LDAP + Time-Based One Time Password: This option will enable external LDAP authentication plus the OTP mechanism using the Google Authenticator app, for example. You must enable the OTP seed option for the users to be able to use it.
The extra options when using LDAP and time-based OTP are as follows:
- Token length: This is the length of the token in digits. The options are 6 or 8.
- Time window: The time that the token will be valid for before changing to a new one. The default time is 30 seconds.
- Grace period: The time difference that will be allowed between the token in the user app and the server.
- Reverse token order: The default will require the user to type the token before the password. Checking this option will reverse this order, which can make things easy for the user. The token will be valid for only 30 seconds. In this way, the user can type the password without being concerned about the token changing.
- Local + Time-based One Time Password: This will enable the OTP feature of the local database authentication.
- RADIUS: This will use RADIUS as the authentication protocol.
The following are the available options for the RADIUS protocol:
- Hostname or IP address: Fill this with the IP address or hostname of the RADIUS server.
- Shared Secret: This is the shared secret configured in the RADIUS server.
- Services offered: The available options for this are Authentication to just authenticate users in the RADIUS server, and Authentication and Accounting, which will send a request packet to the RADIUS server to start the accounting session. This is useful while using Captive Portal with RADIUS authentication.
- Authentication port value: The configured port in the RADIUS server.
- Accounting port value: The configured port in the RADIUS server.
- Authentication Timeout: The timeout for the RADIUS server to respond to requests.
- Voucher: This option is used in combination with Captive Portal. We'll explore it in Chapter 14, Captive Portal.
Now we have explored how to manage users, groups, and authentication, it's time to look at digital certificates and how to use them in OPNsense.
Certificates – a brief introduction
OPNsense uses certificates to ensure secure communication between nodes in services such as OpenVPN and IPsec, and HTTP services such as Captive Portal, web proxies, and WebGUI.
The available types of certificates in OPNsense are the following:
- Certificate Authority (CA): A CA is a trusted entity that issues trusted certificates. On OPNsense, this will be used to issue self-signed certificates.
- Server type certificate: This certificate must be used on the server side of encrypted communication. On OPNsense, you will enable it in services such as OpenVPN or WebGUI, for example.
- Client type certificate: This type of certificate will be used on the other side of client-server encrypted communication. On OPNsense, we use it, for example, on OpenVPN clients' certificates and on some plugins such as NGINX or HAProxy.
- Combined Client/Server: This type of certificate can be used on both the server side and client side.
We will dive into the entire process of creating and using certificates in Chapter 8, Virtual Private Networking.
Meanwhile, let's move on to learn how to configure the OPNsense general settings.
General settings
In the System | Settings menu, you will find several submenus that will allow you to configure some settings in OPNsense. Let's go through them one by one. To access each one, access System | Settings | <Submenu's name> as follows.
The administration page
On this page, we will find options related to accessing OPNsense and administration such as WebGUI and SSH configuration and authentication options.
WebGUI options
The following options are available in WebGUI:
- Protocol: Which protocol will be used to access WebGUI: HTTP or HTTPS? It isn't recommended that you use HTTP as it will pass all data in cleartext, which means no security; prefer HTTPS instead.
- SSL certificate: The certificate that will be used to enable HTTPS to have access to WebGUI.
- SSL ciphers: The ciphers that will be used to access WebGUI. This can limit access from old web browsers, for example. Caution: If you select ciphers incompatible with your available browsers, you could lose access to WebGUI.
- HTTP Strict Transport Security: Known as HSTS, this policy mechanism can help to protect against man-in-the-middle attacks such as protocol downgrade and cookie hijacking. It is disabled by default.
Note
To learn more about HSTS, please refer to https://developer.mozilla.org/en-US/docs/Web/HTTP/Headers/Strict-Transport-Security.
- TCP port: The port used by WebGUI. It is desirable to change this when you plan to use the 443 port for another service running in the same IP used by OPNsense, such as a NAT rule pointing to a web server, or an NGINX or HAProxy plugin installed and in use. I would recommend you always change it to another port number that is unpredictable.
- HTTP redirect: When checked, this option will disable automatic redirection while trying to access WebGUI with the default HTTP protocol in TCP port 80. This is another option to leave checked if you plan to use the HTTP port for another service.
- Login messages: When checked, this will disable logging after successful logins, which is a bad idea. When you want to trace and audit access to WebGUI, it is recommended to leave it as the default option: unchecked.
- Session timeout: The period that a WebGUI session will last before it expires; the default value is 4 hours.
- DNS rebind check: WebGUI has protection against DNS rebinding attacks as default. It is recommended to leave this unchecked. For more information about DNS rebinding attacks, please refer to https://en.wikipedia.org/wiki/DNS_rebinding.
- Alternate hostnames: In this option, you can fill in the hostnames that will bypass the DNS rebinding check.
- HTTP compression: The level of compression can be low, medium, or high. When compression is enabled, it will save bandwidth while transferring data from WebGUI to the client web browser but will demand more CPU power from the OPNsense hardware. If you are accessing the web-browser from a high-speed WAN or by LAN, it won't be necessary.
- Access log: This option will enable the access log file for WebGUI. The process that serves WebGUI access is lighttpd, thus if you enable it, the access log will be available in /var/log/lighttpd.log and can be accessed in real time using the clog -f /var/log/lighttpd.log command. If you want to audit access to WebGUI, I recommend you enable this option.
Note
In the old OPNsense versions (until 21.7 version), the default log format was the circular log (clog), which changes the manner to access the logs using the CLI:
Ex.: clog -f /var/log/lighttpd.log
- Listen interfaces: This option will configure the WebGUI to listen for requests only in the selected interfaces. The default is to listen to all interfaces. Be careful changing that. If you are accessing from the LAN interface, for example, and unmark it here, you could lose access to WebGUI.
- HTTP_REFERRER enforcement: By default, WebGUI will check the HTTP_REFERRER header to protect itself from redirection attempts. If you use an application that doesn't work well with that, for example, password managers that access WebGUI from it, maybe it would be desirable to disable this option.
WebGUI caveats
Nowadays, it is common to read in cybersecurity news pages about flaws in WebGUI/managers that allow attackers to gain privileged access to them, so I would advise you – even with the excellent security history of the OPNsense project – to avoid allowing WebGUI to be accessed from the internet (WAN interfaces). This could expose your firewall unnecessarily. Always prefer to use a VPN or limit the source IP in a firewall rule.
Another relevant topic is the default ports used by WebGUI, HTTP, and HTTPS – TCP/80 and TCP/443 (HTTP/3 should use the UDP protocol) respectively are common ports used by web servers that might be without the protection of OPNsense. So, to avoid ports conflicting, change the WebGUI default port and disable the HTTP redirect. Let's now learn how to enable CLI remote access using the Secure Shell protocol.
Secure Shell (SSH)
The SSH protocol is very popular, useful, and secure and it is the way to access the OPNsense CLI remotely. The available options to configure are the following:
- Secure shell server: Check this option to enable SSH access to OPNsense. This is disabled by default.
- Login group: The allowed groups that will have access through the SSH protocol. It is a good idea to limit these only to groups that really need access via SSH. Once allowed, these groups will have full SSH access, which means accessing files using SFTP or SCP methods that belong to the SSH protocol.
- Root login: This option will enable root access to SSH, which sometimes can be dangerous. You can leave it disabled and enable sudo (explained in the Authentication section) to log in with a normal user and change to the root user afterward or just disable password authentication.
- Authentication method: When checked, this will permit logging in using passwords, otherwise, you will need to configure authorized keys for each user that has SSH access.
- SSH port: The port that will listen to SSH requests.
- Listen interfaces: This option will configure the SSH service to listen for requests only for the selected interfaces. The default is to listen in on all interfaces.
- Key exchange algorithms: Select which algorithms will be used to generate keys used in each SSH connection.
- Ciphers: Select the ciphers that will be used to encrypt the SSH connections.
- MACs: The message authentication codes that the SSH service will use.
- Host key algorithms: Select which host key algorithms will be served by the SSH service.
Console access
The following are the available options on the Console access page:
- Console driver: When this is checked, OPNsense will prefer the vt terminal driver instead of the older sc driver.
- Primary console: The available options include VGA console, for displaying boot messages in a display output such as VGA, HDMI, DVI, and others. The Serial console option will display boot messages to an available serial port. This will require hardware support. The EFI console is available on modern hardware and will output messages to the display port configured in the hardware setup utility, also known as BIOS setup on older hardware. Only select this option if your hardware is UEFI compatible and if it is enabled on the hardware setup utility. The Mute console option, as the name suggests, will mute boot messages.
Important Note
If you select an option that isn't supported by the hardware on which OPNsense is installed, you could lose console access.
- Secondary console: If the hardware supports multiple console outputs, you can select a second one in this option. The same options from the primary console apply here.
- USB-based serial: Instead of using /dev/ttyu0, USB-based serial will use /dev/ttyU(X) for the respective connected USB serial console device, where X is the number of the connected device. For example, /dev/ttyU0 for the first, /dev/ttyU1 for the second, and so on.
- Console menu: When checked, this will protect the console access with a login prompt, requiring you to log in with an existing user.
Authentication
The authentication options are as follows:
- Server: Using centralized authentication makes sense to configure an external authentication backend here. This way, administrators can authenticate on OPNsense to manage it using an Active Directory authentication service, for example. If the authentication server or servers become unavailable, it's a good idea to let the local database always be selected as a fallback. The default option when none is selected is the local database.
- Disable integrated authentication checkbox: Check this option if you want to use only local accounts for system services such as SSH, console login, and others (based on Unix authentication).
- Sudo: This will enable sudo usage in the CLI and SSH access. You can select disallow (default) or the Ask password option to prompt the user to type the password every time sudo is invoked or No password to allow the user to call sudo without prompting for the password.
- sudo group combo box: The groups that will be allowed to use the sudo command. The special wheel group is always allowed. This is the root group.
On the System | Settings | Administration page, we can define how to connect to OPNsense to manage it, whether via the CLI, console, or WebGUI. Next, we will explore the General page options.
The General page
To access it, go to System | Settings | General. On this page, we can configure some basic system and network settings. Let's explore each of these.
System settings
The system options are the following:
- Hostname: The OPNsense hostname. Just type here the hostname without the domain or suffix part.
- Domain: Type here the network's domain.
- Time zone: Select the time zone that OPNsense will be configured in.
- Language: Select the preferred language that WebGUI will use.
- Theme: You can select here your preferred theme for WebGUI. Additional themes can be installed using plugin additions.
Network settings
The following are the networking options:
- Prefer IPv4 over IPv6: If OPNsense is installed on an IPv4 network, check this option to avoid that name resolution using IPv6 as the preferred address.
- DNS server: Here, you can set the DNS that OPNsense will use to name the resolution service.
Important Note
If you have multiple WANs configured and it will set the ISP's DNS servers, you should select the respective ISP gateway to avoid resolution requests flowing to another ISP that has been blocked at the destination DNS server.
- DNS server options: Check this option if you want WAN connections configured via DHCP or the PPP protocol to override the configured DNS servers. In the Exclude interfaces option, you can select which interfaces will be excluded from receiving DNS servers' configurations automatically. To not use local DNS services such as Dnsmasq and Unbound as the DNS server, check the Do not use the local DNS service as nameserver for this system option. This will only apply to OPNsense, not the entire network, for example, when OPNsense has the DHCP server enabled.
- Gateway switching: This is a very important option to check if you are using multiple WANs. If a WAN goes offline, then the next one available will be used as the default gateway.
Let's now discuss the logging process in OPNsense.
About OPNsense logging
OPNsense has inheritance from pfSense, which used the circular logging format. This means that the logs will have a predefined size, never exceeding it. This can be good when you need to keep small logs but isn't suitable when you want a longer event history in each log file. This applies to the core log files, which means that log files from plugins don't use the circular logging approach. Later in this chapter, we will see how to read circular logs in the CLI. Once in WebGUI, the visualization doesn't differ from regular log files.
Since version 20.7 of OPNsense, it is possible to disable the circular logs. By doing that, the one-file-per-day approach will be used for log file rotation. Let's see how to configure this and other logging options in OPNsense.
Go to System | Settings | Logging to open the log settings page:

Figure 4.13 – Log settings page
The options in the log settings page are as follows:
- Preserve logs: This will set how many log files will be preserved, one per day. The default number of logs preserved is 31.
Note – Disabling the Circular Log
If you disable the circular log, pay attention to the size of your log files. They can become very large and then occupy the entire OPNsense disk. The size of log files can vary depending on the volume of traffic OPNsense is processing.
- Log Firewall Default Blocks: The options present here are as follows:
- Log packets matched from the default block rules put in the ruleset: Checking this option will log every packet blocked by the default block firewall rule. You can always decide which firewall rule will be logged or not, adjusting the logging option present in each rule.
- Log packets matched from the default pass rules put in the ruleset: Checking this option will log the implicit pass rules created by OPNsense automatically. Wait… default pass rule? There is a hole in our firewall?! Stay calm! There are some implicit rules such as permitting traffic, for example, when OPNsense needs to obtain a dynamic IP address in an interface configured as a DHCP client. So it is desirable for some pass rules to be created to avoid things from breaking. As Franco Fichtner says, Stay safe. Don't worry, with OPNsense your network is safe and sound!
- Log packets processed by automatic outbound NAT rules: checking this option will log the automatic outbound NAT rules created by default on OPNsense installation.
- Log packets blocked by 'Block Bogon Networks' rules: As the option's label says, it will block the packets dropped by the rules generated by the Block Bogon Networks option present in the network interface configuration, as we learned in Chapter 3, Configuring an OPNsense Network.
- Log packets blocked by 'Block Private Networks' rules: As the option's label says, it will block the packets dropped by the rules generated by the Block Private Networks option, when the Block Private Networks option is checked on the network interface configuration.
- Web Server Log: OPNsense has an embedded web server used by WebGUI and by Captive Portal, which is the lighttpd web server. When this option has been checked, errors related to it will be presented in /var/log/system.log. You can also access this log by going to System | Log Files | General.
- Local Logging: Disable writing log files to the local disk (checkbox). Checking this option will disable all local disk logging. I don't recommend you do that, even with remote logging enabled. Without logs, all visibility of errors or other system events is lost.
- Reset Logs: Clicking on this button's option will empty all the local disk log files. It will also restart the DHCP service.
Let's now look at the remote logging options.
Remote logging
Remote logging is very useful when we want to preserve log entries, whether from losing them in a disk crash or from a system compromise due to a cyberattack. It is a good practice to enable remote logging in all managed hosts and send the log entries to a system that will process each log entry. For example, at Cloudfence, our SOC analyzes all log entries using a Security Information and Event Management (SIEM) system that helps us to detect and respond to threats. We can do that thanks to the remote logging feature present in OPNsense, protecting dozens of networks. If you are curious which system we are using to do that, look at the Wazuh project: https://www.wazuh.com. Another good option is to send logs to the ELK Stack, which you can create nice dashboards with. You can learn more about it by visiting https://www.elastic.co. If you need help in sending logs from OPNsense to the ELK Stack, look at Fabian Franz's repository on GitHub: https://github.com/fabianfrz/opnsense-logstash-config.
Now that I think that you are convinced that it's a good idea to enable remote logging, let's move on and see how to do that. Go to System | Settings | Logging / targets and click on the + icon to add a new syslog server, also called target here:

Figure 4.14 – Adding a new logging target
A new page will appear with details that must be filled in to configure the remote logging target as shown in the following screenshot:

Figure 4.15 – Configuring a new logging target
Before detailing each field, it is important to say that we will not cover here how to set up and configure a remote logging server, but if you want, you can do that using a syslog server such as syslog-ng, Graylog, or any other syslog compatible server. Googling it, for syslog, you will find a lot of options to use as a syslog-server. OPNsense uses the syslog-ng server to send remote events using the syslog standard. At https://en.wikipedia.org/wiki/Syslog-ng, you will find explanations about terms used in syslog message logging, such as facility, severity, or level. If you don't know anything about syslog messages, then I recommend you spend some time reading about this before continuing.
The following are the fields present in the preceding screenshot:
- Enabled: Check this to enable this remote logging target.
- Transport: Select between the UDP and TCP options. They are available in the IPv4 and IPv6 versions.
- Applications: Select which OPNsense internal applications will send events to this remote logging target.
- Levels: Select which levels will be included in the logging events that will be sent to the remote target.
- Facilities: Select the facilities that will be configured for the select remote logging services.
- Hostname: Fill this with the logging server IP or hostname.
- Port: Fill this with the port used by the remote logging server. The default for syslog is UDP 514.
- Description: An optional description to help you identify this server.
Lastly, before we move on from the logging topic, let's look at the log visualization options available in the System | Log Files menu:
- Backend: Here, you can visualize /var/log/configd.log, which is the log of OPNsense's backend daemon.
- General: This page will show you the /var/log/system.log events. This log will show general system events.
- Web GUI: This page will output /var/log/lighttpd.log, which is the WebGUI web server.
You can always check the files presented in this chapter in the CLI using the clog command while circular logs are enabled. If they're disabled, then change the command to tail.
An example of reading the system.log CLI is shown here.
Circular logs can be enabled, using the following command:
tail -f /var/log/openvpn/openvpn_`date *%Y%m%d`
Circular logs can be disabled, using the following command:
tail -f /var/log/system/system_20210605.log
Now that we have explored the OPNsense general settings and logging, we are ready to learn about advanced settings available in WebGUI.
Advanced settings
OPNsense's WebGUI is a powerful management interface that allows us to configure even the most advanced features available in the FreeBSD operating system. Let's explore them and learn how to optimize and customize our firewall with available advanced options.
In this topic, we will explore two menu options: System | Settings | Miscellaneous and System | Settings | Tunables. Let's start with the first one.
On the Miscellaneous page, we will find options related to hardware, system file backups, disk and memory settings, and the hardware buzzer control when it is present on the hardware.
Cryptography settings
There are the following cryptography options:
- Diffie-Hellman parameters: These cryptographic keys exchange methods used in services such as VPN tunnels. In the default configuration, it will be updated at least twice a year by software updates. If you need to change it from the default option, you will be able to set it as RFC7919, which defines static recommendations. Otherwise, it can be set to a renewal period such as Weekly, Monthly, or Custom, which will require that you create a custom CRON entry at System | Settings | Cron. Only change it if you know what you are doing.
- Hardware acceleration: Here, you can set a cryptographic accelerator if present in OPNsense hardware. As we discussed back in Chapter 3, Configuring an OPNsense Network, in the Hardware considerations topic, you can, for example, select the AES-NI CPU-based Acceleration option if the CPU supports it. If your OPNsense hardware doesn't support any of the listed options, choose None.
Thermal sensors
Hardware requirements: it will load the driver to read the CPU's temperature. For Intel CPUs, select Intel Core CPU on-die thermal sensor (coretemp). If the CPU is an AMD, then select AMD K8, K10 and K11 CPU on-die thermal sensor (amdtemp), otherwise, leave it as the default None/ACPI option, then the operating system will try reading the temperature from the motherboard sensor if it has Advanced Configuration and Power Interface (ACPI) support.
Periodic backups
In the following options, you can select how many times you want OPNsense to run a backup of the data to be restored in the next boot. These options are especially useful when OPNsense is running based on a nano image that saves the volatile data only in RAM or when the power is cut off and data not saved in the disk will be lost:
- Periodic RRD Backup: This option is related to the graphs presented in the Reporting menu.
- Periodic DHCP Leases Backup: This option is related to the DHCP server leases data when it is enabled.
- Periodic NetFlow Backup: This option is related to the NetFlow data, which will only save data if this service is enabled. You can configure NetFlow at Reporting | NetFlow.
- Periodic Captive Portal Backup: This option is related to Captive Portal. When it is enabled, it will save the session data.
Power saving
The power saving options are related to power control. There are modes available and three options, each one representing a power mode: on AC, on Battery, and on Normal. This last one is used when the power control can't determine whether the power source is connected.
The power modes are as follows:
- Adaptive: This mode will try to balance power saving and performance. The performance will decrease while the system is idle and increase when it is under load.
- Hiadaptive: This works similarly to Adaptive, but in this mode will prioritize the system performance over power saving.
- Minimum: This will save power but with degraded hardware performance.
- Maximum: This will set the power control to the maximum hardware performance.
Disk/memory settings (reboot to apply changes)
The following are the options available in the disk/memory settings:
- Swap file – the Add a 2GB swap file to the system checkbox: This option will do as the name suggests, adding a swap file to the system. Select it only if your OPNsense installation doesn't create a swap partition.
- /var RAM disk - Use memory file system for /var: If this is checked, this option will move the /var directory to a disk mounted on RAM, which means that in the event of a reboot, all data in this directory will be lost. My advice is that it isn't a good idea to use it.
- /tmp RAM disk: The same as the previous option but related to the /tmp directory.
System sounds
Startup/Shutdown Sound - Disable the startup/shutdown beep: Check this if you no longer want to hear the sound played when OPNsense finishes the boot or when it starts the shutdown process.
Let's move on to the System | Settings | Tunables page to have a brief introduction to what we can set for the FreeBSD low-level settings.
Tunables
When FreeBSD boots into multi-user mode, which is the default mode for OPNsense, it reads a configuration file, /etc/sysctl.conf, and there we can set a lot of low-level settings that allow us to tweak the entire system behavior.
The OPNsense default configuration brings a lot of sysctl settings, or tunables as we will call them here. These tunables can configure settings such as network card driver options, TCP/IP protocol stack behavior, and so on. To get a complete list, you can run the sysctl -a command in the CLI.
Tunables Important Note
Only change settings on the Tunables page if you really know what you are doing. Common examples of changing tunable settings are recommended settings for specific hardware drivers, such as network interfaces or a network performance tweak. It is recommended that an experienced FreeBSD professional handles these settings.
If you want to learn more about FreeBSD sysctl and other advanced configurations, I recommend you look at Packt's available FreeBSD books.
Configuration backup
OPNsense saves all the configuration settings in an XML file, /conf/config.xml, and it is extremely important to save it in a safe place that will allow you to restore this configuration if it is necessary.
OPNsense offers some embedded options to save this configuration in external cloud drives such as Google Drive and Nextcloud (using an additional plugin). This book will not cover the configuration of how to use backup configuration, but you can find information at https://docs.opnsense.org/manual/how-tos/cloud_backup.html. Some plugins can help with this task also; check out the OPNsense plugins list at System | Firmware | Plugins.
To back up your system configuration files, you can go to System | Configuration | Backups.
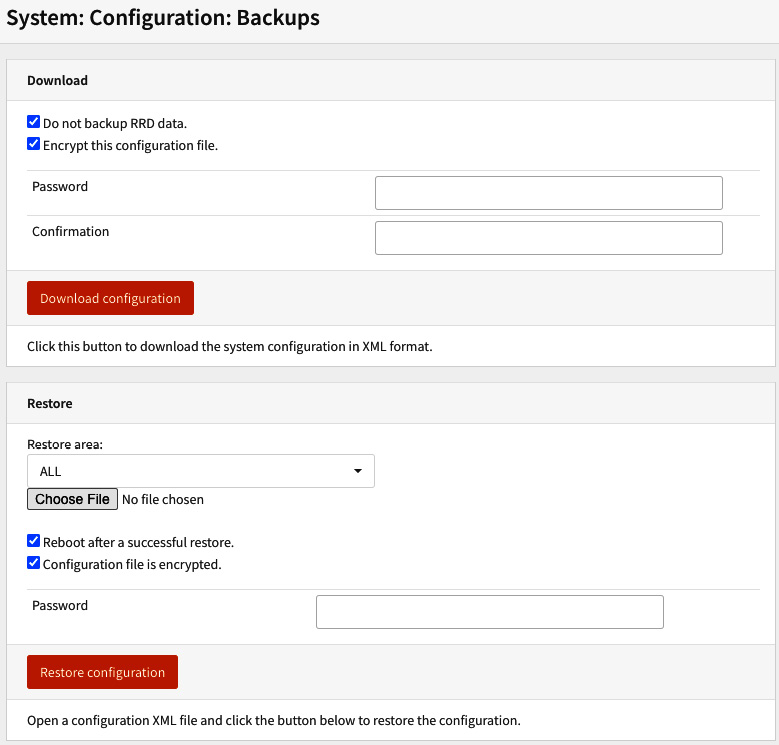
Figure 4.16 – Configuration backup and restore page
Click on the Download configuration button to download the configuration file to your computer's local disk. Check Encrypt this configuration file., if you want to encrypt it. Doing that requires that you type a password twice. Fill in the Password and Confirmation textboxes.
To restore the file is quite simple. On the same page, you will find the Restore options. Click on the Choose File button, choose the backup config.xml file on your computer, and then click on the Restore configuration button. A system reboot is recommended, so you can leave the Reboot after a successful restore. option checked. If you saved this configuration file using encryption, then you need to check the Configuration file is encrypted. option and then fill it with the password used while backing up this configuration.
In the Restore area option, you can select which configurations you want to restore. If you need a full restore, just leave it as the default option: ALL.
Another very useful backup and restore feature is the configuration history. To use it, go to System | Configuration | History:

Figure 4.17 – Configuration history page
This page will contain the last 100 configuration file versions. It can save you when you made a change by mistake and need to restore the configuration fairly quickly. To restore, just go to the line before your modification and click on the restore icon button (the first icon). It will restore the configuration without a reboot. Very nice, huh? I'm sure that this feature has saved a lot of jobs!
The other two icons are to exclude the configuration version – the trashcan icon (the second icon), or to download it (the third icon).

Figure 4.18 – Comparing configuration file versions
You can also see the differences between two configuration versions, in a different format, on this page. To do that, just select the two versions you want to compare and then click on the View differences button.
Summary
In this chapter, we've learned how to configure the OPNsense system settings, create users and groups, and how to back up the system configuration. You are now able to change OPNsense settings, add users and groups with different levels of privileges, enable external authentication for remote users' authentication in OPNsense, and change low-level settings using tunables. And you can do all these system modifications with confidence by doing a system backup before applying changes.
In the next chapter, we will dive into firewalling concepts and features available on OPNsense. We will learn how to manage rules, change firewall settings when necessary, and troubleshoot common issues using diagnostic tools and logs.