
Chapter 13: Web Proxy
A web proxy is one of the top features of a modern firewall solution. With it, you can extend the control capabilities of your system to another level. We will learn about web proxy deployment methods, why to use a web proxy, the core features, the basic configuration, and how to customize it. We will explore the available web filtering options using the core OPNsense capabilities and learn how to block undesired content. Last but not least, we will see some common troubleshooting scenarios and how to read web proxy logs to solve them.
The chapter covers the following main topics:
- Web proxy fundamentals
- Basic configuration
- Web filtering
- Reading logs and troubleshooting
Technical requirements
A clear understanding of the HyperText Transfer Protocol /HTTPS Secure (HTTP/HTTPS) protocol is fundamental to understanding this chapter. Knowledge of additional concepts such as man-in-the-middle (MITM) attacks (HTTPS interception), Domain Name System (DNS), browser configuration, and knowing how a Microsoft Active Directory (AD) and a Lightweight Directory Access Protocol/LDAP Secure (LDAP/LDAPS) protocol works are essential to thoroughly understand the web proxy topics discussed in this chapter. A running OPNsense system with a client host connected to it will ease a lot of testing and labs.
Web proxy fundamentals
Back in the 2000s, when the internet bubble burst and the World Wide Web (WWW) arose, many companies were adopting it to keep their business connected in a new era. As a young network administrator, I had the mission of keeping users working, even with many distractions popping up on their screens while they worked online. I was using just Linux-based gateways (iptables-based firewalls), and they were not enough to carry on. So, I searched online and found an HTTP forwarding proxy—an HTTP firewall that could handle HTTP(S) requests from users, cache website contents, and apply some control through access control lists (ACLs). It was the perfect tool for the job! The name of this tool? The Squid Web Proxy.
So, this is my personal history about web proxies. Since then, they have remained a fundamental tool in ensuring users' security and control online. But let's dive deep into web proxies and explore how they work and how we can use one on OPNsense to keep networks safe.
We can deploy a web proxy using two types of implementation methods, as detailed next.
The explicit method
The explicit method requires configurations both on the web proxy server and on every host in the network. Using this method, the browser knows that it is talking to a web proxy server, thus all communication between both regularly applies the features a web proxy supports without any protocol modification or interception.
An explicit proxy supports authentication, and the overall behavior using the explicit method is better once everything is configured and predicted for both sides (host and server). The cost of this method is that all hosts in the network must be configured to work with the web proxy, and in some cases, this could mean several hours of work. It is possible to automatically deploy the proxy configurations to hosts while using solutions such as Microsoft AD (using Group Policy) or the Web Proxy Auto-Discovery (WPAD) protocol, saving precious time. Still, we must consider that if some host has failed to apply this configuration, more effort will be demanded to troubleshoot the issue. Even using the explicit method, much software doesn't support HTTP(S) proxies, so evaluate this before deploying a web proxy in a network environment.
An explicit proxy example topology is shown in the following diagram:
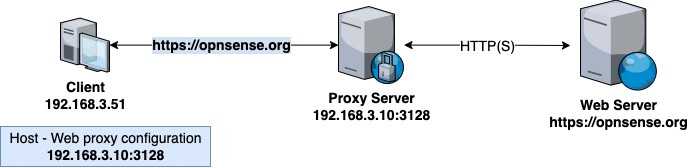
Figure 13.1 – Explicit proxy example topology
As we can see in the preceding diagram, in the explicit method, the host sends the HTTP request to the web proxy that will handle it and then forwards it to the proper web server after all the configured controls are applied. If the web proxy denies the user's requests, it will send a block page back to its web browser.
Using the explicit method has some advantages, mainly while using user authentication or basic HTTPS protocol control. A few advantages of using the explicit method are outlined here:
- User authentication is supported by the explicit method, which can help get better control of hosts/users based on authentication instead of using source Internet Protocol (IP) addresses.
- No workaround is necessary—once the browser and operating system know that it is a web proxy dealing with HTTP(S) requests, it doesn't require any workaround on the OPNsense system/web proxy to get it running.
- A more straightforward approach—to get this method working, we can just configure the web browsers to use a proxy.
Common deployment methods of web proxy configuration are Microsoft AD's Group Policy or WPAD, which can use Dynamic Host Configuration Protocol (DHCP) or DNS to send special instructions to users' web browsers.
OPNsense supports WPAD usage in its core features, both in the DHCP server and the Unbound DNS server. Depending on your OPNsense configuration, you may need to install additional plugins such as nginx and HAProxy to support the deployment of the wpad.dat file (for example, https://<OPNsense_IP_address>/wpad.dat).
For small-to-medium networks, without resources such as Microsoft AD, another method could be considered to implement the web proxy. Let's look at a good option for such cases.
The transparent method
This method intercepts HTTP(S) requests from the client to the web server and does not require changes in client configurations, which can be an advantage. The proxy server acts as the web server to the clients and also acts as the client to the web server by not modifying the HTTPS requests; therefore, the client and the web server don't know about the web proxy.
It doesn't support user authentication and demands some additional steps to intercept HTTPS traffic. This method is common in small networks or when changing host configuration is a problem or limitation. It requires additional network address translation (NAT) rules to work, and if Secure Sockets Layer/Transport Layer Security (SSL/TLS) traffic inspection is necessary, it will be needed to configure a certificate on each host in the network.
Here is an example topology of a transparent method web proxy implementation:
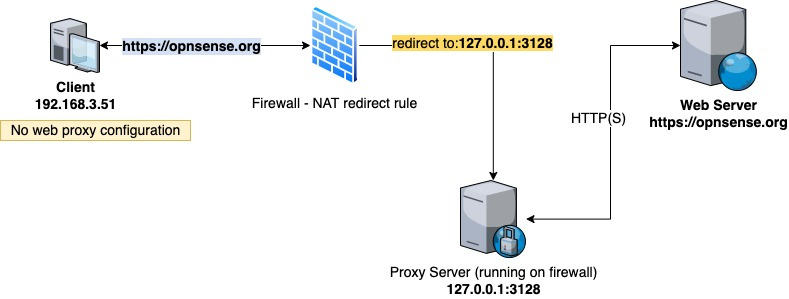
Figure 13.2 – Transparent proxy example topology
As we can see in the preceding diagram, neither the client nor the web server knows about the web proxy. The trick is done by a NAT rule that redirects HTTP(S) traffic to the web proxy server. Sometimes, this method is tricky to configure and get running. This also occurs while using the explicit method.
So, which method may be chosen? There isn't a correct answer here, but a method that will better fit the network is demanded. This will depend on the network requirements and limitations, such as unmanaged hosts in a guest network.
Why use a web proxy?
As a network firewall, should OPNsense with only packet filtering be enough to control users' access to websites? It depends: if we cut off HTTP(S) protocols of users' access, they won't access websites, but the internet will become quite useless without it. So, as we already know, most layer-4-based firewalls can handle IP addresses and Transmission Control Protocol/User Datagram Protocol (TCP/UDP) ports on OPNsense, even with hostnames and domains. So, if we want to block YouTube access, we must block YouTube's destination IP address on an inbound firewall local area network (LAN) rule—for example—and the problem is solved, right? Not so simple! A single public IP address can host several websites and domains, so you also block all associated websites by blocking just the IP address. And what about using hostnames and domains in firewall aliases? This also might be tricky, as a single host or domain can resolve to several different IP addresses. So, something working on layer 7 might be necessary, and here, a web proxy is a good solution! It will treat every single domain and Uniform Resource Locator (URL) as unique, allowing accurate web browsing control.
OPNsense web proxy core features
OPNsense has web proxy capabilities in its core features. The core features are capable of serving as a decent HTTP(S) proxy with basic filtering features. The service used under the hood is the Squid caching proxy, which means that it has one of the better open source solutions to get this job done. Some of the web proxy features available on OPNsense that we can name are listed here:
- Authentication (internal and external).
- Antivirus support—for example, through the Internet Content Adaptation Protocol (ICAP). ICAP can also be used by other solutions that modify JavaScript and HyperText Markup Language (HTML) for advertisement blocking.
- Access Control List (ACL).
- Blacklists (can be based on categories).
- OPNsense supports proxy auto-configuration (PAC) and WPAD.
- Transparent mode with HTTPS (TLS) inspection.
- Custom error pages.
Let's move on to the practical part and see how to configure a web proxy on OPNsense.
Basic configuration
We'll start the basic web proxy configuration by heading the browser to the Services | Web Proxy | Administration page. The default tab is General Proxy Settings, as illustrated in the following screenshot:
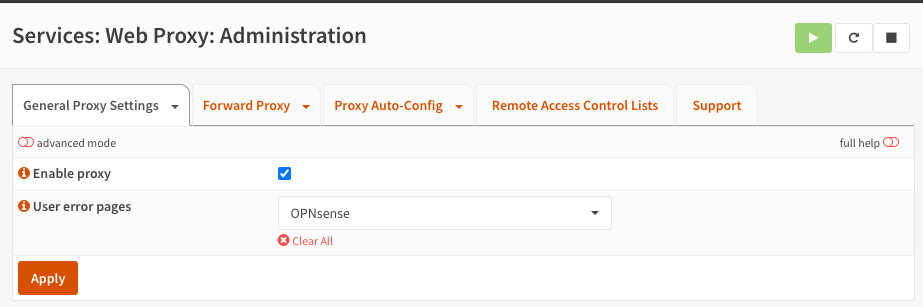
Figure 13.3 – Web Proxy | Administration page
As the web proxy has several configuration pages with tons of options, it unfortunately isn't possible to describe every configuration option, as done in the other chapters. Otherwise, this chapter would have hundreds of pages, and the editors would be crazy with me. Still, I'll try to cover the most relevant options (based on my experience) to explore the main web proxy functionalities.
Let's start by describing the main configuration options, as follows:
- Enable proxy: Check this option to start the web proxy service.
- User error pages: This is a recent feature, and it is a cool one! Before this feature was implemented, Squid error pages were only the default ones, which are not the fanciest, in my humble opinion. So, in this option, you can choose from OPNsense, Squid, or Custom web proxy error pages that will be shown to users when some web proxy error is detected.
Before moving on, let's take a look at the custom error pages page and how to configure it.
Custom error pages
To start customizing error pages, we must select Custom in the User error pages option on General Proxy Settings and then click on the Error Pages tab.
The following screenshot shows the numbered steps to take for customizing error pages:
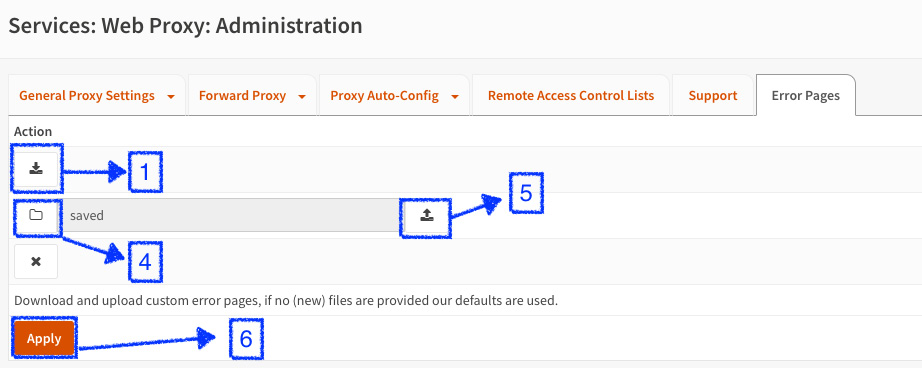
Figure 13.4 – Creating a custom error page template
In the following steps, we'll change how the web proxy's error pages look:
- Click on the Download button to save the proxy ZIP file, as illustrated in the following screenshot:
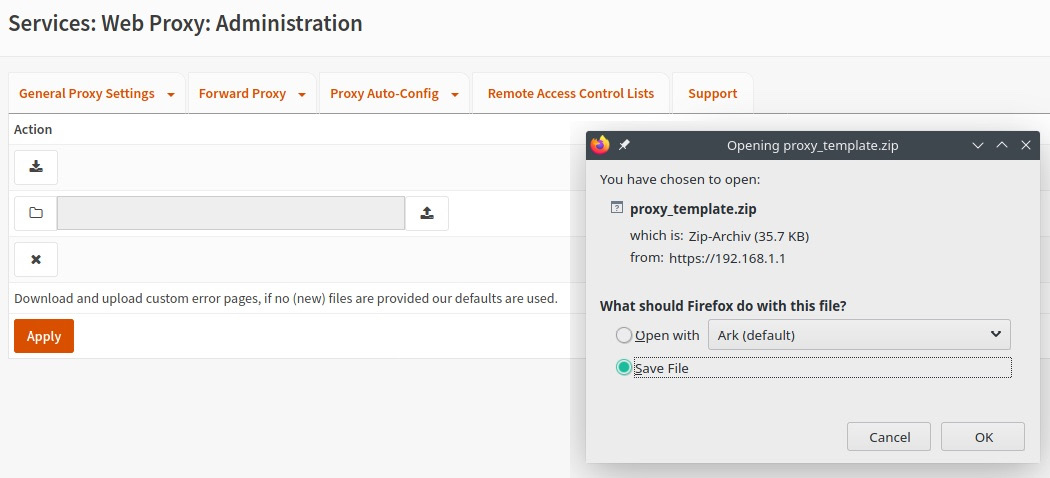
Figure 13.5 – Saving the proxy ZIP file
- Uncompress the ZIP file and edit the Cascading Style Sheets (CSS) file, as illustrated in the following screenshot:
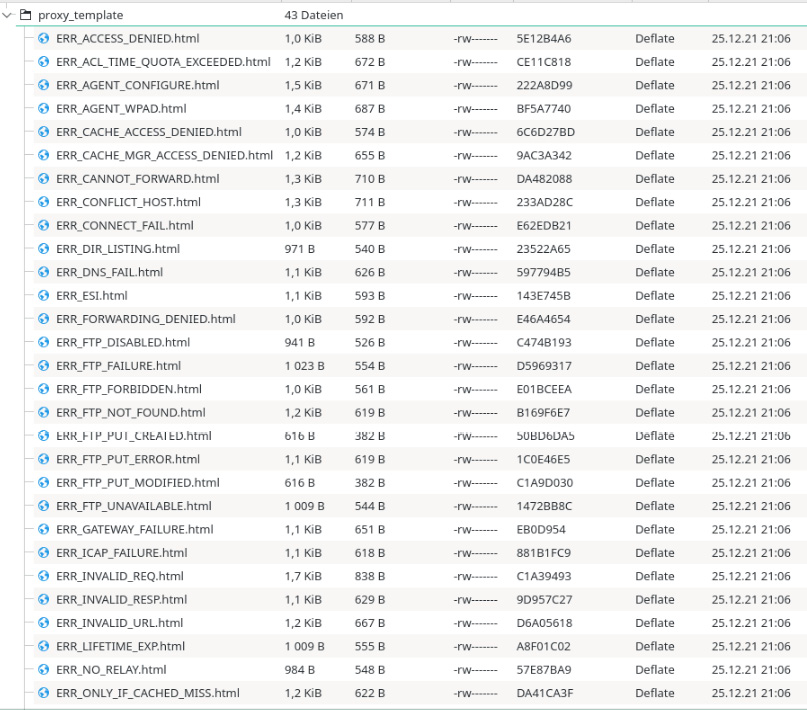
Figure 13.6 – Editing the CSS file
- Click on any HTML file inside the decompressed folder (named proxy_template) to check the original file layout. You should see something like this:
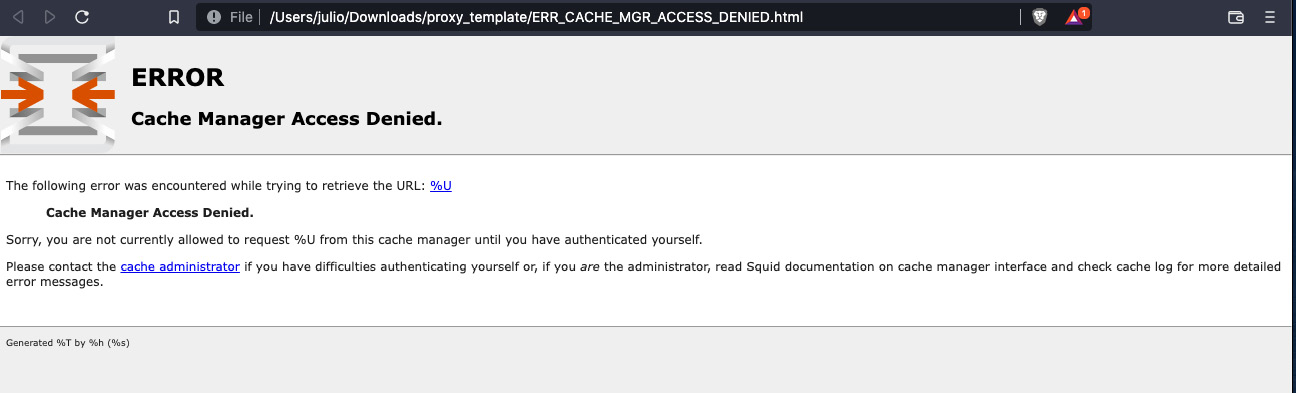
Figure 13.7 – Default template error page example
- Inside the proxy_template directory, edit (with your favorite text editor) the errorpage.css file.
- To change the template's image, find the following line of code:
background: url('data:image /svg+xml;base64,PD94bWwgdmVyc2lvbj0iMS4wIiBlbmNvZGluZz0i VVRGLTgiIHN0YW5kYWxvbmU9Im5vIj8+CjwhRE9DVFlQRSBzdmcgUFVC TElDICItLy9XM0MvL0RURCBTVkcgMS4xLy9FTiIgImh0dHA6Ly93d3cud zMub3JnL0dyYXBoaWNzL1NWRy8xLjEvRFREL3N2ZzExLmR0ZCI
…
- The image is encoded using the Base64 algorithm. To change it, we need to convert the new image to Base64 format. An easy way to do this is by using the following website: https://www.base64-image.de/. On this website, you can drag and drop the new image and it will convert the image for you like a charm following the steps to convert it, as illustrated in the following screenshot:
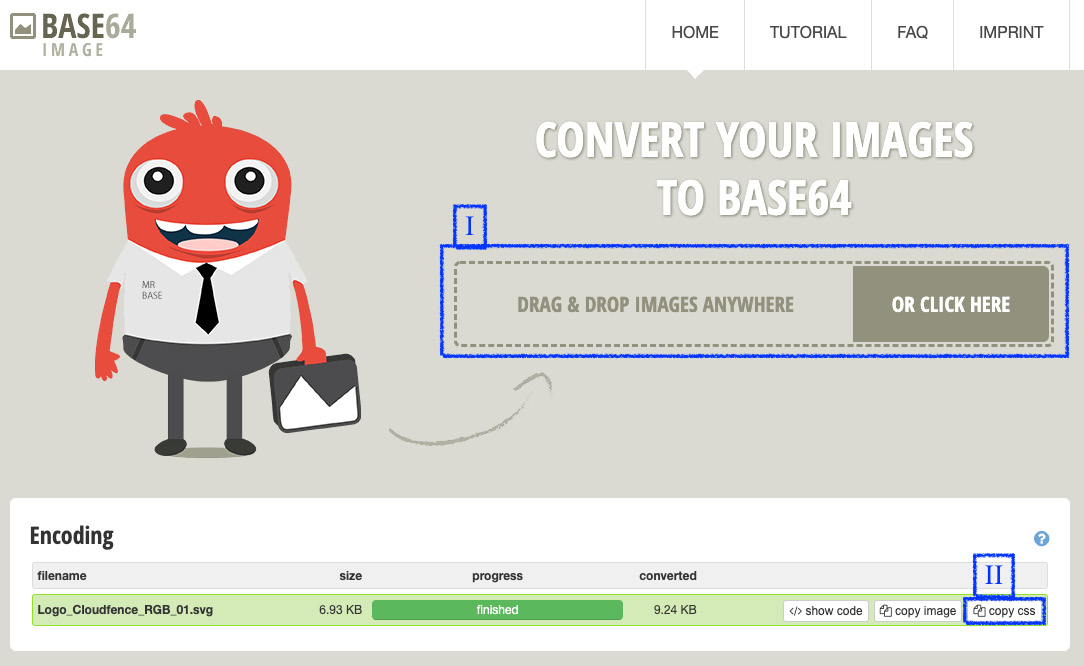
Figure 13.8 – Converting the new image to Base64 using the base64_image.de website
- Drag and drop any new image as you wish (I have used a Scalable Vector Graphics (SVG) file).
- Click on the copy css button. You should then see the process running, as follows:
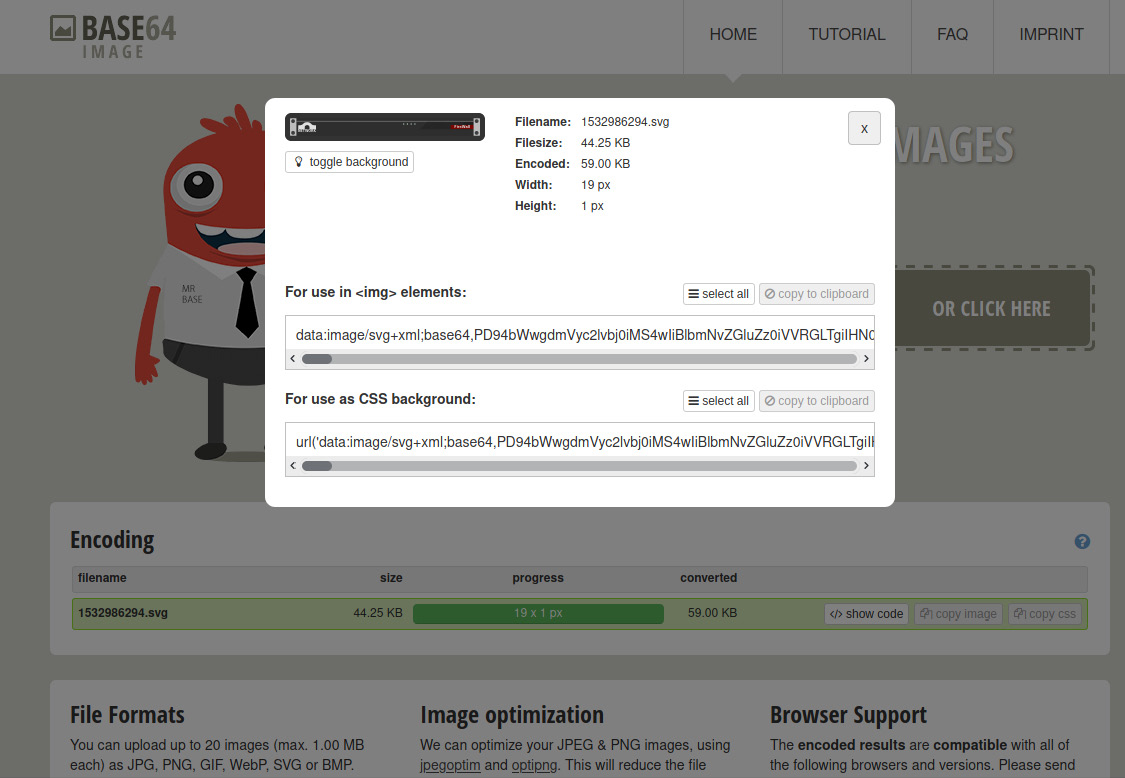
Figure 13.9 – The copy css process running
- Go back to the CSS file, and paste the copied content substituting the entire url(...) old block, keeping just the new one copied from the website. A template CSS file with the image changed can be found at the following address: https://git.io/JM8Tj.
- Save the modified CSS file and zip the proxy_template directory again.
- Click on any HTML file inside the proxy_template directory decompressed folder to check the modified template version file layout. Check out my version example version here:
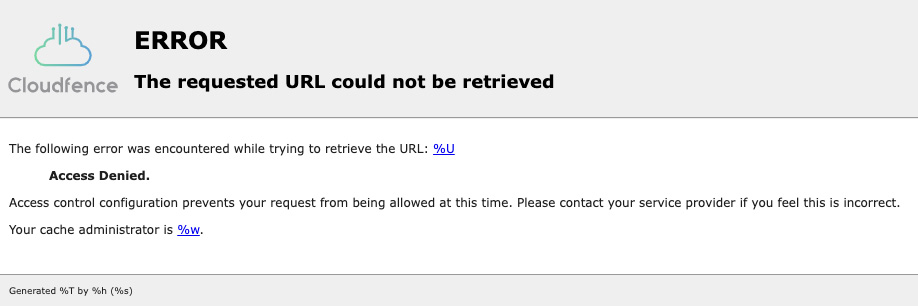
Figure 13.10 – Custom user error page example
- Click on the load file button.
- Click on the upload button.
- Click on the Apply button to change the custom template.
OK! We're ready to go! Now, web proxy users will see a fancy customized error page! Let's go back to web proxy configuration.
Configuring a web proxy with the explicit method
We'll use the explicit method in the following configuration. Get the web proxy enabled and running through these steps:
- Double-check if the Enable proxy field is checked on the General Proxy Settings option and click the Apply button to start the service. You should see a running icon, as shown in the following screenshot:
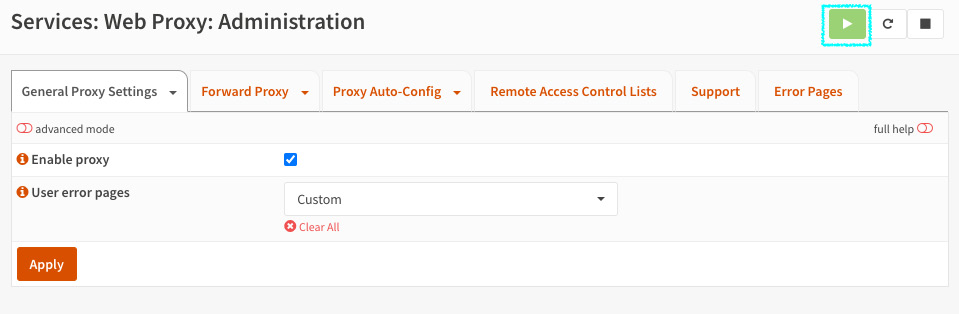
Figure 13.11 – Web proxy service running
- If the service does get up and running for you, it may be necessary to check if the proper network interface is configured. Let's move to the next page's tab, Forward Proxy, and check this out! This tab will define which network interfaces the web proxy service will listen to if it will work as a transparent proxy and intercept SSL/TLS traffic. Let's start checking this page's options, as follows:
- Proxy interfaces: This option will select each network interface that the web proxy service will listen to. If you had some issue starting the web proxy service in the last step, check this option. Note that this option doesn't allow setting the default wide-area network (WAN) interface. For this configuration, LAN might be selected.
- Proxy port: This will define which TCP port the web proxy service will listen to for HTTP(S) requests. The default is 3128 (Squid's default). We can leave the default port configured.
Important Note
As we are configuring the explicit method, we'll not touch the following options related to transparent mode/SSL interception in this section.
- Enable Transparent HTTP proxy: This option will configure the web proxy service to work with the transparent proxy method. Nowadays, without SSL inspection, this option is quite useless as most internet traffic is based on HTTPS (TCP/443 port), therefore it isn't recommended to use it without the Enable SSL inspection option. It will require adding a NAT rule (port forwarding) to work. To ease this rule addition, the OPNsense team added a shortcut in this option description. Click on the i icon to show the option's description.
- Enable SSL inspection: This option will enable the SSL inspection feature on the web proxy. It will also require an additional NAT rule (as with the transparent HTTP proxy option, it also can be added in the same way). While enabled, the Squid daemon will act as a MITM attack, so sensitive data could be extracted from the user's HTTPS traffic. Be aware of the implications of doing this! The SSL inspection will require all hosts using the web proxy to have an OPNsense-configured Certificate Authority (CA) installed and trusted by the host operating system. Without a Microsoft AD server, enabling it could become a Herculean job with many hosts on the network.
- Log SNI information only: Server Name Indication (SNI) is a TLS extension and acts as a unique identifier (UID) for hostnames. Enabling this option will configure the web proxy not to decode (decrypt) the HTTPS traffic and just log it. In this way, we can just see accessed domains on the access log, not entire URLs like when using HTTP- or HTTPS-decrypted traffic.
- SSL Proxy port: The port the web proxy uses to listen to HTTPS traffic. Note that this must only be redirected by the added NAT rule and not configured on the user's web proxy hosts.
- CA to use: While intercepting HTTPS traffic, we need to generate a CA. We can easily do this by clicking on this option description in the CA Manager link. Select a CA that might be used for HTTPS traffic decrypting. Remember to add this CA as trusted on each host using the web proxy.
- SSL no bump sites: While using HTTPS inspection, it might be desirable not to inspect all users' encrypted traffic. Good examples of websites that shouldn't be inspected are online banking sites and ones containing users' personal information.
Important Note
Some regulations, such as the European Union's (EU's) General Data Protection Regulation (GDPR) or the Brazilian General Personal Data Protection Law (LGPD), control personal information usage. Before implementing this feature in your company, get advice from the legal department about local laws.
To finish the configuration, just click on the Apply button.
Testing the web proxy
After configuring the web proxy with the explicit method, it is time to see it in action.
We'll need a desktop with a web browser running to do this. If you followed this book's steps and created an Ubuntu virtual machine (VM), it is probably running without any graphical user interface (GUI). You can skip Steps 1-3 if you already have a GUI installed on your Ubuntu VM. Otherwise, let's install the MATE GUI on our Ubuntu host, as follows:
- First, update your Ubuntu host by running the following commands:
sudo apt-get update && sudo apt-get upgrade
- In your Ubuntu host, run the following command to install the MATE core desktop:
sudo tasksel install ubuntu-mate-core
- To get the GUI up and running, run the following command:
sudo service display_manager start
We can also reboot your VM to test. The GUI might be up and running automatically after the reboot.
After getting the Ubuntu host running on the GUI, you might see something like this:

Figure 13.12 – Ubuntu host running on the MATE desktop (GUI)
- Click on the Firefox web browser icon to open it (as highlighted in the preceding screenshot).
- With Firefox open and running, click on the Settings menu and search for proxy, as illustrated in the following screenshot:
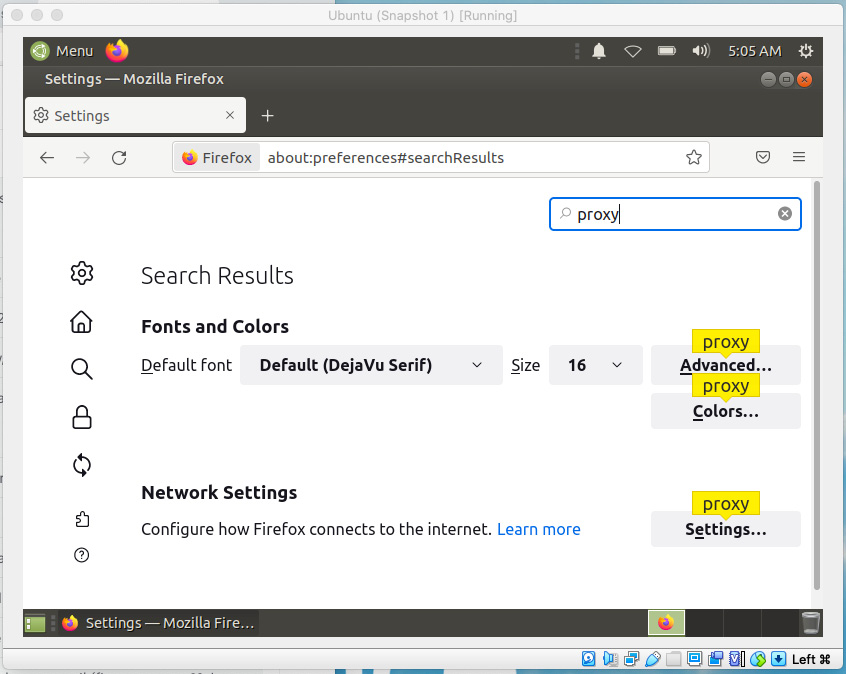
Figure 13.13 – Configuring a web proxy in the Firefox web browser
With the proxy settings dialog opened, fill it with your OPNsense LAN IP address (in my case, 192.168.56.1) and with the default proxy port 3128, and click on the OK button, as shown in the following screenshot:
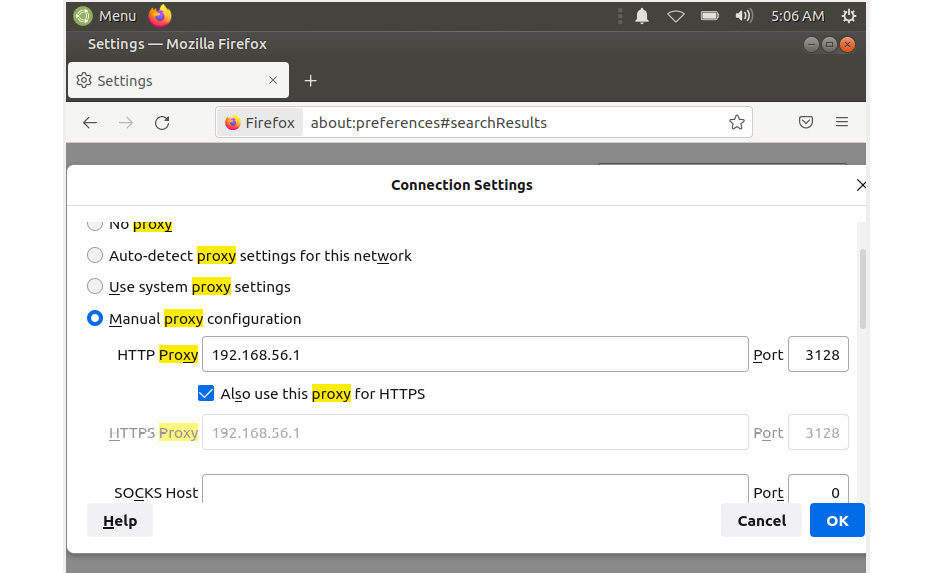
Figure 13.14 – Firefox proxy settings dialog
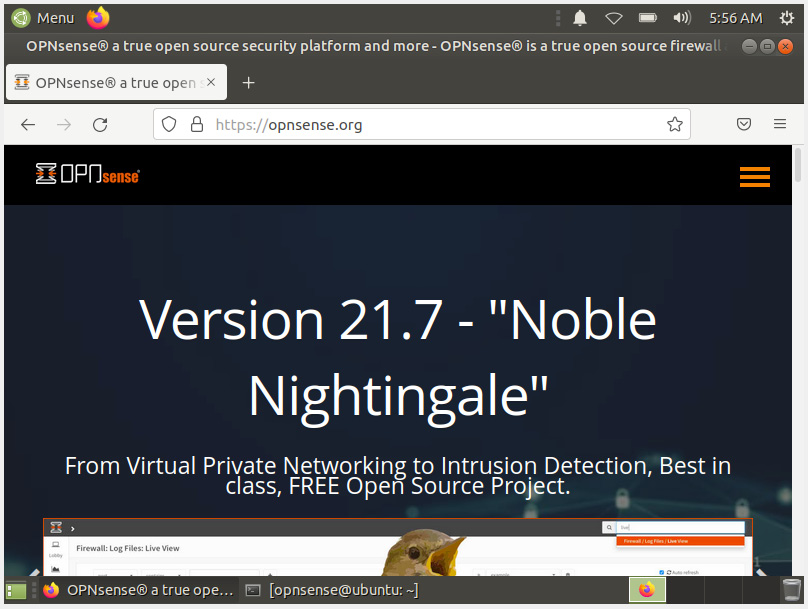
Figure 13.15 – OPNsense website in Firefox using the new proxy settings
- Now, let's check the web proxy access logs in OPNsense's web GUI by going to Services | Web Proxy | Access Log, as illustrated in the following screenshot:
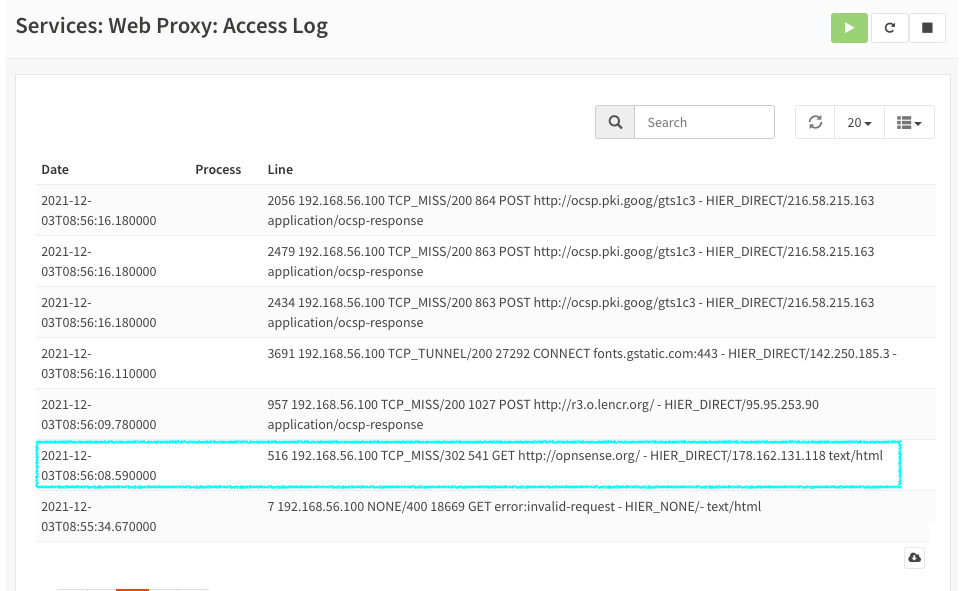
Figure 13.16 – Web proxy access log detail
As we can see in the preceding screenshot, the web proxy is logging Ubuntu's host requests. If you can see that in your lab, congratulations!! You just have configured a web proxy on OPNsense!
Let's now take a brief look at the transparent mode configuration.
Transparent web proxy configuration
We'll use the already configured option in the explicit method to configure the transparent one. The necessary changes are shown in the following screenshot:
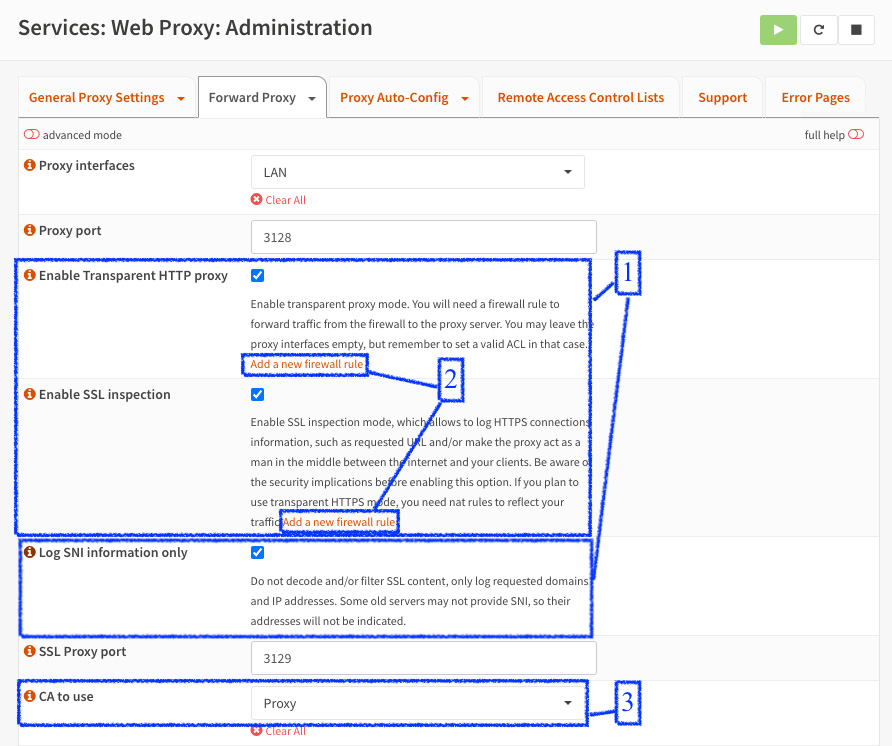
Figure 13.17 – Configuring the transparent method
Follow these next steps (numbered in the preceding screenshot):
- Check the Enable Transparent HTTP proxy and Enable SSL inspection options. Also, check the Log SNI information only option—this will only log HTTPS requests without breaking the cryptography (not inspecting the ciphered content).
- Click on the Add a new firewall rule links (in the Enable Transparent HTTP proxy and Enable SSL inspection sections) to add NAT rules for both HTTP/HTTPS ports. This will add a new NAT rule required by the transparent method, as illustrated in the following screenshot:
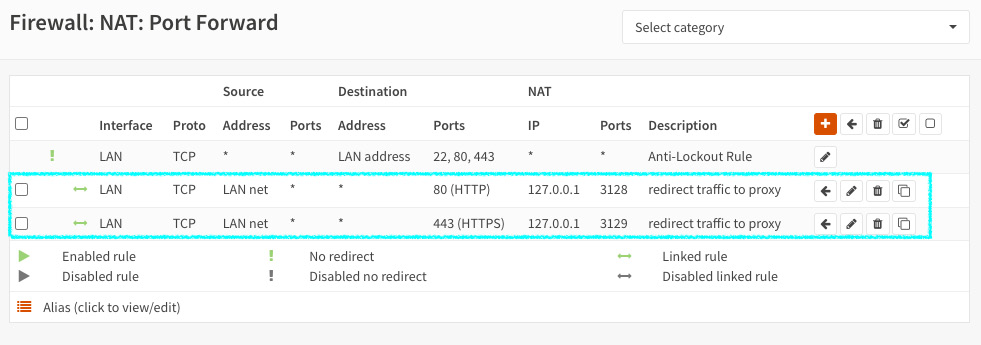
Figure 13.18 – NAT rules required for HTTP(S) redirection traffic using the transparent method
- It will be required to select a CA in the CA to use option. This option also contains a link to create a new CA in the information/description.
- On the lab host (Ubuntu, in our example), remove the proxy settings previously configured (set it to No proxy configuration) and try to access some website (for example, https://wikipedia.org). On the Access Log page, you should see requests from the host, as illustrated in the following screenshot:
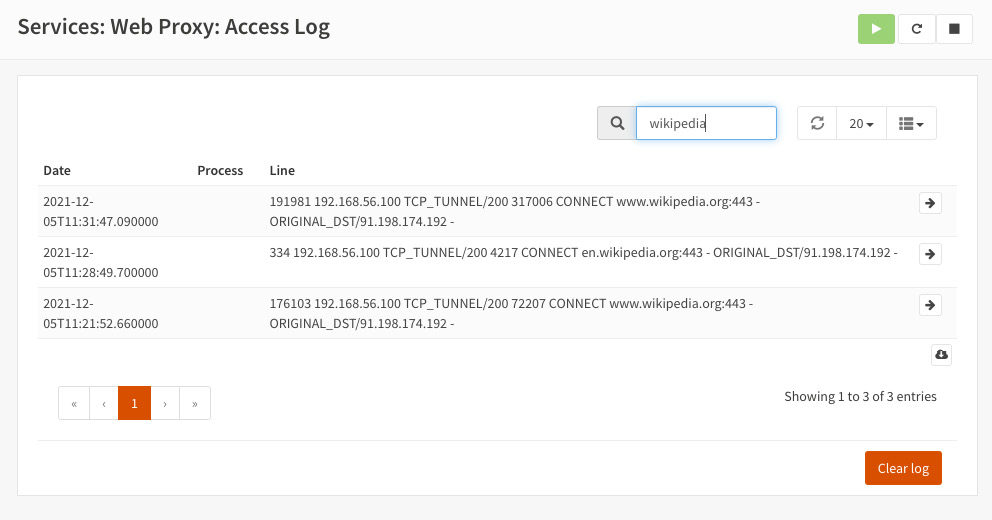
Figure 13.19 – Access Log page with HTTP redirected requests
With that, we have finished our transparent method configuration using OPNsense. Before moving on to web filtering capabilities, let's briefly look at other relevant web proxy configurations and some considerations about each one.
Additional web proxy configurations
The additional pages to configure a web proxy on OPNsense are described in the following sections.
User authentication
Go to the configuration page via Services | Web Proxy | Administration - Forward Proxy - Authentication Settings.
A web proxy supports all authentication backend options configured on System | Access | Servers to be enabled for authenticating users using the web proxy. The limitation is that single sign-on (SSO) can't work without plugin additions while using a Microsoft AD service.
Local cache
To enable this option, navigate to the configuration page via Services | Web Proxy | Administration - General Proxy Settings - Local Cache Settings.
In the modern internet, due to fast internet connections and dynamic content, the local cache isn't something that enhances performance as it used to do in the past. In larger networks, the local cache could help while enabling the Enable Linux Package Cache and Enable Windows Update Cache options, which would both create a local cache of operating system updates (for Linux for major distributions such as Debian, Red Hat, Arch, and so on) and save some time while updating the hosts' operating systems. It can also be used to traffic rate limitations to avoid excessive bandwidth consumption.
Web proxy traffic management
To enable this option, navigate to the configuration page via Services | Web Proxy | Administration | General Proxy Settings | Traffic Management Settings.
Web proxy traffic management can help control users' bandwidth usage while browsing the internet. As some networks may have other protocols' concurrent traffic, it is good to restrict how much of the web proxy bandwidth is used.
General settings
The general configuration page can be found here: Services | Web Proxy | Administration | General Proxy Settings.
Depending on the network host's requirements, some specific web proxy configurations may be changed from the default. There are many reasons to do that, but while troubleshooting a web proxy issue, I recommend you always check this page to search for something that helps in reviewing the configurations, as doing so may help a lot!
Parent proxy settings
The configuration page can be found here: Services | Web Proxy | Administration | General Proxy Settings | Parent Proxy Settings.
Larger network environments may have several web proxies deployed in different places. An example is a branch office that needs to connect to the main office for internet browsing. In that case, you will probably need to configure the main office as the parent proxy for the branch office.
FTP proxy settings
The general configuration page can be found here: Services | Web Proxy | Forward Proxy | FTP Proxy Settings.
First of all: try to avoid File Transfer Protocol (FTP) usage! It is an insecure protocol and causes many headaches for network administrators, who prefer Secure FTP (SFTP) instead, but if this isn't possible, you can configure FTP clients to use a web proxy, and in this configuration page, it will be possible to enable FTP support in the web proxy. Using this feature will tunnel FTP through HTTP. However, it would be best to consider using the os-ftp-proxy plugin as a preferred solution to perform FTP communication using a transparent proxy.
ICAP settings
The general configuration page can be found here: Services | Web Proxy | Forward Proxy | ICAP Proxy Settings.
The Internet Content Adaptation Protocol (ICAP) is a protocol that allows sending HTTP content to external solutions such as antivirus servers, to filter content. In the web proxy, you can set it to scan files that have been downloaded by users to check whether they might be affected by malware. It is possible to achieve an antivirus feature combining the C-ICAP and ClamAV plugins. OPNsense's documentation has a dedicated guide on how to do that, found at the following link: https://docs.opnsense.org/manual/how-tos/proxyicapantivirusinternal.html#setup-anti-virus-protection-using-opnsense-plugins.
SNMP settings
The general configuration page can be found here: Services | Web Proxy | Forward Proxy | SNMP Agent Settings.
Squid supports sending data using the Simple Network Management Protocol (SNMP) to monitor performance. Many good tools can monitor and produce beautiful graphs based on SNMP data. A good example is Zabbix: https://www.zabbix.com/.
Additional configuration pages are mentioned in the next section. You can also always count on OPNsense's official documentation to explore any feature in depth. Let's move on and explore web filtering!
Web filtering
As the modern internet works on top of protocols such as HTTP and DNS, web filtering is one of network administrators' most desired features in their firewalls to keep network users under some control. On OPNsense, this feature doesn't have a dedicated functionality as a core feature or an official plugin; instead, the web proxy achieves web filtering by configuring it with some additional features the OPNsense team has added since the project started. As the web proxy functionality on OPNsense is Squid-based, let's take a closer look at the Squid web proxy project to better understand this filtering matter.
The Squid project website definition is reproduced here: "Squid is a caching proxy for the web supporting HTTP, HTTPS, FTP, and more. It reduces bandwidth and improves response times by caching and reusing frequently-requested web pages. Squid has extensive access controls and makes a great server accelerator." (http://www.squid-cache.org/)
As we can see, the project's primary goal isn't web filtering, so it is expected to have some known limitations when used as a web filtering solution. To overcome some of these known limits, some auxiliary projects such as SquidGuard, DansGuardian, and others were created to improve Squid's web filtering features. Neither of the aforementioned projects is officially maintained anymore, but I mentioned them because they were the most used tools to turn Squid into an accurate web filtering tool for a long time. Many users migrated from pfSense to OPNsense, and we (at CloudFence), as one of them, missed some features that were only provided by using a tool such as SquidGuard (that was supported in pfSense), for example. Back in 2018, when we were trying to migrate customers from pfSense to OPNsense, we needed to keep the same web proxy features that pfSense has, and we stumbled upon the web filtering feature. Back then, OPNsense had minimal web proxy features to get this job done, so we decided to write a piece of code that became the Web Filter plugin later. If you want to know more about this plugin, please take a look at the following link: https://wiki.cloudfence.com.br.
Since the beginning, the OPNsense project has improved the core web proxy features to support web filtering. Other web proxy plugins improve the core features, but I'll focus only on the core features to keep things concise in this book.
The following filtering features can be achieved using the core web proxy features:
- Blacklisting: It is possible to download a Squid-compatible blacklist and install it on OPNsense to block sites based on categories.
- ACLs: In Forward Proxy | Access Control List, it is possible to configure some fine-tuned filters such as clicking on the advanced mode button to show all following options:
- Block browser/user-agents is a handy feature, especially if you need to apply some compliance regulation or policy that forbids some web browsers in the network. Another example is to block some known bad user agents used by malware or other harmful applications.
- Block specific MIME type reply: Combined with a good regex defined in the blacklist option, this can block some content from being accessed, such as video streaming, music, and others. Consider that you can always control web traffic content better using a solution such as the Zenarmor plugin that improves OPNsense, turning it into a next-generation firewall (NGFW) solution with more granular and precise web traffic control.
Important Note
If Multipurpose Internet Mail Extensions (MIME) types don't sound familiar to you, then I recommend you take a look at the following web page:
https://developer.mozilla.org/en-US/docs/Web/HTTP/Basics_of_HTTP/MIME_types
- Google GSuite restricted: This option will deny access to Google G Suite (Google Drive, Gmail, and others), with only access to accounts that an organization manages. To enable this option, you need to type the DNS domain of the organization in the textbox.
- YouTube Filter: This option will enable YouTube native filtering by setting predefined levels: Strict or Moderate. To get more information about this Google service feature, take a look at the following web page: https://support.google.com/a/answer/6212415?hl=en.
Important Note
Both Google G Suite and YouTube Filter features require HTTPS inspection enabled to work, and they were ported from CloudFence's web filter plugin—proudly.
- HTTP TCP port control: The Allowed destination TCP port and Allowed SSL ports options will configure which web proxy will allow HTTP/HTTPS ports. Some web servers have different ports configured (for example, 8081, 8443, and so on) and this must be configured in these options to work with a web proxy.
After all these pages talking about web filtering, you might be wondering: Is it really possible to filter web content? Let's do a lab and find out!
Web filtering practice
To follow the steps in this lab, you must have a running OPNsense system with a host connected on its LAN with a web proxy configured on it. Here are the steps to filter web content:
- To blacklist a website, go to the Forward Proxy | Access Control List menu and click on the Blacklist option, and then enter facebook.com, for example. You can see an illustration of this in the following screenshot:

Figure 13.20 – Adding a domain to a blacklist example

Figure 13.21 – Blocked Facebook website
As the website enforces the HTTPS protocol, the web proxy error page will not be displayed. To display error pages using HTTPS websites, it would be necessary to configure SSL/TLS interception, which requires installing the CA generated by OPNsense in each host using the web proxy.
- To confirm that the website was blocked by the web proxy, go to the Services | Web Proxy | Access Log page. You should then see output like this:
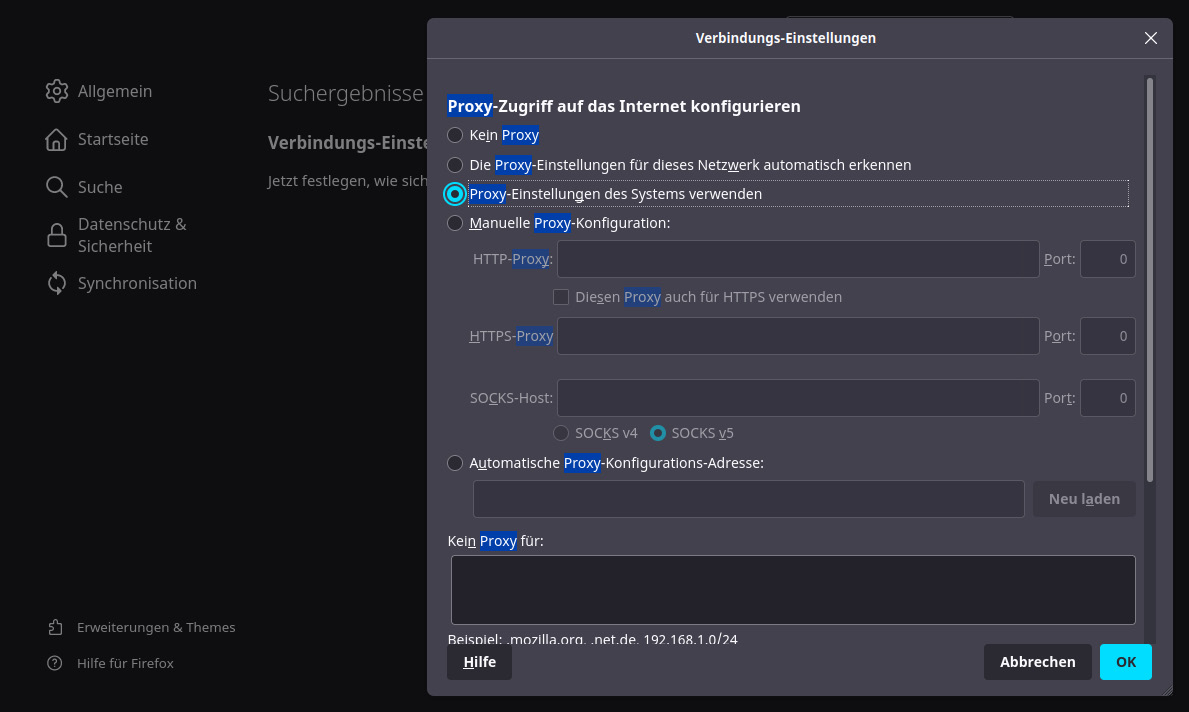
Figure 13.22 – Facebook website request blocked in the Access Log page
It's confirmed—the web proxy is blocking the blacklisted domain! Congratulations!!
Web filtering – final thoughts
It is possible to implement a decent web filtering level using OPNsense, but this will require some additional steps. To mention some, I'll describe a cookbook followed by some reference guides from the official documentation to achieve some web filtering goals. You can view these in the following table:
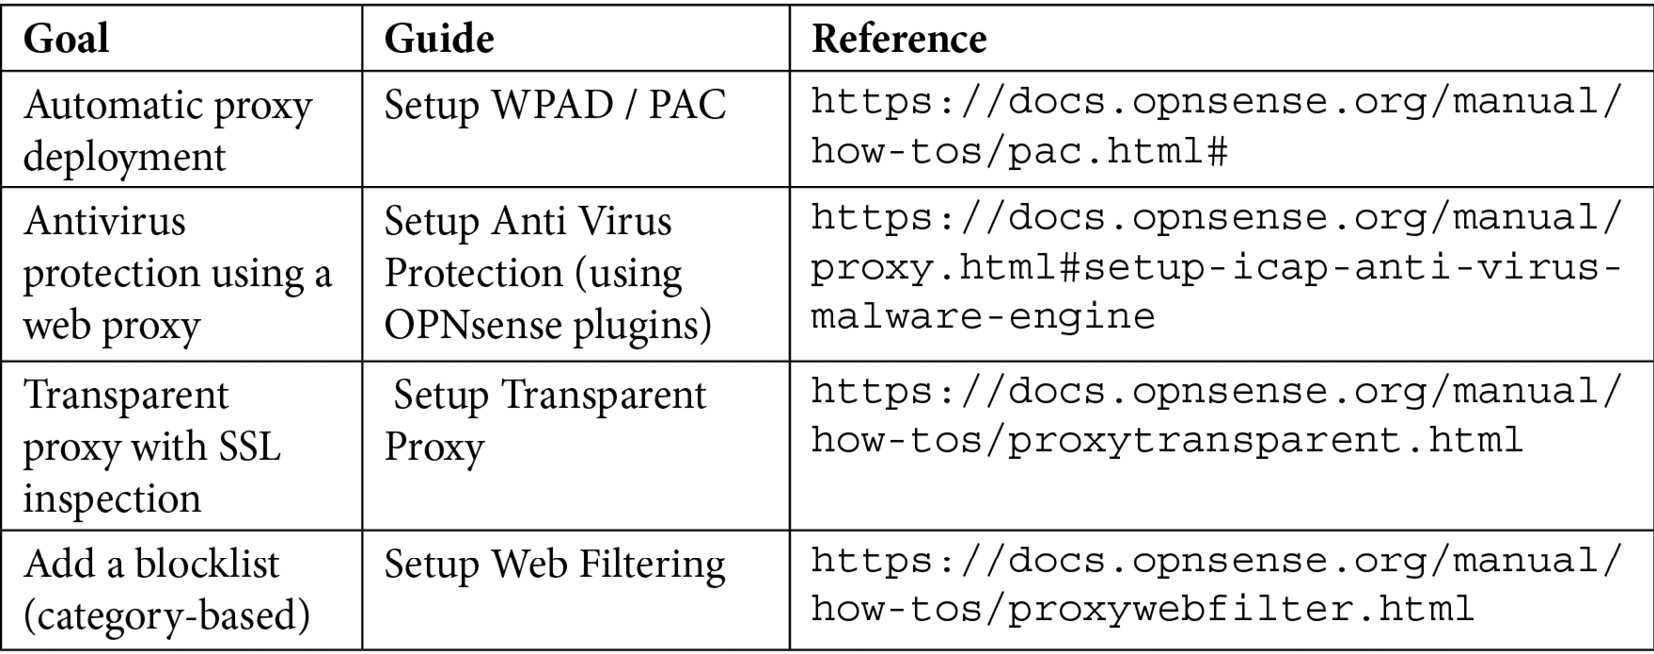
Unfortunately, due to the extensive web proxy content, it isn't possible to include all the preceding topics in this chapter, but I tried to cover the more theoretical part of a web proxy implementation here to serve as a base while setting up these other possible deployments.
Reading logs and troubleshooting
Web proxy troubleshooting strongly relies on log reading, so it is fundamental to know how to read logs. Despite the web GUI having a logs page, I will focus on the command-line interface (CLI) in this section. Why? Because web proxy logs are really dynamic and most times will demand filters (using the grep command, for example) and will help you to see things happening in real time.
Before touching the keyboard to log on to the CLI, I recommend you this must-read Squid documentation:
https://wiki.squid-cache.org/SquidFaq/SquidLogs
Pay special attention to the Squid result codes and HTTP status codes sections. Without knowing what these codes mean, reading the logs would be like reading a foreign language that you don't speak. Maybe you'll be able to understand part of the information, but not all of it.
Log files
The web proxy log files are located in the /var/log/squid/ directory and are described in more detail here:
- access.log: This log file contains all host request information.
- cache.log: Squid's daemon-related messages are stored in this file.
- store.log: This file contains information about cached objects. It may not be relevant while not using a local cache.
Here are some examples while troubleshooting web proxy issues:
Looking for host requests for troubleshooting: When a user complains a website isn't loading or has some web proxy error, try looking for a clue in the access.log file.
Here are some example commands:
- Filtering by source host IP or username:
tail -f /var/log/squid/access.log | grep 192.168.1.10
tail -f /var/log/squid/access.log | grep santos.dumont
- Filtering by destination:
tail -f /var/log/squid/access.log | grep deciso.com
- Filtering by result or HTTP status code:
tail -f /var/log/squid/access.log | grep DENIED
(blocked requests)
tail -f /var/log/squid/access.log | grep TCP_TUNNEL/200
(HTTPS requests)
The tail –f command outputs the file continuously (-f parameter). In this way, it will ease finding requests in real time. Of course, you can combine several grep filters to have more powerful results.
Web proxy service issues
As a full-featured configuration service, a web proxy can sometimes present issues. It is rare but not impossible to face a problem that results in the Squid daemon not getting up and running. A good way to check what is going on is to run the following steps:
- Check the Squid configuration, as follows:
squid -k check
- Try to reload the Squid service with the cache.log file opened using the tail command, as follows:
tail -f /var/log/cache.log
- Sometimes, the web GUI can't stop or start the web proxy service. Try to reload the Squid daemon manually and look for error messages by running the following command:
squid -k reconfigure
Author's Note
You will probably never find these steps in the official documentation (even in the future). Still, please consider that my comments are (heavily) based on years of personal experience and our CloudFence support team discussions, so before suggesting something to you here, I had long discussions with them. They have thousands of OPNsense flying hours, managing hundreds of firewalls in different environments, and I consider their expertise invaluable. Thanks, @cloudfenceteam S2.
Last but not least, you can try to use the Reset button on the Support tab in the web GUI (Services | Web Proxy | Administration) to try solving some service-/configuration-related issues.
Summary
I have tried to cover the most relevant content related to a web proxy service in this chapter. The topic of web proxies could easily produce an entire book due to its complexity. Still, our goal in this book is to complement the existing documentation and share a little bit of experience of years working with network security and OPNsense. Now, you might be able to install and configure a web proxy service for small-to-medium networks using OPNsense. We have explored the basics, deployment methods, basic configuration and customization, enabling web filtering, and troubleshooting common issues. In the next chapter, we'll move on to another great OPNsense feature to control user access using web browsers: the Captive Portal. See you on the following pages!