
Chapter 16: Next-Generation Firewall with Zenarmor
The Sensei plugin broke the commercial-only next-generation firewalls barrier and introduced the open source world to Zenarmor’s outstanding features. In this chapter, we will explore the Sensei plugin’s features and how to install and apply layer7 control to the network. Finally, you will deploy OPNsense as a next-generation firewall solution that extends OPNsense’s capabilities so that they’re at the same level as the premium commercial solutions, which filter packets in layer4 to layer7 in a few steps.
In this chapter, we will cover the following topics:
- Layer7 application control with Zenarmor
- Choosing a Zenarmor edition
- Installing and setting up the Zenarmor plugin
Technical requirements
To complete this chapter, you will need to install plugins in OPNsense. Having OPNsense running with a host connected to its LAN interface will help with the steps we’ll cover.
Layer7 application control with Zenarmor
As we have explored so far, OPNsense is a stateful firewall with some extra features, such as an Intrusion Detection System (IDS) and an Intrusion Prevention System (IPS), that can extend its filtering capabilities. But to compete head-to-head with the well-known commercial firewall solutions from giant cybersecurity tech firms, an open source firewall must have all the capabilities those solutions offer. There was a chasm between commercial and open source network firewalls due to the layer7 filtering feature being present only in the commercial ones. The ability to detect traffic, despite the TCP/IP port number, is a must-have feature these days, especially when malware tries to bypass stateful inspection by mimicking legitimate traffic.
The OPNsense project implemented some application control features, thus creating custom signatures for IPS, which we tested in the previous chapter. Still, its application control wasn’t at the same level as it was for the commercial firewall solutions. The game changed in 2018 when Sunny Valley launched the former Sensei plugin for OPNsense, a next-generation firewall plugin that enabled OPNsense to reach the next level of network security. Later, in 2021, Sensei was rebranded Zenarmor-sensei for copyrights reasons.
The Zenarmor plugin helped OPNsense become a leading open source next-generation firewall project, enabling a Transport Layer Security (TLS) protocol inspection and application control that left some commercial vendors behind, eating dust. The plugin’s frontend is open source, but its traffic engine inspection is proprietary with closed source code.
If you are a Linux user, you might be yelling: Iptables has been doing Layer7 filtering for years! OK! Calm down! I know it, but you must admit, Iptables does not do it the same way as commercial firewalls and Zenarmor does. You should probably become a Linux guru to keep a layer7 firewall based on it working, and a commercial solution does with tons of knowledge and lines of code. The commercial solutions ease this process, which means that a Linux-based firewall will also provide a decent firewall solution. Moreover, some of the most famous commercial firewall solutions run a Linux kernel. The big difference compared to OPNsense with Zenarmor and a Linux kernel with layer7 filtering enabled iptables is the way it is configured and maintained. Sunny Valley has made a significant effort to keep the layer7 filtering updated and working with newer applications. Besides that, they have cloud-enabled filtering that uses DNS, an artificial intelligence (AI)-enabled solution, and they are a company that makes money on it! Sometimes, it is better to count on a company that’s dedicated to supporting and improving an affordable product rather than trying to build it by yourself.
The following features are listed in Sunny Valley’s official documentation:
- Application Control Filtering – control traffic based on the type of application
- Cloud Application Control (Web 2.0 Controls)
- Advanced Network Analytics
- All-Ports Full TLS Inspection (for every TCP port, not just HTTPS)
- Cloud Threat Intelligence
- Encrypted Threats Prevention
- Web Filtering and Security
- User-Based Filtering and Reporting
- Active Directory Integration
- Policy-Based Filtering and QoS
- Application/Web Category-Based Traffic Shaping and Prioritization
- Cloud-Based Centralized Management and Reporting
They also support other platforms such as FreeBSD, pfSense, and some Linux distribution flavors, but we will focus on OPNsense in this book.
Choosing a Zenarmor edition
The plugin has a free edition that is pretty functional and works great in most small network environments. Compared to the paid versions, it has some limitations, but most are features that are only required by complex networks that deserve a paid version subscription.
Before comparing the different available versions, let’s check the hardware requirements.
Hardware requirements
As IPS does, Zenarmor also uses the Netmap framework to inspect and filter network packets, so don’t enable it in the same configured network interfaces, as you would in IPS mode by going to Services | Intrusion Detection | Administration – Interfaces.
Reports are something else that Zenarmor has that demands more memory and CPU than a stock OPNsense installation. It is based on Elasticsearch, which requires significant memory and CPU power to process data and transform it into meaningful graphs. The plugin installation does a hardware requirements test to indicate how many devices the installation will support. To have a good user experience with this plugin, consider having at least 4 GB of RAM and a modern two-core CPU.
Now, let’s explore each subscription type. This will help you find out which suits your needs the most.
Paid subscriptions
There are different paid subscriptions. Each one was designed with the size and complexity of the network environment it will protect in mind. For example, the available plans are Home, SoHo, and Business. These names easily define which type of network they are suitable for, as described here:
- A Home subscription is intended for non-commercial usage and can protect up to three different networks, for example, using the different filtering policies.
- SoHo is the first step for small and home offices, and it is a version that can protect networks with up to five different filtering policies.
- A Business subscription is complete and provides businesses with the most advanced security features.
The main differences between these versions are based on the number of policies you can create, resource reporting, authentication integration (for example, Active Directory), malware protection, and so on. The product had a fast evolution, and at the time of writing, new features will probably be added to the product. Look at the plans page and pick the best option for you!
Important Note
To check the available plans, from free to business, go to https://www.sunnyvalley.io/plans.
Now, let’s learn how to install and configure the Zenarmor plugin.
Installing and setting up the Zenarmor plugin
To install the Zenarmor plugin, we will follow the same steps we used for OPNsense’s other plugins:
- Go to System | Firmware | Plugins and click on the + icon on the right-hand side of os-sunnyvalley. This will install SunnyValley’s repository, which will allow you to install Zenarmor:

Figure 16.1 – Sunny Valley repository installation
- Once you’ve installed Zenarmor, click on the Status tab and click the Check for updates button to update the newly installed repository:
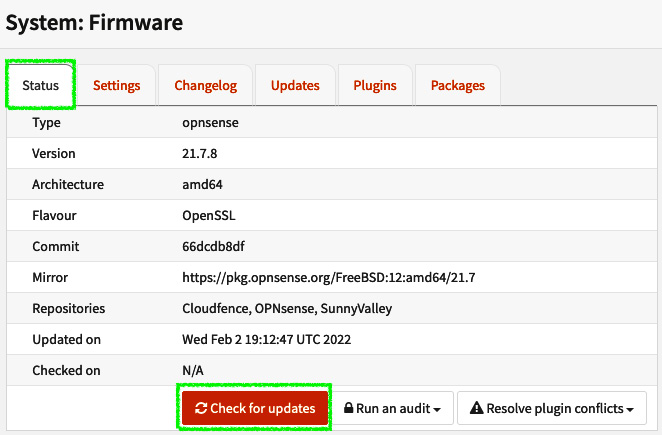
Figure 16.2 – Updating the packages from the newly installed repository
- Go back to the Plugins tab, find the os-sensei package, and click on the + icon to install it. The search box can be found at the top left:
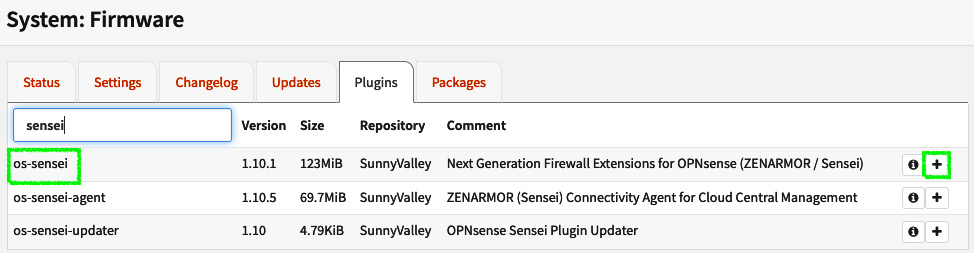
Figure 16.3 – Adding the os-sensei package
Important Note
Remember that the plugin was called Sensei before it was rebranded as Zenarmor, so the package’s names will remain as *-sensei* for ease of use. The maintainers may update the package’s name to *-zenarmor* in the future.
- Once it’s been installed, click on the OPNsense logo (in the top-left corner). The Zenarmor | Dashboard menu should be visible, so click on it to begin the configuration wizard process.
- You must agree with the Terms of Service and Privacy Policy documentation to proceed with the configuration wizard. Check the box next to Check here to indicate that you have read and agree to the Terms of Service and Privacy Policy. and click Proceed:
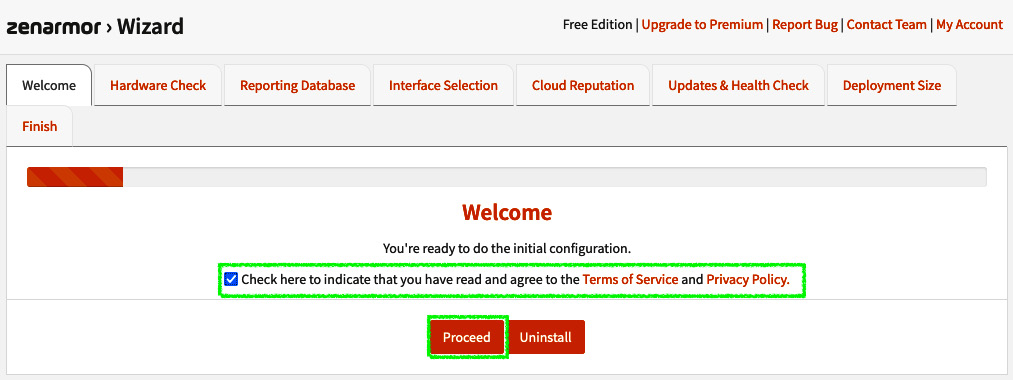
Figure 16.4 – Configuration wizard welcome page
- The plugin will analyze your hardware performance and will classify it based on its criteria. Click Next to continue:
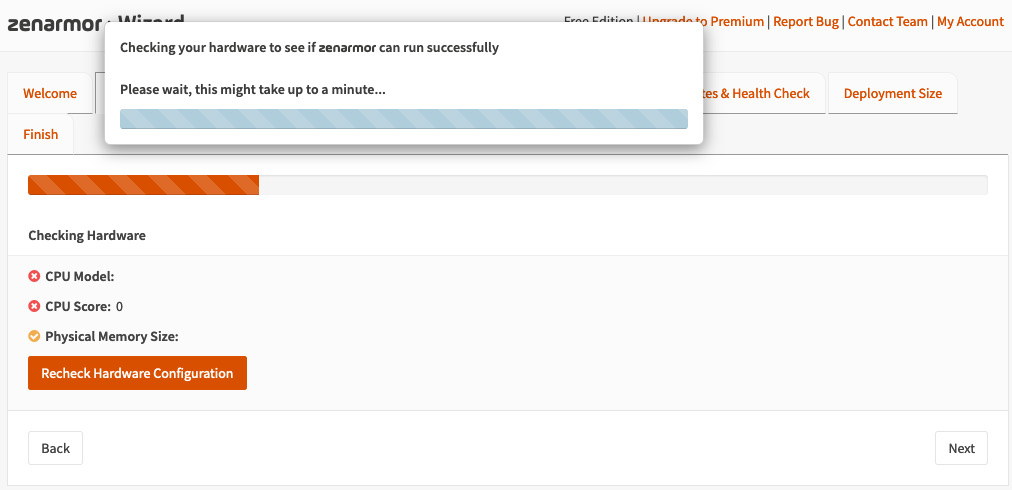
Figure 16.5 – Hardware requirements check page
After the hardware tests, you should see something similar with the following screen:

Figure 16.6 – Hardware requirements page once the tests have finished
- On the next screen, the wizard will ask you about installing the database. We will use a local database for this installation, so we’ve left the default option selected – that is, Install a local Mongodb Database. This database will be used for reporting. It is possible to use a centralized reporting tool with an Elasticsearch database running on it by clicking the Use a Remote Elasticsearch Database option. Using a remote database might be helpful if you’re installing hardware with limited RAM and CPU. Otherwise, using a local database will demand more CPU and RAM resources from the OPNsense machine. To proceed, click the Install Database & Proceed button. Wait for the database installation process to finish and click the Next button. Warning: Don’t close the database installation process window! Have a coffee and enjoy while the configuration wizard does its job:
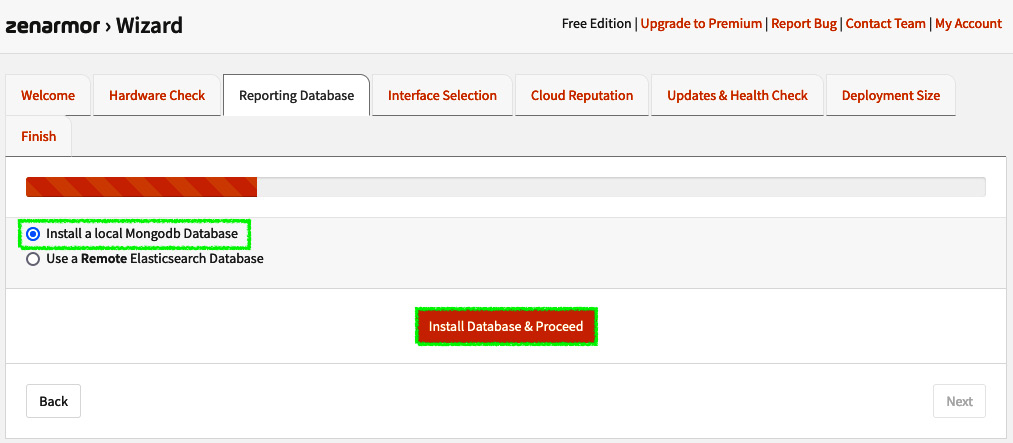
Figure 16.7 – Database installation page
- On the Deployment mode page, leave the option set to Routed Mode (L3 Mode, Reporting + Blocking) with native netmap driver if you have a Netmap-capable network card. If you don’t have that, you can choose the Routed Mode (L3 Mode, Reporting + Blocking) with emulated netmap driver option. The Passive Mode (Reporting Only) option will, as its name suggests, only report the traffic without blocking. Bridge Mode will work in layer2 as a bridge.
- In the Interfaces Selection section, select the LAN interface under Available Interfaces and click the >> button to add it to Protected Interfaces. Then, click Next:
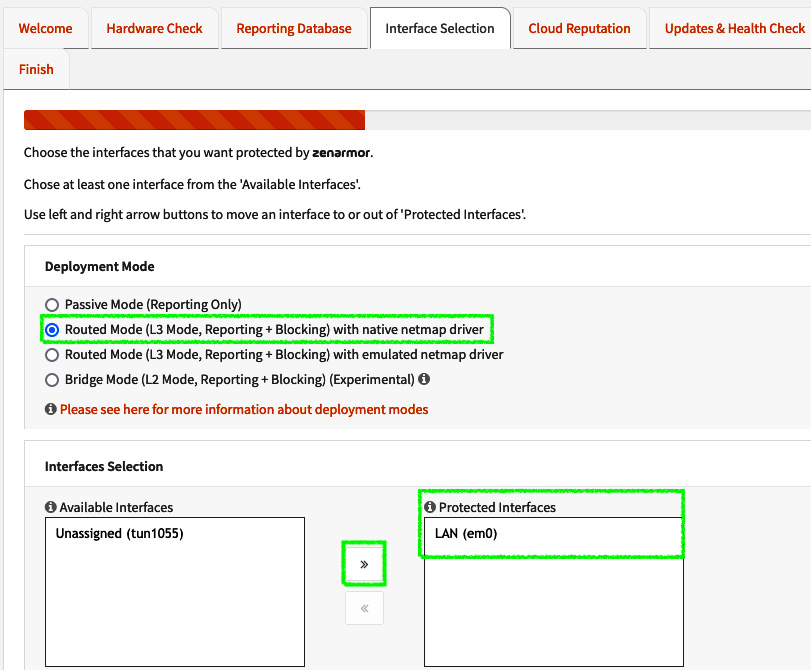
Figure 16.8 – Zenarmor mode and interface selection page
Important Note
If the interface you’ve chosen is being used by IDS, the configuration process will not move on. As a simple rule of thumb, while using IDS and Zenarmor together, only keep IDS watching for traffic on WAN interfaces and Zenarmor on the LAN interfaces.
On the Cloud Reputation & Web Categorization page, the wizard will pick a better location while using network latency as a parameter. If you have an internal domain, you can set it in the Local Domains Name To Exclude From Cloud Queries box to avoid local domain requests from being forwarded to Sunny Valley’s servers. The Cloud Reputation & Web Categorization features will filter DNS queries based on the locally configured policies:
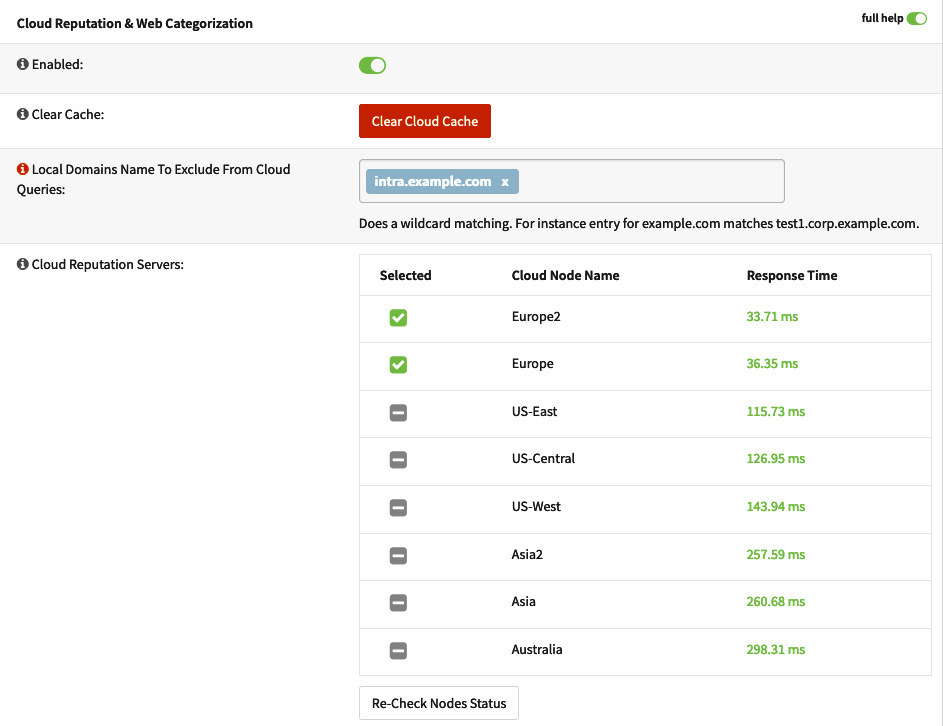
Figure 16.9 – The Cloud Reputation & Web Categorization page
- You can leave the default options as-is for Updates and Support and Health Check on the next page. Click Next.
- Under Deployment Size, the configuration wizard will show the available options based on the hardware test (Step 3), so you can choose the best choice for the network you are deploying Zenarmor on:
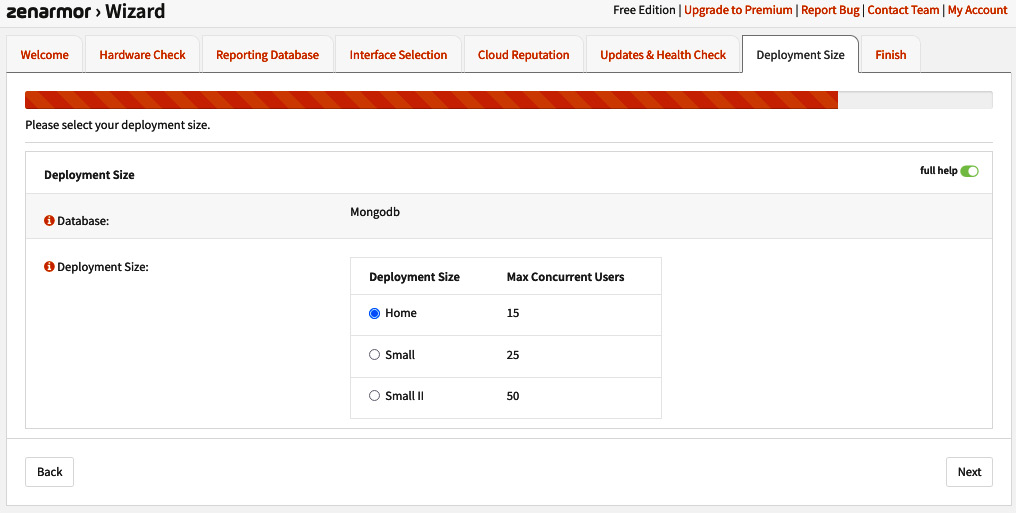
Figure 16.10 – Selecting the deployment size
- Now, you can sign up for Sunny Valley’s newsletter, fill in your email address, and click Finish to start using the Zenarmor plugin!
Important Note
If you need to revise the configurations you have set in the configuration wizard, you can go to Zenarmor | Configuration | General and set the configurations that your network needs.
To start using the Zenarmor plugin, go to the Zenarmor | Dashboard menu and check out the graphs for app categories, top local hosts, top remote hosts, and so on. It may take a while for helpful information to appear. Now, it’s time to go to OPNsense’s LAN-connected host and do some web browsing to generate traffic:

Figure 16.11 – Zenarmor’s Dashboard page
On the Zenarmor | Status page, we can check the engine, rules versions, cloud node status, protected interfaces, and the services’ statuses. It is also possible to set the services to start on boot, stop, restart, and so on. Something that might be helpful while you’re troubleshooting outgoing traffic blocks is setting the Zenarmor packet engine to bypass mode, which will bypass all the traffic without blocking or reporting it. You can enter bypass mode by clicking the Enter Bypass Mode button. Warning: this mode will not survive a reboot:
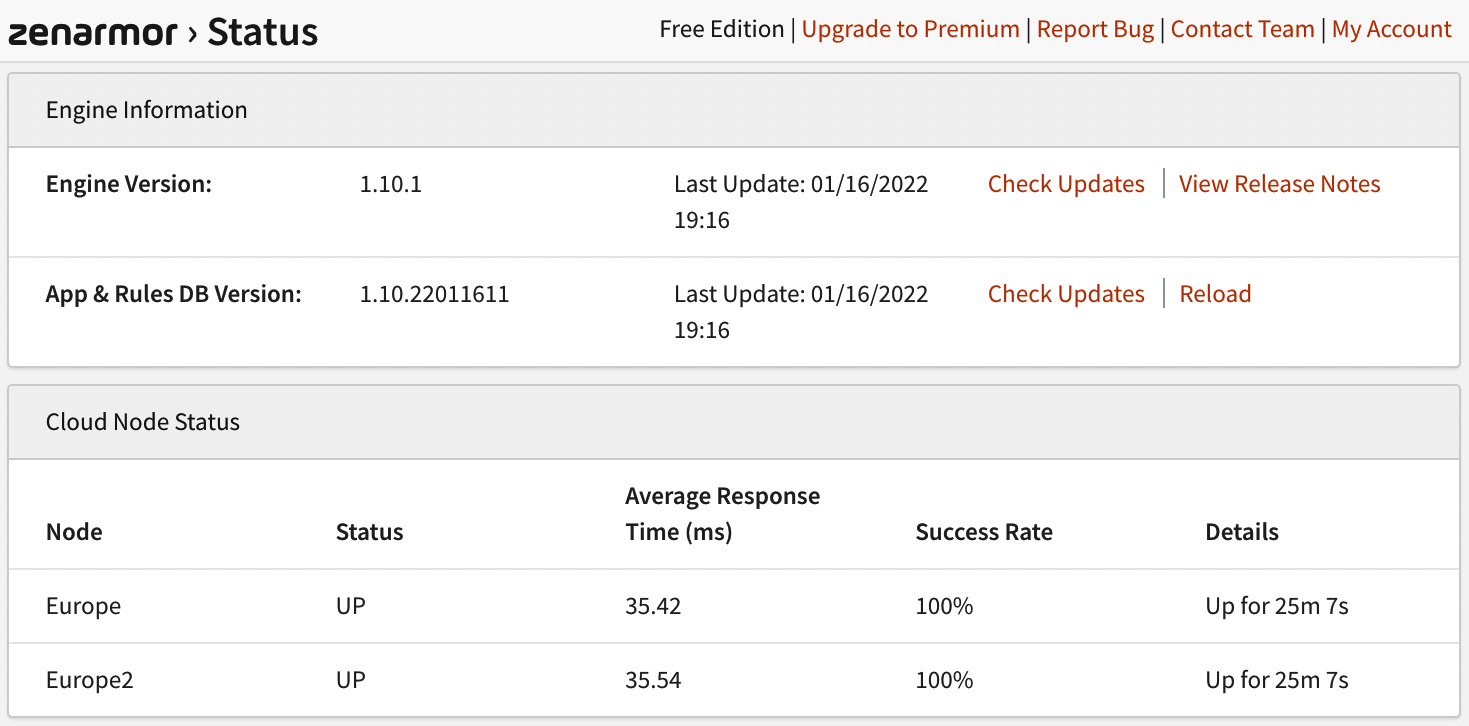
Figure 16.12 – Zenarmor’s Status page
Another thing that’s great about Zenarmor is its reporting feature. You can check the available reports by going to Zenarmor | Reports. I recommend that you invest some time exploring the available reports and options – it’s worth it!
In the Zernarmor | Policies menu, it is possible to set up protected network policies. Note that in the free version, only one policy will be available, so if you select two different networks – for example, to protect using Zenarmor – they will use the same rules that were defined in this policy. If you need different policies for different users or networks, I recommend checking out one of the paid subscription options.
Following we will edit the default policy:
- To start editing a policy, click on the pencil icon button:
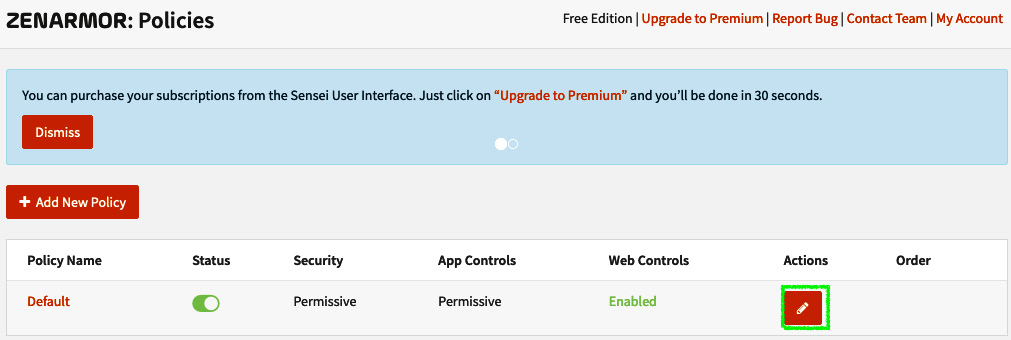
Figure 16.13 – Editing a Zenarmor policy
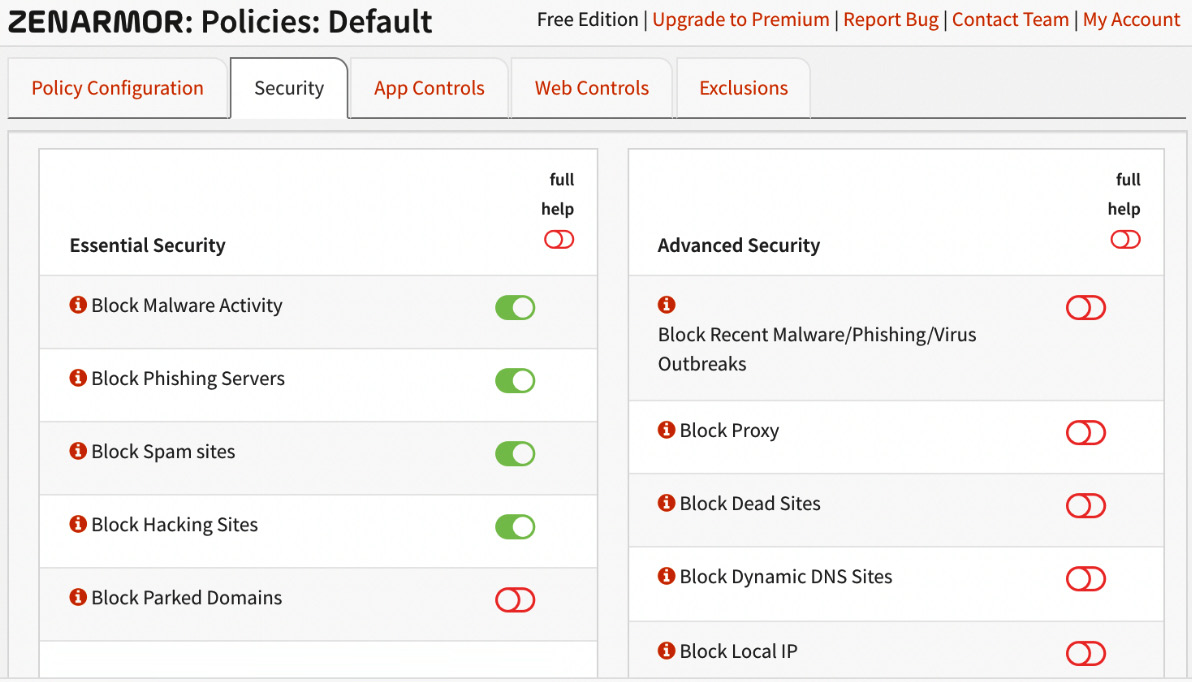
Figure 16.14 – The Security tab
Here, you can select which malware categories will be blocked on the protected networks.
Important Note
Some options are paid exclusives.
Application control can be configured under the App Controls tab. By clicking on it, you can check out all the available applications and select the ones you want to block. By default, all are allowed:
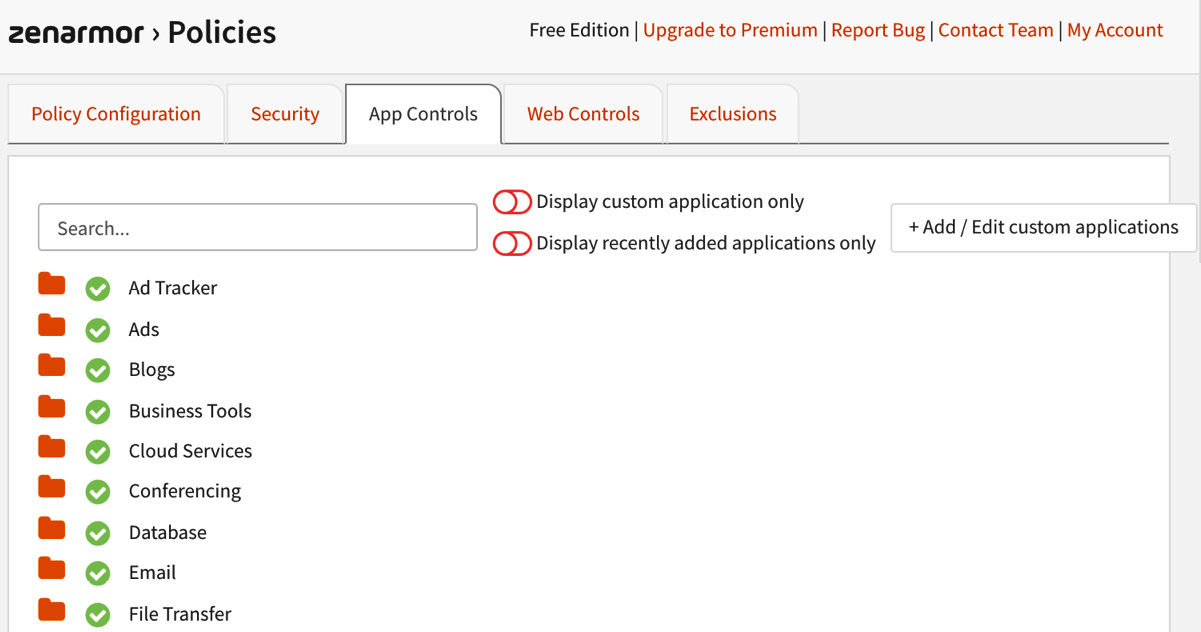
Figure 16.15 – The App Controls page
You can also make the categories block specific web browsing filtering by clicking the Web Controls tab. The preset profiles that are available in the free version are Permissive, Moderate Control, and High Control. To customize these web categories, you will need a paid subscription.
To allow and block domains for web filtering, go to the Exclusions tab and set your own white or blacklists.
Important Note
The Policy Configuration tab is only customizable if you have a paid subscription version.
As we’ve seen, the Sunny Valley team did an outstanding job integrating Zenarmor with OPNsense webGUI. They created a turning-table product that has led open source firewall projects such as OPNsense to compete with commercial firewall solutions at the same features level.
Summary
In this chapter, you learned how to install the Zenarmor plugin and enable next-generation firewall capabilities on OPNsense. Now, you can deploy OPNsense as a firewall, just like any other commercial solution, with application inspection and control, DNS and web filtering, excellent reports, and the outstanding cloud-enabled threat detection provided by Sunny Valley. In the next chapter, we will discuss the high availability of firewalls.