
Chapter 20: API – Application Programming Interface
In this chapter, we will learn how the OPNsense application programming interface (API) works and how to use it externally by looking at some examples. By the end of this chapter, you will understand the OPNsense API structure and how to create custom calls using it.
In this chapter, we will cover the following topics:
- Concepts
- Setting up API keys
- API calls
Technical requirements
For this chapter, you will need basic knowledge of using the curl command on the CLI and a basic understanding of how HTTP protocol methods work.
Concepts
APIs are a way that software can talk with other software and integrate and automate routines. The REpresentational State Transfer (REST), also known as the RESTful API, is a web API that uses HTTP requests. For example, it allows you to make calls to a web application to display information or execute commands on the web server's backend. The OPNsense framework supports APIs for most webGUI features to interact with the backend controller as a modern web application.
The following diagram shows OPNsense's framework architecture, which has been extracted from the official documentation:

Figure 20.1 – OPNsense architecture extracted from https://docs.opnsense.org/development/architecture.html
As we can see, OPNsense's architecture is composed of a frontend, where the webGUI resides, and a backend, where the configd service resides. Every time we use OPNsense's API, we are utilizing this architecture. One of the advantages of this model is that the webGUI doesn't execute commands directly on the operating system (OS), for example. Executing commands from web applications directly in the OS can lead to misconfigurations, service interruptions, or even security vulnerabilities.
Once OPNsense has an API, it is possible to integrate it with other software, such as security tools, administrative consoles, other online services, and more. Some example code for this can be found in Cloudfence's GitHub repository, which integrates Wazuh with OPNsense. You can check it out here: https://github.com/cloudfence/opnsense-wazuh.
The OPNsense API's structure is as follows:
https://opnsense.local/api/<module>/<controller>/<command>/[<param1>/[<param2>/...]]
The API works with the POST and GET HTTP methods. As a rule of thumb, the GET method is used to display information, while the POST method is used to send data to change settings.
For example, if we want to get the existing firewall aliases on OPNsense, we can make a GET call using our browser (we must be logged into the webGUI):
https://<OPNsense_IP_Address>/api/firewall/alias/get
The preceding example uses the following OPNsense API structure:
- Module: firewall
- Controller: alias
- Command: get
Important Note
For a complete OPNsense API reference, please go to https://docs.opnsense.org/development/api.html.
Executing the preceding example on an OPNsense firewall outputs data in JSON format in your browser, as follows:

Figure 20.2 – API GET output example using the Firefox web browser
As you can see, the API call's JSON output shows the firewall aliases in a structured manner, displaying its contents.
Now, let's learn how to set up the API keys for external usage of the API and look at some other examples.
Setting up API keys
In the previous example, we made an API call internally using the webGUI. To make an external call, we need to configure the API's authentication.
API authentication in OPNsense can be created by associating a key and a secret with an existing user. To create an API key and secret for the root user, follow these steps:
- On the webGUI, go to System | Access | Users and edit the root user:
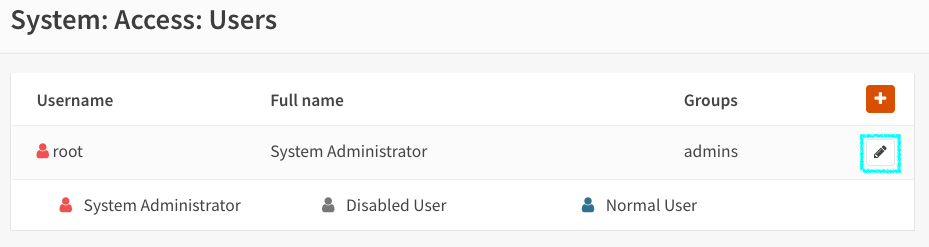
Figure 20.3 – Editing the root user
- On the user's edit page, click the + button under API keys:
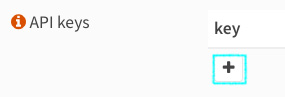
Figure 20.4 – Adding a new API key/secret pair to the root user
- This will save a text file that contains the API's key and secret:
key=xc8Odoms2r+a45Z9UOXG8drL5MHl+PkeUOrCTbj9abxZ7SDlFUJZ vp8s23uGB5eygqQDrl5wTv7f/yJm
secret=RzYoJ/uw+8btPCbXVljqijDLRIywXpOUg2xmeashsl/l/+XhR D1DHaNVu0N3yq2xV1BJKdhoi1txcsnm
This file contains two lines. The first line specifies the API's key, while the second specifies the API's secret.
These credentials will allow you to remotely execute remote commands on OPNsense using the API, so keep them in a safe place!
Now, let's make some API calls using these credentials.
API calls
The simplest way to test API calls is by using the curl tool. You can install it on Linux, FreeBSD, macOS, and Windows. On Windows 10/11, it is installed by default. Choose your preferred OS and start testing!
We will need access to the OPNsense webGUI port for testing, so I recommend that you do the tests from the LAN network. Avoid keeping webGUI and SSH access open to the internet so that you don't use it from the WAN. It would be best if you used a VPN instead.
GET method example
We will use the following curl parameters in this example:
Important Note
We are using the curl and jq parameters for Unix-like environments in the following steps. If you want to use it on another shell, such as Windows Powershell, the parameters and outputs may vary.
- -k: Allows insecure server connections when you're using TLS. Do not use this in a production environment! Consider using a trusted certificate instead.
- -u: <user:password> This is the server's user and password. Here, we must specify the API key as the user and the API secret as the password.
- -s: Silent mode – prevents curl noise output.
Let's repeat the previous example of getting the firewall aliases but using external API access:
curl -s -k -u "xc8Odoms2r+a45Z9UOXG8drL5MHl+PkeUOrCTbj9abxZ7SDlFUJZvp8s23uGB5eygqQDrl5wTv 7f/yJm":"RzYoJ/uw+8btPCbXVljqijDLRIywXpOUg2 xmeashsl/l/+XhRD1DHaNVu0N3yq2xV1BJKdhoi1txcsnm" https://192.168.3.1/api/firewall/alias/get
The command's output will look like this:
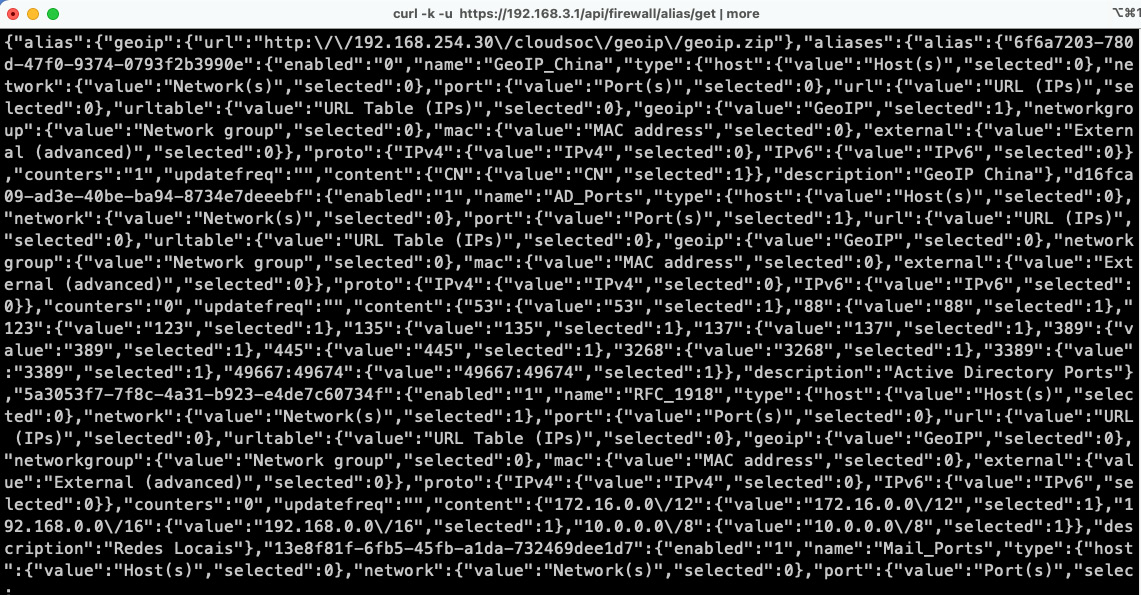
Figure 20.5 – The curl command's output
To help format this output, we can use the jq tool. It can be installed on Linux, FreeBSD, Windows, and macOS. Check it out at https://stedolan.github.io/jq/:
curl -s -k -u "xc8Odoms2r+a45Z9UOXG8drL5MHl+PkeUOrCTbj9 abxZ7SDlFUJZvp8s23uGB5eygqQDrl5wTv7f/yJm":"RzYoJ/uw+8bt PCbXVljqijDLRIywXpOUg2xmeashsl/l/+XhRD1DHaNVu0N3yq2xV1B JKdhoi1txcsnm" https://192.168.3.1/api/firewall/alias/get | jq
Just add | jq to the end of the previous curl command line.
This will output a more structured (and colorful) JSON:

Figure 20.6 – curl output combined with the jq tool
So, as we can see, it is also possible to extract data from the webGUI using the API with tools such as curl and jq. This is a pretty straightforward example, but if we think about all the possibilities of integrating, managing, and automating tasks using API calls, we will realize that the sky is the limit while using the OPNsense API.
Now, let's learn how to use the API to modify firewall alias content.
POST method example
Now, let's learn how to modify firewall alias content using an API call. To change the content of an alias using the API, we must use the POST HTTP method.
For example, let's create a new alias on the webGUI by using the External type, which is the recommended type for using API calls.
Go back to the webGUI and create a new firewall alias (by going to Firewall | Aliases):
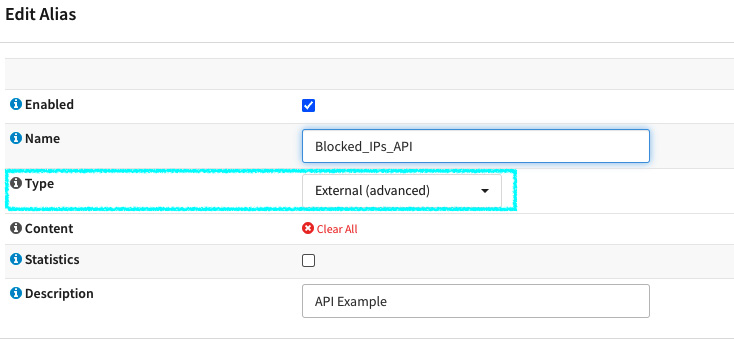
Figure 20.7 – Creating an external firewall alias
In this example, we will assume that this alias will be used in a firewall rule to automatically block offenders' IP addresses that an API call will add. To finish, click the Apply button.
For this example, we will use the following API structure:
- Module: firewall
- Controller: alias_util
- Commands: list and add
Now, let's make an API call using curl and jq to format the JSON output:
- First, let's list the newly created alias content using an API call:
curl -s -k -u "xc8Odoms2r+a45Z9UOXG8drL5MHl+PkeUOrCTbj9 abxZ7SDlFUJZvp8s23uGB5eygqQDrl5wTv7f/yJm":"RzYoJ/uw+8bt PCbXVljqijDLRIywXpOUg2xmeashsl/l/+XhRD1DHaNVu0N3yq2xV1B JKdhoi1txcsnm" https://192.168.3.1/api/firewall/alias_ut il/list/Blocked_IPs_API | jq
{
"total": 0,
"rowCount": -1,
"current": 1,
"rows": []
}
Now, let's add an IP address to it by using the POST method:
curl -s -k -u "xc8Odoms2r+a45Z9UOXG8drL5MHl+PkeUOrCTbj9 abxZ7SDlFUJZvp8s23uGB5eygqQDrl5wTv7f/yJm":"RzYoJ/uw+8bt PCbXVljqijDLRIywXpOUg2xmeashsl/l/+XhRD1DHaNVu0N3yq2xV1B JKdhoi1txcsnm" https://192.168.3.1/api/firewall/alias_ut il/add/Blocked_IPs_API -XPOST -d '{"address": "203.0.110.10"}' -H "Content-Type: application/json"
{"status":"done"}%
As the highlighted part of the preceding command shows, we have added the following arguments:
- add/Blocked_IPs_API: the URL part specifies the add command and the alias's name as a parameter.
- -XPOST: This argument tells curl that it is a POST method call.
- -d '{"address": "203.0.110.10"}': This is the POST call payload that will send the IP address we want to add to the alias.
- -H "Content-Type: application/json": This specifies that our payload is using JSON format in the request header.
As we can see, the result of the API call was done:
{"status":"done"}%
Now, let's repeat the GET call to list the alias content:
curl -s -k -u "xc8Odoms2r+a45Z9UOXG8drL5MHl+PkeUOrCTbj9abxZ7 SDlFUJZvp8s23uGB5eygqQDrl5wTv7f/yJm":"RzYoJ/uw+8btPCbXVljqij DLRIywXpOUg2xmeashsl/l/+XhRD1DHaNVu0N3yq2xV1BJKdhoi1txcsnm" https://192.168.3.1/api/firewall/alias_util/list/Blocked_IPs _API | jq
{
"total": 1,
"rowCount": -1,
"current": 1,
"rows": [
{
"ip": "203.0.110.10"
}
]
}
As we can see, the IP address was added to the alias!
Another way to check the alias content is by using the pfctl command on the CLI:
root@bluebox:~ # pfctl -t Blocked_IPs_API -T show
203.0.110.10
That's it – it's confirmed! Our API call that uses the POST method has worked!
You can improve this example by writing a script using programming languages such as shell scripting, Python, PHP, and others.
Summary
In this chapter, you learned about the OPNsense API and how to use it to integrate with other tools. Now, you can try to create some code and extend OPNsense's functions by using its API calls with other tools. With that, we have come to the end of this book! Thank you for reading it, and I hope this book has contributed to your OPNsense knowledge.