
Chapter 14: Captive Portal
In this chapter, we will learn about Captive Portal concepts, how to configure and use the Captive Portal with OPNsense, the most common issues while configuring a Captive Portal, and how to solve them. By the end of this chapter, you will be able to set up a guest network to authenticate and control guest hosts using a Captive Portal and web proxy with OPNsense. Specifically, we'll be looking at the following topics:
- Captive Portal concepts
- Setting up a guest network
- Web proxy integration
- Common issues
Technical requirements
To follow along with this chapter, you need to have a clear understanding of the HyperText Transfer Protocol/HTTP Secure (HTTP/HTTPS), Transport Layer Security (TLS), and Domain Name System (DNS) protocols. It is also advisable to have an OPNsense system with a host connected to its local area network (LAN). My suggestion is to use the previously configured lab scenario (Chapter 9, Multi-WAN – Failover and Load Balancing) with OPNsense and Ubuntu virtual machines (VMs).
Captive Portal concepts
Everyone with a smartphone or laptop has tried to access a public wireless network at least once and got an authentication page before proceeding with internet access—haven't you?
This method used to redirect a user trying to access the internet to an authentication page is a Captive Portal, which OPNsense has as a core feature. Captive Portals are usually used on guest networks Captive Portals are usually used on guest networks, such as airports and hotels' wireless networks hotspots, pay-as-you-go Wi-Fi guest networks, or even on wired networks in business centers.
OPNsense Captive Portal implementation
On OPNsense, the method used to redirect users is an HTTP redirect. Once the user tries to access a web page, a network address translation (NAT) rule will redirect it to a web service that runs the Captive Portal authentication page.
The following authentication methods are available through the OPNsense backend fabric: LDAP, RADIUS, Local users, and Vouchers. We can also configure a Captive Portal with no authentication (not recommended) or with a combination of the available methods (configured on the System | Access | Servers page).
Setting up a guest network
To start configuring a Captive Portal, follow the next steps:
- Go to Services | Captive Portal | Administration, as illustrated in the following screenshot:

Figure 14.1 – Captive Portal configuration page
As we can see in the preceding screenshot, the configuration page has two tabs: Zones and Templates. These tabs are described in more detail here:
- Zones: The Captive Portal is divided into different zones, each with its own configuration. Working this way, OPNsense can manage different guest networks. We can add multiple zones in OPNsense's Captive Portal feature.
- Templates: Each template can use a different form of authentication or show a splash page to agree with the internet usage terms.
- Let's start the configuration by creating a new zone. Clicking on the + sign will take you to the following screen:
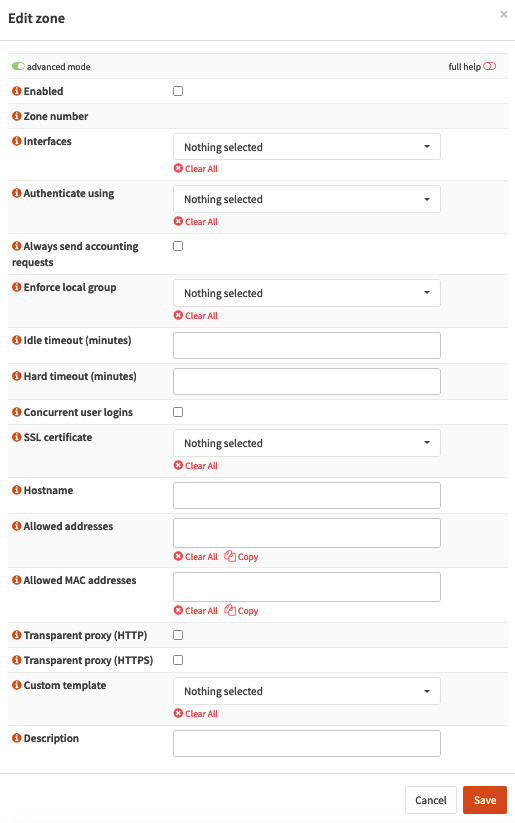
Figure 14.2 – Edit zone page with advanced mode on
The following options will be available to configure the Edit zone page:
- Enabled: Check this option to enable the zone.
- Zone number: This is a label and can't be configured. The first created zone starts with 0 (zero).
- Interfaces: Select on which network interfaces the Captive Portal should be enabled.
- Authenticate using: Select a configured authentication backend. If nothing is selected, the authentication will be disabled.
- Always send accounting requests: Check this option to enable session accounting. The Remote Authentication Dial-In User Service (RADIUS) authentication protocol has an accounting process that starts as soon as the user has access granted.
- Enforce local group: This option will restrict users to a local group created on OPNsense.
- Idle timeout (minutes): This option will set a timeout for user inactivity. After the timeout, the user will need to authenticate again. The default value is 0 (zero), which disables this timeout.
- Hard timeout (minutes): This option will set a timeout to force users to disconnect even with activity. The default value is 0 (zero), which disables this timeout.
- Concurrent user logins: If this option is checked, then a user can log in to more than one machine at once, such as a laptop and a mobile phone. For security reasons, it isn't recommended to enable this option to avoid users sharing their credentials.
- SSL certificate: When an HTTP request is redirected, it will be served by an HTTP-only authentication portal. To enable an HTTPS authentication portal, set a Secure Sockets Layer (SSL) certificate in this option.
- Hostname: By default, HTTP redirects will use the OPNsense Internet Protocol (IP) address. To use a hostname instead, set it in this option. Remember that hosts in the network must be able to resolve this hostname. An easy way is to set the OPNsense server as the default DNS server and create a local hostname entry. While using an SSL certificate, the hostname and the Subject Alternative Name (SAN; or Common Name (CN), as labeled in the web user interface (UI)) must match.
- Allowed addresses: List IP addresses including subnets that will not need authentication. This is like a bypass option by IP address.
- Allowed MAC address (needs advanced mode marked): Once OPNsense is serving the Captive Portal in a local network, it will be able to get the localhost's media access control (MAC) address. This option will bypass authentication for the MAC addresses specified in it. It is a little bit more secure than using an IP address, but remember that a person with bad intent who uses a MAC spoofing technique can bypass this kind of control.
Important Note
MAC spoofing: It is possible to change the MAC address despite the MAC address being hardcoded in the network interface, thus spoofing it.
- Transparent proxy (HTTP) and Transparent proxy (HTTPS): Both options will forward HTTP(S) traffic to the web proxy using the transparent proxy method. These options are helpful while filtering or just logging user access.
- Custom template: While using a custom web authentication page template, we can select a template here. We'll explore custom templates in the next section.
- Description: Put a description of this zone that will make sense to other OPNsense administrators.
- To create a new zone, click on the Save button. This will add a new zone to the Services | Captive Portal | Administration page, as illustrated in the following screenshot:
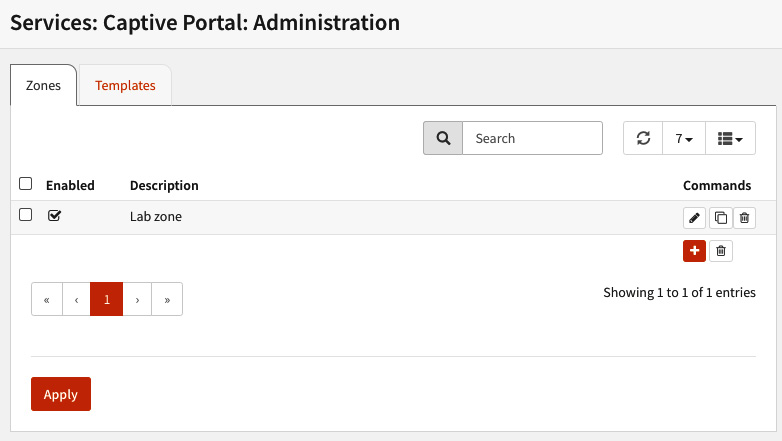
Figure 14.3 – A newly added Captive Portal zone
To apply the new configuration, you must click on—guess what? Yes! The Apply button!
Testing the configuration
We'll need a connected host on OPNsense's LAN to test the Captive Portal configuration. Using the Ubuntu host, I'll assume the same lab scenario from the previous chapters. Follow the next steps to test the configuration:
- Disable any NAT redirect for HTTP/HTTPS if your OPNsense system has any.
- Create the following firewall rules in the LAN interface:

Figure 14.4 – Captive Portal LAN's firewall rules
- The first rule will allow DNS traffic to the local DNS service running on OPNsense (in this lab, we'll assume that is Unbound).
- The second rule will allow traffic that the HTTP redirect rule produces (automatically created by the Captive Portal service) to the authentication page.
- The third rule is rejecting any traffic to local networks. To ensure that nothing will evade this rule, I recommend you create an alias with RFC 1918 networks in its content: 10.0.0.0/8, 172.16.0.0/12, and 192.168.0.0/16.
- The two final rules allow any traffic outgoing to the internet (only) once the third rule assures that no traffic escapes to the addresses of the local network. Go to the host and open a new web browser. Notice that we are considering just the IP version 4 (IPv4) network in this chapter. If you are using IPv6, you must set rules for both IP protocol versions.
Important Note
We assume the LAN network is our guest network in our lab to avoid additional steps in creating a GuestNet-only network, but in a real environment, a dedicated guest network interface is recommended to be added.
- Try to open an HTTP-only address in the Captive Portal authentication page, as illustrated in the following screenshot:

Figure 14.5 – Captive Portal authentication page while trying to open the http://start.ubuntu-mate.org URL
- If you try opening an HTTPS URL, the browser will show an error page, as displayed in the following screenshot:

Figure 14.6 – Error page while trying to access an HTTPS URL
- This issue is caused for the same reason that error pages don't work on the transparent proxy method; the presented certificate will not match the expected by the browser, so this SSL error occurs. We will see how to solve this issue in the Common issues section. It can quickly be solved by changing https to http in the URL bar.
- To continue, fill in the username and password fields with previously created user credentials. If you didn't create any additional users, go to System | Access | Users (the OPNsense webGUI) and create a new one.
- After authenticating, the browser will be redirected to the typed URL—in our example, this is https://start.ubuntu-mate.org.
Important Note
Note that the HTTP to HTTPS redirection in this last step was done by the remote web server, not by OPNsense, once we had typed the URL using HTTP-only.
- To confirm the existing session, go back to the OPNsense webGUI and go to the Services | Captive Portal | Sessions page, as illustrated in the following screenshot:

Figure 14.7 – Active Captive Portal session
As shown in the preceding screenshot, the user (dumont in my lab) is logged in and has an active session. We can check the user's IP address and MAC address values and the connection start time (found in the Connected since column). To terminate a user session, we can click on the trashcan icon.
With this last step, we have finished configuring our first Captive Portal zone on OPNsense! Congratulations!
Using voucher authentication
Let's suppose that our guest network is configured in an airport, where it would be impractical to create a new user for each new guest who wants to use it. Some techniques to handle this better are outlined here:
Important Note
Vouchers are stored in a local SQLite database that is not backed up while the OPNsense configuration is exported.
- Social login (based on social media authentication). This method is not supported by OPNsense.
- Social identifier (ID), which can create a problem with regulations such as the General Data Protection Regulation (GDPR).
- Vouchers.
This last one is an option that OPNsense supports natively, and we'll see how to configure it in the following steps:
- Go to the System | Access | Servers page and click on the + button to add a new option.
- On the new configuration page, select the Voucher option and a Type value.
- Provide a description such as Captive Portal, for example.
- Fill the Username and Password length fields with the number 4. Notice that users will need to type eight digits in total: four for the username and four for the password. For security best practices, you should consider an eight-character username and an eight-character password.
- Click on the Save button to finish adding the new voucher authentication backend.
- Go back to the captive portal configuration page via Services | Captive Portal | Administration and edit the current zone.
- Change the Authenticate using option to the new voucher backend we created and click on the Save and Apply buttons.
- Now, we must create vouchers. To do that, go to Services | Captive Portal | Vouchers and click on the Create vouchers button.
- A window will be shown; change the Number of vouchers option to 10, for example, and click on the Generate button, as illustrated in the following screenshot:
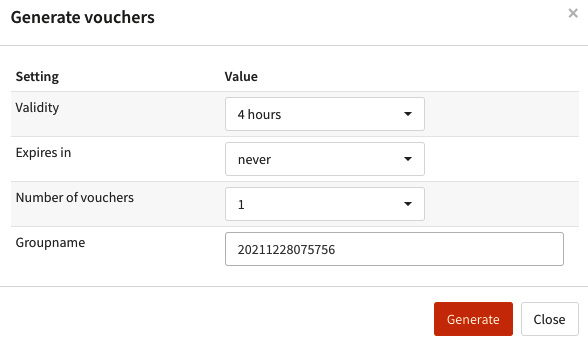
Figure 14.8 – Generate vouchers dialog
- A browser dialog will be shown to download a comma-separated values (CSV) file for the voucher, as illustrated in the following screenshot. Save it on your computer:

Figure 14.9 – CSV file content
- We can also check for vouchers on the Services | Captive Portal | Vouchers page, as illustrated in the following screenshot:

Figure 14.10 – New generated vouchers listed
- Now that we have changed the authentication of vouchers, go back to Services | Captive Portal | Sessions and click on the trashcan icon to drop the previous active session.
- Try opening an HTTP-only URL on the host and wait for the Captive Portal authentication page. To avoid web cache issues, use a private-mode window in your browser.
- Pick a voucher username and password from the previously downloaded CSV file when the authentication page is shown, and authenticate using them.
- After successfully authenticating, check the active session on Services | Captive Portal | Sessions. You should see the current voucher in use in the Username column, as illustrated in the following screenshot:
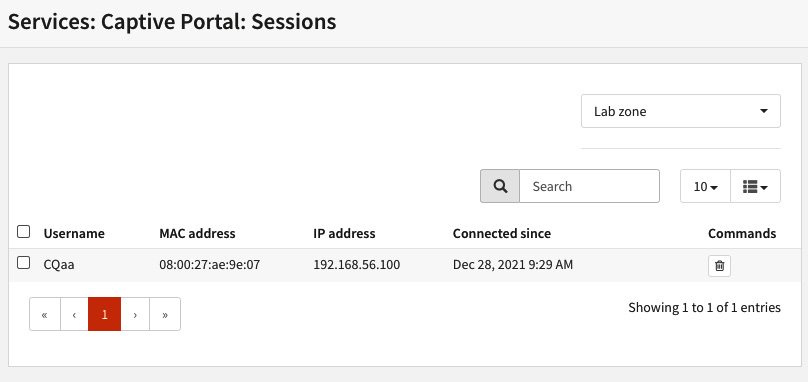
Figure 14.11 – Active session using voucher authentication
As we can see, voucher-based authentication will work very similarly to local database user authentication, but with the advantage that we can export a list of vouchers and create an administrative procedure to share each voucher with guests. Next, we'll take the necessary steps to enable web filtering on the guest network to integrate it with the web proxy.
Web proxy integration
To control what guests can access on the internet, we can apply some web proxy controls. As we explored in the last chapter, the native web proxy features on OPNsense provide reasonable control of internet content. It is a good idea to control what guests access on the internet. Depending on each country's laws, it may not be allowed to inspect users' web browsing traffic, so check whether you can do this first!
In this section, we'll take the necessary steps to enable web filtering on the GuestNet, integrating it with the web proxy, as follows:
Important Note
Before we start working through the following steps, make sure that the web proxy is up and running. If you aren't sure how to do that, please refer to Chapter 20, API – Application Programming Interface, for the steps to configure the web proxy with the transparent method.
Remember to disable or remove the NAT port forwarding rules created in the previous chapter to redirect HTTP(S) traffic to the web proxy. Captive Portal uses the ipfw packet filter, and it might conflict with the port forwarding NAT rules created on the webGUI.
- Go to Services | Captive Portal | Administration and edit the current configured zone.
- Check the Transparent proxy (HTTP) and the Transparent proxy (HTTPS) options and apply the configuration.
- On Services | Web Proxy | Administration - General Forward Settings submenu, check that the Enable Transparent HTTP proxy, Enable SSL inspection, and Log SNI information only options are marked, and apply the configuration.
- Try browsing on the host and check if requests are being logged by the web proxy (Services | Web Proxy | Access Log).
You should see HTTP(S) requests from your host logged by the web proxy. It is done! Our Captive Portal and web proxy integration are working! Now, we can choose which filtering rules we want to apply in the GuestNet.
Important Note
I recommend you revise the web proxy configuration steps in Chapter 20, API – Application Programming Interface, if you have any issues following the preceding steps.
Let's now look at some common issues while using the Captive Portal on OPNsense.
Common issues
As we have explored so far, the OPNsense Captive Portal implementation works pretty well, but things in life are not always a bed of roses. We sometimes face issues while using the Captive Portal, such as HTTPS URLs' redirection to the Captive Portal authentication page, as I mentioned previously in this chapter.
I will mention some common issues we need to handle daily with our CloudFence support team. Of course, you might find dozens of issues on the official forum, but it will not be possible to cover each one here as we have a limited number of pages for this chapter.
HTTPS page redirection while using the Captive Portal
We have two different approaches to try to address this issue, as outlined next.
Using DNS
This is an effective way for most modern mobile devices to access specific DNS entries while detecting a Captive Portal before going out to the internet. It might also work with most modern desktop browsers too. This technique consists of adding domain overrides in the local DNS server (Unbound, for example) to resolve the IP configured in the OPNsense GuestNet network interface. In this way, a device will find the authentication portal faster. Each device operating system/browser has its own domain list, also called walled garden domains. If you google it, you might find lists for each type of device.
Using DHCP
A special option can be configured on the DHCP server to help devices identify a Captive Portal authentication page. This option must be set as DHCP option 114 (for IPv4). An example using OPNsense would look like this:

Figure 14.12 – Services | DHCPv4 | LAN – Additional Options configuration example
Naturally, the HTTPS protocol's protection mechanisms will often result in errors on devices that don't recognize these mechanisms for identifying a Captive Portal correctly, but it is a protection mechanism this protocol was designed for.
Users failing authentication often while using vouchers
Try reducing vouchers' complexity. This will penalize the security level but might help in this case. To generate simpler vouchers, you can set the Use simple passwords field (less secure) on System | Access Servers (editing an existing voucher's backend). Notice that if existing vouchers are created, you will need to recreate them to apply this new configuration.
Users complaining about vouchers expiring without using them
First of all, explain to users the basics: once a voucher is activated, the time will count even if the user doesn't access the internet. Another issue is that users sometimes have difficulties understanding the authentication page. You can customize a template (on Services | Captive Portal | Administration) and upload it on the Captive Portal. A real-life example: as we (at CloudFence) support many Portuguese-speaking companies, it is common to translate the default template and customize it to customers' needs. The official documentation has a well-written guide on creating custom templates and adding some other features that we didn't cover in this chapter. I strongly recommend you read it: https://docs.opnsense.org/manual/how-tos/guestnet.html.
As we explored, the Captive Portal is a really useful OPNsense feature, and there are many other possibilities to authenticate and control guest internet access. You can try combining other OPNsense features as well.
Summary
As we explored, OPNsense has a pretty decent Captive Portal implementation, and it can work in combination with other features such as web proxy but is not limited to it. We also took a brief look at common issues and how to overcome them. Now, you can set up an entire GuestNet using all these and other possibilities. As we can observe, the more we learn about OPNsense, the more we realize that it is a flexible and powerful security solution. In the next chapter, we'll dive into outstanding intrusion detection systems (IDS) and intrusion protection systems (IPS) features.