
Chapter 6: Network Address Translation (NAT)
Following the last chapter, where we explored firewalling, Network Address Translation (NAT) is a simple way to have an entire local network using a single public IP address. Since NAT is an IPv4-exclusive method, we will not explore IPv6 and its equivalent NPTv6 (also known as NAT66). This book aims to provide valuable and practical information. Unfortunately, these days, IPv6 and NPTv6 aren't the predominantly used technology in local networks.
IPv6 Adoption
According to Google's IPv6 statistics page (in July 2021), IPv6 adoption was 35% globally (https://www.google.com/intl/en/ipv6/statistics.html).
Coming back to our chapter's topic, we will learn about NAT concepts, which types OPNsense supports, and how to create NAT rules on WebGUI. By the end of this chapter, you will be able to manage NAT rules on OPNsense and will understand how the NAT method works.
The following are the topics we'll explore in this chapter:
- NAT concepts
- Outbound port forwarding
- One-to-one NAT
Technical requirements
This chapter requires that you have a clear understanding of firewall concepts and the TCP/IP network stack, and feel comfortable running commands on the CLI. You will need OPNsense running to follow some of this chapter's steps. I suggest you use the virtual machine we set up earlier in this book, in Chapter 2, Installing OPNsense.
NAT concepts
Before we start to talk about NAT concepts, let's understand what kind of problems it solves. Let's think of a small company with a network of 10 devices and all of them need to be connected directly to the internet. We are talking about a small company with a limited budget, so the available WAN connection has only one public Internet Protocol (IP) address and there is no possibility to get an upgrade to a service that provides an entire IP network range. Sound familiar? In Brazil and Portugal, this scenario is very common. So, how do we connect all those devices using a single public IP address? If you answered using NAT, you're right! This is one of the most common scenarios for using NAT. Another one is when you need to provide, let's say, web services, but you have more web servers than available public IP addresses. In this case, NAT can help too, by using different ports of the same IP address. But what is the difference between these two examples? The direction. The first example uses outbound NAT and the second one uses inbound NAT, also known as port forwarding. There is a third supported type of NAT in OPNsense – one-to-one. This kind of NAT can be used in both directions. A special term used when talking about one-to-one NAT is when you have networks of the same size and need to apply NAT in both directions. We call this BINAT in OPNsense. We will explore all these three types of NAT in the following sections.
Port forwarding
Using our previous example, let's consider a small company with three web servers but with just one public IP address and a lot of users needing to access them from the internet. How can we solve this problem using just firewall features? By creating an inbound NAT rule! We will refer to this type of NAT in this book in the same way as OPNsense: port forwarding. It will forward a port or a port range from the public interface to an internal host such as, for example, a web server. At the same time, the port number/range can be changed.
Using the preceding example, let's take a look at the following topology:
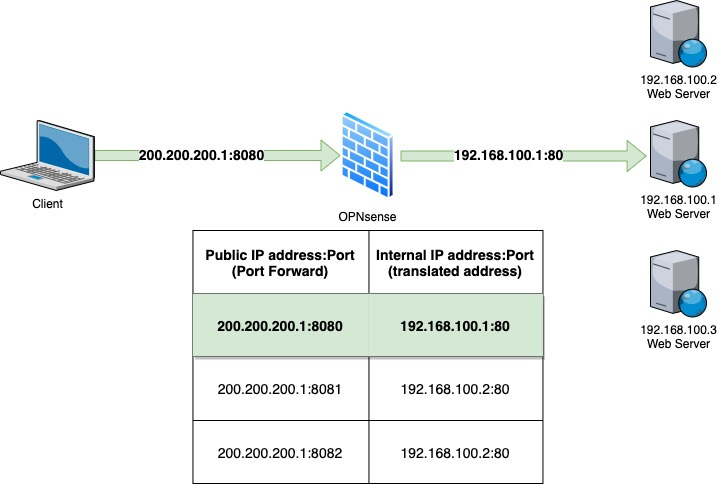
Figure 6.1 – Port forwarding example
In the preceding figure, you can see a client requesting access from the internet to the public IP 200.200.200.1 on port 8080. When this request arrives in our firewall, it will look for a NAT entry that forwards port 8080 in its public IP address to an internal address and port – 192.168.100.1 on port 80 in this case. As OPNsense is a stateful firewall, the reply from the web server will follow the same path back to the internet client, leaving the internal network with the translated address 200.200.200.1, instead of 192.168.100.1. Otherwise, the packet will not be routable to the internet since its internal IP address is an RFC1918 private IP address and couldn't be routed on the internet. Using port forwarding allows us to assign thousands of ports to internal services/ports with just one public IP address.
Notes
A common issue related to port forwarding NAT is when the internal host has a default gateway set to another router/host rather than the firewall that is forwarding the inbound NAT rules. This will break the connection and will not work, since the outgoing packets (replies) are leaving the internal network from another gateway.
For more about RFC1918 address allocation for private internets please refer to http://www.faqs.org/rfcs/rfc1918.html.
Let's now look at caveats, which is another important NAT concept.
Caveats
Port forwarding will not always save the day. Some situations will require more sophisticated solutions, such as reverse proxies. An example is when you have just one public IP address available and multiple web servers that require serving on port 443 (HTTPS), which will not be possible with only one IP address available. While using NAT, you must configure a different port for each server. In this case, a reverse proxy could help. OPNsense has some plugins that may help in this case, such as HAProxy and NGINX, but for logging the real client's IP addresses, they may demand that the application supports reverse proxy protocols to work as expected.
Note
If you have some trouble while using proxy protocols with reverse proxies, check out this awesome project that could help you: https://github.com/cloudflare/mmproxy. Thanks to Fabian Franz for this tip!
Now that we have learned about the port forwarding basics, let's look at how to create a rule of this type.
Creating a port forwarding rule
OPNsense WebGUI simplifies a lot of how to create a NAT port forwarding rule. Let's see the steps we will need to create our first port forwarding rule:
- Log into WebGUI and go to Firewall | NAT | Port Forward:
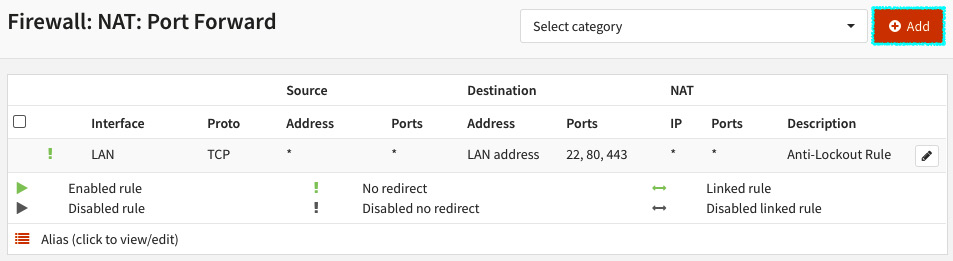
Figure 6.2 – NAT Port Forward rules page
- Click on the + Add button to create a rule.
A new page will be opened, with the following options:
- Disabled: Check this option to disable the current rule.
- No RDR (NOT): If this option is marked, OPNsense will NAT the matching packets. There are a few special cases where this is necessary and to explore it, we would need to cover the port-forwarding (pf) in detail, which is not our goal in this book. Please refer to Packt's books about this subject to learn more, or to the pf manual: https://www.freebsd.org/cgi/man.cgi?pf.conf(5).
- Interface: The network interface that this port forwarding rule applies to.
- TCP/IP Version: Select which version of TCP and IP protocols this rule will process: IPv4, IPv6, or IPv4+IPv6 (both).
- Protocol: Select which IP protocol this port forwarding rule will match. OPNsense supports a lot of protocols in this option, but the most common ones to select here are TCP and UDP.
- Source: Click on the Advanced button to show the source and source port range options.
- Source / Invert: If checked, this option will invert (negate) the sense of the source in this rule. A ! will be added before the source to identify it as an inverted source (after the rule is created). For example, if checked, a rule with the source 192.168.1.1 will apply to all other addresses except this specified one.
- Source: Select the source address for this port forwarding rule.
- Source port range:
- from: The first port number of a range
- to: The last port number of a range
- Destination / Invert: If checked, this option will invert (negate) the sense of destination in this port forwarding rule. An ! will be added before the source to identify it as an inverted source (after the rule is created). For example, if checked, a rule with the destination of an alias with the RFC1918 networks (private networks) in it will apply this rule only to public IP addresses, because it will not match all private networks (compliant with RFC1918).
- Destination: Select the destination address that this port forwarding rule will apply to. You can select previously created aliases, virtual IPs, interface addresses, or choose the Single host or Network option to type an IP address.
- Destination port range: Select the destination port range for this rule.
- from: The first port number of a range
- to: The last port number of a range
- Redirect target IP: Enter the internal IP address that the packets will redirect to.
- Redirect target port: Enter the port of the internal IP address.
- Pool Options: The pool options can be used when you define a host alias with two or more addresses. The following pool options are available:
- Default: This option will not apply any NAT algorithm to this NAT rule, and is the preferred option while using a single redirect IP port forwarding rule.
- Round Robin: This algorithm will send packets for each available IP address sequentially. An example of usage is balancing traffic to web servers.
- Random: As the name suggests, the option will randomize the available addresses in the pool (alias).
- Round Robin with Sticky Address / Random with Sticky Address: The last two options can be combined with the sticky address option, which means that this port forwarding rule will map connections based on the source address. This is quite useful for applications and protocols that are session-based, such as TCP, for example.
- Source Hash: Similar to the sticky address, will use a hash based on the source address to determine the pool's IP address to use.
- Bitmask: This will map the source address using its subnet mask to define the translated address. For example, if the source address is 192.168.0.10/24 and the pool's subnet is 172.16.0.0/24, then the translated IP address will be 172.16.0.10.
- Log: Log packets that are handled by this rule: Check this option to enable the log for this port forward rule.
- Category: Like the firewall rules, you can define categories for NAT rules. Please refer to Chapter 5, Firewall, to review more details about firewall rule categories.
- Description: Describe what this port forwarding rule is doing as clearly as possible. It will help your teammates!
- Set local tag: Tags are a useful pf resource to manage complex rulesets when you need to check something more than source/destination addresses. You can set a tag to mark packets processed by this rule to be checked later by other rules.
- Match local tag: Once you have a ruleset using tags, you can set a tag here to match it.
- No XMLRPC Sync: Check this option while using OPNsense in a high-availability configuration, to prevent this rule from being automatically synced to the other firewall members.
- NAT reflection: This option is useful when you have an external NAT created but with internal clients accessing it. When enabled, it will redirect internal clients to the internal IP address of this rule. The available options are Enabled, Disabled, and Use system default. This last one can be set as you learned in Chapter 5, Firewall, in the Settings and tweaks section.
- Filter rule association: When you create a port forwarding rule, it is still necessary to add a firewall rule to permit its traffic. In this option, you can select None to not create a firewall rule or add one manually later. Add associated filter rule adds a non-editable rule associated with this NAT rule. If the NAT rule is deleted, the rule will also be removed. The opposite occurs when you select the Add unassociated filter rule option. In this case, the NAT rule and the created filter rule can be removed, not depending on each other. The Pass option will not create a filter rule. Instead, it will permit traffic using only the NAT rule. Caution: the Pass option will not work properly with multi-WAN installations and will demand an interface with a default gateway configured in it.
Now that we have explored the port forwarding rules page, let's practice a little bit.
Proposed exercise
To see a working port forwarding rule, we can redirect a new port to WebGUI. To follow these steps, we'll need a working OPNsense installation. In this exercise, we will assume that you are using the virtual machine we set up earlier in this book.
Create a new port forwarding rule that will forward the TCP port 8443 of our LAN network interface address to the loopback address at port 443, the WebGUI default port (the options not mentioned keep the default values):
- Interface: Select LAN.
- Destination: Select LAN address.
- Destination port range: Select the (other) option and type 8443 (both in the from and to options).
- Redirect target IP: Select the Single host or Network option and type the following in the textbox that will show below (after selecting the Single host or Network option): 127.0.0.1.
- Redirect target port: Select the (other) option and type 443 in the textbox that will show below (after selecting the (other) option).
- Description: NAT port forwarding test (suggestion).
- Filter rule association: Select Add associated filter rule.
- Click on the Save button.
- Click on the Apply button.
After creation, your rule will look like this:
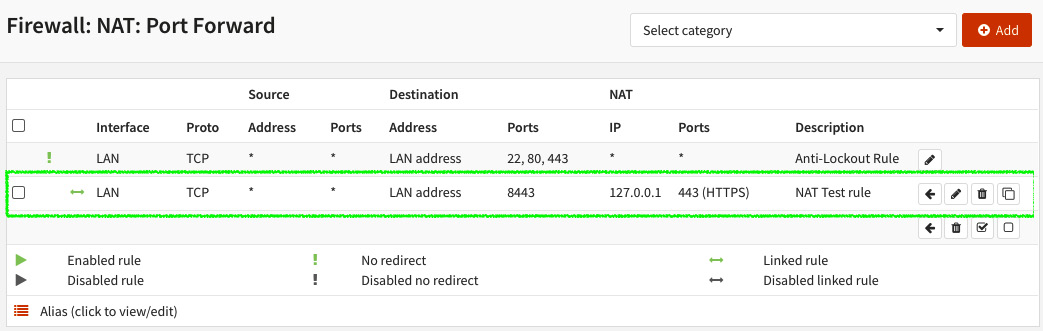
Figure 6.3 – Example port forwarding rule
Now try to access OPNsense WebGUI using the LAN IP address but using port 8443, for example, https://<OPNsense_LAN_IP_Address>:8443.
If your rule is correct, WebGUI will load using port 8443. It's done! Your first port forwarding rule is working!
If you want to check that the rule just added is working, go to Firewall | Diagnostics | States Dump, and you should see the translated connection states as in the following screenshot:
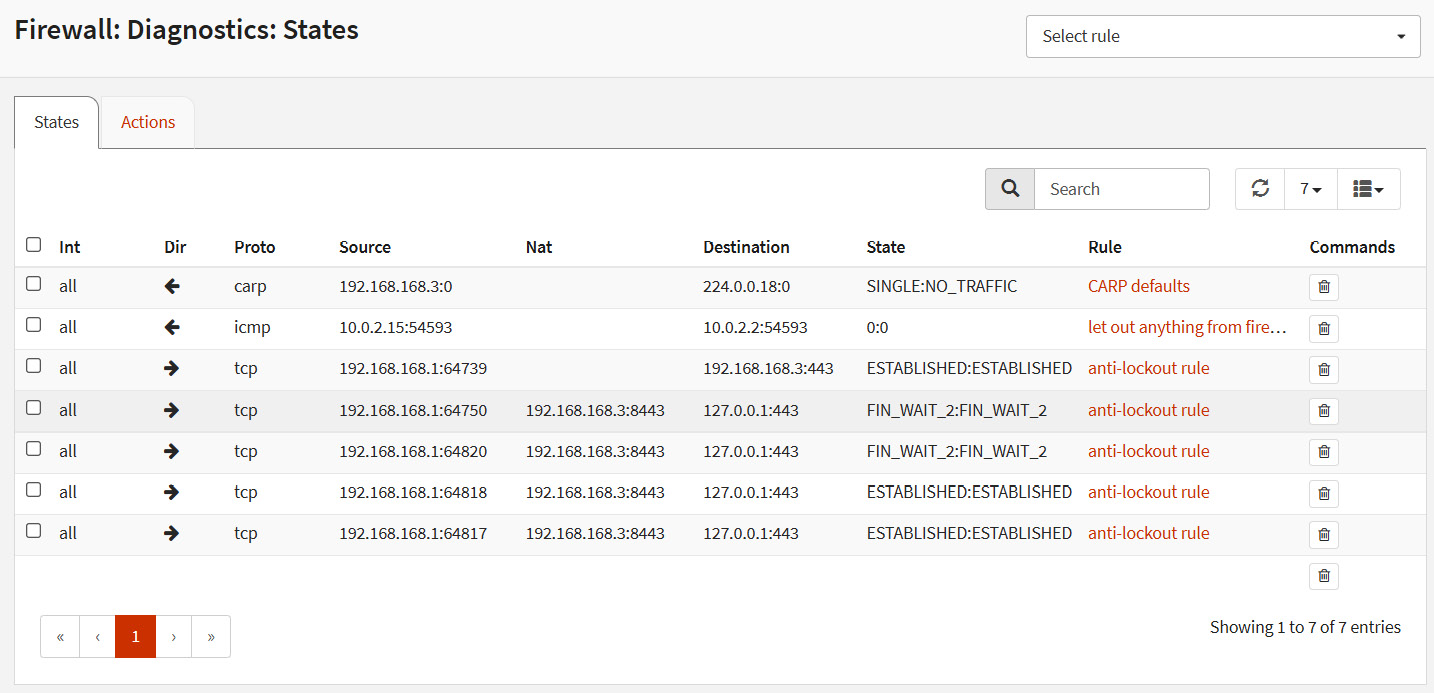
Figure 6.4 – Translated connection states example
As we can see, the IP address inside the parentheses (192.168.168.3:8443) is the destination address and port set in the rule, and the address after the <- is the redirect target IP. As you can see, even with this unusual example, port forwarding works very well!
Note
I tried to use a simple example that does not demand an entire network lab setup, but feel free to add some virtual machines in your laboratory to practice other port forwarding examples.
Now that we have learned about port forwarding basics and created our first rule, let's move on with outbound NAT.
Outbound NAT
Back to our examples, as we discussed at the beginning of this chapter, let's use the example of a small company with 10 computers and just a single public IP address in its WAN connection. Moving on in this scenario, we have the goal to connect all those computers to the internet just using firewall capabilities. How do we achieve that? By creating an outbound NAT! Let's see how things work. The following is an example topology of outbound NAT traffic:
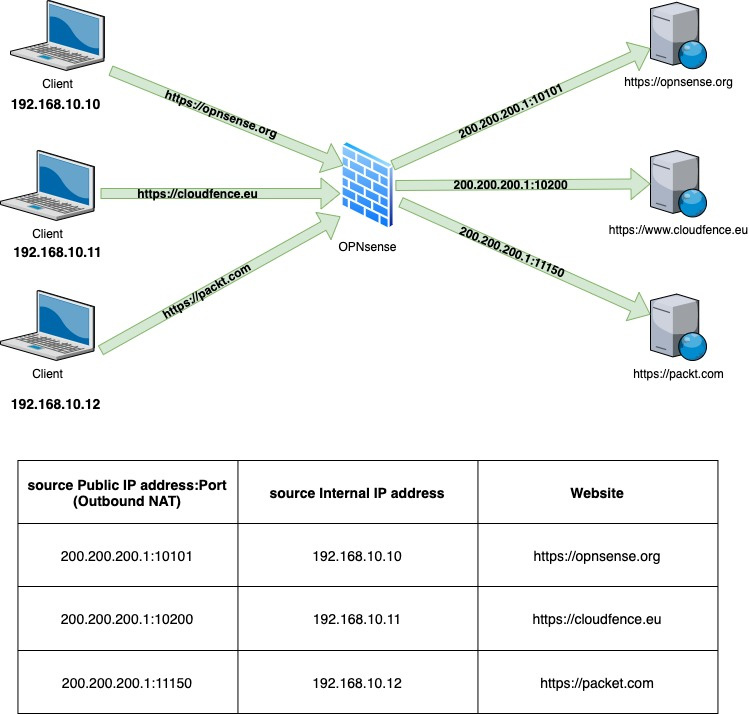
Figure 6.5 – Outbound NAT example
As we can see in the preceding figure, three clients are each accessing a website. Let's pick the host 192.168.10.11: it is accessing the https://cloudfence.eu website, but to the CloudFence web server, the source IP address is the public IP of OPNsense firewall 200.200.200.1 with source port 10200. So what is happening here? The outbound NAT rule is translating from the internal source IP to a public IP address, so from a TCP perspective, the client for the web server is the OPNsense public IP. In this way, all the internal clients can access different internet hosts at the same time, sharing the same public IP address, and as we can observe in the preceding table, the mapping is based on the internal source IP and public IP source port. Cool, huh?
Note
I have used a translation from an internal to a public IP address in this example, but it is common to use outbound NAT in scenarios that demand a translation from an internal to another internal IP address. An example of doing that is while using VPN tunnels.
Let's go to OPNsense WebGUI and see how to create NAT outbound rules.
NAT outbound modes
To create a new rule, we need to first set OPNsense to the correct NAT outbound mode. There are four possible modes, and you can set them by going to Firewall | NAT | Outbound:
- Automatic outbound NAT rule generation: The default OPNsense configuration, this mode will automatically generate the NAT outbound rules based on configured networks, but it does not permit adding manual rules. It is like autopilot – if it is engaged, the pilot becomes a passenger!
- Manual outbound NAT rule generation: This option is recommended when you want to create your own rules with 100% control of the outbound NAT behavior. In this mode, no automatic rule is generated by OPNsense.
- Hybrid outbound rule generation: This is a good option for most scenarios. With it, you can count on the automatic rules generated by OPNsense and can also create your own rules. The processing order, in this case, is first manual rules are processed and then comes the automatic rule. In this way, the manual rules will always prevail.
- Disable outbound NAT rule generation: This option simply turns outbound NAT off.
To create a new outbound rule, I'll suggest you set the Hybrid outbound NAT rule generation mode to on. To do that, you will need to do the following:
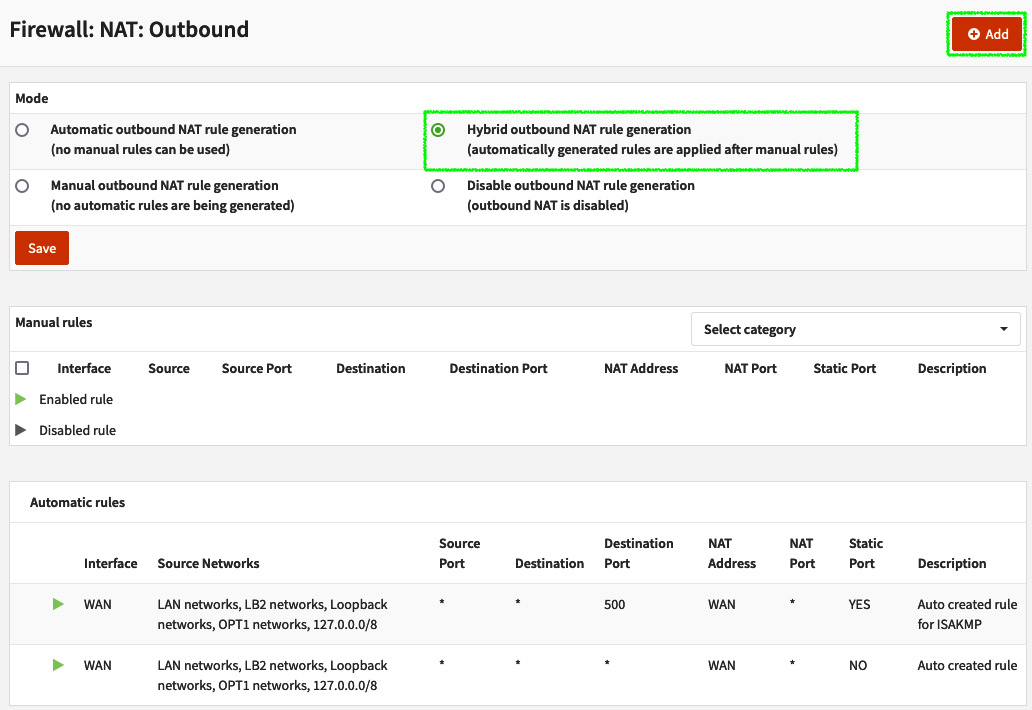
Figure 6.6 – Firewall: NAT: Outbound page
Let's now look at how to add an outbound NAT rule.
Adding an outbound NAT rule
To add a new outbound NAT rule, first, select a compatible mode – Hybrid outbound NAT rule generation or Manual outbound NAT rule generation – then click on the Save button. As I said before, I suggest using the hybrid mode.

Figure 6.7 – Firewall: NAT: Outbound page
As you can see in the preceding screenshot, Manual rules is displayed before Automatic rules, following the processing rules order.
After selecting a compatible mode, next click on the + Add button to create a new rule. The following options will be shown:
- Disabled: Check this option to disable the current rule.
- Do not NAT: If this option is marked, it will disable NAT for this outbound rule.
- Interface: The network interface that this NAT outbound rule applies to.
- TCP/IP Version: Select which version of TCP and IP protocols this rule will process: IPv4 or IPv6.
- Protocol: Select which IP protocol this port forwarding rule will match. OPNsense supports a lot of protocols for this option, but the most common ones to select here are TCP and UDP.
- Source invert: If checked, this option will invert (negate) the sense of the source in this rule. A ! will be added before the source to identify it as an inverted source (after the rule is created). For example, if checked, a rule with the source 192.168.1.1 will apply to all other addresses except this specified one.
- Source address: Select the source address for this rule.
- Source port: The source port that this rule must match with.
- Destination invert: If checked, this option will invert (negate) the sense of destination in this rule.
- Destination address: Select the destination address that this rule will apply to.
- Destination port: Select the destination port for this rule.
- Translation / target: Enter the IP address that this outbound rule will translate the source address(es) for. The default option is Interface address.
- Log: Log packets that are handled by this rule: Check this option to enable the log for this port forwarding rule.
- Translation / port: Enter the port that will be translated as the source port of this rule.
- Static-port: Check this option if you want to always use the same port as the source port after the NAT outbound translation.
- Pool Options: The pool options can be used when you define a host alias with two or more addresses. The following pool options are available:
- Default: This option will not apply any NAT algorithm to this NAT rule. This is the preferred option while using a single redirect IP port forwarding rule.
- Round Robin: This algorithm will send packets for each available IP address sequentially. An example of usage is balancing traffic to web servers.
- Random: As the name suggests, the option will randomize the available addresses in the pool (alias).
- Round Robin with Sticky Address / Random with Sticky Address: The last two options can be combined with the sticky address option, which means that this port forwarding rule will map connections based on the source address. This is quite useful for applications and protocols that are session-based, such as TCP, for example.
- Source Hash: Similar to the sticky address, this will use a hash based on the source address to determine the pool's IP address to use.
- Bitmask: This will map the source address using its subnet mask to define the translated address. For example, if the source address is 192.168.0.10/24 and the pool's subnet is 172.16.0.0/24, then the translated IP address will be 172.16.0.10.
- Set local tag: You can set a tag to mark packets processed by this rule to be checked later by other rules.
- Match local tag: Once you have a ruleset using tags, you can set a tag here to match it.
- No XMLRPC Sync: Check this option while using OPNsense in a high-availability configuration, to prevent this rule from being automatically synced to the other firewall members.
- Category: Defines which category this rule will be grouped in (optional).
- Description: The rule description.
Manually created outbound NAT rules are usually used in multi-WAN scenarios and while using high availability. We will explore both features later in this book, and we will have the opportunity to create outbound NAT rules when the right time arrives. Usually, the automatic mode will fit most small networks that need to share an internet connection with the internal network hosts.
Let's now move on to the last type of NAT available in OPNsense WebGUI — one-to-one.
One-to-one NAT
So far, we have learned about NAT types that allow us to map one-to-many IP addresses, so the main difference of this type of NAT is that it will map one IP to another one in a one-to-one manner. Every port will be forwarded to the internal IP or network, and if all traffic is permitted by the filter rule, this can mean an internal IP is exposed to the internet, so be careful using this type of NAT.
In my personal experience, I have seen a few instances of OPNsense using NAT one to one in corporate networks. A common situation I will mention is when you need to connect two remote sites using an IPsec tunnel and the internal networks overlap between those sites. In this case, one-to-one BINAT usually helps a lot!
Next, we'll see how to add a one-to-one rule.
Adding a one-to-one NAT rule
To add a rule, go to Firewall | NAT | One-to-One and click on the + Add button. A new page will be opened with the following options:
- Disabled: Check this option to disable the current rule.
- Interface: The network interface that this NAT rule applies to.
- Type: There are two one-to-one NAT types:
- BINAT: The default option, this mode will map networks with the same netmask (CIDR) in a bidirectional way. If you are mapping just one IP to another, it will work well too.
- NAT: If you need to map networks that don't have the same netmask, this option is the one you need to set.
- External network: Enter the IP address or subnet that will start the translation mapping. For example, if you select a WAN interface in the Interface option, you'll probably want to set its IP address here.
- Source / Invert: If checked, this option will invert (negate) the source in this rule. A ! will be added before the source to identify it as an inverted source (after the rule is created).
- Source: The source address for this rule. For example, if you are using this rule for a BINAT from an external to an internal address (and vice versa), you need to set the internal IP address.
- Destination / Invert: If checked, this option will invert (negate) the destination in this port forward rule. A ! will be added before the source to identify it as an inverted source (after the rule is created).
- Destination: Set the destination address this rule will apply to. This is most used when you set a NAT type rule.
- Category: Defines which category this rule will be grouped in (optional).
- Description: The rule description.
- NAT reflection: This option is useful when you have an external NAT created but with internal clients accessing it. When enabled, it will redirect internal clients to the internal IP address of this rule. The available options are Enabled, Disabled, and Use system default. This last one can be set as you learned in Chapter 5, Firewall, in the, Settings and tweaks section.
- To add the rule, just click on the Save button.
Note
To permit traffic, you need to also add a firewall rule once. One-to-one rules don't automatically add rules in the firewall ruleset.
To illustrate a scenario using BINAT, let's consider a network with a Linux host using the Secure Shell (SSH) protocol for remote connections (incoming traffic NAT), and the same host using OPNsense as the default gateway to access the internet (outgoing traffic NAT):

Figure 6.8 – BINAT example
The created one-to-one BINAT rule for the preceding scenario will look like this:
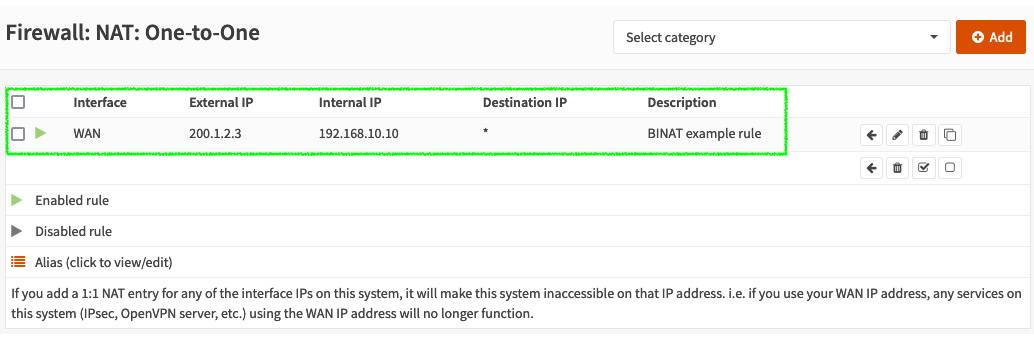
Figure 6.9 – BINAT example rule
Another example using BINAT is using it with IPSec tunnels. We will explore VPN tunnels in the next chapter, but if you are curious about this BINAT implementation using IPSec, you can take a look at https://docs.opnsense.org/manual/how-tos/ipsec-s2s-binat.html.
Note
I just used the SSH protocol as an example; it is not a good idea to allow SSH access to the public internet. Instead, always prefer accessing it through VPN tunnels.
To allow both incoming and outgoing traffic, you must create the proper firewall rules in the respective network interface.
As you can see, one-to-one NAT rules are an option in some specific situations that NAT port forwarding and NAT outbound rules will also fit, but the way you set it is, in most cases, simpler than other NAT-type rules.
Summary
In this chapter, we learned about the types of NAT OPNsense supports, how they work, and when to use each one. Of course, not all possible examples can fit in just one chapter, or maybe even one book, but I tried to cover the most common usages. Now you can understand and create port forwarding, outbound, and one-to-one rules using OPNsense WebGUI.
In the next chapter, we'll learn about traffic shaping and how to use OPNsense to create rules using it. See you there!