
In this recipe, we'll learn how to create a project for a basic desktop application for Windows and Mac OSX.
Projects can be created using a powerful tool called TinderBox. TinderBox comes bundled in your Cinder download and contains templates for creating projects for different applications for both Microsoft Visual C++ 2010 and OSX Xcode.
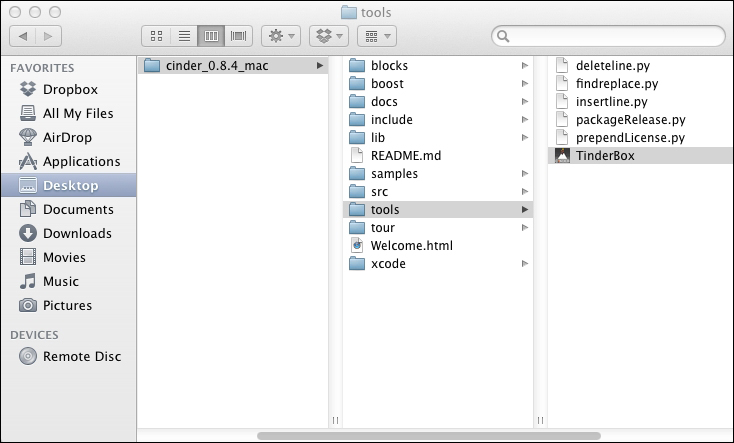
To find Tinderbox, go to your Cinder folder, inside which you will find a folder named tools with, TinderBox application in it.
The first time you open TinderBox, you'll be asked to specify the folder where you installed Cinder. You'll need to do this only the first time you open TinderBox. If you need to redefine the location of Cinder installation, you can do so by selecting the File menu and then Preferences on Windows or selecting the TinderBox menu and then Preferences on OS X.
We'll use TinderBox, a utility tool that comes bundled with Cinder that allows for the easy creation of projects. Perform the following steps to create a project for a basic application:
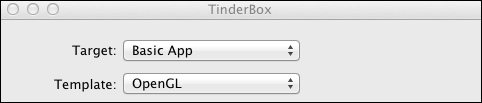
- Open TinderBox and choose your project's location. In the main TinderBox window select BasicApp as Target and OpenGL as Template, as shown in the following screenshot:
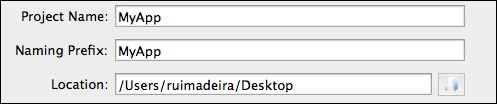
- Choose your project's location. The Naming Prefix and Project Name fields will default to the project's name, as shown in the following screenshot:
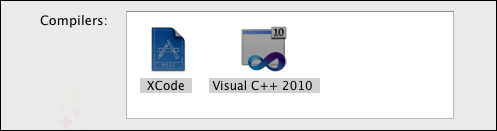
- Select the compilers you want to use for your project, either Microsoft Visual C++ 2010 and/or OS X Xcode.
- Click on the Create button and TinderBox will show you the folder where your new project is located. TinderBox will remain open; you can close it now.
TinderBox will create the selected projects for the chosen platforms (Visual C++ 2010 and OS X Xcode) and create references to the compiled Cinder library. It will also create the application's class as a subclass of ci::app::AppBasic. It will also create some sample code with a basic example to help you get started.
Your project name and naming prefix will be, by default, the name of the folder in which the project is being created. You can edit this if you want, but always make sure both Project Name and Naming Prefix fields do not have spaces as you might get errors.
The naming prefix will be used to name your application's class by adding the App suffix. For example, if you set your Naming Prefix field as MyCinderTest, your application's class will be MyCinderTestApp.