We will try to use built-in Cinder methods to visualize some basic information about the scene we are working on. It should make working with 3D space more comfortable.
We will draw some objects that will help to visualize and find the orientation of a 3D scene.
- We will add another camera besides
MayaCamUI. Let's start by adding member declarations to the main class:CameraPersp mSceneCam; int mCurrentCamera;
- Then we will set the initial values inside the
setupmethod:mCurrentCamera = 0; mSceneCam.setEyePoint(Vec3f(0.f, 5.f, 10.f)); mSceneCam.setViewDirection(Vec3f(0.f, 0.f, -1.f) ); mSceneCam.setPerspective(45.0f, getWindowAspectRatio(), 0.1, 20); - We have to update the aspect ratio of
mSceneCamerainside theresizemethod:mSceneCam.setAspectRatio(getWindowAspectRatio());
- Now we will implement the
keyDownmethod that will switch between two cameras by pressing the 1 or 2 keys on the keyboard:void MainApp::keyDown( KeyEvent event ) { if(event.getChar() == '1') { mCurrentCamera = 0; } else if(event.getChar() == '2') { mCurrentCamera = 1; } } - Another method we are going to use is
drawGrid, which looks like this:void MainApp::drawGrid(float size, float step) { gl::color( Color(0.7f, 0.7f, 0.7f) ); //draw grid for(float i=-size;i<=size;i+=step) { gl::drawLine(Vec3f(i, 0.f, -size), Vec3f(i, 0.f, size)); gl::drawLine(Vec3f(-size, 0.f, i), Vec3f(size, 0.f, i)); } // draw bold center lines glLineWidth(2.f); gl::color(Color::white()); gl::drawLine(Vec3f(0.f, 0.f, -size), Vec3f(0.f, 0.f, size)); gl::drawLine(Vec3f(-size, 0.f, 0.f), Vec3f(size, 0.f, 0.f)); glLineWidth(1.f); } - After that, we can implement our main drawing routine, so here is the whole
drawmethod:void MainApp::draw() { gl::enable(GL_CULL_FACE); gl::enableDepthRead(); gl::enableDepthWrite(); gl::clear( Color( 0.1f, 0.1f, 0.1f ) ); if(mCurrentCamera == 0) { gl::setMatrices(mMayaCam.getCamera()); // draw grid drawGrid(100.0f, 10.0f); // draw coordinate guide gl::pushMatrices(); gl::translate(0.f, 0.4f, 0.f); gl::drawCoordinateFrame(5.0f, 1.5f, 0.3f); gl::popMatrices(); // draw scene camera frustum gl::color(Color::white()); gl::drawFrustum(mSceneCam); // draw vector guide gl::color(Color(1.f,0.f,0.f)); gl::drawVector(Vec3f(-3.f, 7.f, -6.f), Vec3f(3.f, 10.f, -9.f), 1.5f, 0.3); } else { gl::setMatrices(mSceneCam); } // draw some 3D object gl::rotate(30); gl::drawColorCube(Vec3f(0.f, 5.f, -5.f), Vec3f(2.f, 2.f, 2.f)); }
We have two cameras; mSceneCam is for final rendering and mMayaCam is for the preview of objects in our scene. You can switch between them by pressing the 1 or 2 keys. The default camera is MayaCam.
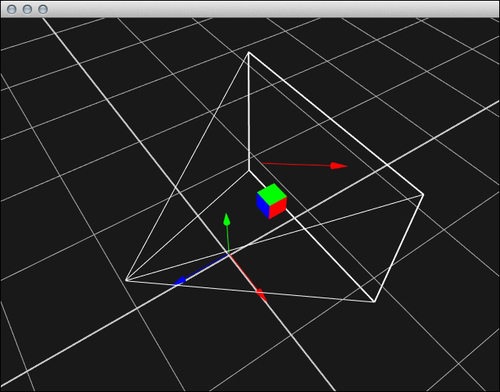
In the previous screenshot, you can see the whole scene set up with the elements, such as the origin of the coordinate system, the construction grid that lets you keep orientation in 3D space easily, and the mSceneCam frustum and vector visualization between two points in 3D space. You can navigate through this space using MayaCamUI.
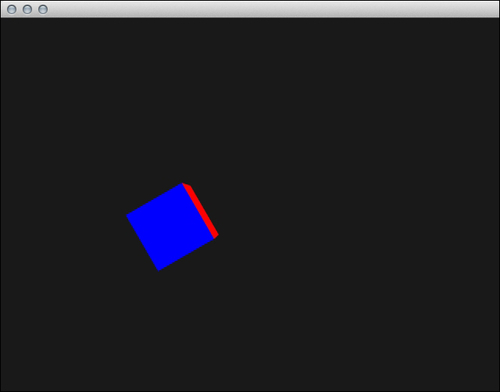
If you press the 2 key, you will switch to the view of mSceneCam, so you will see only your 3D objects without guides as shown in the following screenshot: