In this recipe, we are going to use a 3D version of the particles' code base from the Creating a particle system in 2D recipe. To navigate in 3D space, we will use MayaCamUI covered in the Using MayaCamUI recipe in Chapter 2, Preparing for Development.
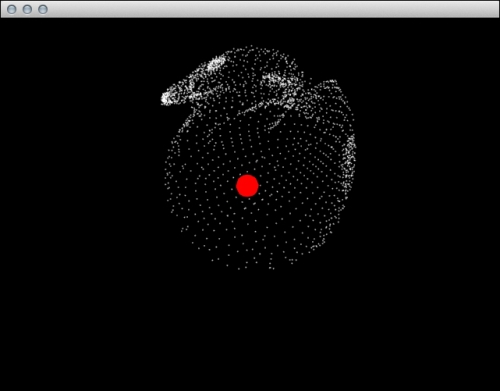
To simulate repulsion, we are using the code from the Applying repulsion and attraction forces recipe with slight modifications for three-dimensional space. For this example, we are using the ducky.mesh mesh file that you can find in the resources directory of the Picking3D sample inside the Cinder package. Please copy this file to the assets folder in your project.
We will create particles aligned to the mesh. Perform the following steps to do so:
- Add an
anchorproperty to theParticleclass in theParticle.hfile.ci::Vec3f anchor;
- Set the
anchorvalue at the end of theParticleclass constructor in theParticle.cppsource file.anchor = position;
- Add the necessary headers in your main class.
#include "cinder/TriMesh.h"
- Add the new properties to your application's main class.
ParticleSystem mParticleSystem;

float repulsionFactor;
float maxAlignSpeed;

CameraPersp  mCam;
MayaCamUI       mMayaCam;

TriMesh  mMesh;
Vec3f    mRepPosition;
- Set the default values inside the
setupmethod.repulsionFactor = -1.f; maxAlignSpeed = 10.f; mRepPosition = Vec3f::zero(); mMesh.read( loadAsset("ducky.msh") ); mCam.setPerspective(45.0f, getWindowAspectRatio(), 0.1, 10000); mCam.setEyePoint(Vec3f(7.f,7.f,7.f)); mCam.setCenterOfInterestPoint(Vec3f::zero()); mMayaCam.setCurrentCam(mCam); - At the end of the
setupmethod, add the following code snippet:for(vector<Vec3f>::iterator it = mMesh.getVertices().begin(); it != mMesh.getVertices().end(); ++it) { float mass = Rand::randFloat(2.f, 15.f); float drag = 0.95f; Particle *particle = new Particle ( (*it), 0.f, mass, drag ); mParticleSystem.addParticle( particle ); } - Add methods for camera navigation.
void MainApp::resize( ResizeEvent event ){ mCam = mMayaCam.getCamera(); mCam.setAspectRatio(getWindowAspectRatio()); mMayaCam.setCurrentCam(mCam); } void MainApp::mouseDown(MouseEvent event){ mMayaCam.mouseDown( event.getPos() ); } void MainApp::mouseDrag( MouseEvent event ){ mMayaCam.mouseDrag( event.getPos(), event.isLeftDown(), event.isMiddleDown(), event.isRightDown() ); } - Implement the
updateanddrawmethods for your main application class.void MainApp::update() { mRepPosition.x = cos(getElapsedSeconds()) * 3.f; mRepPosition.y = sin(getElapsedSeconds()*2.f) * 3.f; mRepPosition.z = cos(getElapsedSeconds()*1.5f) * 3.f; for( std::vector<Particle*>::iterator it = mParticleSystem.particles.begin(); it != mParticleSystem.particles.end(); ++it ) { Vec3f repulsionForce = (*it)->position - mRepPosition; repulsionForce = repulsionForce.normalized() * math<float>::max(0.f, 3.f - repulsionForce.length()); (*it)->forces += repulsionForce; Vec3f alignForce = (*it)->anchor - (*it)->position; alignForce.limit(maxAlignSpeed); (*it)->forces += alignForce; } mParticleSystem.update(); } void MainApp::draw() { gl::enableDepthRead(); gl::enableDepthWrite(); gl::clear( Color::black() ); gl::setViewport(getWindowBounds()); gl::setMatrices(mMayaCam.getCamera()); gl::color(Color(1.f,0.f,0.f)); gl::drawSphere(mRepPosition, 0.25f); gl::color(Color::white()); mParticleSystem.draw(); } - Replace the
drawmethod forParticleinside theParticle.cppsource file to read as followsvoid Particle::draw(){ glBegin(GL_POINTS); glVertex2f(position); glEnd(); }
Firstly, we created particles in place of vertices of the mesh that you can see in step 6.
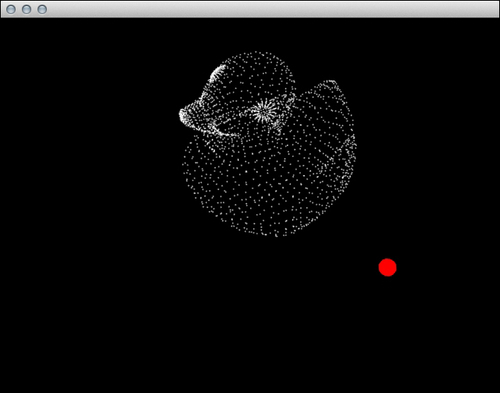
You can find another important calculation in step 8 where we tried to move particles back to their original positions stored in the anchor property. To displace the particles, we used the same repulsion code that we used in the Applying repulsion and attraction forces recipe but with slight modifications for three-dimensional space. Basically, it is about using Vec3f types instead of Vec2f.