
In this recipe, we will learn how we can create springs.
Springs are objects that connect two particles and force them to be at a defined rest distance.
In this example, we will create random particles, and whenever the user presses a mouse button, two random particles will be connected by a new spring with a random rest distance.
We will be using the same particle system developed in the previous recipe, Creating a particle system in 2D. Create the Particle and ParticleSystem classes described in that recipe and include the ParticleSystem.h file at the top of the application source file.
We will be creating a Spring class, so it is necessary to create the following files:
Spring.hSpring.cpp
We will create springs that constrain the movement of particles. Perform the following steps to do so:
- In the
Spring.hfile, we will declare aSpringclass. The first thing we need to do is to add the#pragma oncemacro and include the necessary files.#pragma once #include "Particle.h" #include "cinder/gl/gl.h"
- Next, declare the
Springclass.class Spring{ }; - We will add member variables, two
Particlepointers to reference the particles that will be connected by this spring, and therestandstrengthfloatvariables.class Spring{ public: Particle *particleA; Particle *particleB; float strength, rest; }; - Now we will declare the constructor that will take pointers to two
Particleobjects, and therestandstrengthvalues.We will also declare the
updateanddrawmethods.The following is the final
Springclass declaration:class Spring{ public: Spring( Particle *particleA, Particle *particleB, float rest, float strength ); void update(); void draw(); Particle *particleA; Particle *particleB; float strength, rest; }; - Let's implement the
Springclass in theSpring.cppfile.In the constructor, we will set the values of the member values to the ones passed in the arguments.
Spring::Spring( Particle *particleA, Particle *particleB, float rest, float strength ){ this->particleA = particleA; this->particleB = particleB; this->rest = rest; this->strength = strength; } - In the
updatemethod of theSpringclass, we will calculate the difference between the particles' distance and the spring's rest distance, and adjust them accordingly.void Spring::update(){ ci::Vec2f delta = particleA->position - particleB->position; float length = delta.length(); float invMassA = 1.0f / particleA->mass; float invMassB = 1.0f / particleB->mass; float normDist = ( length - rest ) / ( length * ( invMassA + invMassB ) ) * strength; particleA->position -= delta * normDist * invMassA; particleB->position += delta * normDist * invMassB; } - In the
drawmethod of theSpringclass, we will simply draw a line connecting both particles.void Spring::draw(){ ci::gl::drawLine ( particleA->position, particleB->position ); } - Now we will have to make some changes in the
ParticleSystemclass to allow the addition of springs.In the
ParticleSystemfile, include theSpring.hfile.#include "Spring.h"
- Declare the
std::vector<Spring*>member in the class declaration.std::vector<Spring*> springs;
- Declare the
addSpringanddestroySpringmethods to add and destroy springs to the system.The following is the final
ParticleSystemclass declaration:classParticleSystem{ public: ~ParticleSystem(); void update(); void draw(); void addParticle( Particle *particle ); void destroyParticle( Particle *particle ); void addSpring( Spring *spring ); void destroySpring( Spring *spring ); std::vector<Particle*> particles; std::vector<Spring*> springs; }; - Let's implement the
addSpringmethod. In theParticleSystem.cppfile, add the following code snippet:void ParticleSystem::addSpring( Spring *spring ){ springs.push_back( spring ); } - In the implementation of
destroySpring, we will find the correspondent iterator for the argumentSpringand remove it from springs. We will also delete the object.Add the following code snippet in the
ParticleSystem.cppfile:void ParticleSystem::destroySpring( Spring *spring ){ std::vector<Spring*>::iterator it = std::find( springs.begin(), springs.end(), spring ); delete *it; springs.erase( it ); } - It is necessary to alter the
updatemethod to update all springs.The following code snippet shows what the final update should look like:
void ParticleSystem::update(){ for( std::vector<Particle*>::iterator it = particles.begin(); it != particles.end(); ++it ){ (*it)->update(); } for( std::vector<Spring*>::iterator it = springs.begin(); it != springs.end(); ++it ){ (*it)->update(); } } - In the
drawmethod, we will also need to iterate over all springs and call thedrawmethod on them.The final implementation of the
ParticleSystem::drawmethod should be as follows:void ParticleSystem::draw(){ for( std::vector<Particle*>::iterator it = particles.begin(); it != particles.end(); ++it ){ (*it)->draw(); } for( std::vector<Spring*>::iterator it = springs.begin(); it != springs.end(); ++it ){ (*it)->draw(); } } - We have finished creating the
Springclass and making all necessary changes to theParticleSystemclass.Let's go to our application's class and include the
ParticleSystem.hfile:#include "ParticleSystem.h"
- Declare a
ParticleSystemobject.ParticleSystem mParticleSystem;
- Create some random particles by adding the following code snippet to the
setupmethod:for( int i=0; i<100; i++ ){ float x = randFloat( getWindowWidth() ); float y = randFloat( getWindowHeight() ); float radius = randFloat( 5.0f, 15.0f ); float mass = radius; float drag = 0.9f; Particle *particle = new Particle( Vec2f( x, y ), radius, mass, drag ); mParticleSystem.addParticle( particle ); } - In the
updatemethod, we will need to call theupdatemethod onParticleSystem.void MyApp::update(){ mParticleSystem.update(); } - In the
drawmethod, clear the background, define the window's matrices, and call thedrawmethod onmParticleSystem.void MyApp::draw(){ gl::clear( Color( 0, 0, 0 ) ); gl::setMatricesWindow( getWindowWidth(), getWindowHeight() ); mParticleSystem.draw(); } - Since we want to create springs whenever the user presses the mouse, we will need to declare the
mouseDownmethod.Add the following code snippet to your application's class declaration:
void mouseDown( MouseEvent event );
- In the
mouseDownimplementation we will connect two random particles.Start by declaring a
Particlepointer and defining it as a random particle in the particle system.Particle *particleA = mParticleSystem.particles[ randInt( mParticleSystem.particles.size() ) ];
- Now declare a second
Particlepointer and make it equal to the first one. In thewhileloop, we will set its value to a random particle inmParticleSystemuntil both particles are different. This will avoid the case where both pointers point to the same particle.Particle *particleB = particleA; while( particleB == particleA ){ particleB = mParticleSystem.particles[ randInt( mParticleSystem.particles.size() ) ]; } - Now we'll create a
Springobject that will connect both particles, define a random rest distance, and setstrengthto1.0. Add the created spring tomParticleSystem.The following is the final
mouseDownimplementation:void SpringsApp::mouseDown( MouseEvent event ) { Particle *particleA = mParticleSystem.particles[ randInt( mParticleSystem.particles.size() ) ]; Particle *particleB = particleA; while( particleB == particleA ){ particleB = mParticleSystem.particles[ randInt( mParticleSystem.particles.size() ) ]; } float rest = randFloat( 100.0f, 200.0f ); float strength = 1.0f; Spring *spring = new Spring ( particleA, particleB, rest, strength ); mParticleSystem.addSpring( spring ); } - Build and run the application. Every time a mouse button is pressed, two particles will become connected with a white line and their distance will remain unchangeable.
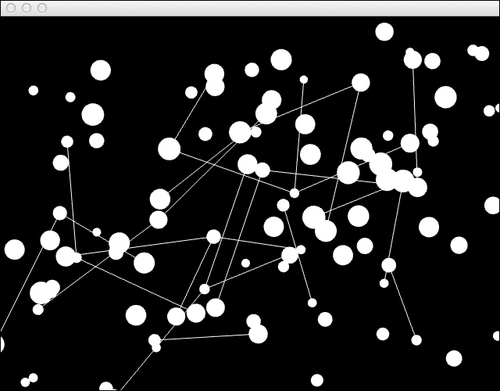
A Spring object will calculate the difference between two particles and correct their positions, so that the distance between the two particles will be equal to the springs' rest value.
By using their masses, we will also take into account each particle's mass, so that the correction will take into account the particles' weight.
The same principle can also be applied to particle systems in 3D.
If you are using a 3D particle, as explained in the There's more… section of the Creating a particle system in 2D recipe, the Spring class simply needs to change its calculations to use ci::Vec3f instead of ci::Vec2f.
The update method of the Spring class would need to look like the following code snippet:
void Spring::update(){
    ci::Vec3f delta = particleA->position - particleB->position;
    float length = delta.length();
    float invMassA = 1.0f / particleA->mass;
    float invMassB = 1.0f / particleB->mass;
    float normDist = ( length - rest ) / ( length * ( invMassA + invMassB ) ) * strength;
    particleA->position -= delta * normDist * invMassA;
    particleB->position += delta * normDist * invMassB;
}