In this recipe, we will learn how we can apply a blur effect while drawing a texture.
In this recipe, we are going to use a Gaussian blur shader provided by Geeks3D at http://www.geeks3d.com/20100909/shader-library-gaussian-blur-post-processing-filter-in-glsl/.
We will implement a sample Cinder application to illustrate the mechanism. Perform the following steps:
- Create a file inside the
assetsfolder with the namepassThru_vert.glsland put the following code snippet inside it:void main() { gl_Position = ftransform(); gl_TexCoord[0] = gl_MultiTexCoord0; gl_FrontColor = gl_Color; } - Create a file inside the
assetsfolder with the namegaussian_v_frag.glslandand put the following code snippet inside it:#version 120 uniform sampler2D sceneTex; // 0 uniform float rt_w; // render target width uniform float rt_h; // render target height uniform float vx_offset; float offset[3] = float[]( 0.0, 1.3846153846, 3.2307692308 ); float weight[3] = float[]( 0.2270270270, 0.3162162162, 0.0702702703 ); void main() { vec3 tc = vec3(1.0, 0.0, 0.0); if (gl_TexCoord[0].x<(vx_offset-0.01)){ vec2 uv = gl_TexCoord[0].xy; tc = texture2D(sceneTex, uv).rgb * weight[0]; for (int i=1; i<3; i++) { tc += texture2D(sceneTex, uv + vec2(0.0, offset[i])/rt_h).rgb * weight[i]; tc += texture2D(sceneTex, uv - vec2(0.0, offset[i])/rt_h).rgb * weight[i]; } } else if (gl_TexCoord[0].x>=(vx_offset+0.01)){ tc = texture2D(sceneTex, gl_TexCoord[0].xy).rgb; } gl_FragColor = vec4(tc, 1.0); }Create a file inside the
assetsfolder with the namegaussian_h_frag.glsland put the following code snippet inside it:#version 120 uniform sampler2D sceneTex; // 0 uniform float rt_w; // render target width uniform float rt_h; // render target height uniform float vx_offset; float offset[3] = float[]( 0.0, 1.3846153846, 3.2307692308 ); float weight[3] = float[]( 0.2270270270, 0.3162162162, 0.0702702703 ); void main() { vec3 tc = vec3(1.0, 0.0, 0.0); if (gl_TexCoord[0].x<(vx_offset-0.01)){ vec2 uv = gl_TexCoord[0].xy; tc = texture2D(sceneTex, uv).rgb * weight[0]; for (int i=1; i<3; i++) { tc += texture2D(sceneTex, uv + vec2(offset[i])/rt_w, 0.0).rgb * weight[i]; tc += texture2D(sceneTex, uv - vec2(offset[i])/rt_w, 0.0).rgb * weight[i]; } } else if (gl_TexCoord[0].x>=(vx_offset+0.01)) { tc = texture2D(sceneTex, gl_TexCoord[0].xy).rgb; } gl_FragColor = vec4(tc, 1.0); } - Add the necessary headers:
#include "cinder/Utilities.h"
#include "cinder/gl/GlslProg.h"
#include "cinder/gl/Texture.h"
#include "cinder/ImageIo.h"
#include "cinder/gl/Fbo.h"
- Add the properties to your application's main class:
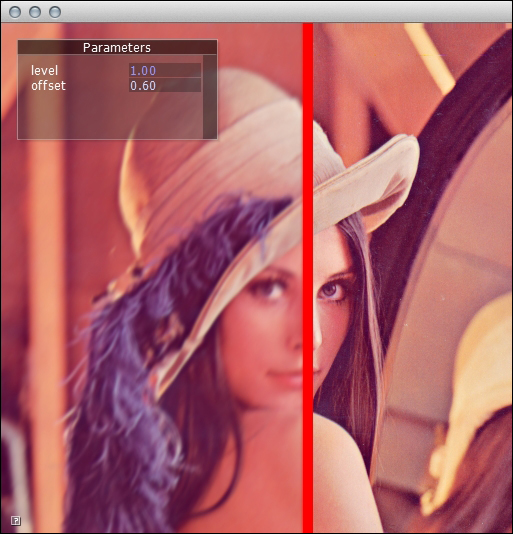
gl::GlslProg  mGaussianVShader, mGaussianHShader;
gl::Texture mImage, mImageBlur;
gl::Fbo    mFboBlur1, mFboBlur2;
float           offset, level;
params::InterfaceGl mParams;
- Implement the
setupmethod, as follows:void MainApp::setup(){ setWindowSize(512, 512); level = 0.5f; offset = 0.6f; mGaussianVShader = gl::GlslProg( loadAsset("passThru_vert.glsl"), loadAsset("gaussian_v_frag.glsl") ); mGaussianHShader = gl::GlslProg( loadAsset("passThru_vert.glsl"), loadAsset("gaussian_h_frag.glsl") ); mImage = gl::Texture(loadImage(loadAsset("image.png"))); mFboBlur1 = gl::Fbo (mImage.getWidth(), mImage.getHeight()); mFboBlur2 = gl::Fbo (mImage.getWidth(), mImage.getHeight()); // Setup the parameters mParams = params::InterfaceGl ( "Parameters", Vec2i( 200, 100 ) ); mParams.addParam ( "level", &level, "min=0 max=1 step=0.01" ); mParams.addParam ( "offset", &offset, "min=0 max=1 step=0.01"); } - At the beginning of the
drawmethod calculate the blur intensity:float rt_w = mImage.getWidth()*3.f-mImage.getWidth()*2.f*level; float rt_h = mImage.getHeight()*3.f-mImage.getHeight()*2.f*level;
- In the
drawfunction render an image tomFboBlur1with a first step shader applied:mFboBlur1.bindFramebuffer(); gl::setViewport( mFboBlur1.getBounds() ); mImage.bind(0); mGaussianVShader.bind(); mGaussianVShader.uniform("sceneTex", 0); mGaussianVShader.uniform("rt_w", rt_w); mGaussianVShader.uniform("rt_h", rt_h); mGaussianVShader.uniform("vx_offset", offset); gl::drawSolidRect(mFboBlur1.getBounds()); mGaussianVShader.unbind(); mFboBlur1.unbindFramebuffer(); - In the
drawfunction render a texture frommFboBlur1with a second step shader applied:mFboBlur2.bindFramebuffer(); mFboBlur1.bindTexture(0); mGaussianHShader.bind(); mGaussianHShader.uniform("sceneTex", 0); mGaussianHShader.uniform("rt_w", rt_w); mGaussianHShader.uniform("rt_h", rt_h); mGaussianHShader.uniform("vx_offset", offset); gl::drawSolidRect(mFboBlur2.getBounds()); mGaussianHShader.unbind(); mFboBlur2.unbindFramebuffer(); - Set
mImageBlurto the result texture frommFboBlur2:mImageBlur = mFboBlur2.getTexture();
- At the end of the
drawmethod draw a texture with the result and GUI:gl::clear( Color::black() ); gl::setMatricesWindow(getWindowSize()); gl::setViewport(getWindowBounds()); gl::draw(mImageBlur); params::InterfaceGl::draw();
Since a Gaussian blur shader needs to be applied twice—for the vertical and horizontal processing—we have to use frame buffer object (FBO
), a mechanism of drawing to the texture in the memory of graphic card. In step 8, we are drawing the original image from the mImage object and applying shader program stored in the gaussian_v_frag.glsl file loaded into mGaussianVShaderobject. At this point, everything is drawn into mFboBlur1. The next step is to use a texture from mFboBlur2 and apply a shader to the second pass which you can find in step 9. The final processed texture is stored in mImageBlur in step 10. In step 7 we are calculating blur intensity.