
In this recipe we will learn how we can create an image gallery in 3D. The images will be loaded from a folder selected by the user and displayed in a three-dimensional circular fashion. Using the keyboard, the user will be able to change the selected image.
When starting the application you will be asked to select a folder with images, so make sure you have one.
Also, in your code include the necessary files to use OpenGL drawing calls, textures, the timeline, and loading images.
#include "cinder/gl/gl.h"
#include "cinder/gl/Texture.h"
#include "cinder/Timeline.h"
#include "cinder/ImageIo.h"
Also, add the following useful using statements:
using namespace ci;
using namespace ci::app;
using namespace std;
We will display and animate images in 3D space. Perform the following steps to do so:
- We will start by creating an
Imageclass. Add the following code snippet before the main application class:class Image{ public: Image( gl::Texture texture, constRectf& maxRect ){ this->texture = texture; distance = 0.0f; angle = 0.0f; Vec2f size = Vec2f(texture.getWidth(), texture.getHeight()); rect = Rectf(-size * 0.5f, size*0.5f).getCenteredFit( maxRect, true ); } void draw(){ gl::pushMatrices(); glRotatef( angle, 0.0f, 1.0f, 0.0f ); gl::translate( 0.0f, 0.0f, distance ); gl::draw( texture, rect ); gl::popMatrices(); } gl::Texture texture; float distance; float angle; Rectfrect; } - In the main application's class we will declare the following members:
vector<shared_ptr<Image>> mImages;
int mSelectedImageIndex;
Anim<float> mRotationOffset;
- In the
setupmethod we will ask the user to select a folder and then try to create a texture from each file in the folder. If a texture is successfully created, we will use it to create anImageobject and add it tomImages.fs::path imageFolder = getFolderPath( "" ); if( imageFolder.empty() == false ){ for( fs::directory_iterator it( imageFolder ); it != fs::directory_iterator(); ++it ){ const fs::path& file = it->path(); gl::Texture texture; try { texture = loadImage( file ); } catch ( ... ) { } if( texture ){ Rectf maxRect(RectfmaxRect( Vec2f( -50.0f, -50.0f), Vec2f( 50.0f,50.0f ) ); mImages.push_back( shared_ptr<Image>( new Image( texture, maxRect) ) ); } } } - We need to iterate over
mImagesand define the angle and distance that each image will have from the center.float angle = 0.0f; float angleAdd = 360.0f / mImages.size(); float radius = 300.0f; for( int i=0; i<mImages.size(); i++ ){ mImages[i]->angle = angle; mImages[i]->distance = radius; angle += angleAdd; } - Now we can initialize the remaining members.
mSelectedImageIndex = 0;
mRotationOffset = 0.0f;
- In the
drawmethod, we will start by clearing the window, setting the window's matrices to support 3D, and enabling reading and writing in the depth buffer:gl::clear( Color( 0, 0, 0 ) ); gl::setMatricesWindowPersp( getWindowWidth(), getWindowHeight() ); gl::enableDepthRead(); gl::enableDepthWrite();
- Next we will draw the images. Since all our images have been displayed around the origin, we must translate them to the center of the window. We will also rotate them around the y axis using the value in
mRotationOffset. Everything will go in anifstatement that will check ifmImagescontains any image, in case no image was generated during the setup. - Add the following code snippet inside the
drawmethod:if( mImages.size() ){ Vec2f center = (Vec2f)getWindowCenter(); gl::pushMatrices(); gl::translate( center.x, center.y, 0.0f ); glRotatef( mRotationOffset, 0.0f, 1.0f, 0.0f ); for(vector<shared_ptr<Image> >::iterator it=mImages.begin(); it != mImages.end(); ++it ){ (*it)->draw(); } gl::popMatrices(); } - Since the user will be able to switch images using the keyboard, we must declare the
keyUpevent handler.void keyUp( KeyEvent event );
- In the implementation of
keyUpwe will move the images on to the left or right-hand side depending on whether the left or right key was released.If the selected image was changed, we animate
mRotationOffsetto the correspondent value, so that the correct image is now facing the user.Add the following code snippet inside the
keyUpmethod:bool imageChanged = false; if( event.getCode() == KeyEvent::KEY_LEFT ){ mSelectedImageIndex--; if( mSelectedImageIndex< 0 ){ mSelectedImageIndex = mImages.size()-1; mRotationOffset.value() += 360.0f; } imageChanged = true; } else if( event.getCode() == KeyEvent::KEY_RIGHT ){ mSelectedImageIndex++; if( mSelectedImageIndex>mImages.size()-1 ){ mSelectedImageIndex = 0; mRotationOffset.value() -= 360.0f; } imageChanged = true; } if( imageChanged ){ timeline().apply( &mRotationOffset, mImages[ mSelectedImageIndex]->angle, 1.0f, EaseOutElastic() ); } - Build and run the application. You will be prompted to select a folder containing images that will then be displayed in a circular fashion. Press the left or right key on the keyboard to change the selected image.
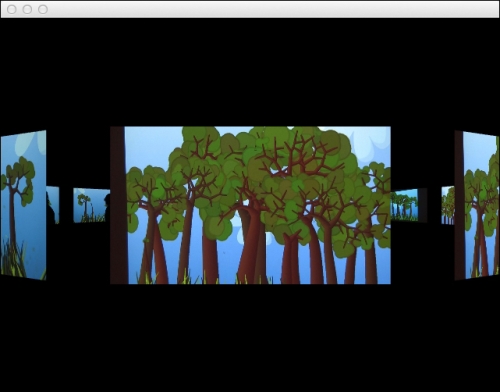
The draw method of the Image class rotates the coordinate system around the y axis and then translates the image drawing on the z axis. This will extrude the image from the center facing outwards on the given angle. It is an easy and convenient way of achieving the desired effect without dealing with coordinate transformations.
The Image::rect member is used to draw the texture and is calculated to fit inside the rectangle passed in the constructor.
When selecting the image to be displayed in front, the value of mRotationOffset will be the opposite of the image's angle, making it the image being drawn in front of the view.
In the keyUp event we check whether the left or right key was pressed and animate mRotationOffset to the desired value. We also take into account if the angle wraps around, as to avoid glitches in the animation.