
Chapter 13
Preparing Your Lab and Ensuring Your Safety
IN THIS CHAPTER
![]() Designing a workspace that works for you
Designing a workspace that works for you
![]() Stockpiling tools and other supplies
Stockpiling tools and other supplies
![]() Creating a starter kit of electronics components
Creating a starter kit of electronics components
![]() Realizing that Ohm’s Law applies to humans too
Realizing that Ohm’s Law applies to humans too
![]() Avoiding electrocution
Avoiding electrocution
![]() Keeping your components from turning into lumps of coal
Keeping your components from turning into lumps of coal
Finding out how resistors, diodes, transistors, and other electronic components work is great, but creating real projects that make things buzz, beep, and go bump in the night is where the real fun is! To get the most out of your journey into the world of electronics, you’d be wise to spend some time getting properly prepared.
In this chapter, I give you guidelines for setting up a little electronics laboratory in your own home. I outline the tools and supplies you need to accomplish circuit-building jobs, and I give you a shopping list of electronic components to purchase so you can build a bunch of different projects.
Because building circuits isn’t for the faint of heart (even small currents can affect your heart), I run you through the safety information you need to know to remain a healthy hobbyist.
 A word to the wise: It doesn’t take much electrical current to seriously hurt or even kill you. Even the most seasoned professionals take appropriate precautions to stay safe. I strongly suggest (insist, even) that you thoroughly read the safety information provided (hey, I took great pains putting it together) and, before you start each project, review the safety checklist at the end of this chapter. Promise?
Picking a Place to Practice Electronics
Where you put your workshop is just as important as the projects you make and the tools you use. Just as in real estate, the guiding words for electronics work are location, location, location. By staking out just the right spot in your house or apartment, you’ll be better organized and enjoy your experiments much more. Nothing is worse than working with a messy workbench in dim lighting while breathing stale air.
The top ingredients for a great lab
The prime ingredients for the well set-up electronics laboratory are the following:
- A comfortable place to work, with a table and chair
- Good lighting
- Ample electrical outlets, with at least 15-amp service
- Tools and toolboxes on nearby shelves or racks
- A comfortable, dry climate
- A solid, flat work surface
- Peace and quiet
The ideal workspace isn't disturbed if you have to leave it for hours or days. Also, the worktable should be off-limits or inaccessible to your children. Curious kids and electronics don’t mix!
The garage is an ideal setting because it gives you the freedom to work with solder and other messy materials without worrying about soiling the carpet or nearby furniture. You don’t need much space; about 3 by 4 feet ought to do it. If you can’t clear that much space in your garage (or you don’t have a garage), you can use a room in the house, but try to designate a corner or a section of the room for your electronics work. When working in a carpeted room, you can prevent static electricity by spreading a protective cover, such as an antistatic mat, over the floor. I discuss this in detail later in this chapter.
If your work area must be exposed to other family members, find ways to make the area off-limits to others with less knowledge about electronics safety (which I cover later in this chapter), especially young children. Keep your projects, tools, and supplies out of reach or behind locked doors. And be sure to keep integrated circuits and other sharp parts off the floor — they’re painful when stepped on!
No matter where you set up shop, consider the climate. Extremes in heat, cold, or humidity can have a profound effect on your electronics circuits. If you find a work area chilly, warm, or damp, take steps to control the climate in that area, or don’t use that area for electronics work. You may need to add insulation, an air conditioner, or a dehumidifier to control the temperature and humidity of your work area. Locate your workbench away from open doors and windows that can allow moisture and extreme temperatures in. And for safety reasons, never — repeat, never — work in an area where the floor is wet or even slightly damp.
Workbench basics
The types of projects that you do determine the size of the workbench you need, but for most applications, a table or other flat surface spanning about 2 by 3 feet will suffice. You may even have a small desk, table, or drafting table that you can use for your electronics bench.
You can make your own workbench easily by using an old door as a table surface. If you don’t have an old door lying around the house, pick up an inexpensive hollow-core door or a sturdier solid-core door at your local home improvement store. Build legs using 30-inch lengths of 2-by-4 lumber and attach the legs using joist hangers. As an alternative, you can use 3/4-inch plywood or particle board to fashion your work surface.
If you prefer, forgo the 2-by-4 legs and make a simple workbench using a door and two sawhorses. This way, you can take your workbench apart and store it in a corner when you’re not using it. Use bungee cords to secure the door to the sawhorses, to prevent accidentally flipping the top of your workbench off the sawhorses.
Remember, as you work on projects, you crouch over your workbench for hours at a time. You can skimp and buy or build an inexpensive worktable, but if you don’t already own a good chair, put one on the top of your shopping list. Be sure to adjust the seat for the height of the worktable. A poor-fitting chair can cause backaches and fatigue.
Acquiring Tools and Supplies
Every hobby has its special assortment of tools and supplies, and electronics is no exception. From the lowly screwdriver to the high-speed drill, you'll enjoy playing with electronics much more if you have the right tools and an assortment of supplies, organized and stored so that you can put your hands on them when you need them without cluttering your work area.
This section tells you exactly what tools and supplies you need to have to complete basic-to-intermediate electronics projects.
 If you have a permanent place in your house to work on electronics, you can hang some of the hand tools mentioned in this section on the wall or a pegboard. Reserve this special treatment for the tools you use the most. You can stash other small tools and some supplies in a small toolbox, which you can keep on your workbench. A plastic fishing tackle box with lots of small compartments and one large section can help you keep your things organized.
Amassing a multimeter
One of the most important tools you'll need is a multimeter, which you use to measure AC and DC voltages, resistance, and current when you want to explore what’s going on in a circuit. Most multimeters you find today are of the digital variety (see Figure 13-1), which just means they use numeric displays, like a digital clock or watch. (You can use them to explore analog as well as digital circuits.) An older-style analog multimeter uses a needle to point to a set of graduated scales.
Each multimeter comes with a pair of test leads: one black (for the ground connection) and one red (for the positive connection). On small pocket units, the test leads are permanently attached to the meters, whereas on larger models, you can unplug the leads. Each test lead has a cone-shaped metal tip used for probing circuits. You can also purchase test clips that slip over the tips, making testing much easier because you can attach these clips onto wires or component leads.
Prices for new multimeters range from $10 to over $100. The higher-priced meters include additional features, such as built-in testing capabilities for capacitors, diodes, and transistors. Think of a multimeter as a set of eyes into your circuits, and consider purchasing the best model you can afford. That way, as your projects grow more complex, you still get a magnificent view of what’s going on inside.
I give you the lowdown on how to use a multimeter in Chapter 16.
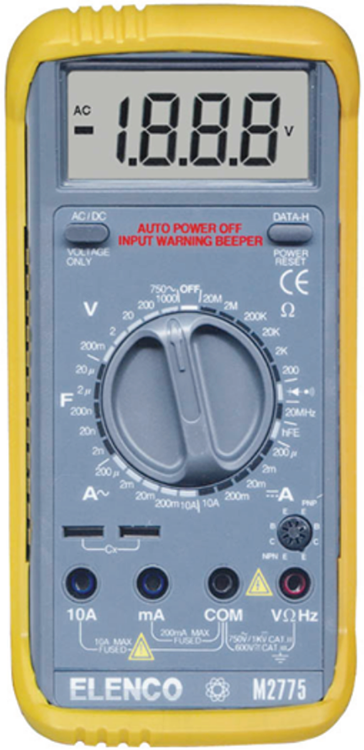
FIGURE 13-1: Multimeters measure voltage, resistance, and current.
Stockpiling soldering equipment
Soldering (pronounced “SOD-er-ing”) is the method you use to make semipermanent connections between components as you build a circuit. Instead of using glue to hold things together, you use small globs of molten metal called solder applied by a device called a soldering iron. The metal provides a conductive physical joint, known as a solder joint, between the wires and component leads of your circuit.
You’ll be glad to know that you need only a few simple tools for soldering. You can purchase a basic, no-frills soldering setup for under $10, but the better soldering tools cost a bit more. At a minimum, you will need the following basic items for soldering:
- Soldering iron: A soldering iron, also called a soldering pencil, is a wand-like tool that consists of an insulating handle, a heating element, and a polished metal tip. (See Figure 13-2.) Choose a soldering iron that is rated at 25–30 watts, sports a replaceable tip, and has a three-prong plug so that it will be grounded. Some models allow you to use different size tips for different types of projects, and some include variable controls that allow you to change the wattage. (Both are nice but not absolutely necessary.)
- Soldering stand: The stand holds the soldering iron and keeps the very hot tip from coming into contact with anything on your work surface. Some soldering irons come with stands. (Usually, these combos are known as soldering stations.) The stand should have a weighted base; if not, clamp it to your worktable so it doesn’t tip over. A stand is a must-have — unless you want to burn your project, your desk, or yourself!

FIGURE 13-2: Some soldering iron models are temperature-adjustable and come with their own stands.
Solder: Solder is a soft metal that is heated by a soldering iron, and then allowed to cool, forming a conductive joint. Standard solder used for electronics is 60/40 rosin core, which contains roughly 60 percent tin and 40 percent lead and has a core of rosin flux. (Avoid solder formulated for plumbing, which corrodes electronic parts and circuit boards.) The wax-like flux helps to clean the metals you're joining, and it improves the molten solder’s capability to flow around and adhere to the components and wire, ensuring a good solder joint. Solder is sold in spools, and I recommend diameters of 0.031 inch (22 gauge) or 0.062 inch (16 gauge) for hobby electronics projects.
The lead content in 60/40 rosin core solder may pose a health hazard if you don’t handle it carefully. Be sure to keep your hands away from your mouth and eyes whenever you’ve been touching this solder. Above all, don’t use your teeth to hold a piece of solder while your hands are busy.
I recommend that you also get these additional soldering tools and accessories:
- Wetted sponge: You use this to wipe off excess solder and flux from the hot tip of the soldering iron. Some soldering stands include a small sponge and a built-in space to hold it, but a clean household sponge also works fine.
- Solder removal tools: A solder sucker, also known as a desoldering pump, is a spring-loaded vacuum you can use to remove a solder joint or excess solder in your circuit. To use it, melt the solder that you want to remove, quickly position the solder sucker over the molten blob, and activate it to suck up the solder. Alternatively, you can use a solder (or desoldering) wick or braid, which is a flat, woven copper wire that you place over unwanted solder and apply heat to. When the solder reaches its melting point, it adheres to the copper wire, which you then remove and dispose of.
- Tip cleaner paste: This gives your soldering tip a good cleaning.
- Rosin flux remover: Available in a bottle or spray can, use the remover after soldering to clean any remaining flux and prevent it from oxidizing (or rusting, in unscientific terms) your circuit, which can weaken the metal joint.
- Extra soldering tips: For most electronics work, a small (3/64-inch through 7/64-inch radius) conical or chiseled tip, or one simply described as a fine tip, works well. You can find larger or smaller tips used for different types of projects. Be sure to purchase the correct tip for your make and model of soldering iron. Replace the tip when it shows signs of corrosion, pitting, or peeling plating; a worn tip doesn’t pass as much heat.
In Chapter 15, I explain in detail how to use a soldering iron.
Hoarding hand tools
Hand tools are the mainstay of any toolbox. These tools tighten screws, snip off wires, bend little pieces of metal, and do all those other mundane tasks. Make sure you have the following tools available at your workbench:
- Wire cutter: You can find general-purpose wire cutters at hardware and home improvement stores, but it pays to invest $5 or so in a flush, or diagonal cutter, shown in Figure 13-3, for making cuts in tight places, such as above a solder joint.
- Wire stripper: You often need to expose a half-inch or so of bare wire so you can solder a connection or insert the wire into the holes of a solderless breadboard (which I discuss next). A good wire stripper contains notches allowing you to neatly and easily strip just the plastic insulation from wires of various sizes (known as gauges, as described in Chapter 12), without nicking the copper wire inside. You can also find a combination wire cutter and stripper, but you may have to perform your own gauge control.
- Needle-nose pliers (two sets): These pliers help you bend wires, insert leads into breadboard holes, and hold parts in place. Get two pairs: a mini (5-inch long) set for intricate work and a standard-size set to use when you need to apply a wee bit more pressure.
- Precision screwdrivers: Make sure you have both straight and Phillips head (cross-shaped tip) screwdrivers that are small enough for your electronics needs. Use the right size for the job to avoid damaging the head of the screw. To make it easier to work with small screws, use a magnetized screwdriver or place a small amount of rubber holdup putty into the head of the screw before inserting the screwdriver tip. Works wonders.
- Magnifying glass: A 3X (or more) magnifying glass can help you check solder joints and read teeny tiny part numbers.
- Third hand: No, this isn’t a body part from your buddy. It’s a tool that clamps onto your worktable and has adjustable clips that hold small parts while you’re working. A third hand makes tasks such as soldering a heck of a lot easier. See Figure 13-4 for an example of a third hand that also sports a magnifying glass.

FIGURE 13-3: Diagonal cutters trim wire ends flush to the surface.

FIGURE 13-4: These helping hands combine alligator clips with a magnifying glass.
Collecting cloths and cleansers
If you don't keep the circuitry, components, and other parts of your electronics projects as clean as a whistle, they may not operate as advertised. It’s especially important to start with a clean slate if you’re soldering parts together or to a circuit board. Dirt makes for bad solder joints, and bad solder joints make for faulty circuits.
Here’s a list of items that can help you keep your projects spick-and-span:
- Soft cloth or gauze bandage: Keep your stuff dust-free by using a soft cloth or sterilized lint-free bandage. Don’t use household dusting sprays because some generate static charges that can damage electronics.
- Compressed air: A shot of compressed air, available in cans, can remove dust from delicate electronic innards. But keep it locked away when you’re not using it; if misused as an inhalant, compressed air can cause death.
- Water-based household cleaner: Lightly spray to remove stubborn dirt and excess grease from tools, work surfaces, and the exterior surfaces of your projects. Don’t use them around powered circuits, or you may short something out.
- Electronics cleaner/degreaser: Use only a cleaner/degreaser specifically made for use on electronic components.
- Artist brushes: Get both a small brush and a wide brush to dust away dirt, but avoid cheap brushes that shed bristles. A dry, clean toothbrush works well, too.
- Photographic bulb brush: Available at any photo shop, a bulb brush combines the whisking action of a soft brush with the cleaning action of a strong puff of air.
- Contact cleaner: Available in a spray can, contact cleaner enables you to clean electrical contacts. Spray it onto a brush, and then whisk the brush against the contacts to give them a good cleaning.
- Cotton swabs: Soak up excess oil, lubricant, and cleaner with these swabs.
- Cuticle sticks and nail files: Scrape junk off circuit boards and electrical contacts, and then give yourself a manicure!
- Pink pencil eraser: Great for rubbing electrical contacts clean, especially contacts that have been contaminated by the acid from a leaky battery. Must be pink; other erasers can leave a hard-to-remove residue. Avoid rubbing the eraser against a circuit board because it may create static electricity.
Loading up on lubricants
Motors and other mechanical parts used in electronics projects require a certain amount of grease or oil to operate, and you need to re-lubricate them periodically. Two types of lubricants are commonly used in electronics projects — and there's one type of lubricant you should avoid using with electronics projects.
Avoid using a spray-on synthetic lubricant (such as WD-40 and LPS) with your electronics projects. Because you can’t control the width of the spray, you’re bound to get some on parts that shouldn’t be lubed. Also, some synthetic lubricants are nonconductive, and their fine mist can get in the way, interrupting electrical contacts.
The okey-dokey lubricants are
- Light machine oil: Use this type of oil for parts that spin. Avoid using oil with antirust ingredients that may react with plastic parts, causing them to melt. A syringe oiler with a long, thin spout is ideal for hard-to-reach places.
- Synthetic grease: Use lithium grease or another synthetic grease for parts that mesh or slide.
You can find light machine oil and synthetic grease at electronics supply houses as well as many music, sewing machine, hobby, and hardware stores.
Don’t apply a lubricant unless you know for sure that a mechanical part needs it. Certain self-lubricating plastics used for mechanical components can break down when exposed to petroleum-based lubricants. If you’re fixing a CD player or other piece of electronic equipment, check with the manufacturer for instructions regarding use of lubrication.
Stocking up on sticky stuff
Many electronics projects require that you use an adhesive of some type. For example, you may need to secure a small printed circuit board to the inside of a pocket-sized project box. Depending on the application, you can use one or more of the following adhesives:
- White household glue is best used for projects that involve wood or other porous materials. Allow 20–30 minutes for the glue to dry, and about 12 hours to cure.
- Epoxy cement creates strong, moisture-resistant bonds and can be used for any material. Allow 5–30 minutes for the epoxy to set, and 12 hours for it to cure.
- Cyanoacrylate (CA) glue, or super glue, bonds almost anything (including fingers, so use caution), almost instantly. Use ordinary CA glue when bonding smooth and perfectly matching parts; use the heavier-bodied gap-filling CA glue if the parts don’t mate 100 percent.
- Double-sided foam tape is a quick way to secure circuit boards to enclosures or to make sure that loosely fitting components remain in place.
- A hot-melt glue gun allows you to glue things with a drying time of only about 30 seconds. The waterproof, gap-sealing glue comes in a stick that you slide into a slot in the gun, which heats the glue to about 250°F–350°F — hot enough to hurt you but not hot enough to melt solder.
Other tools and supplies
I highly recommend that you acquire three other items before you begin any electronics work:
- Safety glasses: Stylish plastic safety glasses never go out of fashion. They are a must-have to protect your eyes from flying bits of wire, sputtering solder, exploding electronics parts, and many other small objects. If you wear prescription glasses, place safety glasses over them to ensure complete protection all around your eyes.
- Antistatic wrist strap: This inexpensive strap prevents electrostatic discharge from damaging sensitive electronic components. I discuss this device later in this chapter.
- First-aid kit and guide: Burns (or worse) can happen when working with electronic circuits. Keeping a first-aid kit at your workbench is a good idea. Make sure you include guidelines for applying first aid.
The time will come when you'll want to enclose an electronics project in a container with wires or knobs sticking out. For instance, say you build a holiday light display with a controllable blink rate. You may want to place the main circuit in a box, cut a hole through the front of the box, and insert a potentiometer (variable resistor) through the hole so you (or someone else) can control how fast the lights blink. Or you may want to build a circuit that detects intruders opening your refrigerator. You could disguise the circuit as a breadbox and place it next to the fridge. In any case, you’ll need some additional tools and supplies to enclose your project.
Here’s a list of supplies and associated tools you may need to box up your project:
- Ready-made box: You can find simple unfinished wooden boxes at craft stores, and ABS plastic boxes at most electronics suppliers. Or you can make your own box out of plywood or PVC plastic, using contact cement or another adhesive to keep it together.
- Wire clips: Adhesive-backed plastic clips hold wires in place along the insides of your box.
- Cable ties: Use cable ties to attach wires to non-flat surfaces, such as a wooden dowel.
- Electric drill: A drill with a 3/8-inch chuck (the opening in the drill where you insert the drill bit) comes in handy for making holes in your box for knobs and switches. You can also use it to attach wheels or other external parts to your box.
- Hand saws: You can use a hack saw to cut wood or plastic to make your box, and a coping saw to cut broad openings in the box.
Stocking Up on Parts and Components
Okay, so you have your workbench set up, complete with screwdrivers, pliers, and hand saws, you’ve donned your antistatic wrist strap and safety glasses (along with your everyday clothes, please!), and you have your soldering iron plugged in and ready to go. So what’s missing? Oh yeah, circuit components!
When you shop for circuit components, you usually don’t go out and purchase only the parts listed for a particular circuit diagram, or schematic. You purchase an assortment of parts so you can build several different projects without having to run out for parts each time you try something new. Think of this like gathering ingredients for cooking and baking. You keep many basic ingredients, such as flour, sugar, oil, rice, and spices, on hand all the time, and you purchase enough other ingredients to enable you to cook the sorts of things you like for a week or two. Well, the same is true when stocking up on electronics parts and components.
In this section, I tell you what parts and how many you should keep on hand to build some basic electronics projects.
Solderless breadboards
A solderless breadboard is similar, in a way, to a LEGO table: It's a surface on which you can build temporary circuits simply by plugging components into holes arranged in rows and columns across the board. You can easily take one circuit apart and build another different circuit on the same surface.
The holes in a solderless breadboard aren't just ordinary holes; they are contact holes with copper lines running underneath so that components plugged into two or more holes within a particular row are connected below the surface of the breadboard. You plug in your discrete components (resistors, capacitors, diodes, and transistors) and integrated circuits (ICs) in just the right way, and — voilà — you have a connected circuit without soldering. When you’re tired of the circuit, you can simply remove the parts and build something else using the same breadboard.
Figure 13-5 shows a small solderless breadboard with a battery-powered circuit connected. The breadboard in the figure has sections of rows and columns connected in a certain way underneath the board. I discuss just how the various contact holes are connected in Chapter 15, where I also discuss how to build circuits using breadboards. For now, just know that different sizes of breadboards with different numbers of contact holes are available.
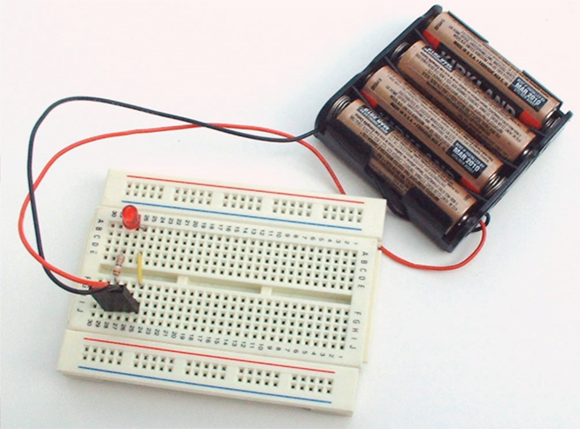
FIGURE 13-5: You can build a circuit on a small solderless breadboard in just minutes.
A typical small breadboard has 400 contact holes, and it's useful for building smaller circuits with no more than two ICs (plus other discrete components). A typical larger breadboard contains 830 contacts, and you can use it to build somewhat more complex circuits. You can also link multiple breadboards simply by connecting one or more wires between contact holes on one board and contact holes on the other board.
I recommend that you purchase at least two solderless breadboards, with at least one of them a larger (830-contact) breadboard. Also, buy some adhesive-backed Velcro strips to help hold the breadboards in place on your work surface.
You commonly use solderless breadboards to test your circuit design ideas or explore circuits as you’re learning how things work. If you create and test a circuit using a breadboard and you want to use the circuit on a long-term basis, you can re-create it on a soldered or printed circuit board (PCB). A PCB is a kind of breadboard, but instead of contact holes, it has ordinary holes with copper pads surrounding each hole and lines of metal connecting the holes within each row. You make connections by soldering component leads to the copper pads, ensuring that the components you're connecting are located in the same row. In this book, I focus exclusively on circuit construction using solderless breadboards.
Circuit-building starter kit
You need an assortment of discrete electronic components (those with two or three individual leads), a few ICs, several batteries, and lots of wire to connect things. Some components, such as resistors and capacitors, come in packages of ten or more pieces. You'll be happy to know that these components are inexpensive (cheap, even); it’ll cost you one or two weeks’ worth of lattes to stock up.
You may want to refresh your memory on what these components are and how they work by referring to other chapters in this book. Resistors and potentiometers are covered in Chapter 5, capacitors in Chapter 7, diodes (including LEDs) in Chapter 9, and transistors in Chapter 10. Integrated circuits are covered in Chapter 11, and batteries and wires in Chapter 12.
Here are the discrete components I recommend that you start with:
- Fixed resistors (1/4-watt or 1/2-watt carbon film): 10–20 (1 or 2 packages) of each of these resistances: 1 kΩ, 10 kΩ, 100 kΩ, 1 MΩ, 2.2 kΩ, 22 kΩ, 220 kΩ, 33 kΩ, 470 Ω, 4.7 kΩ, 47 kΩ, 470 kΩ.
- Potentiometers: Two each of 10 kΩ, 50 kΩ, 100 kΩ, 1 MΩ.
- Capacitors: 10 each (1 package) of 0.01 μF and 0.1 μF nonpolarized (polyester or ceramic disc); 10 each (1 package) of 1 μF, 10 μF, 100 μF electrolytic; 3–5 each of 220 μF and 470 μF electrolytic.
- Diodes: 10 each of 1N4001 (or any 1N400x) rectifier diode and 1N4148 small-signal diode, 1 4.3-volt Zener diode (or other Zener breakdown voltage between 3 and 7 volts).
- LEDs (light-emitting diodes): 10 each (1 package) of red, yellow, and green 5mm diffused LEDs.
- Transistors: 3–5 general-purpose, low-power bipolar transistors (such as the 2N3904 NPN or the 2N3906 PNP) and 3–5 medium-power bipolar transistors (such as the NTE123A NPN or NTE159M PNP).
I suggest that you obtain a few of these popular ICs:
- 555 timer IC: Get 3–5 of these. You’ll use ‘em!
- Op-amp ICs: Get one or two op amps, such as the LM741 general-purpose amplifier.
- 4017 CMOS decade counter IC: Get two or three of these. You need two if you want to make a tens counter, too, as I discuss in Chapter 11, and it’s wise to have an extra one on hand if you think you might accidentally zap one with electrostatic discharge.
Don’t forget these essential power and wire components:
- Batteries: Pick up an assortment of 9 V batteries as well as some 1.5 V batteries. (Size depends on how long you think you’re going to run your circuit.)
- Battery clips and holders: These devices connect to batteries and provide wire leads to make it easy for you to connect battery power to your circuit. Get 3–5 clips for the size batteries you plan to use.
- Wire: Ample 20–22 gauge solid wire. You can buy a 100-foot roll in any one of a variety of colors for about $7. You cut it to various lengths and strip the insulation off each end to connect components. You can solder each end to a component lead, or insert each end into contact holes on your solderless breadboard. Some electronics suppliers sell kits containing dozens of precut, prestripped jumper wires of various lengths and colors, ideal for use in solderless breadboards. A kit with 140–350 jumper wires may cost you $8–$12, but it can save you the time (and trouble) of cutting and stripping your own wire. (Plus, you get rainbow colors!)
You can use a jumper wire as a sort of on/off switch in your circuit, connecting or disconnecting power or components. Just place one end of the jumper wire in your solderless breadboard and alternatively place and remove the other end to make or break the connection.
Adding up the extras
Lots of other parts and components that can enrich your circuits are out there. I recommend you get a few of the ones listed here:
- Alligator clips: So-named because they look like the jaws of a fierce gator, these insulated clips can help you connect test equipment to component leads, and they can double as heat sinks! Get a bunch (10 or so).
- Speakers: You gotta build a circuit that makes noise, so purchase one or two miniature 8-ohm speakers. (Chapter 12 discusses speakers.)
- Switches: Purchase 5–10 single-pole, double-throw (SPDT) switches with 0.1” spacing between terminals for use in a solderless breadboard. These SPDT switches can double as on/off switches in your circuits. You may also want to buy a few pushbutton (momentary on) switches. If you think you might enclose one or more projects in a box and you’d like a robust front-panel on/off control, pick up a couple of SPST (single-pole, single-throw) switches, such as an SPST mini rocker switch. For a little more money, you can get a mini rocker switch with a built-in LED that lights up when the switch is in the on position. (Chapter 4 provides details on switches.)
Organizing all your parts
Keeping all these parts and components organized is essential — unless you’re the type who enjoys sorting through junk drawers looking for some tiny, yet important, item. An easy way to get it together is to run over to your local big-box discount store and purchase one or more sets of clear-plastic drawer organizers. Be sure to spray the plastic boxes with an antistatic ESD (electrostatic discharge) spray, which you can find on Amazon.com. Then label each drawer for a particular component (or group of components, such as LEDs, 10–99 Ω resistors, and so forth). You’ll know in a glance where everything is and be able to see when your stock is getting low.
Protecting You and Your Electronics
You probably know that Benjamin Franklin “discovered” electricity in 1752 by flying a kite during a lightning storm. Actually, Franklin already knew about electricity and was well aware of its potential power — and potential danger. As Franklin carried out his experiment, he was careful to insulate himself from the conductive materials attached to the kite (the key and a metal wire) and to stay dry by taking cover in a barn. Had he not, we might be looking at someone else’s face on the $100 bill!
Respect for the power of electricity is necessary when working with electronics. In this section, you take a look at keeping yourself — and your electronic projects — safe. This is one section you should read from start to finish, even if you already have some experience in electronics.
As you read this section, remember that you can describe electrical current as being one of the following:
- Direct current (DC): The electrons flow one way through a wire or circuit.
- Alternating current (AC): The electrons flow one way, and then another, in a continuing cycle.
Refer to Chapter 1 for more about these two types of electrical current.
Understanding that electricity can really hurt
By far, the single most dangerous aspect of working with electronics is the possibility of electrocution. Electrical shock results when the body reacts to an electrical current — this reaction can include an intense contraction of muscles (namely, the heart) and extremely high heat at the point of contact between your skin and the electrical current. The heat leads to burns that can cause death or disfigurement. Even small currents can disrupt your heartbeat.
The degree to which electrical shock can harm you depends on a lot of factors, including your age, your general health, the voltage, and the current. If you’re well over 50 or in poor health, you probably won’t stand up to injury as well as if you’re 14 and as healthy as an Olympic athlete. But no matter how young and healthy you may be, voltage and current can pack a wallop, so it’s important that you understand how much they can harm you.
The two most dangerous electrical paths through the human body are hand-to-hand and left hand to either foot. If electrical current passes from one hand to the other, on its way it passes through the heart. If current passes from the left hand to either foot, it passes through the heart as well as several major organs.
Seeing yourself as a giant resistor
Your body exhibits some resistance to electrical current, mostly due to the poor conductive qualities of dry skin. The amount of resistance can vary tremendously, depending on body chemistry, level of moisture in the skin, the total path across which resistance is measured, and other factors. You'll see figures ranging anywhere from 50,000 ohms to 1,000,000 ohms of resistance for an average human being. (I discuss what resistance is and how it's measured in Chapter 5.)
If your skin is moist (say you have sweaty hands), you’re wearing a metal ring, or you’re standing in a puddle, you can bet you’ve lowered your resistance. Industry figures indicate that such activity can result in resistances as low as 100–300 Ω from one hand to the other or from one hand to one foot. That’s not a whole lot of resistance.
To make matters worse, if you’re handling high AC voltages (which you shouldn’t be), your skin’s resistance — wet or dry — won’t help you at all. When you’re in contact with a metal, your body and the metal form a capacitor: The tissue underneath your skin is one plate, the metal is the other plate, and your skin is the dielectric. (See Chapter 7 for the lowdown on capacitors.) If that metal wire you’re holding is carrying an AC current, the capacitor that is your body acts like a short circuit, allowing current to bypass your skin’s resistance. Voltage shocks of more than 240 volts will burn right through your skin, leaving deep third-degree burns at the entry points.
Knowing how voltage and current can harm you
You’ve seen the signs: WARNING! HIGH VOLTAGE. So you might think that voltage is what causes harm to the human body, but it's actually current that inflicts the damage. So why the warning signs? That’s because the higher the voltage, the more current can flow for an equal amount of resistance. And because your body is like a giant resistor, you should shy away from high voltages.
So how much current does it take to hurt the average human being? Not much. Table 13-1 summarizes some estimates of just how much — or how little — DC and 60-Hz (hertz) AC current it takes to affect the human body. Remember that a milliamp (mA) is one one-thousandth of an amp (or 0.001 A). Please note that these are estimates (no one has performed experiments on real humans to derive these figures), and that each person is affected differently depending on age, body chemistry, health status, and other factors.
TABLE 13-1 Effects of Current on Average Human Body
Effect |
DC current |
60-Hz AC current |
Slight tingling sensation |
0.6–1.0 mA |
0.3–0.4 mA |
Noticeable sensation |
3.5–5.2 mA |
0.7–1.1 mA |
Pain felt, but muscle control maintained |
41–62 mA |
6–9 mA |
Pain felt, and unable to let go of wires |
51–76 mA |
10–16 mA |
Difficulty breathing (paralysis of chest muscles) |
60–90 mA |
15–23 mA |
Heart fibrillation (within 3 seconds) |
500 mA |
65–100 mA |
As Table 13-1 shows, the average human body is four to six times more sensitive to AC current than to DC current. Whereas a DC current of 15 mA isn’t all that dangerous, 15 mA of alternating current has the potential to cause death.
So what does all this mean to you as you pursue your electronics hobby? You probably know enough to stay away from high voltages, but what about getting up close and personal with low voltages? Well, even low voltages can be dangerous — depending on your resistance.
Remember that Ohm’s Law (which I cover in Chapter 6) states that voltage is the product of current and resistance:
Let’s say your hands are dry and you aren’t wearing a metal ring or standing in a puddle, and your hand-to-hand resistance is about 50,000 ohms. (Keep in mind that your resistance under these dry, ringless conditions may actually be lower.) You can calculate an estimate (repeat: estimate) of the voltage levels that might hurt you by multiplying your resistance by the different current levels in Table 13-1. For instance, if you don’t want to feel even the slightest tingling sensation in your fingers, you need to avoid coming into contact with wires carrying DC voltages of 30 V (that’s ![]() ). To avoid involuntary muscle contractions (grabbing the wires), you need to keep AC current below 10 mA, so avoid close proximity to 500 volts AC (VAC) or more.
). To avoid involuntary muscle contractions (grabbing the wires), you need to keep AC current below 10 mA, so avoid close proximity to 500 volts AC (VAC) or more.
Now, if you’re not so careful, and you wear a ring on your finger while tinkering around with electronics, or you step in a little puddle of water created by a dog or small child, you may accidentally lower your resistance to a dangerous level. If your resistance is 5,000 ohms — and it may be even lower — you’ll notice a sensation if you handle just 17.5 VDC (because ![]() ), and you’ll lose muscle control and have difficulty breathing if you handle 120 VAC line power (because
), and you’ll lose muscle control and have difficulty breathing if you handle 120 VAC line power (because ![]() ).
).
Household electrical systems in the US and Canada operate at about 120 VAC. This significantly high voltage can, and does, kill. You must exercise extreme caution if you ever work with 120 VAC line power.
Until you become experienced in the ways of electronics, you’re best off avoiding circuits that run directly off household current. Stick with circuits that run off standard-size batteries, or those small plug-in wall transformers. (You can read about these DC sources in Chapter 12.) Unless you do something silly, like licking the terminal of a 9 V battery (and, yes, that will deliver a shock!), you’re fairly safe with these voltages and currents.
The main danger of household current is the effect it can have on your heart muscle. It takes only 65–100 mA to send your heart into fibrillation, which means the muscles contract in an uncontrolled, uncoordinated fashion — and the heart isn’t pumping blood. At much lower levels (10–16 mA), AC current can cause severe muscle contractions, so what might start out as a loose grip on a high-voltage wire (just to move it a little bit, or something like that) ends up as a powerful, unyielding grip. Trust me: You won’t be able to let go. A stronger grip means a lower resistance (you’re just making it easier for electrons to travel through your hand and into your body), and a lower resistance means a higher (often fatal) current. (Situations like this really do happen. The body acts like a variable resistor, with its resistance decreasing sharply as the hands tighten around the wire.)
The potential dangers of DC currents are not to be ignored either. Burns are the most common form of injury caused by high DC current. Remember that voltage doesn’t have to come from a power plant to be dangerous. It pays to respect even a 9 V transistor battery: If you short its terminals, the battery may overheat and can even explode. Battery explosions often send tiny battery pieces flying out at high velocities, burning skin or injuring eyes. Many people have been burned by placing a battery in a pocket along with coins, keys, or other metallic objects. When the battery terminals are shorted, the battery heats up quickly.
Maximizing your resistance — and your safety
When working with electronics, it pays to maximize your resistance just in case you come into contact with an exposed wire. Make sure any tools you pick up are insulated, so that you add more resistance between you and any voltages you may encounter.
Take simple precautions to ensure that your work area starts out dry and stays dry. For example, don’t place a glass of water or cup of coffee too close to your work area; if you accidentally knock it over, you may lower your own resistance or short out circuit components.
Keeping a first-aid chart handy
Even if you’re the safest person on earth, it’s still a good idea to get one of those emergency first-aid charts that include information about what to do in case of electrical shock. You can find these charts on the Internet; try a search for first aid wall chart. You can also find them in school and industrial supply catalogs.
Helping someone who has been electrocuted may require cardio-pulmonary resuscitation (CPR). Be sure that you’re properly trained before you administer CPR on anyone. Check out www.redcross.org to get more information about CPR training.
Soldering safely
The soldering iron you use to join components in an electronics project operates at temperatures in excess of 700 degrees Fahrenheit. (You can read up on soldering in Chapter 15.) That’s about the same temperature as an electric stove burner set at high heat. You can imagine how much that hurts if you touch it.
When using a soldering iron, keep the following safety tips in mind:
- Solder only in a well-ventilated area. Soldering produces mildly caustic and toxic fumes that can irritate your eyes and throat.
- Wear safety glasses when soldering. Solder has been known to sputter.
- Always place your soldering iron in a stand designed for the job. Never place the hot soldering iron directly on a table or workbench. You can easily start a fire or burn your hands that way.
- Be sure that the electrical cord doesn’t snag on the table or any other object. Otherwise, the hot soldering iron can get yanked out of its stand and fall to the ground. Or worse, right into your lap!
- Use the appropriate soldering setting. If your soldering iron has an adjustable temperature control, dial the recommended setting for the kind of solder that you’re using. Too much heat can spoil a good circuit.
- Never solder a live circuit (a circuit to which you’ve applied voltage). You may damage the circuit or the soldering iron — and you may receive a nasty shock.
- Never grab a tumbling soldering iron. Just let it fall, and buy a new one if the iron is damaged.
- Consider using silver solder. If you’re concerned about health issues — or tend to stick your fingers in your mouth or rub your eyes a lot — you may want to avoid solders that contain lead. Instead, use silver solder specifically designed for use on electronic equipment. (Never use acid-flux solder in electronics; it wrecks your circuits.)
- Unplug your soldering iron when you’re finished.
Avoiding static like the plague
One type of everyday electricity that can be dangerous to people and electronic components is static electricity. It’s called static because it’s a form of current that remains trapped in some insulating body, even after you remove the power source. Static electricity hangs around until it dissipates in some way. Most static dissipates slowly over time, but in some cases, it gets released all at once. Lightning is one of the most common forms of static electricity.
If you drag your feet across a carpeted floor, your body takes on a static charge. If you then touch a metal object, such as a doorknob or a metal sink, the static quickly discharges from your body, and you feel a slight shock. This is known as electrostatic discharge (ESD), and can run as high as 50,000 V. The resulting current is small — in the μA range — because of the high resistance of the air that the charges arc through as they leave your fingertips, and it doesn’t last very long. So static shocks of the doorknob variety generally don’t inflict bodily injury — but they can easily destroy sensitive electronic components.
On the other hand, static shocks from certain electronic components can be harmful. The capacitor, an electronic component that stores energy in an electric field, is designed to hold a static charge. Most capacitors in electronic circuits store a very minute amount of charge for extremely short periods of time, but some capacitors, such as those used in bulky power supplies, can store near-lethal doses for several minutes — or even hours.
Use caution when working around capacitors that can store a lot of charge so that you don’t get an unwanted shock.
Being sensitive to static discharge
The ESD that results from dragging your feet across the carpet or combing your hair on a dry day may be several thousand volts — or higher. Although you probably just experience an annoying tickle (and maybe a bad hair day), your electronic components may not be so lucky. Transistors and integrated circuits that are made using metal-oxide semiconductor (MOS) technology are particularly sensitive to ESD, regardless of the amount of current.
A MOS device contains a thin layer of insulating glass that can easily be zapped away by 50 V of discharge or less. If you, your clothes, and your tools aren’t free of static discharge, that MOS field-effect transistor (MOSFET) or complementary MOS (CMOS) IC you planned to use will be nothing more than a useless lump. Because bipolar transistors are constructed differently, they are less susceptible to ESD damage. Other components — resistors, capacitors, inductors, transformers, and diodes — don’t seem to be bothered by ESD.
I recommend that you develop static-safe work habits for all the components you handle, whether they’re overly sensitive or not.
Minimizing static electricity
You can bet that most of the electronic projects you want to build contain at least some components that are susceptible to damage from electrostatic discharge. You can take these steps to prevent exposing your projects to the dangers of ESD:
- Use an antistatic wrist strap. Pictured in Figure 13-6, an antistatic wrist strap grounds you and prevents static build-up. It’s one of the most effective means of eliminating ESD, and it’s inexpensive (less than $10). To use one, roll up your shirt sleeves; remove all rings, watches, bracelets, and other metals; and wrap the strap around your wrist tightly. Then securely attach the clip from the wrist strap to a proper earth ground connection, which can be the bare (unpainted) surface of your computer case — with the computer plugged in — or simply the ground receptacle of a properly installed wall outlet. Be sure to review the instruction sheet that comes with the strap.

FIGURE 13-6: An antistatic wrist strap reduces or eliminates the risk of electrostatic discharge.
- Wear low-static clothing. Whenever possible, wear natural fabrics, such as cotton or wool. Avoid polyester and acetate clothing because these fabrics have a tendency to develop a whole lot of static.
- Use an antistatic mat. Available in both tabletop and floor varieties, an antistatic mat looks like a sponge, but it's really conductive foam. It can reduce or eliminate the build-up of static electricity on your table and your body.
Usually, wearing cotton clothing and using an antistatic wrist strap is sufficient for preventing ESD damage.
Grounding your tools
The tools you use when building electronics projects can also build up static electricity — a lot of it. If your soldering iron operates from AC current, ground it to defend against ESD. There’s a double benefit here: A grounded soldering iron not only helps prevent damage from ESD but also lessens the chance of a bad shock if you accidentally touch a live wire with the iron.
Cheapo soldering irons use only two-prong plugs and don’t have ground connections. Some soldering irons that have three-prong plugs still pose an ESD threat because their tips aren’t grounded, even if their bodies are. Because you can’t find a really safe-and-sure means of attaching a grounding wire to a low-end soldering iron, your best bet is to fork over some money for a new, well-grounded soldering iron. The popular Weller WES51 is ESD safe and reasonably affordable.
As long as you ground yourself by using an antistatic wrist strap, you generally don’t need to ground your other metal tools, such as screwdrivers and wire cutters. Any static generated by these tools is dissipated through your body and into the antistatic wrist strap.