
Chapter 2
Gearing Up to Explore Electronics
IN THIS CHAPTER
![]() Appreciating the many different ways to control electric current
Appreciating the many different ways to control electric current
![]() Acquiring the tools and components you need to start building circuits
Acquiring the tools and components you need to start building circuits
![]() Getting a briefing on how to use a solderless breadboard
Getting a briefing on how to use a solderless breadboard
Controlling electrical current is similar in many ways to controlling H2O current. How many different ways can you control the flow of water using various plumbing devices and other components? Some of the things you can do are restrict the flow, cut off the flow completely, adjust the pressure, allow water to flow in one direction only, and store water. (This water analogy may help but it isn’t 100% valid; you don’t need a closed system for water to flow — and you do need a closed system to make electric current flow.)
Many electronic components can help control the electrical energy in circuits. Among the most popular components are resistors, which restrict current flow, and capacitors, which store electrical energy. Inductors and transformers are devices that store electrical energy in magnetic fields. Diodes are used to restrict current flow in one direction, much like valves, while transistors are versatile components that can be used to switch circuits on and off, or amplify current. Integrated circuits (ICs) contain multiple discrete (that is, individual) components in a single package and are able to control current in many ways, depending on the particular IC. Sensors, switches, and other parts also play important roles in circuits.
In Chapters 3 through 12, you find out how these different electronic components manipulate current and work together to make useful things happen. Most of those chapters include simple experiments designed to show you firsthand what each component can do. Chapter 17 contains more involved projects, each of which involves many components working together as a team to make something useful (or just fun) happen. In this chapter, you find out what you need to build these experimental circuits and projects.
Getting the Tools You Need
To complete the experiments and projects in this book, you'll need a few tools that may cost you $100 to $250 total, depending on where you shop. I list the essential tools here, and provide a more detailed list of tools and supplies for the serious electronics hobbyist in Chapter 13.
In the following list, I provide some model numbers (identified by #) and prices, but feel free to shop around online or at yard sales to seek better deals.
- Multimeter: This tool enables you to measure voltage, resistance, and current, and is essential for understanding what’s going on (or not) in the circuits you build. Buy RadioShack #22-813 ($40), shown in Figure 2-1, or similar. Purchase a set of spring-loaded test clips, too, such as RadioShack #270-334 ($3.49). Chapter 16 provides detailed information about how to use a multimeter.
- Solderless breadboard: You use a breadboard to build, explore, update, tear down, and rebuild circuits. I recommend you purchase a larger model, such as the Elenco #9425 830-contact breadboard (roughly $14 at various online suppliers), which is shown in Figure 2-2.
- Soldering iron: This tool (shown in Figure 2-3) enables you to create a conductive joint between parts such as wires, component leads, and circuit boards. You will need it to attach leads to a few potentiometers (variable resistors). Models range from a low-end Weller SP25NKUS ($20 at Home Depot) to the mid-range Weller WLC-100 ($44 at Home Depot) to the top-notch Weller WES51 ($129 at Mouser.com). You need 60/40 rosin-core solder in either 0.031-inch or 0.062-inch diameters, such as top-of-the-line Kester 44 ($30 for a 1-lb. spool).
- Hand tools: Must-have hand tools include needle-nose pliers for bending leads and wire and a multipurpose wire stripper/cutter (see Figure 2-4). The pliers also come in handy for inserting and removing components from your solderless breadboard. Expect to spend at least $10 each on these items at your local hardware store or online electronics supplier.
- Antistatic wrist strap: You need to use a strap like the one in Figure 2-5 to prevent the charges that build up on your body from zapping — and potentially damaging — static-sensitive integrated circuits (ICs) during handling. Purchase a Zitrades #S-W-S-1 ($10) or similar.
- Calculator: You use a little math when choosing certain components for your circuits and to help you understand circuit operation. Even if you’re a rock star at math, it’s still a good idea to use a calculator.
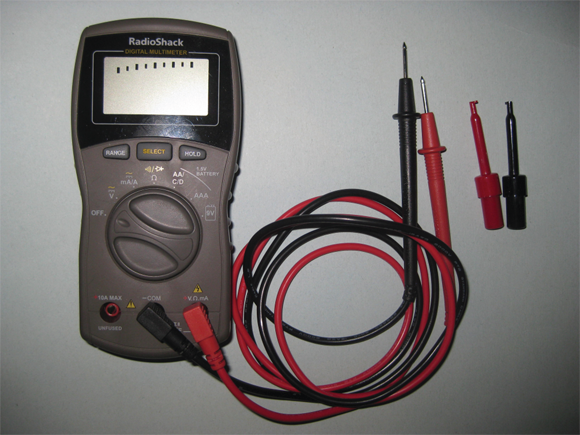
FIGURE 2-1: A multimeter and spring-loaded test clips.
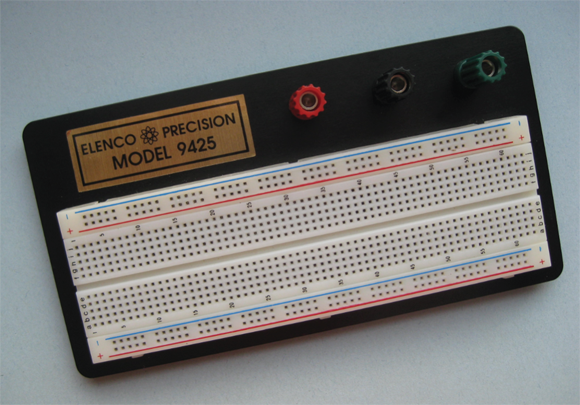
FIGURE 2-2: This solderless breadboard has 830 contact holes.

FIGURE 2-3: The Weller WES51 soldering station includes a temperature-adjustable soldering iron and a stand.

FIGURE 2-4: A gauged wire stripper/cutter and needle-nose pliers.
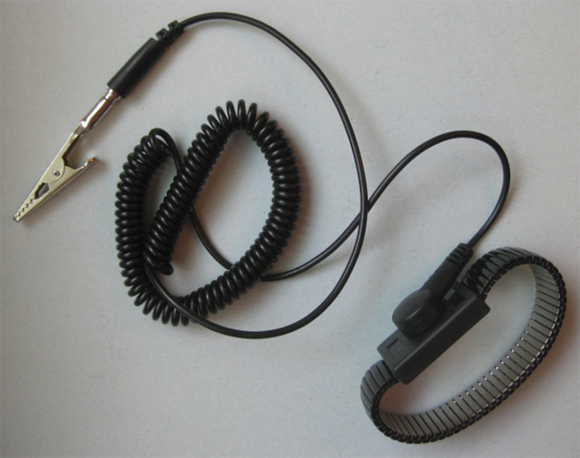
FIGURE 2-5: An antistatic wrist strap can prevent you from zapping sensitive components.
Stocking Up on Essential Supplies
In this section, I provide a comprehensive list of the electronic components, power supplies, interconnections, and other parts you need to complete the experiments in Chapters 3–11 and the projects in Chapter 17. You can find most of these products at RadioShack stores (many of which are in the process of closing as of this writing). If you plan, you can find great deals online at Amazon.com, eBay.com, Parts-Express.com, and other websites. Check consumer reviews of products, shipping costs, and delivery-time windows before ordering online. See Chapter 19 for more parts sources.
In the list that follows, I sometimes specify a product code (identified by #) and price (as of this writing, in mid-2015). I do this just to give you an idea of what to look for and roughly how much you should expect to pay. Because multiple options are usually available, feel free to shop around. Here’s your shopping list of electronic parts, most of which are shown in Figure 2-6:
- Batteries and accessories
- One (minimum) fresh 9-volt disposable (not rechargeable) battery.
- Four (minimum) fresh AA disposable batteries.
- One four-battery (AA) holder with leads or terminals for a battery snap connector. Parts Express #140-972 ($1.49) or similar.
- One 9-volt battery clip (sometimes called a snap connector). Buy two if your four-battery holder has terminals for a clip rather than leads. Parts Express #090-805 ($0.65 each) or similar.
- Wire, alligator clips, and switches
- 22-gauge solid wire, insulated, at least 4 feet total (multiple colors are preferable but not necessary). Elenco #884420 (red), #884440 (yellow), and #884410 (black) cost less than $3 each at various online suppliers. Each model provides 25 feet of wire on a spool.
- Assorted precut, prestripped jumper wires (optional, but highly recommended). Purchase RadioShack #276-173 ($7) or similar.
- Alligator clips, fully insulated. Get one set of 10, preferably in assorted colors. Purchase RadioShack #270-378 (1-1/4-inch mini clips) or #270-356 (2-inch clips) or similar ($2.50-3.50 per set).
- Five (minimum) single-pole, double-throw (SPDT) slide switches. Make sure these switches are breadboard friendly, with pins spaced 0.1 inch (2.54mm) apart. Mouser #123-09.03201.02 ($1.15 each), Banana Robotics #BR010115 (5-pack for $0.99), or similar.
- Eight mini pushbutton (momentary on, normally open) switches. Purchase SparkFun Electronics #COM-00097 ($0.35 each), Amico #a12011500ux0302 (100-pack for $3.90 on Amazon.com), or similar. You may want to use your pliers to straighten the curved legs on these mini switches so they fit more snugly in your solderless breadboard. Banana Robotics sells a 10-pack of 2-pin pushbutton switches for $0.99 (#BR010084).
- Resistors: You’ll need an assortment of resistor values. Many suppliers sell resistors in packs of 5 or 10 for $1 or less. Resistors rated at 1/4 watt with 10% or 20% tolerance are fine. You can order a multipack for each resistance value, or you can buy a variety pack, such as RadioShack #271-312 ($14.49), which contains 500 assorted 1/4 W resistors with 5% tolerance and includes all the values listed next. Here are the resistor values, the color codes used to identify them, and the minimum quantities you need:
- One 330 Ω (orange-orange-brown)
- Three 470 Ω (yellow-violet-brown)
- One 820 Ω (grey-red-brown)
- Two 1 kΩ (black-brown-red)
- One 1.2 kΩ (brown-red-red)
- Two 1.8 kΩ (brown-grey-red)
- Two 2.2 kΩ (red-red-red)
- One 2.7 kΩ (red-violet-red)
- One 3 kΩ (orange-black-red)
- One 3.9 kΩ (orange-white-red)
- One 4.7 kΩ (yellow-violet-red)
- Four 10 kΩ (brown-black-orange)
- One 12 kΩ (brown-red-orange)
- One 15 kΩ (brown-green-orange)
- One 22 kΩ (red-red-orange)
- One 47 kΩ (yellow-violet-orange)
- One 100 kΩ (brown-black-yellow)
- Potentiometers (variable resistors)
- One 10 kΩ; Parts Express #023-628 ($1.55) or similar
- One 50 kΩ; Parts Express #023-632 ($1.55) or similar
- One 100 kΩ; Parts Express #023-634 ($1.55) or similar
- One 1 MΩ; Parts Express #023-640 ($1.60) or similar
- Capacitors: For the capacitors in the following list, a voltage rating of 16 V or higher will do. Prices range from roughly $0.10 to $1.49 each, depending on the size and supplier (online is cheaper).
- Two 0.01 μF disc
- One 0.047 μF disc
- One 0.1 μF disc
- One 4.7 μF electrolytic
- Three 10 μF electrolytic
- One 47 μF electrolytic
- One 100 μF electrolytic
- One 220 μF electrolytic
- One 470 μF electrolytic
- Diodes: Minimum quantities are specified in the following list, but I recommend you purchase at least a few more of each (they’re cheap — and they’re fryable).
- Ten 1N4148 diodes. These diodes cost a few pennies each online, or you can purchase a 10-pack at RadioShack for about $2.
- Ten diffused light-emitting diodes (LEDs), any size (3mm or 5mm recommended), any color. You may want to buy at least one red, one yellow, and one green for the traffic light circuit in Chapter 17. These LEDs cost $0.08–$0.25 each online (for instance, Parts Express #070-020).
- Eight ultrabright LEDs, 5mm, any color. You may want to purchase red ones, such as Parts Express #070-501 ($0.58 each), if you’re serious about using the LED Bike Flasher you build in Chapter 17.
- Transistors: Buy one or two more than the minimum specified quantity of each type, just in case you fry one. They cost about $0.30 each online, or $1.49 each in RadioShack stores.
- Two 2N3904, 2N2222, BC548, or any general-purpose NPN bipolar transistors
- One 2N3906, 2N2907, or any general-purpose PNP bipolar transistor
- Integrated circuits (ICs)
- One 74HC00 CMOS quad 2-input NAND gate, 14-pin dual-in-line package (DIP). Get two because they can be easily damaged by static discharge. Purchase Jameco #906339 ($0.79) or similar.
- Two 555 timers (8-pin DIP). I recommend you purchase one or two extra chips. This IC costs about $0.25-$1 online or $2 in RadioShack stores.
- One LM386 audio power amplifier (8-pin DIP). Expect to pay $1 to $2 online or at RadioShack.
- One 4017 CMOS decade counter. I recommend you get at least one extra chip, due to its sensitivity to static. Per chip costs range from $0.35 to $2 online, depending on quantity.
- Miscellaneous
- One 8 Ω, 0.5 W speaker. Purchase RadioShack #273-092 ($3.99) or similar.
- One or more photoresistors (any value will do). RadioShack sells a 5-pack (#276-1657) for $3.99, but you can find larger quantities for less money online.
- Condenser microphone (optional). Purchase RadioShack #270-092 ($3.99) or similar.
- One wooden pencil or small-diameter wooden dowel.
- One relatively strong bar magnet, approximately 2 inches long.
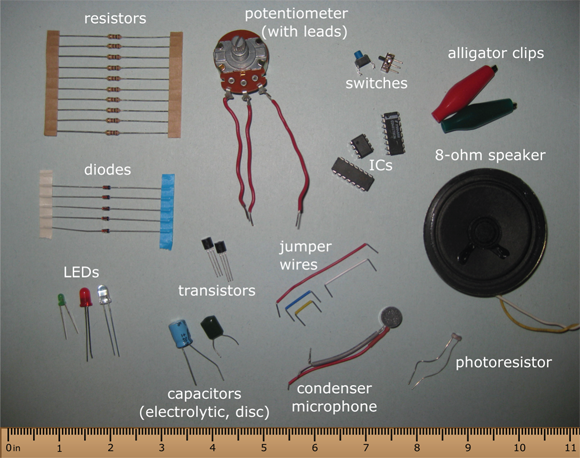
FIGURE 2-6: A sampling of the electronic components used in the experiments and projects in this book.
Getting Ready to Rumble
After you've purchased all your supplies, tools, and components, you need to do a few things before you can start building circuits:
- Attach a battery clip to a 9-volt battery. The clip provides leads so you can connect the 9-volt battery to your solderless breadboard. The leads are color-coded: Red indicates the positive battery terminal and black indicates the negative battery terminal. (See Figure 2-7.)
- Insert the four AA batteries into the four-battery holder, observing the polarity markers. The battery holder is wired to connect the four batteries end-to-end, creating a battery pack that supplies
 . If your four-battery holder does not have leads, attach a battery clip to the snap connectors on the holder. (See Figure 2-7.)
 - Attach leads to the potentiometers. This step involves cutting three short lengths (2–3 inches each) of 22-gauge solid wire for each potentiometer, stripping both ends of each wire, and soldering the stripped leads to the potentiometer terminals (refer to the top row in Figure 2-6). See Chapter 15 for detailed instructions on soldering.

FIGURE 2-7: Prepare your batteries for use in a solderless breadboard.
Using a Solderless Breadboard
This section provides a brief overview of how to use a solderless breadboard. I explain much more about solderless breadboards in Chapter 15, and I strongly encourage you to read that chapter before you get too deep into building circuits because you need to know about the limitations of these handy circuit-building platforms.
A solderless breadboard is a reusable rectangular plastic board that contains several hundred square sockets, or contact holes, into which you plug components such as resistors, capacitors, diodes, transistors, and integrated circuits. Groups of contact holes are electrically connected by flexible metal strips running below the surface. The photo in Figure 2-8 shows part of an 830-contact solderless breadboard with yellow lines added to help you visualize the underlying connections between contact holes.

FIGURE 2-8: The contact holes in a solderless breadboard are arranged in rows and columns that are electrically connected in small groups below the surface.
 Say you poke one lead of a resistor into hole b5 in the breadboard in Figure 2-8. You're connecting that lead to the underlying metal strip that connects the five holes in column 5, rows a through e. By plugging, say, one lead of a capacitor into hole d5, you make a connection between the resistor and the capacitor because holes b5 and d5 are electrically connected. You can build a working circuit — without permanently bonding components — by plugging in components to make the connections you need, and then running wires from your breadboard to your power supply (say, a 9-volt battery).
 Solderless breadboards enable you to test a circuit easily by swapping components in and out. The not-so-nice thing about them is that it is easy to make a mistake. Common mistakes include plugging both leads of a component into holes in the same row (that is, creating an unintended connection) and plugging a lead into a hole in the row next to the row you want (that is, leaving an intended connection unconnected).