7
Importing Blender Assets into Godot
You’ve come a long way. Your models are ready. Their scale and rotation values are fixed. What’s left to do? Import them into Godot, of course! Hopefully, you’ll find the importing process much more straightforward. This is a transitional chapter that covers mostly Godot topics with a minimal amount of Blender involvement.
We’ll start this chapter by showing you how to create game objects using your imported models with the click of a button. This process will convert the glTF files into game objects – more specifically, scenes in Godot terminology.
If you must fix something with your models or add detail, where can you do this? Since you are now in Godot, it’s tempting to fix the models in Godot, but this is counterproductive. In this chapter, we’ll show you how you can update your Blender file and reflect the changes in Godot.
In Chapter 2, Building Materials and Shaders, we learned how to work with materials in Blender. We’ll revisit this topic in the context of Godot so that we can understand how materials work in both applications. We’ll present the pros and cons of handling materials in either application so that you can decide which one works best for you. Whether you are working alone or in a team, there are a few decisions that can either save a lot of time or be frustrating down the line when you realize you’ve got to make a fundamental change. A decent material pipeline is one of these topics.
In Chapter 5, Setting Up Animation and Rigging, we stored two actions in our snake model. We’ll import that model to see how Godot handles the animations stored in a glTF file. This chapter will only cover how to import animations; how to use imported animations will be covered later in this book when we build our point-and-click adventure game.
Thus, you’ll be presented with some of the crucial building blocks and practices that will serve you in later chapters and your game projects.
In this chapter, we will cover the following topics:
- Making a scene!
- Going between Blender and Godot
- Deciding what to do with materials
- Importing animations
By the end of this chapter, you’ll be able to take your glTF files and convert them into usable Godot assets, decide what to do with materials from a project pipeline perspective, and make sure you can access the animations that come with a model file.
Technical requirements
As mentioned in the Preface section, we assume you already know your way around Godot for basic things such as creating and composing scenes, adding scripts to nodes, using the Inspector panel to change the conditions of your game objects, and more.
However, if you are a novice in Godot Engine, then you may want to start with the official learning material at this address first: https://docs.godotengine.org/en/3.4/getting_started/introduction/.
Throughout this book, we’ll be using Godot 3.4.4. There may always be something new or missing even between minor versions. Should you be using a different version when you are reading this book, you can either switch to the version this book is using or read the detailed changelog for different releases for the appropriate version listed at https://godotengine.org/news.
This is still a transitional chapter; as is the previous and the next chapter. We’ll create a new Godot project in Chapter 9, Designing the Level, and work within that Godot project in later chapters to make a point-and-click adventure game. Until then, we can make do with temporary Godot projects. This means that in this chapter and the next, we won’t be concerned at all with the structure of our files and folders. However, the sections in this chapter have been laid out in a way that we assume you are still working on the same Godot project.
As usual, this book’s GitHub repository at https://github.com/PacktPublishing/Game-Development-with-Blender-and-Godot contains some files that are relevant to this chapter.
Making a scene!
In a typical 2D game built in Godot, using a sprite node is essential. You would then assign a texture to your sprite nodes in Godot’s Inspector panel. The 3D version is essentially the same, but it involves using a MeshInstance node and then assigning a mesh to it. So, what textures are to sprite nodes is what meshes are to mesh instance nodes. Although creating a Godot scene that just has a sprite node and instancing this scene in a bigger scene is possible, it’s overkill since you could easily attach the sprite node itself to the big scene.
This is where it makes sense to treat mesh instances differently and store them in their own scenes, unlike sprites, since 3D models have a lot more going on than getting assigned just one texture. Additionally, since a 3D model has a lot more moving parts, assigning individual meshes to mesh instances could be tiresome too, so let’s do better. The goal of this section will be to create a scene out of a 3D model and to automate how to assign meshes to mesh instances.
Adobe Animate
Godot’s scene concept incorporates a lot of notions you might be familiar with if you have worked with Adobe Flash in the past, or Adobe Animate these days, which uses movie clips, similar to what Godot does with its scenes. Creating nested movie clips and binding scripts is very handy, which is pretty much how a Godot project goes. Despite this similarity, there comes a moment in Godot when it makes sense to consider a 3D model its own scene, which is what this section will cover.
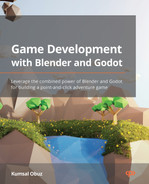
We suggest that you start a fresh Godot project for this section. Once you’ve done that, you need to find the Sconce.glb file in the Start folder for this chapter. You have two options at this point. First, you can copy and then paste this file, using your operating system’s filesystem, into where your Godot project folder is. Alternatively, you can drag the sconce file to the FileSystem panel of Godot. When you make a glTF file as part of your project, you’ll have something similar to the following:
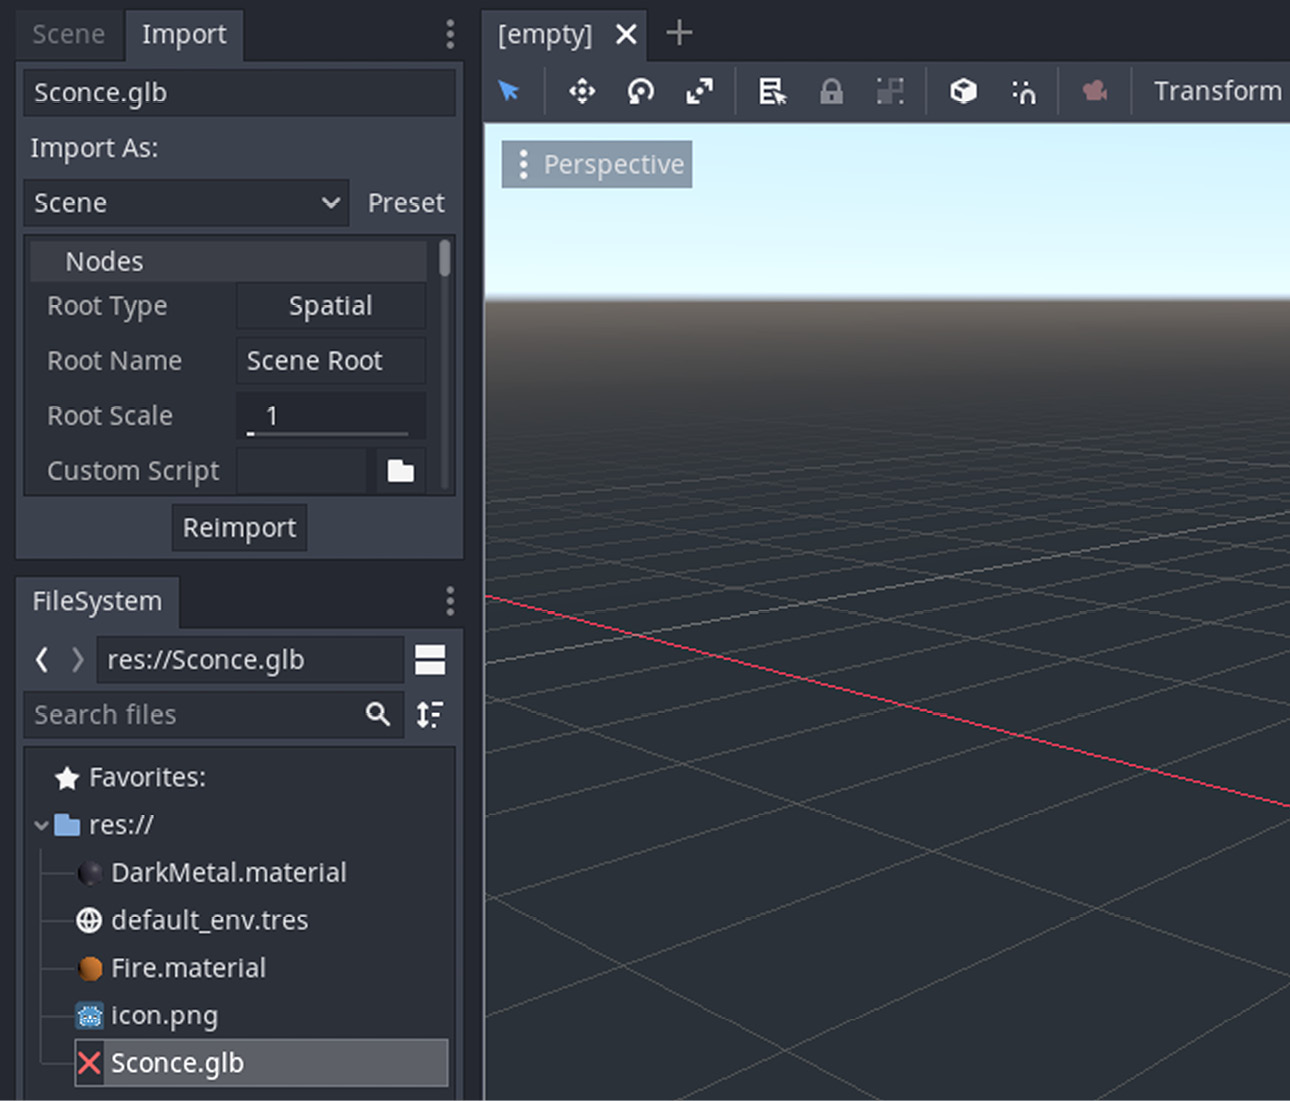
Figure 7.1 – The Sconce model is now part of your Godot project
Did you have a red cross as an icon for your Sconce.glb entry too? This doesn’t happen all the time, but that icon indicates there is a configuration problem; luckily, the fix is easy. Restarting Godot fixes the issue most of the time. If that doesn’t work, then we’ll have to press a button to reimport the file for Godot to configure it for us. The preceding screenshot also shows the Import panel in focus. You can click the Reimport button at the bottom of that panel to make the file compatible with Godot.
Something else happened while we were discussing the icon issue. There are two material files in our project:
- DarkMetal.material
- Fire.material
These materials came within the glTF file that was exported from Blender since we opted to keep the materials. If you need a refresher on this, you can read the Deciding what to export section in Chapter 6, Exporting Blender Assets. By default, Godot will place the materials next to the model file. You may want to place your models and materials in separate folders for organizational reasons. We’ll discuss something related to this in the Deciding what to do with materials section later in this chapter.
We’re now ready to make a scene using the sconce model. This effort will create all the necessary bindings to display a Blender model in Godot. To achieve this, you must do the following:
- Double-click the Sconce.glb entry in the FileSystem panel.
- Click the New Inherited button on the pop-up screen.
The pop-up screen will display another button beside the one you’ve just clicked. There is also a piece of information about what each button does but it might be confusing, so let’s explain it. In layman’s terms, the Open Anyway button will let you see the contents of a glTF file, but this will be read-only. Since you may want to make alterations, such as attaching scripts, you’ll often click the New Inherited button.
If you bring up the Scene panel, you’ll see that your last effort has created two MeshInstance nodes under one Spatial node. When you click either the Sconce or Flame mesh instance node, you’ll see their mesh bindings in the Inspector panel. We didn’t have to create all this structure and bindings manually; creating a scene out of a glTF file did it all for us.
When you have finished examining what’s changed so far, you can save your file as Sconce.tscn since it is still a temporary construct as far as Godot is concerned. The following screenshot shows our progress:
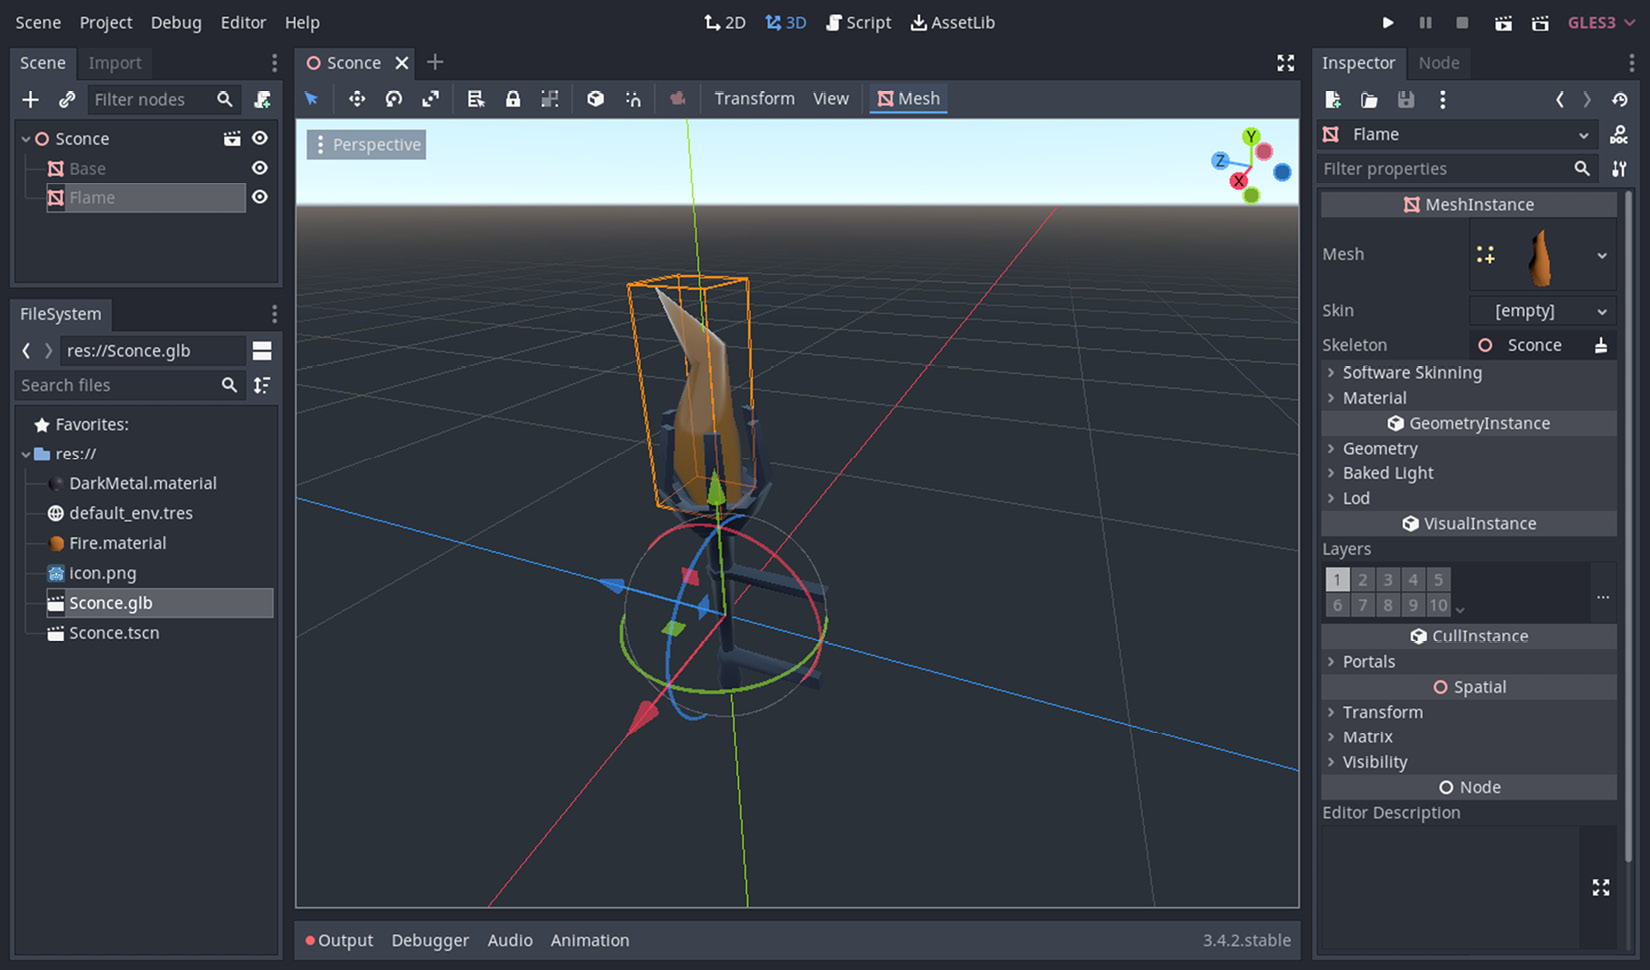
Figure 7.2 – You have created a scene with a click of a button
You can now utilize Sconce.tscn in other scenes by creating more instances of it. For example, in most 2D platformer games where there are enemies, you would have to create instances of scenes that stored the enemy character sprites. This is similar. Hence, every time you need a sconce, you can use the Sconce scene instead of the model file. We’ll create many more instances of this scene when we work on our game later in this book.
Creating a scene out of a model file was easy, but how easy is it to change it? Either the sconce or the flame could use a bit of touch. We’ll tackle how to update our models in our scenes next.
Going between Blender and Godot
In later versions of Godot, specifically starting with Godot 4.x, you’ll be able to directly import Blender files into Godot and interact with them. Saving things in Blender will automatically update the situation in Godot. We are not there yet. At the time of writing, we must resolve to an already tried and tested method: re-exporting our assets. Let’s see how we can accomplish this easily.
While you are developing your game, you’ll likely want to make changes to your models. Perhaps you’ve been working with a prototype that your 3D artist friend or contractor provided a while ago. Now, they are ready to give you a more refined piece. So, let’s simulate a similar scenario by making modifications to the sconce model we’ve been using. If you want to skip the Blender parts, you can find the finished changes in the Sconce.blend file in the Finish folder. If you want to exercise some Blender muscles, then we suggest that you make two changes in the Sconce.blend file in the Start folder. These changes are as follows:
- Move the tip of the flame so that it doesn’t look too pointy. (Hint: go into Edit Mode.)
- Replace the flame material with something that is bright yellow. You can pick a name such as HotFire for it. (Hint: Remove the old material and add a new one.)
We’re applying two important changes to our model. First, we are changing the geometry of our model, however minor it might be. Second, we are introducing a new material instead of changing the color of an existing material. All there is left to do is re-export our model and overwrite the existing Sconce.glb file in our Godot project. Chances are, if you were following along, the Sconce scene in Godot is still open, and despite overwriting Sconce.glb in the project, it looks like nothing has changed.
If you restart Godot, switch to a different scene tab, or do any other thing that would refresh the view, then you’ll see your updates. Otherwise, you may still have the same old look. There is a general refreshing problem, it’d seem. Hopefully, little things like this will be fixed in future versions of Godot.
The following screenshot shows the updates you will see:
Figure 7.3 – The flame is hotter and straighter with our newest changes
While we successfully updated the Sconce scene, we also introduced a new material to the project. The import process was smart enough to know there was a new material coming in, but it was judicious enough to keep the old materials, just in case they might be needed and used sometime later in your project.
This could lead to having lots of unused files over time. That is not the worst of your problems, though. There is a much more insidious thing waiting for you when you import more and more models and eventually lose track of what’s happening due to the sheer number of files as your project grows.
In the next section, we’ll present a scenario where importing glTF files straightforwardly as we have done so far may cause some problems.
Deciding what to do with materials
An important decision awaits you. When you were exporting your Blender assets in Chapter 6, Exporting Blender Assets, we briefly discussed what the export options in the exporter’s UI meant. However, we never really talked about the implications of keeping the materials or not. In this section, we’ll present the pros and cons of handling materials in Blender versus Godot.
Let’s assume you are now ready to import another model. For example, the Vessel.glb file in the Start folder is something you want to add to your game. If you take a look inside the associated Vessel.blend file, you’ll notice that we are using a material labeled as DarkMetal. Ironically, perhaps accidentally, someone has decided to pick a light color, but the name, regardless of what the intentions are, is the same material name we used in the sconce model file.
So, what will happen when we import this file into Godot? To find out, follow these steps:
- Add Vessel.glb to your Godot project.
- Turn this vessel model into a scene. For familiarity’s sake, save it as Vessel.tscn.
The following screenshot shows the new scene, as well as the status of the FileSystem panel:

Figure 7.4 – Everything is kind of looking OK, but shouldn’t this vessel have a lighter color?
Despite the mislabeling in Blender, we knew what we wanted for the vessel’s color. It was supposed to be a lighter color but that’s not what we are seeing in Godot. While importing the vessel model, since there was already a material with the same name in the project, Godot chose not to duplicate the resources. This is efficient, perhaps, but not accurate. This kind of thing could easily happen, especially if you are utilizing someone else’s files. Luckily, only the new stuff doesn’t look correct. In other words, the incoming resources are not overwriting and messing up the existing resources.
So, what do we do to make the vessel show the color we want? We can offer a few suggestions that are more organizational solutions. Thus, this is not a technical but a workflow or a pipeline type of solution as it is often labeled in the industry. Therefore, the solution lies in how you want to treat your files in your project, and whether you are working solo or in a group. These suggestions are to do the following:
- Label Blender materials by purpose
- Label Blender materials by color
- Import your models into separate folders
- Use a staging area in Godot
None of these suggestions is a magic pill. You have to try and decide if they’re beneficial for you. Also, sometimes, projects of different sizes make some of these solutions easy or difficult to apply. The decision is yours after you learn what each one entails.
Labeling Blender materials by purpose
Naming materials in Blender by their shade, such as DarkMetal, can only go so far. How dark are we talking about? Sooner or later, we will find ourselves playing a game of adjectives: dark, darker, darkest, and likewise. It will get worse when we want to pick a lighter version of the dark tone we have already picked.
Typically, a sconce’s base is wrought iron. Since it’s a metal, it makes sense to use the word metal in its name, but it could easily get confusing. Instead, you could use the object’s name for its material title. So, you’ll have Sconce.material once you import it into Godot.
Labeling Blender materials by color
If you want to go with color-like labels, then you can make this obvious and in a unique way without leaving any room for Godot to interpret it in its own way. The Hex value in Blender for the DarkMetal material is 393646. You could use that as a label. Hence, once imported, you’ll have this material as 393646.material.
Keep in mind that you’ll often get busy and distracted while you are authoring your models and find yourself fine-tuning a lot of things in your models, whether it’s geometry, materials, animations, and much more. So, if you have already chosen a hex color as a name, and later alter the color of the material, then you will have to remember to update the name.
Importing your models into separate folders
Some people organize their Godot projects so that they have separate folders for bigger concepts. This includes materials, models, scenes, and scripts. If you want to make sure your materials are unique to the model you are importing, a safer and easier way to do this is to create custom folders inside a specific folder. For example, if you have a Models folder at the root of your project, instead of dumping all the glTF files into this folder, you can create subfolders named after the model you are importing. In our case, this is the structure you’d see:
- Models > Sconce > Sconce.glb
- Models > Vessel > Vessel.glb
Then, all the relevant materials for each glTF file will be contained in their own folder. This might seem counter-productive at first since the same material file will be duplicated in different folders, especially if the material’s names are color-coded. However, you’ll at least know what you are importing is what you want in the first place.
This method might be advantageous in some scenarios. Maybe you are designing more than one sconce style for your game. In this new style, despite the wrought iron part having a different shape, it’ll most likely use the same material. Then, you can easily rename the folder as Sconces to store multiple sconce files. This way, you’re intentionally agreeing with the fact that Godot will not create duplicate materials but use the first imported model’s material.
Last but not least, let’s cover a caveat about this technique. If you are importing your files by dropping them over the FileSystem panel, you’ve got to be careful since that panel is context-sensitive. This means that you need to have the appropriate folder selected in the entry list. Otherwise, whichever entry is selected will be the recipient. To be sure of where you are sending your files, you can do all this by using your operating system’s filesystem. When you switch to Godot, your files will be processed and, depending on the speed of your system, you might see a progress bar showing the progress of the import.
Using a staging area in Godot
Last in our list of possible solutions to making sure models and materials are imported properly is to use a staging area. This means, similar to using unique folders for models, you can designate a folder to monitor what’s going on with a model. Perhaps this is a folder labeled as Staging inside the Models folder.
Using the search functionality in the FileSystem panel, you can even check if there are duplicate materials in other folders. This is a safe way to compare materials because you can observe their properties in the Inspector panel. If there are no obvious differences, and you deem it safe, you can just move the relevant glTF file to its final place while ignoring the duplicate material file in this staging area.
This requires a bit of work, but it might be a necessary practice in larger teams so that you can decide and even notify the artist if there are obvious labeling mistakes. For example, if there is a typo for the same material that multiple similar models should use, you won’t end up with two separate materials.
Wrapping up
Out of all these options, and perhaps a few more you may find online, you must decide which one works best for you. It’s a common thing that you’ll start one way and switch to an alternative method as your project’s needs change. Although your choice might have technical ramifications, it’s rather a business decision; so, weigh up the pros and cons while making it.
There is one more thing you can do regarding your materials and models, but since this chapter is about importing, we’re intentionally leaving it for later. It’s when you decide to create your materials in Godot and bind them to the meshes of a model manually because, sometimes, you find models with just their meshes but with no material information. We’ll show you how to create materials in Godot in Chapter 9, Designing the Level, in the Constructing the missing materials section.
Now that we seem to be done with material things, in the next section, we’ll learn how to import the animations we created for our snake in Chapter 5, Setting Up Animation and Rigging.
Importing animations
The last thing we’ll cover about importing Blender assets is animation. Thus far, we have taken care of importing the mesh and materials of a model. We even discussed workflow problems concerning the default import workflow for materials. Hopefully, there won’t be a hidden surprise in importing animations, but how do we do it? You’ll find out in this section.
You can start by moving the Snake.glb file in the Start folder of this chapter to your project. Then, as shown in the Making a scene! section, you can create and save a scene out of this model. The snake model will bring a lot of its materials, and your FileSystem panel will look a bit crowded, but this is what we have so far:
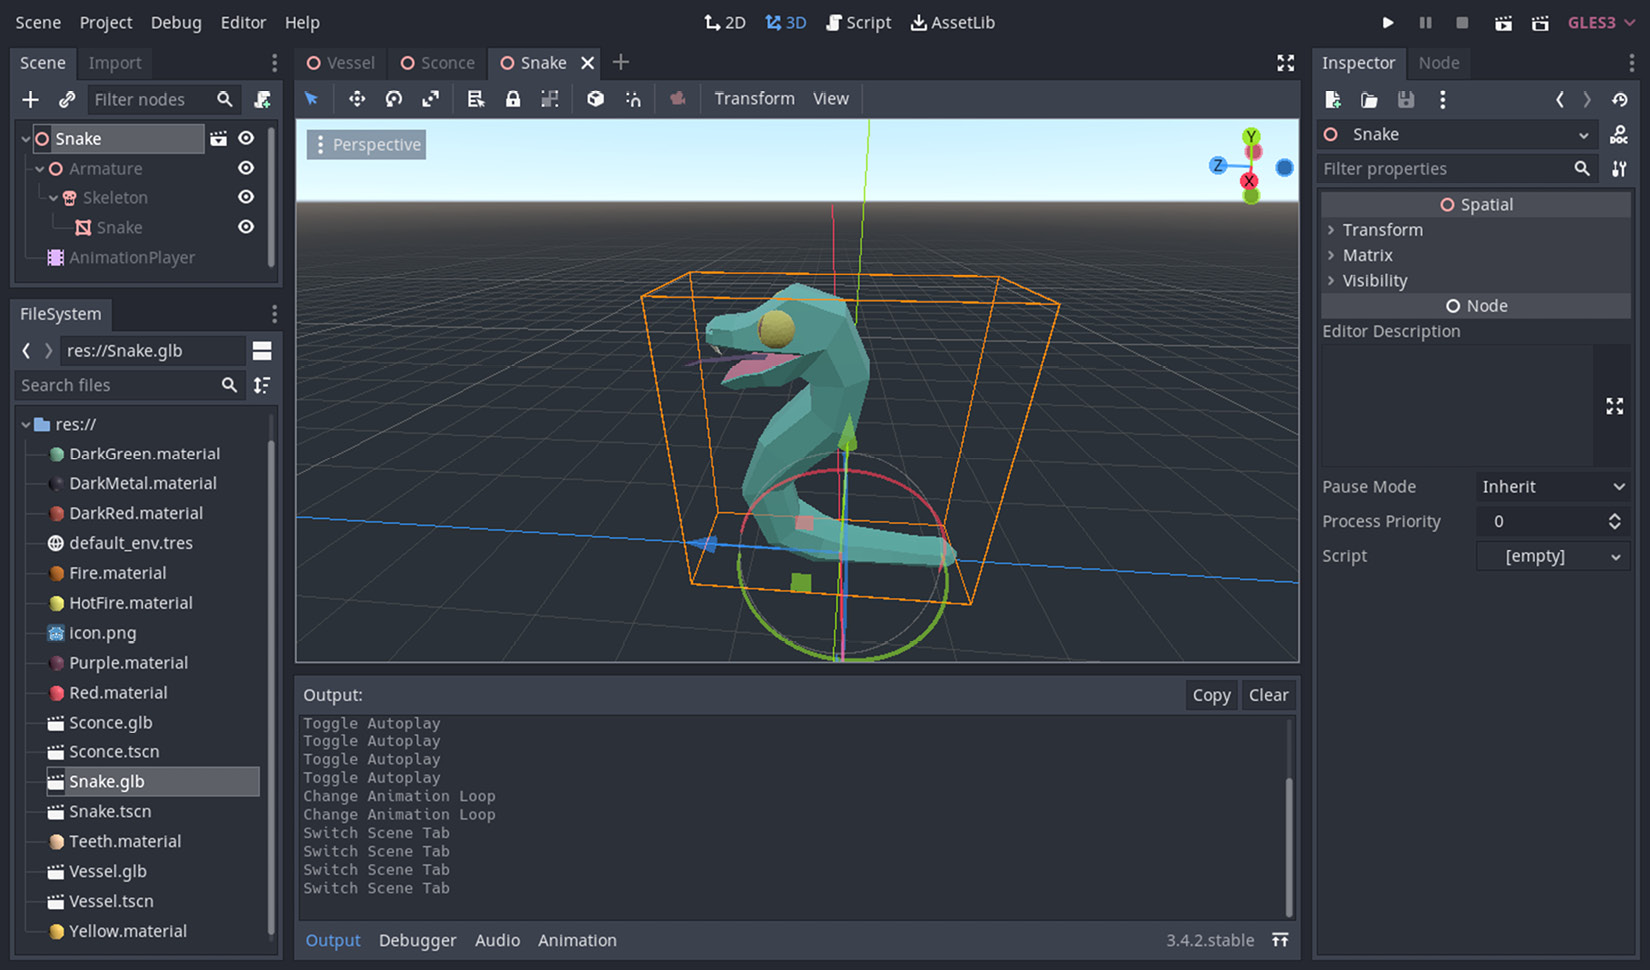
Figure 7.5 – The snake has followed you to Godot Engine
This is a good time to introduce some of the 3D nodes Godot uses. We’ll utilize the snake scene for this effort because it has a good sample of different nodes you’ll most likely use in your projects.
The root node is of the spatial type. Godot’s chosen color for all 3D nodes is red. If you’ve been using Godot’s Node2D nodes, which have a blue circle icon, Spatial nodes are the equivalent of that, only in 3D, and they are red. Whereas a Node2D node will have coordinates only in the XY plane, a Spatial node will have them in the XYZ plane. You usually employ this kind of node as a root container for other nodes. For example, the Armature and AnimationPlayer nodes are the direct children of the root Spatial node, which is labeled as Snake.
Node types versus labels
In the snake scene, the MeshInstance node has been renamed Snake, which is useful so that you can differentiate if you have a lot of mesh instances. There is no built-in Snake node type in Godot, but it’s okay to just say Snake node, even though it’s of the MeshInstance type. The Inspector panel will figure out the type and only list the relevant properties. Therefore, throughout the rest of this book, we’ll refer to the scene’s nodes either with their custom labeled names or node types.
We’ll soon analyze the role of AnimationPlayer, but let’s finish looking at the MeshInstance and Skeleton child nodes first.
MeshInstance and Skeleton
We made an analogy between the MeshInstance and Sprite nodes in the Making a scene! section, stating that they are responsible for holding visual elements in 3D and 2D spaces, respectively. So, that leaves us with the Skeleton node.
In Chapter 5, Setting Up Animation and Rigging, we used bones and attached them so that we could animate the snake. When the Snake.glb file was imported, the bones were imported as a single unit. In other words, Godot grouped all your bones into a node of the Skeleton type. However, you can still access each bone if you wish:
- Select the Skeleton node.
- Expand the Bones section in the Inspector panel.
- Expand some of the entries, especially 9 and 10.
Do you recognize the names? These are the names you picked for the bones in Blender. Look at how much preparation we require to construct a skeleton. The rigging process to create all this, however complicated it may have looked initially, is still far too easy to do in Blender compared to Godot.
Now, let’s turn our attention to the last node type in the scene to further appreciate why doing the animation in Blender was also a superior and preferred move. Enter AnimationPlayer.
AnimationPlayer
The last node in the Snake.tscn scene is AnimationPlayer. The color of this node is neither blue nor red. This means you can use it in both 2D and 3D contexts. You may already be familiar with this node if you have been building 2D games. If that’s the case, then you know that you need to place keyframes in the player’s timeline to mark the changing points, just like we did in Blender. Regardless of whether you have experience with AnimationPlayer or if this is the first time you are tackling it, you’ll notice that creating so many keyframes, as shown in the following screenshot, is a lot of work:
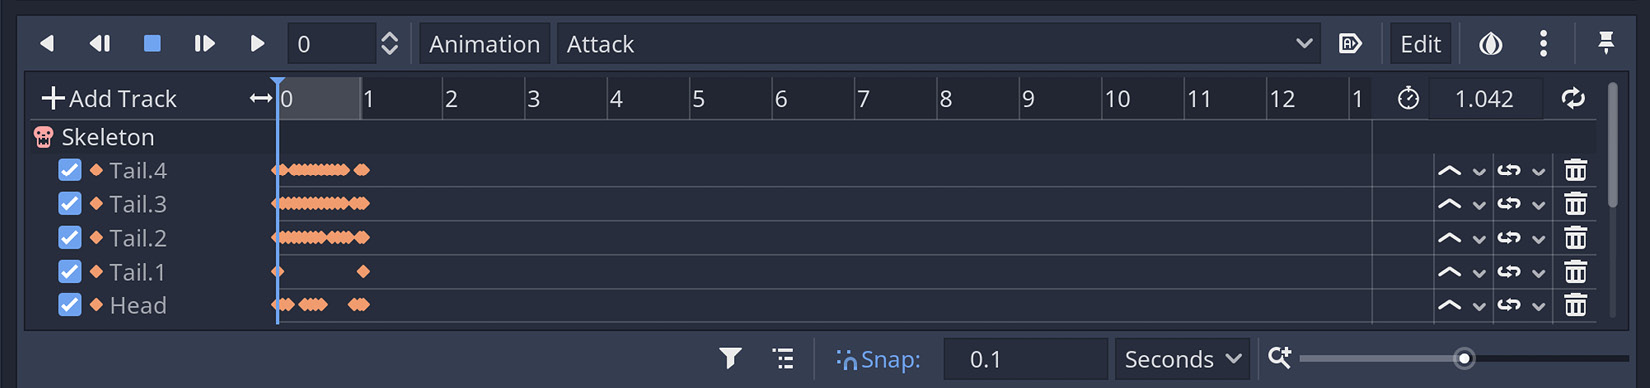
Figure 7.6: You worked smart, not hard, to create all those keyframes in AnimationPlayer
Each orange diamond in the preceding screenshot is a keyframe and marks an important turning point in the animation’s life cycle. This is the timeline for the Attack action we created in Blender. You can see it in a dropdown in the top section. This is the main reason why we opted for Blender to create all this for us – we were only concerned with the major events, not with what exactly happened in between major events. Godot and Blender worked together to fill in the details. Also, updating your animation in Blender is still a much better idea than fiddling with those diamonds.
As you can see, animations and actions are automatically imported, recognized, and organized in AnimationPlayer for us. Despite how easy this was, there is currently a bug in Godot regarding the animation imports. So, we need to do something about it that may not be necessary in the future. We’ll discuss what the problem is and present a solution here. However, to follow the discussion and updates on the problem, you can go to https://github.com/godotengine/godot/issues/34394.
On the right-hand side of the Animation panel, there is an icon that looks like a recycling symbol. At the time of writing, that loop button, which is supposed to play an action indefinitely, only works while you are editing a scene. So, even though you can toggle the loop button on, the action will play only once when you launch the game. Hopefully, soon, newer Godot versions will fix this looping issue. Still, it makes sense to present a workaround for the time being.
Separating actions
Luckily, there is a solution to the problem we’ve just presented. We’ll instruct Godot to separate the actions into separate files, similar to the way materials for a model are kept in the filesystem.
The default behavior for keeping animations for a model is to store them inside its file. In this case, the Snake.glb entity is holding all its animations. To extract these animations, follow these steps:
- Select Snake.glb in the FileSystem panel.
- Switch on the Import panel and scroll down to the Animation section.
- Choose Files (.anim) in the Storage drop-down options.
- Click the Reimport button.
The following screenshot shows the steps we have taken so far:
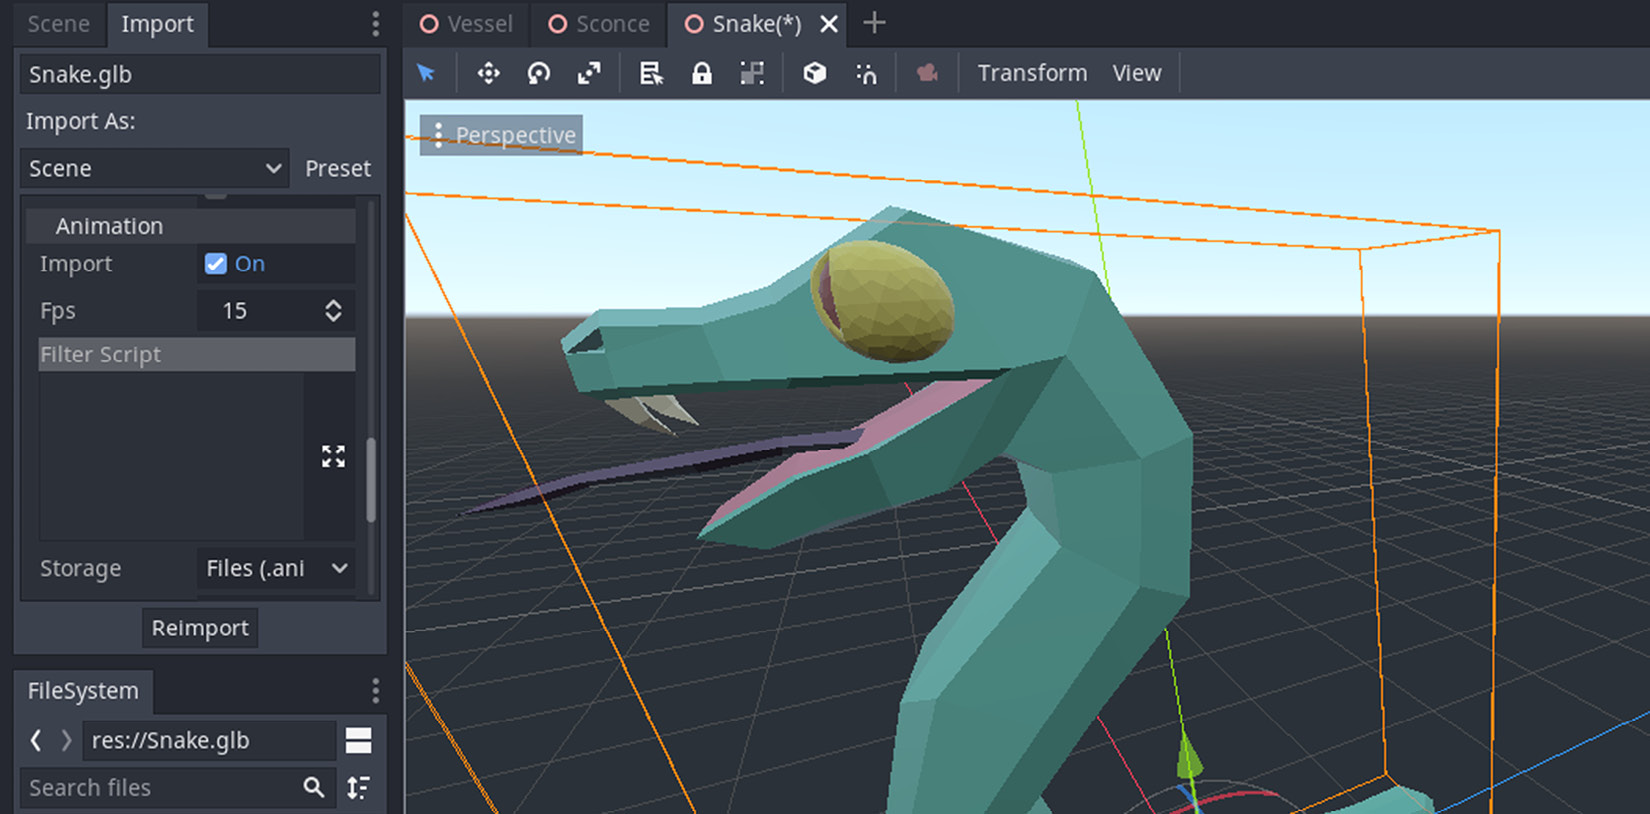
Figure 7.7 – The import settings for the Snake.glb file
This will extract the actions into the filesystem. In the end, you’ll have two more files in your project:
- Attack.anim
- Idle.anim
These are the actions you defined in Blender a while ago. Also, similarly named actions are listed in Godot’s AnimationPlayer dropdown. For example, Figure 7.6 shows the Attack action selected. There is one more step left for us to fix the looping issue – it’s to reintroduce these actions we’ve just separated back to AnimationPlayer, even though it’s already listing them. To achieve this, follow these steps:
- Switch the Scene panel on.
- Select the AnimationPlayer node in the scene structure.
- Click the Animation button in the Animation panel (the button to the left of the Action dropdown).
- Choose Load and select Attack.anim from the Open a File pop-up menu.
- Repeat Step 4 to load Idle.anim.
This will replace the existing actions with the actions coming from your filesystem. The following screenshot shows where you can find all these names since there have been a lot of similar words. Here, the Animation button has already been pressed and is displaying the available commands:
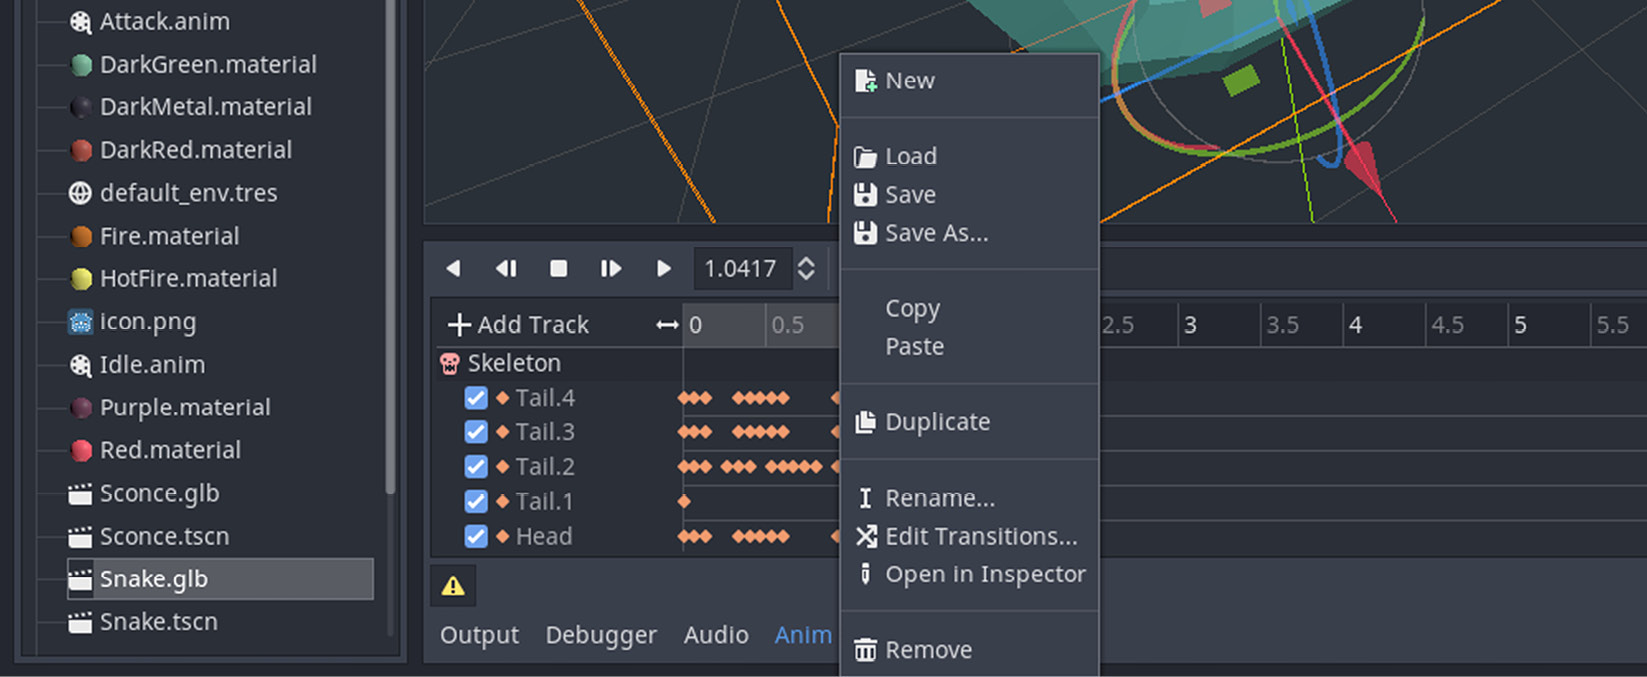
Figure 7.8 – The Animation panel’s menu for loading, saving, and doing many other things
In the future, hopefully, you won’t have to separate and reimport your actions with newer versions of Godot. For the time being, this will work, but we won’t see the effects of this until we get to the later chapters of this book, where we will trigger these actions.
Summary
Since we took care of exporting Blender assets in the previous chapter, it was time to learn how to import these into Godot. This is what we covered in this chapter.
First, we learned that once a glTF file is part of a Godot project, Godot automatically takes care of things such as separating materials. That being said, since we’d most likely keep creating more instances of 3D assets, we looked into creating dedicated scenes out of glTF files. Moreover, we learned how to make modifications to our models in Blender and get the scenes using these models updated back in Godot.
Then, we covered materials, which is an enmeshed topic within the model workflow, and discussed different ways of labeling the materials, and even keeping the models in separate folders to prevent any material file from overlapping. You decided what works best for you since this kind of thing might be team-size or project specific.
Finally, we tackled how easily animations can be imported. Creating a scene out of a model took care of all the scaffolding. Even though we’ll learn how to trigger animations in later chapters, especially for looped animations, we presented a problem that may occur. A workaround was presented, and we hope you won’t need this in the future.
This was your first chapter on Godot and you’re now officially using Godot Engine. Importing 3D assets into Godot is an essential operation, and we hope you have a seamless back-and-forth between Blender and Godot for your games.
In the next chapter, we’ll still work on a standalone topic, Adding Sound Assets, to keep things simple. By the end of the next chapter, we’ll have covered the basics of setting up a project structure, which means we can focus on building the game after that.
Further reading
You’ve already interacted with the Import panel of Godot. That area has a lot of settings that would require us to write a chapter to investigate all possible combinations. The default settings work most of the time but there is a Preset button in the top-right corner that lists the most used combinations.
Since the needs of a project, and thus the import requirements of a model, won’t be clear ahead of time, we leave the task of discovering what those options entail to you. That being said, here is the official resource that can guide you if you want to get more information: https://docs.godotengine.org/en/3.4/tutorials/assets_pipeline/importing_scenes.html.
Similarly, you may want to import images instead of 3D assets. This is necessary when you are building UI elements for a game. We’re mostly covering the 3D workflow throughout this book, so we won’t emphasize the import settings for 2D assets. Nevertheless, if you want to be informed before we tackle the UI topics, here is the official URL: https://docs.godotengine.org/en/3.4/tutorials/assets_pipeline/importing_images.html.