
2
Building Materials and Shaders
According to Wikipedia, a material is a substance, or a mixture of substances, that constitutes an object. This definition for real-life objects also stands true for the models you create electronically with some extra technical details. Let’s look at the definition of a material in our context.
In Blender, materials are essentially containers that hold a bunch of numbers, colors, and textures, besides other useful stuff, and most importantly the shader itself. A shader is a piece of code that tells the rendering engine, either Blender’s or Godot Engine’s, what to do with a material’s properties.
In essence, a material is like a box full of little items, and it comes with a user manual (the shader) so that the software you work with knows what to do with those little items.
You now know the raw definition of what materials and shaders are, but what are they used for? The barrel you created in the previous chapter had metal rings and wooden slats that gave it its form. However, everything in that model looked rather gray. Adding materials to your models will enhance their form by showing colors and other properties you are familiar with from real life.
In this chapter, you’ll learn how to make your models look more real by applying materials. To that end, we will cover the following topics:
By the end of this chapter, you’ll know how to create and assign different materials, and understand where shaders come into play during this process.
Technical requirements
Although this chapter is about materials, you’ll need at least one 3D model. This can be your finished work from Chapter 1, Creating Low-Poly Models. Alternatively, you can use the barrel model that comes in the Start folder of the Chapter 2 folder in this book’s GitHub repository: https://github.com/PacktPublishing/Game-Development-with-Blender-and-Godot.
Introducing materials
As we mentioned in the introduction, materials are assigned to objects. However, you can’t assign materials to all objects. When you start up a new Blender file, it comes with a cube, a camera, and a light object. Only one of these objects has substance from Blender’s perspective, and that’s the cube. Let’s break this down a bit more to understand why it matters. Although a camera and a light source have physical properties and they occupy space in real life, this isn’t the case in Blender. They are conceptual objects.
A camera is a tool through which you see the world. So, you don’t get to see the visual properties of the camera itself. It doesn’t matter if the camera is painted red or blue. Similarly, a light source shines a bright or dim light, sometimes with a certain color, but it doesn’t take up space in a Blender scene. Therefore, if there is no substance, we can’t apply a material to these two objects.
If only there was an easier way to know which objects can receive materials…
If you select each of the default objects one after another, you’ll see that some icons are popping in and out of the view on the right-hand side of the screen. Different sets of options, represented by icons, are stacked in the Properties panel. This panel will display the relevant properties of the selected objects.
When you select the cube, you’ll notice that the Properties panel introduces a lot of icons, different than the ones for a camera or a light object. Either hover over the icons to see their title or simply click the icons to take a quick look at what’s at your disposal. While doing that, you’ll eventually discover the second-last icon, which should turn on the Materials panel (if you need to remember it later, it’s the icon that looks like a sphere with a checkerboard pattern).
You haven’t created a material yet. However, Blender starts with a default cube, which comes with a default material. Let’s learn how to change its color. After selecting the cube, follow these steps:
- Open the Materials tab in the Properties panel.
- Click the colored rectangle on the right-hand side of Base Color.
- Pick a different color from the color wheel.
The following screenshot will help you find all this. Once you have chosen a color, the change will not apply to the cube at first; you’ll find out why soon:
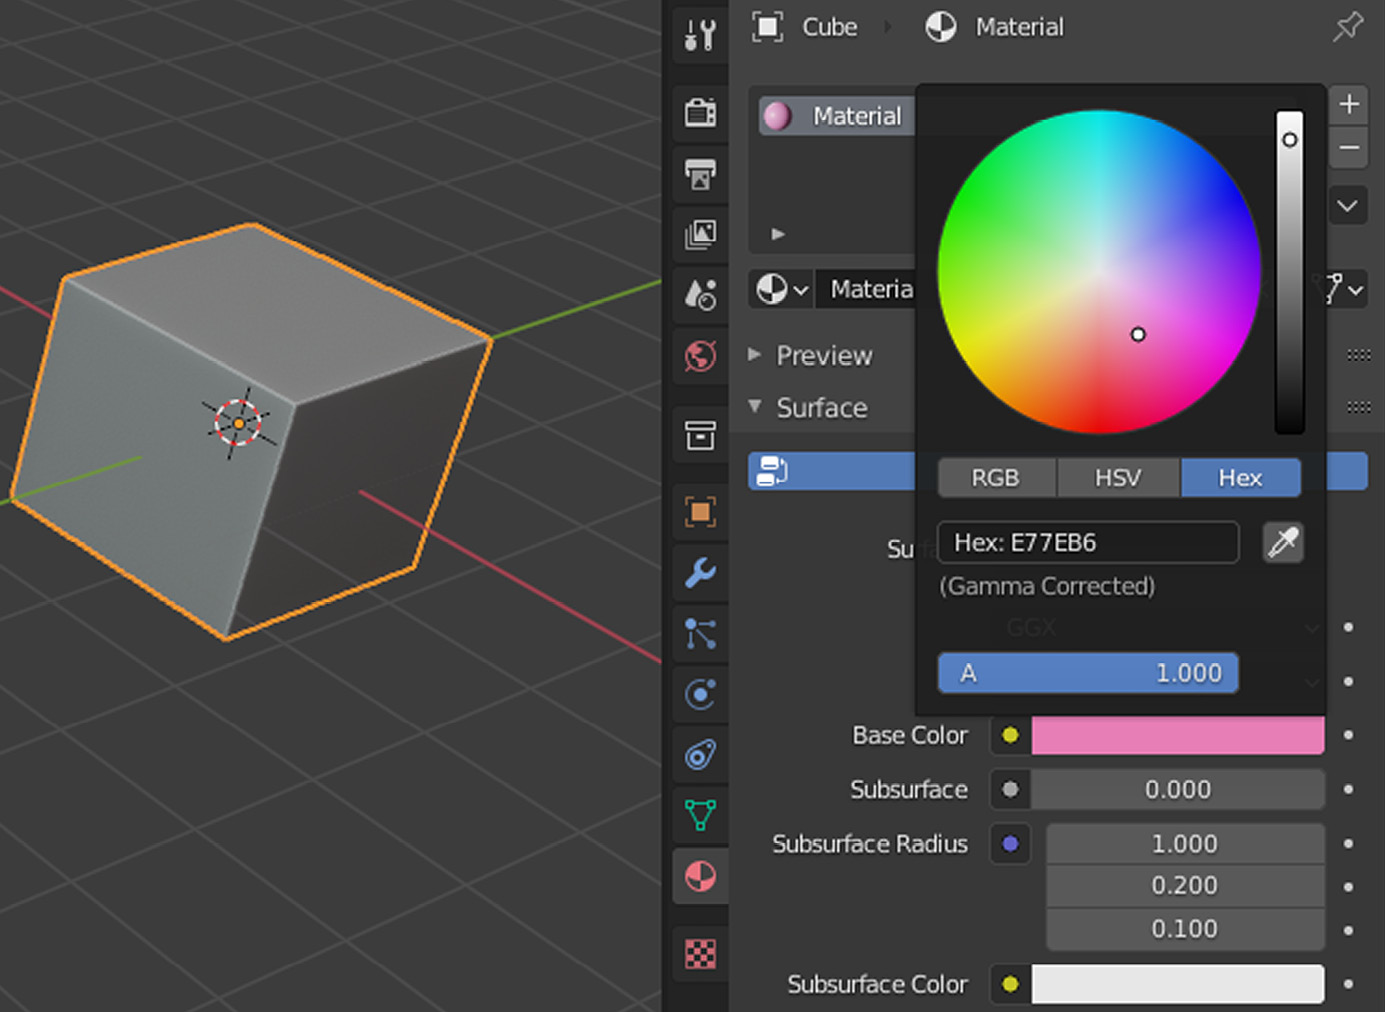
Figure 2.1 – Color is one of many things you can change for a material
While selecting a color, the color wheel will help you out. However, if you want to be more precise with the color you are selecting, the three buttons (RGB, HSV, and Hex) under the color wheel can help you. In the preceding screenshot, a value of E77EB6 was used in Hex mode. All these color modes act like units, but the result will always be the same color when you switch between different modes.
Panels and settings
Working in Blender doesn’t always mean you have to directly modify the geometry (vertices, edges, and faces) of your models; you will often find yourself looking for settings and altering them in many panels. Later in this book, when you work with objects such as camera and light, you’ll use the appropriate panels so that you can tweak the settings for these objects.
Let’s figure out why the last change you made didn’t reflect on the screen. By default, Blender shows models as solid objects. Sometimes, just like an X-ray may help a doctor understand what’s going on, you will need to see your model differently. The following are four different ways you can see your objects:
- Solid: The default option; you’ve been using this all along. It simply shows your model as a solid object.
- Material Preview: You will mainly see the color you applied to the object, but you will also see some of the other properties you have applied.
- Wireframe: The object will look like a metal wire has been bent and welded to create a frame that defines the model. Since this mode only renders edges and vertices, it is useful when you want to visualize polygons and detect overloaded areas so that you can easily optimize the models.
- Rendered: This is a more accurate view than Material Preview because it uses the rendering engine of Blender to create the most accurate representation. It does this by considering the lights and shadows in your scene. Naturally, it uses more GPU, so you’ll most likely work with other view options most of the time.
The previous list shows all the options you have for Viewport Shading. The default view, Solid, is fast but not accurate when you want to work with materials. Now that you’ve changed the properties of your material, you must be in Material Preview to see it in effect. To switch to it, press Z and then 2. Alternatively, after you press Z, you can select the appropriate option with your mouse, as shown in the following screenshot:

Figure 2.2 – Different Viewport Shading options presented in a radial menu
Now that you have a basic understanding of what materials are, we’ll go back to the barrel from Chapter 1, Creating Low-Poly Models, and create materials for it.
Creating materials
So far, you’ve been editing the default Blender material, but creating new ones is easy enough. We’ll need at least one object that has some substance. You can either continue with the barrel you’ve designed or open the file in the Start folder in the Chapter 2 folder of this book’s GitHub repository. If you go with your own file, you’ll most likely have the default material, labeled as Material, still in the Material panel. Using the minus (-) button, you can remove that and start fresh. The aforementioned file in this book’s GitHub repository has already removed this default material for you.
It might be tempting to click the plus (+) button right above that minus (-) button you may have just clicked. Go ahead and do it. You’ll end up with an empty line appearing in the material list. Those two buttons simply add and remove material slots to/from the objects, but not the materials themselves. Once you have a slot ready, you can designate a material for that slot. We’ll investigate slots and different materials as we move forward, but let’s create our first material by following these steps:
- Select the body of the barrel.
- Press the New button in the Material panel.
- Change Base Color to a brown color.
- Rename your new material Wood after double-clicking its title.
The following screenshot should help you compare your results with what’s expected to happen. While selecting a color, you can hit the Hex button (shown in Figure 2.1) and type in AD8654 so that your barrel is the same color as the one shown here:
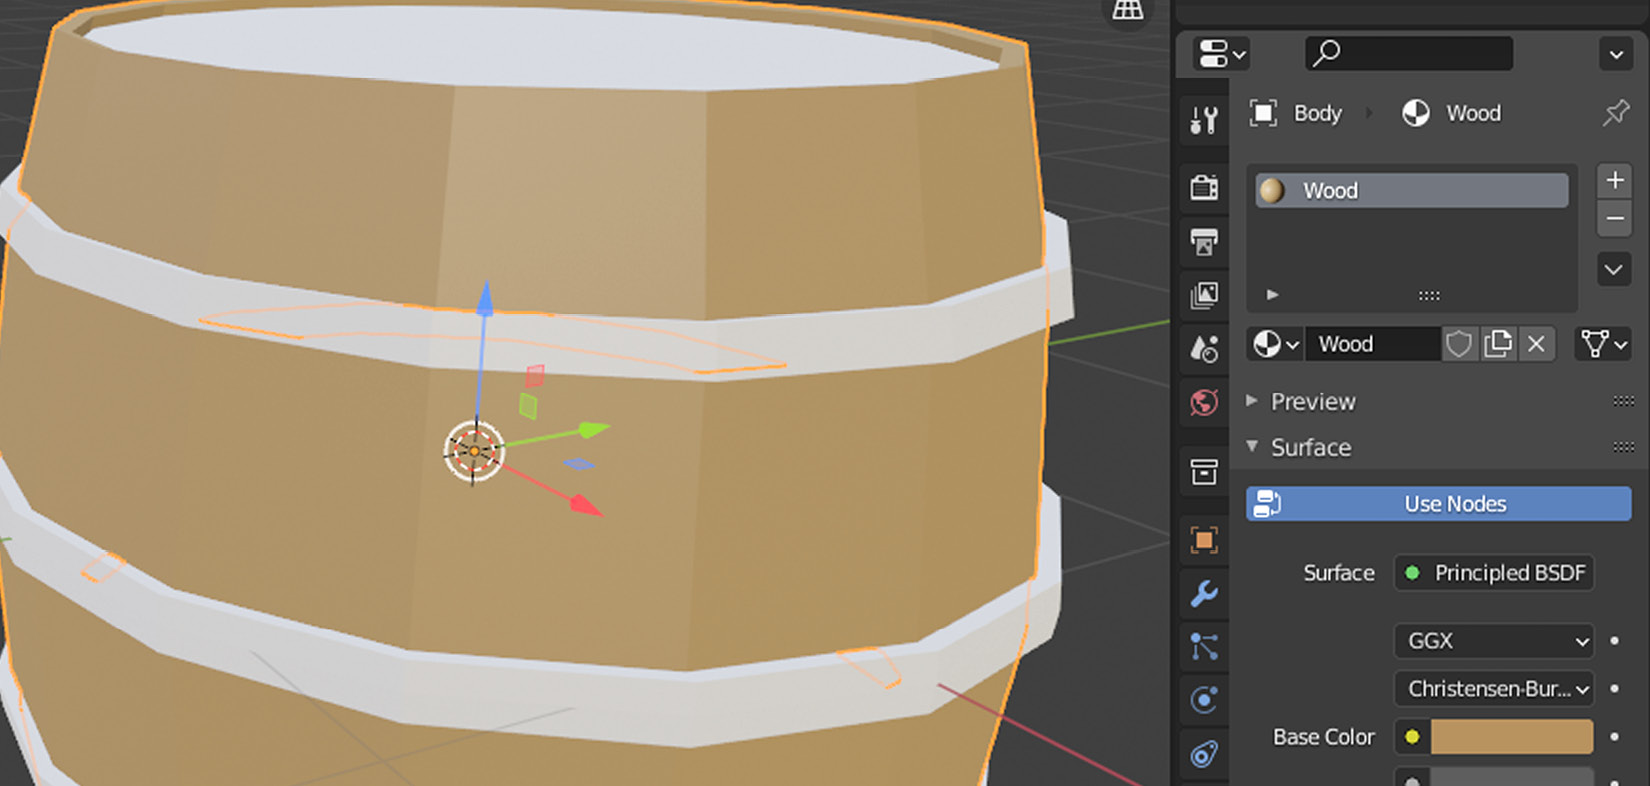
Figure 2.3 – The body of the barrel looks more wooden
Now, let’s create another material – this time, a metallic one. But where did that New button go? In this situation, when the New button is missing, you can do the following:
- Click the button with the plus (+) sign.
- Press the New button.
- Rename your new material Steel.
- Pick an appropriate color for it, such as 555E64.
So, this time, you have introduced a new slot and filled it with a new material. It would seem the Body object now has two materials and only one of them is in effect. Furthermore, we don’t need that steel material for the body part of our model anyway. So, we should remove it. While the Steel material is selected, press the button with the minus (-) sign to remove it from the body.
Although you have created a new material and removed it, this doesn’t mean it was all a waste. The material is still part of your Blender file but has been left unassigned. We’ll make use of it soon. This means that you have used the Material panel like a workbench. Now, let’s learn how to assign existing materials to objects.
Assigning materials
If you have your materials at the ready, then you can assign them to different objects easily. This saves you from creating the same materials repeatedly. We’ll see how this is done in this section.
The Ring object has not been assigned any material, but you can assign the Steel material to it. Start by selecting the Ring object, then expand the drop-down menu next to the New button, as shown in the following screenshot. Select the Steel material from the list. This will assign the selected material to the object:

Figure 2.4 – Existing materials are listed in this drop-down menu
It’s a good idea to name your materials according to their function, such as Wood and Steel, as it will be easier to find them later. You will also see that the color of the material is shown as a small icon next to the material’s name; this helps to a certain extent, but it’s limiting if you have many materials with similar colors.
The lid might use the same wood material but, maybe, we can change things up a bit. After selecting the Lid object, do the following:
- Assign the Wood material.
- Click the New Material button (it looks like two sheets of paper).
- Rename Wood.001 to Dark Wood.
- Choose a darker color, such as 7E623D.
You have just created a copy of the original Wood material for the Lid object. If you expand the materials list, you’ll see all the available materials. Feel free to add, remove, duplicate, and/or assign as many materials as you wish for practice.
Additionally, you can assign materials not only to the whole object but also parts of that object. If you select some faces in Edit mode, then you can also apply a material to those selected faces only. In essence, the Material panel lists the materials associated with your model, regardless of whether it’s applied to the whole model or parts of it.
Things must look a bit more colorful at this point. However, despite all your efforts, you can only go so far by just changing colors. The metal rings still don’t look metallic enough. They should look more reflective, so we are missing something here. We need to discover new ways to give extra qualities to the base color. That’s what shaders are for and that’s what we’ll tackle next.
Discovering shaders
Shaders were defined as two things at the beginning of this chapter: a piece of code and a user manual. Have you felt like you’ve been writing code so far? Most likely, no.
Nevertheless, behind that Material user interface, there is a code layer, which is the shader. For example, the default shader you’ve been using so far has hundreds of lines of code. The following is only a portion of the code that makes that shader:
metallic = saturate(metallic);
transmission = saturate(transmission);
float diffuse_weight = (1.0 - transmission) * (1.0 -
  metallic);
transmission *= (1.0 - metallic);
float specular_weight = (1.0 - transmission);
clearcoat = max(clearcoat, 0.0);
transmission_roughness = 1.0 - (1.0 - roughness) * (1.0 -
  transmission_roughness);
specular = max(0.0, specular);
Luckily for you, you don’t have to write a single line of code. More importantly, Blender interprets the shader code so that it can offer UI elements such as color pickers to select colors, sliders to define a range of values, and drop-down menus that come with more advanced options so that you can utilize the shader easily.
The “user manual” aspect of shaders regards which properties of the material will be exposed to the user. For example, color is an obvious setting we should be able to change. The shader code will expose color and some of the other properties of a material to the outside world so that you can use the material easily. This is very similar to the way you use any device. You usually interact with a device via an interface by clicking buttons and turning some dials. A combination of these actions triggers certain events internally, which are not revealed to you, but you get to experience the result of these operations.
Going back to the original definition, you work with materials via a shader. These two go hand in hand. Moreover, just as Blender introduces a default material, it also comes with a default shader assigned to this material. It’s called Principled BSDF. You can see this name next to the Surface section of the material’s details. If you click Principled BSDF (Principled from now on, for simplicity’s sake) in the interface, you’ll see a list of other shaders. Selecting a different shader from that list will associate a different shader with your material. Some of the other shaders in that list are as follows:
- Diffuse BSDF: A basic shader that is responsible for displaying color on a surface. When objects are supposed to have a simple color – in other words, diffuse a certain color – this is the right shader to use.
- Emission: If you are designing an object and you want it to act like a light source, such as a fluorescent light, you can use this shader so that it looks like it’s glowing.
- Glass BSDF: A shader with which you can simulate a glass surface. It comes with an Index of Refraction (IOR) setting so that you can decide how transmissive the glass is since there are different types of glass out there.
- Glossy BSDF: This is used to add reflection, which is great for simulating metals or mirrors.
- Toon BSDF: When you need the surfaces and edges to have a cartoony effect.
When you want your objects to show different qualities, then you will want some of the simple shaders to work together. For example, in a lot of science-fiction movies that show advanced machines and such, it is common to see glowing force fields that are also transparent. If you use Glass BSDF only, you’ll see through but without a glow. If you use Emission, there will be no see-through visibility.
So, the Principled shader is the best combination of commonly used shaders. It acts like an uber shader that employs properties of different shaders under one roof. For that reason, at this point, it’s best to stick with the default shader.
BSDF
You’ll notice that some shaders come with this abbreviation. BSDF is a technical term and stands for bidirectional scattering distribution function. It is composed of BRDF and BTDF, which are responsible for reflecting and transmitting the light, respectively. Altogether, this system is responsible for how realistic the light will interact with your object. In layman’s terms, it calculates how much of the light is soaked by the material, and how much of it will be reflected by considering intensity, angle, and so on.
Now, let’s learn how to make modifications to the Steel material for our barrel. Unfortunately, there isn’t just one setting you can turn on to give a surface a metallic look. It turns out that not all metals are created equal. Some metal surfaces look more reflective or shiny, while some look rougher, and so on. We’ll use a mixture of the following properties with different values to get the result we want:
- Metallic
- Specular
- Roughness
The dictionary definitions of these words might be good enough. That being said, in the context of Blender, those three properties work in tandem to create different metal surfaces. Therefore, you need to balance the intensity for each, similar to working with a recipe sometimes. When you are changing these values, to see the effect, you need to be in Rendered mode. You can switch to it by pressing Z and then 8.
Shader values
The numerical values you change for a shader don’t have units but act more like a percentage or intensity. 0 means you want none of it. 1 means full scale. So, 0.5 means 50%.
Let’s analyze the results shown in the following screenshot. A default Blender material comes with 0, 0.5, and 0.5 as values for Metallic, Specular, and Roughness, respectively. So, the sphere in the top-left corner has values very close to a default Blender material. This means that, by default, your models will have some shine and roughness:

Figure 2.5 – The same spheres with the same color but with different metallic, specular, and roughness values
In the top-right corner, you can see that only the metallic value has been increased. Even though the specular value is the same, we get to see more light being reflected. This makes sense because metal surfaces reflect more light. So, a surface that has more metallic qualities should reflect more light. This is exactly the case for the bottom-left model.
Finally, the sphere at the bottom right is what happens when we have a fully metal surface with an amplified roughness value. Notice how the shine is distributed more evenly on the sphere’s surface because it’s rougher. When light hits a rough surface, all the nooks and crannies of the surface will reflect much of the light in many different directions. When the surface is less rough or more polished, the light will directly bounce back into your eyes – in this case, Blender’s camera. Hence, it will look shiny.
By the way, in all these cases, the base color is still the same, but the final look sure does feel different. The user manual page for the Principled shader contains a few charts that depict how some of this shader’s settings interact with each other. It’s similar to what’s shown in the preceding screenshot but it comes with a lot more cases: https://docs.blender.org/manual/en/latest/render/shader_nodes/shader/principled.html.
The following screenshot shows the difference between two materials that both use the same base color:
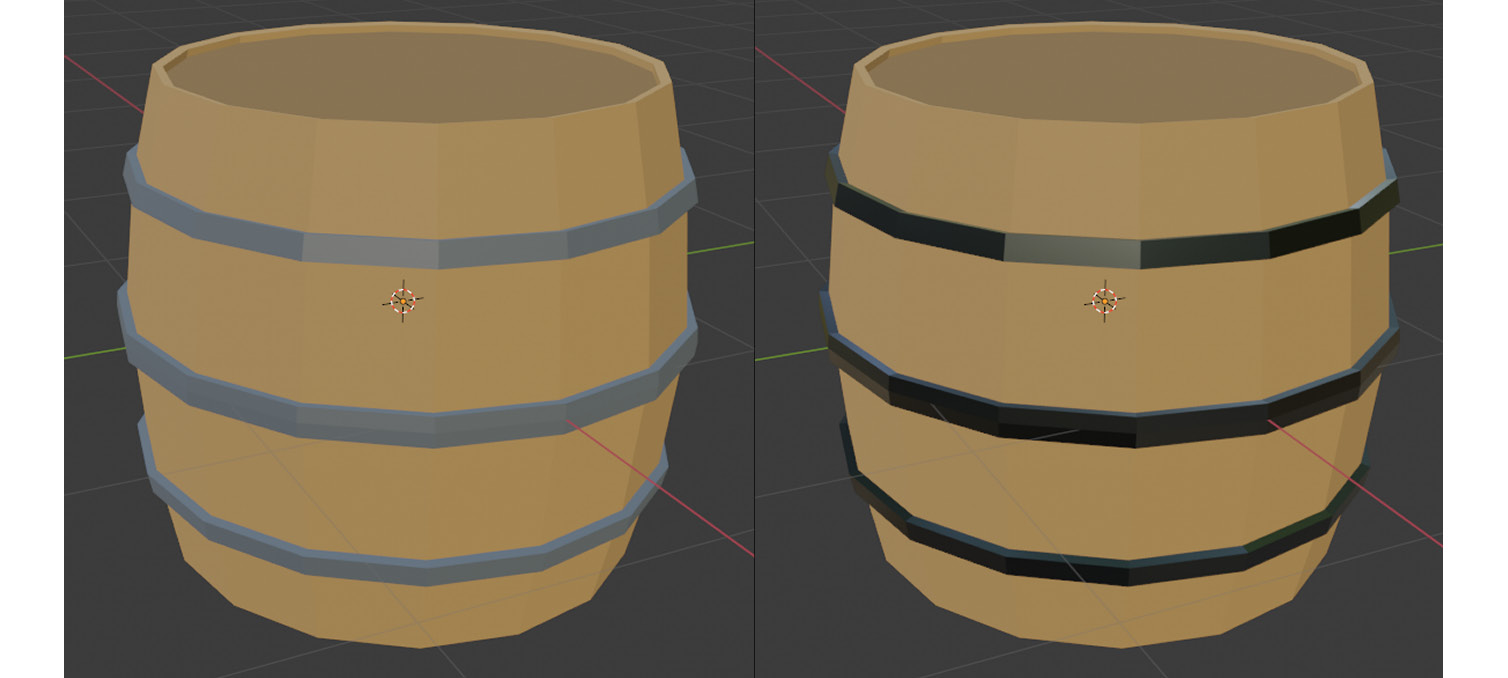
Figure 2.6 – As expected, the metal rings are reflecting some of the light
The barrel on the left uses the default metallic, specular, and roughness values Blender provides. The barrel on the right has a material with 1.0, 0.5, and 0.2 set for its Metallic, Specular, and Roughness values, respectively. In summary, chances are you’ll have to play with all three properties to get the metal look you want.
Non-metallic objects
Playing around with these three properties is also true for non-metallic cases, such as bricks, liquids, grass, and more. Let’s compare a brick and a liquid, for example. Both can have the same base color – that is, blood red or some other tone. A brick is not a reflective object, so it should have very low – perhaps 0 – metallic and specular values. Most likely, its roughness value will be high. On the other hand, the liquid will need to be less rough and have a higher specular value.
Playing with the properties of a shader can be fun but it can also feel like you don’t know what you are doing half the time. There is nothing wrong with experimenting to achieve the look you want. If you want to feel more confident about what you’re doing, you can start observing objects around you. This may give you a better insight into choosing the properties that will give the result you’ve imagined. The property names are helpful in that sense, but they rarely work alone, so mix-and-match is necessary, even for professionals.
We’ll investigate materials and shaders again when we cover Godot Engine, but here, you’ve seen how they work in Blender. Let’s summarize what we have learned so far.
Summary
Throughout this chapter, you learned how materials can be used to give objects a different look. To create materials, you used the Material panel as a workbench to prepare many materials at once, and later assign these materials to different objects.
Shaders are almost inseparable from materials, and you got a glimpse of how many options they come with. You also saw that you can pick different shaders for your materials. However, most of the time, Blender’s default shader, Principled BSDF, will be enough.
Using the default shader, you created a few materials that have different qualities, such as wood and steel. Furthermore, you discovered ways to create different-looking metal surfaces by utilizing metallic, specular, and roughness properties with varying intensities.
There is another topic that is usually covered alongside materials and shaders: textures. It was intentionally omitted, but it’ll be covered in the next chapter with an explanation of why. For now, all that matters is that textures are graphic files that may enhance a material’s visual impact. When you are ready, turn to the next chapter so that you can get to know them better.
Further reading
Blender’s official documentation provides a detailed enough explanation of how different shaders and their properties work. The following URL lists many shaders you can investigate: https://docs.blender.org/manual/en/latest/render/shader_nodes/shader/.
Sometimes, seeing more examples may help you in your creation process. BlenderKit is a useful Blender add-on that you can use to access a whole bunch of materials and a lot more, such as models and scenes. Visit https://www.blenderkit.com/ to read the installation instructions.
Since this book is about game development, we are only covering the basics of Blender in the context of helping us build a game with low-poly models. This means we are also limiting the level of detail that’s employed while creating materials for the game. However, many professionals use Blender for different reasons, such as to create marketing material, product visualization, animation, and more. So, should you want to dig deeper into creating materials in a different workflow, here are some of the many great online courses out there: