10
Making Things Look Better with Lights and Shadows
We have a simple and clean-looking level design, but it could use a good makeover. For example, the sconces on the walls and the candles on the floor are just sitting there without adding much interest to the scene. Also, there is the slight issue of having this level as an underground environment since this is a cave. We must find a way to simulate the light from the exterior since Clara sailed her boat in. Overall, we will have the level be lit just enough for the players to perceive things.
In this chapter, we’ll introduce lights and shadows to our workflow so that our scene looks visually appealing. We covered lights earlier in Chapter 4, Adjusting Cameras and Lights, but we did that in the context of Blender. While generic concepts still apply, we’ll have a chance to do things from a game development perspective this time instead of taking an artistic render in Blender.
Shadows are not automatically available in Godot. Therefore, we’ll show you how to turn them on and discover some of the shadow settings that balance quality and performance. Besides placing light objects and enabling shadows, and altering their qualities, we will present a higher-level concept, creating a WorldEnvironment. This is also referred to as post-processing and it’s a great tool to improve the look and feel of your scenes.
Although we’ll be improving the level with each new addition of the topics we have listed so far, to tie this all together, we’ll also tackle a somewhat advanced topic, global illumination, which will add a realistic touch to the scene.
We have many steps to take before we will have created a handsome-looking level. In this chapter, we will cover the following topics:
- Adding different types of light
- Enabling and adjusting shadows
- Creating post-processing effects
- Using global illumination
Even though the purpose of this chapter is to understand how the lighting system works, we’ll introduce a few complementary Godot topics along the way.
By the end of this chapter, you’ll be able to utilize lights and enable shadows, as well as to take advantage of global illumination and post-processing effects that will further enhance the atmosphere in the level.
Technical requirements
We’ll add and change things from where we left off. You have two options at this point – you can either keep working on your copy from the previous chapter or use the Finish folder mentioned in Chapter 9, Designing the Level, which is available in this book’s GitHub repository: https://github.com/PacktPublishing/Game-Development-with-Blender-and-Godot.
Adding different types of light
In Chapter 4, Adjusting Cameras and Lights, we discussed how different types of light worked – more importantly, the kind of effect they bring to a scene. In this chapter, we’ll revisit the same topic but pursue the effort in the context of Godot.
Blender uses four light types: Sun, Point, Spot, and Area. However, Godot has only three lights, as follows:
- DirectionalLight: This is the equivalent of the Sun light in Blender. We stated directionality in the Sun light’s description. The angle of this light type is the most important since it’s an infinitely distant light source, so all its rays are considered to flow parallel to each other. So, in Godot, this concept is part of the node’s name, hence making it easier to remember.
We’ll not be using this type of light in our scene since it’s an indoor environment. Despite that, it may still be tempting to utilize it to give an overall light effect, but this light source would overwhelm the whole scene. We need something else that can be fine-tuned as we go. Therefore, we’ll focus on the two other light types.
- OmniLight: This is what the Point light is in Blender. Lightbulbs and, yes, the sconces on the walls, are the right kind of objects for which this type of light is good. As a reminder, omni means in every direction.
- SpotLight: This one is self-evident – it’s the Spot light in Blender. It’s good for simulating car lights, flashlights, and any other light source that has a beam-like quality. We’ll be using this light to simulate the exterior light creeping into the cave.
So, where is the Area light in Godot? It simply doesn’t exist. There are different mechanisms in Godot that you can use to simulate the effect of an Area light in Blender. Often, this kind of light is for mimicking the light coming in from a window, and it can be simulated with emissive materials.
Speaking of using different types of light, let’s start by lighting those candles.
Lighting candles
For this type of exercise, the OmniLight type is the right choice, but how many are we supposed to have? If you look closely at the candle model, you’ll see that the model is composed of multiple candles; some short, some tall. Does it make sense to place one OmniLight above each wick? It’s entirely possible but it’s also an artistic decision to make, and we leave it to you.
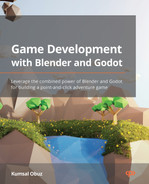
In our case, we’ll assume that the overall light coming from this object could be reduced to a point over the candles’ wicks. Thus, it’s perfectly fine to place one OmniLight for the whole model. It’s time to demonstrate how this can be done:
- Double-click Candles_1.glb in FileSystem to create a New Inherited scene. Save it as Candles_1.tscn in its original folder (Models/Candles/).
- Add an OmniLight to the Scene tree.
- Adjust its Y position to 0.8, for example, so that it’s slightly over the wicks.
This will place a point light in your candle scene. Right now, with the default settings, it’s hard to see the impact. If you get close to the light object and adjust your camera angle so that you no longer see the horizon and the sky, you can get a better view. Perhaps turn the visibility of OmniLight on and off in the Scene tree to see the light’s contribution.
We’ll leave most of the settings in the Inspector panel untouched for now, but you can change the light’s color to, for example, d6d58e. This can be found under the Light section in the Inspector panel. The result is as follows:
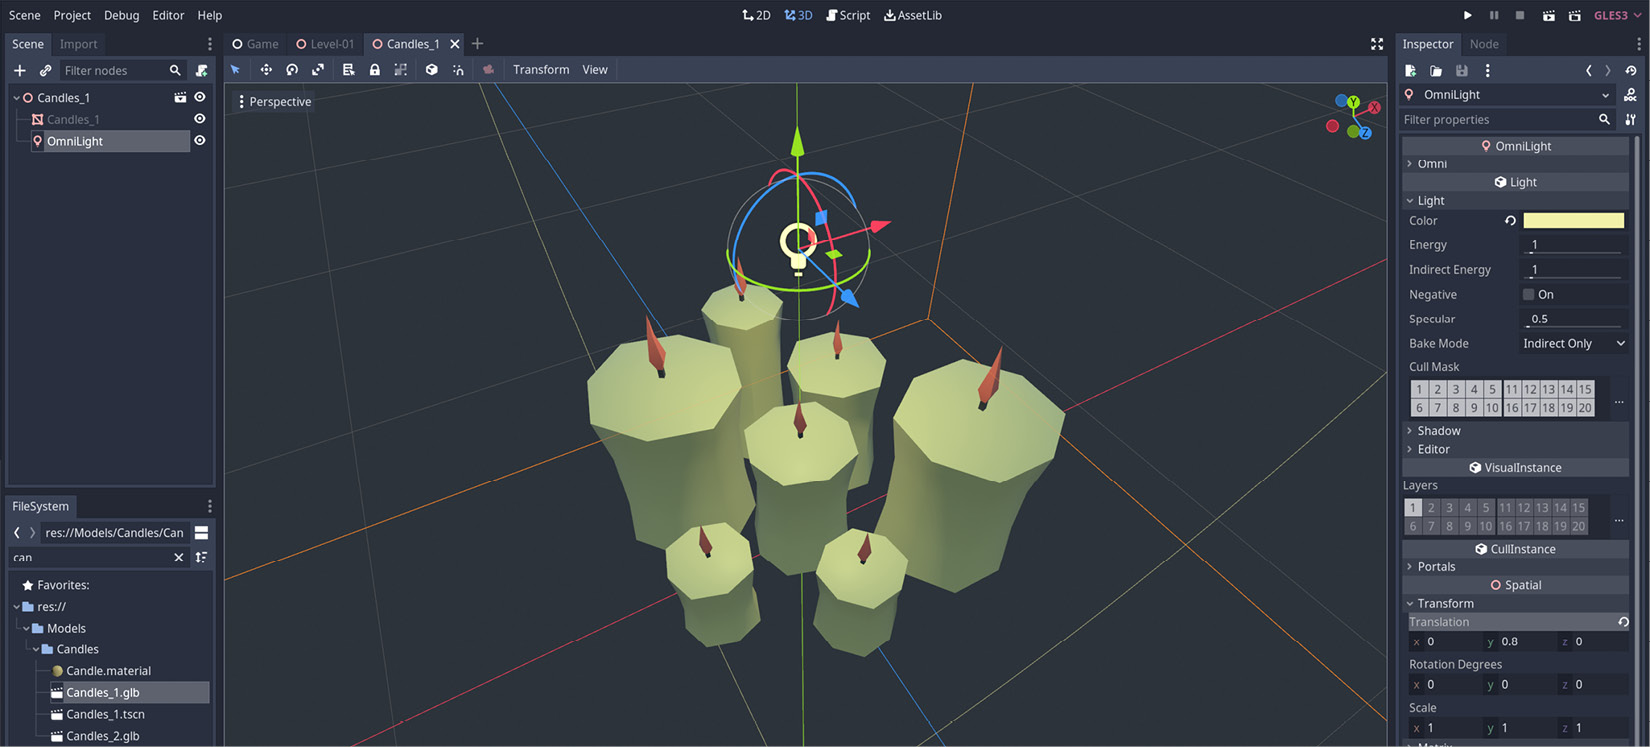
Figure 10.1 – An OmniLight with a yellow color right over the candles
Let’s take a moment to discuss why we’ve added a light to a scene that we are constructing out of a model instead of directly adding it to the level scene. After all, we already had several Spatial nodes to hold items that were similar, such as walls, columns, and more. We could have created a Spatial node called Lights and stuck a bunch of OmniLight nodes in there.
By introducing a light node to the model scene instead of the main level, you can utilize this candle scene in other scenes as well. Hence, you don’t have to create more light objects and position them over all the candles in the level. When you are decorating a level, and when you need candles, they will arrive as a full-service package.
Overcoming the jagged edges
After adding lights to the scene, you may notice that some objects look jagged around the edges since the details are popping up more. To eliminate this, you can turn on the anti-aliasing setting. The hard edges will be smoothed out, objects will blend more seamlessly, and everything will look easier on the eyes. To enable it, set the Msaa value to 2x. This setting can be found under the Quality subsection of Rendering in Project Settings.
So far, so good, but will the lights always be on? It seems so, for now. Let’s see how we can complete the full-service aspect of the candles by introducing a mechanism that will switch the lights off. To do this, we need to add a short script:
- Right-click the root node (Candle_1) and choose Attach Script.
- Keep everything the same in the upcoming pop-up screen, but change the path so that it shows /Models/Candles/Candles.gd.
- Your script file should contain the following lines of code:
extends Spatial
export(bool) var is_lit = false setget switch
func switch(condition):
is_lit = condition
func _process(_delta: float) -> void:
$OmniLight.visible = is_lit
This will create a toggle state for OmniLight, and it’ll start its life off by default. Only when the player, or you as a developer, change the value of is_lit will the light become visible again.
To test this without running the game, you can add the tool keyword at the beginning of the script and see your changes live while you are still working on the level. Observe how the light’s visibility changes in the Scene panel when you toggle the state of is_lit in the Inspector panel.
We have another candle model, Candles_2.glb, that could also benefit from all this. Instead of starting from scratch, this is what we suggest you do:
- In the Candles_1 scene, right-click the OmniLight node in the Scene tree and choose Copy.
- Create a scene out of Candles_2.glb and save it in its original folder.
- Right-click the root node of this new scene and choose Paste.
- Select the root node and attach Candles.gd to the Script property in the Inspector panel.
This will minimize the number of steps you have to take to add an OmniLight, position it, then write pretty much the same script for controlling it. Here, we are using the same script for both scenes since the node references in the scene are the same. After making our most recent changes, the Godot editor will look as follows:
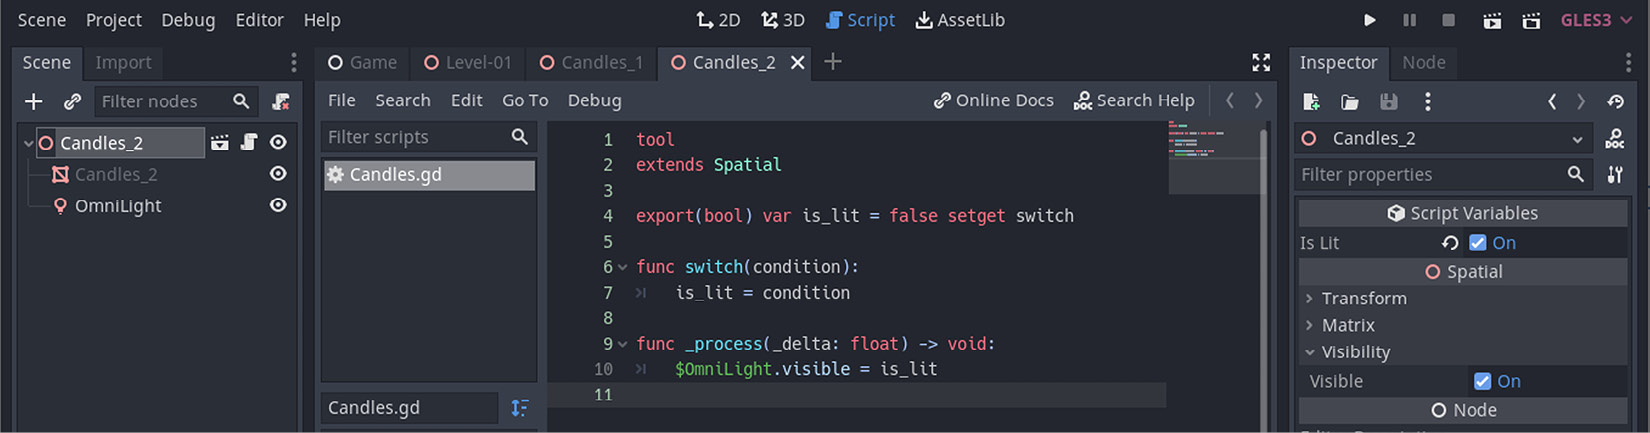
Figure 10.2 – A new candle scene using the same script for switch functionality
Although we have been working on a smart way to add lights via attaching light objects to the candle models, we haven’t made any changes to the level itself. We will discuss this next and share a few words about workflow improvements that you can make in your future projects.
Introducing candles to the level
In Chapter 9, Designing the Level, we instructed you to instance glTF files directly to the level, which kept the filesystem clean without creating redundant .tscn files. Otherwise, you’d have had one scene file per model with no purpose at all. A simple workflow such as only adding the models to a scene is often enough, especially in cases where you don’t have prior knowledge of where your project is headed.
On the other hand, in certain cases, such as where you have candles and sconces, you will most likely have a light node beside a MeshInstance node, as well as a script attached to control the light’s behavior. In that case, it pays off to convert the model into a scene and build up from there.
The Scene tree for the level still holds the raw candle models. In Chapter 9, Designing the Level, we used two types of candles but three models in total to decorate the level. It’s perfectly alright to remove these models from the level so that you can instance the new candle scenes. You would have to reposition these new items though. So, we’ll follow a different path to keep the position information:
- Select Candles_1 in the Scene tree.
- Instance Candles_1.tscn, which will result in a nested node.
- Drag this nested node out of its parent and make it a sibling of its parent.
By nesting the candle scene inside the old model instance, we are appropriating the position. If you added the candle scene directly into the Props node, you’d have to find the position of the model instance and apply it to the new item.
You can repeat this process for the other two candles, which will eventually double the number of visible candles in the level. That being said, our initial three candle model instances are no longer necessary, so you can delete them. Also, notice how a script icon appears in the Scene tree when you bring the candle scene versus keeping just the model itself. The following screenshot shows the result:
Figure 10.3 – The new candles in the Scene tree have script icons
The preceding screenshot shows not only the more advanced candles that have been added to the level but also the fact that you can turn these candles on and off via the Is Lit property in the Inspector panel. Similar to what you’ve done for the candles, you can continue practicing point lights by creating a scene out of the sconce model. In that case, the light object’s position in the scene will most likely be higher since the model is taller, but the concept is the same. You can even bind the same script to the root of this sconce scene.
This creates a bit of a dilemma though. So far, we have kept everything related to candles in their own folder, with the script included. However, the light switch script is so generic that it could be used within any scene that has a similar structure. Although it’s also possible to attach the Candles.gd script inside the Candles folder to a scene in a different folder, if you want to generalize things, you can move the script file into a separate Scripts folder at the root of the project.
This is one of many project management conundrums you’ll face, so it’s up to you how you want to go with it. We’ve decided to keep things as generic as possible. Hence, the Finish folder of this chapter will have both the candles and the sconce share the light script from the Scripts folder.
After swapping the sconce models with the sconce scenes, the level will have a bit more character, as shown here:
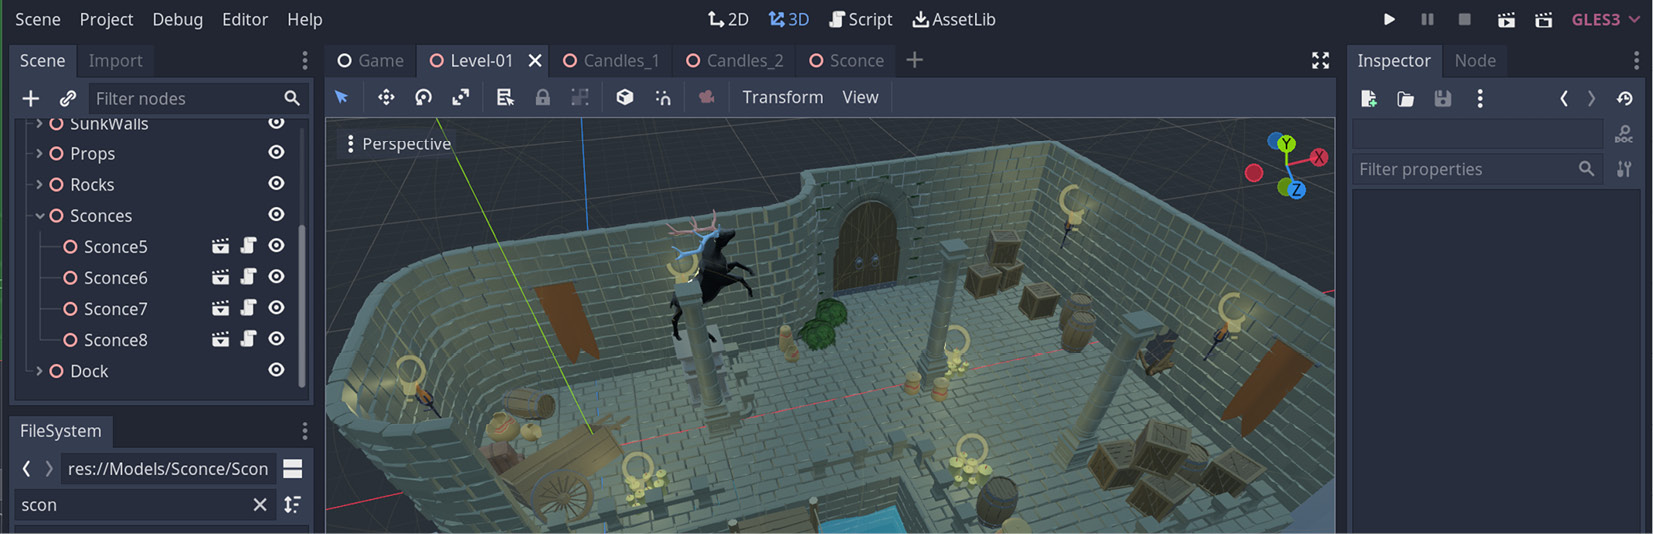
Figure 10.4 – Three candles and four sconces are illuminating the level
We have the basic lights covered, but we still don’t have the kind of light effect you may see inside a cave. The idea is that Clara used an opening to enter this structure, so it makes sense to get some sunlight into the general area. We’ll achieve this by using a SpotLight node.
Mimicking the sunlight
The narrative in our game is that the dock area Clara secured her boat to wasn’t too far off from the entrance. Hence, it makes sense to get some sunlight from the exterior. An easy way to get an effect like this is to use a SpotLight node. Let’s also discuss an alternative.
Using a DirectionalLight node seems tempting at first, but that would brighten the whole scene. Also, we want this cave to look as dark as possible, and only to be illuminated with artificial lights such as candles and sconces. To achieve both goals, you’d have to position planes over the level, pretending that they’re the cave’s ceiling, to block most of the light. So, since that kind of effort feels counter-productive, we’ll try to light what we need instead of blocking the light.
Therefore, using a SpotLight node seems to be the best choice we have. We’ll describe the process we used to place the light over the level so that it highlights the boat and a portion of the pier. Here we go:
- Select the root node of the level (Level-01).
- Add a SpotLight node and position it over the boat seven units or so in the Y direction.
- Rotate it -70 degrees in the X and Y directions (hint: use Rotation Degrees under Transform in the Inspector panel).
- Change its color to d6d58e.
- Expand the Spot section in the Inspector panel and set the following values:
- Set Range to 20.
- Set Angle to 55.
We’ll provide you with a screenshot right after we explain what the intention with the light’s placement is and give a disclaimer about the screenshot itself. Since the default environment settings in your Godot project will result in a scene that’s too bright for you to see the impact of what you are doing, we temporarily tweaked some settings to better highlight the contribution of the light you are working with.
We’ll study environment effects in the Creating post-processing effects section after we finish exploring lights and shadows. For now, we still owe you an explanation about the settings of the SpotLight node. Even when you’ve been following a similar layout, the coordinates you have picked for your floor tiles might be so different that there is no easy way to ask you to place the light in a certain position. Hence, we are giving you a mix of general and precise directions. This is what we have got so far:

Figure 10.5 – The SpotLight node simulating the sun in the cave
The preceding screenshot shows the SpotLight node right above the boat’s back. We chose the top-down view for you to see how far the light goes from this object. The Range and Angle properties you set in the Inspector panel will configure this light source so that it reaches far and wide enough to illuminate the entrance partially. Thus, if your layout necessitates different values so that you have an area lit just enough, as shown in the reference picture, you may have to alter the rotation and position values.
If you fancy, you could create another SpotLight node and alter its values as if there is a secondary opening in the rock formation that is letting more light through. Once you figure out the technical parts, it’s up to you to push the envelope for an artistic result that pleases you.
So far, we’ve been analyzing different types of light and their impact on our level. With light, we usually expect shadows. These are not enabled by default, so we’ll discover how to turn them on, as well as adjusting a few settings in the context of our project.
Enabling and adjusting shadows
In some situations, such as in stage arts, engineers work hard to illuminate parts of a stage with lights by casting their beams from so many angles that shadows can be eliminated. That’s an extreme case. Normally, a shadow is something that occurs naturally when there is a nearby light source.
Despite this natural phenomenon, simulating shadows doesn’t automatically happen in computer simulations just because there is a light object. The GPU has to know where the light is coming from and how strong it is. So, it can create an area, starting from the base of the object the light is turned to, and stretch this area out gradually in the opposite direction to the light by blending it into the surface the object is standing on. This is approximately how shadows are calculated and simulated by computers.
In Godot Engine, a light source is responsible for its own shadow. This means the shadow settings are part of a light object, but since the effort is resource-intensive, Godot has this property turned off by default. Let’s look at an example and see how we can enable it:
- Double-click the Candles_1.tscn item in FileSystem to open it.
- Select the OmniLight node and expand its Shadow section in the Inspector panel.
- Turn the Enabled property on.
The color of the shadow is irrelevant at this point, but it might be something you can tweak in your projects to get the dramatic effect you wish. At this point, we advise you to open the Candles_2 and Sconce scenes to enable the shadow for the OmniLight nodes they have. When you save all these three files and go back to the Level-01 scene, you should see something similar to the following:
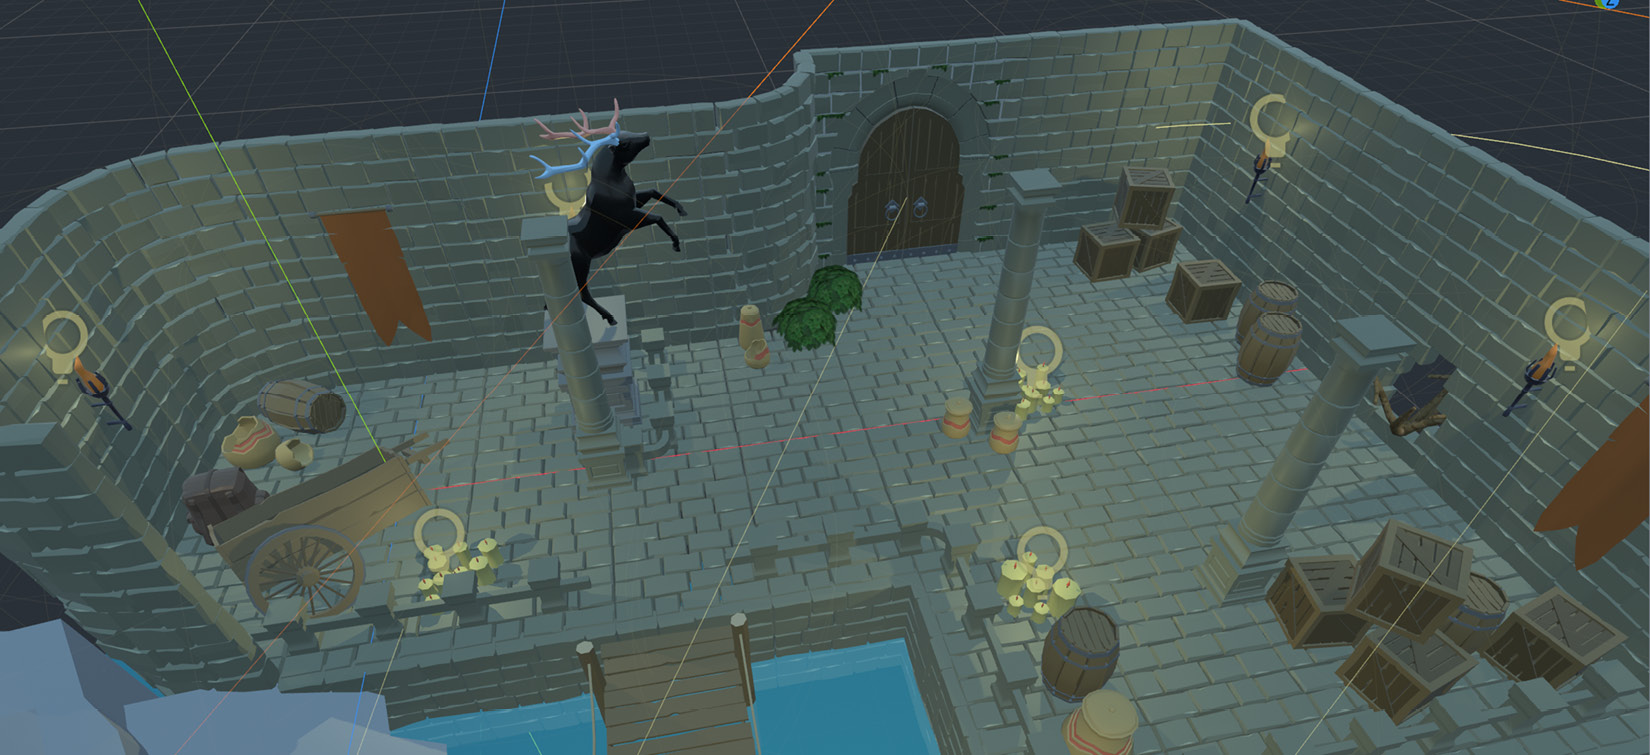
Figure 10.6 – Let there be shadows, and shadows you shall have
Notice how enabling shadows elevates the experience overall. The column, the crates, and the other objects have started to come to life. There is one big missing piece in this picture, though: we still haven’t enabled the shadows for the light source we are using to simulate the sun’s effect. Go ahead and turn its shadow on; you’ll make the pier pop up, as shown here:
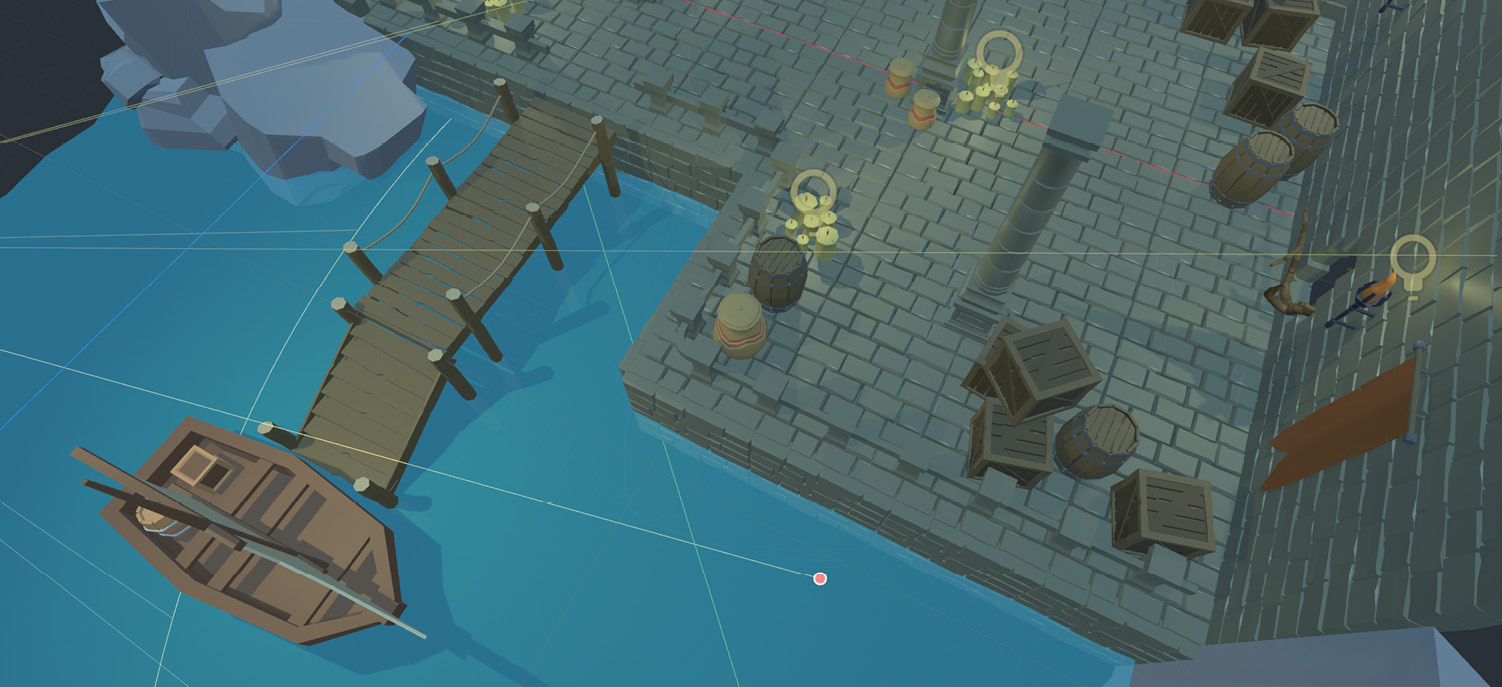
Figure 10.7 – The pier and the boat look more realistic thanks to the sun’s shadow effect
We are slowly improving the visual quality of the level. Our last effort introduced shadows. They are nice and all, but sometimes, they can also create a few defects. Now, let’s talk about some of the settings you can find in the Shadow section of light nodes in the Inspector panel:
- Bias: Some names you come across in game development will sound technical, and won’t always give you a quick idea about what they control. This one certainly sounds like one of those. In simple terms, this property controls where the shadows are going to start in comparison to an object’s volume. A picture is worth a thousand words, so please refer to the following diagram to see what different Bias values will lead to:
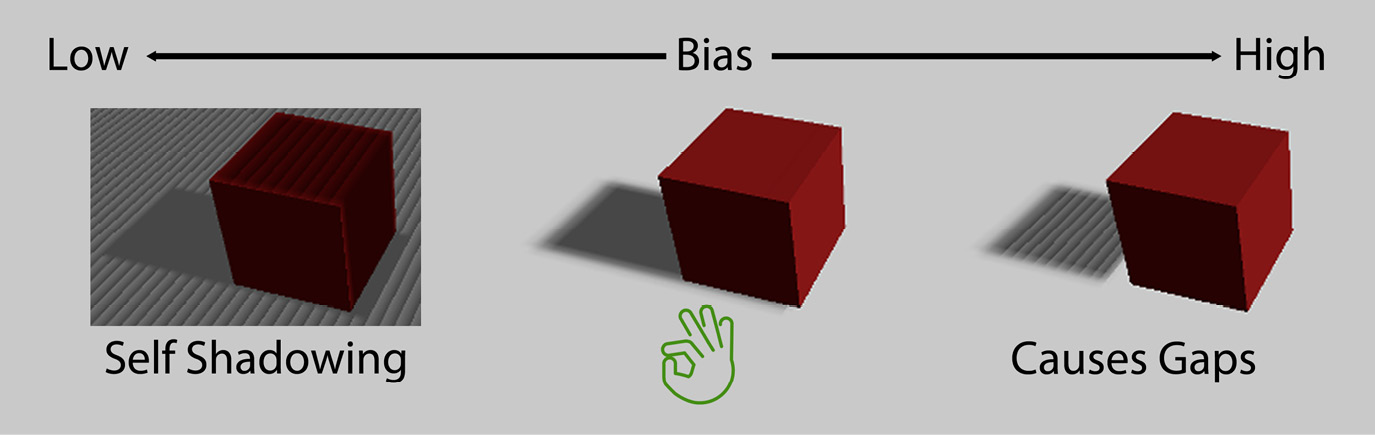
Figure 10.8 – Different bias values and their effects
- Contact: When you have a high Bias value, and it creates a gap between the shadow and the object (as shown in the preceding diagram), this property will try to fill in that gap.
So, if you happen to have visual glitches due to enabling shadows, which may result in shadows not always meeting an object or self-shadowing issues, as shown in the preceding diagram, we suggest you explore using a combination of the Bias and Contact properties for your lights.
The level is starting to look like there is more life to it, thanks to lights and shadows. Still, everything looks a bit too bright. If only we could dim the overall brightness… We certainly can, and that’s what we are going to explore next.
Creating post-processing effects
Since we are pretending that Clara is visiting a cave that’s got some human traffic in its past that led to having a pier built and sconces hung on the walls, it’s only normal to expect some areas of it to be really dark. We have been placing lights and turning on shadows to improve the visual fidelity of our scene, but we are fighting against the environment; it’s just too bright.
In this section, we’ll study an interesting Godot node that will control the environment or world settings so that you have a much better hold on how your world looks. This kind of process is also referred to as post-processing since its effects are applied after the directly placed elements such as lights, shadows, reflections, and others have been processed. It comes with a lot of settings, and hopefully, this will be clearer after we explore some.
A node for everything
If you are coming from Unity, then the node system Godot uses might be confusing. In Unity, you attach scripts to game objects to add or control the behavior of systems. Nodes are analogous to scripts in Unity, but nodes are much more practical since you can also attach scripts to Godot nodes. This is convenient since you can nest nodes and compose bigger node structures. In Godot, you’ll most likely find a node that will do a crucial job. One such node is what we are discussing in this chapter. Also, you can find more about the process behind using nodes in the Godot’s design philosophy section at https://docs.godotengine.org/en/3.4/getting_started/introduction/.
Godot has a nifty node, WorldEnvironment, that is responsible for the overall atmosphere in your scenes. Although the node’s name is quirky, introducing it to the level is no different than adding other nodes:
- Open the Level-01.tscn scene.
- Add a WorldEnvironment node to the Scene tree. For its Environment property, use default_env.tres from FileSystem.
- Double-click default_env.tres in FileSystem to populate the Inspector panel with its properties.
Chances are nothing has changed, but we have effectively created a WorldEnvironment node and attached an environment resource to it. When you create a new Godot project, it comes with a default environment resource. Instead of creating a new resource, we are repurposing the default environment resource that’s been sitting in the project folder all this time.
This opens up different possibilities for you. Your game may have different levels where you would like to have the visual clues support the characteristics of a particular level. In a situation like that, your project folder could store multiple environment resources and use them accordingly in the WorldEnvironment node.
Although the WorldEnvironment node’s purpose may sound self-evident by its name, to fully take advantage of it, it would be best if you practice using its properties. You can do this by looking at the properties of the resource it’s using. There are quite a few and we’ll discover the ones that are relevant to our goal.
Background
This part of the environment’s settings is responsible for simulating the background. Currently, the mode is set to Sky, so the background is painted as if there is a dark ground portion that goes out far enough to meet the sky. In this mode, you can further customize the properties of the sky you want to depict. We won’t cover this since we are working with an indoor scene.
Thus, start by changing the mode to Custom Color. This will pick a black color by default, so the whole background of your scene will be pitch black. This will surely accentuate the candles and the sconces.
If you would like to use Godot Engine to take in-game renders of your models, then you can set the background to Clear Color, which will create a transparent color. We’re not using it in our case since having a completely dark background suits our artistic needs better and also, the body of water looks a bit awkward with transparency underneath. We’d need another similarly sized dark plane under it to hide the effect of transparency.
Therefore, we’ll stick with a custom background color. This will result in the following output:

Figure 10.9 – The cave is starting to look more ominous
Just a quick discussion about the Ambient Light section before we move on to ToneMap. The arched door seems to be hidden right now because there aren’t enough lights in the scene. So, to remedy this, you could pick a lighter ambient color. However, this will make the overall scene brighter again, and you’ll have some of the dark areas more lit. There is a much more judicious way to keep darker areas still dark but have the effects of light sources spread out further. We’ll look into achieving this kind of getting the best of both worlds later, in the Using global illumination section.
ToneMap
This is something you can use as a quick solution for blending lights into darker areas, which will make everything look a bit more homogeneous. It comes with a few properties of its own:
- Mode: The default mode is Linear, and this is what you’ve been experiencing all along. We leave it to your taste, but we suggest you change it to Filmic or ACES Fitted. It’ll remap the tones of the whole scene to the point that things will start to look more realistic.
- Exposure: Compared to Linear mode, the other modes may make your scene look really dark. Changing Exposure will brighten the scene while still applying the tone mapping.
- White: Digital cameras have a setting similar to this one. You designate a tone as white so that the other colors can be calculated according to this new baseline. Smaller values will blow out the whole scene because it’ll start considering a lot more colors as white. Naturally, higher values will exclude more colors, and make the scene darker.
We won’t mess with the Exposure and White values in our exercise, but this is what we have after choosing ACES Fitted for ToneMap:
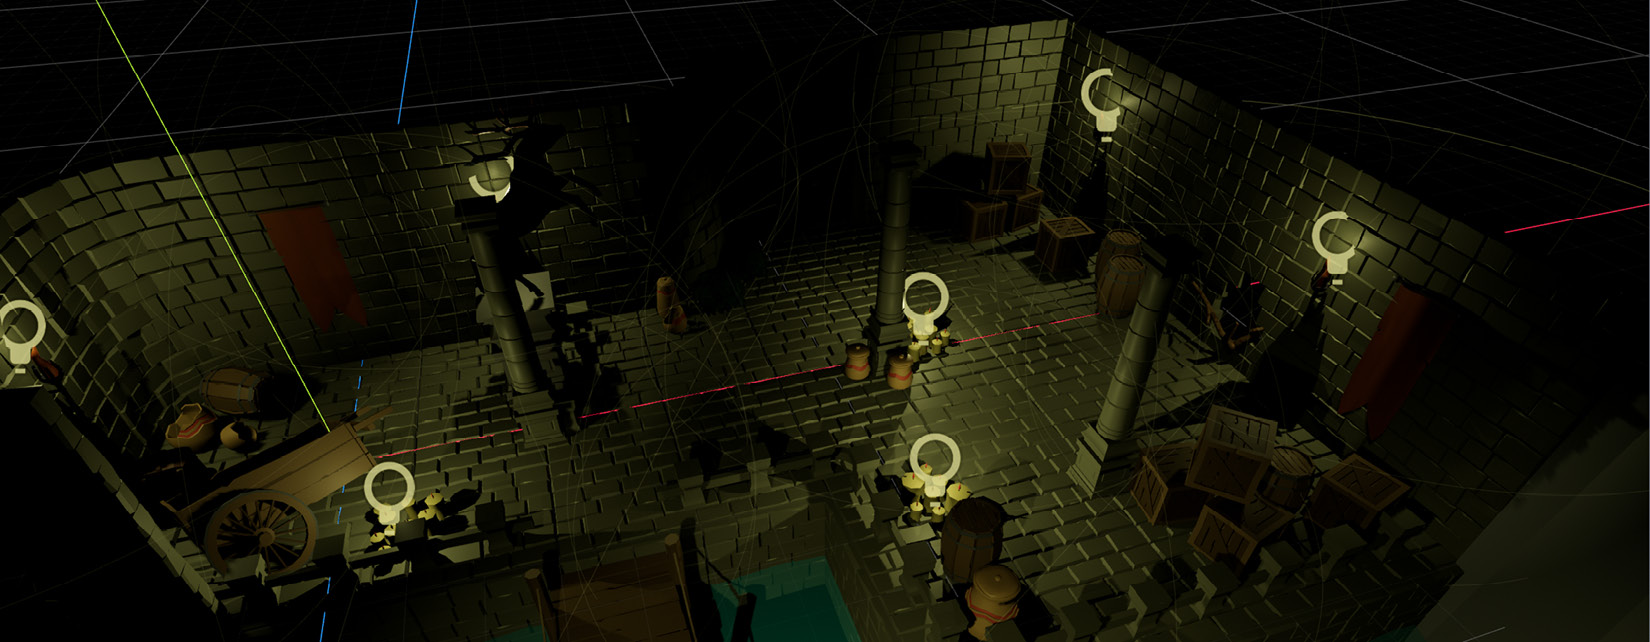
Figure 10.10 – Everything looks more pronounced thanks to tone mapping
Since we’ve touched on the concept of exposure, a quick word about enabling Auto Exposure. We won’t use it in our work, but it is a helpful option for mitigating some of the problems you may face when the camera transitions between indoor and outdoor areas.
Screen Space Reflections (SSR)
When some objects have reflective qualities due to their material settings, such as Metallic, Specular, and Roughness, turning this environment setting on will create a more realistic effect.
To appreciate the impact of SSR, the level must have more light, so it may not look like much is changing when you turn it on. The body of the statue has a reflective material. Thus, if you zoom into that area, you should be able to see some reflection where the feet of the stag meet the pedestal.
Reflections will be more pronounced when there are more lights nearby. When we work on the player character’s involvement in Chapter 12, Interacting with the World through Camera and Character Controllers, and Clara walks by the statue with a torch in her hand, you may notice the effect even better. Until then, we’ll simply have this feature enabled.
Ambient Occlusion (SSAO)
This isn’t the first time we have come across this term. We first got to know it in Chapter 4, Adjusting Cameras and Lights, when we wanted to emphasize the edges of the objects where they connected. Similarly, we’ll turn this setting on in Godot too, but we have to tweak a few properties:
- Light Affect: You won’t see the effect of Ambient Occlusion without the contribution of this property, so we are describing it first. It’s for adjusting the role of light sources in the occlusion. We’ll set it to 1.0.
It seems as if we are using it as an on/off switch in our current situation. However, since it can be any value between 0.0 and 1.0, you can use it as a useful scale by controlling the value with scripts. This works in cases where you don’t want to fully turn off the occlusions but gradually decrease them.
- Radius: When objects are close to each other, the contact points will look occluded. This setting is for adjusting the area that will be considered in the calculation for creating the correct amount of occlusion. We picked 0.4 as our value, but you can set it to any value, depending on your taste.
Additionally, the Intensity property can be used with Radius to create more accurate occlusions. Also, with the help of a secondary set of radius and intensity, you can overlay more details.
As with most things in game development, adjusting the correct amount of Ambient Occlusion is often an artistic endeavor. With the suggested values, the result will be as follows:
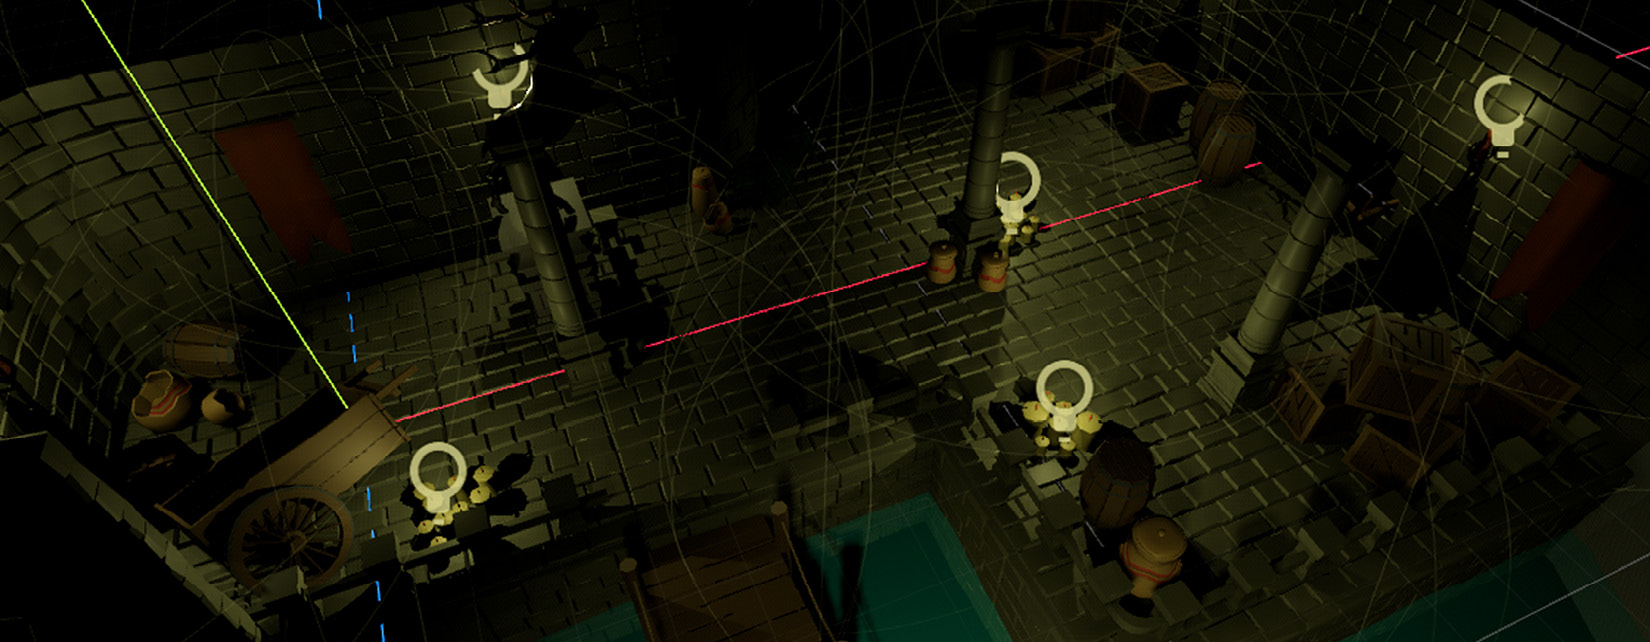
Figure 10.11 – The level after Ambient Occlusion has been turned on
The preceding screenshot may not be doing what we have achieved much justice. However, if you compare the previous two screenshots, you can see the occlusion in between the bricks, and also where the crates are making contact with the floor.
Glow
This feature is often referred to as the bloom effect in other applications. It’s used to exaggerate the effect of colors, and especially light sources. While it has many properties, we’ll only focus on a couple:
- Bloom: A value such as 0.2 will be enough to accentuate the effect of the sconces and the candles. In essence, while dark areas will stay relatively dark, lit areas will be glowing.
- Blend Mode: To increase the impact further, we suggest that you set this to Additive. It’ll give the lights in the scene a real nice cozy effect since the light sources are open fires.
We won’t touch the rest of the settings. The following screenshot shows the final state of the level:
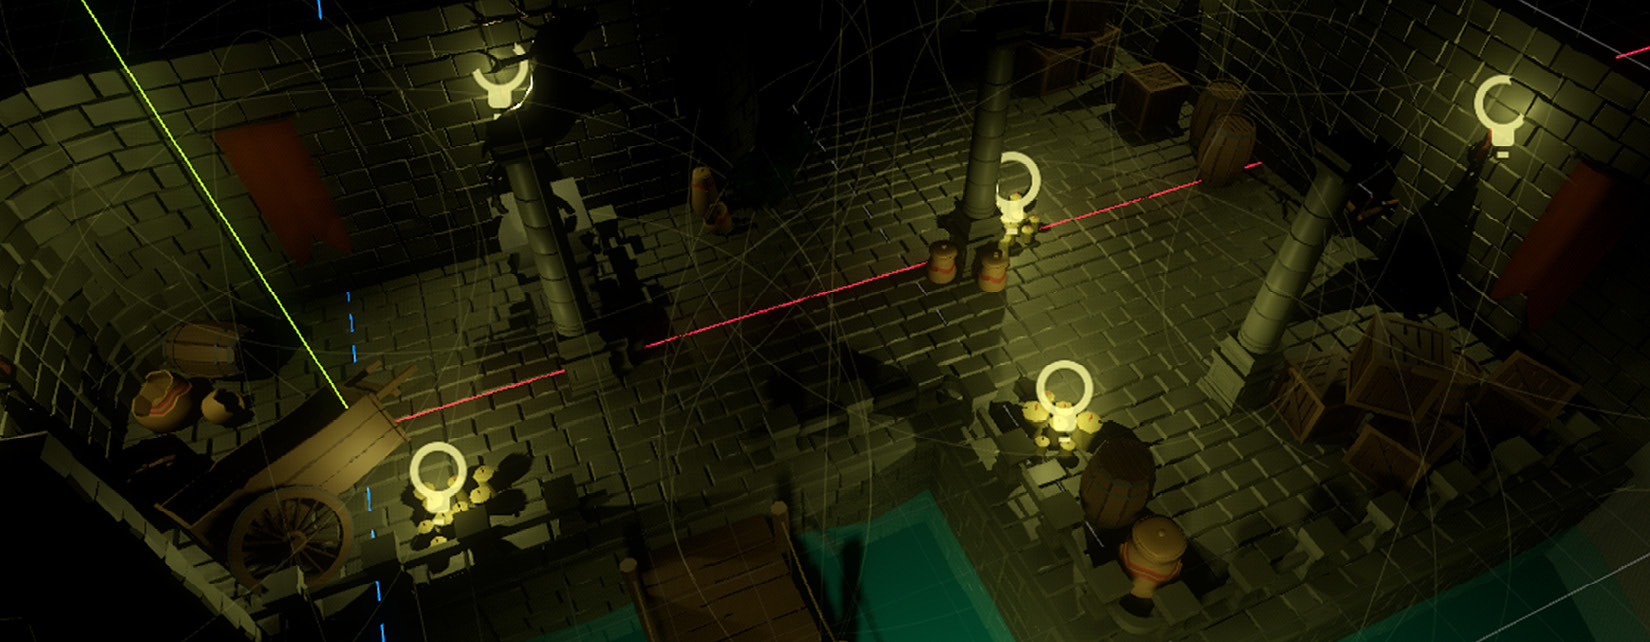
Figure 10.12 – Our light sources glow in the dark
In the Glow settings, there is a particular section called Levels. You can expand that area and decide how far out the bloom and blur effect will emanate. It’s useful when you want to adjust the detail of the bloom that’s engulfing an object.
Adjustments
While applying different environmental effects, some of the features will be competing against each other. Even though we have more oomph for the lights, and more defined contours and shadows for the models, after a while, you may end up with a scene that looks a bit washed out. You will employ two properties of the Adjustments feature that will give your scene a decent touch:
- Brightness: Our main tool to remedy the washed-out look is increasing the contrast. However, turning up brightness alongside contrast works better. Feel free to adjust it the way you like it, but a value such as 1.1 or 1.2 might be enough.
- Contrast: This will tidy up the dull look and give the whole scene a more vibrant look. Using a value such as 1.1 will make things look better in tandem with more brightness.
We could go on forever while changing so many of these settings. Depending on your taste, you may prefer different effects. However, we are content with what we have so far.
Wrapping up
Our level’s look has changed drastically since we first started laying out the floor and wall pieces. Ordinary-looking brick surfaces now have character, and the scene looks more ominous, thanks to lights, shadows, and finally, the environment settings. This can be seen here:
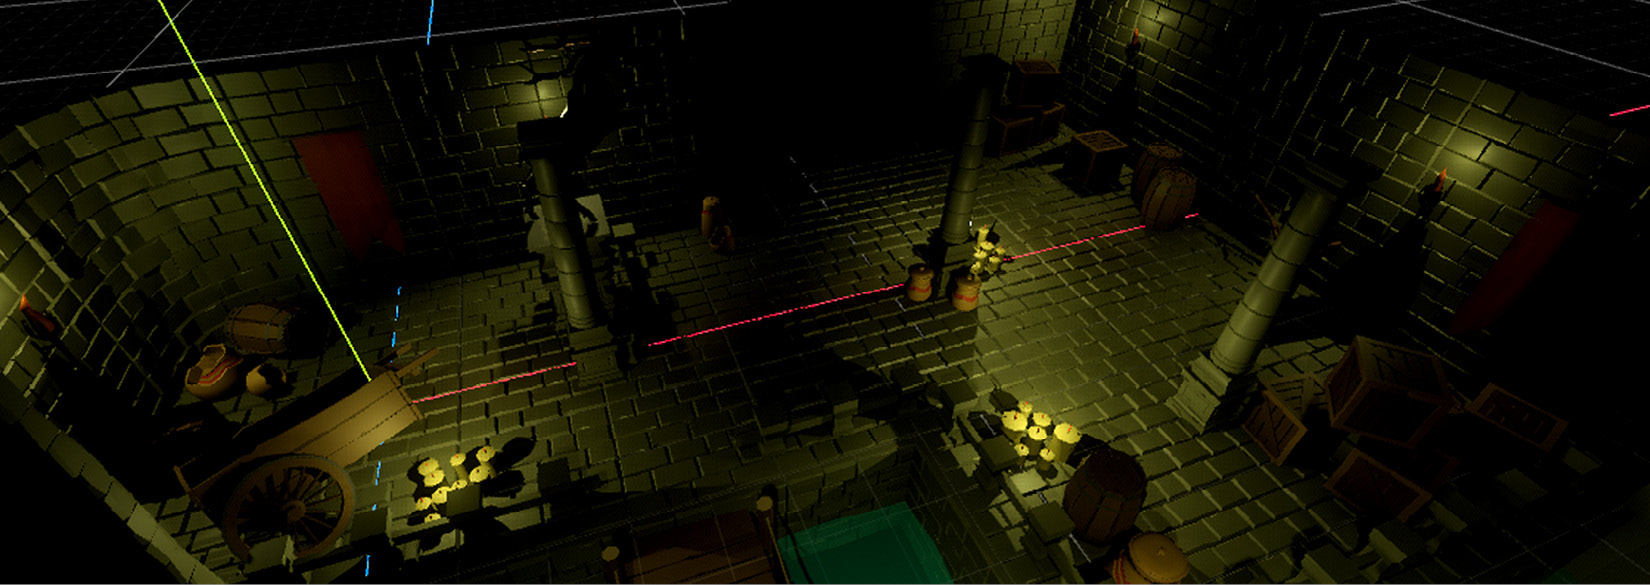
Figure 10.13 – The post-processing effects are all in place and working together
Depending on the atmosphere you want to create for your game, you can come up with a different combination of post-processing effects. Also, you can adjust their values programmatically during a game session to entice the player even more.
When one is too many
Post-processing effects are nice. You may feel like a kid in a candy store. However, keep in mind that some effects will enhance each other, and some will outdo each other. At the end of the day, you may end up having too many effects in play that are a burden on your computer. You can hear the cost of it when your GPU is vehemently trying to cool off.
Despite our efforts to improve the look of our level, there is room for improvement. While we have noticeably enhanced dark and bright areas, the scene is still missing another real-life quality that is often referred to as global illumination in the industry.
Using global illumination
If you’ve ever used a digital camera, you may already be familiar with the concept we are going to present in this section. Our brains, through expectation and familiarity with a similar environment, will blend in the light with darker areas, and fill in the missing parts. A camera, on the other hand, doesn’t have prior knowledge of how places must look, and it can’t process dark areas as well as our brains. In other words, the human brain approximates the missing parts and paints a more complete picture.
The rendering engine has worked like a camera so far. If you look at the level now, you’ll see that the arched door is in the dark. It would be nice to have certain areas look more like what we would expect them to look like. If we increased the intensity of the light sources, it would cast the light farther away. However, we’d still end up with some areas darker than others. We need something that extends the effects of the existing light sources similar to the way our brains process light.
To that end, we’ll introduce global illumination to achieve a more realistic look. Via this method, the area near the arched door will look like it’s getting more light from nearby candles and sconces. If you haven’t guessed it already, there is a node for this job. Let’s add it to our scene:
- Select the root node of the level.
- Add a GIProbe node.
- Adjust Extents in the Inspector panel so that x is 12, y is 5, and z is 15.
- Turn its Interior setting on.
- Position this probe in your level so that it engulfs everything like an envelope.
GIProbe will resemble a green wireframe cube initially. After you place it so that it wraps around the level, the Godot interface will look as follows:
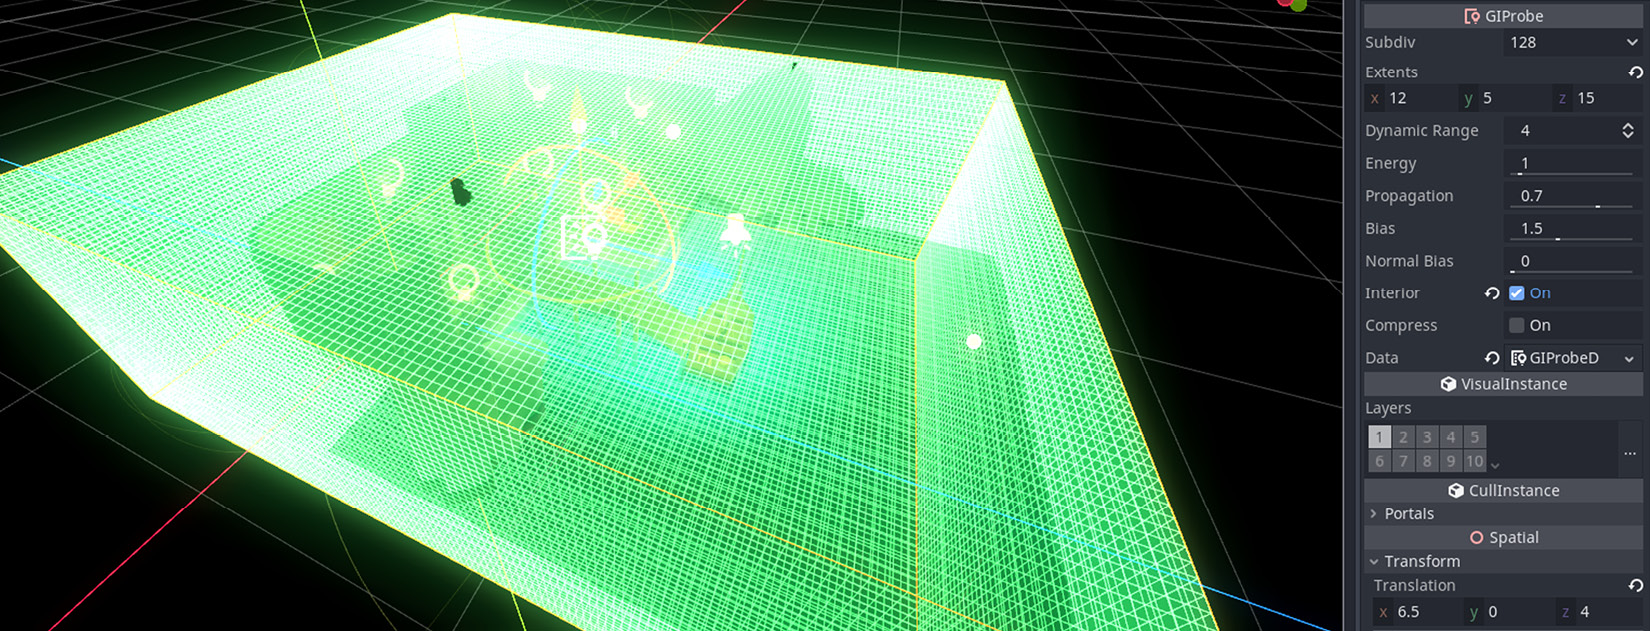
Figure 10.14 – GIProbe is in place but it’s not functional yet
This node will probe the light sources in its volume. Then, it will interpolate this information to darker areas so that the light can be distributed more evenly, just as our eyes would expect. Although the probe is ready, we need to take care of two important things before we trigger the calculations.
Turning on Light Baking
We have already seen some of the import settings relevant to 3D models. For example, we saw that materials are imported automatically because it’s the default setting in the Import panel. Also, using the Animation section in that panel, we were able to extract the actions from a model into the filesystem. All this was covered in Chapter 7, Importing Blender Assets into Godot.
We’ll revisit the Import panel for a different need this time. We want some of the models to receive more light. So, by turning Light Baking on, some models will receive extra lighting information that’s been sent by GIProbe. As the name suggests, this technique will bake some of the light in the scene into a model’s material once. Then, it’ll get updates as needed when the light conditions change.
So, we’ll pick a list of models that look like they could benefit from light baking since they have large, uninterrupted surfaces:
- Wall (Wall_Hole)
- Curve
- Floor_Standard (Floor_Standard_Curved_1 and Floor_Standard_Curved_4)
- Column_Round
Smaller objects such as props are usually not good candidates for light baking, but technically, you can turn the setting on for any model you import. For now, we’ll select the wall model and enable light baking for it:
- Select Wall.glb in FileSystem.
- Bring up the Import panel and scroll down to find the Light Baking option (hint: this is the last option in the Meshes section).
- Change its value to Enable.
- Click the Reimport button.
- Repeat this process for the other aforementioned models.
Generally speaking, we are enabling light baking for the architectural models in the scene. This is one part of the equation. Now that we have configured the models to accept light baking, we have to tell the renderer how much light should be baked into the materials for these models. We’ll do that by adjusting the energy levels of the light sources we have used so far.
Adjusting Indirect Energy
The second most important thing in having proper global illumination is to adjust the energy levels of the light sources. Although this section’s title indicates that we’ll be adjusting indirect energy levels, it would also be useful to talk about what direct energy means.
In Blender, you changed the direct energy level for lights by adjusting their Power properties, which were measured in Watts. That meant you could have typed in real-life lightbulb values to get an accurate result. Godot’s energy values for lights don’t follow a unit system. So, it’s more of an artistic value you can adjust based on your scene and liking.
While the Energy property, also known as direct energy, defines how intense the light will be, its Indirect Energy value is used to calculate the natural effect we described earlier in the opening lines of the Using global illumination section, where we made a comparison between human sight and cameras.
There is a simple way to observe this effect at home when it’s sufficiently dark. You can light a candle and observe that there is going to be an adequately lit area near it. Then, the light will drop off gradually into the distance, but you’ll still be able to notice some faraway objects. Their details won’t be quite clear, but their most characteristic shapes will be apparent to the eye. It’s possible to simulate this kind of effect with indirect energy using GIProbe.
For this effort, we have to adjust some of the OmniLight nodes we have used so far:
- Open Sconce.tscn and select its OmniLight node.
- Change its Indirect Energy to 2.5 under the Light section.
- Change its Range to 8 under the Omni section.
This will increase the range of the light that’s emanating from the sconces so that it’ll reach farther. The energy level of 1.0 has already been used, hence we’re only adjusting the indirect energy since we want it to contribute to global illumination.
Let’s repeat this effort for the candles with different values:
- Open Candles_1.tscn and Candles_2.tscn and select their OmniLight nodes.
- Change Indirect Energy to 1.5 and Range to 3.
Compared to sconces, candles shouldn’t emit that much light. So, it makes sense to have lower values. However, since there isn’t one candle but a group of candles, the values aren’t too far off. This is something you may have to balance in your work too: artistic concerns versus realism.
We’ve been settings things up for GIProbe to do its job. It seems like we have increased the overall light in the scene. We need it to be that way since some of this extra light will go toward calculating a better light distribution. All there is left to do is trigger GIProbe:
- Select GIProbe in the Scene tree.
- Click the Bake GI Probe button in the header just above the 3D view.
Godot Engine will calculate how light bounces off the surfaces of the models for which you have enabled light baking. Depending on the intensity, range, and indirect energy of the lights, the darker areas will receive more light. This will result in a more even distribution and give a more realistic look that meets our expectations. Figure 10.15 shows the before and after of what global illumination does for the area near the arched door:
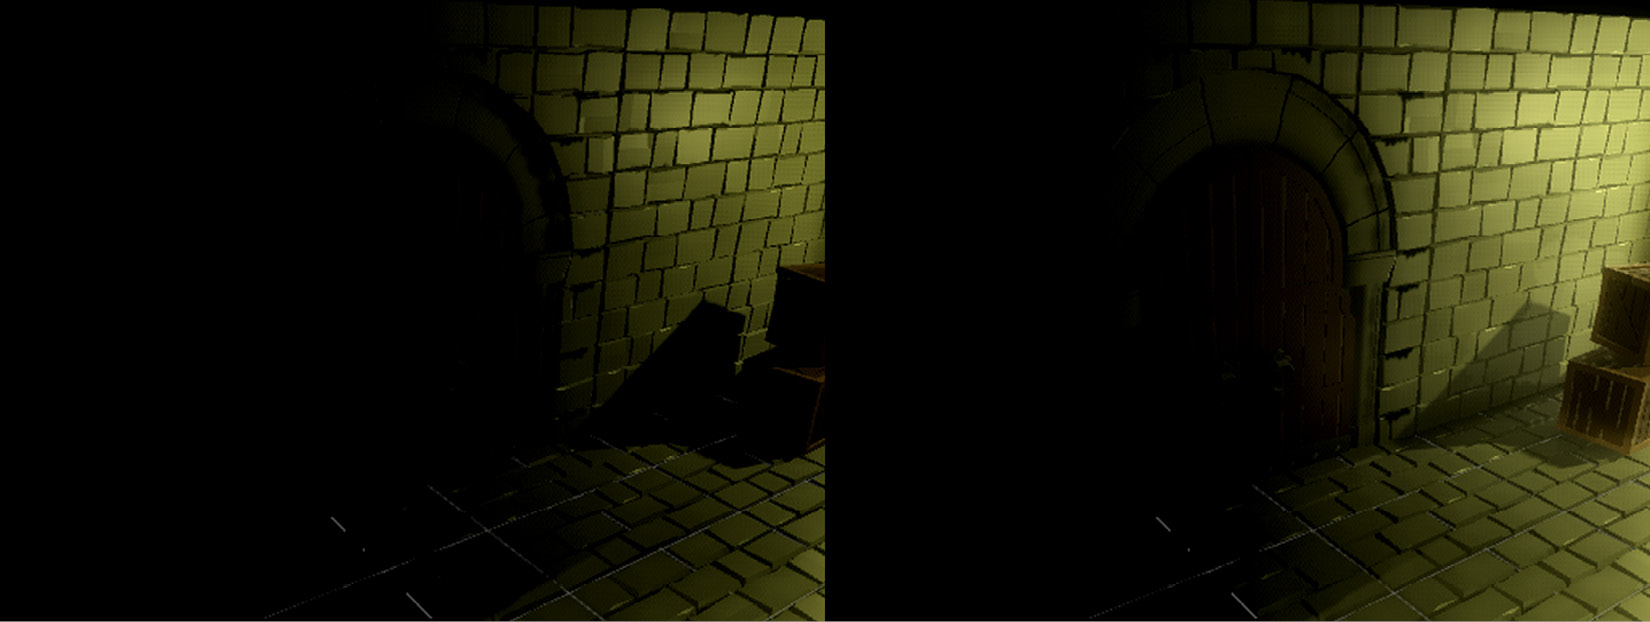
Figure 10.15 – The door has become more noticeable thanks to more evenly distributed light
Depending on the size and layout of your levels, you may need to place multiple GIProbe nodes. For example, if you were designing a dungeon with many rooms and hallways, it might be a better idea to consider each room and hallway as a unique GIProbe node since the distribution of lights will be achieved more accurately.
Also, when you have a level where an outdoor environment is connecting to an indoor environment, it’s a good idea to create one GIProbe for each area and adjust the Interior settings accordingly. Using one major node that encompasses the whole level will do an injustice to either environment, so introduce as few and, sometimes, as many as necessary.
With that, we have improved the look of our level. Let’s summarize the steps we have taken to get here.
Summary
The level we took over from the previous chapter looked complete, and yet uninteresting. To give it more life, we introduced a few instruments in this chapter.
First, we introduced two types of light nodes, OmniLight and SpotLight, to simulate candles, sconces, and the sun’s effect in the cave. While accomplishing this, you also saw the reason why creating a scene for a model might be useful, as well as necessary, compared to instancing the models directly in the level. This effort was followed by adding a small script that can help you switch the lights if needed. We’ll utilize this functionality later in this book.
Though lights were an obvious tool for improving the visuals, we also investigated shadows. They are resource-intensive, so you may want to turn them on for the lights that will have an important impact on your scenes.
To truly appreciate the effect of lights and shadows, we applied a bunch of environment settings. Although this helped the visuals a great deal, to elevate the realism to the next level, you’ve been introduced to global illumination. By carefully choosing which models should receive more indirect light and adjusting the setting of the lights in the scene, you’ve shed more light on certain areas, which resulted in a more accurate representation.
In the next chapter, we’ll work on a different kind of visual system. It’s a useful mechanism with which players can interact with the world: user interfaces.
Further reading
Out of all the topics we have presented in this chapter, global illumination is the most technical one. Simulating real-life light is a challenging task, and professionals out there are still actively working toward this goal. If you want to get a taste of it, here are a few links that should give you a better idea about what it involves:
- https://ohiostate.pressbooks.pub/graphicshistory/chapter/19-5-global-illumination/
- https://www.scratchapixel.com/lessons/3d-basic-rendering/global-illumination-path-tracing
- https://developer.nvidia.com/gpugems/gpugems2/part-v-image-oriented-computing/chapter-38-high-quality-global-illumination
On a more practical note, the official Godot documentation might be useful if you wish to learn more about what we have covered in this chapter: