
13
Finishing with Sound and Animation
We’re in the home stretch. The effort we started back in Chapter 9, Designing the Level, was resumed by making the level look more exciting in Chapter 10, Making Things Look Better with Lights and Shadows, which led us to implement a basic user interface in Chapter 11, Creating the User Interface. We built new mechanics in Chapter 12, Interacting with the World through Camera and Character Controllers, so we could interact with the world we have created. As a result, Clara is now able to press the parchment left by her uncle, and she can also walk around. This is all very nice, and we can take it a step further by refining some rough edges.
It’s all quiet in here! As she’s walking, we should trigger an audio file that will simulate her footsteps. While we are at it, we will also add background music and effects that will better reflect the qualities of the environment Clara is in.
You must have noticed that, as Clara walks around, sconces and candles around the level illuminate her. Can she do the same with the torch she is holding in her hand? Of course! It might help her see the backpack behind the cart. In fact, she’s going to have to use her torch to see better because we’ll turn off all of the light sources in this chapter.
We’ll discover a new node in Godot to know whether a player character entered an area. Via this method, game designers usually trigger in-game events such as traps, a conversation with a quest giver, and so on. Our event choice will be Clara lighting the sconces and candles as she goes near them.
Eventually, she’ll reach the backpack where she’ll pick up the key. We are not concerned with an inventory system in this game, yet we will consider this key object as a requirement for opening the door. So, once the condition is satisfied, we need that door to open for us. However, the door did not come into Godot with its animation set up in Blender. This is our chance to see how basic animations can be created inside Godot.
When all of the conditions are in place, including the door opening that simulates a clear path upstairs, we’ll swap our current level with another one. That particular moment will signify the conclusion of our little game, but you can take it wherever you want to take it.
This is going to be another chapter with lots of distinct topics used together. Speaking of which, the following are the titles under which you’ll find us executing the plan we’ve presented so far:
- Playing music and sound effects
- Creating reaction spots
- Building simple animations in Godot
- Loading another level
By the end of this chapter, you’ll have finished the core mechanics of our point-and-click adventure game. Not only will you construct and work with new systems, but you’ll also make these systems conditional on world or character events.
Good luck and enjoy!
Technical requirements
It’s perfectly fine if you would like to continue where you left off in the previous chapter. However, there are some extra resources you will need to finish the work in this chapter. You can merge these assets with the rest of your project files. They are in the Resources folder next to the Finish folder in this book’s repository that can be found at https://github.com/PacktPublishing/Game-Development-with-Blender-and-Godot.
Playing music and sound effects
Music and sound effects sometimes can make or break the enjoyment people get out of movies, theatre plays, and of course, video games. When done right, they will definitely add to the immersion. In this section, we’ll tackle the use of music and sound effects from a technical point of view. In your own free time, we suggest you investigate the artistic aspects of sound design in multimedia for which we’ll mention a few resources later on in the Further reading section.
In Chapter 8, Adding Sound Assets, we discussed different nodes Godot uses to play sound in different dimensions, as follows:
- AudioStreamPlayer3D for conveying 3D positional information to the player. It’s most commonly used in FPS games where not only front and back directions matter, but an audio stream coming from an elevated place is important as well.
- AudioStreamPlayer2D for games in which the direction the sound is coming from doesn’t need to have depth information. Most platformer games are a good example of this kind.
- AudioStreamPlayer for background music since it may be considered one-dimensional.
Out of these three, two types seem to be the right candidates for our purposes. We want to play background music, so we will use AudioStreamPlayer. Then, when Clara is walking around, it makes sense to use AudioStreamPlayer3D.
The latter case may not seem obvious, and we can certainly use the regular AudioStreamPlayer as well for the footsteps, but we will cross that bridge when we come to it. Our most immediate concern is to set up the ambient music.
Setting background music
In the Understanding the camera system section of Chapter 12, Interacting with the World through Camera and Character Controllers, we showed the use of an outer scene structure, such as Game.tscn, to hold the level we built in Chapter 9, Designing the Level. A wrapper structure such as ours is also a good place to place more global-scale constructs, such as audio streamers. Yet, we would like to discuss an alternative before we move on with our initial plan.
Although a player character is part of the game world, we decided to place it inside the level via a Player node. It was convenient to do so because we could easily see where to position Player inside the coordinate system of the Level-01.tscn scene. If you place it inside Game.tscn, for the sake of keeping things separate and sanitized, then you will have to figure out a way to connect both the Player and the Level-01 nodes inside Game.tscn. This would not be impossible, but it would make things less convenient.
Similarly, where should you place the node that will play the background music? Although we may want every level to play its own thematic music, and this would guide us in the direction of using an AudioStreamPlayer node inside each level, we’ll still place it in Game.tscn. When we attack the topic of loading different levels in the Loading another level section, hopefully, the scheme we are suggesting will make more sense.
Let’s see how we can execute the original plan. Open the Game.tscn scene and perform the following steps:
- Add an AudioStreamPlayer node to the root and rename it as BackgroundMusic.
- Drag Native Dream.mp3 from FileSystem to the Stream property of this new node.
- Turn on the Autoplay option in the Inspector panel.
- Press F5 and relax.
The piece of music we are using is about 2 minutes long and it will be automatically looped by Godot. Thus, it won’t feel too repetitive while Clara or the player is discovering the level.
Speaking of placing a background music structure at a higher level, there is one more approach you can use: singletons, also known as AutoLoad. For absolute beginners, these are the ultimate top-level structures you can use in your project. These will always be present when you launch your game and loaded in the order you define them in the AutoLoad tab of Project Settings. Via this method, you can use a dedicated scene as a single source of music. You can read more about it at https://docs.godotengine.org/en/3.4/tutorials/scripting/singletons_autoload.html.
Some players turn off game music for the sake of focusing on sound effects. In the following section, we’ll introduce our first sound effect. We expect Clara’s walking to trigger a suitable sound effect, namely footsteps.
Conditionally playing a sound
Let’s see how we can play a sound file conditionally in this section. There is actually nothing magical nor special in the way of achieving this goal. It’s similar to knowing when Clara walks or stands idly. In the Playing the right action for Clara section of Chapter 12, Interacting with the World through Camera and Character Controllers, we implemented two extra lines of code inside the move_along function to trigger the correct actions for Clara to show, animation-wise, the state she is currently in.
We could still take advantage of the same function by enabling the execution of the sound file for her footsteps. That being said, now might be a good moment to discuss some of our practices. It would seem that we are overloading the meaning of the move_along function. You might consider our current efforts still a phase of building a prototype similar to, as is often said during a writing exercise, writing a draft, then focusing on edits later.
Sometimes, good architecture might be deduced before you start the bulk of the work, perhaps because you’ve done something similar before. Often, though, this may not be the case, and your discoveries, thus your decisions into coming up with an efficient architecture, might have to wait for later. As soon as you notice there are common parts you can extract out of the current structures, you should. However, concerning yourself with the fine details of creating the most efficient code structure and information flow might not be the best use of your time while you are still deciding on gameplay.
So, for now, we’ll add the footsteps sound as an extra element inside the move_along function until we need a much more efficient way, as follows:
- Open the Player.tscn scene and add AudioStreamPlayer3D under the root node. Rename it as FootSteps.
- Select FootSteps.wav and switch to the Import panel. Then do as follows:
- Turn on both the Loop and Normalize options.
- Press Reimport.
- Drag Footsteps.wav from FileSystem to the Stream field in the Inspector panel.
- Turn on both the Autoplay and Stream Paused properties.
- In the Clara.gd script, do as follows:
- Type $FootSteps.stream_paused = false after you trigger her walk action.
- Type $FootSteps.stream_paused = true after you trigger her idle action.
The method we are using here was discussed in the Playing a sound effect on demand section of Chapter 8, Adding Sound Assets, when repeatedly triggering a sound file in a loop might sound like the sound is jammed.
Additionally, we turned on the loop feature and normalized the volume. The loop is self-explanatory since we will want her footsteps to repeat ceaselessly as long as she’s walking. The Normalize option deserves a few more words, though. The sound files we are using in this project have been collected from multiple sources. This makes it hard to have all these files have a similar level of volume. Some will be louder, some will be quieter. The feature we turned on adjusts the volume of the sound file, so it would be at a similar level to the other files.
When you run the game now, you’ll hear the background music as usual. Then, click around and wait for Clara to walk to the desired spot. Do you hear her footsteps? Most likely just barely. We’ll look into adjusting audio volume later in the Understanding the volume through decibels section.
For the time being, it might be better if we presented a handy feature in Godot. There might come a time when you would like to apply special effects to some of the sound files you are playing. Godot offers multiple audio channels, also known as an audio bus, via which you can decide which files will play on a specific channel so you can apply a particular effect only on select channels.
We’ll now pretend that there is a situation like this and play the footsteps sound in its own audio channel. Let’s see how it is done as follows:
- Expand the Audio panel at the bottom section of Godot Engine. Click on the Add Bus button in the top right corner of the Audio panel.
- Rename this New Bus as SFX.
- Select the FootSteps node and choose the SFX option in the drop-down options for Bus.
The footsteps sound will now be played on a different audio channel in Godot. The interface that’s reflecting the changes we have made is shown in Figure 13.1.

Figure 13.1 – We are playing the sound effect on its own bus
Via this method, a dedicated audio channel will play the sound you want. As you can see at the bottom of the SFX bus in the Audio panel in Figure 13.1, the audio is sent to the Master channel. When all the audio sources are merged and processed, it’s delivered to Speakers. Furthermore, by using the Add Effect dropdown for an audio bus, you can apply and stack effects that go through this channel.
Although you hear both pieces of audio, they might be competing volume-wise. In the following section, we’ll get a bit technical about how audio volume works.
Understanding the volume through decibels
Every vocation has its trade secrets and unique practices, and this is also true for sound engineers. When they talk about volume as how loud a sound is, they use a unit called decibel, marked as dB. If you are used to the metric system, this is one-tenth of a bel, similar to a decimeter as one-tenth of a meter. However, what exactly is a bel?
Wikipedia has a page that provides a decent amount of technical information for the decibel. Therefore, we’ll provide you with the practical aspects and/or pitfalls of working with decibels in your projects.
Similar to how earthquake magnitude is measured, a decibel is a relative scale where every time you increase the sound level by 6 dB, you double the amplitude of the sound. Consequently, -6 dB means you are halving the amplitude. As far as values go, 0 dB is the maximum amplitude a digital audio system will use. Anything above this value, which means positive values, will be clipped. So, you might still hear something above 0 dB, but it will be distorted the higher you go in decibels. Thus, you’ll be using the negative range when it comes to picking values.
Moreover, there are physical limits to human hearing. Sound is no longer audible between -60 dB and -80 dB. So, in the end, you have from -60 dB to 0 dB as a workable range. If all of this is confusing, there is perhaps one important fact you might want to keep in mind about decibels. 0 dB denotes the normal amplitude of the sound when it was exported from an audio application. If the base level at 0 dB is too quiet, you might have to fix it at the source rather than messing with it by choosing a higher dB value in Godot.
That being said, we can decrease the amplitude easily. This is indeed what we are going to do with the background music as follows:
- Open Game.tscn and select the BackgroundMusic node.
- Adjust Volume Db in the Inspector panel to -12, or even -18.
Since you are now able to discern the footsteps from the background music better, did you notice how Clara’s footsteps get louder as she approaches the camera and quieter as she walks toward the end of the cave? This is thanks to the AudioStreamPlayer3D node’s behavior of processing audio in 3D. If you want to perceive this effect more clearly, feel free to temporarily turn off the background music and focus on the directionality of Clara’s footsteps.
Who is listening?
The Camera node has a built-in Listener construct that makes it possible for us to identify from which direction the sound is coming. In some cases, we may want the camera to be in one corner of the world and the listener in another corner. Thus, creating a separate Listener node is not only possible, but it will also be beneficial when you want to simulate a situation where a microphone is placed away from the camera.
If you would like to practice more on playing sound files, we suggest you add a sound effect to the Close button we used in the note user interface. You already know when the button is clicked since we wait for that moment to close the interface. That is the right moment to play a sound effect such as ButtonPress.wav in the Audio folder.
It seems the world is reacting to our actions by playing animations and sound files, which is nice. In all of these efforts, we’ve had a direct involvement mainly by a mouse click. In the following section, we’ll discover how the world can react to our player character without the player’s direct intervention.
Creating reaction spots
When the player clicks on the parchment, the game shows the content written on that parchment via a user interface. When the player clicks on a particular location in the world, Clara walks to that spot by playing a walking animation and playing a footsteps sound. These are all direct interactions at the player’s end, which brings us to discuss cases when the game should react to indirect events.
Although not lit, Clara is holding a torch. You already know how to use the Light nodes in Godot. So, it’s easy to place OmniLight near the torch mesh inside the Clara node. Our basic expectation is that, when she walks by the candles on the floor and the sconces on the walls, she’ll be lighting those up using her torch. Thus, the game needs to know when she’s near some objects.
Let’s first give Clara a torch she can carry around, then we can proceed to discuss how this torch can affect other objects in the level, as follows:
- Create a scene out of Clara.glb and place an OmniLight node under Torch002.
- Position OmniLight according to the torch so it’s slightly above. 0.75 on the Y axis might be enough.
- Select d6d58e for Color and turn on Enable in the Shadow section.
Since OmniLight is a child of the torch mesh, whenever the AnimationPlayer node controls the torch, the light will follow along. This is also a nice example of taking Blender animations and enhancing them with Godot nodes.
We have a dedicated Clara.tscn scene, but the Player.tscn scene is still unaware of this new development. It’s still using the old model reference. Therefore, you must delete the Clara node in Player.tscn and instance Clara.tscn instead. The Scene panel won’t look that much different but it’s now going to have Clara holding a lit torch. Test your scene and have Clara walk around, especially near the door. The torchlight will synchronize with her walking cycle.
Clara seems to be carrying the right tool in her hand to light those candles and sconces. It’s time we added the trigger zones so that the world can react to her presence. That’s what’s coming up next.
Placing trigger points in the world
We made use of a StaticBody node to detect user clicks in the Preparing a clickable area for raycasting section of Chapter 12, Interacting with the World through Camera and Character Controllers, so we could deduce where to move Clara. This is useful when you know that an agent, most likely the player, will directly trigger a system. There are cases when game objects act freely on their own and they should also initiate a response from systems that are waiting to be triggered. This section will cover this kind of situation.
By now, you may have noticed an odd behavior regarding pathfinding and the player’s destination. StaticBody that we set up goes as far as where the floor pieces meet the wall pieces. Therefore, it successfully captures the clicks on the floor tiles. However, if you click anywhere far away or along the walls, the pathfinding may give you an unexpected result. If you extend StaticBody further out, similar to how it covers the water, it will be alright. You can refer to Figure 12.11 of Chapter 12, Interacting with the World through Camera and Character Controllers, to observe the placement of StaticBody and adjust it to account for extra space to catch faraway clicks.
Once the destination is determined, Clara will move toward it by getting closer to the props. Some of these objects are good candidates to trigger certain events. For this, we’ll use the Area node, which is inheriting from the same internal structure as StaticBody. These are similar nodes since they both originate from the same place but provide different results.
Although we could place and position an Area node per trigger zone in the level just as we did with many other nodes, keeping in mind that we want to do this for lighting the sconces and candles, it makes more sense to open the dedicated scenes we already have for these. To that end, you will do as follows:
- Open Candles_1.tscn and place an Area node under the root.
- Bring up the Node panel and double-click the body_entered(body: Node) item.
- Press the Connect button right away, which will automatically add an event handler to the LightSwitch.gd script. Change it as follows:
func _on_Area_body_entered(body):
print(body)
- Place a CollisionShape node under the Area node you have just added.
- Define New BoxShape for the Shape property in the Inspector panel.
The number from the print statement might look different in your machine, but you’ll see something like StaticBody:[StaticBody:2025] in the Output panel when you run the game. We’ve just got a collision result from the Area node we’ve added, but what is it that it hit? It is detecting the catch-all area that covered all of the floor pieces and some portion of the water.
We need to exclude all unwanted candidates so that this trigger zone only responds to our player’s activities. There are multiple ways to do this. We’ll explain an elaborate version right after we present a very simple method. For now, swap the function you just saw with the following code:
func _on_Area_body_entered(body):
    if body.name == "Player":
        print("Hello, Clara!")
The changes we are making are in Candles_1.tscn, which holds the candle group by the barrel when Clara turns right after she clears the docking area. So, press F5 to run the game and move her near the candles as described. You’ll see the Output area display the print message only when she enters the space of those candles. Figure 13.2 will help you see what’s expected.
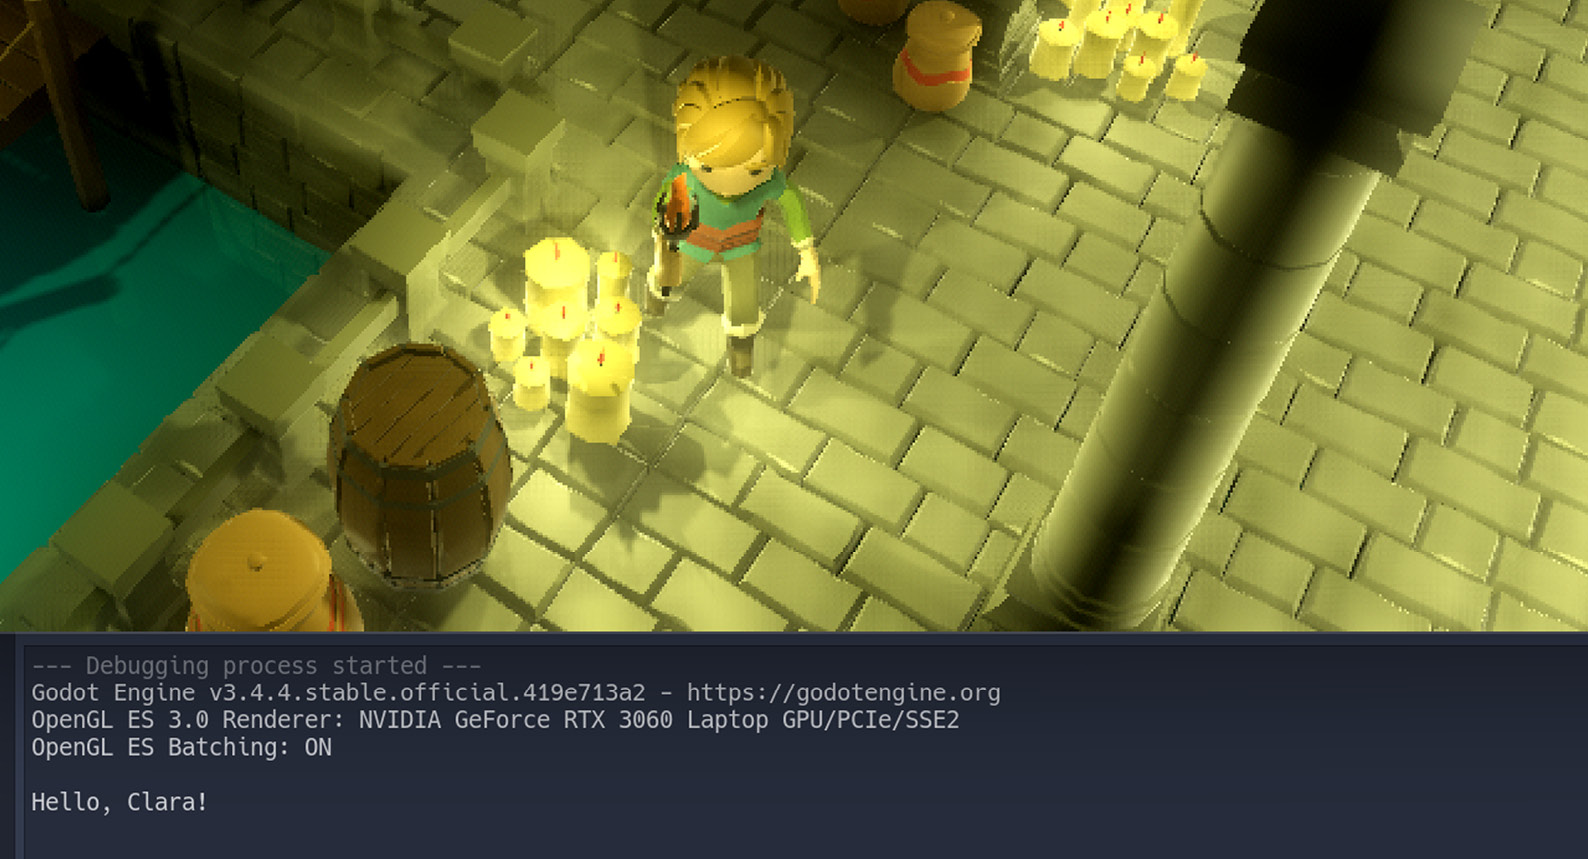
Figure 13.2 – It’s as if the candles sensed Clara coming nearby and welcomed her
With this method, we are only interested in knowing whether name of the body that entered the Area node’s space is equal to Player. If so, we can trigger the next chain of events. However, before we start tackling our initial intentions, the following are a few words about a more advanced detection method we mentioned.
Getting to know a better collision detection method
Godot’s PhysicsServer, a system that’s responsible for undertaking all of the calculations for the objects that should be affected by physical rules (such as gravity, collision, intersection, and so on) uses a layer system to keep track of where objects reside. This is not a visual layer as you might see in a graphics editing application such as Adobe Photoshop. Nevertheless, it’s similar because if the objects are on separate layers, then you can define how these layers will interact with each other. Aptly so, the structure that allows this kind of functionality is called Layer in Godot.
Moreover, if all objects are always in the same layer, then you would have to resort to solutions such as name checking. It’s simple and effective, but it could easily get unwieldy because who would want to pick a unique name for each game object? Unquestionably, that if block we wrote earlier would get longer and longer to filter which particular object entered the area. To eliminate such situations, Godot has another construct that is called Mask.
Through a clever way of creating multiple Layer and Mask options, and defining their relationship, you can reduce the load of writing unnecessarily long and inconvenient if blocks where you check what’s colliding with what. In a way, that sort of check will be done for you in PhysicsServer, so you can only account for completely necessary if checks for controlling other less trivial cases.
The following figure shows where you can find the Layer and Mask options for the Area node we are currently configuring:
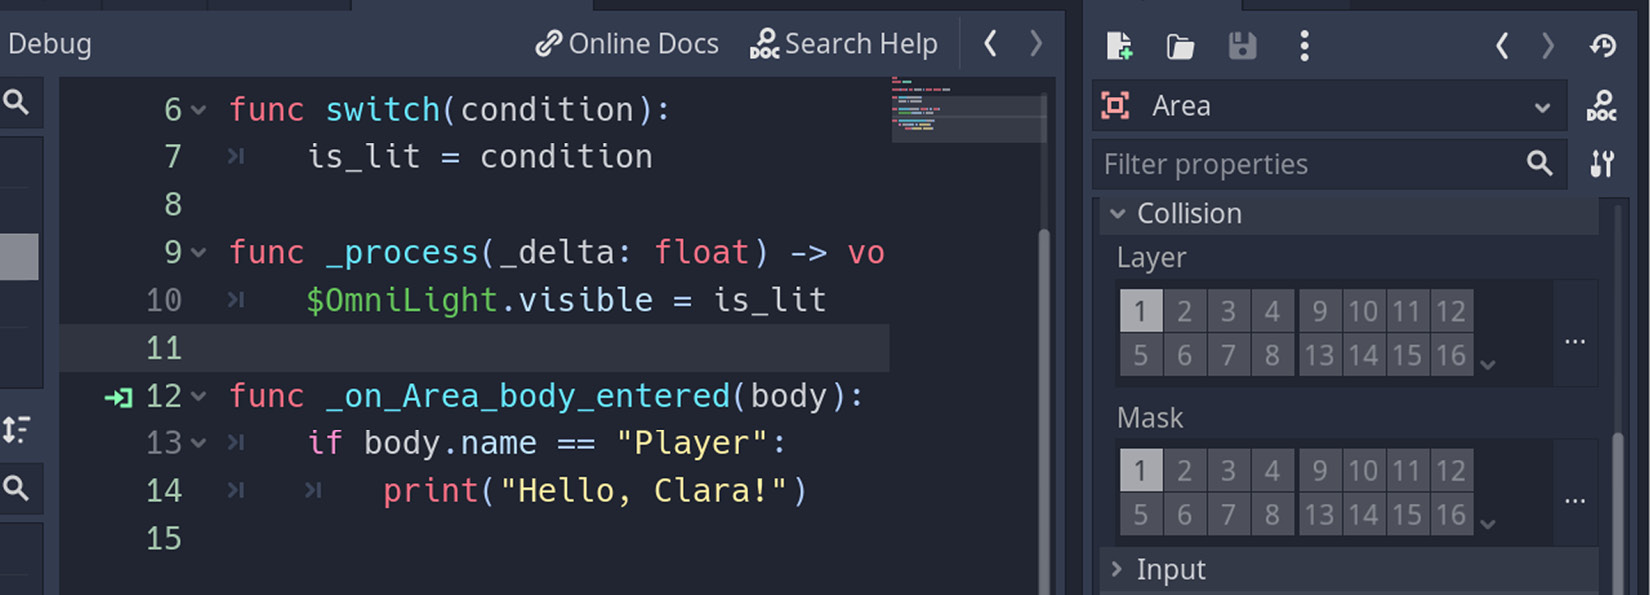
Figure 13.3 – Using collision layers might be another detection method
While this method is effective and valuable, setting it up in our current situation and explaining it via the pages of this book would be inefficient. Instead, we will use the available space to present other practical applications. Still, it is a vital architectural choice you might have to rely on in your future projects. So, we suggest you read about this by visiting the Collision layers and masks section at https://docs.godotengine.org/en/3.4/tutorials/physics/physics_introduction.html.
Our more immediate concern is what we do when Clara goes near those candles. Let’s see her influence on the world.
Lighting the candles and sconces
We’ve been laying the groundwork for Clara to interact with the world around her. Our latest effort involved proximity detection by Candles_1.tscn through the use of an Area node. The reaction is not useful at this point since it’s just a silly print statement, but we are at a good spot to make it more interesting.
To truly appreciate Clara’s impact on the world, we should start by turning off some of the lights on the level. Switch to the Level-01.tscn scene and perform the following steps:
- Select all instances of Candles_1.tscn and Candles_2.tscn.
- Turn off the Is Lit property in the Inspector panel.
- Repeat the first two steps for all sconces in the level.
- Press F5 to run the game and move Clara around.
Atmospheric, isn’t it? When Clara goes to the same spot that triggered the message in the Output panel, the level will look like the following:
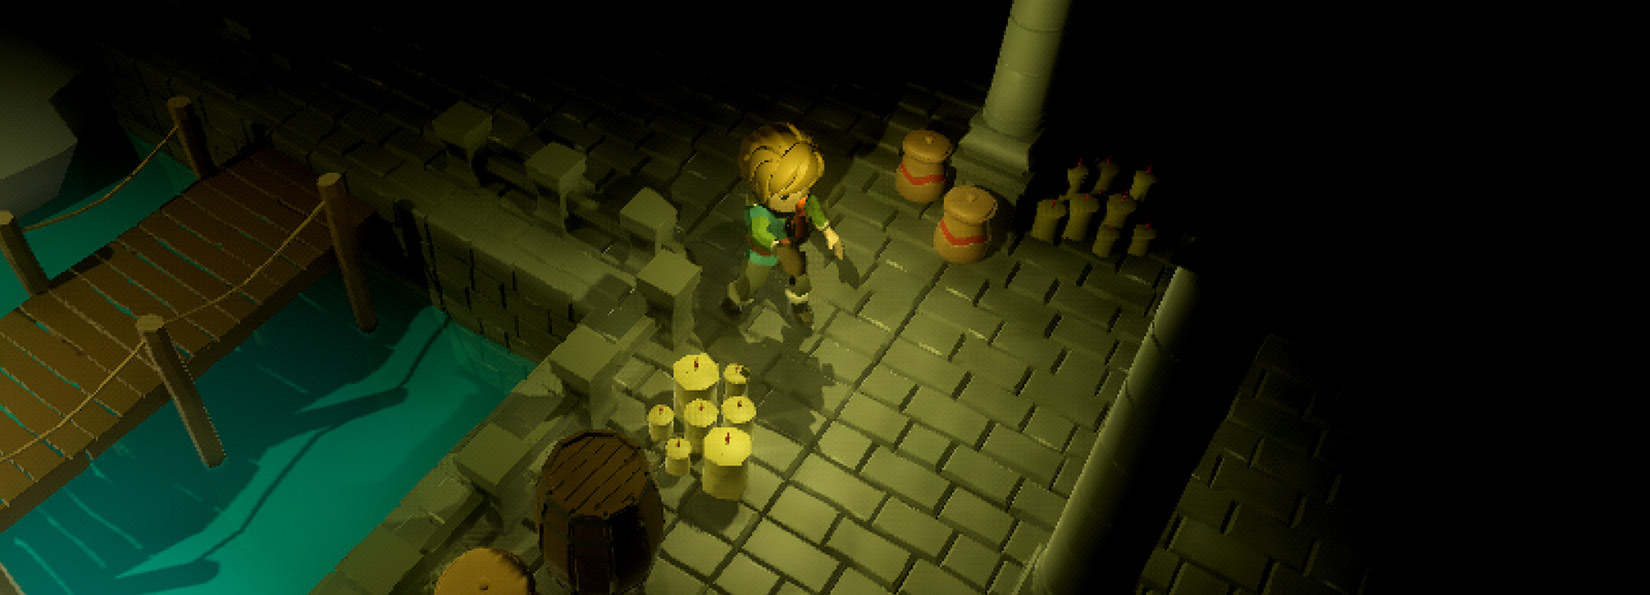
Figure 13.4 – Clara is depending on the torch she’s holding in her hand
The torch she’s holding is enough for her to see where she’s going. However, it would be nice to light those candles she’s just standing by. We’ve already done the hard work in Candles_1.tscn so all there is left to do is to turn on OmniLight internally as follows:
- Open the LightSwitch.gd script.
- Replace the print statement in the _on_Area_body_entered function by typing is_lit = true. The function will look like the following example after your changes:
func _on_Area_body_entered(body):
if body.name == "Player":
is_lit = true
- Press F5 to run the game and move Clara first to the same area, then to a different location.
When Clara goes near the same candles this time, those candles will be lit. It might be a bit difficult to see the effect depending on exactly where she’s standing. So, when she walks away from those candles, you’ll truly feel her mark on the world, as seen in Figure 13.5:
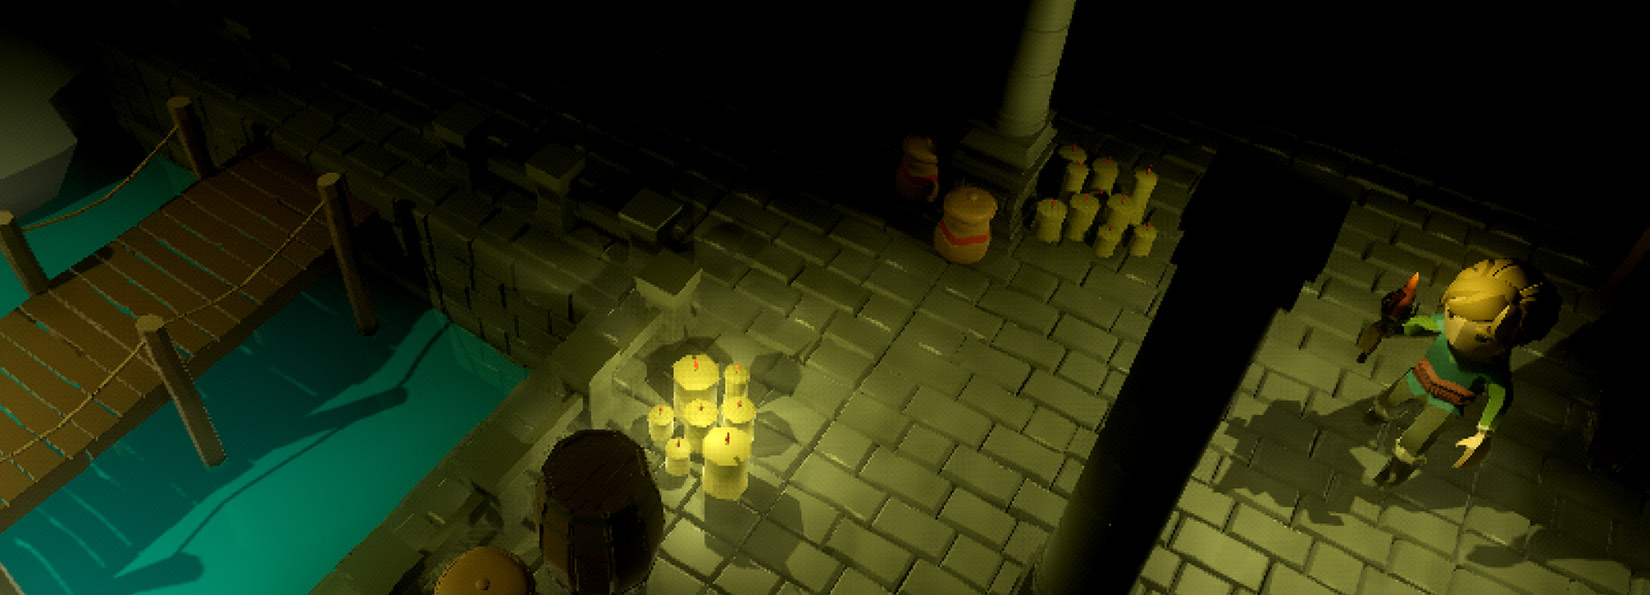
Figure 13.5 – Clara is getting some help from those candles she just lit
This was just one candle game object Clara interacted with. We have another candle scene, Candles_2.tscn, and a separate scene for the sconces, Sconce.tscn. We could easily replicate what we have done to this point for these other scenes, as follows:
- Open Candles_1.tscn first, then right-click the Area node, and select Copy in the context menu.
- Open Candles_2.tscn next, then right-click the root node, and select Paste in the context menu.
- Bring up the Node panel and then do as follows:
- Right-click the body_entered item in the list and select the Disconnect All option. Press the OK button on the upcoming confirmation screen.
- Double-click the body_entered item in the list. Press the Connect button on the upcoming screen.
Normally, we shouldn’t have to do the third step. When you copy and paste nodes between scenes, the signals are not transferred. So, we had to manually remove what seemed to be an active signal and rebind it. Luckily, both candle scenes are using the same script and we already have the event handler. That’s why we didn’t have to write the programming parts. When you transfer nodes between scenes as we did, keep in mind to reconnect the signals. Godot 4 might have a fix for this behavior.
So, run the game and have Clara walk by all of the candles. They will be lit one after another as she gets close, and the following is what you’ll experience when she does so:
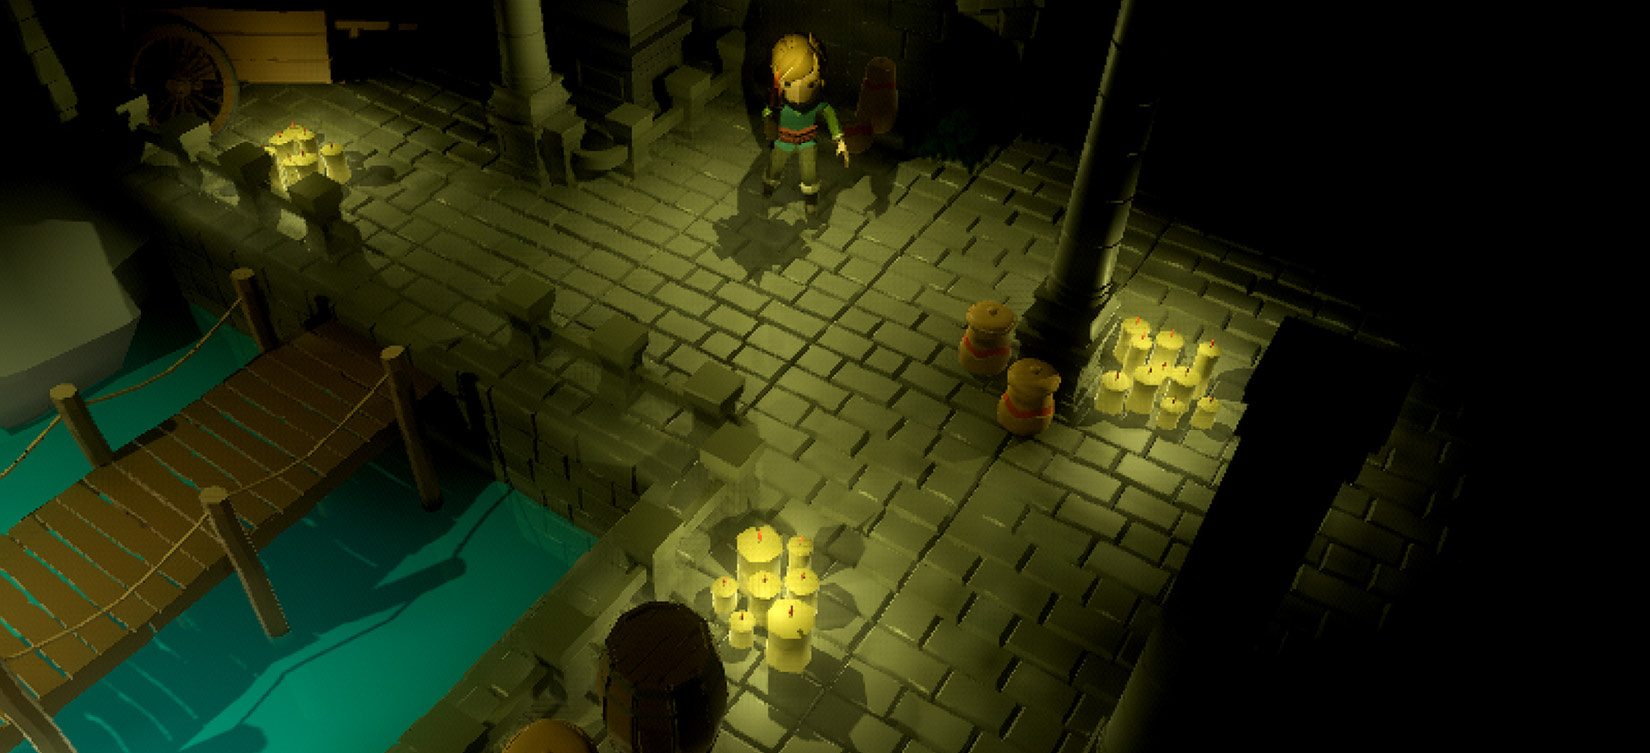
Figure 13.6 – All of the candles were lit after Clara walked by them
We suggest you apply the same procedure to the Sconce.tscn scene. This time around though, alter the Z axis of BoxShape for the CollisionShape node to simulate the extra distance the sconces must have between the walls and Clara. We chose a value of 2, but you might want to adjust it to something that suits your conditions. Alternatively, you could move the whole Area node a bit forward to line it up with the two extensions of the sconce that connect to a wall. As long as there is enough area extended out of sconces, Clara will trigger it.
So, where else can you take this idea? A simple case might be to introduce traps or enemies reacting to the player’s position. In the case of enemies, they can also take advantage of pathfinding via the same Navigation node we placed in the level. Also, it’s common, in a case like this, when enemies give up after following the player for a certain period of time. If the distance is not getting any shorter and the player is getting away fast enough, the enemy will usually return to their designated patrol zone instead of trying to catch up with the player.
We aren’t going to introduce such mechanics in this game. However, it might be something you can pursue as a more advanced game feature. If you are really interested in enemy versus player behavior, then we suggest you read a few artificial intelligence books on game development. There are a plethora of options out there and we’ll give you a brief list in the Further reading section.
There are two more trigger zones we should create. One is for the backpack behind the cart when Clara goes near that area. The other one is when she approaches the door that leads upstairs. Let’s start with the backpack.
Adding the trigger for the backpack
This effort will be similar to the way we did it for the candles and sconces. Since you already know that by using an Area node you can introduce interactivity, we’ll present something slightly new.
When players interact with the world, more specifically with the game objects, they feel that they have agency over these items. For example, players have just discovered that walking near candles will light them. This is part of the fun besides the narrative and story elements a game can have. At this point, it’s up to the game designer to interweave another layer of complexity. Perhaps, being close to the candles is only a precondition and the player is also expected to click on the candles.
Regardless of the conditions a game designer will expect the player to satisfy, giving feedback to the player is quintessential. When players try things on their own, they will get negative or positive feedback. This kind of harmless trial and error could easily be used in lieu of a tutorial. An easy and reliable way to provide feedback is something we’ve already looked at. It is playing sound.
For the backpack exercise, we’ll combine both playing an audio file and reacting to an area effect. Once Clara approaches the backpack as she did with the candles, the backpack will play a sound file that will inform the player that she picked up the key. The following steps show you how you do it:
- Create a scene out of Backpack.glb and save it as Backpack.tscn in its original folder.
- Place an AudioStreamPlayer node under the root. Assign CollectItem.wav to its Stream field.
- Add an Area node with CollisionShape under the root, similar to how you did it for the candles. Position it at -2 on both the X and Z axes. You may want to pick values that make sense in your scene. As long as there is ample room for Clara to reach this zone, things should be fine. Use Figure 13.7 as a reference.
- Create a Backpack.gd script for the root node and save it in the same folder. Activate the body_entered signal for the Area node, which will add a boilerplate function to the script. Then, change the script as follows:
extends Spatial
signal key_collected
func _on_Area_body_entered(body):
if body.name == "Player":
$AudioStreamPlayer.play()
emit_signal("key_collected")
- Swap the Backpack node in Level-01.tscn with an instance of Backpack.tscn.
We are following the same principles we used in player detection for the candles. This time, instead of enabling lights, we are playing a short sound effect. We chose the AudioStreamPlayer node instead of its 3D version because we don’t want this sound effect to be affected by its distance to the camera. However, this is a perfect situation for you to swap and try both to see the difference.
The sound effect command is followed by the emission of a custom signal. In simple terms, we have converted the body_entered signal into a key_collected signal, which will be used in a more advanced scenario in the Playing the door animation on a condition section.
As mentioned in the third step, Figure 13.7 shows the relative position of the Area node.
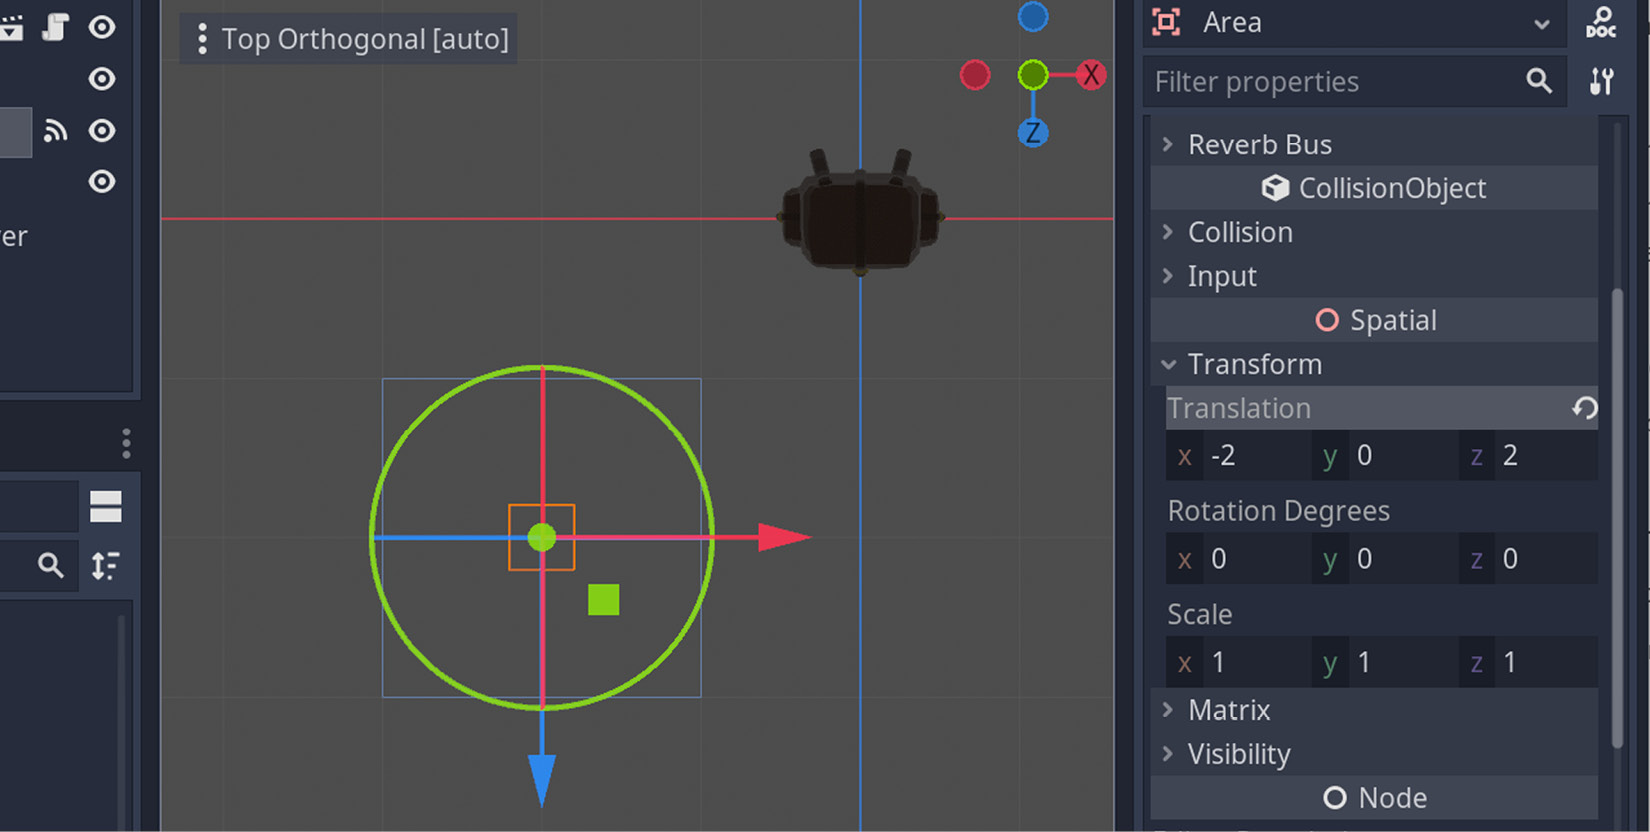
Figure 13.7 – The trigger area for the backpack is offset so Clara can reach it
As they are now, the sconces and candles don’t play a sound effect when they are lit. This might be a short and nice exercise for which you can use the TorchWhoosh.ogg file. By default, the file’s Loop feature will be on. So, remember to press the Reimport button after you turn the loop off in the Import panel.
Last on the list of making some of the game objects interactive is the arched door. Our workflow will be similar but additionally accounts for that key_collected signal we defined in this section.
Interacting with the door
You’ve been using the Area node quite liberally for a while. So, you must be used to it by now. In this section, you will use it one last time to complete the topic of interactivity. It will be for the door where you’ll also make use of that custom signal we have recently created.
Since some of the steps will be so similar, we will give shorter instructions for the sake of focusing on the unique parts, as follows:
- Create a scene out of Doors_RoundArch.glb and save it in its original folder.
- Attach the Doors_RoundArch.gd script from the Scripts folder to the root node.
- Add two AudioStreamPlayer nodes under the root. Rename them as LockFiddling and OpenDoor. For these two nodes, use LockFiddling.wav and OpenDoor.wav, respectively, for their Stream property.
- Add an Area node to the root with its dependencies and requirements, such as its collision, signal, and position. Figure 13.8 should be helpful to show where we are placing Area.
- Swap the existing door asset in the Level-01.tscn scene with this new scene. Also, assign the backpack asset to the Backpack property in Inspector.
- Press F5 and have Clara walk directly to the door.
We’ll pay closer attention to the script this new scene is using after you see how things look in the editor with our most recent changes.
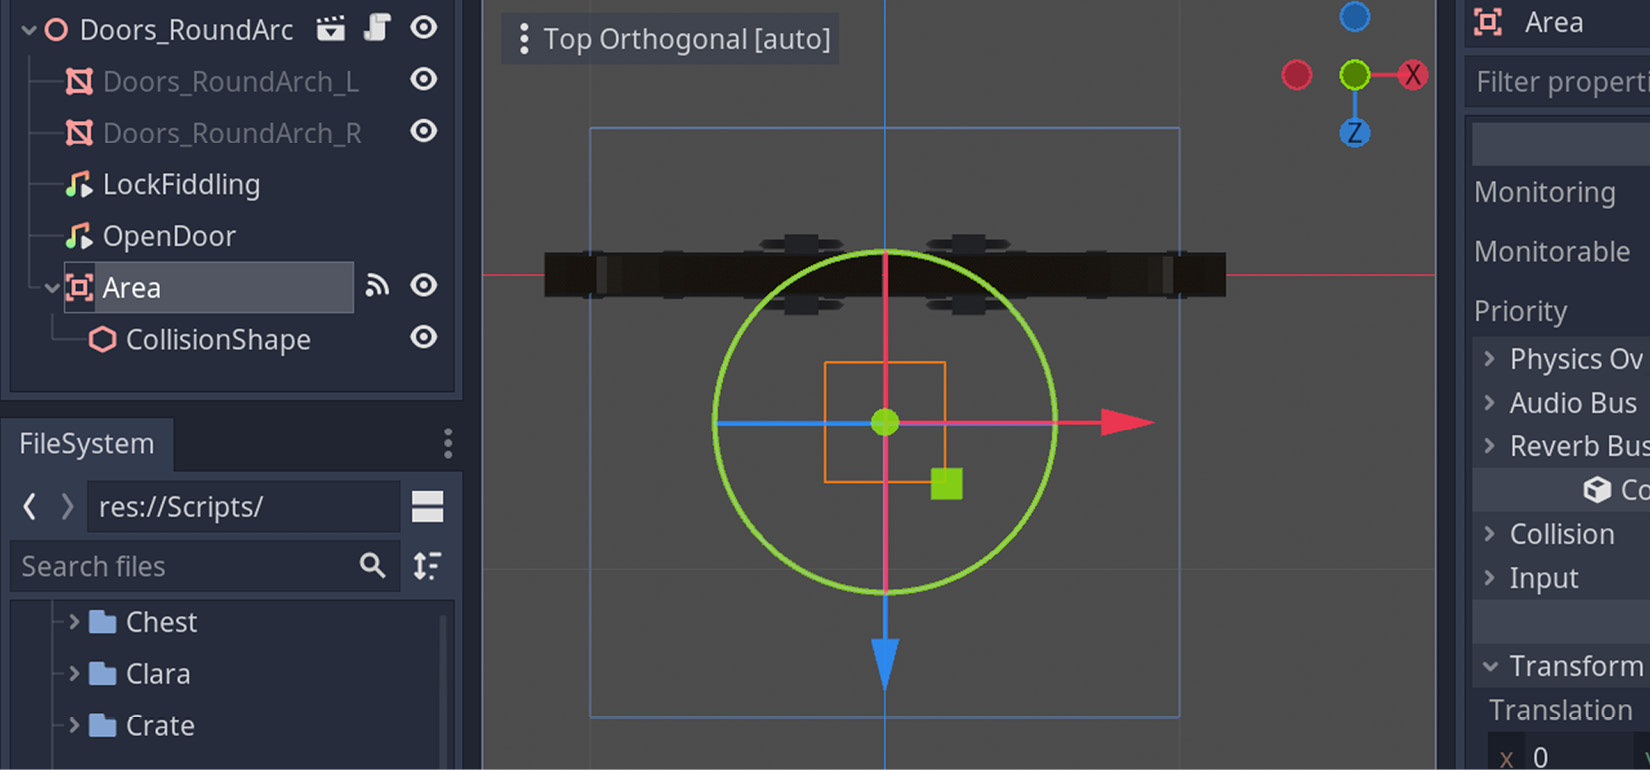
Figure 13.8 – This should be enough space in front of the door for Clara
The scene layout is pretty similar to the other examples you have created, but instead of one, there are two audio stream nodes. Their names indicate the kind of functionality we are trying to achieve. This time around, Clara standing in front of the door won’t be enough by itself because we expect her to have found the key first.
Let’s analyze the Doors_RoundArch.gd script and see how we are working it out. You can refer to this code block at https://github.com/PacktPublishing/Game-Development-with-Blender-and-Godot/blob/main/Chapter%2013/Resources/Scripts/Doors_RoundArch.gd.
We have a flag variable to keep track of whether the key has been collected. The value of this variable becomes true only when the on_key_collected function is run. All of this relies on whether the backpack variable emits the appropriate event, which is set up in the _ready function. That’s why you are binding the backpack object to the door using the Inspector panel so that these two can communicate.
In the body_entered function, we check whether the intruding object is the player. This is where the flag variable comes into play. If the condition to open the door is satisfied, then we request the door opening sound. Otherwise, the game engine will play a sound file that indicates Clara fiddling with the lock.
One type of solution may not always cut it
The solutions we show you throughout this book may not always be ideal if your level or game structure is different. Even the game we are building right now might benefit from a drastically and much more efficient architecture. The concept of architecture means the hierarchy of game objects you lay out in your scenes, how scripts share common variables, and ultimately how your systems talk to each other. There is no golden solution, rather best practices that come with more exposure to coding, perusing forums, and attending conferences where seasoned developers share their battle scars.
We suggest you try both cases where Clara walks directly to the door to hear the no-go sound. Then, have her pick up the key, which is already notifying the player with its pickup sound. Lastly, she can go in front of the door again to hear the door creaking. That door sure needs some greasing!
Even though the squeaking sound makes us think the door is opening with some protest, we don’t see it yet. So far, we’ve successfully mixed different disciplines we learned in the Playing music and sound effects and Creating reaction spots sections. It’s time we added the missing animation component to our workflow.
Building simple animations in Godot
Back in Chapter 5, Setting Up Animation and Rigging, we discussed variances between Blender and Godot Engine for animation needs. In summary, we claimed that you’d be better off with Blender for animating anything more complex than bouncing balls and simple rotating objects. To drive the point home, we rigged and animated a snake model. Similarly, we have been using a humanoid character, Clara, done in Blender as well.
However, there comes a time when it might be suitable to animate some of the models in the game engine. The topic we have at hand is the opening animation of the arched door Clara is standing in front of. If you prefer so, you could still open the model in Blender, implement the necessary steps that represent the opening of the door, and reimport your work in Godot. It’ll be no different than any other imported model that came with its animation.
For such a simple task, it’s a bit of an overkill, though. We’ll still use AnimationPlayer, but instead of triggering imported actions, we’ll create our own by manually placing keyframes in the timeline to match the creaking sound we play when the door opens.
Creating the door animation
Before you start tackling any kind of manual animation in Godot, we suggest you take a closer look at the MeshInstance nodes the model uses. In our case, we are fortunate that there are only two. However, this might also be a problem too.
The model’s mesh shows metal rings for grabbing and pulling to open such a heavy door. Sadly, they are part of the same MeshInstance nodes. This means that they can’t be individually animated. To be able to do it, you’d have to go to Blender and separate those pieces and reexport the model. Then, you’ll have more MeshInstance nodes you can work with. Keep in mind, though, that any one of these options is fine but comes with a trade-off. More individual objects often signal freedom, but they also clutter the Scene panel if you don’t need them in the first place.
We’re not concerned about the rings on the door for the time being. Our goal here is to learn the basics of animation in Godot, which starts by opening the Doors_RoundArch.tscn scene. After that, you will perform the following steps:
- Place an AnimationPlayer node under the root. This will automatically bring up the Animation panel at the bottom. If not, press the Animation button in the bottom menu.
- Press the Animation button in this panel’s top area to bring a context menu and select New in the options. As a reminder, you used the Load option in that context menu in Chapter 5, Setting Up Animation and Rigging.
- Type Open and press the OK button to confirm.
- Set the animation length to 2.3 by typing it in the area between the clock and loop icons on the right side of the panel.
There are a lot of similar named buttons or options in the last set of steps. Thus, Figure 13.9 will help you see what the editor will look like after your latest effort.

Figure 13.9 – Scaffolding for the open animation is done
The animation track is empty, but the groundwork is done. We need to tell AnimationPlayer how a specific property of an object is changing over time. To that end, you should do as follows:
- Select the Doors_RoundArch_L node in the Scene panel.
- Expand the Transform section in the Inspector panel. Press the key icon for the Rotation Degrees property. A confirmation popup will appear.
- Press the Create button to accept the proposed changes.
- Click and drag your mouse over the numbers in the timeline of the Animation panel. We want to set the time to the end of the animation, which is 2.3. Alternatively, you can type it in the area above the timeline to move the time marker.
- Change the Y value in Rotation Degrees to -60 and press the key icon again. There won’t be a confirmation popup this time.
If you scrub the timeline back and forth as you did to move the time marker, you’ll now see the door pivot around its hinges. Speaking of which, this was covered in the Setting origin points section of Chapter 6, Exporting Blender Assets.
Also, feel free to use the forward and backward play buttons to test the Open action. We’ll trigger it programmatically soon, but we should take care of the other portion of the door first as follows:
- Select the Doors_RoundArch_R node in the Scene panel.
- Reset the time marker to 0 in the Animation panel.
- Follow steps 2–5 from the preceding set of instructions with only one difference. Mark the Y value as positive 60 this time since the directions are reversed.
After the two sets of changes, the editor will resemble what you see in Figure 13.10:
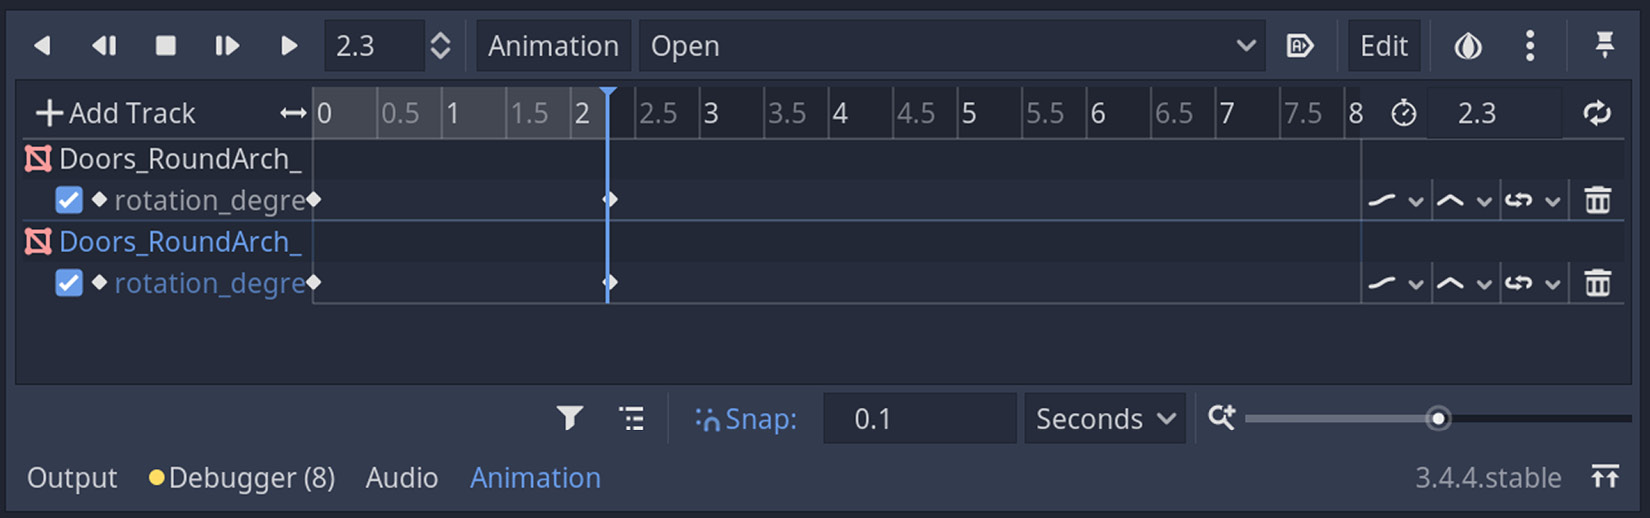
Figure 13.10 – Two sections of the door model have been keyframed, hence animated
This will add the necessary keyframes to the timeline at points where changes occur. Since we want the door to open in one go without any slowing down or stuck effect, we are not introducing more keyframes other than those we are using. If you fancy more complex scenarios, you can position the time marker along the track to where you want to introduce more keyframes.
The Open animation you have just created should run on a condition. We’ve already discussed and even implemented the necessary condition to a certain extent. However, we didn’t really place the animation part in the door script. Let’s do that right away.
Playing the door animation on a condition
Earlier in the Interacting with the door section, we attached a script to the door scene. This script had all of the necessary rules to check whether the player satisfied the conditions to open this door. We’ve also done a whole bunch of other things since then. So, let’s summarize what we’ve got so far.
The arched door scene has an Area node that reacts to the player’s presence. The door provides an auditory effect either way, but if Clara has already claimed the key, we expect the door to open with a creaking sound effect. Aptly named, we should trigger the Open animation. The change is simple enough, and it requires you to do as follows:
- Open the Doors_RoundArch.gd script.
- Replace print(“Open Sesame!”) with $AnimationPlayer.play(“Open”).
- Press F5 to run the game. Have Clara first go for the key and then stand in front of the door.
Voila! A big obstacle in the way of going upstairs has been eliminated.
Although it’s not possible to convey sound and visual effects via a still image, nevertheless, the following is the fruit of your hard work in Figure 13.11:
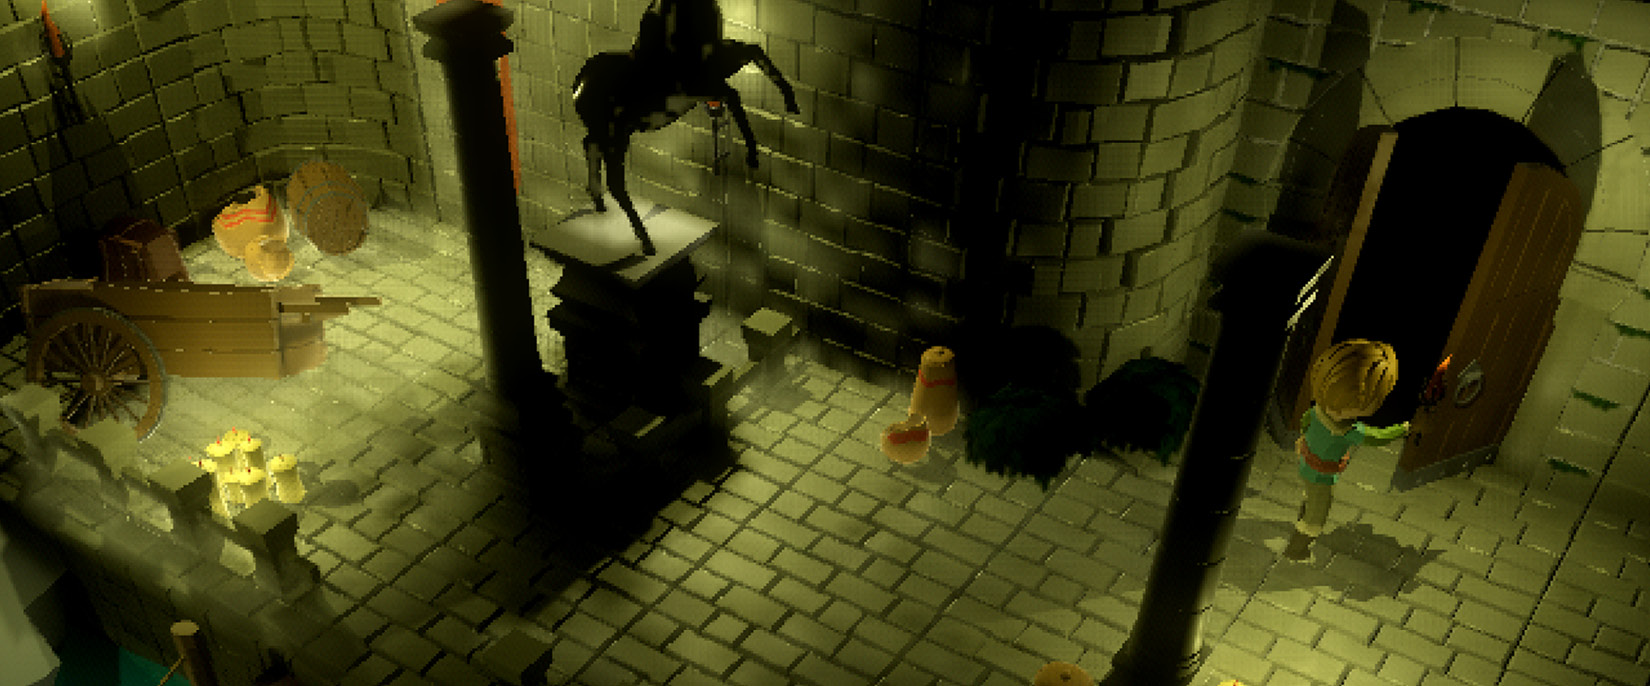
Figure 13.11 – Clara opened the door only after she collected the key from the backpack
If you move Clara away and come back near the door, the animation and sound will trigger over and over. Coming up with the necessary conditions to execute an event is important. However, it might sometimes be equally important to stop it from happening again. You might have already noticed a similar, and maybe annoying, repeating behavior with the candles as well. Some effects should only fire once.
We still have quite a few things to do in this chapter. That’s why we will give you a quick guideline for eliminating this kind of repeating behavior. By nesting or combining if blocks, not only can you make sure the condition has been met just then, but also that it has been met before. For this, you might want to take advantage of simple Boolean variables. If the solution doesn’t come to you, you can always check the GitHub repository for the finished work.
What’s left for Clara to do at this point? Well, she’s currently standing there waiting to go upstairs. In this context, upstairs means loading another level, which we will discover in the Loading another level section later. For the time being, we still don’t know exactly when we are supposed to load the next level. Let’s see how we can determine that.
Waiting for the door animation to trigger an event
It’s tempting to load the next level when we start opening the door. That being said, you’ve worked hard to keep track of what Clara has been doing as a precondition to start the door’s opening animation. If you switch to a new level right away, the animation will be for naught.
Instead, we should wait for the Open animation to finish. Only after that does it make more sense to switch things up. There are two common but equally awkward ways to do this. We’ll discuss both, so you get to know them before we dismiss them for the sake of a better alternative, and they are as follows:
- yield: You can add yield($AnimationPlayer, “animation_finished”) after you trigger the Open animation. Whatever comes after the yield line, such as loading a new level, will have to wait for the animation to be finished. This is, in a way, like holding the line. Nothing else will happen unless, well, the program yields. This concept will change in Godot 4 in favor of the await command, which is a more permissive architectural choice than blocking things during the execution of your code.
- Timer: An alternative to yield where you are still letting things run is introducing a Timer node to your Scene tree. This is just like any other node you could add. Its Wait Time field in the Inspector panel could be set to when you want it to go off, in our case, 2.3 seconds, since that’s the length of our Open animation. Then, once the time is out, this node will fire a timeout signal for which you can write a listener.
This method’s usage in our situation would be to start the timer as soon as you initiate the Open animation. Since the timer’s Wait Time would be synced with the action you are playing, it would look like loading a new level right after the action is finished.
We will not use either of these methods because why would you make your life more complicated when there is already a way to accomplish something with the toolset you are familiar with? Instead of switching gears, we’ll see how AnimationPlayer can still help us as follows:
- Add the following function somewhere in the Doors_RoundArch.gd script:
func load_level():
print("What level?")
- Select the AnimationPlayer node and expand a context menu by pressing the Add Track button.
- Choose Call Method Track among the options. You’ll be presented with a list of nodes to pick from. So, select the root node, Doors_RoundArch, on the upcoming screen.
- Move the timeline marker to 2.3 seconds. Right-click where the blue timeline marker meets Functions for the Doors_RoundArch entry in the animation tracks. To get a better idea, refer to Figure 13.12 to see the location we are talking about.
- Search and choose load_level from the upcoming list. Press F5 to run the game and follow the necessary steps as before to open the door.
Everything will be exactly the same, except when the door animation is finished playing the Open sequence, the load_level function will run too. Since showing the door animation won’t make sense, we’d rather show you the editor’s status as mentioned in the fourth step:
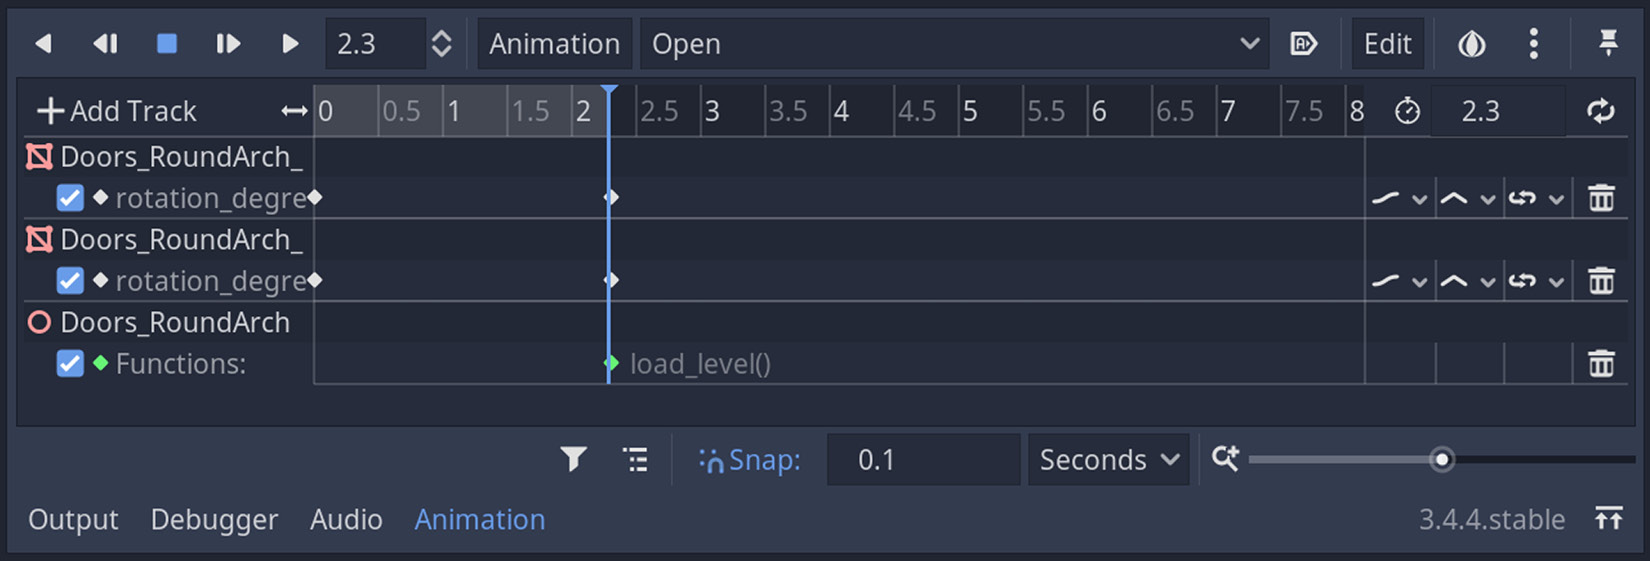
Figure 13.12 – The load_level function will be triggered when the timeline arrives at the keyframe we set
The last frame of the Open action is where we are firing the function responsible for loading the next level. For now, it’s printing only a statement. We’ll be looking into swapping our current level with a new one later in the Loading another level section.
While we are still working on building simple animations, we could take care of the light sources that kind of look static.
Let there be flickering lights
The work we did with the sconces and candles for introducing the Light nodes to our game in Chapter 10 , Making Things Look Better with Lights and Shadows, didn’t include animations. Nevertheless, we’ve been gradually improving everything else ever since.
Consequently, it would be nice to add some oomph to our light sources as follows:
- Open Sconce.tscn and add an AnimationPlayer node to the root.
- Introduce a new action. Choose Flicker for its name.
- Set the length to 2 seconds. Also, turn on Animation Looping and Autoplay on Load.
- Press the Add Track button and choose Property Track. Select OmniLight from the list that pops up. This will display another list to pick from.
- Pick omni_range. Right-click the track in the Animation panel at 0.0, 0.4, 1.3, and 1.9 seconds to open a context menu and select Insert Key.
- Select each one of these keyframes and enter 8, 6, 7, and 5, respectively, in their Value property in the Inspector panel.
- Press F5 and have Clara light the sconces. They should start to flicker.
Before we discuss a more refined and advanced version of what we have done, the following is what we have in the Animation panel:
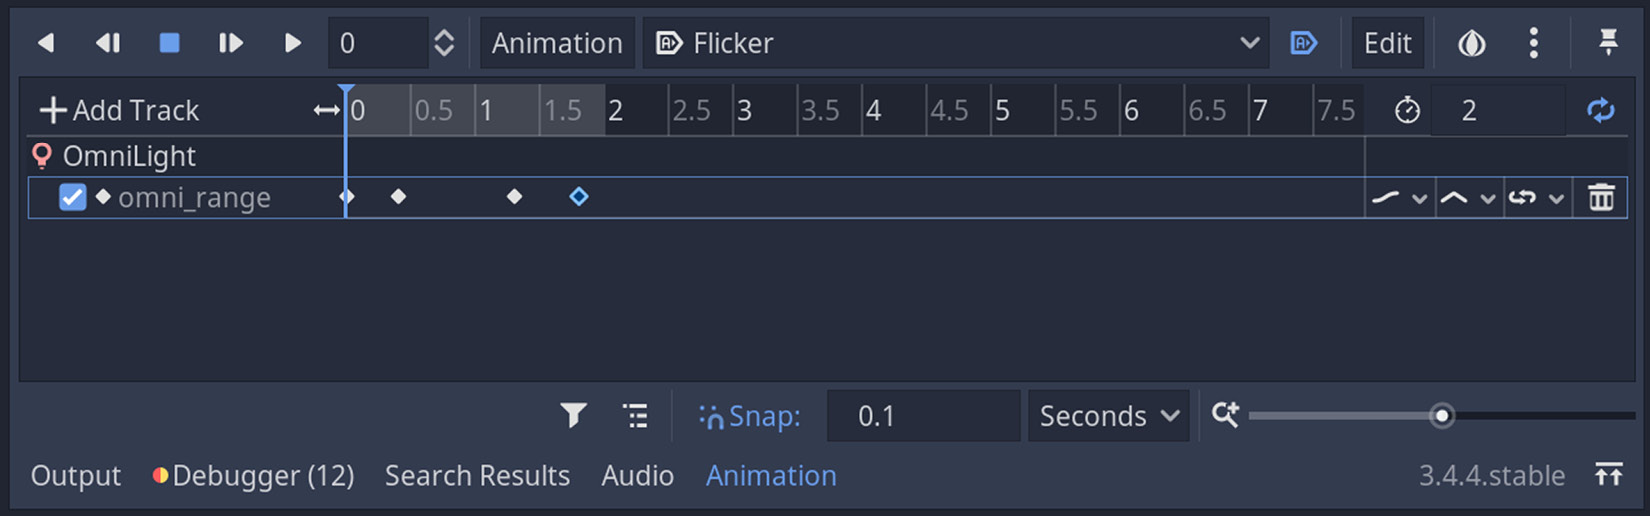
Figure 13.13 – The Flicker action has been defined for OmniLight in sconces
Things now must look more organic when you light the first sconce. Then, perhaps after the second or the third one, the cozy flickering effect will look disturbingly repetitive, won’t it? If only there was a delay between different sconces so they wouldn’t all fire the Flicker action at the same time.
Achieving that will be relatively easy, but we suggest you first copy the AnimationPlayer node inside Sconce.tscn and paste it into both the Candles_01.tscn and Candles_02.tscn scenes. It’ll be easier to notice the effect of randomness when we use the animation everywhere.
When all of the light sources are lit, the whole level will look like it’s pulsing. Let’s see how we can break the unanimity and introduce some randomness to what we have, as follows:
- Turn off AutoPlay on Load in AnimationPlayer for all of the three scenes you are using it for.
- Open the LightSwitch.gd script and alter the _process function as follows:
func _process(_delta: float) -> void:
$OmniLight.visible = is_lit
if is_lit:
yield(get_tree().create_timer(randf()*2.0),
"timeout")
$AnimationPlayer.play("Flicker")
All our light sources share this script. So, the changes will apply to all instances. While we were not in favor of using the yield command, it was relatively harmless to do so in this case. The last three lines tell the engine to create Timer on the fly and it randomly picks Wait Time for it between 0 and 2 seconds. When this timer goes off, the Flicker action plays.
Although you copied and pasted the same AnimationPlayer node that forced the light sources to share the same length and keyframes with exactly the same values, since the Flicker action for each light starts with a delay thanks to our latest change, it will induce enough visual differences.
Additionally, if you want to be really fancy, you could add another track such as light_energy to vary the brightness of the light sources.
Wrapping up
Slowly but surely, you will have a more complete and believable feeling game by introducing small variations here and there, either by placing them in the world in a non-repeating pattern or by animating some of the game objects’ key features.
Sometimes the method to do this will be completely different. For example, the shader we are using to simulate the body of water doesn’t use a node such as AnimationPlayer, but we still have motion. That being said, it’s disillusive to have that boat look so still while the water is in motion. With the knowledge you have gained in this section, we suggest you turn the boat model into a scene and animate it to show an oscillating motion like a boat would do.
While you should feel confident that you know how to animate the basic properties of game objects, you have left out something important: Clara was supposed to head upstairs. Let’s help her do that.
Loading another level
Before we started to animate the light sources in the Let there be flickering lights section, we were ready to move Clara upstairs. To that end, we used a nifty feature of the AnimationPlayer node to fire the load_level function, which printed a statement to the Output panel, a substitution for the real thing. In this section, we’ll investigate how to swap the existing level with another.
Let us remind you that our current level, Level-01.tscn, is instanced inside the Game.tscn scene, which is holding a Camera and an AudioStreamPlayer type of nodes. Godot has a built-in function, change_scene, that can change the current scene to another scene. However, this might be dangerous since it’ll replace the entire structure. In our case, this is not Level-01.tscn but everything in Game.tscn because that’s the main scene.
The solution we’ll offer is a process that’s operational at a higher level than Level-01.tscn itself. Ideally, your scenes should notify a higher authority of the changes they would like to introduce to the overall system. As it happens, this could very well be the Game.tscn scene via which not only can you use it to load a new level, but you could also be taking care of other stuff in your game such as keeping a log file, contacting a database to store important changes, or even reaching to a third-party service to show ads.
Now that we’ve established the importance of the Game.tscn taking over the task of loading a new level, how are we going to let it know when to do it? You have used signals before to facilitate a way between different game objects to know each other. This involved placing a reference of an object inside another by exposing a script variable to the Inspector panel. Although we could still try this, there is a better way.
Using an event bus
When we expose variables to the Inspector panel so that scripts can recognize other game objects to be able to connect to their signals, we are coupling things, in a sense. When the number of objects and signals grows, this method will be difficult to maintain. There is an alternative, a concept called event bus, that might be helpful in an ever-growing list of dependencies.
We’ll revisit this concept in more detail in the Further reading section since the notion is part of a much bigger family of options available to you. For the time being, we’ll be satisfied with a practical application of it. This is what it entails:
- Create an EventBus.gd script in the Scripts folder. Add the following line to it:
signal change_level(level)
- Open Project Settings and switch to the AutoLoad tab.
- Use the button with the folder icon to find the EventBus.gd script.
- Press the Add button to add this script to the list underneath.
Figure 13.14 shows what the editor will look like.
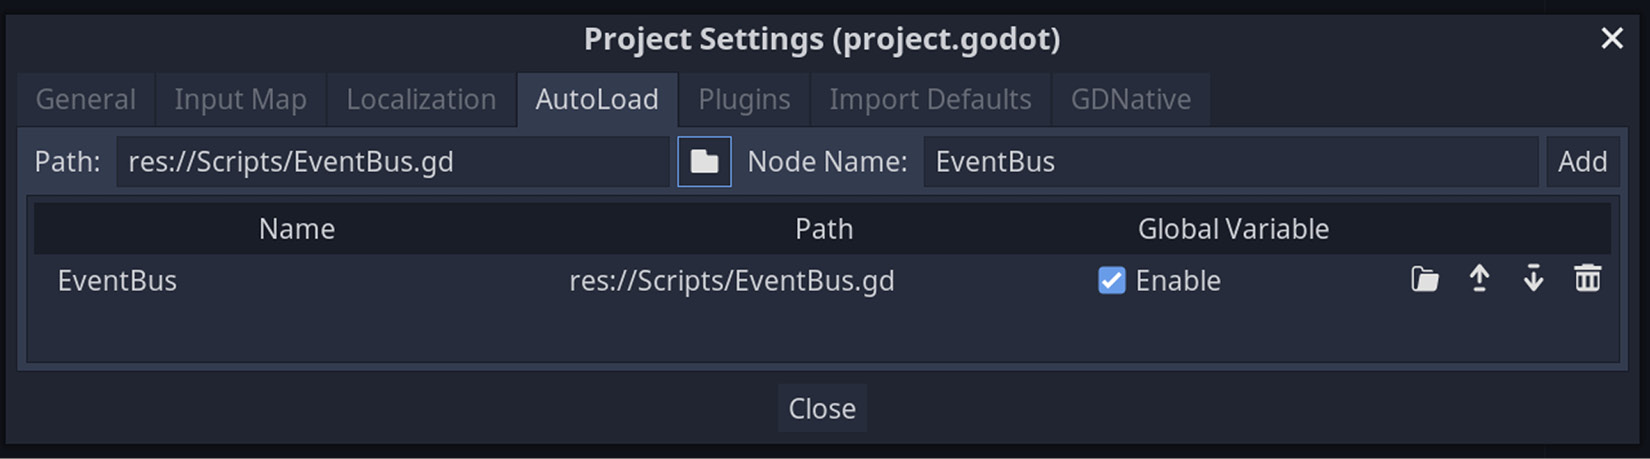
Figure 13.14 – Our first singleton is set up and ready to use
We have just added a script to the AutoLoad list. A singleton is also another common name that is used in the industry for this concept. It means that there can only be one instance of the script. Besides the conventional description, in a Godot-specific context, as soon as you introduce it to the AutoLoad tab, there will always be one and only copy of this script; it will also be loaded for you and be made available to all of the constructs in your project.
So, who’s going to make use of this new script since it doesn’t seem to be attached to anything? After all, it just exists there, but since AutoLoad makes it accessible at all times, we can use it when the door animation is finished.
Let’s reassess our work from the Waiting for the door animation to trigger an event section. When we run and wait for the Open action in the Doors_RoundArch.tscn scene, AnimationPlayer eventually triggers the load_level function. There is currently a line of placeholder code in the body of that function in the form of printing a short statement: What level?
That’s where we originally intended to load the next level. However, in light of the discussion we had in the opening lines of the Loading another level section, we now want to delegate this to the Game.tscn scene. To that end, we have created an EventBus.gd script that will communicate our request to the relevant recipient. Therefore, you will have to make the following change:
- Open the Doors_RoundArch.tscn scene.
- Update the load_level function as follows:
func load_level():
EventBus.emit_signal("change_level",
"Level-02.tscn")
In our earlier efforts, game objects were directly using the emit_signal command. For example, the backpack was emitting a key_collected signal. Here, we generalize the idea. We no longer care about knowing which object is emitting. We use a high-level construct such as EventBus to do this for us. Figure 13.15 shows a diagram of the new architecture we are proposing.
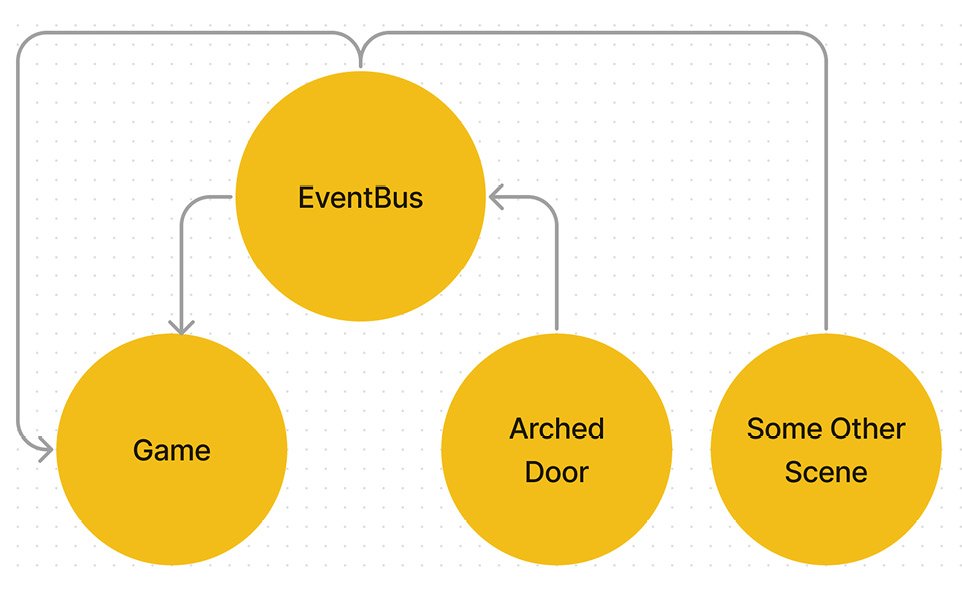
Figure 13.15 – We no longer need to couple structures anymore thanks to EventBus
In the backpack example, the emitted signal was directly captured by the door so that the game could decide whether the player has completed a necessary condition. So, similar to how communication works in real life, there are two main parts to an event: an emitter and a receiver. We’ve made updates to the emitting situation. Let’s see what we can improve at the receiver’s end.
Listening to the EventBus signal
Going back to the relationship the door and the backpack objects had, the backpack wasn’t aware of the door, but the door had a field we set in the Inspector field to reference the backpack. So, when the backpack emitted an event, the door was already keeping an eye on the backpack in a manner.
We are now trying to stay away from this type of architecture. Instead of directly using an object to emit an event, we tell the EventBus to do it for us. However, who is the door in our new example? In other words, who is listening to our event and how? The short answer is the Game.tscn scene.
Let’s implement some code first. Sometimes, it serves the purpose of showing instead of telling. Then, we’ll explain the rationale behind it. The following steps show what you should do after you open Game.tscn:
- Create a new Spatial node under the root node. Rename it as Level.
- Drag the Level-01 node into this new Level node.
- Make a new script as Game.gd and attach it to the root node. You can save it alongside the scene file. Then, you type in the following code:
extends Node
func _ready():
EventBus.connect("change_level", self,
"change_level")
func change_level(level:String):
var new_level = load("res://Scenes/" +
level).instance()
$Level.remove_child($Level.get_child(0))
$Level.add_child(new_level)
Do you see that _ready function where we make use of the EventBus architecture? That’s the sweet part. This way, neither Game.tscn nor Doors_RoundArch.tscn need to know anything about each other. They share and deal with their responsibilities through EventBus.
Somewhere, at some point, a structure may fire a change_level signal. That is all we care for, and after we express our interest in it, we also prepare ourselves for what to do with it, in case the event comes to fruition. If that’s the case, we handle it inside the change_level function.
Naming conventions
Some people keep their signal and event handler (function) names the same for the sake of treating the function as an extension of the signal. Godot’s signal bindings will add an _on_ prefix, though. Keeping your own event handlers’ names the same as the signal name might help you distinguish them from Godot’s own bindings. However, you could always follow Godot’s naming convention in your bindings too.
Let’s now analyze what’s going on in the change_level event handler. When we fired the signal in the arched door scene, EventBus was passed a parameter in the form of a string: Level-02.tscn. The first line in the change_level function looks up and loads this string in the project’s Scenes folder. After finding a match and creating an instance of it, we want to store this new scene because we still have some work to do with the current scene. We should dispose of it before we add the new scene.
Since we’ve made some changes to the Scene tree, the current level, Level-01, is now inside a Level node that acts like a receptacle. Thus, we are instructing it to first find then remove its only child with $Level.remove_child($Level.get_child(0)). Only after that do we add the new level.
There is only one thing left for you to do. Press F5 and have Clara go through all of the steps necessary to trigger the door’s opening. As soon as the door is open, the game will take you upstairs to a new level. You should expect to see what Figure 13.16 shows.
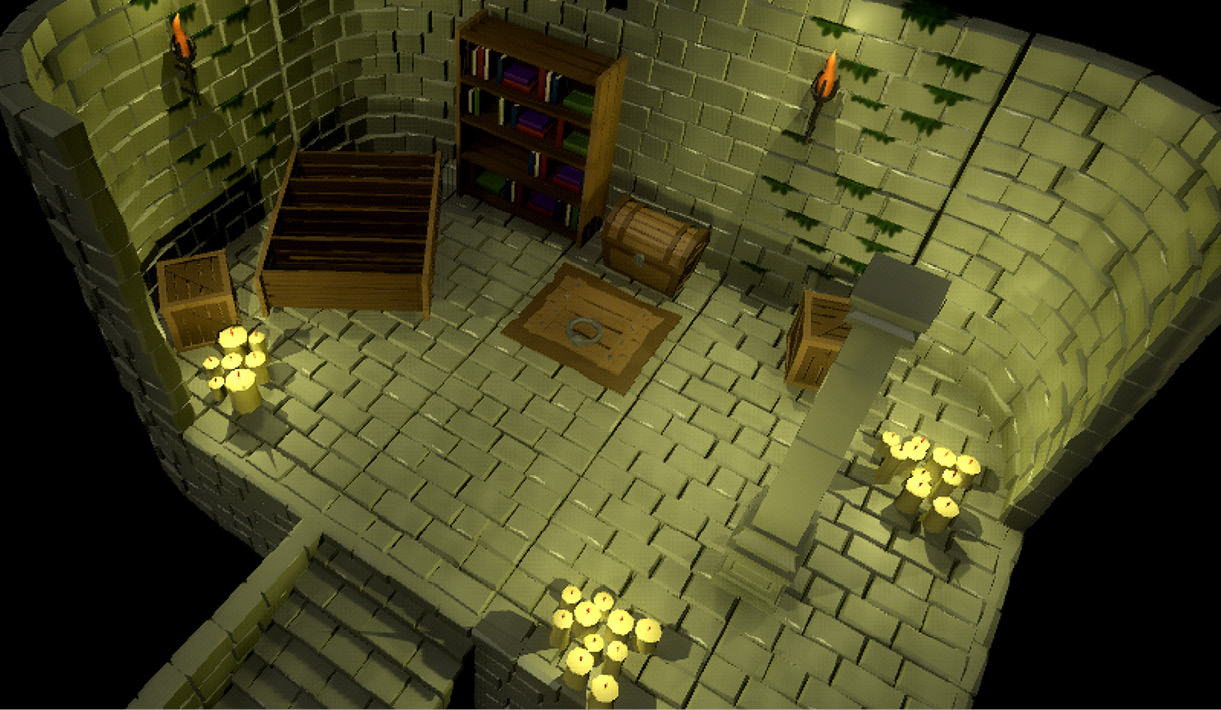
Figure 13.16 – Welcome to our new level
Congratulations! You have guided Clara to find her way in the darkness to collect a key that unlocked the door to this new level. She can continue her adventures from here. Is that a chest over there? There is a trapdoor right in front of it though, so watch out for that. Using the tools that we have shown you, you can go on and create new conditions and obstacles for the player to tackle. It’s up to your imagination.
We’ll now dedicate the rest of this chapter to discussing some of the choices you’ve made by following our guidelines and what you could also do differently.
Discussing some of the choices we can all make
Our goal in this book is to teach you just the necessary parts of Godot Engine to build a simple point-and-click adventure game. It’s a simple statement, and yet it entails two separate efforts. On one hand, we should teach you as much as possible about the game engine without making it look like you are reading documentation.
On the other hand, the game we planned to build must be advanced enough but also simple to the point that you can easily follow its progress by reading as little as possible. Also, the fact is that there are only so many pages in a book. Thus, some of the choices we made during the production of the game were limited by these factors.
You might also face similar but different limitations and conundrums in your own projects. An early plan, even the worst one, might often be better than not having a plan at all. Even then, some cases might be really hard to nail and prepare beforehand, such as making your gameplay fun or achieving a decent user experience.
For example, the level switch is technically done. However, the change is happening so abruptly that the player might want to feel a moment of respite to collect their thoughts and savor their journey throughout the level. You can easily achieve this by extending the animation length and pushing the load_level function to later frames. It might look like there is a healthy pause between the door animation and the loading of the next level.
Even better, having the screen fade out before the switch actually happens might be a good idea. In fact, this might even be useful from a technical point of view. Our second level is so small, thus it’s easy to load it from the disk. However, in more ambitious projects, your levels might be chuck-full of game objects waiting to be loaded.
Furthermore, if your game loads previous sessions, you will have to reset your game objects’ states to their last known values. A generic loading screen in between switching levels or loading a previous game session might be a much better architecture. By following this practice, you’ll most likely find yourself abstracting more and more systems from more directly implemented systems.
Thus, this is perhaps the most valuable piece of advice we can offer you: if you are feeling stuck or unsure of how to tackle a topic, first focus on the special case and its implementation, then try to generalize it if possible and necessary.
Summary
This was another chapter with a lot of moving parts that incorporated so many different aspects of the game engine. Let’s break down some of your activities that helped to add the finishing touches on so many things we carried over from the previous chapters.
First, you tackled background music and sound effects. You had already seen the usage of sound in Chapter 8, Adding Sound Assets, which covered simple scenarios. In this chapter, you’ve learned how to use sound assets in a proper context.
Next, you reexamined a topic you saw in Chapter 12, Interacting with the World through Camera and Character Controllers – player detection. This time, you used Area nodes as trigger zones since there would not be direct player interaction, such as mouse clicks and motion. Instead, Clara triggers predetermined events when she’s in the right zone.
You were also able to communicate information between game objects, essentially separate and distant systems, when an Area node was actively used. For instance, when the player reached the backpack, the condition to open the door was satisfied. The backpack let the door know what was going on through the use of a custom signal.
You symbolized the pickup of the key with a sound effect. Perhaps, a short piece of animation would have been used to display a 3D key moving up and fading out. Sometimes, an icon appears at the bottom of your monitor and finds its place in what’s called a quickbar in some games. Both approaches are fine, but we didn’t want to do either one of them.
Since this chapter was supposed to teach the creation of animations in Godot, we wanted to show off cases that were sufficiently complex, such as flickering light sources or opening two sections of an arched door, rather than simply moving a key up in the game world. We believe our effort has a more didactic value that you can transfer to other simple use cases.
After finishing simple animations, particularly the door’s opening action, it was time for Clara to go upstairs. To achieve that, you looked into swapping the current level with a new one. Although you could have achieved this by letting game objects pass information between each other, you were introduced to a more generic way of doing this via an EventBus architecture.
Even though there is still one more chapter, this is the moment you should pat yourself on the back. You have built a fully functional, however small, point-and-click adventure game. The following chapter will show you how to export your game. We’ll also discuss what other options you can consider on your game development journey.
Further reading
As promised, we want to share with you a few words on the artistic aspects of sound management. Sometimes, a piece of music will have a high tempo. It means it’ll have a higher value of beats per minute (BPM). Depending on the game or the level you are building, you might want to select or create your music with the most appropriate BPM value to convey the best emotions.
There are also situations where gameplay will ask for a mix between a higher and lower tempo. This is common in role-playing or action games where players would like to feel they are under tension when they get involved in a sticky situation. For example, it would absolutely break the immersion if your burly, gun-toting player character is hiding behind a cover under heavy enemy fire when classic or chillout music is playing in the background. Likewise, when all is supposed to look calm between two action zones, if the game is playing a piece of high-tempo music, you will needlessly stress out and confuse your players.
Luckily, there are plenty of courses on this topic on Udemy. Giving a list of courses here would do injustice to all of the others we couldn’t mention since the list is long. We suggest you look it up on their website by using the music for games keywords.
Last in the sound management topic is the use of supplemental technologies. Either of the following two will help you create on-the-fly solutions to ever-changing circumstances if your game can’t make use of prearranged sound assets:
- FMOD
- Wwise
We also briefly mentioned artificial intelligence in this chapter. This is a vast topic, but a pertinent list of books would be the following:
- AI for Games by Ian Millington
- Behavioral Mathematics for Game AI by Dave Mark
- The Game AI Pro 360 series by Steve Rabin:
- Game AI Pro 360: Guide to Character Behavior
- Game AI Pro 360: Guide to Movement and Pathfinding
- Game AI Pro 360: Guide to Architecture
- Game AI Pro 360: Guide to Tactics and Strategy
The EventBus solution we presented in this chapter is frequently utilized in many programming circles. It’s sometimes called a Publish/Subscribe model or an Observer pattern. Referring to Figure 13.15, imagine you replaced EventBus with the post office. When a magazine you are subscribed to has its latest issue coming out, the publisher will notify the post office and you’ll be delivered your subscription.
Since the inception of computer science, and more particularly software programming, developers have noticed problems that exhibited a particular behavior or nature. Solutions to these common problems are called design patterns. There are a lot of resources out there that deal with this topic in the framework of classic software. However, game developers have also gotten some love in recent years. Regardless of domain specificity, a few examples are the following:
- https://gameprogrammingpatterns.com
- https://www.udemy.com/course/design-patterns-for-game-programming/
- Head First Design Patterns: Building Extensible and Maintainable Object-Oriented Software by Eric Freeman
- Learn Design Patterns with Game Programming by Philippe-Henri Gosselin