Chapter 2
Daydream and Unity
Chapter 1 introduced the various aspects of the Daydream and ARCore platforms and laid out the history and current state of the VR and AR landscape. In this chapter, you start getting your hands dirty in Unity and Daydream. By the end of this chapter, you will have sharpened your Unity skills, set up your Daydream development environment, and started building out some reusable interactive VR mechanics. The core Daydream components implemented in this chapter will form the foundation of all the games and apps throughout this book.
This chapter is divided into two parts: Unity Essentials and Daydream Development. Its goal is to get you up and running in Unity and Daydream as quickly as possible so we can get to the fun part: developing virtual reality apps and games.
The next section, “Getting to Know Unity,” introduces to the Unity Editor, fundamental Unity concepts, and gets you familiar enough with Unity to start working in Daydream. In the “Daydream Development” section, you get comfortable with Daydream by building out some simple VR app mechanics that you can used in your games and apps. These include things such as moving around in a virtual environment, using first-person and third-person camera setups, and best practices for solving VR motion sickness.
Getting to Know Unity
This section covers Unity basics and all the foundational knowledge you need to know to become an ace Unity Daydream developer.
If you are new to Unity, or your Unity skills are a bit rusty, this section will be a useful refresher. If you are already comfortable with Unity, you might want to skip ahead to the next section in this chapter, “Daydream Development.” There I introduce the Daydream Software Development Kit (SDK), and we start building VR apps.
The focus of this book is Daydream VR development in Unity. Considering the expansive size of Unity and possible topics to cover, I only introduce the essentials you need to start building Daydream projects and to follow along with the recipes in this book.
If you are new to Unity, don’t panic. Here you will be led through every recipe step by step, so you will learn by doing. By the end of this book you will have mastered Unity VR development.
That said, be aware that a whole world of Unity is out there that is not covered in this book. For a great introduction to Unity, I recommend as a companion to this book, Unity Game Development in 24 Hours. The Unity website itself also has many resources for the novice Unity developer.
What Is Unity?
Unity is a 2D and 3D game engine for cross-platform development: It allows you to build your application once and deploy it to many different platforms. Because of the simplicity of its visual editor and its large development community, Unity has become the game engine of choice in the VR community.
Traditionally, Unity has been the sole domain of game developers; however, with the growth in VR in recent years it has become apparent that game engines such as Unity are the perfect systems for developing all kinds of VR applications. These game engines have a broad array of capabilities and tools for optimization, UI, and animation, even beyond 3D games. Google’s Tilt Brush and Google Arts and Culture VR are great examples of brilliant, non-game VR apps built in Unity. Both are available on the HTC Vive, Oculus Rift, and Google Daydream platforms.
Unity consists of two main parts: The Unity Editor where you build your scene, and Mono Develop where you edit your code.
In the Editor, you create 3D scenes for your game by manually placing content, such as players, enemies, and other visual elements, directly into the environment. You will quickly find that if you have had any previous experience using 3D editing software like Maya, Cinema 4D, or 3DS Max, you will find the Unity Editor very intuitive.
Mono Develop is the default code editor that comes bundled with Unity. However, you will probably find that if you have previous experience with another Integrated Development Environment (IDE), such as Microsoft’s Visual Studio, you will want to set that as your default code editor instead. With that in mind, all the recipes in this book are code editor agnostic, so you are free to work in whichever environment you feel most comfortable. Also, although Unity allows you to develop in two languages (UnityScript and C#), UnityScript is being deprecated; so in this book we will only be using C#. It is a more robust language and has a much larger developer community.
Why Unity?
You have multiple ways to build virtual reality games for Daydream: You could follow the native route, coding everything in Java, or use another game engine such as Unreal Engine. Using Unity makes the most sense here, because it is notoriously accessible to new developers and has the lowest barrier to entry for building VR games, while also having the largest developer community.
Unity’s native support for Daydream means it is easy to create VR content and quickly get it running on not only the Daydream platform but also multiple other VR platforms such as Oculus, Gear VR, and the HTC Vive. Unity also offers the advantage of a free indie developer license, so you pay nothing to use the software.
If you haven’t already done so, download Unity from the Unity website (www.unity3D.com), and follow the installation instructions. When installing, make sure to include the Android Build Support component, along with all the default selected components in the Download Assistant.
Exploring the Unity Editor
Open Unity, so you can get familiar with the most important sections of the Editor. The first screen that appears whenever you launch Unity is the Home screen, which you can see in Figure 2.1.

The Learn tab displays the first time you launch Unity or if you have no projects in the system. If you are an absolute Unity neophyte, I recommend going through all the tutorials in the Learn tab.
Otherwise, the Projects tab displays. Create a new project by clicking on the New button, and then entering a name for your project and a location to save it on your hard drive. Click Create Project to create and open the new project in the Unity Editor (see Figure 2.2).
Project Window
The Project window (see Figure 2.3) displays a tree structure of all the assets, files, and directories in the project. Search by name in the search bar to easily find a file, or drill down through the folders to manually dig them out. When you select a file, related information appears in the Inspector window. Add assets to the project by dragging and dropping them directly from the desktop onto the relevant directory in the Project window, or choose Assets > New Asset.
Scene View
All Unity projects are made up of scenes. The Scene view (see Figure 2.4) is a visual display of three-dimensional space that lets you interact with and manipulate visual elements (or GameObjects) in the currently active scene.
Toolbar
The whole area across the top of the project screen is the toolbar (see Figure 2.5). This area holds controls to play and pause your scene in the Editor, as well as tools for selecting and manipulating objects in the scene.

Hierarchy Window
The Hierarchy window (see Figure 2.6) shows all the GameObjects that have been placed in the scene. You can select objects in the hierarchy and adjust their properties via the Inspector window.
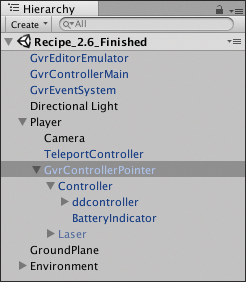
You can nest items in the hierarchy inside of each other by dragging one object on top of the other. When an item is nested inside another item, a small arrow appears next to it. This arrow allows you to collapse and expand the nested structure, exposing its child objects. Nested objects always move in the scene relative to their parent.
Inspector Window
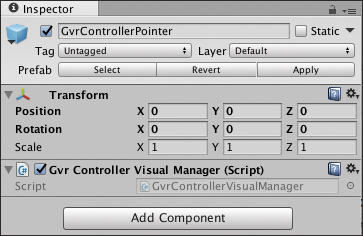
When an object is selected either in the Scene view, the Hierarchy window, or the Project window, information about that object appears in the Inspector window (see Figure 2.7). Here, you can manipulate granular values of component properties attached to GameObjects. You rename GameObjects by typing in the Name field at the top of the Inspector window, and deactivate them by toggling the check box next to the name.
Console
The Console displays system errors, build errors, and warnings. It is also useful for debugging at runtime in the Editor. Logging text to the Console will become very useful as you start building more complex games and apps.
Exploring Unity Concepts
Unity is a uniquely complex piece of software with multiple quirks and idiosyncrasies that can annoy and befuddle programmers unfamiliar with the platform. So in this section, we look at these peculiarities, and make them less likely to become pitfalls, by examining some of Unity’s primary concepts. These primary concepts will be expanded on throughout the rest of the book.
A general apprehension exists among software engineers against developing with a visual editor. They ask, “Why would you need a graphical user interface when the command line offers everything you need?” This question comes from the bad name visual editors have historically earned, for good reason: They are widely considered to be the engineering equivalent of playing with LEGO blocks.
However, the Unity Editor is not simply some pretty gizmo; it is the cornerstone of Unity’s development environment and an extremely useful tool that I am certain you will come to appreciate. In Unity, doing some things visually is not just okay, it is frequently fun. I’m not too embarrassed to say I personally enjoy playing with LEGO blocks.
Let’s go over some key Unity concepts you’ll need to become familiar with when developing games and apps in Daydream.
GameObjects
We’ve already encountered GameObjects. They are fundamental building blocks of a Unity game, representing elements within each game such as players, enemies, obstacles, and the user interface. An asset that is added to the scene is referred to as a GameObject. GameObjects are essentially empty containers that can be filled with components. Components accord GameObjects their functionality. The Transform component is common to all GameObjects, allowing them to be moved (or translated), rotated, and scaled in 3D space by adjusting the values in the Inspector.
To create a new GameObject from the GameObject menu, simply select one of the predefined GameObjects (3D object, Light, Camera, and so on), or an empty one; it is automatically added to the scene. You can also right-click in the Hierarchy window to access this menu.
Components
Components extend a GameObject’s functionality by adding behaviors, such as specifying appearance, interaction, or game logic. Unity provides numerous components whose properties cover all aspects of game development for things such as physics, interaction, and rendering. The Daydream SDK also comes bundled with a stash of useful VR-related components that we will use throughout this book.
You can use scripts to create your own components in Unity. To add a component to a GameObject, simply select the object, click the Add Component button in the Inspector menu to open the Component browser, and then choose the component you want to add from the preset list. You can also add components by selecting them under the Components menu.
Prefabs
A prefab is a reusable GameObject. You create prefabs by dragging a GameObject from the scene view or hierarchy into the Project window. You can then endlessly reuse the prefab by dragging it back into the scene from the Project window. When you make an update to a prefab, choose GameObject > Apply Changes To Prefab, and all instances of that prefab in the project are updated.
Throughout this book we will use many of the prefabs provided by the Google VR SDK for things such as building a VR pointer, spatialized audio, and playing videos.
Scripts
Any asset in Unity that contains code, such as a C# file, is referred to as a script. Scripts are used to add custom functionality to GameObjects, respond to events, handle user interaction, and generally build out game play.
Unity lets you code scripts in two languages: UnityScript (similar to JavaScript) and C#. As mentioned previously, this book focuses on using C#.
To create a script in the Unity Editor, choose Assets > Create > C# Script. Alternatively, add a script directly to a GameObject in the Component browser by selecting the GameObject, and in its Inspector, click Add New Component to open the Component browser. Click on New Script, give it a name (making sure the language is C#), and click Create And Add. This adds a new empty script to that GameObject.
To open and edit an existing script in Mono Develop, either double-click on it in the Project window, or select the gear icon on the script in the Inspector, and then select Edit Script from the drop-down menu.
Script or Class?
In Unity the word script is used in the same way the word class is used in the rest of the software engineering world. A class refers to a template of code that describes how an object of a certain type will behave. Although the term script has a slightly different meaning from class in software engineering (and possibly has some negative connotations attached), in the Unity world these two terms can be used interchangeably, and they will be in this book.
MonoBehaviour
When you create a new script in C#, it extends MonoBehaviour. This means that it inherits all the core functionality of the MonoBehaviour class. MonoBehaviour is a built-in Unity class that acts as a blueprint for creating new components, which you can then add to a GameObject.
The default MonoBehaviour class looks like this:
using System.Collections;
using UnityEngine;
public class MyScript : MonoBehaviour {

    // Use this for initialization
    void Start () {

    }

    // Update is called once per frame
    void Update() {

    }
}
The two important internal functions of a MonoBehaviour are Start and Update. You should place any of your initialization code inside the Start function. Start is called once after the class is instantiated and before the Update function is called for the first time.
The Update function is for code that needs to be executed continuously over time; code related to movement or interaction usually appears here.
Accessing Variables in the Inspector
An important Unity concept to wrap your head around is the process of binding GameObjects in the scene with code inside scripts through public variables. If you declare a C# variable as public in your script, it can be accessed in the Inspector and its values adjusted just like any other component. If you make a reference to a public GameObject, it creates an empty field in the component. You can then drag and drop GameObjects from the scene onto this field to link them, thus binding them.
Here is one example:
public class PlayerScript : MonoBehaviour {
    public GameObject weapon;

   // Other code
}
When this PlayerScript is added to a GameObject in the scene, it creates an empty field for the weapon GameObject in the Inspector window (see Figure 2.8). You can then drag and drop an instance of the weapon GameObject from the scene onto that field, creating a direct reference between the code in the script and the GameObject in the scene.

Daydream Development
With that brief overview of Unity, you will now have both a better conceptual understanding of Unity and have enough knowledge to be at least comfortable opening the Editor. Before you put those skills to the test, you need to complete some essential setup tasks.
If you are at all like me, then you hate wasting time setting up development environments and would rather be actually building VR. Although it is definitely true that some of the setup rigmarole in this next section can be singularly annoying, you will save yourself from a world of pain by doing it properly the first time. There is also a light at the end of the tunnel, because after this setup you will be able to leverage the Daydream SDK to start building out your first VR experiences.
So this section covers all the steps required to get the hardware and software components of your Daydream development environment up and running.
Daydream Development Environment
From a user’s point of view, Daydream looks like a VR game playing in a headset with a connected controller, but for the Unity developer, Daydream looks a little bit different. The game running on the headset is just the end product of a pipeline that makes up the Daydream development environment. The development environment includes Unity, the Google VR SDK (with its various scripts, components, and prefabs), and a Daydream-ready Android phone or headset.
In this section, you connect all the parts of the development environment by setting up Unity, the Daydream hardware, and the Google VR SDK.
Daydream Hardware
The test device you need must be a Daydream-ready Android phone, running at least Nougat (7.0+). You also need a Daydream headset and controller.
Although the possibility exists within Unity to never actually build your app to a phone, regularly running your app on a device to test it is highly recommended. Testing on your phone saves time (and perhaps your social life or your job, when you do not have to go back to the beginning if something turns out to not be working). Also, it will definitely make for a better game.
Setting Up Your Daydream-Ready Android Phone
Currently, an array of Daydream-ready Android phones are available from various manufacturers, including Google, Motorola, Samsung, and Huawei. Google estimates that by the end of 2018 nearly all major Android phone manufacturers will have Daydream-ready devices in the market, and the market is only growing. This means that access should not be particularly difficult, especially as over time the high-end phones will become the mid-range phones.
Daydream ready is a term Google uses for phones that conform to a minimum set of specifications for screen size, pixel density, number of cores, gyro and accelerometer sensors, and refresh rate in VR mode. Daydream is currently backward compatible to Android Nougat 7.0, but I recommend updating your phone to whatever the latest version of Android is at the time of reading this.
To prepare your Daydream-ready phone for development, enabling USB debugging on your device is important.
This is how you enable USB debugging:
Navigate to Settings > About Phone and tap Build number seven times. This exposes the Developer options in Settings.
Navigate back one level to Settings > Developer Options and enable USB debugging.
Setting Up Your Daydream Headset and Controller
Now let us get your Daydream VR headset up and running. The first thing to do, if you have not already, is to download the Daydream app from the Google Play store at the following address: https://play.google.com/store/apps/details?id=com.google.android.vr.home
Open the app, and follow the instructions to go about pairing your headset with the controller, making sure your controller is in close proximity to the phone and fully charged while pairing. During the pairing process you might be required to update the controller’s software, which can take up to 5 minutes. In addition, throughout this whole process if any prompts appear to install Android updates it is imperative that you install them—otherwise, Daydream might have problems running.
During setup, you might also be asked to enter a form of payment. This is a formality that is required to use Daydream; you will only be charged if you purchase something extra. If you already have payment set up with Google Play, you can skip this section.
To start using Daydream, place your phone in the headset, adjust the headset strap so it is comfortable, and enter the wonderful world of VR.
On first launch, you are guided through a short welcome tutorial to get you accustomed to the Daydream world. I recommend this tutorial, if you are unfamiliar with it.
After acclimating in the Daydream world for a while, the Daydream Home screen appears, where you can run installed games and apps or download new ones from the Google Play store.
Google VR SDK
The official name of the SDK Google provides for Daydream development in Unity is the Google VR SDK for Unity (or Gvr SDK). The SDK handles not only support for Daydream, but also Google Cardboard—hence it is not called the Daydream SDK. The Google VR SDK is made up of numerous scripts and components that you will use straight out of the box to help with much of the heavy lifting in your VR apps.
The next section instructs you how to download and install the SDK and introduces you to some of the essential components, after which you will start building your first Daydream apps.
You must download and add the Google VR SDK to your projects. Unity does natively support Daydream VR (as of version 5.6), but the SDK still provides some that are not handled natively. The SDK adds extra features, including spatialized audio, prefabs, scripts, helpful examples and utilities, as well as additional support for the controller and events.
Understanding the difference between what is provided by Unity’s native Daydream support and the installed SDK is helpful, so I spell it out more clearly here.
Unity natively handles:
Head tracking of the user
All things related to stereo rendering of the scene, including distortion correction and stereo configuration for specific viewers
Observing user interaction with the system, such as via the controller
In addition, the installed Google VR SDK provides:
Support for the Daydream controller
Handling spatialized audio
A reticle prefab for gaze-based user interaction scripts
Ability to run projects in Play mode in the Unity Editor
Several demo scenes for integrating the Daydream controller, playing videos, interacting with UI, handling permissions, and using a keyboard
Other useful utilities, such as a frames-per-second prefab for testing performance
Setting Up Your Daydream Developer Environment
The next recipes take you through the necessary tasks required to prepare Unity for Daydream (and Android) development. You will install the various SDKs and the other bits and pieces you need to set up your Daydream development environment.
In Unity, you will be installing the Android SDK, the JDK (Java Development Kit), and Google VR SDK; updating your phone to run a compatible version of Android; and then building a sample project from the Google VR SDK to test that everything works. Pour yourself a strong caffeinated beverage, and let’s get started!
Installing the Android SDK and Java JDK in Unity
To build to an Android phone from Unity, you need to install the latest Android SDK and the Java JDK, and then link them in Unity.
Let’s start by downloading the Android SDK that is bundled with Android Studio:
Open Unity, and access the External Tools preferences (see Figure 2.9) by choosing Unity > Preferences > External Tools on Mac, or Edit > Preferences > External Tools on Windows. To the right of the Android SDK text field, click Download. The Android Studio download page appears. Follow the steps to install Android Studio; the latest Android SDK (which must be at least Nougat 7.0+) comes packaged with it.

Figure 2.9 Unity Preferences, External Tools. After Android Studio is installed, launch it and open the Android SDK preferences (on Mac, choose Android Studio > Preferences > Appearance and Behavior > System Settings > Android SDK; on Windows, choose File > Settings > Appearance and Behavior > System Settings > Android SDK). In the SDK Platforms list make sure the latest SDK is installed (7.1.1 as of writing). Under the SDK Tools tab, make sure you have installed at least Android SDK Build-Tools, Android SDK Platform-Tools, and Android SDK-Tools.
In the Android SDK Location field, make a copy of the directory path and go back to Unity. In the External Tools, paste the Android SDK path from Android Studio; alternatively, browse to add the location.
Now let’s install and link Java. Back in External Tools, to the right of the JDK field, click Download. The Oracle Java download page appears. Follow the directions on the page to download the latest JDK (8u131 as of writing), and then open the installer and follow the steps to install. By default, Java is automatically installed at this location on a Mac:
/Library/Java/JavaVirtualMachines/jdk1.8.0_131.jdk/Contents/Home
and this location on PC:
C:/Program Files/Java/jdk1.8.0_121
In External Tools next to the JDK text field, browse to find the JDK’s Home directory inside the JDK version directory you just installed. It should look similar to the preceding directory path; however, depending on the version of the JDK you downloaded, the file path will be slightly different. Click OK. Java is now installed and linked to Unity.
Installing the Google VR SDK for Unity
Now let’s create a Daydream Unity project by installing the Google VR SDK. You can use the project created with this recipe as a template for future Daydream development. To install the Gvr SDK, you need to download it from the Google Daydream developer site (or GitHub), add it to your project, target Android as your build device, and set your project to be virtual reality supported:
To download the latest SDK from the Daydream website, go to https://developers.google.com/vr/unity/download and click the Download button. The Google VR GitHub page for gvr-unity-sdk releases appears. Click on the GoogleVRForUnity.unitypackage. As of the time of writing it is GoogleVRForUnity_1.130.1.unitypackage.
Open Unity, create a new project, and import the GoogleVRForUnity package into your project: choose Assets > Import Package > Custom Package and select the GoogleVRForUnity package.
When the import dialog appears, make sure all the files are selected, and click Import.
You need to switch the build platform to Android, so open the Build Settings (choose File > Build Settings), select Android from the platform list, and click Switch Platform. This might take a couple of minutes to complete.
Now add support for Daydream VR: While still in Build Settings, click Player Settings to open the Player Settings Inspector. In the XR Settings section select the Virtual Reality Supported check box. From the Virtual Reality SDKs dropdown that appears, add Daydream by clicking the + symbol. Remove any other SDKs that might be there.
In Player Settings > Other Settings under the Minimum API Level drop-down menu, select at least Android 7.0 Nougat, or whatever the latest version is you have installed and running on your phone. Set the Target API to the latest SDK.
While still in Player Settings, you need to properly set up the Bundle Identifier for Unity to build to the phone. Choose Identification > Package name and change the bundle ID from the default to something like com.yourName.vr.
Save the scene by choosing File > Save Scenes. Give it a name and save it somewhere, preferably in the project’s assets folder.
Back in Build Settings, in the Scenes To Build list, make sure your scene is added. If it is not, click Add Open Scenes to add it. You should now be able to build scenes to your phone and in the Editor. Test this by opening one of the SDK demo scenes. In your Project window open a scene: Go to Assets/GoogleVR/Demos/Scenes/HelloVR, and click the Play button in the Editor controls to run it in the Editor. It should run without errors.
Now it is time to build to your Daydream-ready Android phone. Make sure your phone is running the same version of Android as the SDK that you installed in the previous section. Make sure you’ve added the currently open scene in Build Settings, as per step 9. Plug in your Android phone via USB, and choose File > Build and Run to run on the phone. Unity asks you where you want to save your Android Application Package (or APK). I usually create a directory in the root of my project called Exports. Choose a name, and save the APK. Unity should compile the project, build the APK, and then run it on your phone.
This is now a Daydream base project that you can use to build upon. If you have followed all the steps up until this point, everything should be working smoothly and you are ready to start building Daydream VR apps for real.
Pro Tip
When developing on the phone, you do not actually need to insert the phone into the Daydream Viewer headset every time you build. You can just build to your phone and when the system prompts you to “Place your phone inside the Daydream headset,” simply turn the phone to the landscape position and it will kick off the flow. You can also bypass these entry screens in the VR Developer Settings by enabling VR Developer Options. More detail on this is in the VR Developer Options recipe later in this chapter.
Now that you have a new Unity project with the Google VR SDK installed, take some time to dig around in the SDK’s directories and get to know their contents. Of most interest for a first-time user is the demos folder. Take a look at the example scenes inside the Scenes directory, open them up, and play with them on your phone.
Troubleshooting Setup and Installation Issues
If you are having problems building to your phone, never fear. You can take a number of steps to troubleshoot.
The first thing you should do is quit all running applications, including rebooting Unity, and then repeat all the previous steps precisely, making sure you did not miss anything.
The next thing to do is make sure everything is up to date: your Unity version (which should be at least 5.6, but as of this writing was 2017.3), the latest Android SDK (at least Nougat 7.0), the latest JDK both installed and linked in Unity, and your phone running the latest release version of Android. Also check that your build settings are all correct and building to a minimum Android version that your phone supports, and that you have the Virtual Reality Supported check box selected in Unity Player Settings and your bundle ID is changed from the default.
If you are still having problems, a lot of places exist you can turn to for support. I suggest the Unity Daydream forums as your first point of call. If it seems non-Daydream related, Stack Overflow (www.stackoverflow.com) is the best place. People are generally very helpful to new developers troubleshooting build problems, so go ahead and ask questions.
These kinds of setup and installation issues are some of the most frustrating of development bugs, but hang in there. After you have done this once, you will never have to do it again, and you can focus on building your sweet VR masterpiece.
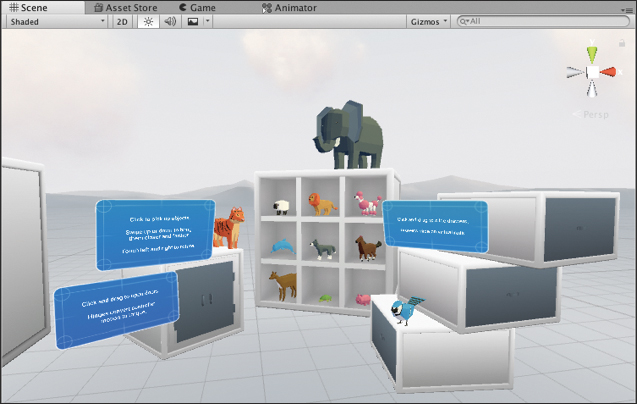
Daydream Elements
In 2017, the Daydream team announced Elements, an open source project showcasing the best practices for developing high-quality VR in Daydream (see Figure 2.10). In conjunction with the Google VR SDK, Elements adds a breadth of easy-to-adapt technical solutions to all different kinds of VR problems. You can deal with problems such as locomotion, camera setup, UI interaction, and rendering with the set of solutions encompassed in Elements.
This section covers digging into the Elements’ components, implementing them, and seeing how you can use them as starting points for your VR games and apps. The Elements app is available to download and test on your Daydream phone from Google Play.
Recipe 2.1: Installing Elements
The great thing about the Elements project is that it comes with the Google VR SDK installed. So, importing the Elements package into your project also imports the latest Gvr SDK.
Follow these steps to import the package to create a base project that you can use throughout this chapter and the rest of the book:
Download the latest Elements Unity package from GitHub at https://github.com/googlevr/daydream-elements/releases, download the latest DaydreamElements.unitypackage, and save it somewhere on your hard drive.
Open Unity, create a new project, and import the Elements package into your project by choosing Assets > Import Package > Custom Package and selecting the Elements package. When the import dialog appears, make sure all the files are selected and click Import.
Make sure your project is set up for VR and Android development by following steps 4–10 from the previous section “Installing the Google VR SDK for Unity.”
Test that it is working by running one of the demo scenes. In the Project window (Assets/DaydreamElements/Elements/Teleport/Demo), open the scene and select Build and Run on your phone. Make sure you have added the open scene in the Scenes to Build list in Build Settings.
Now that you have installed Elements, go ahead and poke around in the code base and test out all the demo scenes to get familiar with them.
Without exaggeration, the Elements project is one of the best examples of front-end VR code you are ever likely to see. Some of Google’s top engineers built the Elements project from the ground up for the Daydream community to use. Use it in your projects, build upon it, and have fun hacking around with it.
If you are concerned about Unity “project bloat” from too many packages in your project, you can easily strip back all the Elements files you are not using. Alternatively, you can build them up from scratch based on the same structure, using the Elements code. My recommendation for smaller projects is to start with Elements as a base. It is only one directory and it offers so much value, especially to new VR developers.
Recipe 2.2: Setting Up Daydream Instant Preview
Having both the Instant Preview plugin for Unity (5.6+) and the Instant Preview app running on your Daydream phone enables you to save time by skipping the Unity build process and instantly test VR apps on your phone. Instant Preview gives you a fully functioning view of the VR app streamed to your phone’s screen, with the rendering happening on your PC. This is a massive time saver for testing builds, and installing Instant Preview in your projects is highly recommended.
The feature supports two modes:
Full VR Preview mode: Streams headset and controller data to Unity. The plugin renders this data into the scene and streams it back to the head-mounted display (HMD) for preview.
Controller-only mode: Streams only the controller data back to Unity. Best for use when focusing on controller interactions and not the 3D environment.
Instant Preview lets you customize the streaming resolution to optimize for either performance or quality. It is important to remember Instant Preview is meant for quick development and debug testing. Because the rendering takes place on your PC, not on the phone, it is not suitable for performance tests or calling Android APIs directly.
To set up Instant Preview, you need both the Instant Preview app running on your Daydream phone and the Unity plugin installed. The Instant Preview plugin and Android APK app are bundled with the Unity SDK (version 1.1 and later).
To get started, open the Recipe_2.2_start scene in the accompanying files, or continue the previous recipe, 2.1.
In the scene, add an instance of the GvrInstantPreviewMain prefab (GoogleVR/Prefabs/InstantPreview). The Instant Preview prefab persists across scenes, so you only need one instance of it ever in your game after it has been instantiated. If your game has multiple linked scenes, only the initial scene needs the prefab. The GvrInstantPreviewMain will install the Instant Preview Android app automatically when you run the app in the Editor. If you are familiar with using the timeline you can install the APK using
adb:adb install -r Assets/GoogleVR/Scripts/InstantPreview/ InstantPreview.apk
Select the prefab in your scene and in the Inspector window adjust the exposed parameters based on your quality versus speed requirements.
Connect your phone to the computer via USB, and click Play in the Editor to begin the preview.
Clicking Pause in the Editor pauses the streaming, allowing you to make configuration adjustments including either Full VR preview or Controller only. Click Play in the Editor to test the new configuration.
The Instant Preview component contains three fields that can be adjusted (see Figure 2.11):
Resolution: This is the resolution of the video stream—the higher the quality, the worse the latency for testing.
Multisampling: This has to do with the antialiasing of the content. Again, higher quality means worse performance.
Bit Rate: This is the video stream rate. Once more, you have a toss-up between performance and quality.
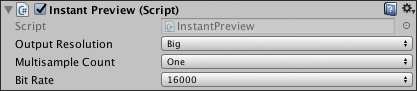
Figure 2.11 Instant Preview component.
Recipe 2.3: Setting Up a Daydream Controller Emulator
Running a controller emulator on an Android phone is possible (you need KitKat and higher, and the phone must have a gyroscope), alongside your Daydream phone. This is also a useful solution if you do not have a Daydream controller handy or have not yet purchased a Daydream headset but want to start developing straight away.
Controller Versus Emulator
The idea of an emulator was useful during the prerelease of the original Daydream hardware, but it has now become somewhat obsolete. Instead of running an emulator on a separate Android phone, getting your hands on an actual Daydream controller and using it in conjunction with Instant Preview for quick testing is highly recommended.
If you do choose to set up an emulator, follow these steps:
Install the Controller Emulator APK onto your controller phone by downloading the APK onto your phone from this page: https://developers.google.com/vr/daydream/controller-emulator or https://github.com/googlevr/gvr-android-sdk/blob/master/apks/controller_emulator.apk?raw=true.
If you want to use the emulator with your Daydream headset, pair it by going to Settings > Bluetooth on both phones. On the headset phone find the controller phone’s name and tap it. A dialog appears on both devices; pair by tapping to confirm on both phones.
To configure the emulator, launch Daydream. After the Place Your Phone into the Headset prompt, tap the Settings gear button in the top right of the screen. The VR Settings page appears.
Tap the Build Version cell seven times to expose the Developer Options, and tap through to the Developer Options.
Scroll down, select the Controller Emulator Device, and from the selection dialog that appears, select your previously paired controller phone. If you later want to re-pair an actual Daydream controller, you will need to disable the emulator.
Click outside the dialog box to save and dismiss, and then close and restart the app to test that the controller phone is now running as the controller emulator.
You now have a separate Android phone running as a controller emulator connected via Bluetooth to your Daydream phone.
The controller emulator works exactly like the real controller except the touchpad requires a double-click to mimic the touchpad’s button click. This negates any conflict between the Touchdown and the click events on the controller phone.
Google also offers stencil overlays that you can print out and stick to the screen of your controller phone to add a tactile element to the screen. By printing them out and sticking them onto your emulator phone’s screen, you can feel where the buttons are, much like the real controller, so you won’t accidentally press the wrong button when testing. Take a look on the emulator page of the Daydream developer website to download the stencils.
Recipe 2.4: VR Developer Options
A useful screen to be aware of when developing on the phone is the VR Developer Options menu. The VR Developer Options houses many useful settings for logging, monitoring, and testing. It also contains another valuable time saver to skip those annoying entry screens when you build your app: Skip VR Entry Screens. Although this can be useful in most instances, the downside is that you will still probably have to wait while your controller connects to the device via Bluetooth.
By default, the VR Developer Options menu is hidden. To make it visible, open a Daydream app on your phone and during the entry screen when prompted to sync your controller, tap the gear button at the top right of the screen. This opens the VR Settings where you can pair controllers and handle notifications. Tap the Build Version cell seven times to reveal the Developer Options section.
Troubleshooting the Controller
If you are regularly experiencing issues connecting your controller to your phone, you can try a range of solutions:
Make sure your controller is fully charged.
Make sure the controller is paired and within distance.
Toggle Bluetooth on and off on your phone.
Factory reset the controller by connecting it to power and holding down the App button and the Home button at the same time for 5 seconds.
In Daydream Settings, unpair the controller and then pair again.
Empty the Google VR cache by going into Settings > Apps > Google VR, and selecting Clear Cache
Restart your phone.
Uninstall and reinstall Daydream and/or Google VR Services.
Core Daydream Components
The Google VR SDK provides a range of components that form the foundation for all Daydream VR applications. This section covers the most important of these components; then later you will implement and customize them for use in your own apps.
As a Daydream developer, being familiar with these components and letting them do as much of the heavy lifting as possible is important. As you move through the book, you will be modifying, customizing, and building out your own components on top of these core modules.
GvrEditorEmulator (Prefab)
The GvrEditorEmulator prefab is required for testing and running your app in the Unity Editor. It provides mouse-controlled HMD emulation in the Editor and a monoscopic viewport of the main camera. Theoretically, if you are only ever building directly to a phone or Daydream HMD you do not need this prefab in your scene. However, that is an unlikely scenario. In reality, you will always be using the Editor, and you will always be using this prefab in your scene.
GvrControllerMain (Prefab)
The GvrControllerMain is the central prefab that communicates with the controller, acting as the connection point between your code and the controller’s software. It contains a GvrControllerInput script.
The GvrControllerInput script (a component of the GvrControllerMain) is the main entry point to the controller API, which is covered in detail in Chapter 3, “Getting to Know the Daydream Controller.” It handles things such as the state of the controller; touch and click events from the controller; and the gyro, acceleration, and orientation of the controller. It is one of the most important classes in Daydream development, and you access it almost all the time throughout this book.
GvrControllerPointer (Prefab)
The GvrControllerPointer is an extremely useful prefab that provides a 3D mesh of the controller and programmatic arm model straight out of the box. Inside the GvrControllerPointer are two GameObjects: ControllerVisual and Laser.
The GvrControllerPointer houses the handy GvrArmModel script where you can adjust the positions of the controller’s elbow, arm, and wrist, and various other positional settings of the controller. Other types of arm models come with the SDK and can be linked to the GvrControllerPointer through its GvrTrackedController component.
The GvrControllerVisual script attached to the ControllerVisual allows you to add tooltips to the buttons of the controller and change the color of the buttons, display state, and transparency of the controller. Tooltips can be set to appear when users lift the controller toward their face, displaying descriptions of the controller’s buttons.
GvrEventSystem (Prefab)
As the name suggests, the GvrEventSystem handles events in Daydream. It contains a specialized InputModule (GvrPointerInputModule) for use with either the 3D pointer from the Daydream controller or a gaze-based pointer for Cardboard. It also handles all the interaction between the pointer and interactive objects in the scene such as UI elements and GameObjects. Later chapters cover the event system, custom events, and the controller in more detail.
GvrPointerPhysicsRaycaster (Script)
The GvrPointerPhysicsRaycaster script provides a raycaster for use with the GvrEventSystem (or more specifically the GvrPointerInputModule). This custom Daydream raycaster is added to the main camera and is used to interact with GameObjects in the scene. The GvrPointerPhysicsRaycaster is similar to a standard Unity raycaster, except that it utilizes specific modes for Gvr—either casting a ray from the center of the camera, or direct from the controller.
GvrPointerGraphicsRaycaster (Script)
The GvrPointerGraphicsRaycaster is similar to the GvrPointerPhysicsRaycaster; however, the GvrPointerGraphicsRaycaster handles interaction with canvas UI elements. Chapter 4, “Building UI in VR,” covers this in detail.
3DoF and 6DoF
Throughout this book, the terms 3DoF and 6DoF are used frequently. DoF stands for degrees of freedom and describes the movement available to the user in the headset. Three degrees of freedom, or 3DoF, describes the rotation of a head-mounted display on three axes: x, y, z. 6DoF adds positional movement (or translation in 3D graphics parlance) in 3D space to the 3DoF rotation. The Google Daydream Viewer, Cardboard, and Samsung Gear VR are all examples of 3DoF headsets. Google Daydream’s WorldSense headset, the Lenovo Mirage Solo, HTC Vive, and Oculus Rift are examples of 6DoF VR systems.
Setting Up a Player in VR
You might feel like getting to this point took an eternity, but you have finally completed all the necessary installation and given yourself a secure base from which to build. Now it is time to start actually building some VR.
In this section, you encounter two different types of player representation in VR—first person and third person—as well as a technique for moving through the environment via teleportation, and an important technique for limiting motion sickness when the player moves. These recipes should get you comfortable building VR apps in Daydream and form a pretty solid launchpad for the work you do through the rest of this book.
You will be implementing and tweaking a combination of code from the Gvr SDK and the Daydream Elements project. Leveraging these components saves valuable development time that you can then put toward creating amazing VR experiences.
All the components provided in Elements and the Gvr SDK have been open sourced by Google under the Apache license. This means you are free to use them however you want, in all of your apps. Through the rest of the book you will be modifying, customizing, and building your own components on top of these foundational modules.
Wrist Model, Arm Model, and Body Model
You will frequently hear the terms wrist model, arm model, and body model (or any other physical joint or limb model) when developing VR. This does not refer to an actual 3D mesh model, but a conceptual model representing the movement of how that limb would work in reality. Here are their descriptions:
Arm model (also referred to as elbow model) is how the controller moves in a life-like manner rotating from the shoulder and elbow joints; the whole arm movement.
Wrist model is the smaller movement of tilting and rotating around the wrist.
Body model (or shoulder model) is how the controller rotates with the body beside the users as they rotate their head on the y axis.
In the controller’s 3DoF space, we do not have accurate data mapped from arm movement. We only have rotational data, so we have to fake the 6DoF movement with a conceptual model of where the arm would naturally be, based on tilt.
The arm model in Daydream is taken care of by the aptly named GvrArmModel script. You delve into this class in detail in the next chapter, “Getting to Know the Daydream Controller,” where I show you how to tweak the various properties of the arm model, including the elbow and wrist position and rotation.
Recipe 2.5: Building a VR Player in the First Person
The most common type of VR experience is one where the user experiences the action in the first person. In this recipe, you will build out a player who sees the world directly through the main camera with a working Daydream controller by his side.
Get started by opening the Recipe_2.5_Start scene, or create a new scene from the previous empty Daydream Unity project.
Remove the camera from the scene by right-clicking on the camera in the hierarchy and selecting Delete. You will add another camera shortly.
Add a large plane to the scene to give the environment some ground (this is already added in the accompanying
Recipe_2.5_Startscene). In the hierarchy, right-click and choose 3D Object > Plane. Give it the position (0,0,0) and scale (10,10,10) in the Inspector. Feel free to change its name to Environment, Ground Plane, or something similar.Add the GvrEditorEmulator prefab to the scene. Do this by searching for GvrEditorEmulator (GoogleVR/Prefabs/GvrEditorEmulator.prefab) in the Project window’s search bar and dragging the prefab into the hierarchy. You will use this for testing the scene in the Editor.
Add the GvrControllerMain prefab in the same manner as the previous step (GoogleVR/Prefabs/GvrControllerMain.prefab).
Now you can set up the Player object to house the MainCamera, the controller, and anything else that is physically connected to the user.
Create an empty GameObject and call it
Player. Do this by right-clicking on the hierarchy and selecting Create Empty. In the Name field in the Inspector, change the name toPlayerand set its y-position to 1.6. This places its head 1.6 meters off the ground. Feel free to adjust this height if you feel it is too tall or short.Search the Project window for the GvrControllerPointer prefab, and add it as a child of the Player by dragging it onto the Player object in the Hierarchy window until it highlights and then drop it there.
Add a camera to the scene as a child of a
Playerobject. Do this by right-clicking on thePlayerin the Hierarchy window and selecting Camera. Make sure its position is (0,0,0). All objects that are a part of thePlayer(like the camera and controller) are added as child objects of thePlayer, so they move relative to thePlayerwhen thePlayermoves.In the camera’s Inspector, set the Tag drop-down menu to Main Camera, and change the Clipping Planes Near in the Inspector window to 0.03. This stops the controller from disappearing when you hold it to your face.
Add the GvrEventSystem prefab to the root of the scene the same way you added the previous prefabs. You don’t use it just yet, but it is good to have so you can handle controller interaction later on.
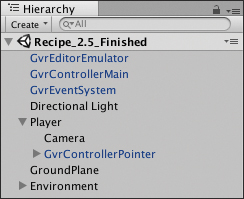
That’s it! Your hierarchy should now look like Figure 2.12. If you Build and Run the scene on your Daydream headset, you should see the controller move around as if it were attached to your arm. It will also rotate with your body when you turn around and face the opposite direction.
Recipe 2.6: Traveling via Teleportation
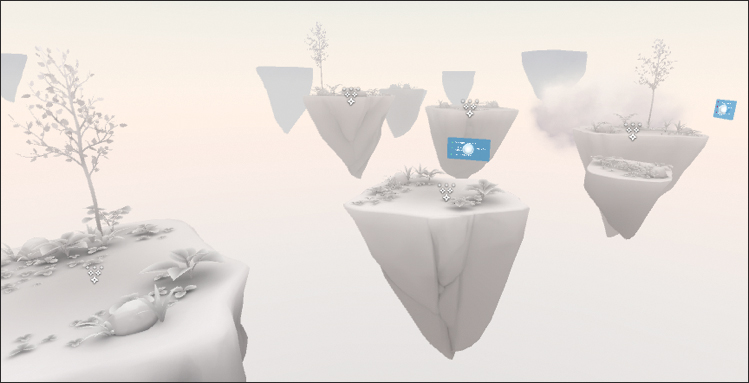
Teleportation is a type of movement in VR that allows users to instantaneously transport themselves across large distances, generally by pointing and clicking at a destination. Teleportation has the distinct advantage over other forms of VR locomotion in that it does not cause motion sickness.
Daydream Elements offers a robust and open source first-person teleportation system in the form of the TeleportController prefab. It is both extensible and configurable for most situations; see Figure 2.13.

Let’s go through the steps to get it working in a scene. Open the Recipe_2.6_start scene; it is set up with a first-person player similar to the one you built in Recipe 2.5 and environment to teleport around in:
Familiarize yourself with the base scene. It contains a GvrEventSystem, GvrEditor Emulator, GvrControllerMain, and a
PlayerGameObject with a GvrController Pointer as a child.Find the TeleportController prefab in the project (DaydreamElements/Elements/Teleport/Prefabs/TeleportController.prefab), not to be confused with the
Teleport Controllerscript, and add it as a child of thePlayerby dragging and dropping onto the Player in the hierarchy. It is important for the TeleportController to be facing the same direction as thePlayerGameObject for teleportation to work correctly.Select the TeleportationController and take a look at it in the Inspector. In the TeleportController component, there is a slot for Player. Drag the
PlayerGameObject from the hierarchy into this slot.Repeat step 3 for the Controller slot in the TeleportationController component. The
ControllerGameObject is a child of the GvrControllerPointer in thePlayer. Find it in the Hierarchy window and drag it in.Select the
GroundPlaneGameObject in the root of the hierarchy. In the Layer drop-down menu of GroundPlane’s Inspector, select Add Layer. In one of the layer fields type TeleportLayer.Select the Plane again. In the Layer drop-down in the Inspector, select TeleportLayer to assign the layer you just added to the GroundPlane.
Select the TeleportController again and in the ArcTeleportDetector component, select TeleportLayer from the Valid Teleport Layers dropdown and make sure it is selected in the Raycast Mask dropdown, too.
Now hide the old pointer, so you only see the new teleport arc pointer. To do this you need to switch off the
LaserGameObject, child of the gvrPointerController, by deselecting the check box next to its name in the Inspector. Also switch off the LineRenderer component on theLaserand switch off the reticle, child GameObject of theLaser.Build and Run this on your phone; you should be able to teleport around.
This is the minimum work you need to do to get the TeleportationController working. However, you are still using all the default settings and visual elements. In the next recipe, you will customize the look and feel of the teleporter.
Let us discuss how the teleporter actually works from a technical perspective. First of all, the teleportation system provided by Daydream Elements has three main parts:
Detector: Determines whether a valid teleportation location exists by raycasting.
Visualizer: Handles the visual side of the system. By default, this is an arc and target visual drawn between the controller and the target location.
Transition: Handles the transition movement between the player’s current location and the destination, after the teleportation has been initiated.
The system works by casting a ray via the Detector to determine whether a valid target location exists to teleport to at the other end. A valid location is defined by the Valid Target Layer property in the ArcTeleportDetector script. Any GameObject that is both assigned to a valid target layer and has a flat horizontal surface can be teleported to.
When a valid target is detected, the Visualizer places a target GameObject at the location and draws a line between the controller and the target. The TeleportController component binds the detector, visualizer, and transition scripts together and takes care of user input from the various triggers.
Triggers map the user input to the various states of the system. By default, the states are mapped to the Daydream controller’s inputs (these inputs are the buttons and touchpad), and are used to start, commit, or cancel the teleportation process.
Recipe 2.7: Customizing the Teleportation System
The TeleportationController provided with Daydream Elements is made to be customized and reskinned. In this recipe, you will tailor the look and feel of the teleportation system by adding a custom destination target, changing line color and style, and adjusting the animation speed.
Either create a new Daydream-ready project with a working TeleportationController in it (Recipe 2.6) or open the Recipe_2.7_Start scene and follow these steps:
In the Recipe2.7/Prefabs directory is a prefab called TargetCircle. Use this as your target. Select the
TeleportControllerGameObject in the hierarchy and in the ArcTeleportVisualizer component in the Target Prefab field, drag the TargetCircle prefab from the Project window. You can create your own prefab with any assets or animation you want.To change the color of the teleport arc line, select the Valid Selection Material field in the ArcTeleportVisualizer component. This shows the material in the Project window. Select the material in the Project window—by default it is ValidSelectionBezierMat—and in the Inspector use the color picker to change the color. Do the same for valid and invalid selection materials.
Adjust the curve of the line by adjusting the Arc Smoothness, Start Bending Angle, and Arc Bending Strength. For a straight line set the Start Bending Angle to 180.
In the
ArcTeleportDetectorscript, change the Max Distance variable to 30. This increases the distance the teleport system can reach to.In the LinearTeleportTransition component, change the Transition Speed to 120 for a snappier transition between locations.
Build and Run on your phone to see the changes.
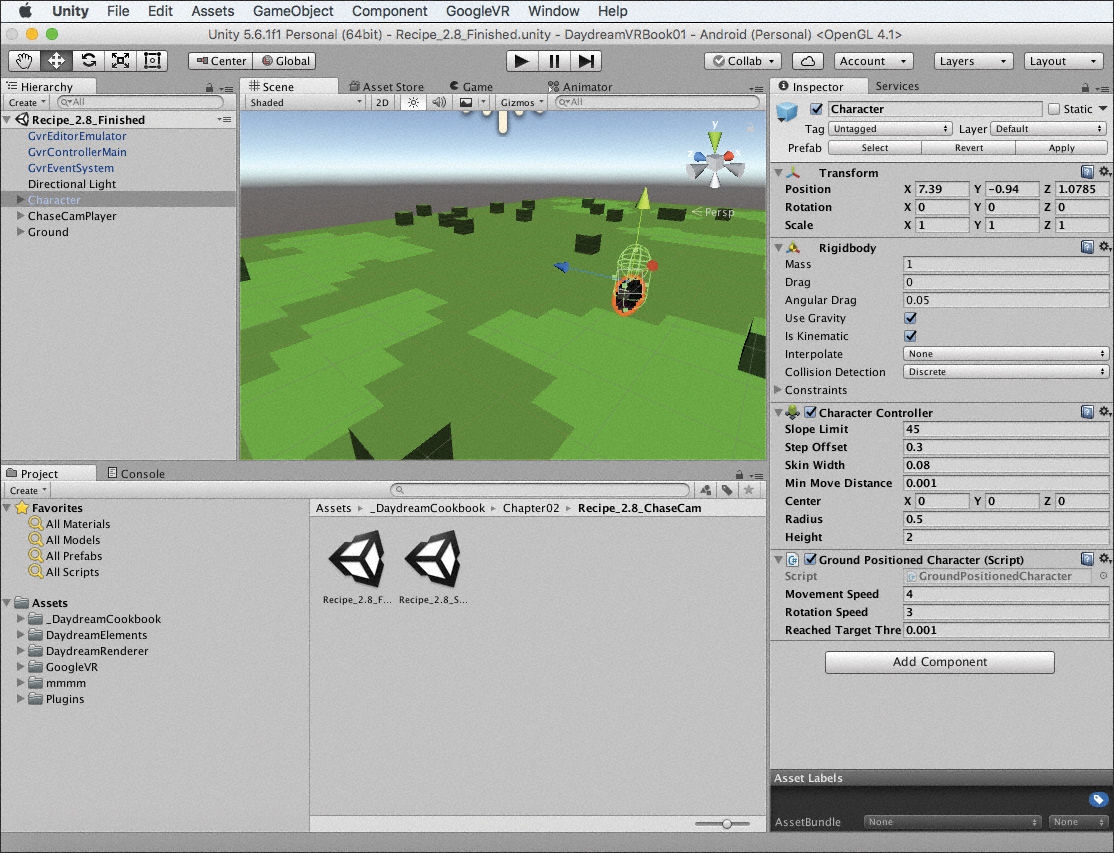
Recipe 2.8: Setting Up the Chase Camera
Daydream Elements provides a customizable third-person camera rig that follows a Player GameObject around the scene. If the player moves only a short distance and is within view, the chase camera does not move. If the player moves toward the edges of the frustum, the camera follows, implementing tunnel vision during the locomotion (see Recipe 2.9 for a description of tunnel vision).
In the Elements project, the Daydream team has provided a prefab called ChaseCamPlayer. This makes the task of hooking up a chase camera to a player GameObject very simple.
This recipe requires the Elements package to be installed. You can simply open the Recipe_2.8_start scene that is ready in order to start the recipe with a player and environment, or you can create a base scene with a player in it, similar to finished recipe 2.5.
If you are not starting from the
Recipe_2.8_startscene, you will need to have the GvrControllerMain, GvrEditorEmulator, and GvrEventSystem prefabs added to your hierarchy as you did in Recipe 2.5. Add them if you have not already done so.Delete the
PlayerGameObject from your scene’s hierarchy.Search the Project window for the ChaseCamPlayer prefab, and add it to your scene at the (0,1.6,0) position.
If you want the camera to follow a GameObject when it moves, you need to attach a
GroundPositionedCharacterscript to it. Do that by selecting the GameObject in the scene, searching in the Project window for theGroundPositionedCharacterscript, and drag it onto the GameObject’s Inspector. Alternatively, click New Component in the GameObject’s Inspector, and add it that way. This automatically adds a CharacterController component to the GameObject, as well as the GroundPositionedCharacter. Call this GameObject theCharacterGameObject.Select the ChaseCamPlayer and drag the
CharacterGameObject from the scene into the Chase Character field in the ChaseCam component.If you want to be able to point and click to move the character, select the
ChaseCamPlayerGameObject’sLaser(ChaseCamPlayer/Pointer/Laser) and in theCharacterPositionPointerscript, drag theCharacterGameObject into the Character field.Still in the
CharacterPositionPointerscript, drag a prefab to be used as a target into the target prefab. Elements has a target prefab you can use called ChaseCamTarget. Drag this from the Project window, or build your own.Select the GroundPlane, or in the sample scene select all the
GrassGameObjects in the hierarchy (these are children of theEnvironmentGameObject). In the Inspector, choose Layer > Walking. This makes it a valid layer for the pointer. Your character will now walk to wherever you point and click on the ground.Build and Run your project, and test out the third-person camera.
The way it works is relatively simple. The ChaseCamPlayer prefab sets up the third-person camera (Chase Cam) script; it also includes a tunneling system and a pointer system. The pointer system is used for navigating the character around the environment on the ground plane assigned to the Walk layer.
Whenever movement happens and the user has her thumb on the touchpad, tunneling is turned on to limit motion sickness. Recipe 2.9 covers tunneling in more detail.
Let’s look at Chase Cam, the main script that does all the heavy lifting (see Figure 2.14).
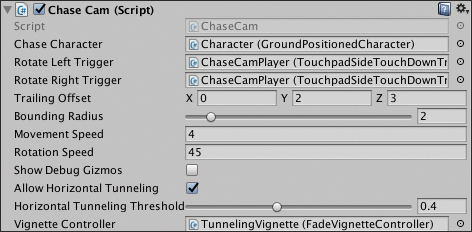
Chase Cam script.These are the editable properties exposed by the Chase Cam script:
Chase Character: This is your GameObject to follow with the GroundPositionedCharacter added to it.
Rotate Left Trigger: The controller input to use for rotating the character left.
Rotate Right Trigger: The controller input to use for rotating the character right.
Trailing Offset: How far behind the character the camera sits.
Bounding Radius: The space within which there is no camera movement.
Movement Speed: The speed of the character walking to the click destination.
Rotation Speed: Rotation amount in angles, when the user clicks to rotate the character.
Show Debug Gizmos: Shows the
Chase Cam’s gizmos in the Editor, useful for debugging.Allow Horizontal Tunneling: Toggles tunneling when moving horizontal.
Allow Horizontal Tunneling Threshold: The threshold before tunneling kicks in on the horizontal axis.
Vignette Controller: The script to use to control the style of the tunneling vignette; you can extend the
BaseVignetteControllerscript to create your own tunnel vignette style.
Simulator Sickness
One of the largest challenges currently facing the broader VR industry is simulator sickness, a general sense of nausea or dizziness that can be triggered for some users by certain specific design choices in a VR application.
Only a subset of users experience simulator sickness; however, it is likely a rather large subset of the addressable market for your application.
Simulator sickness is ultimately a design issue. Performance issues with VR applications can definitely cause users to experience simulator sickness. These include low frame rates, inconsistent frame rates, and even very occasional freezing and stuttering. Delivering high-performance VR applications that consistently always render at a fixed 90 frames per second (or higher depending on the native refresh rate of the screen) is absolutely critical to avoid simulator sickness.
Many platforms introduce techniques to mitigate the impact to users in the event that an application fails to maintain the correct frame rate, or suddenly freezes, by continuing to correctly track the user’s head movement. However, developers should not rely on the platform. An app that freezes or has poor graphics performance in VR is a completely unacceptable experience for users.
However, do not conflate simulator sickness based on poor app performance with a misguided belief that simulator sickness is no longer a significant issue after your app has successfully locked in high graphics performance. Motion sickness occurs in reality, and reality has an extremely high frame rate. It is also extremely easy to design an app that will induce significant simulator sickness in about a third of users, even if that app is running on the highest end hardware available today and locked to an extremely high frame rate.
Assuming you have addressed all the performance issues in your application, simulator sickness in VR is a design issue. Remember:
Never ever move the user’s head.
Never ever block the user’s head from moving itself.
Recipe 2.9: Using a Tunneling Effect to Combat Motion Sickness
Motion sickness in VR is generally considered to be caused by confusion between the user’s visual and vestibular systems during simulated motion. The user sees movement that does not match the physical sensations of her body, leading to an intense feeling of motion sickness.
By shrinking the field of view of the moving environment, it is possible to mentally ground a user and limit motion sickness. The effect, sometimes called tunneling, creates a window or tunnel in front of the user composed of the moving scene, while the rest of the world is stationary (see Figure 2.15).
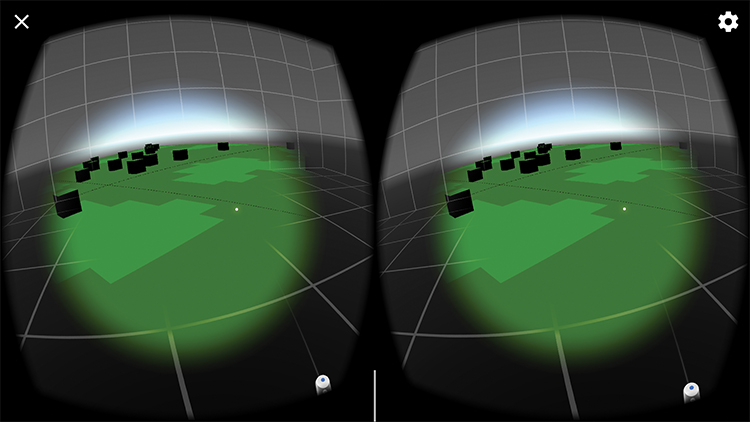
Tunneling works by reducing the player’s field of view to decrease the sense of motion, particularly in the user’s peripheral vision. Limiting movement in the peripheral vision has been shown to significantly decrease the sense of motion sickness in VR.
Daydream provides an easily customizable tunneling system for use in your games and apps. In this recipe, you will build out this tunneling system. To start off, make sure you have a scene with a first-person player; the GvrControllerMain, GvrEditorEmulator, and GvrEventSystem prefabs added to your hierarchy; and the Elements package installed in the project. Alternatively, open the Recipe_2.9_Start scene to prepare a 3D environment and player ready for a tunneling system.
Search in the Project window for the TunnelingVignette prefab, and drag it into the hierarchy as a child of the
PlayerGameObject.Create an empty GameObject as a child of the Camera, and call it
Iris. Update its rotation in the Inspector to be (–90,0,0).Search in the Project window for the pCylinder35 mesh. Drag and drop it onto the
IrisGameObject. This forms the tunnel in your tunneling effect.Remove the
Iris’s MeshRenderer by selecting its component in the Inspector window and under the gear icon selecting Remove Component. In the Project window, search for the DaydreamMeshRenderer, and add it to theIris. If theIrishas a collider component attached, remove this, too.Search for the VignetteIrisColor shader, and drag and drop it on the
IrisGameObject in the Inspector.Select the
TunnelingVignetteGameObject, and in the Inspector in theTunnelingVignettescript, drag theIrisinto the Iris field.Select the
PlayerGameObject, and in the Inspector in theFirstPersonTunneling Locomotionscript, drag theTunnelingVignetteGameObject into the Tunneling Vignette field.Build and Run on your device. When you swipe around on the touchpad, you should move around the scene with the tunneling effect limiting the field of view.
The TunnelingVignette prefab contains two scripts and a cage mesh as a child. When you use the touchpad to navigate, the TunnelingVignette script renders a tunnel with the moving scene projected on it and the rest of the view rendered with a stationary cage grid.
Three main scripts control the tunneling system. Let’s go through each of them.
First Person Tunneling Locomotion Script
The First Person Tunneling Locomotion script (shown in Figure 2.16) is added to the Player GameObject and manages the Player movement controlled from the touchpad. It also provides camera controls over the TunnelVignette script.

First Person Tunneling Locomotion script.Most of the editable properties on the script affect the movement. Here is what they do:
Max Speed: The maximum speed of the movement.
Max Angular Speed: The maximum angular velocity; how fast it can move sideways.
Smoothing Factor: Smooths out jerky movement from the thumb swipe on the trackpad.
Min Input Threshold: The minimum movement of the thumb to trigger Player movement.
Max Input Threshold: The peak speed of the thumb to be mapped to the Player movement.
Only Move After Swiping: Stops conflicts with other interactions on the touchpad; for example, it will not move if the user clicks the touchpad.
Vignette Controller: The vignette associated with this locomotion for the tunnel effect.
Tunneling Vignette Script
The Tunneling Vignette script is attached to a GameObject child of the Player called Tunneling Vignette. It controls the actual vignette effect: the mask effect that reduces the field of view when you move. The script has the editable properties shown in Figure 2.17.
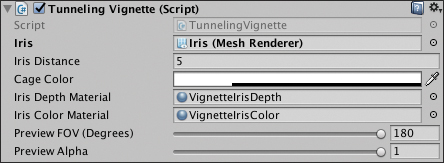
Tunneling Vignette script.The script has these editable properties:
Iris: This is a reference to the mesh that will form the shape of the vignette. Update this mesh to change the shape of the vignette.
Iris Distance: How far away the Iris, and the vignette, will sit from the user.
Cage Color: Changes the color of the grid.
Iris Depth Material: Used to render the depth of the Iris.
Iris Color Material: Used to adjust the color of the Iris.
Preview FOV (Degrees): The field of view in the preview movement as seen through the tunnel.
Preview Alpha: The minimum alpha the vignette must be to be considered ready for tunneling.
Fade Vignette Controller
The Fade Vignette Controller controls the fade transition between tunneling state and normal state. Figure 2.18 shows the editable properties.

Fade Vignette Controller script.The Fade Vignette Controller has these editable properties:
Fade Speed: How quickly the animation transition fades in and out between tunneling and normal occurs.
Iris Speed: The speed of the Iris opening and closing.
Alpha Ready: The minimum alpha threshold when the vignette is considered ready for movement.
Summary
This chapter covered an immense amount of ground. You got ramped up in Unity and then started applying your Unity skills to building real VR experiences. You set up the Daydream development environment, and along the way you were introduced to the principal Daydream SDK components you will be leveraging in the coming chapters.
The installation and setup process might have felt tedious at points, but you now have the solid foundations for building the VR wonderland (or dystopian nightmare) you have long been imagining.
You should now feel comfortable with the basics of how the Daydream SDK works and how to use its core components. In the next chapter, you take a deep dive into one of the most important features of the Daydream platform: the Daydream controller.