Chapter 5
Video and Audio
Video and audio are possibly two of the most technically expansive subjects in VR. Thankfully, the Daydream SDK abstracts out much of this complexity, allowing you to focus on building fun and engaging apps and games. This chapter covers the essentials of using Daydream’s video and audio components for building immersive media-based VR applications using stereoscopic video, 360 video, and powerful 3D spatialized audio and effects.
Video in Daydream
The first section of this chapter focuses on simplifying the VR video landscape through the introduction of the technology, terminology, and development of different types of VR video systems in Daydream. The second half of this chapter turns its focus to audio in VR; specifically, implementing spatial audio for your apps and games using Daydream’s best-in-class spatial audio engine.
Video in VR
The three main types of video in VR are rectangular (traditional 16:9), 360 (or spherical), and 180 (or VR180). Each of these types of video can be either monoscopic or stereoscopic.
Monoscopic and Stereoscopic
When we talk about video in VR generally, there are two modes the video can be in: stereoscopic (or stereo) or monoscopic (or mono). Stereoscopic means that the footage in both eyes is slightly offset spatially to give the impression of 3D. Monoscopic video, on the other hand, projects a flat image, so that the same image is projected onto each eye.
Rectangular Video
This book refers to traditional, standard sizes of video from television and film as rectangular video. In most cases the same rules apply to rectangular video in VR just as they do in traditional video production, except that the rectangular video screen is programmatically created and placed in the environment.
Flat Video
Rectangular video in VR is sometimes referred to as flat video, but it is important to remember that rectangular video can also be stereoscopic. That is, it does not have to be flat. Therefore, unless the video is actually flat (that is, monoscopic), referring to it as rectangular is best.
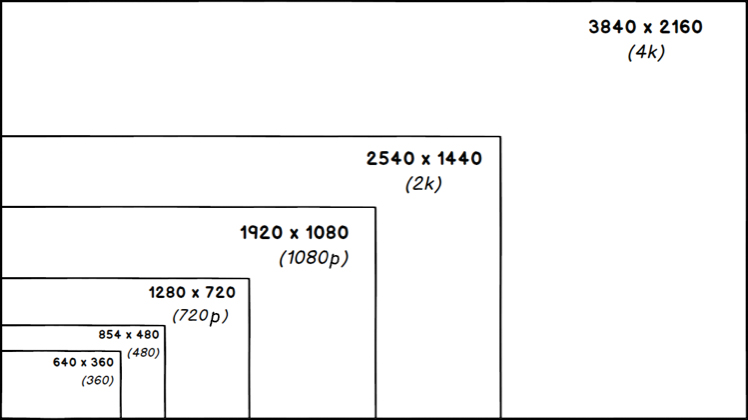
Rectangular video generally comes in two aspect ratios: 16:9 and 4:3 (however, most modern professional video is only shot in 16:9) with a range of different resolutions. Figure 5.1 shows the different resolution used for 16:9 digital video starting from 640x360 all the way up to 4K.
360 (Spherical) Video
360 (or spherical) video works by rendering the video image onto the inside of a sphere. In Unity, spherical videos use a shader (wrapped in a material) to project the pixels of the 360 video onto the inside of a sphere mesh.
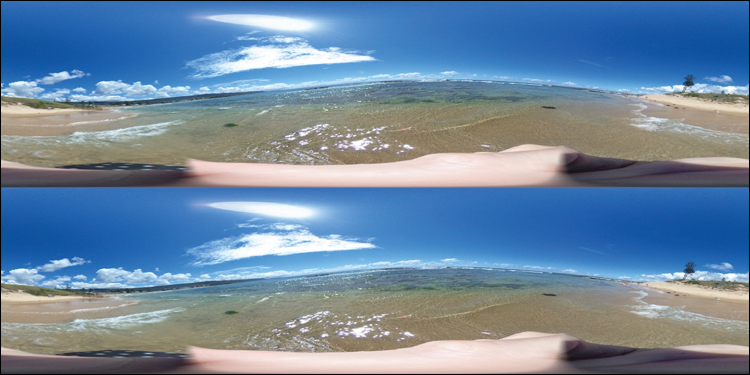
Most 360 videos use a system of rendering that is known as equirectangular. Figure 5.2 shows an example of an equirectangular projection for VR. Although the frame appears awkwardly stretched when laid out in a rectangular shape, when it is projected onto the inside of a sphere the scene looks normal.
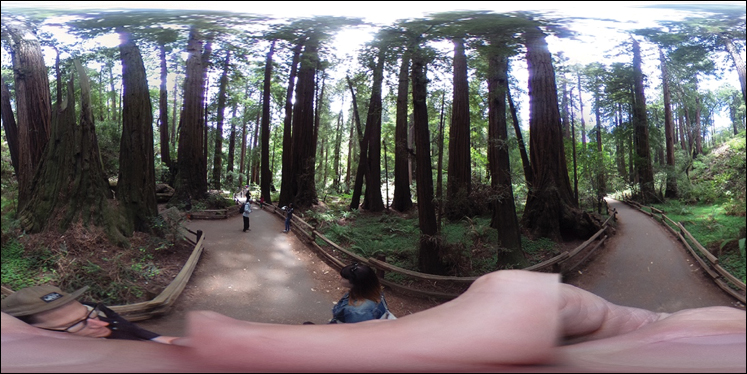
It is easy to visualize how equirectangular projection works when applying it to the standard map of the world. A world map uses the system of equirectangular projection to unwrap the spherical surface of planet earth into a rectangle so that its shape is morphed into a format that can be hung on the wall as a poster.
A major downside to the equirectangular rendering technique is that a large percentage of the screen is taken up at the poles; that is, at the top and bottom of the screen. Because this is generally not where the video action is, nor where the viewer is looking, it is a waste of valuable screen pixels.
A common type of 360 projection that attempts to solve this wasted pixel problem is called equiangular cubemap (EAC). By evenly distributing the pixels across the inside faces of a cube, EAC attempts to solve the problem of the equirectangular and the wasted pixels at the poles. Think of EAC as unfolding a cube into its six sides and laying the image out on these faces.
180 Video
180 video, also referred to as VR180, is a stereoscopic format that only projects onto the inside of half a sphere (see Figure 5.3). At first this might seem counterintuitive: Why not use the whole sphere? However, there are many advantages to limiting the size of the viewing area.
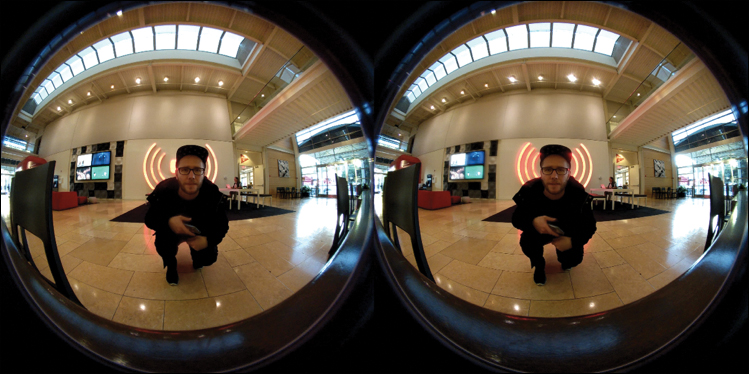
With VR180, content creators are better able to direct the action, knowing that the viewer will always be facing the shot. Setting up for a 180 shot is also much easier than doing the same for a 360 shot. Also, for the viewer the output is higher resolution, with less bandwidth (that is half of a spherical 360 video).
The other great advantage of VR180 is that it elegantly falls back to rectangular video. This is especially valuable on YouTube (www.youtube.com/vr) where content creators only have to shoot once and can use VR video that falls back to traditional rectangular video. Other advantages of VR180 for creators include that it allows crew and lighting equipment behind the camera, cameras are much cheaper, and live stereo VR content is possible.
Streaming Video
The Gvr video plugin handles two types of video streaming: Dash and HLS. Both of these protocols allow for adaptive bitrates. This means that multiple versions of the video can be encoded and stored on the server, and the video player on the client side can seamlessly switch between the appropriate stream based on the user’s available bandwidth.
MPEG-DASH (Dynamic Adaptive Streaming over HTTP)
MPEG Dynamic Adaptive Streaming (or DASH) is an HTTP-based streaming technology. It works by sending video from the server in segments. In an effort to limit buffering and pausing of the video, the client (the player on your computer, phone, or headset) can then choose the highest quality version of the next segment based on the current bandwidth restrictions.
DASH was created by the Motion Picture Experts Group (MPEG) in an effort to standardize the video streaming landscape. It is codec and container agnostic (H264, WebM, VP9, and so on) and works over HTTP; therefore, no special infrastructure is required.
HTTP Live Streaming (HLS)
HTTP Live Streaming (HLS) is a streaming protocol developed by Apple that works in a similar fashion to Dash. On the server side it creates multiple different bit rate versions of the video, broken down into smaller chunks. The client is then responsible for dynamically selecting the next best chunk based on the available bandwidth in that session.
Daydream and Video
The video player in Daydream is a wrapper for the Android Exoplayer. The Android Exoplayer is an open source, customizable media player that supports adaptive streaming of video.
To build a video player in Daydream, the Gvr video plugin needs to be installed in your project (see Recipe 5.1) and then a GvrVideoPlayerTexture script and a shader (via a Material) must be attached to the surface of a GameObject for rendering the video.
Android Exoplayer
Find out more about the Android Exoplayer on the Android website: https://developer.android.com/guide/topics/media/exoplayer.html.
Daydream Video Specifications
Daydream handles H264 video with a maximum resolution of 4K. A good general rule for video in Daydream is to export your videos at 30 frames per second at a data rate of 30 Mbits and 1080p. If you want to export at 2K and 4K, that is great, but make sure to have a 1080 version as a fallback for users with a slower bandwidth.
Videos that need to be played locally can be imported into Unity the same way as any other asset. Simply drag and drop the video file into the Streaming Assets folder in the Project window. If a StreamingAssets folder does not exist already in the root of the Assets folder, create one to add your video files.
When working with Daydream’s SDK, you should to be aware of two types of stereoscopic video layouts: Top/Bottom and Left/Right. Top/Bottom is the more common layout and, as the names suggest (see Figure 5.4), it lays out the left eye’s frame as a strip at the top and the right eye’s frame as a strip at the bottom. Most stereo equirectangular video will be split top and bottom. The VR180 frame in Figure 5.3 is an example of the Left/Right layout. Handling either of these two layout types with the Gvr SDK’s native shader is covered in the next section.
GvrVideoPlayerTexture
The GvrVideoPlayerTexture script is the core of the Daydream video system. The GvrVideoPlayerTexture script can be attached to any GameObject with a renderer that you want to use as your screen, as shown in Figure 5.5. Usually, this would be a sphere or 16:9 rectangle, but there is no reason why you could not have some fun making video screens out of any shaped GameObject.

GvrVideoPlayerTexture component.The GvrVideoPlayerTexture script has these editable properties:
Status Text: Takes a UI Text component from your scene to display useful video-related information such as resolution and frame rate.
Video Type: The type of streaming protocol, if any, to use.
Video URL: The actual URL of the video file, both local and remote on a server.
Video Content ID: The content ID of a video is a system used to track videos for copyright purposes. This field is generally only required when streaming digital rights management (DRM) enabled videos from a Content Delivery Network (CDN).
Video Provider ID: As with the content ID, the video provider ID is generally only required when streaming DRM-enabled videos from a CDN.
Initial Resolution: This is the target resolution quality for the video.
Adjust Aspect Ratio: This only applies to flat videos; it adjusts the size of the player to match the aspect ratio of the video.
VideoStereoInside Material
Daydream comes with a robust and versatile material for rendering videos called VideoStereoInside. Although its name suggests otherwise, VideoStereoInside can be used to render both mono and stereo videos in both rectangular and 360 formats.
Shaders and Materials
In Unity, shaders and materials work together to render how a surface is represented. The material specifies a shader, and the shader then draws the surface. When talking about a materials in Unity, we are also implicitly talking about the shader to which it points. For example, the VideoUnlitShader that comes with the GoogleVR SDK is the shader being used by all the video materials in this chapter.
For mono videos, just update the Stereo mode to None. When it is attached to a sphere it renders the video on the inside of the sphere.
The SDK also comes with two other materials: VideoMono and VideoStereo. These are essentially the same as the VideoStereoInside, which is shown in Figure 5.6, but the default settings of the material are set to work with mono and stereo, but they all use the same shader. It is possible that future versions of the SDK will only include a single material.
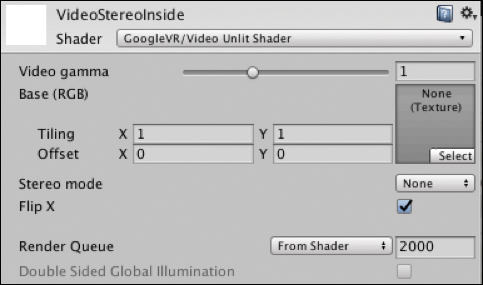
These are the most important properties that can be adjusted:
Video Gamma: The gamma relates to the luminance of the pixels.
Texture: A texture can be linked here to be displayed initially on the GameObject, before the video has loaded.
Stereo Mode: Three modes are available. None is for mono footage, and TopBottom and LeftRight refer to how the stereo footage is placed on the frame.
Flip X: Flips the footage on the horizontal. If your footage looks back to front try switching this on.
Media App Template
The Media App Template is a Daydream Elements (refer to Chapter 2, “Daydream and Unity”) project and app that has examples of best practices for almost anything you would need to do with video in Daydream. You can think of the recipes in this chapter as like the Media App Template’s “Swiss Army Knife” components that can be taken apart and built back up from scratch.
Find out more about the Media app template and download it on the Daydream website:
https://developers.google.com/vr/unity/media-app-template
It is recommended that you download the media app template’s Github project and explore the code base before embarking on any large-scale video or audio project in Daydream. The programming patterns and system they use are beneficial to developers of all levels.
Recipe 5.1: Importing the GvrVideoPlayer SDK
To build a video player in Daydream, you need to import the GvrVideoPlayer SDK. This is a very important initial step and none of the video-related recipes in this chapter will work if you do not follow it. The GvrVideoPlayer SDK is included as another package in the main Gvr SDK package.
If you are using the book’s accompanying Unity files for this chapter, the GvrVideoPlayer has already been imported so that this step is unnecessary. But if you are starting here from scratch, it is absolutely required.
Follow these steps to import the GvrVideoPlayer SDK:
In a Unity project with the Gvr Unity SDK already imported and set up (refer to Chapter 2), search the Unity Project window for GvrVideoPlayer package using the search bar.
Double-click on the GvrVideoPlayer package and follow the steps to import. The GvrVideoPlayer SDK is now imported and you will be able to work with video in Daydream.
Slow Build Times
If it is taking a long time to build your scene to your VR device, you might need to switch off auto generate lighting data. Open the Lighting Settings panel by choosing Window > Lighting > Settings and uncheck Auto Generate at the bottom of the dialog. This should increase build time by not automatically generating lighting data in the scene whenever any changes are made to the lighting system.
Recipe 5.2: Building a Flat Rectangular Video Player
This recipe creates a basic rectangular video player that plays a video from a locally stored video file. This is probably the simplest video player you can create and therefore is a good introduction to Daydream’s video capabilities.
Streaming Assets Special Folder
For videos to play locally from the device, not streaming, the files must be placed in a folder called StreamingAssets. The StreamingAssets folder is Unity’s cross-platform solution for placing media assets in the correct location based on the file system of your device. Read more about the StreamingAssets folder on the Unity website: https://docs.unity3d.com/Manual/StreamingAssets.html.
The video in the recipe is provided with the SDK, is called vid_bigbuckbunny.mp4, and is stereo rectangular. This can be swapped out with any other rectangular video, but it needs to be placed in the StreamingAssets folder in your Unity project for it to play.
Open the Recipe_5.2_Start scene, the standard Daydream-ready scene, and follow these steps to build the player:
Create an empty GameObject called
VideoPlayer. Position it at (0,1,0).Add a new
QuadGameObject to theVideoPlayerand call itVideoScreenand scale it to (16, 9, 1), which will give it a 16:9 aspect ratio.In the Project window, search for VideoStereo. This material comes with the Gvr SDK with defaults set for displaying stereo video. Select the
VideoScreenGameObject and add theVideoStereomaterial to itsMesh Rendererin Element 0 of the Materials list. (See Figure 5.7.)
Figure 5.7 The Mesh Renderer component showing the VideoStereo material in the Materials list. The VideoStereo material has now been added to the
VideoScreenGameObject and can be adjusted to suit the type of video playing. In the Inspector expand it out and confirm that the settings look like Figure 5.8. If you were playing a mono video, the Stereo mode of the material could be updated to None; however, in this case the Stereo mode is TopBottom. It is also possible to add an initial texture to the material that is displayed initially before the video has loaded. By default, a texture displays the word Loading.
Figure 5.8 The VideoStereo material with Stereo mode set to TopBottom. Select the
VideoScreenGameObject and add this component:GvrVideoPlayerTexture(GoogleVR/Scripts/Video).Update the properties of the
GvrVideoPlayerTextureto look like Figure 5.9. The video URL should be set to:jar:file://${Application.dataPath}!/assets/vid_bigbuckbunny.mp4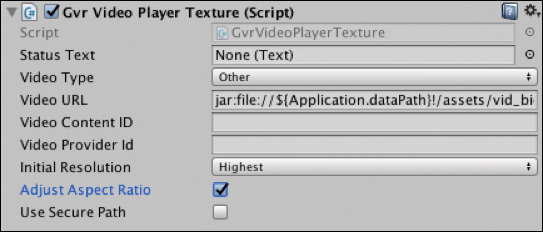
Figure 5.9 The GvrVideoPlayerTextscript updated with a local URL.Local URLs
${Application.dataPath}points to the actual location of where the data is stored on the device and is used by Unity for cross-platform purposes. This is replaced at runtime by the actual value of Android’sApplication.dataPath.Add the VideoControls prefab (GoogleVR/Demos/Prefabs/VideoDemo) as a child of the
VideoPlayer. Set its position to (0, –4, –9), and rotate it up slightly (6.5,0,0) so as to face the camera. If you find the controls are too small to aim at with the pointer, add a UI Panel to sit behind the other UI elements (on the top of the Canvas stack in the hierarchy) to make it easier to see the pointer reticle, or bring the controls closer.Select the VideoControls and drag the
VideoScreeninto theVideoPlayerReferencescript in the Player slot, linking the controls to the video screen (see Figure 5.10).
Figure 5.10 The VideoPlayerReferencescript with theVideoScreenlinked.The hierarchy should now look like Figure 5.11.
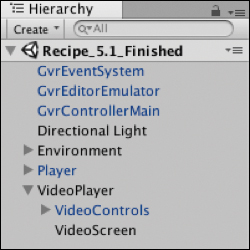
Figure 5.11 The hierarchy of the scene with VideoPlayer.
This is the easiest way to get a rectangular video player with controls working, using only the components provided by the SDK. Using your knowledge of the Unity UI system from Chapter 4, “Building UI in VR,” it is relatively easy to reskin the video controls by swapping out the default images with your own.
Recipe 5.3: Streaming Rectangular Video
The most common scenario for playing video on a headset is for it to stream from a server. Streaming lowers the file size of your apk and means you can dynamically update the videos on the backend.
Open Recipe_5.3_start; it follows on from the finished 5.1 recipe, so it already has the VideoStereo material and the GvrVideoPlayerTexture script attached to the VideoScreen GameObject.
The video streamed in this recipe is mono, so set the VideoStereo material’s Stereo mode to None (or replace it with the VideoMono material). Do this by selecting the
VideoScreenGameObject and updating the VideoStereo material’s Stereo mode from the dropdown. It should look like Figure 5.12.
Figure 5.12 The VideoStereo with Stereo mode set to None. Change the
GvrVideoPlayerTexture’s Video Type to Dash (see Figure 5.13) and update the video URL and Video Content ID to this URL:https://storage.googleapis.com/wvmedia/clear/h264/tears/ tears_hd.mpd

Figure 5.13 The GvrVideoPlayerTextureusing the DASH protocol from a remote video URL.Build and Run the scene on your device, making sure you have a network connection.
Recipe 5.4: Building a Spherical Video Player
This recipe creates a basic spherical video screen and plays a video from a local file. A mono spherical video has already been added to the StreamAssets folder in the accompanying files: vid_360Party.mp4.
As described previously, the spherical video player uses a shader (wrapped in a material) to render the video on the inside of a large sphere with the user (Main Camera) placed at its centroid. The Daydream SDK provides the material, VideoStereoInside, (Assets/GoogleVR/Materials/Video/VideoStereoInside.mat) for rendering video on the inside of an object.
The starting point for this recipe is the standard Daydream VR start scene except that the environment has been removed so that the full spherical video is viewable in all directions and is not cut off at the floor. Open Recipe_5.4_start to begin.
Create an empty GameObject called
SphericalVideoPlayer.Add a new sphere GameObject to the
SphericalVideoPlayer, scale it to (12, 12, 12), and make sure its position is (0, 0, 0).Set the
Player(the one with the main camera, not the video player) GameObject’s position to (0,0,0), so it is at the center of the sphere.Add the VideoStereoInside material to the sphere to show the video on the inside. Do this by searching for
VideoStereoInsidein the Project window, and drag it into theMesh Renderer'smaterials list at Element 0, as shown in Figure 5.14.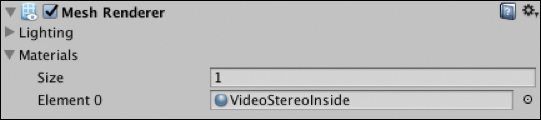
Figure 5.14 The Mesh Renderer. Expand the sphere’s VideoStereoInside material and adjust the Stereo mode drop-down menu to be None, because this is a mono 360 video, and uncheck Flip X, as shown in Figure 5.15. If your video is stereo, or you’re not sure of that, play around with the other two Stereo mode settings. They adjust the way that the video is rendered and wrapped around the inside of the sphere, based on the equirectangular layout. If things seem back to front horizontally, make sure to select Flip X.
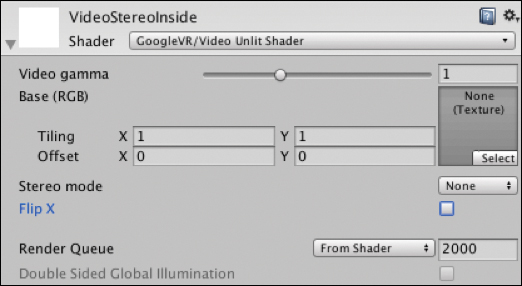
Figure 5.15 The VideoStereoInside material with Stereo mode set to None and Flip X unchecked. As shown in Figure 5.16, add the
GvrVideoPlayerTexturescript to the sphere and update the Video URL field tojar:file://${Application.dataPath}!/assets/vid_360Party.mp4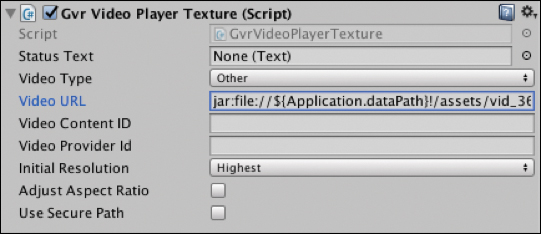
Figure 5.16 The GvrVideoPlayerTexturewith a local, spherical Video URL.Add the VideoControls prefab to the
SphericalVideoPlayerand set their position to (0,–0.66,3).Select the VideoControls and drag the sphere into the
VideoPlayerReferencescript’s Player field.Build and Run the scene on your device to test the 360 video.
This recipe uses a mono 360 video, but you could just as easily use a stereo 360 video. In this case, update the Stereo mode setting in the VideoStereoInside material so the video is correctly represented.
Recipe 5.5: Streaming a Spherical Video
This recipe takes off from where the previous recipe landed and it applies the more common case of use whereby the spherical video is streaming from a server.
The video being streamed in this recipe is an example of a streaming spherical video using the DASH protocol. It is a public-facing Google video used as an example for streaming 360 video. The URL can be easily updated to point at any other spherical video on a server using the DASH protocol. Open Recipe_5.5_start to begin.
Update the
VideoStereoInsidematerial’s Stereo mode toTopBottom.In the
GvrVideoPlayerTextureleave the Content ID and Provider ID empty. Update the Video Type to Dash. Add the Video URL: https://storage.googleapis.com/daydream-deveng.appspot.com/japan360/dash/japan_day06_eagle2_shot0005-2880px_40000kbps.mpd.
Recipe 5.6: Handling Large Video Assets
The Google Play Store does not allow APK file sizes over 100 MGs. If your app has large video files that need to be stored locally, it can be stored in an OBB file.
The video assets must be placed in the
StreamingAssets. As discussed previously, if your project does not already have this folder, create one.Set up the
GvrVideoPlayerTexturein the same way as Recipe 5.2 with the Video URL pointing to the location of the file inApplication.DataPath:jar:file://${Application.dataPath}!/assets/vid_bigbuckbunny.mp4Open Player Settings, and in Publish Settings select the Split Application Binary check box. This creates an OBB file.
Recipe 5.7: Adding VR180 Video
A VR180 video player is similar to a full spherical video, except that the sphere is cut in half. For this reason, a hemispherical mesh is required to render 180 video correctly. The Daydream’s Media App Template (discussed previously in this chapter) provides a hemispherical mesh that can be used for this exact purpose.
The accompanying files also have this mesh included as a prefab called EquiRectangular180 and a VR180 video called samKeeneVR180.mp4 in the StreamingAssets folder. This recipe starts off with the base Daydream-ready scene; open it (Recipe_5.7_Start), and follow these steps:
In the Project window, search for the Equirectangular180 prefab, add it to the scene at (0, 0, 0), and set its rotation to (0, –180, 180). This will flip it to face the camera on the inside and flip the video frame vertically; otherwise, the shader will render the video upside down. The video is projected onto the inside of the sphere.
The
Equirectangular180GameObject has a child GameObject calleddefault. This contains the mesh for rendering the video.Drag and drop the VideoStereoInside material onto the
defaultGameObject’s MeshRendererMaterial list at Element 0. Set the Stereo mode of theVideoStereoInsidetoLeftRight.Add
GvrVideoPlayerTextureto thedefaultGameObject, set the Video Type to Other, and the Video URL to:jar:file://${Application.dataPath}!/assets/samKeeneVR180.mp4Add the Controls prefab (GoogleVr Demos Prefabs/VideoDemo/VideoControls) to the scene and position the controls so they can be seen from the camera.
Drag the
defaultGameObject into the VideoControls’VideoPlayerReference.Build and Run to test the scene.
Recipe 5.8: Creating a Versatile Video Player with a Playlist
This recipe puts all the players from the previous recipes together into one master player that loads in videos from a JSON file. Based on metadata from the JSON file, the player switches between rectangular and spherical, and mono and stereo, and cycles through a playlist of videos.
Each item in the list has an associated video object with information about how to set up the material and which screen (360 or rectangular) to use. The JSON file is easily updatable with new videos and can also be loaded from a server and updated with backend script, although that is beyond the scope of this chapter.
The videos used to stream in this recipe are all publicly facing examples of videos of DASH or HLS. If over time they are no longer available, you can easily update the URLs with your own, or find other public and open source videos to stream.
JSON
JSON is a data format commonly used for storage or sending over a network. JSON in its simplest form is human readable, thus making it a perfect candidate for creating a video playlist. It can be easily updated without your needing to touch the internals of the app code, and it sets up things nicely for the data to be loaded dynamically from a server. The JSON file in this recipe needs to be placed in a folder called Resources in the root of the Assets folder. If your project does not have a Resources folder, create one.
The video players in this recipe are placed dynamically by instantiating them from prefabs. This works around a bug in the current version of the Gvr SDK that causes errors when trying to render out two different video textures using the VideoStereoInside material.
This recipe starts with the finished streaming spherical video player. Open Recipe_5.8_Start and follow these steps:
Turn the spherical video screen into a prefab. The accompanying files already have this prefab included (Recipe_5.8_videoPlaylist/prefabs), so this step can be skipped if you want to use that. Drag the
sphereGameObject, the child of theSphericalVideoPlayer, into the Project window to make it a prefab, and then delete it from the hierarchy. Rename theSphericalVideoPlayertoVideoPlayer.Make the rectangular video screen into a prefab. In the accompanying files, there is already a prefab of the rectangular video for use (Recipe_5.7_videoPlaylist/prefabs), so this step can be skipped if you want to use that.
Otherwise, save the scene and copy the original rectangular video player from Recipe 5.2. Open
Recipe 5.2_finished, select theVideoPlayerGameObject, and choose Edit > Copy. Go back into this recipe’s scene and paste the video player in the hierarchy by choosing Edit > Paste. It should be lined up in the correct position, but make sure it is placed in a comfortable position in front of thePlayer’s camera. Now turn it into a prefab by dragging it into the Project window. Delete the rectangular video from the hierarchy.Create a new script called
VideoPlayerControllerand add it to theVideoPlayerGameObject. Update theVideoPlayerControllerto look like Listing 5.1.Listing 5.1
VideoPlayerControllerScript
using System.Collections;
using System.Collections.Generic;
using UnityEngine;
using UnityEngine.UI;
using System;

public class VideoPlayerController : MonoBehaviour {

    private const string videoDataFile = "VideosJSON";

    public GameObject sphereVideoScreenPrefab;
    public GameObject rectVideoScreenPrefab;
    public GameObject videoControls;
    public Material matNone;
    public Material matLeftRight;
    public Material matTopBottom;

    private VideoControlsManager videoControlsManager;
    private GvrVideoPlayerTexture rectVideoTexture;
    private GvrVideoPlayerTexture sphereVideoTexture;
    private GvrVideoPlayerTexture currentVideoTexture;
    private GameObject currentVideoScreen;
    private List<VideoObject> videoObjects;
    private int currentVidIndex;

    void Start () {
        LoadVideoObjects ();
        currentVidIndex = 0;
        videoControlsManager =
            videoControls.GetComponentInChildren<VideoControlsManager>
(true);
        PlayNextVideoFromPlaylist(videoObjects[currentVidIndex]);
    }

    void Update () {
        if (currentVideoTexture.PlayerState ==
            GvrVideoPlayerTexture.VideoPlayerState.Ended) {
            PlayNextVideoFromPlaylist(videoObjects[currentVidIndex]);
        }
    }

    public void PlayNextVideoFromPlaylist (VideoObject videoObject) {
        currentVidIndex++;
        if (currentVidIndex > videoObjects.Count - 1) {
            currentVidIndex = 0;
        }

        if (currentVideoScreen != null) {
            Destroy (currentVideoScreen);
        }

        currentVideoScreen = CreateVideoScreen (videoObject.isSphere);
        currentVideoScreen.transform.SetParent(transform, false);
        currentVideoTexture =
            currentVideoScreen.GetComponent<GvrVideoPlayerTexture> ();
        videoControlsManager.Player = currentVideoTexture;

        currentVideoTexture.videoType =
            (GvrVideoPlayerTexture.VideoType)System.Enum
                .Parse (typeof(GvrVideoPlayerTexture.VideoType),
                    videoObject.videoType);
        currentVideoScreen.GetComponent<MeshRenderer> ().material =
            MaterialFromStereoMode(videoObject.stereoMode);
        currentVideoTexture.videoURL = videoObject.url;
    }

    private void LoadVideoObjects () {
        TextAsset file = Resources.Load(videoDataFile) as TextAsset;
        string jsonString = file.ToString ();
        VideoObjectsContainer listContainer =
            JsonUtility.FromJson<VideoObjectsContainer>(jsonString);
        videoObjects = new List<VideoObject>(listContainer.videoObjects);
    }

    private Material MaterialFromStereoMode(string stereoMode) {
        if (stereoMode == "TopBottom") {
            return matTopBottom;
        } else if (stereoMode == "LeftRight") {
            return matLeftRight;
        } else {
            return matNone;
        }
    }

    private GameObject CreateVideoScreen(string isSphere){
        if (isSphere == "true") {
            return GameObject.Instantiate(sphereVideoScreenPrefab);

        } else{
            return GameObject.Instantiate(rectVideoScreenPrefab);
        }
    }
}

[Serializable]
public class VideoObjectsContainer {
    public List<VideoObject> videoObjects;
}
The
VideoPlayerController’s main purpose is to load in the JSON, and parse it into the video objects that store the video metadata. It also listens to see whether the currently playing video has ended. If it has ended, the next video is cued up and the correct video screen (spherical or rectangular) isInstantiated().The
Start()method callsLoadVideoObjects()to load in and deserialize the JSON. It then resets thecurrentVideoIndexto0to keep a track of the current video in the playlist. A reference to thevideoControlsManageris then created so that the video player can be assigned and the controls linked to the player.PlayNextVideoFromPlaylist()is then called to start playing the first video.The
Update()method polls thecurrentVideoTexture'splayer for the player state. If it has ended, thePlayNextVideoFromPlaylist()method is called to play the next video in the list.The
PlayNextVideoFromPlayList()method takes aVideoObjectargument that is then used to decide the type of player and the URL to play. ThecurrentVideoIndexis incremented and then reset to zero if it has reached the end of the list, essentially looping the playlist infinitely. ThecurrentVideoScreenis then checked to see whether it exists. If it does, we destroy it to reset it. This fixes a bug in the version of Daydream at the time of writing, whereby two different video screens cannot exist in the scene together.Resetting an object by destroying and then reinstantiating it is generally not best practice. But because this only happens once at the start of the video, there is not too much overhead, and it is also a workaround for the aforementioned SDK bug.
The
VideoObjectis then checked to see whether it is spherical or rectangular, and the correct screen is instantiated via theCreateVideoScreenfunction and parented to theVideoPlayerGameObject. A reference is made to theGvrVideoPlayerTextureof the new screen and assigned to theVideoControlsManager's Playerproperty. The video controls now point to this new video.The
videoType,stereoMode, and video’sURLare then set to thecurrentVideoTexture. It is important to note here that theStereoModehas to be set by setting thecurrentVideoScreen'smaterial to the specific material for thestereoMode(None,TopBottom, orLeftRight). The logic for this is worked out through theMaterialFromStereoModefunction.The
LoadVideoObjectsmethod loads in the JSON file from the Resources folder as aTextAsset. TheTextAssetis then turned into a string and passed into Unity’s nativeJsonUtiltyusing theFromJsonfunction.One of the complaints developers have about Unity is its JSON parser. It does not handle complex JSON very elegantly (even though this really is not a complex JSON). The solution here is to deserialize the JSON as a
VideoObjectsContainer, which is a small class that has been added to the end of this file, and it contains one property, a list ofVideoObjects. In this manner, Unity is able to parse the array ofVideoObjectsfrom the JSON into a list ofVideoObjectsmapped directly from JSON into equivalent class properties.The
ShaderStereoModeFromStringmethod is a simple helper method that turns thestereoModestring from the JSON objects into the required float for the shader, so that the video is drawn in the correct way.Now it is time to create the three materials for each of the three possible stereo modes. Do this by searching for the VideoStereoInside material (GoogleVR/Materials/Video) in the Project window, copy it three times, and rename these new versions: VideoStereoInside_LeftRight, VideoStereoInside_None, and VideoStereoInside_TopBottom. Select each of the materials and update their Stereo mode in the Inspector to correlate to their namesake, either LeftRight, TopBottom, or None.
Hook up the GameObject prefabs to the public variables in the Inspector. Start by dragging the three newly created materials from the Project window into the
VideoPlayerController'sempty matNone, matLeftRight, and mattopBottom fields.Drag the SphereVideoScreen and RectVideoScreen prefabs from steps 1–3 into the empty fields on the
VideoPlayerControllerscript.Drag in the
VideoControlsGameObject from the scene hierarchy into the other empty slot.Unity cannot create JSON files, so you need to do it manually by creating a C# file, deleting all the contents, and changing the extension to .json. Create a new C# file and call it VideosJSON. To turn it into a valid JSON file, the extension needs to be changed to
.json. Right-click the VideosJSON file in the Project window and select Show In Explorer on PC (or Reveal in Finder on a Mac). In the Finder (or Windows on a PC), change the full name of the file to read VideosJSON.json. The string JSON in the name is now probably redundant; however, in Unity you cannot tell that it is a JSON file so it is useful to keep.Back in Unity, double-click the VideosJSON file to edit it. Delete all the prepopulated
MonoBehaviourcode and update it to look like Listing 5.2. The companion Unity project already has a finished JSON file in the project’s Resources folder for you to use if you don’t feel like typing out the JSON schema.Listing 5.2 VideosJSON.json File
{
    "videoObjects": [

        {
            "url": "https://bitdash-a.akamaihd.net/content/MI201109210084_1/m3u8s/f08e80da-bf1d-4e3d-8899-f0f6155f6efa.m3u8",
            "isSphere": "false",
            "stereoMode": "None",
            "videoType": "HLS"
        },
        {
            "url": "https://bitmovin-a.akamaihd.net/content/playhouse-vr/mpds/105560.mpd",
            "isSphere": "true",
            "stereoMode": "None",
            "videoType": "Dash"
        },
        {
            "url": "https://storage.googleapis.com/wvmedia/clear/h264/tears/tears_hd.mpd",
            "isSphere": "false",
            "stereoMode": "None",
            "videoType": "Dash"
        },
        {
            "url": "https://devstreaming-cdn.apple.com/videos/streaming/examples/bipbop_4x3/bipbop_4x3_variant.m3u8",
            "isSphere": "false",
            "stereoMode": "None",
            "videoType": "HLS"
        },
        {
            "url": "https://storage.googleapis.com/daydream-deveng.appspot.com/japan360/dash/japan_day06_eagle2_shot0005-2880px_40000kbps.mpd",
            "isSphere": "true",
            "stereoMode": "TopBottom",
            "videoType": "Dash"
        }
    ]
}
The JSON file (refer to Listing 5.2) is a relatively basic JSON schema compared to some you might find. This was a deliberate attempt to remove nested objects because Unity’s native JSON parser is not very robust. There is basically a
videoObjectsarray that houses the video objects each with aurl,isSphere,stereoMode, andvideoTypeproperty. These are being mapped to theVideoObject’s properties in theVideoPlayerControllerclass.For the JSON to be able to be loaded and parsed programmatically, it needs to be placed in the project’s Resources folder. If your project does not have a folder called Resources in the root of the Assets folder, create one and add the JSON file there. If you are following along with the book’s companion files there is already a Resources folder with the JSON from Listing 5.2 added in the Project.
Create a new C# script called
VideoObjectand update it to look like Listing 5.3.Listing 5.3
VideoObjectScript
using UnityEngine;
using System;

[Serializable]
public class VideoObject {
    public string url;
    public string isSphere;
    public string stereoMode;
    public string videoType;
}
The VideoObject class is a data model class used to store the metadata of the videos. When the JSON file is deserialized it is mapped directly to the public strings in this class. Including the [Serializable] line above the class declaration is important so that the JSON utility assigns the values directly to the properties of this class.
The video player can now be built and run in the headset. More videos can be added to the playlist via the JSON and it could just as easily live on a server and be loaded in dynamically.
Recipe 5.9: Handling Video Callback Events
The GvrVideoPlayerTexture fires off a number of useful events that can be used to update UI elements in your application; for example, to make sure the video has loaded before playing, to notify you when the video has changed, or to debug and handle exceptions. This recipe shows how you can handle them in a single class. These events are fired:
Video Ready
Video Start Playback
Video Format Changed
Video Surface Set
Video Size Changed
Exception Callback
This recipe starts from the finished rectangular video, Recipe 5.2. Open Recipe_5.9_Start and follow these steps:
Add a Canvas in World Space and two text fields to the Canvas in the same way as outlined in Chapter 4 (Recipes 4.1-3) using dmms. Make it so they are clearly visible in front of the video screen; these will be used for feedback from the callback events and video status. Make sure their height, width, and font size are large enough so that the text is legible.
Select the
VideoScreenGameObject inside theVideoPlayerand drag one of the text objects from step 1 into theGvrVideoPlayerTexture’s StatusText field. This will update with useful debugging information about the status of the video.Create a new C# script called
VideoEventManagerand add it to theVideoPlayerGameObject. Update it to look like Listing 5.4.Listing 5.4
VideoEventManagerScript
using UnityEngine;
using UnityEngine.UI;
using System;

public class VideoEventManager : MonoBehaviour {

    public GvrVideoPlayerTexture videoPlayer;
    public Text eventText;

    void Awake () {
        eventText.text = "Awake";
        SetupCallbackHandlers ();
    }

    private void SetupCallbackHandlers () {
        Action<int> videoReadyAction = new Action<int>(HandleVideoCallback);
        videoPlayer.SetOnVideoEventCallback (videoReadyAction);

        Action<string, string> onExceptionAction = new Action<string, string> (HandleExceptionCallback);
        videoPlayer.SetOnExceptionCallback(onExceptionAction);
    }

    private void HandleVideoCallback(int eventId){
        if (eventId == (int)GvrVideoPlayerTexture.VideoEvents. VideoReady) {
            eventText.text = "VideoReady";
        } else if (eventId == (int)GvrVideoPlayerTexture.VideoEvents. VideoStartPlayback) {
            eventText.text = "VideoStartPlayback";
        } else if (eventId == (int)GvrVideoPlayerTexture.VideoEvents. VideoFormatChanged) {
            eventText.text = "VideoFormatChanged";
        } else if (eventId == (int)GvrVideoPlayerTexture.VideoEvents. VideoSurfaceSet) {
            eventText.text = "VideoSurfaceSet";
        } else if (eventId == (int)GvrVideoPlayerTexture.VideoEvents. VideoSizeChanged) {
            eventText.text = "VideoSizeChanged";
        } else {
            eventText.text = "Unknown";
        }
    }

    private void HandleExceptionCallback(string type, string message){
        eventText.text = "Exception of type: " + type + ": " + message;
    }
}
The
VideoEventManagerscript assigns a callback handler through an Action to fire when theGvrVideoPlayerTexturebroadcasts an event.The
SetupCallbackHandlers()method creates two Actions, one for all the valid video-related callbacks and one for any exception (or error) callbacks. When you create a newAction, it takes a reference to the callback method as a parameter and then you add it to the player through theSetOnVideoEventCallbackmethod.HandleVideoCallbackis then executed when an event is triggered and theeventIDis passed through as an argument. The conditional operator (ifstatement) checks theeventIDagainst existing IDs and displays the result in the UI Text field.Sometimes errors happen, and that is what the
HandleExceptionCallbackmethod is for. Much like the previous callback, it displays the error type and message in the UI Text component.With the
VideoPlayerselected, link the two public variables in theVideoEventManagerscript. Drag theVideoScreenGameObject into the VideoPlayer slot to link theGvrVideoPlayerTexture, and drag the other UI Text object from step 1 into the eventText slot.
When the app is running in a Daydream headset, the UI Text components will update with the real-time events triggered from the GvrVideoPlayerTexture.
Audio in Daydream
Google has developed a robust spatial audio engine that is easy to develop on and optimized for mobile. It is called Resonance Audio, and it makes spatialized audio and related environmental and atmospheric effects simple to implement.
At a basic level, the spatialized audio system allows for audio to emanate from a specific location in the virtual environment. The engine takes into account the distance and direction from the sound to the user and the position and rotation of the user’s head for the audio to sound as though it is coming from a particular location.
Spatial Audio Theory
This section is solely concerned with the practicalities of implementing Daydream’s audio system. For more in-depth information on Resonance Audio, see Google’s Resonance Audio developer website: https://developers.google.com/resonance-audio/develop/overview.
There are two main parts to the way in which spatial audio works in Unity and Daydream. An audio listener (ResonanceAudioListener) is placed at the location where the user will hear the sound, usually the main camera of the scene. An audio source (ResonanceAudioSource) is also attached to the origin of the sound, say a gunshot or some other location of the sound effect.
Daydream supports .wav and .mp3 file formats for audio, and audio files are imported the same way as any other asset. Simply drop the file into the relevant folder. Unlike video, it is not required that the audio file be added to the Streaming Assets folder.
Five main components make up the Resonance Audio engine in Unity:
ResonanceAudioListener: Attached to the main camera of the scene, where the sound is being heard
ResonanceAudioSource: The source of the sound
ResonanceAudioRoom: Reverb effects mimicking the inside of a room
ResonanceAudioSoundField: Used for playback of first-order ambisonic recordings
ResonanceAudioReverbProbe: Advanced reverb effects based on geometry
The best way to learn about each component is to follow the recipes and spend some time tweaking the properties. Most of these recipes use audio loops you can find in Assets/Chapter05/SharedAssets/Sounds in the companion Unity project for this chapter. Feel free to replace these sounds with your own.
Recipe 5.10: Installing and Configuring Resonance Audio
To utilize the power of Resonance Audio’s spatial audio engine in your games, you’ll first need to install it and then configure it in your Unity project. This chapter’s companion Unity project already has it installed, so if you’re following along with that you can skip to step 3, configuration.
Download the latest ResonanceAudioForUnity.unitypackage from GitHub: https://github.com/resonance-audio/resonance-audio-unity-sdk/releases
Create a new Daydream-ready Unity project and import the package by choosing Assets > Import Package > Custom Package. In the Importing Package dialog, click Import and accept any API upgrades if prompted.
Configure Unity’s audio settings to use the Resonance Audio engine. Open the Audio Manager settings by choosing Edit > Project Settings > Audio.
Update the Spatializer Plugin to be Resonance Audio.
Update the Ambisonic Decoder Plugin to also be Resonance Audio.
Spend some time exploring the Resonance Audio SDK. Some demo scenes are included that show some of the more complex features of the technology.
Recipe 5.11: Using Spatialized Audio
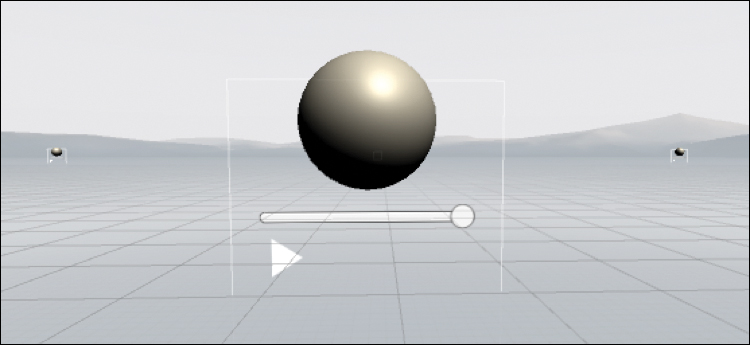
This recipe introduces the use of spatial audio in Daydream by placing audio nodes (ResonanceAudioSources) throughout the Unity scene’s environment (see Figure 5.17). Each node is in the form of a sphere with a volume slider attached that adjusts the volume of the node. The user can teleport around the environment and experience the different sounds coming from different locations, in different directions, depths, and volumes.
Directing Attention
Spatial audio is a great way to direct the user’s attention in VR, particularly if the user is facing away from the action.
Recipe_5.11_start is the starting point for this recipe. It uses the standard Daydream-ready scene with the TeleportController prefab attached (refer to Recipe 2.6). The environment’s ground plane also has Box Collider attached to it for the teleportation system to work. Follow these steps to build an environment with nodes of spatial audio:
The Main Camera needs a
ResonanceAudioListener(ResonanceAudio/Scripts/ResonanceAudioListener) component added to it for spatial audio to work; see Figure 5.18. ThePlayerinRecipe_5.11_Startalready has one attached, so only add this if you are starting from scratch. Confirm that you have at least one, and only one,ResonanceAudioListenerattached to thePlayerGameObject’s Main Camera.
Figure 5.18 The ResonanceAudioListener.Create an empty GameObject, and call it
SoundSphere. Place it somewhere in front of thePlayer’s camera.Add a
sphereGameObject to the emptySoundSphereGameObject and update the child sphere’s position to (0, 0, 0)Select the
SoundSphereand add aResonanceAudioSourcecomponent (see Figure 5.19); this automatically adds a standard UnityAudioSourcecomponent to the GameObject.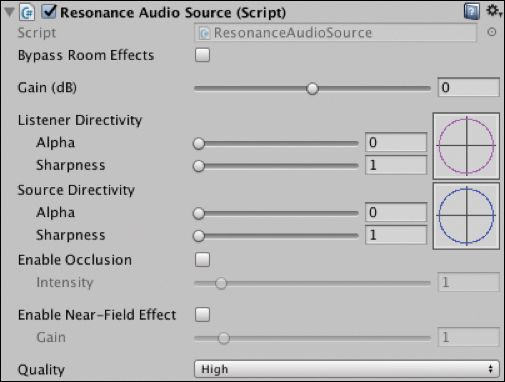
Figure 5.19 The ResonanceAudioSource. This chapter’s project has some audio files included (Assets Chapter0 / SharedAsset /Sounds). Drag and drop the ZombieSynth into the AudioSource’s AudioClip field.
In the AudioSource’s Output field, link the Master Resonance AudioMixer by clicking the selection circle to the right of the field and selecting Master from the list.
Still in the AudioSource, select the Loop and Play On Awake check boxes, and make sure the Volume Rolloff is Logarithmic (as shown in Figure 5.20). This gives a more natural decrease in volume. Set the Max Distance for the rolloff to 10. Leave everything else as the default.
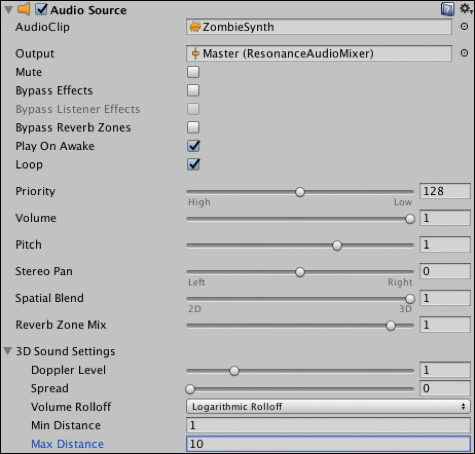
Figure 5.20 The AudioSource component. Test out the scene in the headset with headphones —teleport up close to the sphere, and move your head around to get an idea of the spatialized audio. It is quite impressive. The further you teleport away from the sphere, the more the audio level drops off. The next steps add a volume slider to the
SoundSphereto dynamically adjust the audio in VR.Add a Canvas to the
SoundSphereand make it World Space with a position (0,–0.7,0), Width: 200, Height: 200, and its scale: (0.01, 0.01, 0.01).If you are unsure how raycasting and interaction work with UI elements, it would be worthwhile reviewing Chapter 4, “Building UI in VR” now.
Add a UI Slider object as a child of the Canvas and leave its properties at the defaults. It should be sitting just below the sphere and large enough to be selectable in VR.
Select the Slider in the hierarchy and in its script in the On Value Changed section, drag and drop the
SoundSphereinto the empty object field, and select ResonanceAudioSource > volume from the dropdown. It should look like Figure 5.21.In the Slider component, update the initial value of the slider so it starts at 1 to match the start volume of the target sound.
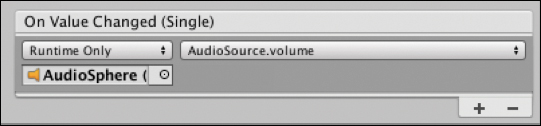
Figure 5.21 The Slider’s OnValueChangedEvent TRIGGER updating the audio source volume.Test the scene now in the headset. The volume can be adjusted by dragging the thumb of the slider, but the teleportation system conflicts with the slider interaction, causing you to teleport when you release the button.
Create a new script called
SoundSphereController, add it to theSoundSphereGameObject, and update it to look like Listing 5.5.Listing 5.5
SoundSphereControllerScript
using UnityEngine;
using DaydreamElements.Teleport;

public class SoundSphereController : MonoBehaviour {

    public GameObject teleportController;
    public GameObject pauseSprite;
    public GameObject playSprite;

    private AudioSource audioSource;
    private  GameObject teleportTarget;

    void Start () {
        audioSource = GetComponent<AudioSource>();
        pauseSprite.SetActive(audioSource.playOnAwake);
        playSprite.SetActive(!audioSource.playOnAwake);
    }

    public void OnPointerEnter (){
        teleportController.GetComponent<ArcTeleportDetector> ().active = false;
    }

    public void OnPointerExit (){
        teleportController.GetComponent<ArcTeleportDetector> ().active = true;
    }

    public void OnPlayPauseClick (){
        if (audioSource.isPlaying) {
            audioSource.Pause ();
        } else {
            audioSource.UnPause ();
        }

        pauseSprite.SetActive(audioSource.isPlaying);
        playSprite.SetActive(!audioSource.isPlaying);
    }
}
The
SoundSphereControllertoggles the audio on and off and coordinates and updates the audio UI for theSoundSphere. It also hides the teleportation system when the user is interacting with the UI in theOnPointerEnterandOnPointerExitmethods.Drag the teleport controller in the
GvrControllerPointerfrom the hierarchy into theSoundSphereController’s TeleportController slot in the Inspector.Select the Slider and add an Event Trigger for the PointerExit and PointerEnter events. Press the + button to add a new handler and drag the
SoundSphereControllerinto the empty object field. From the drop-down menu, select SoundSphereController > OnPointerEnter for the PointerEnter event and OnPointerExit for the exit event (see Figure 5.22).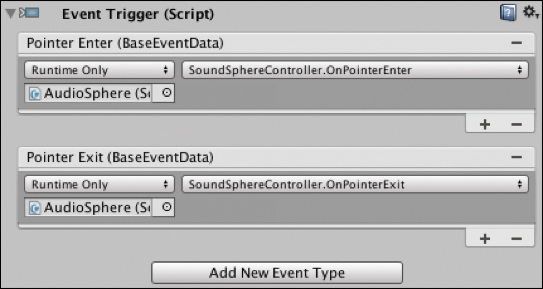
Figure 5.22 The Slider’s Event Trigger for PointerEnter and PointerExit events. The next steps add a play and pause button to the
SoundSphere.Add a UI Button to the
SoundSphere’s Canvas, call itPlayPauseButton, and position it somewhere just below the slider.Remove the button’s child text object in the hierarchy by expanding out the button; that is, right-clicking on the text GameObject and deleting it.
Hide the default button image by clicking the Color field in the
PlayPauseButton’sImagescript, opening the color picker. In the bottom half of the color picker where the RGBA sliders are, turn the alpha all the way down to zero by dragging the A slider all the way to the left.Add a new Raw Image as children of the button by right-clicking on the button in the hierarchy, selecting UI > Raw Image, and calling it
PauseImage. The SDK comes with pause and play images that you can use for this recipe. In theRaw Imagescript’s Texture field, choose the pause image by clicking the circle to the right of the field and searching for ic_pause_white_72.png. Click to select it.Duplicate the
PauseImage, call itPlayImageand select the ic_play_arrow_white_72.png image into the Texture field.Select the
PlayPauseBtnand scale it down so it looks normal.Select the
SoundSphereGameObject and in theSoundSphereControllerscript, drag the two play and pause images into the two empty fields, as shown in Figure 5.23.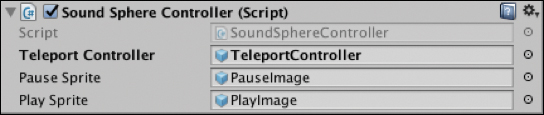
Figure 5.23 The SoundSphereControllerscript with the public fields linked.The
PlayPauseBtnneeds an event hooked up to trigger the play and pause actions. Use theonClickevent that comes with the Button script. SelectPlayPauseBtnand in the Button script’s On Click event, click the + symbol to link a new event handler. Into the empty object field, drag theSoundSphereGameObject, and from the function drop-down menu select SoundSphereController > OnPlayPauseClick.Stop the teleporter system from executing when interacting with UI by adding the same Event Triggers with the PointerEnter and PointerExit listeners to the
PlayPauseBtnas you did in step 16, and link them to the same public methods in theSoundSphereControllerclass in the same way.Turn the
SoundSphereinto a prefab and drag copies of it at various locations around the environment. Change theResonanceAudioSourceaudio clip to different audio tracks for each prefab instance.Build, run, and test out your VR sound installation.
Recipe 5.12: Adding Room Effects
The ResonanceAudioRoom component (shown in Figure 5.24) adds complex spatial reverb effects to the sound, based on the size of the room, its walls, ceiling, floor, and building materials.
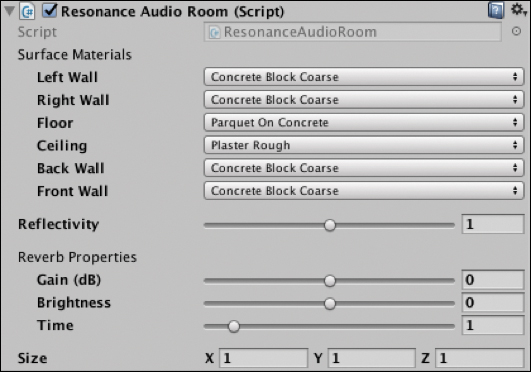
ResonanceAudioRoom component.The adjustable properties of the ResonanceAudioRoom script are:
Surface Materials: This controls the different materials for each of the walls in the room. Different materials cause different reverb.
Reflectivity: How much sound is reflected versus how much is absorbed. This gives a sense of the size of the room; a larger number makes a room feel like a larger space whereas a smaller value makes a room feel smaller.
Reverb Properties: This is global control of the reverb for the room.
Size: This is the size of the room.
Recipe_5.12_Start has the standard Daydream-ready scene with the teleportation system added. Follow these steps to add it to a room and use it in a scene.
Create a room-like structure in the scene by resizing cubes into walls and floors, or use the prefab included in this recipe’s folder.
Add the
ResonanceAudioRoomprefab to the scene and position it to be in the center of the room. The yellow wire gizmo outline displays the boundaries of the room.Scale and position the ResonanceAudioRoom prefab to fit the room and adjust the various properties of the surface material based on your needs, or just leave the defaults. Concrete walls give a pretty good indoor sound effect.
You have created an indoor room effect with reverb, but an audio source is still required. Attach the
ResonanceAudioSourceto a GameObject in the same manner as the previous recipe. A prefab of theSoundSphereGameObject is available (from Recipe 5.11) in the Chapter05/SharedAssets folder—if you use this remember to drag the teleport controller into theSoundSphereController’s teleport controller field so it toggles the teleport visual.Play around with different locations to suit the needs of your game, see Figure 5.25.

Figure 5.25 Recipe 5.8’s scene of the audio room. Now Build and Run to experience the room’s reverb. Enter and exit the room to hear the difference. The Audio room only has an effect when the
ResonanceAudioListeneris inside of its bounds—in this case, the audio listener is attached to the camera of thePlayer. So, thePlayerneeds to be in the room for the effect to work.
Recipe 5.13: Setting Normal Audio
Although spatialized audio is great, a need still exists for non-spatialized audio; that is, a consistent volume no matter what the user’s location or direction is.
Open Recipe_5.13_Start and follow these steps:
Add the SoundSphere prefab that you created in Recipe 5.10.
In the
ResonanceAudioSourcescript, turn down the Spatial Blend to 0, as shown in Figure 5.26. This turns the audio source from 3D sound to 2D.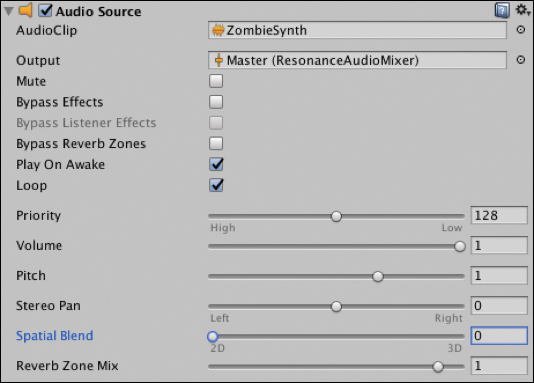
Figure 5.26 ResonanceAudioSourceshowing Spatial Blend to remove audio spatialization.
Recipe 5.14: Understanding Directivity
Directivity is an audio phenomenon that describes the direction a sound emanates from an object. If you consider an audio speaker at a rock concert, the sound travels directly out into the crowd and is therefore much louder in front of the speaker in the direction it is facing compared to beside or behind the speaker backstage.
Slightly different to occlusion, where the audio is physically blocked by an object, the directivity pattern has to do with directional emanation of the sound. Therefore, walking around the speaker you will have different audio.
The Resonance Audio SDK helps handle this problem of directivity in the ResonanceAudioSource component, which has two ways directivity can be adjusted: from the listener and from the source. The listener directivity changes the way the audio listener picks up the sound, so sounds only come from certain directions based on their forward position. Also, directivity is for how the audio source emanates sound. Both of these are controlled in the ResonanceAudioSource component and are unique to each audio source.
The two properties of directivity, which are shown in Figure 5.27, are:
Alpha: Determines the shape of the sound’s emission pattern
Sharpness: Sharpens the angle that the source projects or the listener focuses on
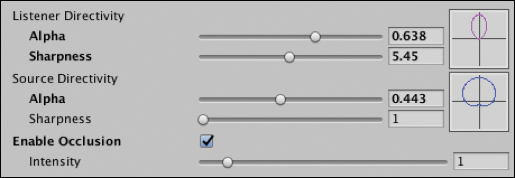
Figure 5.27 The ResonanceAudioSource’s Directivity settings.
The directivity settings shown in Figure 5.27 for the Listener and audio emitting object would look like Figure 5.28 in the scene. Here, the Listener can only hear sounds coming from in front of the camera, and the audio source is projecting sound in roughly a semicircle in front of the object. In the companion files, Recipe_5.14_Finished has a scene set up with similar audio directivity.
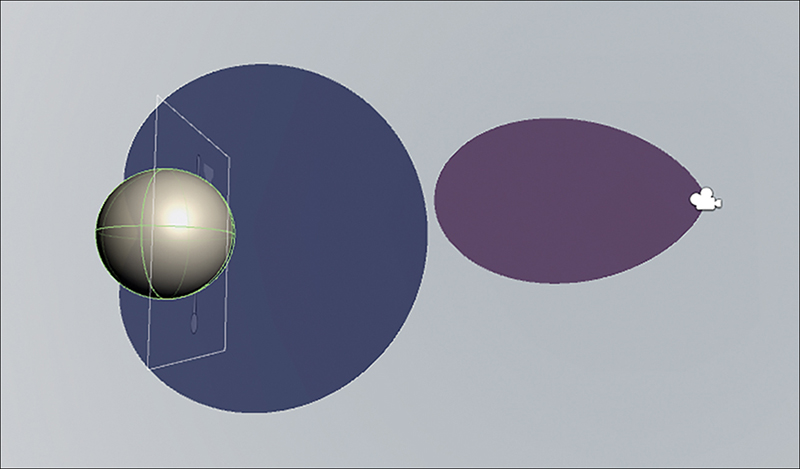
ResonanceAudioSource’s Directivity scene visualization viewed from top down.Summary
This chapter introduced you to some of the essential concepts of video in VR. The focus then turned from theory to practice by building out all the standard types of video players in VR (rectangular, 360, and 180). Daydream’s powerful audio engine was used to build a spatial audio installation in VR and show how spatial audio can be used to enhance immersive experiences.
You now have a solid understanding of how video and audio work in Daydream and the range of possible ways it can be rendered to create engaging media-based applications.