
Chapter 8
AR Apps
A new generation of AR apps are transforming industries and changing the way we approach retail, education, health care, entertainment, and creativity. However, as these massive changes take place AR developers need to be looking for opportunities to build experiences that solve real user problems and move away from contrived gimmicks. In this chapter we approach this nascent territory by exploring two use cases for AR applications in the fields of creative production and retail shopping.
AR Applications
The future of AR has always held out the promise of enhancing our lives by helping us to make sense of the world around us and do this by imbuing the experience of that world with a rich layer of contextual information. The current appeal of the AR ecosystem, however, is much less compelling. Up until recently, the capabilities of phone-based AR, that is, of using visual markers and QR codes for tracking, has been clumsy and inconvenient, thereby reinforcing the notion that AR is a gimmick. However, with the release of Google’s ARCore platform, the potential for AR is finally coming of age and taking the user into an era when the most exciting and innovative AR experiences are yet to be realized.
For AR products to be successful, they need to take a human-centered approach to solving existing user needs. When required, AR in apps is best employed not as the primary focus but as a practical utility, in short vignettes that strengthen a larger experience.
The next generation of AR apps will enliven the user experience by ushering context, by inferring intent, and by authenticating location. Additionally, and quite delightfully, next generation AR promises to bring a touch of fun and magic to the user’s world.
Building User-Centered AR Apps
The app recipes covered in this chapter focus on two user-driven AR use cases: one creative and the other utilitarian. The creative application is a drawing app that enables users to paint through the air using a phone as the painting device. The utility application, by contrast, replicates a furniture catalogue app in which the user can choose from a range of chairs and then place them in a room.
The AR value propositions for both the creative tools and the shopping for products are clearly described and address real user needs:
Artistic expression: I want to be able to express my creativity freely on a 3D Canvas.
Try before you buy: I want to see what a product looks like in my own space before I purchase it.
Solving real problems for users, rather than building AR for technology’s sake, will create meaningful and lasting experiences in your apps that will live on long after the initial novelty and gimmick have worn off.
Recipe 8.1: Creating an AR Drawing App
Drawing apps work by rendering a line between two points in space. In every frame a new point is added and a line is drawn from the previous point to the new location.
This recipe uses the phone as a brush to paint strokes in a three-dimensional space (see Figure 8.1). Each stroke is drawn using Unity’s built-in LineRenderer; and each follows the movement of the phone through the environment. When the user touches the screen, the drawing begins. New points are then added to the line in every frame at the phone’s location until the user lifts her finger.

The starting point for the recipe is the DrawingApp_Start scene. A Canvas with the text snack bar (from the SDK’s HelloAR demo scene), and the ARCore Device and Environmental Light prefabs have been already added.
Create a new material that is white (right-click in the Project window and choose Create > Material). Name it
WhiteMaterial. From the Shader drop-down menu in the Inspector change its shader to Unlit/Color and set the color to white (see Figure 8.2).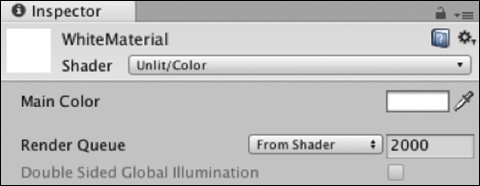
Figure 8.2 Material with the unlit color shader. Create a new empty GameObject called
DrawObject.Add a
LineRenderercomponent toDrawObject. Drag theWhiteMaterialinto the LineRenderer’s Material’s list. Change its Width to 0.01 and the End Cap Vertices to 10 to give it rounded ends (see Figure 8.3).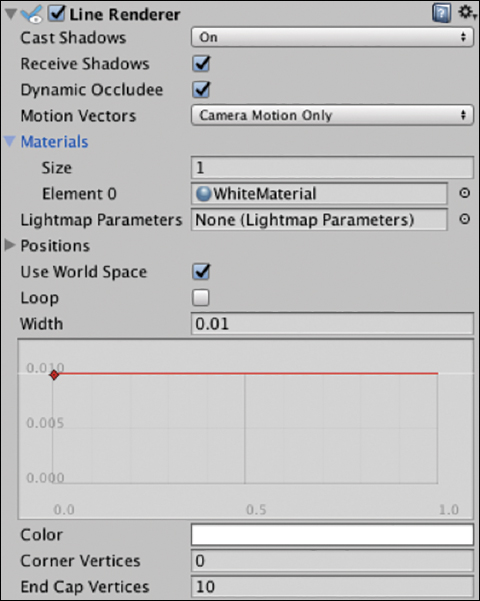
Figure 8.3 The Line Renderercomponent.Turn the
DrawObjectinto a prefab by dragging it into the Project window, and then delete it from the hierarchy; it will be instantiated programmatically from the prefab.Create an empty GameObject called
Scripts.Create a new C# script called
DrawingManagerand add it to theScriptsGameObject. UpdateDrawingManagerto look like Listing 8.1.Listing 8.1
DrawingManagerScript
using System.Collections.Generic;
using UnityEngine;
using UnityEngine.Rendering;
using GoogleARCore;

public class DrawingManager : MonoBehaviour {

    public GameObject canvas;
    public Material whiteMat;
    public GameObject drawObjectPrefab;

    private LineRenderer currentLineRend;
    private List<Vector3> linePath = new List<Vector3>();
    private bool isDrawing = false;
    private bool hasTrackedPlane = false;
    private Anchor drawAnchor;

    public void Update() {
        if (!hasTrackedPlane) {
            List<DetectedPlane> newPlanes = new List<DetectedPlane>();
            Session.GetTrackables<DetectedPlane>(newPlanes,
                TrackableQueryFilter.New);
            for (int i = 0; i < newPlanes.Count; i++) {
                DetectedPlane dPlane = newPlanes [i];
                drawAnchor = dPlane.CreateAnchor (dPlane.CenterPose);
                hasTrackedPlane = true;
                canvas.SetActive (false);
                break;
            }
        }

        if (Input.touchCount > 0) {
            var touch = Input.GetTouch(0);
            if (touch.phase == TouchPhase.Began) {
                CreateDrawObject ();
                isDrawing = true;
            }
            else if (touch.phase == TouchPhase.Ended) {
                linePath.Clear();
                isDrawing = false;
            }

            if (isDrawing) {
                DrawLine ();
            }
        }
    }

    private void CreateDrawObject() {
        Pose cameraPose = new Pose (Frame.Pose.position,
            Quaternion.identity);
        GameObject drawObject = (GameObject)Instantiate(drawObjectPrefab,
            Frame.Pose.position,
            Quaternion.identity, drawAnchor.transform);
        currentLineRend = drawObject.GetComponent<LineRenderer>();
    }

    private void DrawLine() {
        Vector3 camDirect = Frame.Pose.rotation
            * Vector3.forward;
        Vector3 screenPosition = Frame.Pose.position;
        Ray ray = new Ray(screenPosition, camDirect);
        Vector3 newPos = ray.GetPoint(.1f);

        linePath.Add(newPos);
        currentLineRend.widthMultiplier = 0.01f;
        currentLineRend.positionCount = linePath.Count;
        currentLineRend.SetPosition(linePath.Count - 1, newPos);
    }
}
The
DrawManagerlistens for the user to start touching the screen. When a touch occurs it creates a new draw object at that point in space and continues adding points to the draw object’sLineRendererin theUpdatefunction until the touch has ended and the line is complete. EachdrawObjectcontains one full line drawn from a singleLineRenderer.The class has public references to the drawing material, the
drawObjectPrefabcontaining theLineRenderer. The private properties hold references to the currentLineRendererbeing used, aListofVector3points that make up the path of the line, aboolto check if the app is currently drawing, thesnackBarCanvas, ahasDetectedPlanebool, and a reference to thedrawAnchorto be used to attach everything to.The
Updatemethod checkshasTrackedPlaneto see if ARCore is tracking. If not,Session.GetTrackablespopulatesnewPlaneswith any new planes that have begun tracking and creates an anchor on the first one, setshasTrackedPlanetotrue, hides thesnackBarCanvas, and breaks out of the loop. It then polls theTouchPhase. If theTouchPhaseequalsBegantheCreateDrawObjectmethod is called and theisDrawingbool is set totrue. If theTouchPhasehas ended, theListcontaining the line’s points is cleared and theisDrawingbool is set tofalse.The
CreateDrawObject()function is called when the touch starts. It creates aPoseobject from the camera’s position via theFrame’sPoseproperty andQuaternion.identity(meaning no rotation). A newdrawObjectis then instantiated at the camera’s location and added as a child of the anchor’s transform. A reference to thedrawObject’s LineRendereris then stored in thecurrentLineRendererproperty.The
DrawLine()method is called in every frame if theisDrawingbool is true. It starts off by raycasting for aVector3location just far enough away from the camera so the line being drawn is not within the camera’s near clipping field. This point is then added to thelinePath Listof points and passed into theLineRenderer’sSetPositionmethod to continue drawing the line to this new point.Drag in the relevant objects into the
DrawingManager’s public fields. Start with the Canvas, and thenWhiteMaterialand theDrawingObject, both from the Project window.Build and Run the app on your phone and move the phone around to help ARCore track a surface. When the “Searching for surfaces” text has disappeared, start painting your own AR masterpiece.
ARCore and the Poly Toolkit
In 2017, Google launched Poly as a core part of its suite of AR and VR products and services. Poly is an online library of 3D assets built specifically for AR, VR, and 3D creators. It lets users browse, upload, and share 3D models on the web and includes some other handy features, including an API for loading models directly into your app at runtime and a toolkit for doing all of this in the Unity Editor.
The recipes in this section guide you through setting up and integrating the Poly Toolkit for Unity with ARCore. This foundation is then used to build two apps that utilize the API to dynamically import 3D models and place them in the scene.
Licensing and Copyright
Most assets in the Poly library are licensed under the Creative Commons license. This means you will need to give suitable credit to creators when using their asset in a published app. If the object is not tagged as “remixable” in Poly, then the creator owns the copyright.
As an app creator, you must make sure you are not publishing apps that infringe on other people’s copyright. For more on licensing and attribution with Poly objects, see the Poly website at https://developers.google.com/poly/develop/#licensing.
Poly Toolkit and Poly API
You can import Poly assets into your Unity app in two ways:
Edit-time: With the Unity Poly Toolkit plugin installed, developers can browse and import 3D models from the Poly library directly inside the Unity Editor.
Runtime: Using the Poly API, developers can dynamically import 3D models and related assets while the app is running.
Software engineer on the Poly team, Bruno Oliveira, describes the separate use cases for edit time and runtime importing like this: “If you were to build a racing car game where the player could choose between five specific cars, you would import those five cars at edit time. However, if the racing car game was to allow the player to choose whichever model they want as their car, you could use the runtime API to let the user pick any car at runtime. Then their car could be a dinosaur, a lobster, or even a shoe if they want it to be.”
To import a 3D model from the Poly API, an asset ID is required. This can be hardcoded by pulling it from Assets’ detail screen in the Unity Poly Toolkit, or by using the API to retrieve a list of PolyAsset data objects based on a search query. From the PolyAsset data object you can also retrieve thumbnail URLs and a GameObject of the 3D asset itself. The following recipes will apply all of these approaches for integrating 3D Poly assets into an ARCore scene.
Poly
The Unity Poly Toolkit can be downloaded from the GitHub site, the Unity Asset Store, or from the developer site’s quick start guide:
Quick start guide: https://developers.google.com/poly/develop/unity
GitHub site: https://github.com/googlevr/poly-toolkit-unity/releases
Find out more about the Poly Toolkit and the Poly API from the developer site: https://developers.google.com/poly/develop/toolkit-unity.
Recipe 8.2: Integrating the Poly Toolkit with ARCore and Unity
The first step to incorporating Poly assets into your ARCore project is to install the Poly Toolkit Unity package. This recipe walks through the toolkit installation steps and importing a Poly model into a scene from the Unity Editor.
Note
The companion files already have the Poly Toolkit installed, so if you have imported this chapter’s Unity package into a new project you don’t need to install it again. You can skip to step 3 of this recipe.
Follow these steps to get the Poly toolkit installed and working in a Unity project:
Download the Poly Toolkit Unity package from the Unity Asset Store or from the GitHub site. To download it from the GitHub site follow this link: https://github.com/googlevr/poly-toolkit-unity/releases
Create a new project and import the downloaded package into your Unity project by dragging it into the Assets folder. When the Import Unity Package window appears make sure all the assets are selected and click Import.
The Poly Asset browser opens immediately after installation (see Figure 8.4).
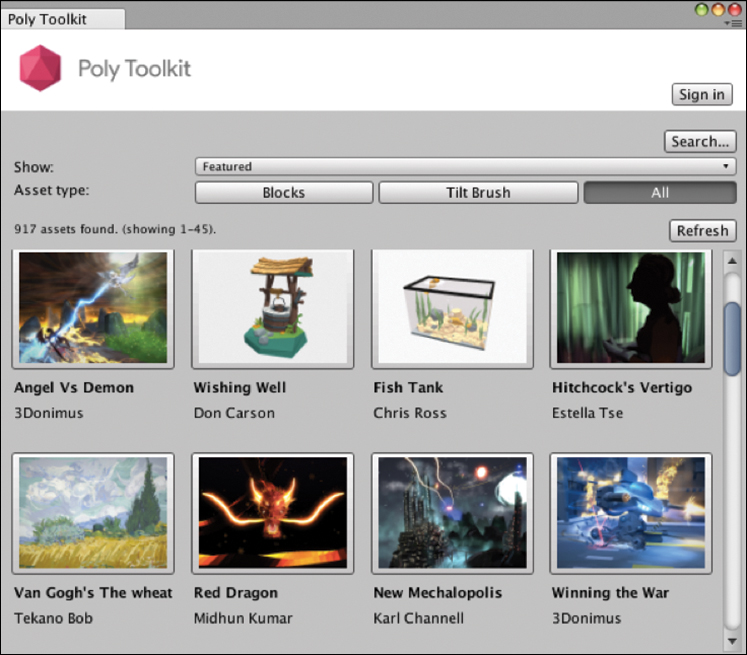
Figure 8.4 The Poly Toolkit browse window. (© Google LLC) The Poly Browse window, Poly settings, and all other Poly-related functions can be accessed from the Poly menu at the top of the Unity workspace. The Poly toolkit requires unsafe command line options to be specified. Do this by enabling “Allow Unsafe Code” in the Other Settings section of the Player Settings.
To import assets into a Unity project choose Poly > Browse Assets. Select the asset thumbnail that you want to import and then click Import Into Project. The 3D model will be imported directly into the open scene and saved in the Poly directory in the root assets folder. This imported object is brought in as a prefab, and so multiple instances of it can be created throughout the project’s scenes.
Recipe 8.3: Using Poly Toolkit Runtime
The finished app in this recipe downloads and imports a single Poly object at runtime that is placed in the AR scene. The first step of the application life cycle is to download a PolyAsset data object. This contains metadata used for importing the actual 3D model and associated GameObject. The user then taps a tracked surface to place the imported GameObject in the ARCore scene.
To use the Poly API in your app, you need two additional things: a Poly API key and the PolyToolkitManager added to the scene. Open the Recipe_PolyPlacement_Start scene and follow these steps to get it working:
Get an API key. You need an API key to make server requests to retrieve Poly objects. If you already have an existing Google project you can simply enable the Poly API for it. Otherwise, navigate to the Poly API documentation webpage and click the Get An API Key button: https://developers.google.com/poly/develop/api.
In the Enable Poly API dialog box that appears, select Create New Project from the drop-down menu to create a new project that will be associated with your API key.
Call it PolyARCoreApp or something similar.
Click Next and copy the key.
The key now needs to be entered into the Poly settings menu in Unity. Back in Unity, open the Poly Settings window (Poly > Poly Toolkit Settings). Select the Runtime tab, and enter your key in the API Key field. See Figure 8.5.
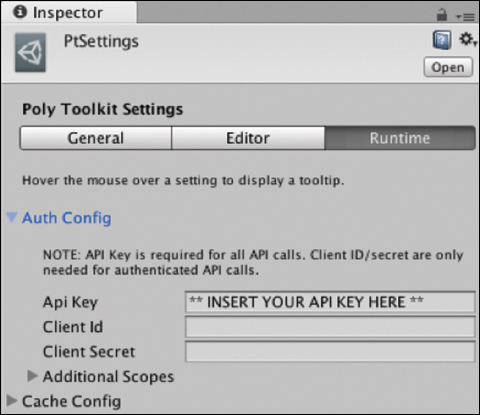
Figure 8.5 The Poly Toolkit settings, Runtime tab. Now it is time to start developing. Open the
Recipe_PolyPlacement_Startscene, which is a base ARCore scene similar to the one built in Chapter 7. The hierarchy looks like Figure 8.6.
Figure 8.6 Starting hierarchy for Recipe 8.3. Add the PolyToolkitManager prefab (PolyToolkit/Prefabs) to the scene by dragging it from the Project window into the hierarchy.
Search the Poly Toolkit in Unity (choose Poly > Browse Assets) to find a Poly object to use. This recipe uses a model of a cup of coffee created by Google (see Figure 8.7): https://poly.google.com/view/1HpVP5w2x1D
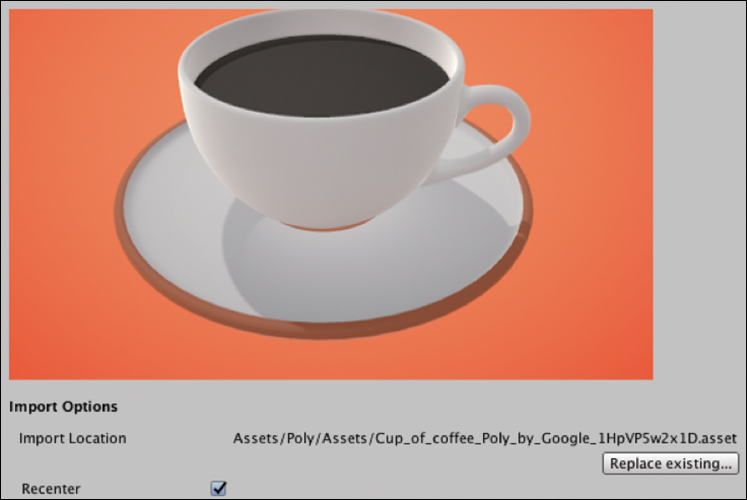
Figure 8.7 The 3D Poly coffee cup, created by Google. (© Google LLC) Because of performance and load times, finding objects that are of lower complexity is a good idea.
To load the object from the API, you need to obtain an asset ID. You can do this in the Poly Toolkit by taking the string of letters and numbers at the end of the Import Location (see Figure 8.8). In this case the asset ID is 1HpVP5w2x1D.

Figure 8.8 The Poly object’s URL with asset ID. Create a new empty GameObject called
Scripts.Create a new C# script called
PolyImportManagerand add it toScripts. Update thePolyImportManagerto look like Listing 8.2.Listing 8.2
PolyImportManagerScript for Importing a Poly Object
using UnityEngine;
using UnityEngine.UI;
using PolyToolkit;

public class PolyImportManager : MonoBehaviour {

    public Text polyStatusText;

    [System.NonSerialized]
    public GameObject polyObject;

    void Start () {
        polyStatusText.text = "Loading Poly Object.";

        // Get the Poly Asset
        PolyApi.GetAsset("assets/1HpVP5w2x1D", GetAssetCallback);
    }

    // Invoked when the Poly asset is loaded
    private void GetAssetCallback(PolyStatusOr<PolyAsset> result) {
        if (!result.Ok) {
            Debug.LogError("Failed to get assets. Reason: "
                + result.Status);
            polyStatusText.text = "ERROR: " + result.Status;
            return;
        }

        PolyImportOptions options = PolyImportOptions.Default();
        options.rescalingMode = PolyImportOptions.RescalingMode.FIT;
        options.desiredSize = 0.25f;
        polyStatusText.text = "Importing...";

        // Import the asset's GameObject into the scene
        PolyApi.Import(result.Value, options, ImportAssetCallback);
    }

    // Invoked when an asset's GameObject has just been imported.
    private void ImportAssetCallback(PolyAsset asset,
        PolyStatusOr<PolyImportResult> result) {
        if (!result.Ok) {
            Debug.LogError("Failed to import asset. :( Reason: "
                + result.Status);
            polyStatusText.text = "ERROR: Import failed: "
                + result.Status;
            return;
        }

        // Show attribution (asset title and author).
        polyStatusText.text = asset.displayName + "
by "
            + asset.authorName;
        polyObject = result.Value.gameObject;
        polyObject.SetActive (false);
    }
}
Namespaces
The classes in the companion Unity files are wrapped in a C# namespace. This is to prevent any conflicts for readers following along who are creating classes of the same name from scratch. If you want to write some of your own classes combined with some from the companion files you will need to include the class’s namespace at the top of your class with the using directive. See the Preface for more information on namespaces.
As the name suggests, the PolyImportManager handles the downloading and importing of the Poly object. Two public properties are in the class. The polyStatusText property links to the UI text to give the user feedback on the status of the download and import. The polyObject property is used to reference the Poly object that will be downloaded and placed in the ARCore scene. The [System.NonSerialized] directive is used so that the public property does not appear in the Editor. It will be referenced by the SurfaceDetection class later when the user taps the screen to place the object.
In the Start() method, the initial status text is set to “Loading” and then the PolyAPI.GetAsset method is called with the ID of an asset passed through as a parameter. A reference to the callback method to be invoked on completion is passed through as the other parameter.
GetAssetCallback returns the PolyAsset, or an error if there was one. The first few lines of the method handle the error using Debug.LogError and updating the status text to notify the user. It then returns out of the function so no more code is executed. If the result is no error, we prepare the import using the default PolyImportOptions. Set the RescalingMode to Fit, scale down to the desired size and re-center the object’s centroid. The PolyAPI.Import method is then called, passing in the import options as a parameter and a reference to a callback method on completion. This is where the Poly model is actually downloaded.
ImportAssetCallback is the callback method invoked after the 3D model has been downloaded, imported, and instantiated in the scene. Again, there is some error handling before the class’s polyObject property is assigned to the query’s resultant GameObject. The newly imported GameObject is then deactivated. It will be activated later when the user taps the screen.
Create a new script called
SurfaceDetectionControllerto handle the surface detection and add it to theScriptsGameObject. Update it to look like Listing 8.3.Listing 8.3
SurfaceDetectionControllerScript
using System.Collections.Generic;
using GoogleARCore;
using UnityEngine;
using UnityEngine.Rendering;
using GoogleARCore.Examples.Common;

public class SurfaceDetectionController : MonoBehaviour {

    public GameObject TrackedPlanePrefab;
    public PolyImportManager polyImportManager;

    private List<DetectedPlane> newPlanes = new List<DetectedPlane>();

    public void Update() {
        Session.GetTrackables<DetectedPlane>(newPlanes, TrackableQueryFilter.New);
        for (int i = 0; i < newPlanes.Count; i++) {
            GameObject planeObject = Instantiate(TrackedPlanePrefab,
                Vector3.zero,
                Quaternion.identity,
                transform);
            planeObject.GetComponent<DetectedPlaneVisualizer>()
                .Initialize(newPlanes[i]);
        }

        Touch touch;
        if (Input.touchCount < 1 || (touch = Input.GetTouch(0)).phase
                != TouchPhase.Began) {
            return;
        }

        // Raycast against the location the player touched to
        //search for planes.
        TrackableHit hit;
        TrackableHitFlags raycastFilter =
                TrackableHitFlags.PlaneWithinBounds
            | TrackableHitFlags.PlaneWithinPolygon;
        if (Frame.Raycast (touch.position.x,
                touch.position.y,
                raycastFilter,
                out hit)) {
            // Hide the planes and place the Poly object
            HidePlanes ();
            GameObject polyObject = polyImportManager.polyObject;
            polyObject.transform.position = hit.Pose.position;
            Anchor anchor = hit.Trackable.CreateAnchor (hit.Pose);
            polyObject.transform.parent = anchor.transform;
            polyObject.SetActive (true);
        }
    }

    private void HidePlanes() {
        GameObject[] planes = GameObject.
            FindGameObjectsWithTag("DetectedPlaneViz");
        foreach (GameObject plane in planes) {
            plane.SetActive(false);
        }
    }
}
The SurfaceDetectionController does exactly what the name suggests. The main difference between this and similar controllers in the previous chapter is the addition of a public property for the PolyImportManager. This is used if the Session.Raycast returns a true value. If the result is true then the HidePlanes method is called, which cycles through the surface planes and deactivates them.
A reference to the downloaded Poly object is obtained from the PolyImportManager class. Its position is set to the touchpoint on the plane, an anchor is created, and the polyObject is added as a child to the anchor. The Poly object is then activated so it can be seen.
For the
HidePlanesmethod in theSurfaceDetectionControllerto work, the DetectedPlaneVisualizer prefab (GoogleARCore/Examples/Common/Prefabs) needs to have its tag property set to DetectedPlaneViz. Do this by selecting the prefab in the Project window, then in the Inspector under the Tag drop-down menu select Add Tag, and add a tag called DetectedPlaneViz (if one doesn’t already exist). Now add this tag to the prefab by selecting the prefab again and in the Tag drop-down menu actually set the DetectedPlaneVisualizer’s Tag to be TrackedPlane.Wire up all the public properties to GameObjects in the Editor. The PolyImportManager needs the Text UI linked (Canvas > SnackBar > SearchingText). The SurfaceDetection Controller needs the TrackedPlanePrefab (GoogleARCore/Examples/HelloAR Prefabs) and the PolyImportManager (drag it in from the
ScriptsGameObject) connected.Build and Run to test placing an AR Poly object on a tracked surface in the world.
Recipe 8.4: Creating an AR Shopping Catalogue App
The finished shopping catalogue app loads in a list of furniture thumbnails from Poly and then lays them out in a scrolling carousel. The user can select a thumbnail to download the Poly object and tap the screen to place it in the environment (see Figure 8.9).
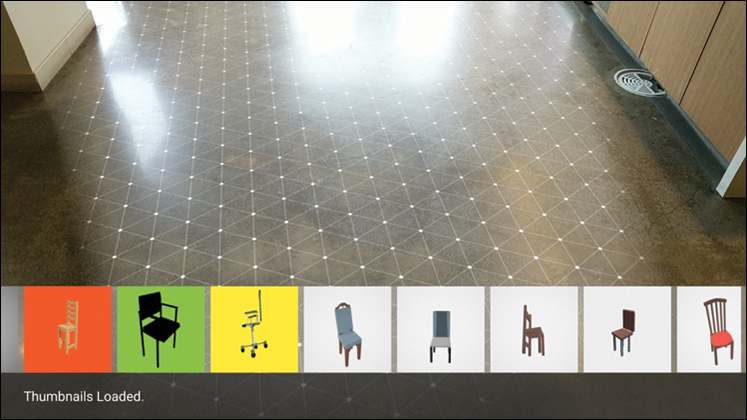
The first step is to build the scroll view UI using Unity’s scroll view component. The next step is to get the thumbnails loaded in and placed correctly in the scroll view. From there things are very similar to the previous recipe: a SurfaceDetection class tracks the surfaces and a PolyImportManager class handles most of the server requests to the Poly API.
The starting point for this recipe is the Recipe_PolyCarousel_Start scene; it is the base ARCore-ready scene with the default prefabs introduced in Chapter 7. Follow these steps to start setting up the Scroll View UI:
Add a Scroll View UI object to the Canvas by right-clicking the Canvas and selecting UI > Scroll View.
Expand the Scroll View in the hierarchy and delete the
ScrollBar HorizontalandScrollBar VerticalGameObjects. Select theScroll Viewand in theScroll Rectscripts, and delete the references in the Horizontal Scrollbar and Vertical Scrollbar fields (see Figure 8.10). These side scrollbars are unnecessary in a mobile app context (see Figure 8.10).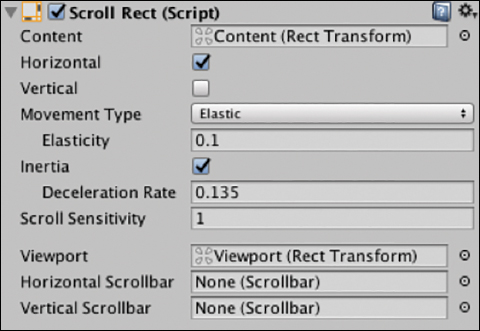
Figure 8.10 The Scroll Rectcomponent.Set the
RectTransformanchor presets to vertical: bottom and horizontal: stretch (see Figure 8.11).
Figure 8.11 The Rect Transform anchor presets for the Scroll View. Set the Left: 0, Right: 0, Pos Y: 310, Pos Z: 0, and Height: 300; see Figure 8.12. This will sit above the status text UI and stretch horizontally.
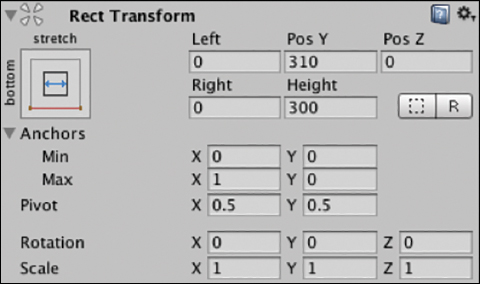
Figure 8.12 The Rect Transform component. Expand out the Scroll View in the hierarchy and in the
ViewportGameObject add a new empty GameObject; call itHorizontalLayout(see Figure 8.13).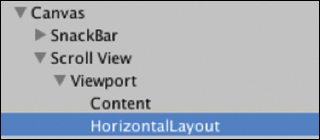
Figure 8.13 The Scene hierarchy with the HorizontalLayout. Set its Pos X: 0, Pos Y: 150, and height to 300.
Set its anchor presets to bottom, left so that it locks to the bottom of the screen (see Figure 8.14).
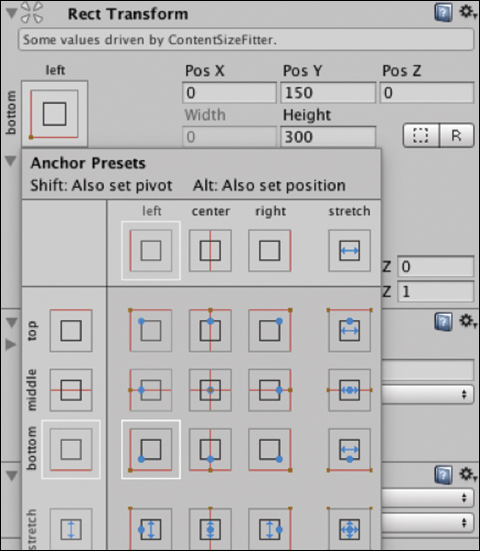
Figure 8.14 The Rect Transform anchor presets for the HorizontalLayout GameObject. With the
HorizontalLayoutGameObject selected, click Add Component and add aHorizontal Layout Groupcomponent. Set its spacing to 20 and its child alignment to Lower Left (see Figure 8.15).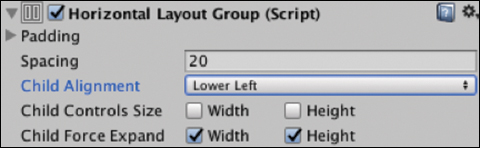
Figure 8.15 The Horizontal Layout Groupcomponent.With the
HorizontalLayoutGameObject still selected add aContentSizeFittercomponent in the Inspector and set itsHorizontal Fitproperty to Preferred Size (see Figure 8.16).
Figure 8.16 Content Size Fittercomponent.Add a new UI Image as a child of the
HorizontalLayoutGameObject. Set the UI Image’s width and height to 300, and call itThumbItem. This will be turned into a prefab and used to display the loaded thumbnails.Add a
Layout Elementscript to theThumbItemand set the preferred width and height to 300 (see Figure 8.17).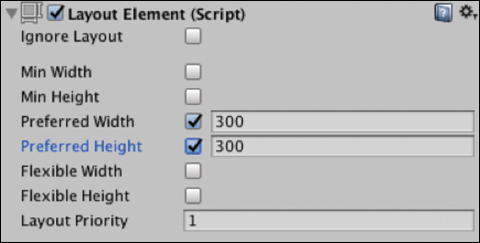
Figure 8.17 Layout Elementcomponent.Select the Scroll View in the hierarchy and in the
Scroll Rectscript’s Content field drag in theHorizontalLayoutGameObject (see Figure 8.18).
Figure 8.18 Scroll Rectcomponent with updated Content field.The Canvas hierarchy should now look like Figure 8.19.
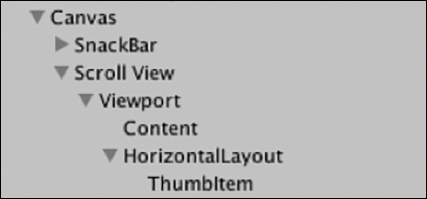
Figure 8.19 The Scroll View’s child hierarchy.
The Scroll View is now set up and ready to dynamically load in thumbnails. The next step is to prepare the ThumbItem by turning it into a prefab and removing it from the scene. Follow these steps:
Turn the
ThumbItemGameObject into a prefab by dragging it from the hierarchy into the Project window. This will be used later for displaying the thumbs.Delete the thumb from the
HorizontalLayout; it will be added dynamically via code from the prefab.
The next steps incorporate the Poly Toolkit and create some classes to query the API and load in the thumbnails and 3d objects. Follow these steps:
Add the
PolyToolKitManagerprefab to the scene by dragging it into the Hierarchy from the Project Window (Assets / PolyToolKit / Prefabs).Create an empty GameObject called
Scripts.Create a new C# class called
PolyImportManagerand add it to theScriptsGameObject. Update it to look like Listing 8.4.Listing 8.4
PolyImportManagerScript
using UnityEngine;
using UnityEngine.UI;
using PolyToolkit;
using GoogleARCore;

public class PolyImportManager : MonoBehaviour {

    public static PolyImportManager instance = null;
    public Text polyStatusText;
    public PolyScrollViewController polyScrollViewController;

    [System.NonSerialized]
    public GameObject polyObject;

    private PolyAsset polyAsset;

    // Implement the singleton pattern
    void Awake() {
        if (instance == null) {
            instance = this;
        } else if (instance != this) {
            Destroy (gameObject);
        }
        DontDestroyOnLoad(gameObject);
    }

    void Start () {
        polyStatusText.text = "Loading Thumbnails.";
        FetchPolyListAssets();
    }

    // Create a custom request to retrieve 20 chair thumbnails
    private void FetchPolyListAssets() {
        PolyListAssetsRequest req = new PolyListAssetsRequest();
        req.keywords = "chair";
        req.curated = true;
        req.maxComplexity = PolyMaxComplexityFilter.MEDIUM;
        req.formatFilter = PolyFormatFilter.BLOCKS;
        req.orderBy = PolyOrderBy.BEST;
        req.pageSize = 20;
        PolyApi.ListAssets (req, ListAssetsComplete);
    }

    // Returns List of PolyAssets - data objects
    private void ListAssetsComplete(PolyStatusOr<PolyListAssetsResult>
        result) {
        if (!result.Ok) {
            polyStatusText.text = "ERROR: Import failed: "
                + result.Status;
            return;
        }

        polyScrollViewController.LoadPolyThumbs (result.Value.assets);
        polyStatusText.text = "Thumbnails Loaded.";
    }

    // Called when user taps scrollview thumbnail to select an object
    public void UpdatePolyAsset(PolyAsset asset) {
        polyAsset = asset;
        polyStatusText.text = "Importing Asset";

        PolyImportOptions options = PolyImportOptions.Default();
        options.rescalingMode = PolyImportOptions.RescalingMode.FIT;
        options.desiredSize = 1f;
        PolyApi.Import(polyAsset, options, ImportAssetCallback);
    }

    // Callback invoked when an asset has just been imported.
    private void ImportAssetCallback(PolyAsset asset,
        PolyStatusOr<PolyImportResult> result) {
        if (!result.Ok) {
            Debug.LogError("Failed to import asset. :( Reason: "
                + result.Status);
            polyStatusText.text = "ERROR: Import failed: "
                + result.Status;
            return;
        }

        // Show attribution (asset title and author).
        polyStatusText.text = asset.displayName + "
by "
            + asset.authorName;
        polyObject = result.Value.gameObject;
        polyObject.SetActive (false);
    }

    // Places the object at the hit location
    public void PlacePolyObject (TrackableHit hit) {
        Vector3 polyPos = new Vector3 (hit.Pose.position.x,
            hit.Pose.position.y, hit.Pose.position.z);
        polyObject.transform.position = polyPos;
        var anchor = hit.Trackable.CreateAnchor (hit.Pose);
        polyObject.transform.parent = anchor.transform;
        polyObject.SetActive (true);
    }
}
The PolyImportManager in this recipe differs from the previous recipe in that we are now requesting a List of PolyAssets. This List is then passed through to the Scroll View to populate the thumbnails.
The class has several public properties that will need to be connected in the Editor. The most notable of these properties is the reference to the PolyScrollViewController used to pass the PolyAssetList to the Scroll View.
The Awake method implements the singleton pattern, allowing any class in the application to access the PolyImportManager. The Start method calls the FetchPolyListAssets method to start loading in the assets.
FetchPolyListAssets builds a custom PolyListAssetsRequest that searches for the keyword “chair,” and sets various other properties such as model complexity, format, and page size. The PolyAPIListAssets method is then called with two parameters: the custom request and the ListAssetsComplete callback method.
The ListAssetsComplete method handles any errors from the PolyListAssetsRequest and then calls the LoadPolyThumbs method on the PolyScrollViewController, passing in the PolyListAsset that was returned in the request’s result.
The UpdatePolyAsset method is called when a user taps a thumbnail in the Scroll View. It passes through a PolyAsset from the thumbnail as an argument. The method then imports the asset in the same way as in the previous recipe, except that it does not recenter the object’s centroid—this would have the effect that the chair’s center would be sitting in line with the surface rather than with its legs.
The ImportAssetCallback handles some errors and then assigns the imported GameObject to the polyObject property and deactivates it so that it is no longer visible; it will be activated later when the user taps the screen. The method also sets the Text UI to display the name of the Poly object and its author.
PlacePolyObject is invoked when the user taps the screen to place an object in the AR scene. The world position is retrieved from the TrackableHit argument and assigned to the imported polyObject that is then activated in the scene.
Create a new C# script called
PolyScrollViewController, add it to theScrollViewGameObject, and update it to look like Listing 8.5.
The PolyScrollViewController is responsible for creating the thumbnails from the loaded PolyAsset List and then populating them in the Scroll View. It has two public properties that need to be connected in the Editor: thumbItemPrefab and horizontalLayout.
Listing 8.5 PolyScrollViewController Script
using System.Collections.Generic;
using UnityEngine;
using PolyToolkit;

public class PolyScrollViewController : MonoBehaviour {

    public GameObject thumbItemPrefab;
    public GameObject horizontalLayout;

    public void LoadPolyThumbs (List<PolyAsset> assets){
        foreach (PolyAsset asset in assets) {
            GameObject thumbItem = Instantiate(thumbItemPrefab);
            thumbItem.transform.parent = horizontalLayout.transform;
            ThumbItemController thumbController =
                thumbItem.GetComponent<ThumbItemController> ();
            thumbController.LoadThumb (asset);
        }
    }
}
The LoadPolyThumb method is called from the PolyImportManager and receives the PolyAsset List as an argument. The assets are iterated over in a for loop, each one instantiating a new thumbItemPrefab. The instantiated ThumbItems are added to the Scroll View by setting their transform’s parent property to the horizontalLayout’s transform. The ThumbItemController component is accessed on each and the LoadThumb method is invoked, passing in the Poly Asset as a parameter.
Create a new script called
ThumbItemController, add it to theThumbItemprefab, and update it to look like Listing 8.6.Listing 8.6
ThumbItemControllerScript
using UnityEngine;
using PolyToolkit;
using UnityEngine.UI;
using UnityEngine.EventSystems;

public class ThumbItemController : MonoBehaviour, IPointerClickHandler {

    private Image thumbImage;
    private PolyAsset polyAsset;

    void Start () {
        thumbImage = GetComponent<Image> ();
    }

    public void LoadThumb(PolyAsset asset){
        PolyApi.FetchThumbnail(asset, FetchThumbnailComplete);
    }

    void FetchThumbnailComplete(PolyAsset asset, PolyStatus status) {
        if (!status.ok) {
            // Handle error;
            return;
        }
        polyAsset = asset;
        Texture2D tex = polyAsset.thumbnailTexture;
        Sprite sprite = Sprite.Create(tex, new Rect(0.0f, 0.0f,
            tex.width, tex.height), new Vector2(0.5f, 0.5f), 100.0f);
        thumbImage.sprite = sprite;
    }

    public void OnPointerClick(PointerEventData pointerEventData)
    {
        PolyImportManager.instance.UpdatePolyAsset (polyAsset);
    }
}
The ThumbItemController loads in and displays a thumbnail from the Poly API. It also handles the user’s interaction with the thumbnail through the IPointerClickHandler interface.
The LoadThumb method calls the PolyAPI’s FetchThumbnail query, passing in the PolyAsset and a completion handler. FetchThumbnail is a helpful method that handles the network request and the loading of the thumbnail.
FetchThumbnailComplete creates a sprite out of the PolyAsset’s thumbnailTexture and assigns it to the Sprite property on the thumbnail’s Image component.
OnPointerClick is an implementation of the IPointerClickHandler interface to handle the user’s tap on the thumbnail. An EventTrigger cannot be used here as it would block any swipe events from reaching the Scroll View.
Create a new C# script called
SurfaceDetectionController, add it to theScriptsGameObject, and update it to look like Listing 8.7.Listing 8.7
SurfaceDetectionControllerScript
using System.Collections.Generic;
using GoogleARCore;
using UnityEngine;
using UnityEngine.Rendering;
using GoogleARCore.Examples.Common;

public class SurfaceDetectionController : MonoBehaviour {

    public GameObject TrackedPlanePrefab;
    public GameObject SearchingForPlaneUI;

    private List<DetectedPlane> newPlanes = new List<DetectedPlane>();
    private bool m_IsQuitting = false;

    // The height of the UI scrollView and status text
    private const float uiHeight = 460f;

    public void Update() {
        if (Session.Status != SessionStatus.Tracking) {
            const int lostTrackingSleepTimeout = 15;
            Screen.sleepTimeout = lostTrackingSleepTimeout;
            return;
        }

        Screen.sleepTimeout = SleepTimeout.NeverSleep;

        Session.GetTrackables<DetectedPlane>(newPlanes, TrackableQueryFilter.New);
        for (int i = 0; i < newPlanes.Count; i++) {
            GameObject planeObject = Instantiate(TrackedPlanePrefab,
                Vector3.zero,
                Quaternion.identity,
                transform);
            planeObject.GetComponent<DetectedPlaneVisualizer>()
                .Initialize(newPlanes[i]);
        }

        Touch touch;
        if (Input.touchCount < 1 || (touch = Input.GetTouch(0)).phase
                != TouchPhase.Began) {
            return;
        }

        TrackableHit hit;
        TrackableHitFlags raycastFilter =
                TrackableHitFlags.PlaneWithinBounds |
                TrackableHitFlags.PlaneWithinPolygon;

        if (Frame.Raycast(touch.position.x,
            touch.position.y,
            raycastFilter,
            out hit)) {
            // If the touch is on a plane and not on the UI
            if (PolyImportManager.instance.polyObject != null &&
                    touch.position.y > uiHeight) {
                HidePlanes ();
                // Place the Poly object
                PolyImportManager.instance.PlacePolyObject (hit);
            }
        }
    }

    private void HidePlanes() {
        GameObject[] planes = GameObject.
                FindGameObjectsWithTag("TrackedPlaneViz");
        foreach (GameObject plane in planes) {
            plane.SetActive(false);
        }
    }
}
The SurfaceDetectionController script handles the surface detection and the placing of the planes on the tracked surfaces. It is similar to the previous recipe; the main difference in this class is the Session.Raycast condition. If there is a valid (non-null) polyObject, meaning that it is loaded and assigned, and the user is tapping above the Scroll View UI’s y position, then the tracked planes are deactivated and the PlacePolyObject method is called in the PolyImportManager, passing the hit response from the Raycast as a parameter.
Hook up all the public properties of the scripts in the Editor. The
PolyScrollView Controllerneeds theThumbItemprefab linked from the Project window and thehorizontalLayoutfrom the scene hierarchy (see Figure 8.20).
Figure 8.20 The PolyScrollViewControllerscript.
The PolyImportManager has two public properties that need to be connected to GameObjects in the scene: SearchingText and the PolyScrollViewController (see Figure 8.21).
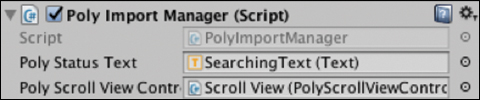
PolyImportManager script.Hook up
SurfaceDetectionController’sthree public properties that need it: the first person camera (ARCore Device > First Person Camera); theDetectedPlane Visualizer(from the Project window: GoogleARCore/Examples/Common/Prefabs), and the SearchingText UI in the Canvas (see Figure 8.22).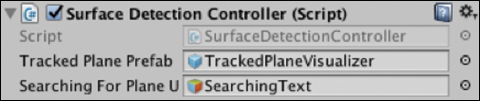
Figure 8.22 The SurfaceDetectionControllerscript.Build and Run to test out the app.
Summary
This chapter worked through the process of building two different types of AR applications: a drawing app and a catalogue-style shopping app. These two examples introduced numerous important ARCore and Unity-related concepts and techniques:
Consideration and the importance of solving user-driven problems with AR.
Using the Unity
LineRendererand ARCore to create an AR drawing app.Integrating the Poly Toolkit with Unity and ARCore to dynamically load 3D models for placement in an AR scene.
Using the Unity
Scroll Viewcomponent to dynamically load in thumbnails as 2D overlay UI for an AR app.Building a complete catalogue-style AR app that integrated dynamic loading of 3D models, server requests, and complex UI.