
Chapter 6
Physics Games
Having established the underpinnings of development in Daydream and Unity, you are now positioned to tackle games in the Unity engine, harnessing its powerful physics simulator to create magnificent 3D experiences. This chapter focuses on Unity’s physics engine, including several essential game mechanics and culminating in the creation of two finished mini-games: a pancake flipping game and an alien shooting game.
Physics, Games, Daydream, and Unity
At the heart of the Unity game engine is its powerful physics simulator that brings 3D games to life. This chapter introduces techniques of game development using Unity’s physics engine through a series of game mechanics and mini games.
To build fun games that people actually want to play, you must understand how games work and what their constituent elements are. Game design theory often breaks games down into four conceptually grouped areas that most games have in common. When combined, these groupings differentiate games from other forms of media and entertainment. The elements of these groups are:
Game Mechanic: A game mechanic is the system that provides the game play. It involves the interaction, rules, logic, and all the things that the player must do in the game. The game mechanic is the distinguishing feature that separates a game from a film or video.
Narrative: All great games have a story even if it is subtle or unclear at first. Narratives are important as they help to give the player a context and a sense of why they are playing the game. It also helps to immerse the player in the game. Great game narrative should be embedded in the other three aspects, not just tacked on at the ends.
Aesthetics: This is how the game looks. It includes the design and style of the art work and all the assets that make up the game.
Technology: This constitutes the platform that the game is played on. For Daydream it is the Daydream headset, but it could be a mobile phone, a game console, or a pack of cards.
Although all four of these elements are of equal importance, the focus of this book is on creating the mechanics of games and apps. As a game designer, building a deep understanding of these surrounding categories and how they work together to create original and compelling games is important.
Unity Physics
Implementing Unity’s physics engine is a relatively simple undertaking, requiring two components to be attached to a GameObject: a Rigidbody and a Collider. The Rigidbody component forces a GameObject’s movement to be controlled by the physics simulation. The Collider component causes a GameObject to react to collisions from other GameObjects in the simulation.
Rigidbody Component
The Rigidbody component (see Figure 6.1) adds physics to a GameObject. When the component is added to a GameObject, its movement is tied to Unity’s Physics simulation.

A Rigidbody component is added to a GameObject in the same way as any other component. Select the GameObject, and in the Inspector, click Add Component, search for Rigidbody and double-click to add it. The GameObject will now obey the laws of physics. Be careful not to confuse the Rigidbody component with the Rigidbody2D component that is used for 2D games.
To control the movement of a Rigidbody-enabled GameObject with code, set the IsKinematic Boolean to true. Other objects in the simulation will still be able to collide with the GameObject but will have no effect on its movement. If you need to move a Rigidbody without IsKinematic being enabled, move it by applying forces to the Rigidbody, as opposed to updating its position property.
These are the adjustable properties of the Rigidbody component:
Mass: The mass of the object.
Drag: The air resistance applied to the object; 0 is none, and higher numbers slow down the object’s movement.
Angular Drag: The air resistance applied to the rotation.
Use Gravity: Toggle whether the object should be affected by the force of gravity.
Is Kinematic: If set to true, any forces or collisions from the physics simulation will have no effect on the object. Useful for controlling the object programmatically.
Interpolate: Smooths the movement of the GameObject by interpolating, or animating, between frames. Use this if the movement of the Rigidbody is jerky.
Collision Detection: This is used for fast-moving objects that pass through the Rigidbody without triggering a collision. Switch the fast-moving object to Continuous Dynamic and the other objects to Continuous. Be aware that this process has a heavy performance hit, so for optimization leaving it as Discrete is best.
Constraints: Constraints freeze the movement of the object on the selected axis, for translation and rotation.
Colliders
The Collider component is required if a GameObject is to be affected by collisions with other Rigidbodies in the physics simulation. Several different types of colliders are available; choose one that best fits the shape of the associated GameObject.
For performance optimization purposes, it is recommended that you do not use a Mesh Collider. Performance-wise, building out the shape of the GameObject with multiple smaller Box, Sphere, and Capsule Colliders is better than using a Mesh Collider. The four different types of colliders are:
Box Collider
Sphere Collider
Capsule Collider
Mesh Collider
The Box Collider is shown in Figure 6.2. The properties are similar for the other variants of colliders.

These are the adjustable properties of the Box Collider component:
Is Trigger: Sometimes it is useful for a GameObject not be controlled by the simulation but to still be able to trigger collision events. Is Trigger means the object can still detect collisions but bypasses the physics engine.
Material: This links to a Physics Material. A Physics Material handles granular control over the friction and bounce of a collision.
Center Point: This is the center point of the collider. Use this to move the collider in relation to the GameObject.
Size: Scales the collider to fit the GameObject.
Handling Collision Events
Collision events between GameObjects require both GameObjects to have a Collider component attached. Collision events are handled from a Monobehaviour script using the OnCollisionEnter() method.
Useful information can be extracted from the Collision event about the opposing GameObject passed through as an argument from the OnCollisionEnter() method. For example, if you implement the OnCollisionEnter in a MonoBehaviour attached to an enemy GameObject, you can access the GameObject that collided with it, say a bullet, and destroy the bullet (and the enemy), as you can see in this snippet of code:
public void OnCollisionEnter(Collision collision)
{
   GameObject bulletGameObject = collision.gameObject;
   Destroy(bulletGameObject);
}
Fixed Update
FixedUpdate() is a public function of the MonoBehaviour class. Unlike Update(), FixedUpdate() is the best place to do any physics-related calculations because it is called at fixed intervals. Programmatic updates to RigidBodies should be done in the FixedUpdate() function.
This snippet of code shows the correct way to update the position and rotation of a Rigidbody inside the FixedUpdate() method. It uses the Rigidbody’s MoveRotation() and MovePosition() functions.
void FixedUpdate() {
        myRigidBody.MoveRotation(GvrController.Orientation);
        myRigidBody.MovePosition(someVector3);
}
Profiling
Unity’s Profiler (see Figure 6.3) allows game developers to analyze and pinpoint performance bottlenecks in a game. By default, the Profiler analyzes possible performance inefficiencies from various sources such as the CPU, memory, rendering, and physics simulations.
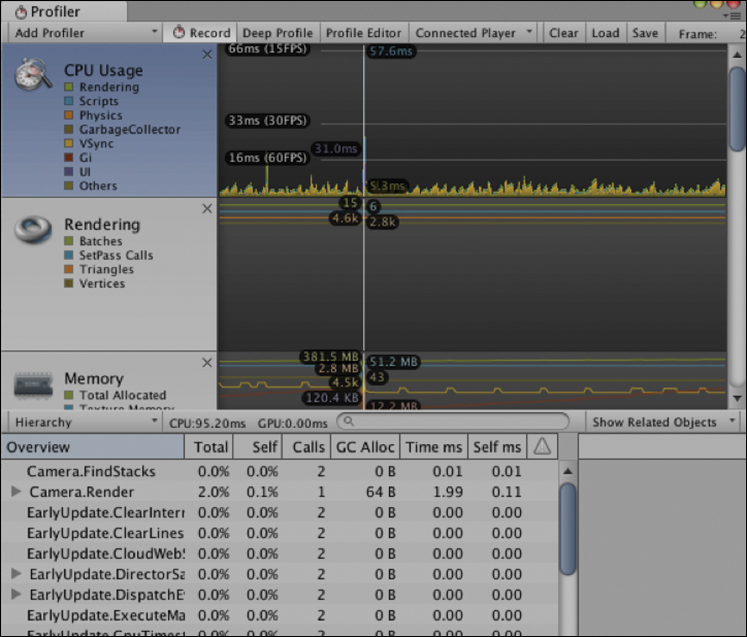
Optimization and profiling is covered in depth later in the book, but it is a good idea to acquaint yourself with the Profiling tool and to be thinking about profiling and optimization not as an afterthought, but as a crucial step in the game development process.
To use the Profiler, open it by choosing Window > Profiler. To record profile information, play the scene in the Editor and navigate to the section of the scene you want to test (or just let it run for a few seconds to test it out). Press pause on the game, go back to the Profiler window and observe the graphs of the various profiles.
Select CPU Usage to see more information in the Overview tab at the bottom of the screen. The Overview shows a percentage snapshot of how much CPU is being used by each process in the game. Clicking on the graph next to CPU Usage gives data for that particular frame in the Overview tab. The numbers shown on the frame line in the graph refer to the time it took for each process to execute during that frame.
Building the Games
The games in this section introduce Unity’s physics engine through some fun and essential game mechanics. You will be building a pancake flipper, several weapon mechanics, and a whack-a-mole duck shoot-style game (but with aliens).
Note
The recipes in this chapter start to pick up the pace somewhat as they are building on assumed knowledge from the previous chapters. If you are having problems with the basics, or are starting to feel slightly lost, I suggest making sure that you have gone through the previous chapters and are comfortable with them.
Recipe 6.1: Intro to Physics—Flipping Pancakes
One of the early demos released with Daydream and the GvrSDK was a whimsical pancake flipping game. It received a lot of attention at Google IO 2016; for some reason people delighted in the silliness of flipping pancakes in VR.
The pancake flipping demo is no longer included with the SDK. In light of this fact, and to make sure the pancake flipper lives on, I’ve decided to bring it back in this recipe!
This version of the pancake flipper is a race against the clock to see how many pancakes the player can flip and place on the bench in 30 seconds. When the player clicks the controller’s click button the countdown starts and a pancake drops from above the pan. When a pancake collides with the frying pan, the direction it is facing is tested to see whether it has been flipped. If it is facing in the down direction, a Boolean is set to true, recording that it has been flipped. When it is placed on the bench this Boolean is checked and the scoreboard increases by one, accordingly.
The recipe starts from the standard Daydream-ready scene you created in Chapter 2, “Daydream and Unity.” Open Recipe_6.1_Start and follow these steps:
Switch off the controller visual and the laser in Player >
GvrControllerPointer. Simply select theLaserGameObject, uncheck the box next to its name in the Inspector, and repeat this step for theControllerVisualGameObject. The focus will be on the frying pan.Create an empty GameObject and call it
FryingPan. In this chapter’s project files you can find a model of a frying pan (Assets/Chapter06/Recipe_6.1_flippingPancakes/Models). Drag this frying pan model into theFryingPanGameObject and set its position to (0, 0, 0.102). Place theFryingPanGameObject’s position to (0, 1, 0.402), or a natural distance in front of the camera for a frying pan to be held.Select the
FryingPanGameObject and add a Rigidbody component to it in the Inspector. Update the properties to look like Figure 6.4.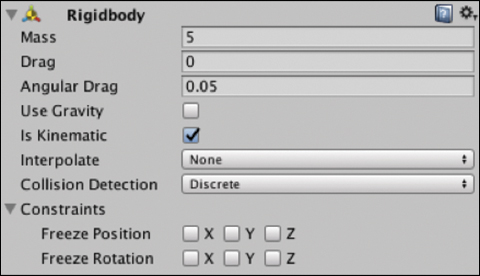
Figure 6.4 The frying pan’s Rigidbody component. Add a Box Collider to the
FryingPanGameObject. Adjust its center and position to cover the base of the pan area, so the pancakes will feel like they’re colliding against the pan and can fall off the edges; see Figure 6.5.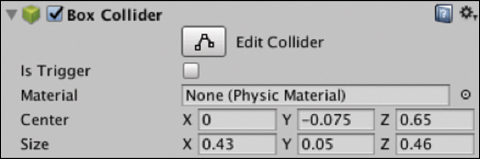
Figure 6.5 The frying pan’s Box Collider component. Create a new C# script called
FryingPanControllerand add it to theFryingPanGameObject. Update it to look like Listing 6.1.Listing 6.1
FryingPanControllerScript
using UnityEngine;

public class FryingPanController : MonoBehaviour {

    private Rigidbody fryingPanRigidbody;

    void Start () {
        fryingPanRigidbody = GetComponent<Rigidbody> ();
    }

    void FixedUpdate() {
        fryingPanRigidbody.MoveRotation(GvrController.Orientation);
    }
}
The sole purpose of the
FryingPanControllerclass is to update the rotation of the frying pan based on the rotation of the controller. It is important to notice this rotation happens in theFixedUpdate()method because it is adjusting a Rigidbody. If you run the app now, the frying pan should move around to the rotation of the controller.Create an empty GameObject called
Scripts, and then create a new C# script calledPancakeManagerand add it toScripts. UpdatePancakeManagerto look like Listing 6.2.Listing 6.2
PancakeManagerScript
using System.Collections;
using System.Collections.Generic;
using UnityEngine;

public class PancakeManager : MonoBehaviour {

    public GameObject pancakePrefab;
    public Transform pancakeDispensePos;
    public PancakeScoreBoardController scoreboard;

    private bool inGame;
    private List<GameObject> pancakes;

    void Start () {
        inGame = false;
        pancakes = new List<GameObject> ();
    }

    void Update () {
        if (GvrController.ClickButtonDown && inGame) {
            AddPancake ();
        } else if (GvrController.ClickButtonDown && !inGame) {
            Startgame ();
            AddPancake ();
        }
    }

    private void AddPancake(){
        GameObject pancake = Instantiate (pancakePrefab);
        pancake.transform.position = pancakeDispensePos.position;
        pancakes.Add (pancake);
    }

    public void Startgame(){
        inGame = true;
        scoreboard.StartGame ();
    }

    public void GameOver(){
        inGame = false;
        foreach(GameObject pancake in pancakes)
        {
            Destroy(pancake);
        }
    }
}
The
PancakeManager’s main role is to keep track of the pancakes in the scene, add them to the scene, and clean them up on game over.Most of the action happens in the
Update()method. If you are currently in the game and press the click button theAddPancake()method executes. If you are not currently in a game and press the click button, a game starts andAddPancake()executes.The
AddPancake()method instantiates a newpancakePrefabGameObject, sets its position to just above the frying pan, and adds the pancake to thepancakeslist.The
StartGame()method kicks off the game by setting theinGameBoolean to true and notifying the scoreboard to start the game.The
GameOver()method sets theinGameBoolean to false and cleans up the scene by cycling through the added pancakes and destroying them.Set up the pancake. In the sample files you can find a prefab with a pancake model in it (Recipe_6.1_flippingPancakes/prefabs). Feel free to use this one or create your own. Leave the pancake in the Project window; it will be linked from there and instantiated programmatically. Select the Pancake prefab in the Project window, add a Rigidbody and a Box Collider to it in the Inspector, and resize the Box Collider so that it fits around the shape of the pancake. See Figure 6.6.
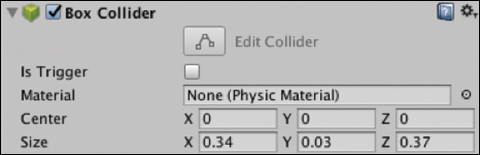
Figure 6.6 The pancake’s Box Collider component. Update the pancake’s Rigidbody to have the same values as shown in Figure 6.7.
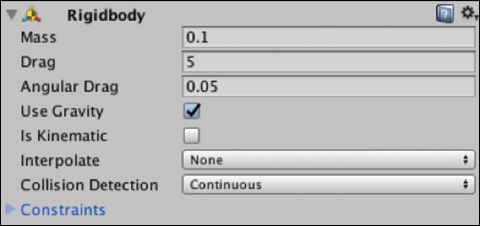
Figure 6.7 The pancake’s Rigidbody component. Create a new C# script and call it
PancakeFlipped, add it to the Pancake prefab, and update it to look like Listing 6.3.Listing 6.3
PancakeFlippedScript
using UnityEngine;

public class PancakeFlipped : MonoBehaviour {

    public bool hasFlipped;

    void Start () {
        hasFlipped = false;
    }

    void OnCollisionEnter(Collision collision) {
        if (collision.gameObject.tag == "FryingPanTag") {
            bool topBottom = false;
            Vector3 projectedUp = Vector3.Project (transform.up, Vector3.up);
            hasFlipped = projectedUp.y < 0;
        }
    }
}
The
PancakeFlippedscript detects a collision and checks whether it was with the frying pan GameObject. If there was a collision with the frying pan, theVector3.Projectmethod is used to see whether the pancake is upside down by testing if the output direction is less than zero. If it is, then the pancake has been flipped and the result is saved in a Boolean to access later when scoring.Create a table top to place the pancakes on after they have been flipped. To keep it simple, just add a cube next to the location of
Playerand scale it to have the shape of a table that comes up to about waist height. Position it next to thePlayerand frying pan so that the pancakes can easily be dumped onto its surface. See Figure 6.8.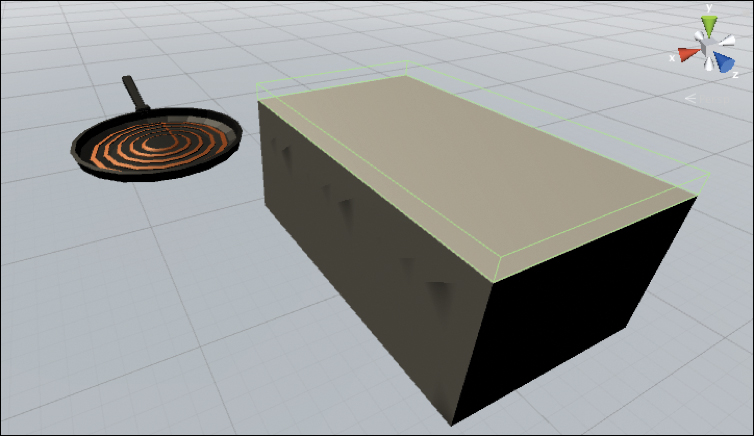
Figure 6.8 The pancake flipping game scene. Create another cube on top of the table and scale it to cover the surface of the table. Rename it
TableCollider; this will be used as the collision trigger when pancakes have landed on the table. Make sure to scale it down on the y axis so it is quite thin. In the Inspector disable theMeshRendererso that it is invisible and check the Is Trigger option in the Box Collider. Your cube should look like that shown in Figure 6.8.Create a new C# script called
TableCollisionController, add it to theTableColliderGameObject, and update it to look like Listing 6.4.Listing 6.4
TableCollisionControllerScript
using UnityEngine;

public class TableCollisionController : MonoBehaviour {

    public PancakeScoreBoardController scoreboard;

    void OnTriggerEnter(Collider collider) {
        if (collider.gameObject.tag == "PancakeTag") {
            PancakeFlipped flipped = collider.gameObject.GetComponent <PancakeFlipped> ();
            if (flipped.hasFlipped) {
                scoreboard.PancakeFlipped ();
            }
        }
    }
}
The
TableCollisionControllerimplementsMonoBehaviour’sOnTriggerEnter()method. Using thePancakeTagit checks to see whether a pancake has entered the collider on top of the table, and then checks the pancake’shasFlippedBoolean. If the pancake has been flipped before reaching the table, then a method on the scoreboard is called, incrementing the pancake flipped tally by one.Create the scoreboard, which is made up of a Canvas in World Space with two UI Text objects added. It follows the same pattern for creating UI, using dmms, as described in Chapter 4, “Building UI in VR.” Start off by creating an empty GameObject, call it
Scoreboard, position it at (0, 1.5, 4), and scale it up to (4, 4, 4). The UI has been moved back 4 meters from the camera, so it needs to be scaled up by four times to conform to the rule of dmms (see Chapter 4).Inside the
ScoreboardGameObject add a Canvas and set its Render mode to World Space.Add a
GvrPointerGraphicsRaycastercomponent to the Canvas and switch off the default raycaster.Set the Canvas size to width: 1200 and height: 800, and scale it down to (0.001, 0.001, 0.001).
Add two UI Text objects to the Canvas and call one
TimeTextand the otherPancakeText. Scale and position them so they are legible and neat.Create a new C# script called
PancakeScoreBoardController, add it to theScoreboardGameObject, and update it look like Listing 6.5.Listing 6.5
PancakeScoreboardControllerScript
using UnityEngine;
using UnityEngine.UI;

public class PancakeScoreBoardController : MonoBehaviour {

    public Text timerText;
    public Text numPancakesText;
    public PancakeManager pancakeManager;

    private float timeLeft;
    private bool inGame;
    private int numPancakes;

    void Start () {
        inGame = false;
        numPancakes = 0;
    }

    void Update () {
        if (inGame) {
            timeLeft -= Time.deltaTime;
            timerText.text = "Time: " + (int)timeLeft;
            if (timeLeft <= 0) {
                GameOver ();
            }
        }
    }

    public void StartGame() {
        inGame = true;
        timeLeft = 30f;
        numPancakes = 0;
        numPancakesText.text = "Flipped Pancakes: " + numPancakes;
    }

    public void GameOver() {
        inGame = false;
        timerText.text = "Game Over";
        pancakeManager.GameOver ();
    }

    public void PancakeFlipped (){
        ++numPancakes;
        numPancakesText.text = "Flipped Pancakes: " + numPancakes;
    }
}
The
PancakeScoreboardControllerkeeps a track of the time left in the game and how many pancakes have been flipped, and updates the UI with the results.The
Update()function checks to see whether the game has started with theinGameBoolean. If a game is currently under way it subtracts theDeltaTimesince the last frame from the total time left, updates the UI with the new time, and then checks to see whether the time left is less than or equal to zero. If it is, then theGameOver()function is triggered.The
StartGame()method is called from thePancakeManagerwhen the user clicks the controller. It kicks off the game by resetting the time and score and setting theinGameBoolean to true.The
GameOver()method is called when the timer has run out. It switches theinGameBoolean back to false, updates the UI Text, and executesGameOver()in thePancakeManager.The
PancakeFlipped()method is called from theTableCollisionControllerwhen a pancake has successfully been flipped and landed on the table top. It increments the pancake tally and updates the pancake score UI accordingly.The pancakes need to appear from a point above the frying pan when the user clicks the controller’s button. Create a small sphere, scale it (0.2, 0.2, 0.2), place it about half a meter above the frying pan, and rename it
PancakeDropPoint. If you are following along, that position would be (0, 1.6, 1.05). Disable the sphere’s Mesh Renderer and Sphere Collider so that the sphere can’t be seen and won’t interfere with the movement of the pancakes. The position of this sphere will be used as a reference for the starting position of the pancakes when they are instantiated.Hook up all the GameObjects to the public fields in the Inspector. Select the
ScriptsGameObject, and into thePancakeManager’s empty fields, drag the Pancake prefab from the Project window, thePancakeDropPointfrom the previous step, and theScoreboardGameObject.Select the
ScoreBoardGameObject. In thePancakeScoreBoardController, drag the UI Text elements,TimeTextandPancakesText, and theScriptsGameObject into thePancakeManagerslot.Select the
TableColliderGameObject, and drag theScoreboardGameObject into theTableCollisionController’s Scoreboard field.Build and Run the scene on your headset. When the controller is clicked it kicks off the game by dropping a fresh pancake on the frying pan. The goal is to try to flip as many pancakes as you can, and then place them on the table in 30 seconds. If the player clicks the button multiple times he can drop stacks of pancakes, although controlling the flip then becomes harder.
Recipe 6.2: Building a Pop Gun Mechanic
There’s no escaping the fact that knowing how to build weapons is essential to building video games. Because I swing more toward the pacifist side of the gun spectrum, the gun mechanic in this recipe resembles something more akin to a silly pop gun than anything that could be used on a battle field.
Voxel
Voxel stands for volumetric pixel and refers to a pixel that occupies a cubic volume of space, not just a flat 2D surface. It is a style that has become fashionable in recent years because of its nostalgic, minimal aesthetic and the simplicity of its creation. A good example of the voxel style is the game Minecraft.
The pop gun is essentially a model of a gun with a script that instantiates a projectile bullet. It then applies a force to the velocity of the bullet, shooting it forward. This recipe starts with the standard Daydream-ready scene. Open recipe_6.1_Start and follow these steps:
The example files come with a basic Gun prefab to use in this recipe (Assets/SharedAssets/SharedPrefabs/Weapons). It is extremely basic and modelled in Unity from a series of cubes. Feel free to import something fancier. Drag the Gun prefab from the Project window into the
Player’sGvrControllerPointerGameObject and position it at around the same location as theControllerVisual. It should look like Figure 6.9.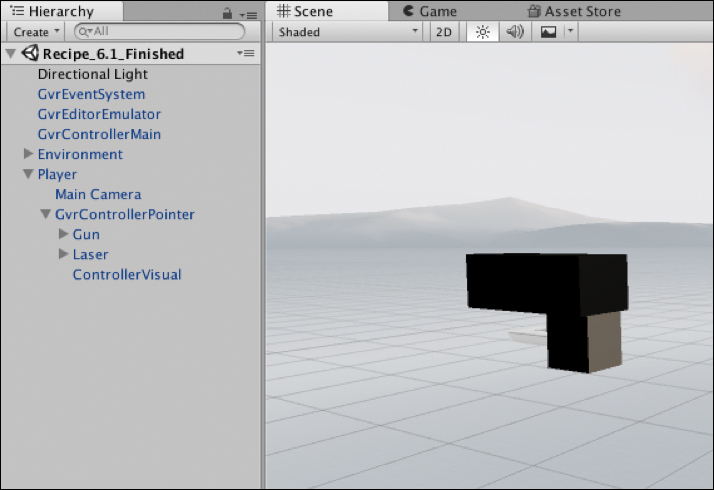
Figure 6.9 The gun mechanic’s Hierarchy and Scene windows. With the
GvrControllerPointerselected, switch off the laser and the ‘ControllerVisualby selecting them and in the Inspector, uncheck the box next to their name. This deactivates them.Create a new C# script and call it
BulletController, attach it to the gun, and update it to look like Listing 6.6.Listing 6.6
BulletControllerScript
using UnityEngine;

public class BulletController : MonoBehaviour {

    public GameObject bullet;

    void Update () {
        if (GvrController.ClickButtonDown) {
            Vector3 bulletPos = gameObject.transform.position;
            bulletPos += gameObject.transform.forward * 0.13f;
            GameObject bulletParticle = Instantiate(bullet, bulletPos, Quaternion.identity);
            Rigidbody rb = bulletParticle.GetComponent<Rigidbody>();
            rb.AddForce(gameObject.transform.forward * 400f);
            Destroy(bulletParticle, 3f);
        }
    }
}
The
BulletControllerhas a public reference to the Bullet prefab. It shoots the bullet when the player presses down on the Controller’s click button. In theUpdate()method when the user clicks the button, thebulletPositionis set to the current position of the gun, and then moved forward to the tip of the muzzle. The bullet is instantiated at this location. Its Rigidbody is retrieved and a force is added in the forward direction with a large multiplier, shooting it off. The bullet is then destroyed several seconds later.In the same folder as the Gun prefab is a voxel Bullet prefab. It is essentially just a cube scaled down with a
Rigidbodyattached. Drag the Bullet prefab from the Project window into the empty bullet field in theBulletController.Build and Run the scene and shoot the gun by clicking the controller’s click button.
Recipe 6.3: Building a Grenade Mechanic
The grenade, or bomb, mechanic is slightly trickier than the gun mechanic. It has two main parts. First, the player is required to throw the bomb; a short time later it then explodes via an explosive force affecting any GameObjects (with colliders) within the force’s radius.
Continue on from the previous pop gun recipe or open Recipe_6.3_start and follow these steps to build out the grenade mechanic:
Deactivate the gun (it won’t be needed until the next recipe where the weapons are brought together) by selecting it in the Hierarchy window (choose Player > GvrControllerPointer > Gun) and unchecking the box in the Inspector next to its name.
With the
GvrControllerPointerselected, deactivate the laser and theControllerVisualby selecting them and in the Inspector and unchecking the boxes next to their names.Add the Bomb prefab GameObject (Assets/SharedAssets/SharedPrefabs/Weapons) as a child of the
Player’sGvrControllerPointerin the same way as the gun in the previous recipe. It contains a mesh of a bomb that will be used for throwing.The Bomb prefab already has a Rigidbody attached, but make sure Use Gravity is unchecked so it doesn’t drop off before it is thrown, and deactivate its Box Collider. This bomb will not actually be thrown; it stays connected to and moves with the controller. Another bomb GameObject will be instantiated and thrown when the click button is released.
Create a new C# script, name it
BombController, and add it to theBombGameObject. Update it to look like Listing 6.7.Listing 6.7
BombControllerScript
using UnityEngine;

public class BombController : MonoBehaviour {

    public Material transparentMat;
    public Material bombMat;
    public GameObject bombPrefab;

    private MeshRenderer rend;
    private Vector3 throwVelocity;
    private Vector3 previousPosition;

    void Start () {
        rend = gameObject.GetComponentInChildren<MeshRenderer> ();
        rend.material = transparentMat;
    }

    void Update () {
        if (GvrController.ClickButtonDown) {
            rend.material = bombMat;
        } else if (GvrController.ClickButtonUp) {
            rend.material = transparentMat;
            Vector3 bombPos = gameObject.transform.position;
            GameObject bombParticle = Instantiate(bombPrefab, bombPos, Quaternion.identity);
            Rigidbody rb = bombParticle.GetComponent<Rigidbody>();
            rb.AddForce(throwVelocity, ForceMode.VelocityChange);
            BombExplosion explosion = bombParticle.GetComponent <BombExplosion>();
            explosion.Detonate ();
        }

        if (GvrController.ClickButton) {
            Vector3 currentVelocity = (transform.position - previousPosition) / Time.deltaTime;
            const int samples = 3;
            throwVelocity = throwVelocity * (samples - 1) / samples + currentVelocity / samples;
            previousPosition = transform.position;
        }
    }
}
The
BombControllerscript handles the throwing of the bomb. The bomb, which is locked to the controller, is transparent before it is being thrown. When the user initiates a throw by clicking the button down, an opaque material is added to the bomb and the velocity of the controller’s movement is recorded over time. When the button is released, a new bomb is placed in the location of the controller-locked bomb and a force is applied to its Rigidbody, throwing it away. ADetonatemethod is called on the thrown bomb, and the controller-locked bomb’s material is set back to transparent, ready for the button to be clicked again.This chapter’s accompanying Unity project has a transparent and standard material for use with the bomb (Assets/Chapter06/SharedAssets/SharedPrefabs/Weapons/Materials). Drag the BombTransparentMat, the BombMat, and the Bomb prefab from the Project window into the
BombControllerscript’s public fields. It should look like Figure 6.10.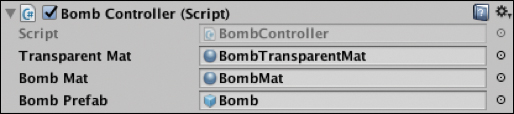
Figure 6.10 The BombControllerscript.Create a new script called
BombExplosionand add it to the bomb. Update it to look like Listing 6.8.Listing 6.8
BombExplosionScript
using UnityEngine;

public class BombExplosion : MonoBehaviour {

    public void Detonate (){
        Invoke ("ExplodeBomb", 1.5f);
    }

    private void ExplodeBomb()
    {
        float radius = 7.0F;
        float power = 500.0F;

        Vector3 explosionPos = gameObject.transform.position;
        Collider[] colliders = Physics.OverlapSphere (explosionPos, radius);
        foreach (Collider hit in colliders) {
            Rigidbody rb = hit.GetComponent<Rigidbody> ();

            if (rb != null) {
                rb.AddExplosionForce (power, explosionPos, 100f, 20.0F);
            }
        }
        Destroy(gameObject);
    }
}
The
BombExplosionscript is called from theBombControllerscript after the bomb is thrown. TheDetonate()method invokes theExplodeBomb()method 1.5 seconds after it is triggered.The
ExplodeBomb()method uses thePhysics.OverlapShere()method to retrieve all the colliders that are within a radius from the position of the explosion. Aforeachloop is then used to cycle through each of the colliders, the Rigidbody associated with the collider is accessed, and an explosion force is added to it.AddExplosionForcetakes power, position, radius, and upward modifier parameters. The upward modifier describes how much the explosion should lift the objects off the ground.Connect the
BombExplosionto theBombControllerby selecting the bomb in the hierarchy and in the Inspector drag theBombExplosionscript directly into the empty field in theBombControllerscript. The explosion will now be triggered after the user throws the bomb.Build and Run the scene; the grenade can be thrown, but nothing happens. You need to add some GameObjects to the scene that can be affected by the force. Create some cubes with Rigidbodies attached and place them around the scene in the path of the grenade, and then test out the explosion effect.
Recipe 6.4: Weapon Selector
This recipe creates a simple system for switching between weapons by clicking on the Controller’s AppButton. The recipe starts off where the preceding recipe ended. Open Recipe_6.4_Start and follow these steps:
Create a new script called
WeaponSelectorand attach it to theGvrControllerPointer. Update it to look like Listing 6.9.Listing 6.9
WeaponSelectorScript
using UnityEngine;

public class WeaponSelector : MonoBehaviour {

    enum Weapon {GUN, BOMB};

    public GameObject gun;
    public GameObject bomb;

    private Weapon currentWeapon;

    void Start () {
        currentWeapon = Weapon.GUN;
        gun.SetActive (true);
        bomb.SetActive (false);
    }

    void Update () {
        if (GvrController.AppButtonDown) {
            if (currentWeapon == Weapon.GUN) {
                gun.SetActive (false);
                bomb.SetActive (true);
                currentWeapon = Weapon.BOMB;
            } else if (currentWeapon == Weapon.BOMB) {
                gun.SetActive (true);
                bomb.SetActive (false);
                currentWeapon = Weapon.GUN;
            }
        }
    }
}
The
WeaponSelectorscript has anenumwith a set of weapon types, public references to the weapons in the scene, and acurrentWeaponproperty. TheStart()method sets thecurrentWeaponto the gun, shows the gun, and hides the other weapons.The
Update()method listens for anAppButtonDownevent. When it happens, it checks the current weapon and hides it, shows the other weapon, and then sets thecurrentWeaponto this new weapon.Select the
GvrPointerControllerand drag the two weapons from the hierarchy into theWeaponSelectorscript. It should look like Figure 6.11.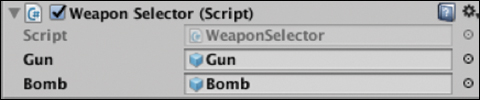
Figure 6.11 The WeaponSelectorscript.
Building an Alien Shooter Game
The rest of the chapter uses the pop gun created previously in a whack-a-mole shooting-style minigame. The game involves aliens appearing on cylindrical plinths and the user must shoot them down before they escape up to the mother ship.
DoTween
This book uses the DoTween animation tweening library. Tweening libraries are code libraries that make it easy to do standard translation, scale, and rotation animations, programmatically. The word tween comes from traditional animation where the “in between” artists are the animators who draw the frames in between the key frames. DoTween is available for free from the Unity Asset Store and distributed under the MIT license. I have already added it to the sample projects for you to use in the recipes.
Recipe 6.5: Building the Core Mechanic
This recipe builds the cornerstone of the game. It starts off with one enemy alien appearing and disappearing, and then builds up to multiple aliens all coordinated via a game manager.
In the game, each alien has an attached controller script that contains all the logic for showing, hiding, colliding, and firing the alien up to the mother ship. When the alien is shot or escapes, an event is fired that communicates the update to other parts of the game.
Three different types of aliens are attached to each plinth; however, only one is shown at a time. The plinth has a controller script that shows and hides the aliens. It handles events from the AlienController and bubbles events up to the game manager. The game manager controls the overall logic of the game, the start and end states, and which plinth should show an alien.
The companion Unity project includes some Alien prefabs for use in the game (Assets/Chapter06/Recipe_6.5_AlienShoot/START_EnemyPrefabs). The aliens have the standard Unity shader applied with the Rendering mode set to Fade, so they can be faded in and out.
The recipe starts off with the weapon switch scene from the previous recipe (Recipe 6.4) with the bomb, ControllerVisual, and Laser deactivated and the weapon selector script on the GvrControllerPointer GameObject also disabled. Alternatively, open Recipe_6.5_start. It starts off by building a single plinth with one shootable alien, and then creates some more.
Add a cylinder to the scene, call it
Plinth, scale it (1, 0.28, 1), and place it in front of thePlayer’s camera so it is sitting flush against the ground plane of the scene.Remove the Capsule Collider from the plinth, add a Box Collider and a Rigidbody component, and set the Rigidbody
Is Kinematicto true. The alien is going to sit on top of the plinth and it will topple off with the Capsule Collider.Drag the alien01 prefab from the
START_enemyPrefabsfolder into the scene and sit it on top of the plinth. Add a Box Collider and Rigidbody to it.Build and Run the scene to test it out. If the plinth isn’t too far away from the camera, you should be able to shoot the alien off. This is the start of the game.
Create a new empty GameObject, call it
AlienPlinth, and in the hierarchy, drag both the alien and the plinth into it. Your scene’s hierarchy should look something like Figure 6.12.
Figure 6.12 The game’s Hierarchy and Scene windows showing an alien plinth. Make the alien appear, disappear, and regenerate if it has been shot. Create a new script called
AlienControllerand attach it to theAlienGameObject. Update theAlienControllerScript to look like Listing 6.10.Listing 6.10
AlienControllerScript
using System.Collections;
using System.Collections.Generic;
using UnityEngine;
using DG.Tweening;

public class AlienController : MonoBehaviour {

    private Vector3 initPos;
    private Quaternion initRot;
    private bool isTarget;
    private Material;
    private Rigidbody rigidbody;

    void Start () {
        rigidbody = GetComponent<Rigidbody> ();
        material = GetComponent<MeshRenderer> ().material;
        material.DOFade (0f, 0f);
        material.DOFade (1f, 2f).OnComplete(SetTarget);
        initPos = transform.position;
        initRot = transform.localRotation;
        SetTarget();
    }

    public void OnCollisionEnter(Collision collision)
    {
        if (collision.gameObject.tag == "BulletTag" && isTarget)
        {
            isTarget = false;
            transform.DOKill(false);
            Vector3 dir = collision.contacts[0].point - transform. position;
            dir = -dir.normalized;
            rigidbody.AddForce(dir * 20f, ForceMode.VelocityChange);
            Destroy (collision.gameObject);
            material.DOFade (0f, 2f).OnComplete(AlienFadeOutComplete);
        }
    }

    private void AlienFadeOutComplete(){
        ResetAlien();
        SetTarget();
    }

    private void ResetAlien(){
        rigidbody.velocity = Vector3.zero;
        rigidbody.angularVelocity = Vector3.zero;
        transform.position = initPos;
        transform.localRotation = initRot;
        material.DOFade (0f, 0f);
        material.DOFade (1f, 2f).OnComplete(SetTarget);
    }

    private void SetTarget(){
        isTarget = true;
    }

}
The AlienController class sets up the alien on the plinth to be shot down and handles the internal collision logic. In the Start() method, references are made to the GameObject’s MeshRenderer and its Rigidbody. The alien’s material is accessed and the alpha is set to zero using DoTween before fading it in. The initial position and rotation are saved to variables that will be used to reset the alien after being shot.
In the OnCollisionEnter() method the colliding GameObject’s tag is checked to see whether it is a BulletTag and that this current alien has been set to be a target by the plinth controller. If it has, then the collision is handled by setting isTarget to false so it can’t be shot again; any current DoTween animations are killed using transform.DOKill(); and a force is added to the alien by getting the direction the bullet was traveling, multiplying it by 20, and using AddForce with ForceMode.VelocityChange. The bullet is then destroyed and the alien faded out.
When the alien’s fade-out animation is complete, AlienFadeOutComplete() fires two methods: one for resetting the position and rotation of the alien and the other for setting the alien back to being a valid target.
The ResetAlien() method does exactly that—it stops the alien from moving by setting the Rigidbody’s velocity and angular velocity to zero, and then resets its position and rotation to the original and fades it back in.
Test shooting an alien on a device. When an alien is shot, another alien automatically appears to take its place. This is the start of a game, but it is clearly unfinished. The next steps add one of three different types of randomly selected aliens to the plinth. This will need to happen out of the AlienController with another script that coordinates the aliens appearing and disappearing.
Prepare the
AlienControllerclass by updating it slightly to accommodate this new design. Update theStart()method by removing theSetTarget()method call and removing the fade-in code:void Start () { rigidbody = GetComponent<Rigidbody> (); material = GetComponent<MeshRenderer> ().material; material.DOFade (0f, 0f); initPos = transform.position; initRot = transform.localRotation; }
Remove the
AlienFadeOutComplete()method altogether, and in theOnCollisionhandler, update theDOFade OnCompletehandler to trigger theResetAlien()method:material.DOFade (0f, 2f).OnComplete(ResetAlien);
Add a new public method to the
AlienControllerscript calledShowAlien(). This will be called from another script when it is time to show a new alien:public void ShowAlien(){ material.DOFade (1f, 1f).OnComplete(SetTarget); }
Declare a public event with the other properties at the top of the class. This will broadcast to the rest of the game when the alien is shot.
public UnityEvent alienShotEvent;
Make sure to import the
Eventsnamespace at the top of the script so that theeventwill work:using UnityEngine.Events;Update the
ResetAlien()method to invoke the newAlienShotEvent():private void ResetAlien(){ alienShotEvent.Invoke (); rigidbody.velocity = Vector3.zero; rigidbody.angularVelocity = Vector3.zero; transform.position = initPos; transform.localRotation = initRot; material.DOFade (0f, 0f); }
To get this working, another class is needed, and some more aliens. Two more aliens are in the
START_EnemyPrefabsfolder—choose one, drag it into thePlinthAlienGameObject, and position it at exactly the same spot as thealien01so they are overlapping with each other. Add a Rigidbody, a Box Collider, and theAlienControllerscript. Repeat this for the third alien prefab.There should now be three aliens in the
AlienPlinthGameObject and they’re all occupying the same space, overlapping and protruding from each other in a weird-looking composite. Do not worry; it looks weird now, but they will be dynamically activated and deactivated via code. Make sure that their Inspectors are identical. They should all have the same scripts and components added.Create a new script called
AlienPlinthController, attach it to theAlienPlinthGameObject, and update it to look like Listing 6.11.Listing 6.11
AlienPlinthControllerScript
using System.Collections;
using System.Collections.Generic;
using UnityEngine;

public class AlienPlinthController : MonoBehaviour {

    public GameObject alien01;
    public GameObject alien02;
    public GameObject alien03;

    private GameObject currentAlien;
    private List<GameObject> alienList = new List<GameObject>();

    void Start () {
        alienList.Add (alien01);
        alienList.Add (alien02);
        alienList.Add (alien03);

        foreach(GameObject alien in alienList)
        {
            alien.SetActive (false);
        }
        ShowAnAlien ();
    }

    private void ShowAnAlien(){
        int alienIndex = (int)Random.Range (0, alienList.Count);
        currentAlien = alienList [alienIndex];
        currentAlien.SetActive (true);
        AlienController alienController = currentAlien.GetComponent <AlienController> ();
        alienController. ShowAlien ();
    }

    public void HandleAlienShot(){
        currentAlien.SetActive (false);
        ShowAnAlien ();
    }
}
The
AlienPlinthControllercontains references to the three alien GameObjects in the scene; a list to hold them; and a reference to thecurrentAlien.The
Start()method programmatically adds the aliens to the list, deactivates them, and then kicks things off by executingShowAnAlien(). Although in this case the aliens are added to the List programmatically using aforeachloop, it is also possible to add them manually in the Editor. This will be covered later.The
ShowAlien()method chooses a random alien from the List, activates it, sets it to be thecurrentAlien, and then triggers theShowAlien()method on the alien to show itself.Unity Events
Unity Events are useful for triggering callbacks between classes while keeping them decoupled. They work in a similar way to a standard .NET delegates. Events can be manually connected in the Editor by linking a GameObject and method callback, or programmatically created and added. This chapter implements Unity Events using both approaches.
With the
AlienPlinthGameObject selected, drag and drop the child aliens into the empty alien fields in theAlienPlinthControllerscript in the Inspector. It should look like Figure 6.13.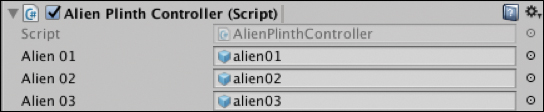
Figure 6.13 The AlienPlinthControllerscript.In the next step you implement the Unity Event from the
AlienControllerclass. The public Unity Event declared at the top ofAlienControllerclass creates a field in the Editor (see Figure 6.14) that can be used to manually hook up the Event to an event handler of another object. This works in a similar way to handlingEventTriggersfrom previous chapters: A GameObject is dragged in and a method is chosen from an attached script. This method is then executed when the Event isInvoked().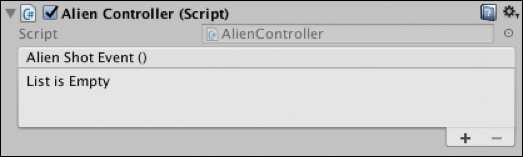
Figure 6.14 The empty AlienShotEventof theAlienControllerscript.Click the + button to add a new event handler. Drag the
AlienPlinthControllerinto the empty field, and from the function drop-down menu choose AlienPlinthController.HandleAlienShot (see Figure 6.15).
Figure 6.15 The AlienShotEventhooked up to theHandleAlienShotmethod.This will fire the
HandleAlienShot()method in theAlienPlinthControllerafter the alien is shot and the event is invoked.Repeat step 9 for the other two aliens, and then check that the three aliens have exactly the same setup in the Inspector.
If you run this script now, an alien fades in at the start. If it is shot, 2 seconds later it loops back and another alien appears. This is the main building block of the game. The next section takes this base mechanic and turns it into a finished minigame.
Turning It into a Game
The basic mechanic of the alien enemy is now set up and it is time to begin turning this into an actual game. Doing this requires some slight refactoring to fit with the logical structure and life cycle of the game.
From a high level, the game works as shown in Figure 6.16.
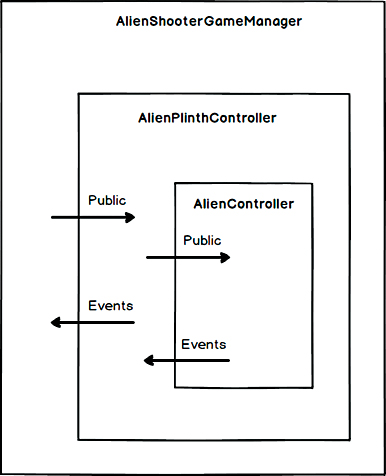
Three classes, each handle a different aspect in the hierarchy of the game. The AlienController script controls the movement and positioning of each individual alien. The AlienPlinthController handles the actual alien that is shown and tracks its life cycle. The AlienShooterGameManager script handles the overall sequencing of when the game starts and ends, and the game logic of when an AlienPlinth should show a new alien. The next section implements the rest of this structure.
The first thing to do is create more AlienPlinths and lay them out in a whack-a-mole formation. Control over the aliens appearing and disappearing then needs to be handed over to a new GameManager script to coordinate the game logic with all the plinths.
Turn the
AlienPlinthGameObject into a prefab by dragging it into the Project window.Set up the
AlienPlinthsin any formation you want by dragging them into the scene in front of the camera. In the example shown, they are laid out in a 3x3 grid, which is the classic whack-a-mole style (see Figure 6.17), but you can lay out as many of them as you want in any position. Play around with scaling them down to lay out more of them over a smaller space. If you find the bullet doesn’t reach the aliens at the back it’s easy to increase the force of the bullet, or simply move them closer.
Figure 6.17 The game’s Scene window showing the layout of the AlienPlinthGameObjects.Create a new empty GameObject called
Scriptsand add a new C# script to it calledAlienShooterGameManager. Update it to look like Listing 6.12.Listing 6.12
AlienShooterGameManagerScript
using System.Collections;
using System.Collections.Generic;
using UnityEngine;

public class AlienShooterGameManager : MonoBehaviour {

    public List<GameObject> alienPlinthList = new List<GameObject>();

    private bool gameActive;
    private float durationOfAlienLife;
    private float timeSinceLastFrame;
    private float timeBetweenAliens;
    private const int maxNumAliensEscape = 10;
    private int numAliensKilled;
    private int numAliensEscaped;

    void Start () {
        StartGame();
    }

    void Update () {
        if (gameActive) {
            timeSinceLastFrame += Time.deltaTime;
            if (timeSinceLastFrame >= timeBetweenAliens) {
                ShowNewAlien ();
                timeSinceLastFrame = 0;
            }
        }
    }

    public void StartGame() {
        timeBetweenAliens = 3f;
        durationOfAlienLife = 4f;
        timeSinceLastFrame = 0;
        numAliensKilled = 0;
        numAliensEscaped = 0;

        foreach (GameObject ap in alienPlinthList) {
            AlienPlinthController apc = ap.GetComponent <AlienPlinthController>();
            apc.alienRemovedEvent.AddListener (HandleAlienRemoved);
        }

        ShowNewAlien ();
        gameActive = true;
        }
    private void ShowNewAlien(){

        List<GameObject> shuffledArray = new List<GameObject> ();
        for (int i = 0; i < alienPlinthList.Count; i++) {
            shuffledArray.Insert (Random.Range (0, shuffledArray.Count), alienPlinthList [i]);
        }

        foreach (GameObject alienPlinth in shuffledArray) {
            AlienPlinthController apc = alienPlinth.GetComponent <AlienPlinthController> ();
            if (!apc.isActive) {
                apc.ShowAnAlien (durationOfAlienLife);
                return;
            }
        }
    }

    private void HandleAlienRemoved(bool wasKilled){
        if (!wasKilled) {
            ++numAliensEscaped;
            if (numAliensEscaped >= maxNumAliensEscape) {
                GameOver ();
            } else {
                ShowNewAlien ();
            }
        } else {
            ++numAliensKilled;
            ShowNewAlien ();
        }
    }

    private void GameOver() {
        if (!gameActive)
            return;

        gameActive = false;
        foreach (GameObject ap in alienPlinthList) {
            AlienPlinthController apc = ap.GetComponent <AlienPlinthController>();
            apc.alienRemovedEvent.RemoveListener (HandleAlienRemoved);
            apc.GameOver ();
        }
    }

}
The
AlienShooterGameManagerhouses the game logic and the states for start and game over. ThealienPlinthListis a list of all theAlienPlinthGameObjects directly linked through the Editor (see step 4).The
Start()method kicks things off by triggering theStartGame()method. In the next recipe you move this into the UI.The
Update()method tests to see whether the game is active and tracks the time since showing the last alien with thetimeBetweenAliensvariable. If enough time has passed theShowNewAlien()method is called and the time is reset.The
StartGame()method sets some initial variables. Aforeachloop cycles through thealienPlinthListand adds a listener to thealienRemovedEventon eachAlienPlinth.ShowNewAlien()is then called and the game is set to active.The
ShowNewAlien()method shuffles thealienPlinthList, cycles through the shuffled array looking for an alien that is not active and adds it to the scene. It passes thedurationOfAlienLifeas a parameter through to theAlienPlinthController.The
HandleAlienRemoved()method is triggered from theAlienPlinth’salienRemovedEvent. ThewasKilledBoolean is passed through as an argument, tracking whether the alien was killed by the player or whether it has escaped. If the alien was not killed (escaped) thenumAliensEscapedis incremented. If thenumAliensEscapedis greater than themaxNumAliensEscapedtheGameOver()method is triggered; otherwise, a new alien is shown. If the alien was killed, thenumAliensKilledvariable is incremented, increasing the score, and then a new alien is shown.The
GameOver()method checks whether the game is already inactive before setting theisActivestate to false. It then cycles through thealienPlinthListand removes all the event listeners from theAlienPlinthsand calls theGameOver()methods on each.Hook up the
AlienPlinths to the publicalienPlinthListlist in the Editor. Do this by selecting theScriptsGameObject in the Editor and in theAlienShooterGameManager, expand out the Alien Plinth list. Set its size to 9, or however manyAlienPlinthsyou have in the scene, and then link them to the Elements in the List by dragging them from the Hierarchy window into the fields in the Inspector. See Figure 6.18.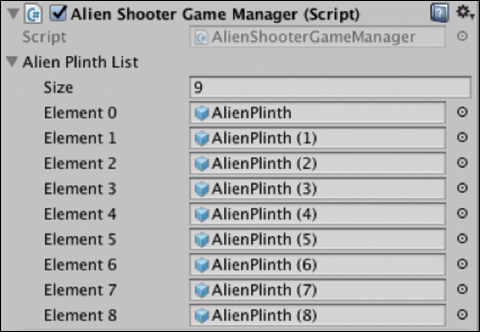
Figure 6.18 AlienShooterGameManagershowing the Alien Plinth List withAlienPlinthsattached.Finishing the game is going to require a bit of refactoring of the original two classes we’ve already made. Conceptually, they are still the same; however, they must now communicate with, and hand over some control, to their parent classes.
The
AlienControllerscript is similar to the version created previously in this recipe, but with some important additions. Update it to look like Listing 6.13.Listing 6.13
AlienControllerScript—Updated for the Finished Game
using System.Collections;
using System.Collections.Generic;
using UnityEngine;
using DG.Tweening;
using UnityEngine.Events;

public class AlienController : MonoBehaviour {

    public AlienResetEvent alienResetEvent;

    private Vector3 initPos;
    private Quaternion initRot;
    private bool isTarget = false;
    private bool isHit = false;
    private Material material;
    private Rigidbody rigidbody;
    private bool wasKilled;

    void Awake () {
        rigidbody = GetComponent<Rigidbody> ();
        material = GetComponent<MeshRenderer> ().material;
        material.DOFade (0f, 0f);
        initPos = gameObject.transform.position;
        initRot = gameObject.transform.rotation;
        wasKilled = false;
    }

    public void OnCollisionEnter(Collision collision)
    {
        if (collision.gameObject.tag == "BulletTag" && isTarget)
        {
            isHit = true;
            isTarget = false;
            transform.DOKill(false);
            Vector3 dir = collision.contacts[0].point - transform. position;
            dir = -dir.normalized;
            rigidbody.AddForce(dir * 30f, ForceMode.VelocityChange);
            Destroy (collision.gameObject);
            material.DOFade (0f, 0.5f);
            wasKilled = true;
            Invoke("ResetAlien", 1f);
        }
    }

    public void ShowAlien(){
        material.DOFade (1f, 1f).OnComplete(SetTarget);
        wasKilled = false;
    }

    private void SetTarget(){
        isTarget = true;
    }

    public void AnimateOut(){
        if (isHit) {
            return;
        }
        isTarget = false;
        rigidbody.velocity = Vector3.zero;
        rigidbody.angularVelocity = Vector3.zero;
        material.DOFade (0f, .7f);
        Vector3 endPos = new Vector3 (initPos.x, initPos.y + 10f, initPos.z);
        rigidbody.DOMove(endPos, 0.7f, false).OnComplete(ResetAlien);
    }

    private void ResetAlien(){
        gameObject.SetActive (false);
        rigidbody.velocity = Vector3.zero;
        rigidbody.angularVelocity = Vector3.zero;
        gameObject.transform.position = initPos;
        gameObject.transform.rotation = initRot;
        alienResetEvent.Invoke (wasKilled);
        isHit = false;
    }
}

[System.Serializable]
public class AlienResetEvent : UnityEvent<bool>
{
}
These are the main changes to the
AlienControllerscript:The creation of a custom Unity Event called
AlienResetEventis declared at the bottom of the script. A custom event is required because of the need to pass through a Boolean value that tracks whether the alien was killed, or escaped before being shot. This will be used upstream by the game manager to track the score and the remaining lives of the player.The addition of the public method
AnimateOut(),used when it is time for the alien to escape, is called from theAlienPlinthControllerscript. TheAnimateOut()method shoots the alien up into space.The
ShowAlien()method is now public and is triggered from the game manager.
The
AlienPlinthControlleralso needs to be updated slightly to hand over some game logic control to the game manager and handle some events. The new lines of code are clearly commented. Update theAlienPlinthControllerto look like Listing 6.14.Listing 6.14
AlienPlinthControllerScript—Updated for the Finished Game
using System.Collections;
using System.Collections.Generic;
using UnityEngine;
using UnityEngine.Events; // NEW

public class AlienPlinthController : MonoBehaviour {

    public AlienResetEvent alienRemovedEvent; // NEW
    public GameObject alien01;
    public GameObject alien02;
    public GameObject alien03;
    public bool isActive;  // NEW

    private GameObject currentAlien;
    private List<GameObject> alienList = new List<GameObject>();
    private float lifeDuration; // NEW
    private float timeSinceLastFrame;

    void Start () {
        timeSinceLastFrame = 0; // NEW
        isActive = false;

        alienList.Add (alien01);
        alienList.Add (alien02);
        alienList.Add (alien03);

        foreach(GameObject alien in alienList)
        {
            alien.SetActive (false);
        }
    }

    // ---- NEW
    void Update () {
        if (isActive) {
            timeSinceLastFrame += Time.deltaTime;
            if (timeSinceLastFrame >= lifeDuration) {
                HideAlien ();
                timeSinceLastFrame = 0;
            }
        }
    }

    public void ShowAnAlien(float duration){
        isActive = true;
        timeSinceLastFrame = 0; // NEW
        lifeDuration = duration;

        int alienIndex = (int)Random.Range (0, alienList.Count);
        currentAlien = alienList [alienIndex];
        currentAlien.SetActive (true);

        AlienController alienController = currentAlien.GetComponent <AlienController> ();
        alienController.ShowAlien ();
    }

    public void HideAlien(){
        AlienController alienController = currentAlien.GetComponent <AlienController> ();
        alienController.AnimateOut ();
    }

    public void HandleAlienReset(bool wasKilled){
        alienRemovedEvent.Invoke (wasKilled); // <<< NEW
        isActive = false;
    }

    public void GameOver(){
        if(currentAlien !=null)
            HideAlien ();

        isActive = false;
    }
}
The main differences in the
AlienPlinthControllerscript are:The addition of a public
AlienResetEventto notify the game manger when an alien has escaped or been killed.The life cycle of the alien is now being tracked in the
Update()method, if enough time has elapsedHideAlien()is triggered.ShowAnAlien()is now a public method and is triggered from the game manager.The addition of a public method
GameOver(), fired from the game manager, that cleans up any active aliens and stops any new ones from being added.isActivebool tracks the state of theAlienPlinthand is used by the game manager to see if a new alien can be added to this plinth.
Each of the
AlienController’s newAlienResetEventsneed to be manually hooked up to the AlienPlinth’s handler methods in the Editor. This can be done fairly quickly in each of the Alien children of the AlienPlinth prefab. Follow these steps to hook up the events:Select the AlienPlinth prefab in the Project window. Expand it out so that it looks like Figure 6.19.

Figure 6.19 The AlienPlinth GameObject prefab in the Project window. Select an alien, and in the Inspector on the
AlienResetEventclick the + symbol and drag the AlienPlinth prefab from the Project window (not the Hierarchy window) into theAlienControllerscript’sAlienResetEventobject field. From the drop-down menu select AlienPlinthController.HandleAlienReset (see Figure 6.20). Repeat this for each of the other two aliens in theAlienPlinthprefab. This hooks up the event for all instances in the scene.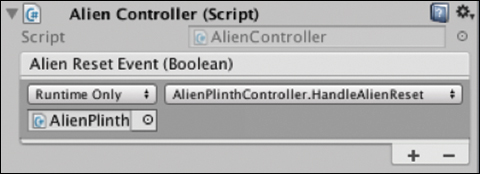
Figure 6.20 The AlienControllerscript with theAlienResetEventhooked up.Hook up the
AlienShotEventin each of theAlienPlinthControllers. Select anAlientPlinthand in itsAlienPlinthControllerscript in the Inspector, add a new event handler in the Alien Shot Event by clicking the + button. Drag in theScriptsGameObject and choose AlienShootGameManager.HandleAlienShot from the drop-down menu (see Figure 6.21).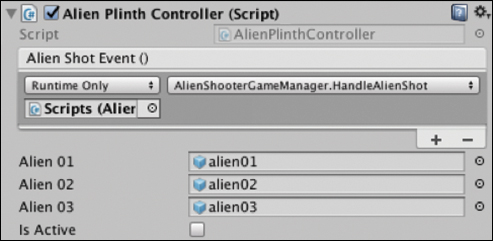
Figure 6.21 The AlienPlinthControllerwith theAlienShotEventhooked up to the game manager.Repeat the previous step for each of the AlienPlinths in your scene.
Build and Run the scene now to test out the game. Most of the game is already there, except that the game starts straight away and there is no UI for scoring or restarting the game after it is over. The next recipe addresses these shortcomings.
Recipe 6.6: Building the UI and Finishing the Game
If you play the game in its current state, it clearly has some unfinished aspects. For instance, it starts as soon as the scene loads, meaning that the player might not be ready to play. Also, there is no way of replaying the game. On top of this it doesn’t have any of the essential things that players expect from a game, like a scoreboard and UI. This recipe wraps up the game by adding a scoreboard and gameOver() state when the player runs out of lives.
Start by creating a scoreboard behind the game using the same UI techniques as covered in Chapter 4, and the pancake flipping game earlier in this chapter. Continue on from the end of the last recipe, or open Recipe_6.6_start and follow these steps:
Create an empty GameObject called
Scoreboard, with a Canvas in World Space.Add a
GvrPointerGraphicRaycasterto the Canvas and remove any other raycaster attached to the Canvas by default.Just like in Chapter 4, in the Canvas’s Rect Transform component, set the width to 1200, height to 800, its position to (0,0,0), and its scale to (0.001, 0.001, 0.001).
In the scene window, manually line up the position of the
ScoreboardGameObject to be in line with the Player’s camera. Move it on the z axis to 7— (0, 1.5, 7). Following the dmm rules (see Recipe 4.1) the Scoreboard now needs to be scaled up to 7, so set its scale to (7, 7, 7).Add a new UI Text object to the Canvas, rename it
TimeText, and set its text to read Time:. In its Rect Transform set the width to 730 and height to 70. Bump up its font size to 45, and change the default font to Roboto Medium or whichever font you prefer.Duplicate
TimeTextto make two more text fields, one calledAliensEscapedTextand the other calledAliensShot. Manually align them vertically in the Canvas so they look neat.Add a button to the Canvas and update its text to read Play Game.
Add another larger text field in the top center with the words Game Over. The Scoreboard UI should look something like Figure 6.22.
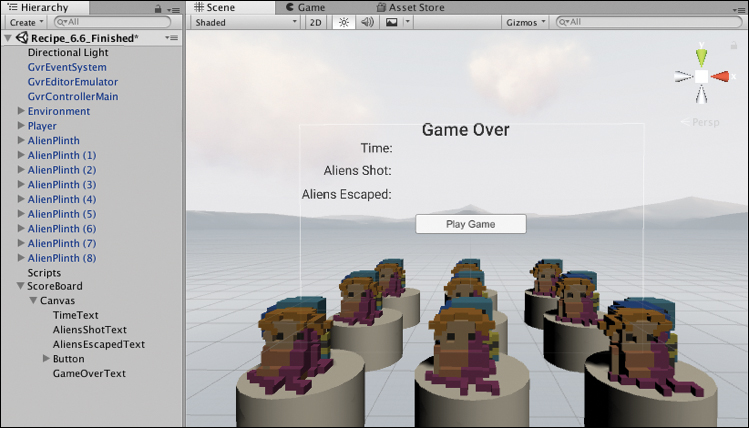
Figure 6.22 A view of the game’s scene showing the UI placement. Create a new C# script and call it
ScoreboardController, attach it to theScoreboardGameObject, and update it to look like Listing 6.15.Listing 6.15
ScoreboardControllerScript
using System.Collections;
using System.Collections.Generic;
using UnityEngine;
using UnityEngine.UI;
using UnityEngine.Events;

public class ScoreboardController : MonoBehaviour {

    public Text timeText;
    public Text aliensEscapedText;
    public Text aliensShotText;
    public Text gameOverText;
    public GameObject playButton;

    private float elapsedTime;
    private bool inGame;

    void Start () {
        inGame = false;
        elapsedTime = 0f;
        timeText.text = "";
        aliensShotText.text = "";
        aliensEscapedText.text = "";
        gameOverText.enabled = false;
    }

    void Update () {
        if (inGame) {
            UpdateTimer ();
        }
    }

    public void StartGameHandler (){
        inGame = true;
        elapsedTime = 0f;
        timeText.text = "Time: 0";
        aliensShotText.text = "Aliens Shot: 0";
        aliensEscapedText.text = "Aliens Escaped: 0";
        gameOverText.enabled = false;
        playButton.SetActive (false);
    }

    private void UpdateTimer(){
        elapsedTime += Time.deltaTime;
        int minutes = Mathf.FloorToInt(elapsedTime / 60F);
        int seconds = Mathf.FloorToInt(elapsedTime - minutes * 60);
        string formattedTime = string.Format("{0:0}:{1:00}", minutes, seconds);
        timeText.text = "Time: " + formattedTime;
    }

    public void ScoreUpdatedHandler(int enemiesShot, int enemiesEscaped){
        aliensShotText.text = "Aliens Shot: " + enemiesShot;
        aliensEscapedText.text = "Aliens Escaped: " + enemiesEscaped;
    }

    public void GameOverHandler(){
        inGame = false;
        gameOverText.enabled = true;
        playButton.SetActive (true);
    }
}
The
ScoreboardControllerhas references to all the UI elements on the Canvas. Its job is to activate the UI elements and update them based on the state of the game. It also tracks the elapsed time of the game. The class is listening for and handling three different events from theAlienShooterGameManager:StartGame,GameOver, andScoreUpdateEvent.The
StartGameHandler()resets the UI and hides thegameOverTextandplayButtonwhen the game starts. TheUpdateTimer()calculates the elapsed time in minutes and seconds and formats the result into a string, which appears in the UI as an upcount in minutes and seconds of the elapsed time since the start of the game.The
ScoreUpdateHandler()method receives two integer arguments:enemiesShotandenemiesEscapedand updates the UI accordingly.The
GameOverHandler()stops the timer from updating by settinginGameto false and shows theGameOverTextand theplayButton.Drag the UI components from the hierarchy into their relevant fields in the
ScoreboardControllerscript to link them up.As annoying as it sounds, there is still a small amount of refactoring that needs to be done in order to add a scoreboard to the game. Luckily, because of the way the code has been structured, the only class that needs to know about the scoreboard is the game manager. Therefore, only the
AlienShooterGameManagerscript needs to be updated.Update the
AlienShooterGameManagerto look like Listing 6.16. The changes and additions to the class are clearly commented as NEW SCOREBOARD STUFF.Listing 6.16
AlienPlinthControllerScript—Updated for the Finished Game
using System.Collections.Generic;
using UnityEngine;
using UnityEngine.Events; // NEW SCOREBOARD STUFF

public class AlienShooterGameManager : MonoBehaviour {

    public List<GameObject> alienPlinthList = new List<GameObject>();
    public ScoreUpdatedEvent scoreUpdatedEvent; // NEW SCOREBOARD STUFF
    public UnityEvent gameOverEvent; // NEW SCOREBOARD STUFF
    public UnityEvent startGameEvent; // NEW SCOREBOARD STUFF
    public GameObject gun; // NEW SCOREBOARD STUFF
    public GameObject laser; // NEW SCOREBOARD STUFF
    public GameObject controllerViz; // NEW SCOREBOARD STUFF

    private bool gameActive;
    private float durationOfAlienLife;
    private float timeSinceLastFrame;
    private float timeBetweenAliens;
    private const int maxNumAliensEscape = 10;
    private int numAliensKilled;
    private int numAliensEscaped;

    void Start () {
// NEW SCOREBOARD STUFF
// StartGame removed, now being triggered from the play game button
        //StartGame ();
        EnableLaser(); // NEW SCOREBOARD STUFF
    }

    void Update () {
        if (gameActive) {
            timeSinceLastFrame += Time.deltaTime;
            if (timeSinceLastFrame >= timeBetweenAliens) {
                ShowNewAlien ();
                timeSinceLastFrame = 0;
            }
        }
    }

    public void StartGame() {
        timeBetweenAliens = 3f;
        durationOfAlienLife = 4f;
        timeSinceLastFrame = 0;
        numAliensKilled = 0;
        numAliensEscaped = 0;

        foreach (GameObject ap in alienPlinthList) {
            AlienPlinthController apc = ap.GetComponent <AlienPlinthController>();
            apc.alienRemovedEvent.AddListener (HandleAlienRemoved);
        }

        ShowNewAlien ();
        gameActive = true;
        startGameEvent.Invoke (); // NEW SCOREBOARD STUFF
        EnableGun(); // NEW SCOREBOARD STUFF
    }

    private void ShowNewAlien(){
        List<GameObject> shuffledArray = new List<GameObject> ();
        for (int i = 0; i < alienPlinthList.Count; i++) {
            shuffledArray.Insert (Random.Range (0, shuffledArray.Count), alienPlinthList [i]);
        }

        foreach (GameObject alienPlinth in shuffledArray) {
            AlienPlinthController apc = alienPlinth.GetComponent <AlienPlinthController> ();
            if (!apc.isActive) {
                apc.ShowAnAlien (durationOfAlienLife);
                return;
            }
        }
    }

    private void HandleAlienRemoved(bool wasKilled){
        if (!wasKilled) {
            ++numAliensEscaped;
            if (numAliensEscaped >= maxNumAliensEscape) {
                GameOver ();
            } else {
                ShowNewAlien ();
            }
        } else {
            ++numAliensKilled;
            ShowNewAlien ();
        }

        // NEW SCOREBOARD STUFF
        scoreUpdatedEvent.Invoke (numAliensKilled, numAliensEscaped);
    }

    private void GameOver() {
        if (!gameActive)
            return;

        gameActive = false;
        foreach (GameObject ap in alienPlinthList) {
            AlienPlinthController apc = ap.GetComponent <AlienPlinthController>();
            apc.alienRemovedEvent.RemoveListener (HandleAlienRemoved);
            apc.GameOver ();
        }
        gameOverEvent.Invoke (); // NEW SCOREBOARD STUFF
        EnableLaser(); // NEW SCOREBOARD STUFF
    }

    // NEW SCOREBOARD STUFF
    private void EnableLaser(){
        laser.SetActive(true);
        controllerViz.SetActive(true);
        gun.SetActive(false);
    }

    // NEW SCOREBOARD STUFF
    private void EnableGun(){
        laser.SetActive(false);
        controllerViz.SetActive(false);
        gun.SetActive(true);
    }
}

// NEW SCOREBOARD STUFF
[System.Serializable]
public class ScoreUpdatedEvent : UnityEvent<int, int>
{
}
Some key differences in this class are:
Several new Events have been added to communicate with the Scoreboard:
startGameEvent,gameOverEvent, andScoreUpdateEvent. TheScoreUpdateEventrequires a custom class, implemented at the bottom of the listing, because it takes two arguments for the aliens killed and aliens escaped.There is logic to switch between the gun and the controller and laser when the game is over, so the UI can be selected.
StartGame()is now public and is being triggered from the play game button in the Canvas UI.
Hook up the
ScoreboardGameObject’s event handlers to the game manager’s new events. Select theScriptsGameObject and in each of the events click the + symbol to add a new object, drag in theScoreboardGameObject, and choose the relevant method call from the dropdown forScoreUpdatedhandler,GameOverHandler, andStartGameHandler. It should look like Figure 6.23.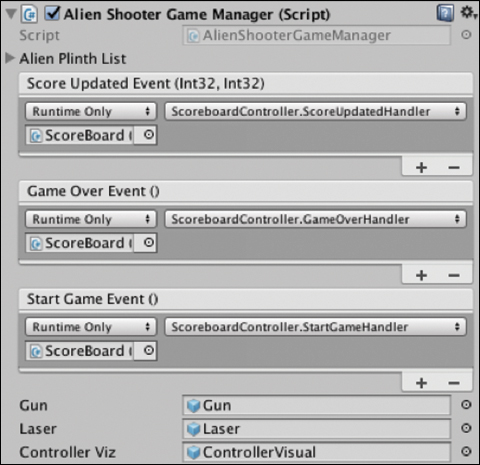
Figure 6.23 The AlienShooterGameManagershowing the new game events handled by theScoreboardController.Probably the most important step of all is to hook up the button that triggers the start of the game. Select the Play Game button in the Canvas, and in its Button script in the On Click field click the + button to add a new event handler to the list. Drag the method GameObject into the empty object field and from the dropdown, choose AlienShooterGameManager.StartGame (see Figure 6.24). Note that the button is triggering the
StartGame()method in the game manager, not in theScoreboardController.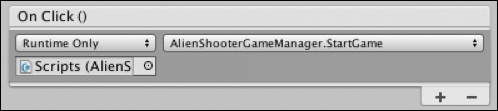
Figure 6.24 The play button’s On Clickevent triggering theStartGamemethod in the game manager.Hook up the required components to hide the gun and show the controller and laser when the game is not in play. You will notice the
AlienShooterGameManagerhas public fields for theGun,Laser, andControllerVisual. Drag theGunGameObject into the empty field; it is a child of the Player >GvrControllerPointer. It should look like Figure 6.23.Drag the
ControllerVisualandLaserGameObjects into their slots. They are children of Player >GvrControllerPointer. This is used to enable and disable the controller and laser. TheAlienShooterGameManagershould look like Figure 6.23.
Where to Go from Here
You have now built the structure of a basic minigame. You can now do a multitude of things as a game designer to liven things up and improve the game play. Here are some ideas:
Give the aliens unique traits. Some aliens could require more bullets to be shot, or last longer, or spawn children, or shoot back, or be worth more points, power up, or give the player new weapons.
Animate the aliens. The more creative you get with the movement, the more engrossing the game will be. Think of ways you can give them some character and personality. Get them to look at the Player when they appear and possibly wink, wave, or sneer.
Add some secondary animation; for instance, the cylinders could open and the aliens come up through them. Having the plinths move up and down could be a fun way of adding some dynamic movement to the scene.
Add sound effects to the game at key moments such as when the gun is shot, or when the alien is hit. Possibly add a background sound track or environmental sounds.
Create a more interesting environment in which the game exists. Add some craters and strange plants, and a giant mothership in the sky, or set the game in a different location such as the jungle or outer space.
Add particle effects as the aliens fly away or when they are shot.
Summary
In this chapter, the essential components of Unity’s physics engine were introduced. To reinforce these ideas, you built:
A physics-based pancake-flipping game
Two game weapon mechanics: one for a pop gun and one for a bomb
An end-to-end alien shooting game