
Chapter 7
ARCore
ARCore is a breakthrough technology that puts augmented reality into the hands of hundreds of millions of users. It is also a new technology, whereby many of the conventions and the “language” of the interactions are still being developed. This chapter begins by introducing some of the key axioms developed by Google that apply to AR product development and that designers can draw on to create engaging and imaginative experiences for AR. It then dives into Unity and the ARCore SDK, covering setup essentials and how to utilize ARCore to perform some of the common and not-so-common tasks and procedures.
Augmented Reality
This chapter shifts the focus away from VR and onto AR, namely Google’s ARCore framework. Although plenty of similarities exist between the processes of developing for AR and for VR, there are also many differences. These stretch beyond the approaches of developing software and into the complexities of interaction design and the creation of the user experience.
The chapter begins by discussing the particular challenges presented by AR, before introducing the reader to some of the key AR UX principles that are used every day by Google to guide design decisions on AR products. It then moves to ARCore technical concepts as part of a deep dive into the hardware and software stack of ARCore. This includes the classes and Unity components that are available to app creators seeking to incorporate AR into their projects.
These concepts are then applied to the practicalities of building actual ARCore apps. We begin by setting up Unity for ARCore development, and then move quickly into the essentials of placement and interaction with objects in the world: dragging and dropping, rotating, scaling, physics, customizing the surface visualization, and handling the various tracking states. As well, there is an explanation to familiarize the user with a series of essential utility methods that can help in the interface with ARCore, and with much more.
Inspiration
If you’re looking for some creative stimulus for your first AR app or are simply interested in exploring the fun things other people are making with ARCore, this site is a great starting point for all AR inspiration:
AR and UX
Although designing for AR is different from designing for any other platform, the underlying UX fundamentals remain the same. To create meaningful and well-designed AR, the experience should have a strong focus on usability with a view to solving actual user needs. This section discusses the design considerations posed by AR and some of the best practices we have established at Google through hands-on experience while building both large- and small-scale AR projects.
Google’s AR Design Guidelines
Google has released an AR design spec that is essential reading for anyone interested in designing or developing for ARCore or AR in general:
AR comes in many different forms, each of which has its own array of contrasting UX considerations. Therefore, it is a good idea to preface the following discussion by delineating the various types of AR that are the focus of this book. At the most general level, augmented reality comprises three types:
Geographic: It can be attached to geography, such as overlays on physical locations in the real world—names of shops, street names, directions.
Object: It can be attached to objects such as surfaces, table tops, floors, AR markers, or any 3D object.
People: It can be attached to people and their faces, such as the selfie camera effects of Snapchat.
The focus of ARCore is on tracking and attaching AR to objects (surfaces) that are within close proximity to the user. Contextual information and 3D objects are then seamlessly overlaid on top of the video feed from the phone’s camera. The focus of the AR chapters in this book will be on designing and building the UX for this type of AR.
Lessons, Principles, and Practice
As an AR app creator, you should be spending a lot of time analyzing how and why users interact with your product. The lessons learned can then be synthesized and integrated back into the product itself for the purpose of continual improvement. The best way of achieving this is through an iterative design process of learning, building, testing, and evaluating.
The following section puts the lessons from this UX process into practice by way of a set of guiding principles that have been distilled using this methodology at Google. They are presented here, firstly, to encourage a continuing dialogue around what in general constitutes good AR user experience and in the particular hope that they may help guide your decisions as an aspiring creator of new AR products. The principles are as follow:
Caveat
Some of these principles may change over time as the limitations of the technology decrease and the user understanding of what is constituted by AR expands. Also, some of them may seem to contradict each other or be at odds with the things you already have discovered for yourself. Of course, such conceptions are always contextual and the list is by no means exhaustive.
Most people don’t know what AR is: At Google we do a lot of research and testing of our apps with users and the common experience is that most of them have never heard of AR. Therefore, you probably should start out with the baseline assumption that the person using your app has no idea what augmented reality is. Nor will they know the conventions or the interactive “language” of AR. Most likely, they will find the concept confusing and have trouble articulating what exactly it is.
It is up to you, therefore, as the designer, to bridge this gulf of understanding by educating users of the experience within your app and get them comfortable with AR technology. It is not necessary to educate them about AR in general, but simply the actual experience they will have with AR in your app. As an AR creator you need to maintain trust with users and make sure their first exposure to the technology constitutes a good experience. In other words, don’t give AR a bad name before it has become mainstream.
The best AR app experiences are often the briefest: Only use mobile AR when it is needed. Mobile AR is best employed in small, sharp vignettes that solve specific problems. Don’t try to solve every problem using AR. The mantra is: Make your AR experience a short and sweet, high-value moment.
Clearly this may not apply if you are making a fully immersive AR game. If this is the case, however, remember that Games that require a lot of movement have been found to be less physically and mentally fatiguing than those with no movement. When shifting positions users are able to take “micro naps.” Even in games, though, it is important to be using AR for what it is best—a tool for solving specific problems. An example might be an AR mini-map in the world that then switches out of AR mode when it is no longer needed.
AR is fun: The very fact that AR works at all is inherently astonishing for most first-time users. Use this moment to your advantage by celebrating it in your app. Even the most utilitarian applications can have personality. It gives people a moment of delight that indeed will keep them coming back to your app.
Design the experience with the environment in mind: The actual environment and surroundings where the AR experience takes place is as important as the software you build on top of it. In the same way that in cinema the landscape of a western movie is often described as a central character, it is also true for AR. Think about the environment as a character in the scene, not just stylistically but in terms of the total effect that it will have on the user experience.
There are also important safety implications to keep in mind when designing both outdoor and indoor AR experiences. Keeping safety and user awareness at the forefront of all design decisions is paramount. Ask yourself: Are users likely to walk out onto a busy street while playing this game? Does it require users to move backward—could they trip and fall?
Design your app to help the user to be aware of the environment, particularly when outdoors. Frequently in user studies we have seen participants locked to the screen blindly following the AR. This can lead to dangerous situations.
Indoor AR can be just as problematic. When encountering spatial-related problems, the solution could be as simple as limiting the user’s movement. Try making the play area adjustable based on the available space, or let the users adjust and manipulate the scene in the case where they can’t or don’t want to move around.
Lastly, remember that people who use AR for the first time often don’t realize that they can move around. So be aware that you may need to prompt them to move their phone or change position.
UI works differently in AR: It is different from web; different from mobile; and different from VR. There are more things to take into account when working with UI in AR: In AR UI can be overlaid on screen space or placed in world space. Also, screen real estate is at a premium so try not to obscure the screen.
Where possible, try to keep UI locked to the edges of the screen, and only visible when needed. When creating UI in world space be aware of legibility; text is very hard to read when it is tracking in 3D and movement can be choppy. Small objects and small UI are hard to manipulate in AR.
Losing AR tracking creates a poor user experience: Design a UX fallback solution for when the phone loses tracking (for more info on the various tracking states the AR session can be in, see Recipe 7.14).
Some important things to consider are: how the app handles the entry point into AR; initializing the AR session; when AR loses tracking; and when the app doesn’t have camera permissions. All of these scenarios need to be thought through, designed out, and implemented. Solutions need not be complicated. For instance, when tracking has been lost, the solution could be as simple as presenting a UI dialog box notifying the user.
Design for immersion: Creating a symbiotic relationship between the virtual and real-world objects builds immersion and adds to the user’s sense of presence. This harmony can be increased through lighting in the scene, immersive interaction, and reinforcing connections between the two worlds. Strategies for doing this can include giving interactive objects weight so they fall back to the ground naturally with physics; making sure environmental lighting illuminates your virtual objects naturally; and having characters look toward the screen and interact with the user.
Think of ways that your style will fit into the real world and how the user’s input will affect the AR environment: how will objects react? Is there physics? How does the scale of objects play a role? Do characters have personality and adjust themselves, move and react to the user’s touch, or interact with objects in the scene? If users are able to feel as if they are really controlling the AR world, it will bridge the gap between simulation and reality.
Lighting and shadows do a lot to help to ground objects in the world—even just simple radial gradient “blob” shadows make a big difference.
Design the transition between 2D and AR: Not just the motion transition but also the user’s mental transition. How does the visual design and user interface visually map between states to help users maintain their mental model of the system? How does it visually keep state?
In studies at Google we have found that, for most users, switching between 2D mode and AR mode can be a complex game of mental gymnastics. Therefore, provide a transition between states to lessen the user’s cognitive load and incorporate consistent visual cues to aid continuity.
The UX team working on ARCore has designed a View in AR icon for use when transitioning from 2D into AR. In the same way that the Chrome print icon signifies the action of printing and not the brand of printer, the View in AR icon is meant to be used on all platforms with all AR technologies. It represents the action of moving into AR, as opposed to moving into a specific AR technology (say ARCore or ARKit). See Figure 7.1.

Figure 7.1 Two different sizes of the View in AR icon. Best Practices for Mobile AR Design
For further reading, see my colleague Alesha Unpingco’s great article on best practices for mobile AR design on the Google developer website:
https://blog.google/products/google-vr/best-practices-mobile-ar-design/
Understand the limitations of mobile hardware: Mobile phone AR is not perfect. There are issues around ergonomics, usability, performance software, and hardware. As an AR creator the one thing you do have control over is how the user will interact with your app. Always assume it will be one handed, probably on the go, with a focus on the magic window but not always in the direction you want them to be pointing.
Product Excellence
The end goal of software development is to achieve a high level of product excellence, but as a creator how exactly do you measure product excellence? One way to describe it is through a design “hierarchy of needs” framework. This is essentially a checklist of criteria you can use to rate against your product to see whether it meets a high standard of product excellence:
Functional: The application must function the way it is intended. It should complete the given task from start to finish.
Reliable: Stability and consistency of performance are essential to product excellence. The product shouldn’t crash, lock up, or freeze while executing its designed function. It must be reliable and performant.
Useable: The application must be useable, meaning the user must be able to understand how to operate the app, how it functions, and easily complete the desired task. Users should be able to use the product to fulfill the critical user journey they are attempting to complete.
Proficiency: The product should somehow enable people to complete the given task at a higher level and with more ease and simplicity than without. It does it better than by any other means.
Creativity: It should do all of this with visual beauty and a level of innovation, exerting creativity in its form and function, and enabling creativity in the user.
Each consecutive step in the hierarchy must be fulfilled before the next can be achieved. For instance, it is impossible for the application to be useable (2) without the application working reliably (1). Similarly, the application cannot enable creativity (5) without being useable (3). As you create your AR products always think about how your work fulfills as many of these criteria as possible so as to build toward product excellence.
Key Technologies in ARCore
ARCore works by tracking 3D objects to the real world and overlaying them on the phone’s “pass through” video feed. This section takes a closer look at the key technologies in ARCore and on the phone that work together to create this AR experience:
Motion tracking: ARCore pinpoints and remembers features in the environment that it tracks and follows over time. By tracking these feature points in conjunction with the phone’s inertial sensors, ARCore is able to establish the position and rotation of the phone as it moves around in 3D space.
Environmental understanding: ARCore builds an understanding of the environment over time by tracking feature points. These feature points include flat surfaces, floors, table tops, walls, and other static objects.
Light estimation: ARCore is also able to estimate the lighting level in the environment and then apply it to virtual objects added to the scenes by the developer.
Each of these inputs works in combination to power AR experiences that merge harmoniously with the real world. The following sections analyze these concepts.
Motion Tracking
The phone is constantly tracking the world throughout the life cycle of an AR session. ARCore uses a process called concurrent odometry and mapping (or COM) to build up an understanding of the physical location in 3D world space where the phone is currently positioned.
ARCore tracks feature points that it then uses to calculate the change in movement over time. This information along with the inertial movement of the phone are then combined to build an accurate understanding of the phone’s position and rotation in space.
Environmental Understanding
ARCore builds its knowledge of the world by tracking feature points and planes. Feature points are high-contrast areas in the environment that stay in a fixed position over time. This could be the corner of a picture on the wall, the edge of a lamp, or a contrasting object on the table.
Groups of feature points that appear to lie on flat surfaces are used to infer planes in the scene. ARCore then infers the boundaries of these planes and tracks them over time. GameObjects can then be attached to these feature points and planes.
Interaction
Developers are able to interact with real-world objects being tracked in the scene through the process of raycasting. ARCore’s Frame class allows casting of rays to retrieve hits against tracked surfaces and feature points in the real world. In this way developers are able to use these surfaces to place objects and for more immersive interaction in your apps.
Raycasting in ARCore works by casting the ray out from a point on the phone’s screen. The ray returns a hit of either all intersecting tracked planes, or the first intersecting plane or feature point. Building on this, developers can create complex systems that interact with actual surfaces and points in the environment.
Oriented Points
An oriented point is a point in space on a non-horizontal surface such as a wall or slope. Oriented points are not constantly being tracked. Hit tests can be performed against feature points representing oriented points using the FeaturePoint property of the TrackableHitFlags filter in the Frame.Raycast method. This returns a hit with the Pose of the intersecting location, thereby allowing the user to place objects on non-horizontal surfaces.
Anchors and Trackables
Trackables are actual features in the real world that are being tracked by ARCore. Trackables come in two forms: points and planes.
As the system builds up a better understanding of the world over time trackables will shift position in relation to each other and be subsumed by more accurate representations of the tracked surface.
Anchors are used to fix GameObjects to trackables. An anchor is attached to a trackable and then a GameObject is added as a child of the anchor. This locks the GameObject to the local space of the anchor.
Note
Because ARCore uses clusters of points to detect and track surfaces, it has difficulty tracking surfaces with no texture. Solid white surfaces and other surfaces without contrasts may not track well.
Light Estimation
ARCore is able to approximate the light level in a room. This can then be applied to GameObjects in the scene through shaders to give realistic lighting effects based on the real-world lighting conditions. Realistic lighting of GameObjects in an AR scene is the key to genuine integration.
ARCore and Unity
This section takes the AR concepts discussed in the previous section and applies them to the classes and components of the ARCore Unity SDK. The main ARCore classes are introduced and, to get you up and running, a number of the components and prefabs that are supplied with the SDK are covered.
ARCore Classes
This section lists some of the most important ARCore classes you will be using in your AR apps. For a full and extensive list of ARCore classes visit the ARCore for Unity API reference page: https://developers.google.com/ar/reference/unity/.
Session
Represents an ARCore session. It connects your app to the ARCore services, encapsulates global state information, and tracks anchors and planes. Through the Session class, developers can find out whether their ARCore app is tracking correctly, retrieve a list of all trackables, and create anchors on those trackables to host GameObjects. In most cases you will use the ARCoreSession component (attached to the ARCore Device prefab) to manage the creation and life cycle of the session.
A session has these properties and public static functions to access in your app:
Status: The currentSessionStatusincludingTracking, NotTracking, LostTracking, and various errors.CheckAPKAvailability: Checks whether the user has the ARCore APK installed on her device.CreateAnchor: A function used to create a new anchor; the Pose and trackable of the anchor are passed through as arguments.GetTrackables: Returns a list of all the trackables from the session. Use the TrackableQueryFilter to return only the new trackables, updated trackables, or all the trackables that have been created during the session.RequestAPKInstallation: Request that the user installs the ARCore APK on her phone, required for ARCore to run.
Trackable
Trackables are planes and points in the real world that ARCore is tracking. As discussed previously GameObjects are connected to trackables in the Unity scene through anchors, which physically bind the GameObject to the trackable.
Over time, as ARCore builds a better understanding of the world, a trackable’s Pose (position and rotation) will change in relation to other trackables in the scene. GameObjects that are anchored to the trackable will move along with it.
Trackables have these properties and public functions:
TrackingState: There are three possible tracking states: Paused (but may continue in the future), Stopped (will not continue tracking), and Tracking (is currently being tracked).CreateAnchor: Creates an anchor on the current trackable at the given Pose.GetAllAnchors: Returns a list of all the anchors attached to the current trackable. From this it is possible to extract all the possible GameObjects attached to that particular trackable. Recipe 7.8 shows how to return all GameObjects attached to all the anchors on a trackable.
A trackable has two known subclasses in the SDK:
DetectedPlane: Is a horizontal surface being tracked. The Pose and size of the plane can be derived from its public properties. This is useful when attaching surface visualization to it.Over time some
DetectedPlaneswill be subsumed by otherDetectedPlanes. For instance, as ARCore builds a better picture of a floor it joins all the smaller trackable areas into one larger surface. These smallerDetectedPlaneswill still exist in the session and can be accessed through theSession.GetTrackables usingTrackableQueryFilter.ALL. TheirSubsumedByproperty will point to the new larger subsuming plane.FeaturePoint: Is simply a point in the real world being tracked by ARCore. This could be on the floor, on a wall, or on a roof. When raycasting against a wall ARCore uses groupings of FeaturePoints that appear to be on a planar surface to infer a vertical plane.
Anchor
Anchors are the glue that ties your GameObjects to the tracked environment. Anchors are created on trackables at a given Pose, and then GameObjects are parented to the anchor component’s associated GameObject. This syncs the GameObject’s position and rotation to the trackable relative to the world.
To Anchor or Not to Anchor
It is possible not to parent a GameObject to an anchor and it will still be tracked by ARCore. Not anchoring, however, is strongly discouraged. GameObjects that are not attached to anchors will track initially, but over time and with distance, the tracking accuracy will decline. Non-anchored GameObjects have a single coordinate system that will not update with ARCore as it builds its understanding of the environment.
As discussed previously it is important to be aware that the position of anchors in the scene will adjust over time as ARCore builds a better understanding of the environment. Sometimes this is critical, but sometimes this will throw out your game.
The best practice for a table-top AR game is to create a single anchor that locks the game world to the top of the table. Game elements could then be added to this single anchor, locking them to the table.
For an app that contains objects spread throughout different locations in a room, using separate anchors for each section of the room is better. The anchor positions will then update independently as the environment is better understood.
Note
According to the ARCore documentation, using more than 12 anchors in your session will significantly decrease the performance of your app. This may change in future versions of ARCore, but for now it is an important limitation to be aware of.
Frame
A Frame is a snapshot of the session at the current frame in the app’s update cycle. It provides access to useful global state information such as tracking status, the Pose of the camera relative to the world, environmental lighting, and methods for interacting with tracked objects through raycasting.
The Frame object has these properties, classes, and public functions:
LightEstimate: The current light estimate.Pose: The Pose of the ARCore device in world space.Raycast: Returns true if hits a trackable surface.TrackableHitis set to thehitResult.RaycastAll: Returns true if hits a trackable surface. A list of alltrackableHitsalong the ray is set to thehitResults.CameraMetaData: Contains state information related to the ARCore camera image metadata.PointCloud: Contains state information related to thePointCloudfor that frame.CameraImage: Contains state information related to the ARCore camera.
ARCore Unity Components
The ARCore SDK includes several useful components that are used throughout this book’s ARCore-related recipes. These include components for the ARCore camera, environmental lighting, and plane visualization.
ARCore Device Prefab
The ARCore Device prefab enables ARCore in your app. When added to the root of a Unity scene it starts the session, creates a new ARCore camera, and handles the video rendering from the camera of the Android device.
The ARCoreDevice prefab has a FirstPersonCamera as a child in its hierarchy that acts as the scene’s main camera. It also has an ARCoreSession script attached to it with a default Session Config component linked.
The FirstPersonCamera GameObject has an ARCoreBackgroundRenderer script attached. This script is used to render the video stream from the phone’s camera to the screen via the Unity camera. The TrackedPoseDriver script updates the Unity camera’s local position and rotation to match the Pose of the actual phone.
Environmental Light
This component applies ARCore’s light estimation of the real world to the lighting in the scene. For it to work it requires the GameObject’s material to use one of the ARCore light estimation shaders included with the SDK. It is recommended you use this component in all of your ARCore scenes along with the requisite shader to truly integrate AR GameObjects into the scene.
TrackedPlaneVisualizer
The TrackedPlaneVisualizer is an extremely useful prefab included with the SDK’s HelloAR demo app. Its purpose is to create a visual mesh of the surfaces being tracked. It dynamically increases and decreases in size as ARCore builds a more accurate representation of the environment. Most of the recipes in this chapter use this prefab to represent tracked planes. See Recipe 7.12 for more information on customizing the prefab’s visual style.
Pose
A Pose represents the position and rotation of a GameObject in 3D space. A Pose is a C# structure that is not specific to ARCore; however, it is used a lot in AR and so it is worth incorporating into your standard lexicon of Unity spatial representations.
ARCore Recipes
By the end of this section, you will be familiar with the elements that make up an ARCore session in Unity and be comfortable building some simple AR experiences of your own. The recipes start off with the essential step of setting up the ARCore SDK in Unity. They then move on to building an ARCore template Unity scene that will be used as the base of most of the recipes in this book. From there, you will learn how to interact with objects in AR: place, drag and drop, rotate, and pinch to scale; and use physics to give the objects realistic weight. As well, there are the recipes to implement various helper methods for searching trackables and anchors for GameObjects, and handling the various tracking states of the AR session and for customizing the surface visualization.
Most likely you will not need all of these recipes straight away, but certainly they will be useful in the future as a reference when you are working on your own AR projects.
Important!
If you’ve skipped ahead to this chapter I recommend reading through Chapter 2 and following all the setup instructions. It covers most of the steps for getting your phone and Unity ready for Android development.
To develop ARCore apps on your phone your development environment will need to meet these requirements:
A supported Android phone running Android 7.0 (Nougat) or later, and setup for development with USB debugging enabled; see the setup sections in Chapter 2 for step-by-step instructions. See the full device list here: https://developers.google.com/ar/discover/#supported_devices
Unity 2017.3.0f2 or higher with the Android build support component installed.
Unity setup for Android development with the Android SDK version 7.0 (API Level 24) installed and the Java JDK installed. See Chapter 2 for more info.
Recipe 7.1 Installing and Running ARCore
This recipe installs the ARCore SDK in Unity and builds the HelloAR demo app to your phone. Follow these steps to get it working:
Start by pulling down the ARCore SDK for Unity package from the GitHub site: https://github.com/google-ar/arcore-unity-sdk/releases
Download the .unitypackage file and save it somewhere on your hard drive. As of this writing the latest SDK is arcore-unity-sdk-v1.3.0.unitypackage.
It is a good idea to read through the notes and known issues in the GitHub release page for the version you are downloading.
Back in Unity create a new project, give it a name, such as MyAmazingARproject, and leave 3D selected.
Import the downloaded ARCore SDK into your project by choosing Assets > Import Package > Custom Package. Import everything.
Open the HelloARCore scene. In the Project window go to Assets/GoogleARCore/Examples/HelloAR/Scenes/HelloAR.
Configure the Build Settings. Open the Build Settings by choosing File > Build Settings.
In the Build Settings change the target platform to Android and click Switch Platform.
Click Player Settings to open the Android Player Settings. In Other Settings set Multithreaded Rendering: off (see Figure 7.2).

Figure 7.2 In Other Settings of Player Settings, turn off the Multithreaded Rendering. Update the package name. In Other Settings set the Package Name to a unique name following the standard Java package name convention; for example,: com.mybusiness.myappname (see Figure 7.2).
Set the minimum API level. In Other Settings set the Minimum API Level to Android 7.0 or 7.1 (see Figure 7.2).
Set the target API level. In Other Settings set the Target API Level to Android 7.0 or 7.1 (see Figure 7.2).
Still in the Player Settings, under the XR Settings section, select ARCore supported.
Connect your device to the computer and back in the Build Settings panel, click Build and Run to build to your phone. You will be prompted to save the APK somewhere on your hard drive. The app will then run on your phone; scan your phone around to detect surfaces and tap the detected surfaces to drop a GameObject.
Recipe 7.2 Building an ARCore Template Scene
This recipe creates a simple ARCore scene from scratch. The finished scene can then be used as a template and a starting point for all ARCore apps. It is a simplified version of the HelloARCore example that comes with the SDK, but because it is built from scratch it will help you understand every step in the setup.
The recipe adds the necessary components to get ARCore working. As well, it provides a class to track surfaces that in turn allow the user to place GameObjects on the surfaces via raycasting.
Open a new Unity scene in a project that has ARCore installed (see Recipe 7.1) and follow the steps. You can see the finished recipe by opening Recipe_7.2_finished scene in the companion files.
Create a new empty scene.
Create a “snack bar” at the bottom of the screen to display useful feedback from the system. It is made up of a text field and a solid background. Create a Canvas, and leave the default settings—its Render Mode should be Screen Space–Overlay.
Unlike the example in the
HelloARscene included in the SDK, we won’t deactivate the snack bar when a surface has been detected and is tracking, but instead leave it active to display and display debug information and useful state info.Add a UI image as a child of the Canvas and call it SnackBar. Update its
RectTransformpositions to look like Figure 7.3.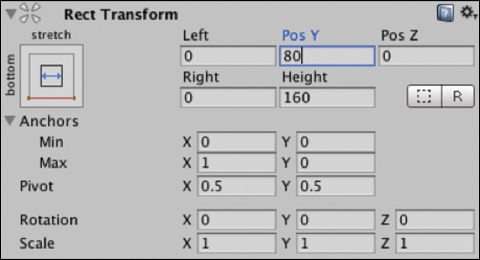
Figure 7.3 UI Image Rect Transform. Click the SnackBar’s AnchorPresets and select the bottom and stretch boxes; see Figure 7.4. This locks the snack bar to the bottom of the screen and stretches its width to the edges of the phone.
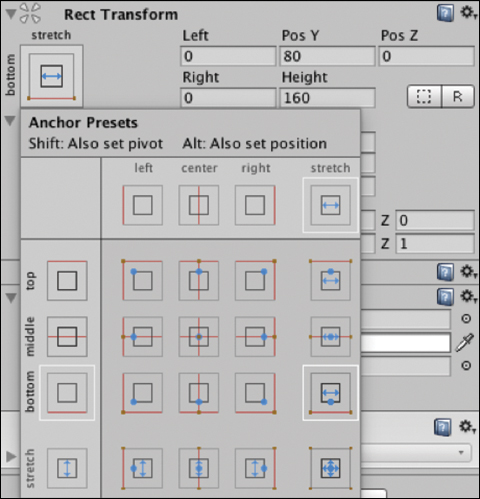
Figure 7.4 SnackBar’s anchor presets. In the SnackBar’s Inspector, update the image color to be black and slightly transparent by selecting the color field of the Image component; see Figure 7.5.
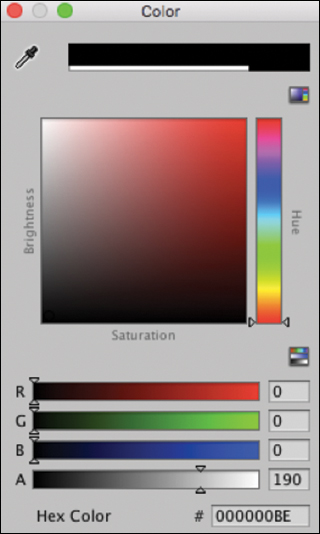
Figure 7.5 Color picker showing slight transparency. Add a UI Text component as a child of the
SnackBar, select the text field’s anchor presets, and set them to middle, left. See Figure 7.6.
Figure 7.6 Text field’s anchor presets. Extend the width of the text field to 600 and its height to 100, and update its Pos X: 80 and change its Pivot X: 0. The Rect Transform should look like Figure 7.7.
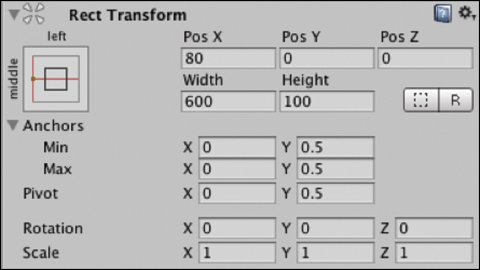
Figure 7.7 The text field’s Rect Transform. Select the Text component and in the Inspector update the Text to read Searching, change its color to white, and update its Font Size: 45.
Add the ARCoreDevice prefab (GoogleARCore/Prefabs) to the scene by dragging it from the Project window into the scene hierarchy.
Add the environmental light prefab to the scene hierarchy by dragging it in from the Project window (GoogleARCore/Prefabs).
Create an empty GameObject called
EventSystemand add to it anEventSystemcomponent. In the Inspector, select Add Component > Event System and then do the same to add aStandaloneInputModulecomponent.Add a directional light to the scene. This can activate/deactivate depending on your own preference, if the environmental light is not enough, or your objects don’t use the correct shader.
Add an empty GameObject called
Scriptsto the hierarchy.Create a new script called
SurfaceDetectionControllerand add it to theScriptsGameObject.Update it to look like Listing 7.1.
Listing 7.1
SurfaceDetectionControllerScript
using System.Collections.Generic;
using UnityEngine;
using GoogleARCore;
using UnityEngine.UI;
using GoogleARCore.Examples.Common;

public class SurfaceDetectionController : MonoBehaviour {

    public Camera FirstPersonCamera;
    public GameObject TrackedPlanePrefab;
    public Text debugText;
    public GameObject objectToPlacePrefab;

    private List<DetectedPlane> newPlanes = new List<DetectedPlane>();

    public void Update() {
        Session.GetTrackables<DetectedPlane>(newPlanes, TrackableQueryFilter.New);
        for (int i = 0; i < newPlanes.Count; i++) {
            GameObject planeObject = Instantiate(TrackedPlanePrefab,
                Vector3.zero,
                Quaternion.identity,
                transform);
            planeObject.GetComponent<DetectedPlaneVisualizer>()
                .Initialize(newPlanes[i]);
        }

        Touch touch;
        if (Input.touchCount < 1 ||
            (touch = Input.GetTouch(0)).phase != TouchPhase.Began) {
            return;
        }

        TrackableHit hit;
        TrackableHitFlags raycastFilter = TrackableHitFlags. PlaneWithinPolygon |
            TrackableHitFlags.FeaturePointWithSurfaceNormal;

        if (Frame.Raycast(touch.position.x,
            touch.position.y,
            raycastFilter,
            out hit)) {
            GameObject placedObject =
                Instantiate(objectToPlacePrefab,
                    hit.Pose.position,
                    hit.Pose.rotation);

            var anchor = hit.Trackable.CreateAnchor(hit.Pose);

            if ((hit.Flags &
                TrackableHitFlags.PlaneWithinPolygon) !=
                TrackableHitFlags.None) {
                Vector3 cameraPositionSameY =
                    FirstPersonCamera.transform.position;
                cameraPositionSameY.y = hit.Pose.position.y;
                placedObject.transform.LookAt(cameraPositionSameY,
                    placedObject.transform.up);
            }
            placedObject.transform.parent = anchor.transform;
        }
    }
}
This class handles the tracking of surfaces and the placement of the surface visualization. Four public properties are declared at the start in order to link to various GameObjects in the Editor, namely the ARCamera, the DetectedPlanePrefab for the surface visualization, the debugText for the snack bar, and the objectToPlacePrefab, which is the object added to the surface when the user taps. The newPlanes list keeps a track of any new plane being tracked in the scene.
In the Update method, the Session.GetTrackables function is called using Trackable QueryFilter.NEW, meaning that only newly added trackables are added to the newPlanes list. A for loop iterates through the new planes and instantiates a detectedPlanePrefab and the DetectedPlaneVisualizer component Initialize method is called passing in the actual plane as an argument. This takes care of the placement, tiling, and size of the surface visualization.
If there are no touch events on the screen or if the Touch phase is anything other than Began, the conditional operator returns out of the Update loop and no more code is executed in that frame.
The next section of code sets up a raycast filter to look for horizontal surfaces. It then calls Frame.Raycast within a conditional operator to cast a ray from the touchpoint out from the screen. If the ray returns true then the Pose of the Hit result is used to instantiate a GameObject at that location on the surface. An Anchor is created on the Trackable. The GameObject is then rotated to look toward the camera, staying planar to the surface, and parented to the Anchor, meaning that it will now be tracked correctly by ARCore.
Select the
ScriptsGameObject and drag in the required components into the public fields of theSurfaceDetectionControllerscript in the Inspector; see Figure 7.8. The First Person Camera is a child of the ARCore Device prefab in the hierarchy, and theDetectedPlaneVisualizeris in the SDK’s HelloAR folder (Assets/GoogleARCore/Examples/Common/Prefabs). The debug text is the text field created in step 6 and the object to place can be any prefab in your project that you want to place in AR. There is a basic cube included for this project with the environment light shader added to it.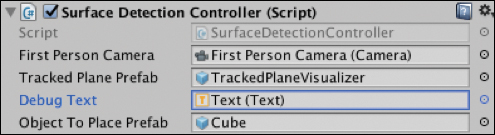
Figure 7.8 The SurfaceDetectionController with public fields connected. Build and Run the project on an ARCore-enabled device and when it detects a surface, tap to place the prefab on that plane.
AR Required and AR Optional
There are two possible modes for enabling ARCore in your app: AR Required and AR Optional.
AR Required: Means that the app will only run on AR-enabled devices and is only available to devices that support ARCore.
AR Optional: Means that the app does not require AR to run, and so may run on non-AR-enabled devices.
All Unity ARCore apps are set to AR Required by default. To toggle this setting go to Edit > Project Settings > ARCore > ARCore Required.
Recipe 7.3 Selecting and Dragging Objects along a Plane
This recipe creates a simple drag-and-drop mechanism that lets the user place an object on the surface and then drag it around with a one-finger touch.
The starting point is the end of the previous recipe (or the Recipe_7.3_start scene in the companion files). In the Scripts GameObject I have removed the linked Debug Text and Object To Place prefab from the SurfaceDetectionController in the Inspector, which will be handled by a new script that is created in this recipe.
Open
Recipe_7.3_startand create a new class calledTouchAndDragControllerand add it to theScriptsGameObject. Update it to look like Listing 7.2.Listing 7.2
TouchAndDragControllerScript
using System.Collections;
using System.Collections.Generic;
using UnityEngine;
using UnityEngine.UI;
using GoogleARCore;

public class TouchAndDragController : MonoBehaviour {

    public GameObject objectToPlacePrefab;
    public Camera firstPersonCamera;
    public Text debugText;

    private GameObject placedObject;
    private bool isDragging = false;
    private Vector3 touchOffset;

    void Update () {

        Touch touch = Input.GetTouch(0);
        if (Input.touchCount < 1) {
            debugText.text = "DRAG ENDED";
            isDragging = false;
            return;
        }

        if (touch.phase == TouchPhase.Began) {

            // Raycast against GameObjects
            Ray ray = firstPersonCamera.ScreenPointToRay (touch.position);
            RaycastHit hit;
            if (Physics.Raycast (ray, out hit, Mathf.Infinity,
                Physics.AllLayers, QueryTriggerInteraction.Collide)) {
                if (hit.transform.gameObject.tag == "Grabbable") {
                    isDragging = true;
                    GameObject touchObject = hit.transform.gameObject;
                    float xOffset =
                        touchObject.transform.position.x - hit.point.x;
                    float zOffset =
                        touchObject.transform.position.z - hit.point.z;
                    touchOffset = new Vector3 (xOffset,
                        touchObject.transform.position.y,
                        zOffset);
                }
            }
        }

        TrackableHit trackableHit;
        TrackableHitFlags raycastFilter = TrackableHitFlags. PlaneWithinPolygon |
            TrackableHitFlags.FeaturePointWithSurfaceNormal;

        // Raycast against ARCore trackables
        if (Frame.Raycast(touch.position.x,
            touch.position.y, raycastFilter, out trackableHit)) {
            if (placedObject == null) {
                placedObject = Instantiate (objectToPlacePrefab,
                    trackableHit.Pose.position,
                    trackableHit.Pose.rotation);
                var anchor =
                    trackableHit.Trackable.CreateAnchor (trackableHit.Pose);
                placedObject.transform.parent = anchor.transform;
                debugText.text = "Placed Object";
            }
            else if (isDragging) {
                debugText.text = "isDragging";
                Vector3 dragPos =
                    new Vector3 (trackableHit.Pose.
                        position.x - touchOffset.x,
                        trackableHit.Pose.position.y,
                        trackableHit.Pose.position.z  - touchOffset.z);
                placedObject.transform.position = dragPos;
                Vector3 planarY = firstPersonCamera.transform.position;
                planarY.y = trackableHit.Pose.position.y;
                placedObject.transform.LookAt(planarY,
                    placedObject.transform.up);
            }
        }
    }
}
This class handles the placement and then the dragging of the placed object across a tracked surface. It does this by implementing two different types of raycast: one for the tracked ARCore surfaces and another for the placed Unity GameObjects.
The
Updatemethod starts by testing to see if the Touch count is less than one; that is, the screen is not being touched, and if true, it returns so that no more code is executed. If the Touch phase is equaltoBegan, it implements a standard Unity physicsRaycastto test for hits against 3D objects. The purpose of this raycast is to test whether the user has tapped on a “grabbable” GameObject, the one that was initially placed there. If it hits a grabbable GameObject the touch offset is saved to a variable to be used to give an accurate drag position.The next block of code involves the second raycast for hit testing against ARCore trackables. It contains an
ifandelse ifcondition. If the placed object is null, it instantiates an object at the hit location on the tracked plane. If theisDraggingboolean is true it moves the placed object’s position to the hit position of the touch intersection on the surface minus the touch offset that was previously recorded. The placed object is rotated toLookAtthe camera, without tilting upward.Set up the GameObject that will be dragged. You can use any GameObject. There is a GameObject included in the project called Soldier (Assets/Chapter07/SharedAssets). However, whichever GameObject you decide to use you will need to add the “Grabbable” tag to it so that it will be detected through the hit test. Do this by selecting the prefab, and in the Inspector in the Tag drop-down menu, select Add Tag.
Create a new tag by clicking the + button and typing the name Grabbable (see Figure 7.9).
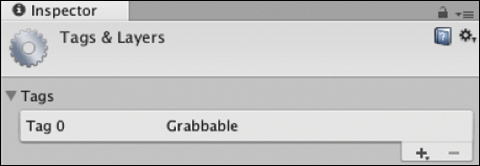
Figure 7.9 The Tags & Layers Inspector. The previous steps only make the tag. They do not add it to the GameObject. To add it to the GameObject, select the prefab in the Project window again, and in the Inspector in the Tag drop-down menu, select the Grabbable tag; see Figure 7.10.
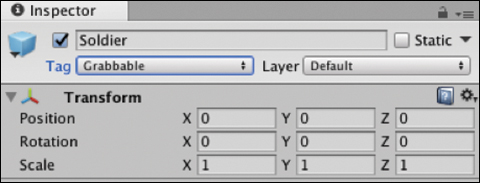
Figure 7.10 The Grabbable tag added to the SoldierGameObject.For the hit test to work, your GameObject needs a collider component added to it. The default Unity primitive shapes already have colliders attached, but many imported models do not. I have already added a Box Collider to the Soldier prefab so there is no need to add another, but if you need to it is an easy process of clicking Add Component in the Inspector and searching for
BoxCollider. See Chapter 6 on physics games for more.Make sure the required objects are hooked up to the empty fields in the
TouchAndDragControllercomponent in the Inspector; see Figure 7.11.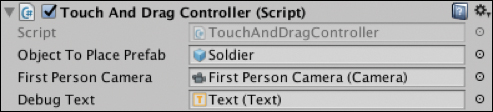
Figure 7.11 The TouchAndDragControllerscript with the public fields hooked up.Build and Run on your device.
Recipe 7.4 Dragging Objects with Physics Weight
This recipe creates a drag-and-drop mechanic using physics spring joints and adds weight to the object to give it a more realistic feel. It also uses a LineRenderer and a Bézier curve equation to draw a curved line from the phone’s screen to the object being dragged.
The starting point is the end of recipe 7.2, or the Recipe_7.4_start scene. In the same way as in the previous recipe, in the Scripts GameObject the linked Debug Text and Object to Place prefab from the SurfaceDetectionController have been removed in the Inspector; they will be added from another class.
Open the
Recipe_7.4_startscene and create a new class calledTouchAndDragPhysicsController.The folder of this recipe (Assets/Chapter07/Chapter7.4) has a copy of the Soldier prefab from the previous recipe, except a
RigidBodycomponent has been added (Add Component > RigidBody). The soldier model has been copied and arigidbodyadded to it and updated to the following settings: useGravity: true, Mass: 5, Interpolate, and Continuous. See Figure 7.12.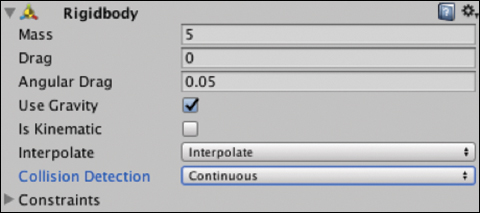
Figure 7.12 The soldierGameObject’s Rigidbody component.Create a new C# script called
TouchAndDragPhysicsControllerand add it to thescriptsGameObject and update it to look like Listing 7.3.Listing 7.3
TouchAndDragPhysicsControllerScript
using System.Collections;
using System.Collections.Generic;
using UnityEngine;
using GoogleARCore;
using UnityEngine.UI;

public class TouchAndDragPhysicsController : MonoBehaviour {

    public GameObject objectToPlacePrefab;
    public Camera firstPersonCamera;
    public Text snackBarText;
    public SpringJoint springJoint;
    public GameObject invisibleFloorPrefab;
    public DragLineController dragLineController;

    private GameObject placedObject;
    private float grabbedDistance;
    private Vector3 localHitPosition;
    private Ray dragRay;

    void Start () {
        dragLineController.gameObject.transform
            .SetParent(firstPersonCamera.transform);
        dragLineController.lineRenderer.enabled = false;
    }

    void Update () {
        Touch touch = Input.GetTouch(0);
        if (Input.touchCount < 1) {
            if (springJoint.connectedBody) {
                snackBarText.text = "No Touch";
                springJoint.connectedBody = null;
                dragLineController.lineRenderer.enabled = false;
            }
            return;
        }

        Ray touchRay = firstPersonCamera.ScreenPointToRay (touch.position);

        // RAYCASTS AGAINST GRABBABLE OBJECTS IN SCENE
        if (touch.phase == TouchPhase.Began) {
            RaycastHit hit;
            if (Physics.Raycast (touchRay, out hit, Mathf.Infinity,
                Physics.AllLayers, QueryTriggerInteraction.Collide)) {
                if (hit.transform.gameObject.tag == "Grabbable") {
                    if (!springJoint.connectedBody) {
                        Rigidbody rigidbody = hit.rigidbody;
                        if (rigidbody) {
                            springJoint.connectedBody = rigidbody;
                            localHitPosition = hit.point;
                            localHitPosition =
                                springJoint.connectedBody.transform
                                  .InverseTransformPoint (localHitPosition);
                            Vector3 grabPos =
                                Vector3.Lerp (springJoint.connectedBody.
                                transform.position, hit.point, 0.5f);
                            springJoint.transform.position = grabPos;
                            springJoint.connectedAnchor =
                                springJoint.connectedBody.transform
                                    .InverseTransformPoint (grabPos);
                            grabbedDistance = hit.distance;
                            dragLineController.lineRenderer.enabled = true;
                        }
                    }
                }
            }
            dragRay = touchRay;
        }
        else if (touch.phase == TouchPhase.Moved
            || touch.phase == TouchPhase.Stationary) {
            snackBarText.text = "Moved";
            dragRay = touchRay;
        }
        else if (touch.phase == TouchPhase.Ended) {
            snackBarText.text = "Drag Ended";
            springJoint.connectedBody = null;
            dragLineController.lineRenderer.enabled = false;
        }

        /// RAYCASTS AGAINST ARCORE SURFACES BEING TRACKED
        TrackableHit trackableHit;
        TrackableHitFlags raycastFilter = TrackableHitFlags. PlaneWithinPolygon |
            TrackableHitFlags.FeaturePointWithSurfaceNormal;

        if (Frame.Raycast(touch.position.x,
            touch.position.y, raycastFilter, out trackableHit)) {
            if (placedObject == null) {
                placedObject =
                    Instantiate (objectToPlacePrefab, trackableHit.Pose.
                    position, trackableHit.Pose.rotation);
                var anchor =
                    trackableHit.Trackable.CreateAnchor (trackableHit.Pose);
                placedObject.transform.parent = anchor.transform;

                // create the physics floor for the object to bounce off
                GameObject invisibleFloor =
                   Instantiate (invisibleFloorPrefab, trackableHit.Pose.
                   position, invisibleFloorPrefab.transform.rotation);
                invisibleFloor.transform.parent = anchor.transform;
            }
        }
    }

    private void FixedUpdate() {
        if (springJoint.connectedBody) {
            springJoint.transform.position =
                dragRay.origin+dragRay.direction*grabbedDistance;
            springJoint.connectedBody
                .AddForce(-Physics.gravity * 0.75f, ForceMode.Acceleration);
            springJoint.connectedBody
                .AddForce(-springJoint.connectedBody.velocity
                    * 0.5f, ForceMode.Acceleration);
            Vector3 angularVelocity = springJoint.connectedBody. angularVelocity;
            angularVelocity /= 1.0f+1.0f*Time.deltaTime;
            springJoint.connectedBody.angularVelocity = angularVelocity;
        }
    }

    private void LateUpdate() {
        if (dragLineController.lineRenderer.enabled) {
            dragLineController.startPosition =
                dragLineController.transform.position;
            dragLineController.endPosition =
                springJoint.connectedBody.transform
                    .TransformPoint(localHitPosition);

            float lineDistance =
                Vector3.Distance(dragLineController.startPosition,
                    dragLineController.endPosition);
            dragLineController.controlPosition =
                dragLineController.transform.position
                + dragLineController.transform.forward*(lineDistance/2);
            dragLineController.UpdateLineRenderer();
        }
    }
}
This class is similar to the
DragAndDropControllerfrom Recipe 7.3 except that it uses Unity’s physics spring joints to drag the placed object around.In the
Startmethod thedragLineControlleris parented to the camera, so theLineRenderer’s start point moves with the camera. It is then deactivated.In the
Updatefunction the Touch count is checked; if the screen is not being touched and the spring joint has a connected body, this is set tonulland theLineRendereris deactivated.As in Recipe 7.3 there are two raycasts: one for 3D objects in the scene and the other for ARCore trackables. The first raycast tests for an intersection with 3D objects in the scene; if there is a hit, the hit object’s tag is compared to the string “Grabbable.” If the current
springJointdoes not have a connected body, check to make sure the hit test object has arigidbody; and, if it does, it is set to thespringJoint’s connected body. The hit point on the object is then switched to local coordinates using theInverseTransformPointmethod. It then creates agrabPositionby Lerping between the hit position and the actual position of thespringjoints. ThespringJoint’s position is then set to this. The distance along the ray between the phone and the hit point is recorded asgrabbedDistanceand theLineRendereris activated to start drawing the line. The variabledragRayis then set to thetouchRayto be used in calculations later.If the touch phase is equal to
MovedorStationary, thedragRayis again updated totouchRayin order to be used in thespringJoint’s positional calculations in theFixedUpdatemethod.If the touch phase equals
EndedthespringJoint’sconnected body is set tonull, and thendragLineController’s LineRendereris deactivated.The second raycast block of code hit-tests against ARCore trackables and is essentially the same as the code in the previous recipe. If the
placedObjectis equal tonull, and it is the first time through, and there is a hit on a trackable, it places theobjectToPlacePrefabat that location and instantiates a large flat floor GameObject so that when the grabbed object is thrown, it bounces off the ground. This flat floor is invisible, the mesh renderer is disabled in the Editor, and it is parented to the anchor to keep position.Repositioning of the physics-related objects takes place in the
FixedUpdatemethod. If thespringJointhas aconnectedBody, thespringJoint’s position is updated based on the position of the drag. Some forces are added to theconnectedBodyand its angular velocity to give its movement a bit of a boost.The
LateUpdatemethod is the place to draw the line, after all the physics and placement of objects has been taken care of. If theLineRendereris enabled, that is, the drag has started, the start position of the line is set to the position of theDragLineController, and the end point is set to theconnectedBody localHitPosition; that is, the location where the touch intersection initially occurred. The control point for the Bézier curve is then calculated and set to thedragLineController’scontrolPositionproperty. TheLineRendereris then updated from within thedragLineControllerclass using theUpdateLineRenderermethod.Create an empty GameObject and call it
RaycastDragTarget. It will house aRigidBodyand theSpringJointto connect with the object being dragged and will give it a spring bounce.Add a
Rigidbodycomponent to theRaycastDragTargetGameObject (Add Component > Physics > Rigidbody) and setisKinematicto true and UseGravityto false. See Figure 7.13.
Figure 7.13 The RaycastDragTarget’s Rigidbodycomponent.Add a Spring Joint component to the
RaycastDragTargetGameObject (Add Component > Physics > Spring Joint) and update the Spring to 40. Feel free to play around with this value to make it more or less springy; see Figure 7.14.
Figure 7.14 The Spring Joint component. Create a new empty GameObject and call it
DragLine. This will house the Line Renderer and the script to create and update a Bézier curve.Select the
DragLineGameObject and, in the Inspector, click Add Component > Effects > Line Renderer and set the Width to 0.0005. Update theLineRendererto have 16 segments—under Positions set Size to 16 and Use World Space: true. Also set the Corner Vertices and End Cap Vertices to 10 (see Figure 7.15).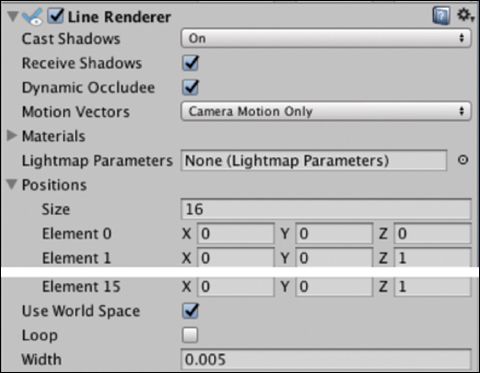
Figure 7.15 The LineRenderer.Create a new C# class called
DragLineController, add it to theDragLineGameObject, and update it to look like Listing 7.4.Listing 7.4
DragLineControllerScript
using System.Collections;
using System.Collections.Generic;
using UnityEngine;

public class DragLineController : MonoBehaviour {

    [System.NonSerialized]
    public LineRenderer lineRenderer;
    [System.NonSerialized]
    public Vector3 startPosition;
    [System.NonSerialized]
    public Vector3 controlPosition;
    [System.NonSerialized]
    public Vector3 endPosition;

    void Start (){
        lineRenderer = GetComponent<LineRenderer> ();
    }

    public void UpdateLineRenderer() {
        if (lineRenderer.enabled) {
            for (int i = 0; i < lineRenderer.positionCount; i++) {
                float ratio = (float)i/(lineRenderer.positionCount-1);
                Vector3 pos =
                  Bezier(startPosition, controlPosition, endPosition, ratio);
                lineRenderer.SetPosition(i, pos);
            }
        }
    }

    private Vector3 Bezier(Vector3 a, Vector3 b, Vector3 c, float ratio) {
        Vector3 startToMid = Vector3.Lerp(a, b, ratio);
        Vector3 midToEnd = Vector3.Lerp(b, c, ratio);
        return Vector3.Lerp(startToMid, midToEnd, ratio);
    }
}
The
DragLineControllerhandles the drawing of the Bézier curve from the hit object to the phone’s screen. Several public properties are declared in the class. These are prefaced with theSystem.NonSerializeddirective so that they cannot be adjusted in the Editor.In the
Startmethod, thelineRendereris associated to the GameObject’sLineRenderercomponent.The public
UpdateLineRenderermethod is called from theTouchAndDragPhysics Controllerclass. It checks to see if theLineRendereris enabled, and if so cycles through each of the points along the line and updates their position based on the Bézier curve equation. The Bézier equation creates a simple arc between a start point, end point, and control point and using the ratio along the curve of the current point.Create an invisible floor plane with a collider. This will be used as the physics-enabled ground for the dragged object to bounce off when it intersects with the tracked surface. Create a large (like REALLY large, larger than your room large; I scaled mine to around 8x8 on the x and z) horizontal plane and call it InvisibleFloor. Drag it into the Project window to turn it into a prefab and delete it from the scene. Select the InvisibleFloor prefab and in the Inspector deselect its
Mesh Renderercomponent. This will mean that its surface won’t be rendered, therefore making it invisible. Also make sure that it has a Box Collider already added, if not add one by clicking Add Component and searching for BoxCollider in the Inspector.Hook all the public fields in the
TouchAndDragPhysicsControllerto the required objects; see Figure 7.16. Both the SoldierRigidBody and the InvisibleFloor prefab are dragged directly from the Project window; they will be added to the scene programmatically.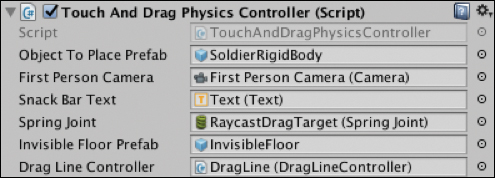
Figure 7.16 The TouchAndDragPhysicsControllerwith the public fields hooked up.Build and Run.
Recipe 7.5 Selecting an Object and Rotating It
This recipe lets the user tap and drag to rotate a GameObject placed in the scene. It starts from the Recipe_7.5_start scene. This is the base template created in Recipe 7.2, but with the references to the ObjectToPlacePrefab and the snack bar text removed from the SurfaceDetectionController script.
Open the Recipe_7.5_start scene, and follow these steps:
Create a new script called
TouchAndRotateController, add it to theScriptsGameObject, and update it to look like Listing 7.5.Listing 7.5
TouchAndRotateControllerScript
using UnityEngine;
using UnityEngine.UI;
using GoogleARCore;

public class TouchAndRotateController : MonoBehaviour {

    public GameObject objectToPlacePrefab;
    public Camera firstPersonCamera;
    public Text snackBarText;

    private GameObject touchObject;
    private bool isRotating = false;
    private Vector2 previousPos;

    void Update () {

        Touch touch = Input.GetTouch(0);
        if (Input.touchCount < 1)
        {
            return;
        }

        // RAYCASTS AGAINST GRABBABLE OBJECTS IN SCENE
        if (touch.phase == TouchPhase.Began) {
            Ray ray = firstPersonCamera.ScreenPointToRay (touch.position);
            RaycastHit hit;
            if (Physics.Raycast (ray, out hit, Mathf.Infinity,
                Physics.AllLayers, QueryTriggerInteraction.Collide)) {
                if (hit.transform.gameObject.tag == "Grabbable") {
                    isRotating = true;
                    touchObject = hit.transform.gameObject;

                    Vector3 bumpUp =
                        new Vector3 (touchObject.transform.position.x,
                        touchObject.transform.position.y
                            + (touchObject.GetComponent<Collider>().
                            bounds.size.y / 4f),
                            touchObject.transform.position.z);
                    touchObject.transform.position = bumpUp;
                    previousPos = touch.position;
                }
            }
        }
        else if (touch.phase == TouchPhase.Ended) {
            isRotating = false;
            snackBarText.text = "ROTATE ENDED";
            Transform parentTrans = touchObject.transform.parent;
            Vector3 bumpDown = new Vector3 (touchObject.transform.
               position.x, parentTrans.position.y,
                touchObject.transform.position.z);
            touchObject.transform.position = bumpDown;
            return;
        }

        /// RAYCASTS AGAINST ARCORE SURFACES BEING TRACKED
        TrackableHit trackableHit;
        TrackableHitFlags raycastFilter = TrackableHitFlags. PlaneWithinPolygon |
            TrackableHitFlags.FeaturePointWithSurfaceNormal;

        if (Frame.Raycast(touch.position.x, touch.position.y, raycastFilter, out trackableHit)) {
            if (touchObject == null) {
                touchObject = Instantiate (objectToPlacePrefab,
                    trackableHit.Pose.position, trackableHit.Pose.
                    rotation);
                var anchor =
                    trackableHit.Trackable.CreateAnchor (trackableHit.
                    Pose);
                touchObject.transform.parent = anchor.transform;
            }
        }

        if (isRotating) {
            snackBarText.text = "isRotating";
            float rot = previousPos.x - touch.position.x;
            touchObject.transform.Rotate (Vector3.up * rot);
            previousPos = touch.position;
        }
    }
}
The
TouchAndRotateControllerscript is similar to the controller scripts from the previous recipes in that it contains two raycasts, one for 3D objects and the other for ARCore trackables. The difference in this script is that on touch the object is selected and rotated, instead of being dragged.Inside the first raycast, there is a
Vector3calledbumpUp; this is set to a position just above the selected object and it sets the object to this higher position. Bumping the object up like this gives it a “selected” feel when touched. Here, too, theisRotatingboolean is set totrue.In the
TouchPhase.Ended, the object is bumped back down to its original y-position, and theisRotatingBoolean is set tofalse.The actual rotation happens toward the end of the class. The rotation is calculated as the delta of the touch position since the last frame. The
transform.Rotatemethod is then used to apply rotation to the object. The current touch position is then stored as thepreviousPosto be used in the same calculation in the next frame.At this stage, the various objects need to be hooked up to the public fields in the
TouchAndRotateControllerscript; see Figure 7.17. For the Object To Place prefab, you can use any object you want: the finished version of this recipe uses the Soldier prefab (Assets/Chapter07/SharedAssets). Whichever prefab you use, remember to add the “Grabbable” tag to it so that it will be selected in the hit test (see Recipe 7.3 for details on adding tags). The first-person camera is a child of the ARCore Device prefab and the snack bar text is the text component child of the snack bar UI (Canvas > SnackBar > Text). Also note, in theSurfaceDetectionControllercomponent, to remove the references to the Object to Place prefab and snack bar text, because the object is now being placed from theTouchAndRotate Controllerscript.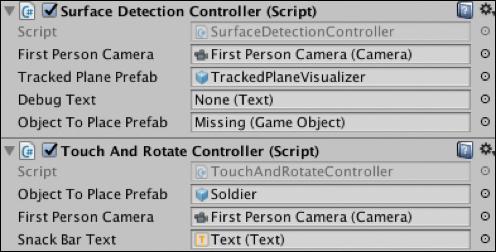
Figure 7.17 The SurfaceDetectionandTouchAndRotateControllerscripts.Build and Run.
Recipe 7.6: Creating a Target Below the Landing Position of the Dragged Object
This recipe places a target reticle under a GameObject being dragged around the surface. On TouchPhase.Began the object is lifted up slightly and the target is placed on the surface directly below it, following the object’s x and z positions.
To get started open the Recipe_7.6_start scene and follow these steps:
The Recipe_7.6_start scene is basically Recipe 7.2 finished with a couple of the references in the SurfaceDetectionController component removed. Open this scene, and follow these steps:
Create an image to use for the reticle/target. There is a prefab of one included in the companion files called Ring (Assets/chapter07/chapter7.6_Target). It is 128x128 pixels and its Texture type is set to Sprite (2D and UI). Feel free to use this texture in your own projects and in this recipe.
Because the Ring target will be a UI Image, it needs to be placed in a Canvas in world space. Create a new Canvas in the scene (choose GameObject > UI > Canvas) and in the Inspector set the Canvas’s Render Mode to World Space. In the Canvas’s Rect Transform set the width: 830 and height: 300, and change the name of the Canvas to TargetCanvas.
Add the Ring sprite to the Canvas by dragging the Canvas into the hierarchy. Update the Ring’s rotation: (90, 0, 0) and scale it down to (0.46, 0.46, 0.46); see Figure 7.18.

Figure 7.18 The Ring’s Transform component. Create a new script called
TargetController. Add it to theScriptsGameObject and updated it to look like Listing 7.6.Listing 7.6
TargetControllerScript
using UnityEngine;
using UnityEngine.UI;
using GoogleARCore;

public class TargetController : MonoBehaviour {

    public GameObject target;
    public TouchAndDragTargetController touchAndDrag;
    public Text snackBarText;

    void Start () {
        target.SetActive (false);
    }

    void Update () {
        if (touchAndDrag.isDragging) {
            target.SetActive (true);
            Transform placedObjTrans = touchAndDrag.placedObject.transform;
            Transform parentTrans = placedObjTrans.parent;
            Vector3 targetPos =
                new Vector3 (placedObjTrans.position.x,
                    parentTrans.position.y,
                    placedObjTrans.position.z);
            target.transform.position = targetPos;
        }
        else {
            target.SetActive (false);
        }
    }
}
The
TargetControllerhandles the movement of the target reticle underneath the object being dragged. In theUpdatemethod, if the object is currently being dragged, the target is activated and then its x and z coordinates are set from the dragged object. The y position, on the other hand, comes from the dragged object’s parent, which is the anchor. This keeps the target flat on the tracked surface. When the dragging has finished, the target is deactivated.Create a new class
TouchAndDragTargetControllerand update it to look like Listing 7.7. It is similar toTouchAndDragControllerfrom 7.3 but with some updates for it to work with this recipe.Listing 7.7
TouchAndDragTargetControllerScript
using UnityEngine;
using UnityEngine.UI;
using GoogleARCore;

public class TouchAndDragTargetController : MonoBehaviour {

    public GameObject objectToPlacePrefab;
    public Camera firstPersonCamera;
    public Text snackBarText;
    public bool isDragging = false;
    public GameObject placedObject;

    private Vector3 touchOffset;

    void Update () {

        Touch touch = Input.GetTouch(0);
        if (Input.touchCount < 1){
            return;
        }

        // RAYCASTS AGAINST GRABBABLE OBJECTS IN SCENE
        if (touch.phase == TouchPhase.Began) {
            Ray ray = firstPersonCamera.ScreenPointToRay (touch.position);
            RaycastHit hit;
            if (Physics.Raycast (ray, out hit, Mathf.Infinity,
                Physics.AllLayers, QueryTriggerInteraction.Collide)) {
                if (hit.transform.gameObject.tag == "Grabbable") {
                    snackBarText.text = "Began Hit";
                    isDragging = true;
                    GameObject touchObject = hit.transform.gameObject;
                    float xOffset = touchObject.transform.position.x
                        - hit.point.x;
                    float zOffset = touchObject.transform.position.z
                        - hit.point.z;
                    touchOffset = new Vector3 (xOffset,
                        touchObject.transform.position.y, zOffset);
                }
            }
        }
        else if (touch.phase == TouchPhase.Ended) {
            isDragging = false;
            snackBarText.text = "DRAG ENDED";
            Transform parentTrans = placedObject.transform.parent;
            Vector3 endPos = new Vector3 (placedObject.transform.
                 position.x, parentTrans.position.y,
                placedObject.transform.position.z);
            placedObject.transform.position = endPos;
            return;
        }

        /// RAYCASTS AGAINST ARCORE SURFACES BEING TRACKED
        TrackableHit trackableHit;
        TrackableHitFlags raycastFilter = TrackableHitFlags. PlaneWithinPolygon |
            TrackableHitFlags.FeaturePointWithSurfaceNormal;

        if (Frame.Raycast(touch.position.x, touch.
            position.y, raycastFilter, out trackableHit)) {
            if (placedObject == null) {
                placedObject = Instantiate (objectToPlacePrefab,
                    trackableHit.Pose.position, trackableHit.Pose.
                    rotation);
                var anchor =
                    trackableHit.Trackable.CreateAnchor (trackableHit.
                    Pose);
                placedObject.transform.parent = anchor.transform;
                snackBarText.text = "Placed";
            }
            else if (isDragging) {
                snackBarText.text = "isDragging";
                Vector3 dragPos =
                    new Vector3 (trackableHit.Pose.position.x -
                    touchOffset.x, touchOffset.y
                        + (placedObject.GetComponent<Collider>().bounds.
                           size.y / 4f),
                    trackableHit.Pose.position.z  - touchOffset.z);
                placedObject.transform.position = dragPos;
                Vector3 planarY = firstPersonCamera.transform.position;
                planarY.y = trackableHit.Pose.position.y;
                placedObject.transform.LookAt(planarY,
                    placedObject.transform.up);
            }
        }
    }
}
The
TouchAndDragTargetControlleris essentially the same as the controller from Recipe 7.3 with a few simple changes. Namely, theisDraggingboolean and theplacedObjectGameObject are public so they can be accessed from theTargetController. Also, theplacedObjectgets bumped up slightly on the y-position while it is being dragged, similar to Recipe 7.5, so as to expose the target on the surface beneath.Hook up all the public fields in the Inspector for the
TouchAndDragTargetControllerandTargetControllerscripts; see Figure 7.19.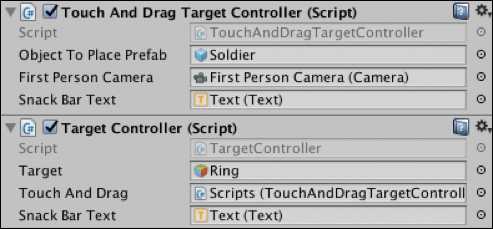
Figure 7.19 The TouchAndDragTargetControllerandTargetControllerscripts.Build and Run.
Recipe 7.7 Retrieving All GameObjects Attached to an Anchor
This recipe creates a method that returns all GameObjects attached to a given anchor. Because an anchor extends the Monobehaviour class and has an associated GameObject, it is possible to cycle through the child transforms of the GameObject to extract its children.
The Recipe_7.7_finished scene shows the method in action. It instantiates a group of GameObjects and attaches them to an anchor. It then uses the GetGameObjectsForAnchor method in Listing 7.8 to return and display the number of GameObjects attached to that anchor.
Listing 7.8 Return All GameObjects on an Anchor
private List<GameObject> GetGameObjectsForAnchor(Anchor anchor){
        List<GameObject> children = new List<GameObject>();
        Transform ancTrans = anchor.gameObject.transform;
        foreach (Transform childTrans in ancTrans) {
            children.Add (childTrans.gameObject);
        }
        return children;
    }
Recipe 7.8 Retrieving All GameObjects Attached to a Trackable
Following on with Recipe 7.7, it is also possible to extract all GameObjects from not only an anchor but also from the trackable to which the anchor is attached. Raycasting against a trackable will return the trackable hit, and this method can then be used to retrieve all the GameObjects attached to that trackable.
Open the Recipe_7.8_finished scene to see the GetGameObjectsForTrackable from Listing 7.9 in action. The method takes a trackable and returns all GameObjects by using a nested foreach loop. It first retrieves all anchors attached to the trackable, and then cycles through each of these anchors, and then each GameObject, and then returns them as a List.
Listing 7.9 Return All GameObjects on a Trackable
private List<GameObject> GetGameObjectsForTrackable(Trackable trackable){
    List<Anchor> anchors = new List<Anchor>();
    trackable.GetAllAnchors (anchors);
    List<GameObject> children = new List<GameObject>();
    foreach (Anchor anchor in anchors) {
        Transform ancTrans = anchor.gameObject.transform;
        foreach (Transform childTrans in ancTrans) {
            children.Add (childTrans.gameObject);
        }
    }
    return children;
}
Recipe 7.9 Hiding the Tracked Surface Visualization
Surface visualizations are extremely useful for giving the user feedback that ARCore is tracking a surface. However, after the game has begun, the surface visualization may need to be hidden in order to expose the actual surface of the real world.
Open Recipe_7.9_finished to see the HidePlanes method from Listing 7.10 in action. To get this working, a tag called DetectedPlaneViz must be added to the surface visualization GameObject prefab so that all instances in the scene will be returned with the FindGameObjectsWithTag method. The method then cycles through the tracked planes and deactivates them.
Listing 7.10 Hide Tracked Surface Visualization
private void HidePlanes() {
    GameObject[] planes = GameObject.
        FindGameObjectsWithTag("DetectedPlaneViz");
    foreach (GameObject plane in planes) {
            plane.SetActive(false);
    }
 }
Recipe 7.10 Getting the Y Position of the Lowest Plane
Being able to find the lowest (or highest) tracked plane is useful for setting a GameObject’s y position to it. The GetLowestPlane method (see Listing 7.11) returns the Vector3 position of the lowest plane in the scene. It does this by retrieving a list of all the TrackedPlanes currently being tracked. It then cycles through them, keeping a track of the lowest y position and returning this value.
Listing 7.11 Get Lowest Tracked Plane
private Vector3 GetLowestPlane() {
    try {
        List<DetectedPlane> m_allPlanes = new List<DetectedPlane>();
        Session.GetTrackables<DetectedPlane>(m_allPlanes,
            TrackableQueryFilter.All);
        DetectedPlane lowest = m_allPlanes[0];
        foreach(DetectedPlane p in m_allPlanes){
            if(p.CenterPose.position.y < lowest.CenterPose.position.y){
                lowest = p;
            }
        }
        return lowest.CenterPose.position;
    } catch (System.Exception) {
        // Couldn't find a plane, use zero.
        return Vector3.zero;
    }
}
Recipe 7.11 Attaching Objects to Non-Horizontal Surfaces
To attach objects to surfaces other than horizontal planes, such as walls, use the TrackableHitFlags.FeaturePoint filter when raycasting. Open Recipe_7.11_finished to see the block of code in Listing 7.12 in action.
The method creates a raycast using a FeaturePoint TrackableHitFlag. This means that the raycast looks for a FeaturePoint. Feature points can exist on non-horizontal surfaces such as walls. It then instantiates a GameObject at the FeaturePoint with the given Pose.
Listing 7.12 Raycast Non-Horizontal Surface
void Update () {
    Touch touch;
    if (Input.touchCount < 1 ||
        (touch = Input.GetTouch(0)).phase != TouchPhase.Began) {
        return;
    }
    TrackableHit trackableHit;
    TrackableHitFlags raycastFilter = TrackableHitFlags.FeaturePoint |
        TrackableHitFlags.FeaturePointWithSurfaceNormal;

    if (Frame.Raycast (touch.position.x, touch.position.y, raycastFilter,
        out trackableHit)) {
        snackBarText.text = "HIT";
        Anchor anchor =
            trackableHit.Trackable.CreateAnchor(trackableHit.Pose);
        GameObject placedObject = Instantiate (prefabToPlace,
            trackableHit.Pose.position, trackableHit.Pose.rotation);
        placedObject.transform.parent = anchor.transform;
    } else {
        snackBarText.text = "NO HIT";
    }
}
Recipe 7.12: Customizing the Surface Visualization
The surface visualization that comes with the SDK can be customized by updating the associated texture in an image-editing application such as Photoshop. For the texture to work as a surface visualization it should be designed as a repeating tile.
In Recipe_7.12_finished the texture has been updated to comprise only dots. To customize the surface detection texture follow these steps:
The default surface detection visualizer that comes with the SDK uses a GameObject called
DetectedPlaneVisualizer. This GameObject has attached a material shader calledPlaneGrid.PlaneGridtakes a texture that is used as the surface visualization. The default texture is calledTriGrid. This is the texture you will need to find to copy and manipulate. Search for thisTriGridtexture in the Project window, and then right-click and select Reveal In Finder.Copy the
TriGridpng and open it up in your favorite image editing software, such as Photoshop. Use it as a template to create your own repeating pattern. Included inChapter7.12_CustomizedSurfaceVizis one called SurfaceDots; it is a simplified version ofTriGrid, but without the connecting grid lines and only the dots.Add the png to the scene by dragging and dropping in the Project window and add it to the PlaneGrid shader by selecting the
DetectedPlaneVisualizer. In the Inspector, in thePlaneGridcomponent, click the select button on the texture and choose the texture.
Recipe 7.13 Pinching to Scale a GameObject
This recipe lets the user pinch to scale an object placed in the scene. Pinch to scale works when the user has two fingers touching the screen. It then tracks the current positions and previous positions, works out the delta over time, and applies this to a fraction the scale of the GameObject, clamping the max scale so it doesn’t grow too large.
Open the Recipe_7.13_finished scene to see the code from Listing 7.13 in action.
Listing 7.13 Pinch to Scale Class
using UnityEngine;
using UnityEngine.UI;
using GoogleARCore;

public class PinchScaleGameObject : MonoBehaviour {

    public GameObject prefabToPlace;

    private bool hasPlacedObject = false;
    private GameObject placedObject;
    private const float SCALE_SPEED = 0.005f;
    private const float MAX_SCALE = 3f;

    void Update () {
        if (!hasPlacedObject) {
            PlaceObjectToScale ();
        }
        else {
            PinchToScale ();
        }
    }

    private void PlaceObjectToScale () {
        Touch touch;
        if (Input.touchCount < 1 ||
            (touch = Input.GetTouch(0)).phase != TouchPhase.Began) {
            return;
        }
        TrackableHit trackableHit;
        TrackableHitFlags raycastFilter = TrackableHitFlags. PlaneWithinPolygon |
            TrackableHitFlags.FeaturePointWithSurfaceNormal;

        if (Frame.Raycast (touch.position.x, touch.position.y, raycastFilter,
            out trackableHit)) {
            Anchor anchor =
                trackableHit.Trackable.CreateAnchor(trackableHit.Pose);
            placedObject = Instantiate (prefabToPlace,
                trackableHit.Pose.position, trackableHit.Pose.rotation);
            placedObject.transform.parent = anchor.transform;
            hasPlacedObject = true;
        }
    }

    private void PinchToScale () {
        if (Input.touchCount == 2) {
            Touch tZero = Input.GetTouch(0);
            Touch tOne = Input.GetTouch(1);

            Vector2 tZeroPrevPos = tZero.position - tZero.deltaPosition;
            Vector2 tOnePrevPos = tOne.position - tOne.deltaPosition;

            float prevTouchDeltaMag = (tZeroPrevPos - tOnePrevPos). magnitude;
            float tDeltaMag = (tZero.position - tOne.position).magnitude;

            float deltaMagnitudeDiff = tDeltaMag - prevTouchDeltaMag;
            Vector3 scaleDiff = new Vector3 (deltaMagnitudeDiff,
                deltaMagnitudeDiff, deltaMagnitudeDiff);
            Vector3 newScale =
                placedObject.transform.localScale + scaleDiff * SCALE_SPEED;

            placedObject.transform.localScale =
                Vector3.ClampMagnitude(newScale, MAX_SCALE);
        }
    }
}
Recipe 7.14: Handling AR Tracking State
For reasons of good UX, handling the status of AR sessions in your app, including the various tracking states of ARCore, is essential. In this recipe the CheckSessionStatus method displays the session status in the snack bar text field. Open the Recipe_7.14_finished scene to see the code from Listing 7.14 working in action.
The most important states to handle thoughtfully are:
Initializing: Is initializing the session.
LostTracking: Has lost tracking and is attempting to recover.
None: Session has not been initialized.
Not Tracking: The session is paused.
Tracking: The session is tracking and working as expected.
Error Permissions Not Granted: The camera permissions have not been granted by the user.
Error APK Not Available: The APK refers to the actual ARCore APK install, required for ARCore to run.
using UnityEngine;
using UnityEngine.UI;
using GoogleARCore;

public class TrackingStateController : MonoBehaviour {

    public Text snackBarText;

    void Update () {
        CheckSessionStatus ();
    }

    private void CheckSessionStatus () {
        switch (Session.Status) {
        case SessionStatus.ErrorApkNotAvailable:
            snackBarText.text = "ErrorApkNotAvailable";
            break;
        case SessionStatus.ErrorPermissionNotGranted:
            snackBarText.text = "ErrorPermissionNotGranted";
            break;
        case SessionStatus.ErrorSessionConfigurationNotSupported:
            snackBarText.text = "ErrorSessionConfigurationNotSupported";
            break;
        case SessionStatus.FatalError:
            snackBarText.text = "FatalError";
            break;
        case SessionStatus.Initializing:
            snackBarText.text = "Initializing";
            break;
        case SessionStatus.LostTracking:
            snackBarText.text = "LostTracking";
            break;
        case SessionStatus.None:
            snackBarText.text = "None";
            break;
        case SessionStatus.NotTracking:
            snackBarText.text = "NotTracking";
            break;
        case SessionStatus.Tracking:
            snackBarText.text = "Tracking";
            break;
        default:
            snackBarText.text = "Problem getting status";
            break;
        }
    }

}
Summary
This chapter covered these topics:
AR and ARCore
UX considerations for AR
Mobile phone-based AR best practices and principles from real-world AR development experience
ARCore Unity SDK
Setting up your Unity development environment to build ARCore apps in Unity and run them on your phone
Creating an ARCore Unity template scene as a base from which to start all of your ARCore projects
Numerous recipes for doing most of the nitty-gritty ARCore procedures, such as using anchors, trackables, raycasting, and using surface visualizations
Interacting with AR GameObjects: dragging and dropping, rotating, and pinch to scale