
Chapter 9
AR Games
With the potential to dramatically change not only how we play games, but also how they exist within and interact with the surrounding environment, augmented reality offers developers an opportunity to create novel interactive and creative experiences as extensions of the real world. This chapter dives into AR game development by exploring the different types of AR games and the characteristics of the AR game life cycle, and shows you how to build a fun AR game from start to finish using Google’s ARCore.
Types of AR Games
With the nascent field of augmented reality comes the necessity to think about games and game design in a whole new way. The game is no longer constrained to the screen, but exists and interacts with everyday surroundings, from inside the living room to out in the urban built environment. The amalgamation of “game-world” and “real-world” must prompt developers to devise new patterns, conventions, and use cases that benefit the user.
Gaming is a definite use case for AR. This chapter introduces the different types of AR games, the different phases of the AR game life cycle, and then walks through the development of a finished ARCore tabletop game.
By focusing on one game, this chapter introduces the processes and techniques required for AR game development: surface detection for games, loading game levels asynchronously, UI for mobile AR games, sound effects, and building out the various states of the game. The end result is a classic top-down arcade-style mechanic merged with the new sensory paradigm of augmented reality.
Phone-based augmented reality games can be split into two general areas:
World scale: World-scale AR games use the phone’s geolocation to track the user’s position in the world. The game mechanic usually requires players to move around a large physical location in the real world. The most famous example of world-scale AR is Pokémon Go (by Niantic Labs), which became a worldwide cultural phenomenon: obsessed gamers swamped parks and sidewalks, chasing the elusive Pokémon on their mobile phones, nostalgia running at an all-time high.
Room scale: Room scale refers to smaller, localized AR experiences that use the phone’s sensors to map and track the surfaces of a room, such as a table top or a floor. In AR gaming this is often referred to as “tabletop” games. Usually these are shorter, ephemeral experiences that don’t extend beyond the surface and don’t require geolocation information.
Tabletop AR games are great for simple casual gaming and can be both single and multiplayer. World-space games are better played out over large areas with longer durations and with potentially many more people.
Both styles can be used as companion games ancillary to a main console or mobile experience. A supplementary experience could be semi-AR, with the main action taking place within the standard mobile game and having certain parts breaking out into AR for visual effect, such as a 3D hologram level map of the game’s environment. In this way AR is being used as a tool for enhancing interactive storytelling and game play, not just gratuitous effect.
AR Game Lifecycle
From a development perspective an AR game’s “application lifecycle” includes the standard stages of a traditional mobile game with some additional parts. A non-AR mobile game can consist of these four generalized stages:
Game Menu: In most games, the starting point happens before the game play itself is initiated. Menu screens ready the player pregame giving the player agency of the start time.
Start Game: The first frame of a game is where the level is loaded, objects are instantiated, enemies created, the environment set up, and the player and her character are readied for action.
Game Loop: After the level has been loaded and set up, the actual game logic is executed. This generally happens within a loop. The loop listens for input from the user, executes events in the scene, and carries out the game play designed by the developer.
End Game: When the game is won or lost, before returning to the game menu, objects and processes in the game need to be cleaned up, destroyed, and reset for the next round.
In addition to these four stages, augmented reality adds a surface detection phase. For ARCore to work the environment needs to be scanned by the player to build up an understanding of the environment and find a suitable surface to track.
The surface detection phase needs to take place before the game starts. This can be either just after the application has launched or just before the start of the game. It is up to you as the game designer to make this decision based on the requirements of the game.
Entering AR
The transition between 2D and AR can be jarring. When building this transition within a game it is a good idea to always make the transition a user-initiated action. This way the player is prepared for the change of state.
The process of surface detection may take up to 10 seconds and requires the user to move the phone around so ARCore can pick up parallax movement and depth of surfaces. During this process it good practice to give the user clear feedback that the system is working and instruction on how to hold the phone. This feedback could be in the form of text or an animation describing the scanning motion users need to make over the area, and the state of the system, such as “scanning surface,” “finished scanning.”
Displaying a visualization of the tracked surfaces that have been scanned is also useful to let the user know when the scanning is complete. This chapter uses the default prefab visualization that comes with the SDK. The surface visualization can be deactivated after the surface detection has been verified by the player and the game has begun.
Recipe 9.1 AR Tabletop Game
The recipe in this chapter builds a complete tabletop game in AR. It is a classic arcade game mechanic used in numerous top-down driving and chase games over the years. The player is an alien who must navigate the surface of the table collecting coins while also trying to avoid enemy soldiers; see Figure 9.1.
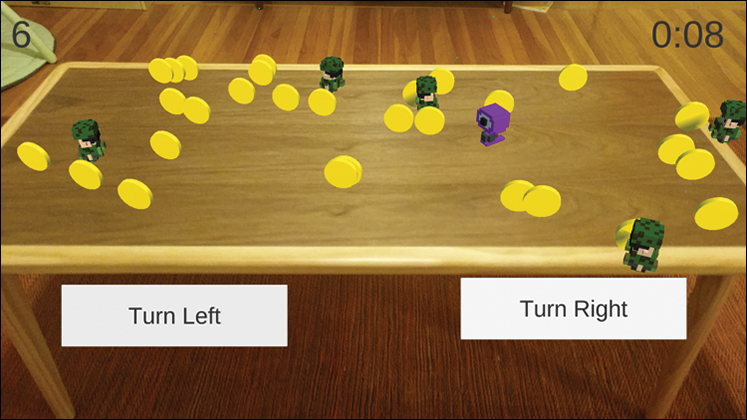
The player’s character has a consistent velocity in the forward direction and players can only control their left and right rotation. Rotate the character left or right to maneuver it around the game play area. The player needs to survive for as long as possible while collecting as many coins as possible.
The code structure of the game consists of two scenes. One is the root game scene that handles surface detection and acts as a level loader to asynchronously load in other scenes. The second scene is a game level to be loaded in. This recipe only creates one level, but you can easily adapt it to expand the game by adding more levels.
Note
If you are jumping ahead and attempting to get the finished companion files working it is essential to follow the “Wire Everything Up” section from step 61 onward. This game contains two scenes: a loader and a game level. Both of these need to be added to the Build Settings in the correct order for the game to run on device.
Building the Loader Scene
The loader scene is the root of the game. It loads in the game levels and handles surface detection. This section sets up the root loader scene, adds some UI, a script to handle the surface tracking, and a script to load in the game levels.
The project requires ARCore to be installed; see Chapter 7 for installation and setup of the ARCore SDK. To get started open the Chapter09.1_Loader_Start scene in the companion files. The start scene already has these GameObjects to begin:
ARCore Device Prefab: The main ARCore prefab containing the camera and scripts to handle the AR session and device.
Environmental Light: Updates the lighting in the scene to match the real-world environmental lighting.
Point Cloud: A visualizing system that displays the tracking points in the scene. Although this is technically unnecessary it can be useful for user feedback during the surface detection phase. Remove it after the surface detection has successfully completed.
Directional Light: Optional light for the scene; tweak based on your needs for the game.
With the Recipe_9.1_Loader_Start scene open, follow these steps to get the game’s root scene working:
Add a new Canvas object to the scene. Set its Render Mode to Screen Space Overlay (see Figure 9.2). This UI will be used to give the user feedback on the state of the surface detection.
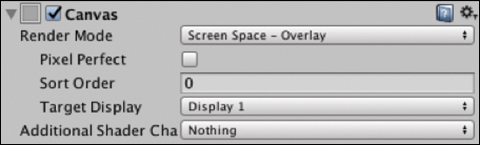
Figure 9.2 The Canvas Render Mode set to Screen Space Overlay. In the
Canvas Scalercomponent set the Canvas’s UI Scale Mode to Scale With Screen Size, and the Reference Resolution to (1920, 1080). See Figure 9.3.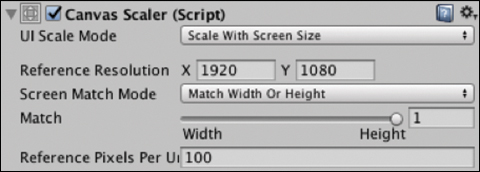
Figure 9.3 The Canvas Scalerscript.Add a new Image UI object to the Canvas and call it
SearchingOverlay. Update its width to 777 and height to 160 and center it in the Canvas. Change the Image component’s color property to black and update its alpha channel to 190 so that it is slightly transparent. Text will be placed on top of this black background so it is legible. See Figure 9.4 for the end result of the UI.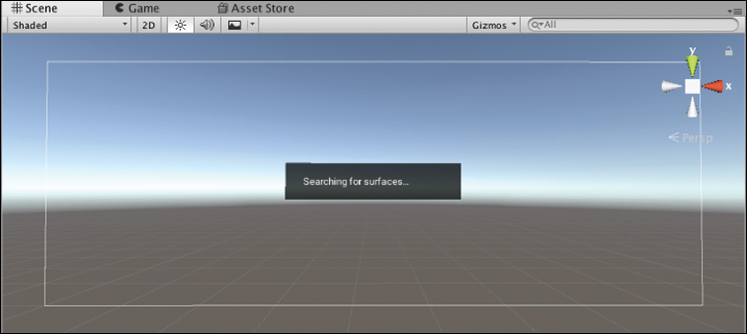
Figure 9.4 The loader scene UI. Add a Text UI object as a child of the
SearchingOverlayand position and resize it so that it fits neatly within the bounds of theSearchingOverlay. Make sure its text color is white and that the font size is legible. Update the text to read Searching for surfaces (see Figure 9.4).Create an empty GameObject called
Scriptsand attach a new C# script calledSurfaceDetectionController. Update theSurfaceDetectionControllerscript to look like Listing 9.1. This will handle all the ARCore surface detection work.Listing 9.1
SurfaceDetectionControllerScript
using System.Collections.Generic;
using UnityEngine;
using GoogleARCore;
using GoogleARCore.Examples.Common;

public class SurfaceDetectionController : MonoBehaviour {

    public GameObject trackedPlanePrefab;

    private List<DetectedPlane> newPlanes = new List<DetectedPlane>();
    private bool isQuitting = false;

    public void Update () {
        Session.GetTrackables<DetectedPlane>(newPlanes, TrackableQueryFilter.New);
        for (int i = 0; i < newPlanes.Count; i++) {
            GameObject planeObject = Instantiate(trackedPlanePrefab,
                Vector3.zero,
                Quaternion.identity,
                transform);
            planeObject.GetComponent<DetectedPlaneVisualizer>()
                .Initialize(newPlanes[i]);
        }
    }
}
This class is similar to the surface detection class from Chapter 7. Its sole purpose is to track new planes and place a GameObject visualization at their location.
It starts by setting up a public property for the TrackedPlanePrefab; this is an SDK prefab that can be used to visualize the tracked surface. The searching text is in the Canvas UI and will be deactivated when the user taps on a valid surface. There is also a List to store the new planes being tracked; this is used to add a surface visualization to a newly tracked surface.
The Update method calls the Session.GetTrackable function passing in the newPlanes List and TrackedQueryFilter.New as parameters. The newPlanes are then looped through, the trackedPlanePrefab GameObject is instantiated, and a DetectedPlane is passed into its DetectedPlaneVisualizer component. This creates a surface visualization at the correct location and size.
Create another script called
RootGameControllerand attach it to theScriptsGameObject. Update theRootGameControllerto look like Listing 9.2 This code will be used to load in the game level.Listing 9.2
RootGameControllerScript
using System.Collections;
using UnityEngine;
using UnityEngine.Rendering;
using GoogleARCore;
using GoogleARCore.Examples.Common;
using UnityEngine.SceneManagement;
using UnityEngine.UI;

public class RootGameController : MonoBehaviour {
    public static RootGameController instance = null;
    public GameObject searchingCanvas;

    [System.NonSerialized]
    public DetectedPlane detectedPlane;
    [System.NonSerialized]
    public Anchor gameAnchor;
    [System.NonSerialized]
    public Vector2 maxPos;
    [System.NonSerialized]
    public Vector2 minPos;

    private const string LEVEL_NAME_01 = "Chapter09_Level1_Finished";
    private bool firstTime = true;
    private GameObject currentLevel;

    void Awake() {
        if (instance == null) {
            instance = this;
        } else if (instance != this) {
            Destroy (gameObject);
        }
        DontDestroyOnLoad(gameObject);
    }

    public void Update () {
        if (Input.touchCount > 0  && firstTime) {
            Touch touch = Input.GetTouch (0);
            TrackableHit hit;
            TrackableHitFlags raycastFilter =
                TrackableHitFlags.PlaneWithinPolygon;

            if (Frame.Raycast(touch.position.x,
                    touch.position.y,
                    raycastFilter,
                    out hit)) {
                firstTime = false;
                gameAnchor = hit.Trackable.CreateAnchor(hit.Pose);
                detectedPlane = (DetectedPlane)hit.Trackable;
                StartCoroutine(LoadLevel(LEVEL_NAME_01));
            }
        }
    }

    IEnumerator LoadLevel (string sceneName) {
        searchingCanvas.SetActive(false);
        AsyncOperation asyncOp =
            SceneManager.LoadSceneAsync (sceneName, LoadSceneMode. Additive);
        asyncOp.allowSceneActivation = false;

        while (! asyncOp.isDone) {
            // Load is complete at 0.9
            if (asyncOp.progress == 0.9f) {
                // Scene loaded, now activate
                asyncOp.allowSceneActivation = true;
                SetupGame ();
            }
            yield return null;
        }
    }

    private void SetupGame() {
        float centerOffsetX = trackedPlane.ExtentX / 2f;
        float centerOffsetZ = trackedPlane.ExtentZ / 2f;
        float minX = trackedPlane.CenterPose.position.x - centerOffsetX;
        float minZ = trackedPlane.CenterPose.position.z - centerOffsetZ;
        float maxX = trackedPlane.CenterPose.position.x + centerOffsetX;
        float maxZ = trackedPlane.CenterPose.position.z + centerOffsetZ;
        minPos = new Vector2 (minX, maxZ);
        maxPos = new Vector2 (maxX, minZ);

        HidePlanes ();
        currentLevel = GameObject.FindGameObjectWithTag ("Level1");
        currentLevel.transform.position = gameAnchor.transform.position;
        currentLevel.transform.SetParent (gameAnchor.transform);
    }

    private void HidePlanes() {
        GameObject[] planes =
            GameObject.FindGameObjectsWithTag("DetectedPlane");
        foreach (GameObject plane in planes) {
            plane.SetActive(false);
        }
    }

    public void GameOver() {
        currentLevel = GameObject.FindGameObjectWithTag ("Level1");
        Level1Manager levelManager = currentLevel.GetComponent <Level1Manager> ();
        levelManager.GameOver();
    }
}
The RootGameController is a singleton class attached to the root scene of the game. It loads in the levels, starts the game after the scene has been loaded, and calls GameOver on the current level.
The class declares some public properties exposing the bounds of the game space: the tracked plane and the anchor attached to the game. There is also a private constant string holding the name of the scene to be loaded asyncronously. Make sure to update this string to match the name of the scene being loaded in your game.
The Update function listens for touch events on the screen to choose a game plane. If there is a touch and a plane hasn’t already been selected, some TrackableHitFlags are set as filters for a raycast. A raycast is then created on the ARCore Frame; this performs a raycast against objects being tracked by ARCore.
If there is a hit against a tracked object, the firstTime Boolean is set to false so the raycast isn’t triggered again. An anchor is then created at the hit point, saved to the gameAnchor variable, and the DetectedPlane property is set to the hit.Trackable so other objects in the game can use them. A coroutine is then called on the LoadLevel method, passing through the scene-level name as a parameter.
The LoadLevel method takes a scene name string as an argument and then loads this scene asynchronously into the root scene. The searchingCanvas GameObject is deactivated. The LoadSceneMode.Additive parameter is passed into the SceneManager’s LoadSceneAsync method, meaning that the scene will be added to the other scene. allowSceneActivation is then set to false, so the scene is not added until fully loaded. Loading completes at 90% (0.9) and the scene is not activated until allowSceneActivation is set to true, breaking out of the while loop, triggering the SetupGame method.
The SetupGame method calculates the bounds of the game area based on the center point of the detectedPlane and its size. Now that a plane is being tracked and has been selected, HidePlanes is called to hide the visualization. Removing the plane visual is a cosmetic change—feel free to leave the planes if you prefer them in your game. The Level1 GameObject in the loaded scene is found, positioned, and added as a child of the gameAnchor. The Level1Manager class on the Level1 GameObject is accessed and the SetupLevel method is called to kick off the game.
The HidePlans method looks for the GameObjects in the scene with the DetectedPlane tag and deactivates them.
The GameOver method is called from within the loaded level when a game over event occurs. This will happen when the player collides with an enemy. It then propagates the game over state through the app by triggering the GameOver method on the currently loaded level.
Important
For the game to load in the correct scene make sure to update the value of the LEVEL_NAME_01 string in the RootGameController class to match the name of the actual scene that is being loaded in:
private const string LEVEL_NAME_01 = "THIS_IS_THE_NAME_OF_YOUR_SCENE";
This scene will be created later in the recipe.
In the Editor, hook up the various GameObjects to the public fields in the
RootGameController’s Inspector and theSurfaceDetectionController. The Searching Canvas was created in the previous steps, and the Detected Plane prefab comes with the ARCore SDK (Assets/GoogleARCore/Examples/Common/Prefabs). See Figure 9.5.
Figure 9.5 The RootGameControllerandSurfaceDetectionControllerscripts.Select the DetectedPlaneVisualizer prefab in the Project window and set its tag to TrackedPlane. This will be used as reference to hide all the planes in the scene when the game starts. Set the tag by selecting the DetectedPlaneVisualizer in the Project window and in the Inspector in the tag drop-down menu select Add Tag (see Figure 9.6).
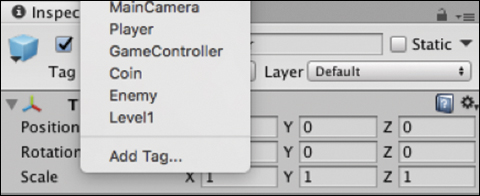
Figure 9.6 Add Tag in the tag drop-down menu. In the Tags and Layers Inspector, click the + button to add a new tag, and then give it the name
DetectedPlane. This creates the new tag but does not add it to theDetectedPlaneVisualizer(see Figure 9.7).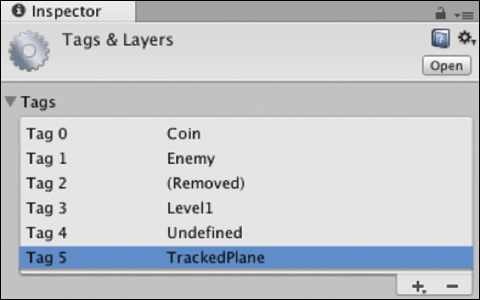
Figure 9.7 The Tags & Layers window. To add it, select the DetectedPlaneVisualizer in the Project window again and in the tag drop-down menu choose the newly created
DetectedPlanetag (see Figure 9.8). This is a critically important step. It is easy to forget to apply the tag after creating it. This recipe relies on several other tags so make sure to double-check they are assigned; otherwise, the game won’t work.
Figure 9.8 The DetectedPlane tag.
Important Info on GameObject Tags
A common mistake in Unity is to forget to explicitly add a newly created tag to the GameObject. Adding a new tag is a two-step process: first create the tag and then add the tag to the GameObject. Newly created tags are not automatically added to the selected GameObject. The GameObject needs to be selected again after the tag has been created and the tag explicitly added via the drop-down menu. Save yourself hours of debugging time by always confirming the tag has been added to the GameObject by checking the tag dropdown in the Inspector.
Building the Level Scene
The level scene contains all the logic for the game and is loaded asynchronously into the root scene. The starting point for this section is the Chapter09_Level1_Start scene, which is an empty scene with all the default GameObjects removed. Open it or create a new empty scene from scratch and follow these steps to set up the game level:
Create a new empty GameObject in the scene called
Level1. All the objects in the scene will be added to this root GameObject.Update the Level1 GameObject’s tag to Level1. Do this by selecting the Add Tag option in the GameObject’s tag drop-down menu in the Inspector (see Figure 9.9).
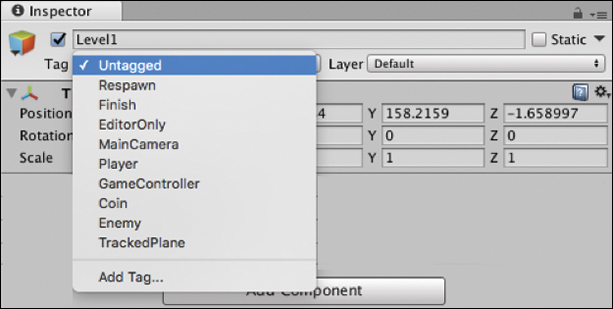
Figure 9.9 The tag drop-down menu. At the bottom of the tag’s list click the + button to add a new tag (see Figure 9.10). Type in Level1 and click Save. This creates the tag but doesn’t add it to the GameObject.
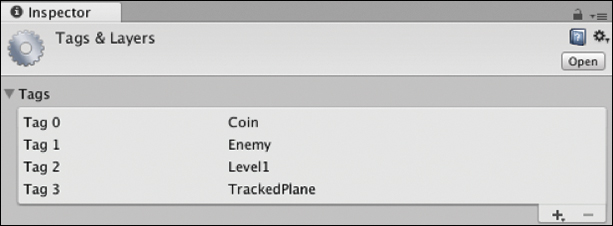
Figure 9.10 The Tags & Layers window. To add the tag to the GameObject select the
Level1GameObject in the hierarchy again and in the Inspector from the tag drop-down menu, select the Level1 tag created in the previous steps (see Figure 9.11).
Figure 9.11 Level1GameObject’s tag set to Level1.Add an EventSystem to the Level1 GameObject (GameObject > UI > EventSystem). This will handle input events from the UI elements.
Building the Player
This section sets up the player’s GameObject and attaches some scripts that handle the navigation from the UI input. This chapter’s Unity package has an alien model prefab to use in this recipe called playerAlienStart (Chapter09_TableGame/Prefabs). Use this or import your own character;, the steps to get it working will be much the same.
Continuing with the level scene from the previous section, follow these steps to build the player:
Add the player alien prefab to the scene as a child of the
Level1GameObject at (0, 0, 0). Scale it down to (0.05, 0.05, 0.05) and update its name to playerAlien. This is a tabletop game so the characters are going to be relatively small. Instead of being instantiated and destroyed programmatically, the playerAlien will stay in the scene and theSetActive()method is used to show and hide it.Add a Rigidbody component to the playerAlien: in the Inspector, choose Add Component > Rigidbody. Uncheck the Use Gravity check box, and switch on Is Kinematic.
Add a Box Collider component to the playerAlien so that it will handle collisions with other game elements in the scene. Position and scale the collider to fit the alien.
Create a new script called
AlienMovementand attach it to the alienPlayer. Update theAlienMovementscript to look like Listing 9.3.Listing 9.3
AlienMovementScript
using UnityEngine;

public class AlienMovement : MonoBehaviour {

    private bool leftBtnIsDown = false;
    private bool rightBtnIsDown = false;
    private bool inGame = false;
    private const float speed = 0.2f;
    private const float rotSpeed = 110f;

    void Update () {
        if (leftBtnIsDown) {
            transform.Rotate(Vector3.up * Time.deltaTime * -rotSpeed, Space.World);
        }

        if (rightBtnIsDown) {
            transform.Rotate (Vector3.up * Time.deltaTime * rotSpeed, Space.World);
        }

        if (inGame) {
            transform.Translate (Vector3.forward * Time.deltaTime * speed);
        }
    }

    public void StartMovement() {
        ResetMovement ();
        inGame = true;
    }

    public void StopMovement() {
        inGame = false;
    }

    public void HandleLeftButtonDown() {
        leftBtnIsDown = true;
    }

    public void HandleLeftButtonUp() {
        leftBtnIsDown  = false;
    }

    public void HandleRightButtonDown() {
        rightBtnIsDown = true;
    }

    public void HandleRightButtonUp() {
        rightBtnIsDown = false;
    }

    public void ResetMovement() {
        leftBtnIsDown = false;
        rightBtnIsDown = false;
    }
}
The AlienMovement class controls the movement of the player’s character, handling the input of the buttons. The class declares some properties to track the state of the game, button inputs, and the speed of the player’s movement. Update these values to increase or decrease the player’s speed.
In the Update method are three conditional operators that listen for Booleans and track whether the left and right buttons are being pressed, and whether the game is in process. If either of the buttons is being pressed, the GameObject is rotated. If the game is in progress, the GameObject is moved in the forward direction. The StopMovement and ResetMovement methods are called when the game has ended.
Create another script called
AlienControllerand add it to thealienPlayerGameObject. Update theAlienControllerscript to look like Listing 9.4.Listing 9.4
AlienControllerScript
using UnityEngine;

public class AlienController : MonoBehaviour {

    public GameObject particleSystemPrefab;
    public AudioSource coinAudioSource;
    public AudioSource deathAudioSource;
    public GameUIController gameUIController;
    public CoinsManager coinsManager;

    void OnTriggerEnter(Collider other) {
        if (other.tag == "Coin") {
            GameObject particleGO = Instantiate (particleSystemPrefab, other.transform.position, particleSystemPrefab.transform.rotation);
            ParticleSystem ps = particleGO.GetComponent<ParticleSystem> ();
            ps.Play ();
            coinAudioSource.Play ();
            gameUIController.IncreaseScore ();
            Destroy (other.gameObject);
            Destroy (particleGO, ps.duration);
            coinsManager.AddNewCoin ();
        } else if (other.tag == "Enemy") {
            deathAudioSource.Play ();
            GameObject particleGO = Instantiate (particleSystemPrefab, other.transform.position, particleSystemPrefab.transform.rotation);
            ParticleSystem ps = particleGO.GetComponent<ParticleSystem> ();
            var main = ps.main;
            main.startColor = Color.red;
            ps.Play ();
            RootGameController.instance.GameOver();
            Destroy (particleGO, ps.duration);
        }
    }
}
The AlienController class handles collisions between the player and other objects in the scene, updates the score, and triggers “game over” flow. The class declares some public variables for the particle system, audio sources, the UI controller, and the CoinsManager. These will be hooked up later in the Editor.
The OnTriggerEnter method is a MonoBehaviour function that is called when the attached collider has its isTrigger boolean set to true and it collides with another GameObject’s collider. If this happens we use the GameObject’s tag to test whether it is a coin or an enemy GameObject.
If it collides with a coin the particle system is instantiated and played, the coin audio source is played, the score is increased in the UI, and the coin is destroyed. After the particle system’s animation has completed, it is also destroyed. The AddNewCoin method in CoinsManager is then called. This creates a new coin every time a coin is collected, meaning the level will play forever or until the player collides with an enemy.
If the colliding GameObject is an enemy, the death audio sound is played. A particle system is again placed at the location but its color is set to red and then the GameOver method in the RootGameController is called to kick off the “game over” flow.
The alienPlayer is now set up. Some public properties still need to be connected to GameObjects in the Editor but this step will take place at the end of the recipe after they have been created.
Building the Enemy
The enemy GameObjects are army soldiers who move around the scene randomly. The logic controlling their movement works by choosing a random location within the game play area and then animating toward it. The animation uses the DoTween animation framework. Feel free to tweak the logic to make it more complex and less predictable.
Continuing from the previous section, follow these steps to implement the enemies:
In the PrefabStart folder is a prefab called EnemyStart. The enemies will be instantiated dynamically in code from the prefab so the GameObject doesn’t need to be dragged into the scene, although doing this may be easier for you while setting it up.
Select the
EnemyStartGameObject and scale it down to (0.05, 0.05, 0.05).Add a Rigidbody component to the
EnemyStart, uncheck Use Gravity, and check Is Kinematic.Add a Box Collider component to the Enemy and scale and position the collider to fit the shape of the enemy.
Create a new script called
EnemyControllerand add it to the EnemyStart prefab by dragging it onto the Inspector while the prefab is selected. Update the script to look like Listing 9.5.Listing 9.5
EnemyControllerScript
using UnityEngine;
using DG.Tweening;

public class EnemyController : MonoBehaviour {

    public void StartEnemy(){
        AnimateToNewLocation ();
    }

    private void AnimateToNewLocation() {

        Vector2 maxPos = RootGameController.instance.maxPos;
        Vector2 minPos = RootGameController.instance.minPos;

        Vector3 randPos = new Vector3(Random.Range(minPos.x, maxPos.x), transform.position.y, Random.Range(minPos.y, maxPos.y));
        float distance = Vector3.Distance (randPos, transform.position);
        transform.DOMove (randPos, 10f * distance, false). OnComplete(AnimateToNewLocation);
        Vector3 direction = (randPos - transform.position).normalized;
        transform.rotation = Quaternion.LookRotation(direction);
    }

    public void KillEnemy(){
        transform.DOKill (false);
    }
}
The EnemyController uses the DoTween (see Chapter 6 for more information on tweening frameworks) animation framework to move the enemy GameObject around the screen. The StartEnemy method is called on game start from the EnemiesManager class and kicks off the movement in the enemy.
The AnimateToNewLocation method finds a random position in the game play area and then measures the distance to this new location. This distance is then used as a multiplier on the duration of the animation. Doing this keeps the speed of the enemy’s movement similar between short and long distances.
The OnComplete handler of the DoTween animation triggers the AnimateToNewLocation method after the animation has finished, effectively creating an infinite animation loop. The direction the enemy is facing is then rotated in the direction of the destination position.
The KillEnemy method is called from the EnemiesManager at the end of the game and stops any animation that is underway.
Create a new tag and call it Enemy and set the enemy GameObject’s tag to Enemy. Make sure that after creating the new tag to go back and update the GameObject’s tag as this will not happen automatically.
The enemy is now ready. This is a simple implementation of a game enemy. You can take this logic as a base and create different types of enemies with more advanced AI logic and behaviors for different levels.
Building the Coin
The process of constructing the coin GameObject is fairly simple. You just need to update its tag and add a collider.
In the PrefabStart folder is a prefab called CoinStart. The coin is simply a Unity cylinder primitive shrunk down into the shape of a coin with a gold-colored material attached. The CoinStart prefab has already been scaled and rotated to work in the scene. You don’t need to add the coin manually to the scene as it will be added programmatically at runtime and you hook it up to a public property in the Inspector later.
Add a Box Collider to the CoinStart prefab. Position and scale the collider to fit the GameObject. Check the collider’s isTrigger check box.
Add a new tag in the Tag drop-down menu called Coin and update the Coin’s tag to be Coin. This tag will be used to determine collisions so it is an important step.
Building Particle Explosions
When the player collides with another object in the scene, a particle explosion effect occurs. The particle system GameObject is instantiated dynamically from a prefab and placed at the location of the intersection of the collision. The color of the particle system is changed depending on the type of collision.
Add a particle system GameObject to the scene: GameObject > Effects > Particle System. Set its rotation (–90, 0, 0) so the particles shoot up.
Tweak the particle system’s properties to get the desired effect. See Figure 9.12.

Figure 9.12 The ParticleSystem component.
The important settings of the ParticleSystem component to update are to switch off Looping; change the Simulation Space to World Space; change the Duration to 0.25; set Start Speed to 14; set Emission Rate Over Time to 63; change the Start Color to a gold color; and set Gravity Modifier to 0.4.
Notice that the Start Color has been changed to match the color of the coins. When the player collides with an enemy it will be changed programmatically to red.
Drag the particle system GameObject into the Project window to create a prefab and remove it from the scene. This will be added programmatically.
Building the UI
The last of the visual game elements to compose is the user interface. The UI in the level scene is used to replay the game, control the movement of the player, and display the time and score.
AR Game Interaction
When designing your game mechanic think about whether you need UI to manipulate objects, or whether it is possible to interact with the objects directly by interacting with them in the world. Any time you add UI to the screen you obstruct the viewing, area taking the focus away from the game.
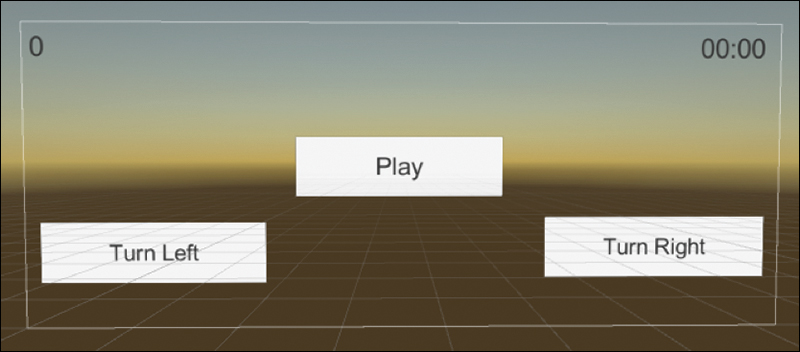
UI works slightly differently in AR than in VR. Unlike VR, where the UI sits in world space, all the UI in this game is overlayed in 2D on the screen. One way of laying out UI for mobile is to set the RenderMode to Screen Space Overlay, change the size of the Canvas to the same pixel dimensions of the phone, and then use the Rect Transform’s anchor presets to get the elements repositioned correctly for different screen sizes. Figure 9.13 shows the UI that will be created. There are three buttons and two text elements for score and time.
Add a Canvas to the scene and make sure it has a standard Graphics Raycaster already attached.
Set the Canvas’s Render Mode to Screen Space – Overlay (see Figure 9.14).

Figure 9.14 The Canvas component. In the
Canvas Scalerscript set the UI Scale Mode to Scale With Screen Size.Set the Reference Resolution to (1920, 1080). See Figure 9.15.
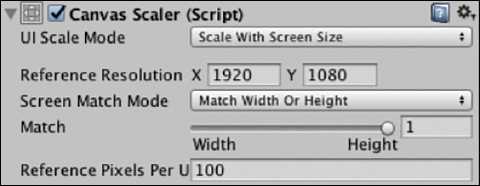
Figure 9.15 The Canvas Scalercomponent.Create a new UI button and rename it LeftButton, update its text to Turn Left, update its Text font size to 90, and update its Rect Transform to look like Figure 9.16.
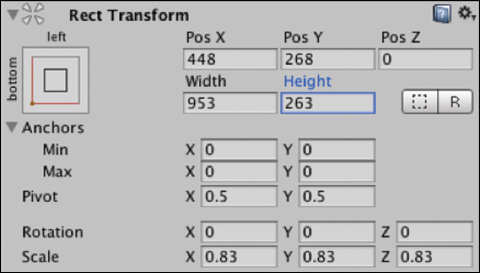
Figure 9.16 The Rect Transform component for the LeftButton. Duplicate the LeftButton and rename it RightButton, update its text to read Turn Right, and update its Rect Transform to look like Figure 9.17. Update its Text font size to 90.
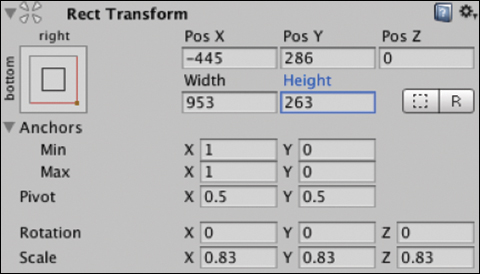
Figure 9.17 The Rect Transform component for the RightButton. Select the LeftButton and in its RectTransform open the Anchor presets box in the top left. With the preset pop-up window open in the top row, select “left,” and in the left column select “bottom.” This will anchor the position of the button to the bottom left of the screen no matter what the device screen size is (see Figure 9.18).

Figure 9.18 The Anchor presets. Repeat step 38 for the right button but select the bottom and right preset anchor points. The left and right buttons should now be locked to the bottom and sides of the screen with a small border space around the edge of the screen.
Create a new button called PlayButton; update its width, height, and scale to match the other two buttons; and change its text to read Play. Position this button directly in the center of the Canvas. You hook up the buttons to Event Triggers in the “Wire Everything Up” section (step 63).
Create a new Text UI called ScoreText and position it at the top left of the screen and update its width to 316 and height to 130. Set its anchor presets to left and top. Update the text to read “0” and change its font size to 98.
Duplicate this Text UI and call it TimerText. Position it on the top right of the screen, set it to be right aligned in the
Textscript, and update its anchor presets to be top and right.Create a new script called
GameUIController, update it to look like Listing 9.6, and attach it to the Canvas.Listing 9.6
GameUIControllerScript
using UnityEngine;
using UnityEngine.UI;

public class GameUIController : MonoBehaviour {

    public GameObject leftButton;
    public GameObject rightButton;
    public GameObject playButton;
    public Text scoreText;
    public Text timerText;

    private bool inGame = false;
    private float elapsedTime;
    private int currentScore;

    void Start () {
        leftButton.SetActive (false);
        rightButton.SetActive (false);
        playButton.SetActive (true);
    }

    void Update () {
        if (inGame) {
            UpdateTimer ();
        }
    }

    public void StartGame() {
        elapsedTime = 0f;
        currentScore = 0;
        leftButton.SetActive (true);
        rightButton.SetActive (true);
        playButton.SetActive (false);
        inGame = true;
    }

    public void EndGame() {
        inGame = false;
        playButton.SetActive (true);
        leftButton.SetActive (false);
        rightButton.SetActive (false);
    }

    public void IncreaseScore() {
        currentScore++;
        scoreText.text = currentScore.ToString ();
    }

    private void UpdateTimer() {
        elapsedTime += Time.deltaTime;
        int minutes = Mathf.FloorToInt(elapsedTime / 60F);
        int seconds = Mathf.FloorToInt(elapsedTime - minutes * 60);
        string formattedTime = string.Format("{0:0}:{1:00}", minutes, seconds);
        timerText.text = formattedTime;
    }
}
The GameUIController holds references to the UI elements: the left button, right button, play button, and the text fields for score and time. The controller toggles these elements on and off in the StartGame and EndGame functions based on the state of the game.
The IncreaseScore method is called when the player collides with a coin. When this happens the score is incremented by 1 and displayed in the score text UI.
In the Update method, if the game is in progress, the UpdateTimer method is called to increase the elapsed time and present the result in a standard time format of minutes and seconds.
In the Editor select the Canvas and hook up all the UI elements to their respective public fields in the
GameUIController(see Figure 9.19).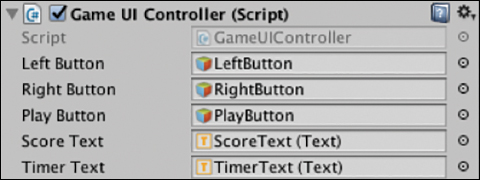
Figure 9.19 The GameUIControllerscript with all public fields hooked up.
Building the Game Play
Now that the visual elements of the game have been created, it is time to program the actual game logic. In this section you create several manager classes for the game level, the coins, and the enemies, and connect all the other-game related pieces together.
All GameObjects used in the scene are added as children of the Level1 root GameObject created earlier, not the root of the hierarchy. This way all the elements are clearly contained and easily referenced in the scene; it is a cleaner approach for creating multiple levels and when working with multiple developers.
Create a new script called
Level1Manager, attach it to theLevel1GameObject, and update it to look like Listing 9.7.Listing 9.7
Level1ManagerScript
using UnityEngine;
using GoogleARCore;
using UnityEngine.UI;

public class Level1Manager : MonoBehaviour {

    public GameObject playerAlien;
    public GameUIController gameUIController;

    private AlienMovement alienMovement;
    private EnemiesManager enemiesManager;
    private CoinsManager coinsManager;

    void Start () {
        enemiesManager = GetComponent<EnemiesManager> ();
        coinsManager = GetComponent<CoinsManager> ();
        alienMovement = playerAlien.GetComponent<AlienMovement> ();
        playerAlien.SetActive (false);
    }

    private void StartGame() {
        gameUIController.StartGame ();
        playerAlien.SetActive (true);
        alienMovement.StartMovement();
        coinsManager.PlaceCoins ();
        enemiesManager.StartEnemies ();
    }

    public void GameOver(){
        gameUIController.EndGame();
        enemiesManager.RemoveEnemies();
        coinsManager.RemoveCoins ();
        alienMovement.StopMovement();
        playerAlien.SetActive (false);
    }

    public void HandlePlayButtonClicked(){
        playerAlien.transform.position =
            RootGameController.instance.gameAnchor.transform.position;
        StartGame ();
    }
}
The Level1Manager is the coordination point for all the game play–related functionality in the level. It has public properties linking to the player GameObject and GameUIController in the Editor, and in the Start method it creates references to the manager scripts for coins, enemies, and player movement.
The StartGame function activates the playerAlien GameObject and then calls all the start methods of the various managers.
The GameOver method does the opposite of the StartGame method. It finishes the game and cleans up the scene by calling the end game methods in all the managers and deactivating the player GameObject.
The HandlePlayButtonClicked is an event handler triggered when the user presses the play button to start the game. You connect this with an Event Trigger later in the recipe. It resets the playerAlien's position to the center and then calls the StartGame function.
Create a new script called EnemiesManager, attach it to the
Level1GameObject, and update it to look like Listing 9.8. This will be used to coordinate the placement and removal of the enemies in the scene.Listing 9.8
EnemiesManagerScript
using System.Collections.Generic;
using UnityEngine;
using GoogleARCore;
using GoogleARCore.Examples.HelloAR;

public class EnemiesManager : MonoBehaviour {

    public GameObject enemyPrefab01;

    private List<GameObject> enemies;
    private const int numEnemies = 15;

    void Start () {
        enemies = new List<GameObject>();
    }

    public void StartEnemies () {

        Vector2 maxPos = RootGameController.instance.maxPos;
        Vector2 minPos = RootGameController.instance.minPos;
        float yPos =
            RootGameController.instance.detectedPlane.CenterPose.position.y;

        for(int i = 0; i<numEnemies; i++){
            Vector3 randPos =
                new Vector3(Random.Range(minPos.x, maxPos.x),
                    yPos ,
                    Random.Range(minPos.y, maxPos.y));
            GameObject enemy =
                Instantiate(enemyPrefab01,
                    randPos,
                    enemyPrefab01.transform.rotation);
            enemy.transform.SetParent (
                RootGameController.instance.gameAnchor.transform);
            enemies.Add (enemy);
            EnemyController enemyController =
                enemy.GetComponent<EnemyController> ();
            enemyController.StartEnemy ();
        }
    }

    public void RemoveEnemies(){
        for (int i = 0; i < enemies.Count; i++) {
            GameObject enemy = enemies [i];
            EnemyController enemyController =
                enemy.GetComponent<EnemyController> ();
            enemyController.KillEnemy ();
            Destroy (enemy);
        }
        enemies.Clear ();
    }
}
The EnemiesManager's job is to create, remove, and keep track of all the enemy GameObjects in the scene. It has a public property linking the enemy prefab to the Project window, and private properties including a List to store the enemies and an integer that determines the total number of enemies in the scene.
The StartEnemies method contains a for loop that instantiates all the enemies at a random location in the game player area, adds the enemy to the List, and fires the enemies StartEnemy method.
The RemoveEnemies method iterates through the enemies List, calls the KillEnemy method on each, and then destroys them from the scene and clears the enemies List.
Create a new script called
CoinsManager, attach it to theLevel1GameObject, and update it to look like Listing 9.9. This will be used to handle the placement and removal of the coins in the scene.Listing 9.9
CoinsManagerScript
using System.Collections.Generic;
using UnityEngine;
using GoogleARCore;
using GoogleARCore.Examples.HelloAR;

public class CoinsManager : MonoBehaviour {

    public GameObject coinPrefab;

    private const int numCoins = 30;
    private List<GameObject> coins;
    private Vector2 maxPos;
    private Vector2 minPos;
    private DetectedPlane detectedPlane;

    public void PlaceCoins(){
        detectedPlane = RootGameController.instance.detectedPlane;
        maxPos = RootGameController.instance.maxPos;
        minPos = RootGameController.instance.minPos;

        coins = new List<GameObject> ();
        for (int i = 0; i < numCoins; i++) {
            AddNewCoin ();
        }
    }

    public void AddNewCoin(){
        float randX = Random.Range (minPos.x, maxPos.x);
        float yPos = detectedPlane.CenterPose.position.y;
        float randZ = Random.Range(minPos.y, maxPos.y);
        Vector3 randPos = new Vector3(randX, yPos, randZ);
        GameObject coin =
            Instantiate(coinPrefab, randPos, coinPrefab.transform.rotation);
        coin.transform.SetParent (
            RootGameController.instance.gameAnchor.transform);
        coins.Add (coin);
    }

    public void RemoveCoins(){
        foreach (GameObject coin in coins) {
            Destroy (coin);
        }
        coins.Clear ();
    }
}
The CoinsManager handles the coordination of the placement and removal of the coins in the scene. There is a public property that links to the Coin prefab in the Editor, and private properties for the total number of coins, the coins List, the bounds of the game play area, and the game’s detected plane.
The PlaceCoins method sets a reference to the game’s detected plane and grabs the game’s bounds from the RootGameController. It then instantiates the coins List and iterates over the number of coins and triggers the AddNewCoin method.
In AddNewCoin a random x and z position are created within the game play bounds, and then a new coin GameObject is instantiated at this location. The GameObject’s parent is set to the anchor of the game, and the coin is added to the coins List.
RemoveCoins cycles through each of the GameObjects in the coins List, destroys them, and then clears the List.
Public methods now exist to handle the events from all the UI buttons created earlier, so you can wire them together, starting with the Play button. Select the play button and in its On Click event click the + button to add a new Event Trigger. Drag in the
Level1GameObject to link and from the dropdown select Level1Manager > HandlePlayButtonClicked (see Figure 9.20).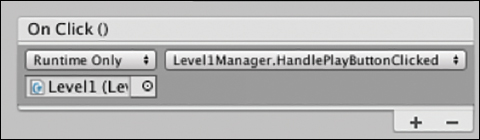
Figure 9.20 The Play Button’s On Click event trigger. The LeftButton and RightButton require two event triggers each to listen for the down and up state of the button. Select the LeftButton and click Add Component and add an Event Trigger. Select the Add New Event Type button and from the menu select PointerDown, click the + button to add a new trigger, and in the empty object field drag in the
playerAlienGameObject. From the drop-down menu selectAlienMovement.HandleLeftButtonDown.With the LeftButton still selected, click Add New Event Type and choose PointerUp. Drag in the
alienPlayerif it is not automatically added and select theAlienMovement.HandleLeftButtonUpmethod. The LeftButton’s Event Trigger should look like Figure 9.21.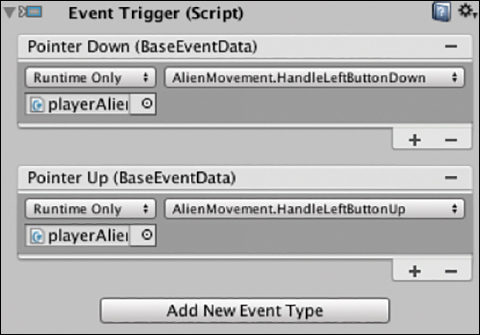
Figure 9.21 The Event Trigger with Pointer Down and Pointer Up events. Repeat the previous steps, starting from step 48, to connect the RightButton’s Event Trigger, making sure to select the
HandleRightButtonDownandHandleRightButtonUpmethods.
Adding Sound Effects
The audio in this game is made up of short, simple sound effects that trigger on collisions. Because it does not require any of the complex spatialized audio discussed in Chapter 5 the standard Unity audio framework will be used.
Included in this chapter’s companion files are two sounds: coinSound and Explosion (chapter09_TableGame/Sounds). Both of these sounds were made with BFXR. BFXR is a simple, open-source, 8-bit sound effects generator for Windows and Mac. You can download it from https://www.bfxr.net/.
Create an Audio Source in the hierarchy as a child of the
Level1GameObject (GameObject > Audio > Audio Source), rename it CoinAudioSource, and drag the coinSound.mp3 (Chapter09_TableGame_01/Sounds) into its AudioClip field.Switch off Play On Awake in the AudioSource component, so the sound does not play on start.
In the Editor link the audio source to the PlayerAlien’s CoinAudioSource public field by dragging it in.
Repeat the previous steps to create and link an Audio Source for the explosion sound. Alternatively, simply duplicate the
AudioSourceGameObject, rename itExplosionAudioSource, drag in the audio file, and then link it to the PlayerAlien’s DeathAudioSource field in the Inspector.
Wiring Everything Up
At this point all the hard work is done! The final step is to wire everything together in the Editor and make sure the build settings are configured correctly to load the scene in asynchronously.
Open the Loader scene, select the
ScriptsGameObject, and in the Inspector confirm that all the GameObjects have been hooked up to the public fields for both theRootGameControllerscript and theSurfaceDetectionscript.With the Loader scene still open, open the Build Settings (choose File > Build Settings) and click the Add Open Scenes button to add the scene to the Scenes In Build list.
Open
Chapter09_Level1_Startor whichever scene you’ve been building the main game play in, and select theLevel1GameObject. In theLevel1Managerscript, drag in the playerAlien from the hierarchy and the Canvas to link theGameUIController.In the
EnemiesManagerscript drag in the Enemy prefab from the Project window.In the CoinsManager drag in the Coin prefab from the Project window.
Select the Canvas and make sure all the UI elements are connected in the GameUIController’s public fields.
Select the playerAlien in the hierarchy and in the
AlienControllerscript connect the particle system prefab from the Project window, the two audio sources, the Canvas to connect theGameUIController, and theLevel1GameObject to link theCoinsManagerscript.Check that the various GameObjects have tags. The coin prefab should have its tag set to Coin, the enemy prefab should have its tag set to Enemy and the
Level1GameObject should have its tag set to Level1.Open the Build Settings and add the scene to the Scenes In Build list by clicking Add Open Scenes (see Figure 9.22). Make sure the scene name matches the level name
LEVEL_NAME_01string used in theRootGameController, and that the scenes are in the same order in the Build Settings as Figure 9.22; otherwise, your scene will not load.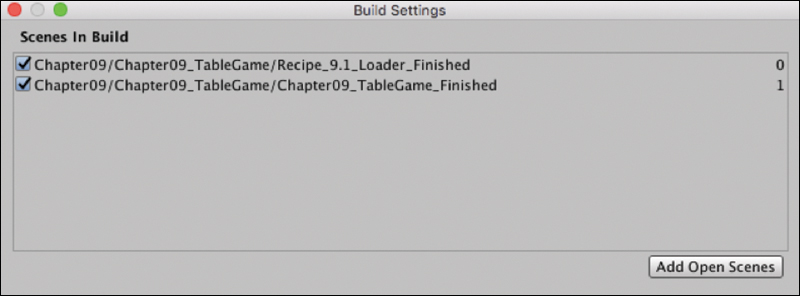
Figure 9.22 The Build Settings with both scenes added. Lock the game to landscape mode. In the Build Settings click the Player Settings button. Under the Resolutions and Presentations section select Landscape Left and Landscape Right for Allowed Orientations for Auto Rotation, as shown in Figure 9.23.

Figure 9.23 Allowed orientations in the player settings. Build and Run the game on your Android device.
Where to Next
In its current state, the game has a fun mechanic, but there is more that can be done. Some ideas for improvements and customizations include:
Add more levels with different enemies and different objects to collect.
At the start of the game always instantiate the enemy GameObjects at a minimum distance away from the player. Currently, they can be placed so close to the player that a collision happens almost instantaneously.
Add some different obstacles to the environment, possibly solid objects that the player can’t pass through.
Limit the game play area and wrap the player’s movement. This is similar to PacMan in that when the player reaches the bounds, he appears on the opposite side of the bounds.
Add power ups that make the player bigger and able to squash the enemies for a short period.
More enemies could be added over time.
The player, and enemies, could get faster over time.
Currently, a new coin is added every time the player picks up a coin, making the game endless. Instead, the player could collect all the coins to finish the level and then load in a new level that is more challenging.
Summary
This chapter guided you through the development of a finished AR tabletop game, and in doing so, covered many emerging conventions and game development techniques of augmented reality games. They included:
Understanding and implementation of surface detection for a tabletop games
Creation of a game framework for loading in separate scenes as levels
Creation of visual elements of an AR game and understanding the differences between and standard mobile game and an AR mobile game
Development of the complete game logic of an AR game