
Chapter 7. List Views and Adapters: Getting Organized

Want to know how best to structure your Android app?
You’ve learned about some of the basic building blocks that are used to create apps, and now it’s time to get organized. In this chapter, we’ll show you how you can take a bunch of ideas and structure them into an awesome app. You’ll learn how lists of data can form the core part of your app design, and how linking them together can create a powerful and easy-to-use app. Along the way, you’ll get your first glimpse of using event listeners and adapters to make your app more dynamic.
Every app starts with ideas
When you first come up with an idea for an app, you’ll have lots of thoughts about what the app should contain.
As an example, the guys at Starbuzz Coffee want a new app to entice more customers to their stores. These are some of the ideas they came up with for what the app should include:
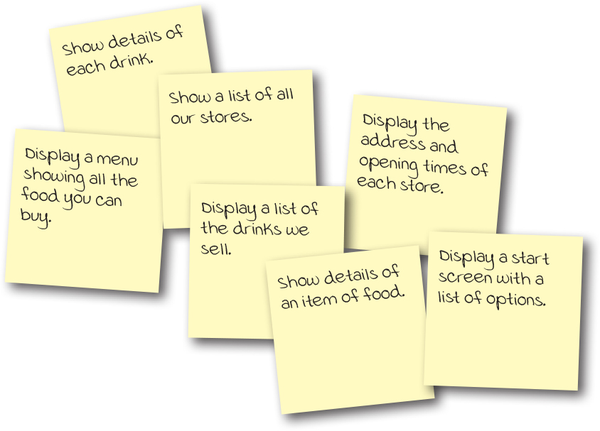
These are all ideas that users of the app will find useful. But how do you take all of these ideas and organize them into an intuitive, well-structured app?
Organize your ideas: top-level, category, and detail/edit activities
A useful way to bring order to these ideas is to organize them into three different types of activity: top-level activities, category activities, and detail/edit activities.
Top-level activities
A top-level activity contains the things that are most important to the user, and gives them an easy way of navigating to those things. In most apps, the first activity the user sees will be a top-level activity.

Category activities
Category activities show the data that belongs to a particular category, often in a list. These type of activities are often used to help the user navigate to detail/edit activities. An example of a category activity is a list of all the drinks available at Starbuzz.

Detail/edit activities
Detail/edit activities display details for a particular record, let the user edit the record, or allow the user to enter new records. An example of a detail/edit activity would be an activity that shows the user the details of a particular drink.

Once you’ve organized your activities, you can use them to construct a hierarchy showing how the user will navigate between activities.
Navigating through the activities
When you organize the ideas you have into top-level, category, and detail/edit activities, you can use this organization scheme to figure out how to navigate through your app. In general, you want your users to navigate from top-level activities to detail/edit activities via category activities.
Top-level activities go at the top
These are the activities your user will encounter first, so they go at the top.
Category activities go between top-level and detail/edit activities
Your users will navigate from the top-level activity to the category activities. In complex apps, you might have several layers of categories and subcategories.
Detail/edit activities
These form the bottom layer of the activity hierarchy. Users will navigate to these from the category activities.

As an example, suppose a user wanted to look at details of one of the drinks that Starbuzz serves. To do this, she would launch the app, and be presented with the top-level activity start screen showing her a list of options. The user would click on the option to display a list of drinks. To see details of a particular drink, she would then click on her drink of choice in the list.
Use list views to navigate to data
When you structure your app in this way, you need a way of navigating between your activities. A common approach is to use list views. A list view allows you to display a list of data that you can then use to navigate through the app.
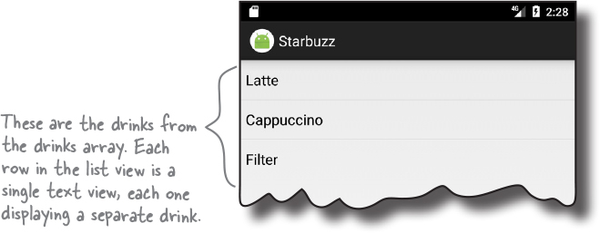
As an example, on the previous page, we said we’d have a category activity that displays a list of the drinks sold by Starbuzz. Here’s what the activity might look like:

The activity uses a list view to display all the drinks that are sold by Starbuzz. To navigate to a particular drink, the user clicks on one of the drinks, and the details of that drink are displayed.

We’re going to spend the rest of this chapter showing you how to use list views to implement this approach, using the Starbuzz app as an example.
We’re going to build part of the Starbuzz app
Rather than build all the category and detail/edit activities required for the entire Starbuzz app, we’ll focus on just the drinks. We’re going to build a top-level activity that the user will see when they launch the app, a category activity that will display a list of drinks, and a detail/edit activity that will display details of a single drink.
The top-level activity
When the user launches the app, she will be presented with the top-level activity, the main entry point of the app. This activity includes an image of the Starbuzz logo, and a navigational list containing entries for Drinks, Food, and Stores.
When the user clicks on an item in the list, the app uses her selection to navigate to a separate activity. As an example, if the user clicks on Drinks, the app starts a category activity relating to drinks.
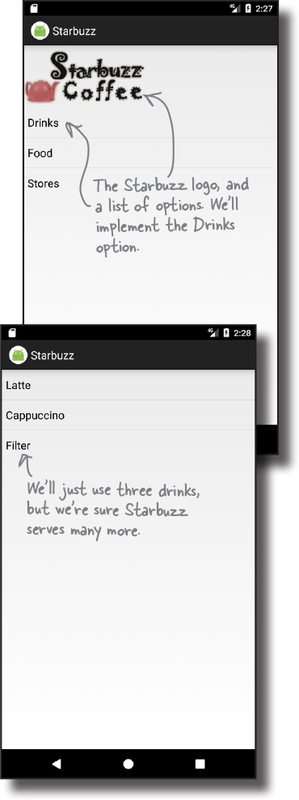
The drink category activity
This activity is launched when the user chooses Drinks from the navigational list in the top-level activity. The activity displays a list of all the drinks that are available at Starbuzz. The user can click on one of these drinks to see more details of it.
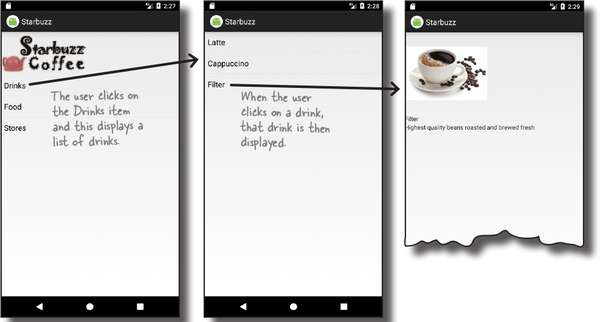
The drink detail activity
The drink detail activity is launched when the user clicks on one of the drinks listed by the drink category activity.
This activity displays details of the drink the user has selected: its name, an image of it, and a description.

How the user navigates through the app
The user navigates from the top-level activity to the drink category activity by clicking on the Drinks item in the top-level activity. She then navigates to the drink detail activity by clicking on a drink.
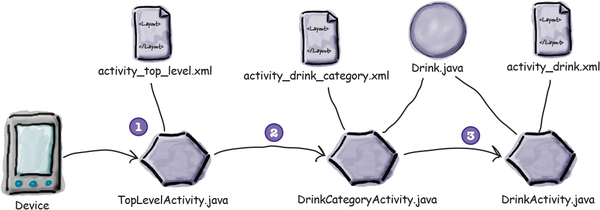
The Starbuzz app structure
The app contains three activities. TopLevelActivity is the app’s top-level activity and allows the user to navigate through the app. DrinkCategoryActivity is a category activity; it contains a list of all the drinks. The third activity, DrinkActivity, displays details of a given drink.
For now, we’re going to hold the drink data in a Java class. In a later chapter, we’re going to move it into a database, but for now we want to focus on building the rest of the app without teaching you about databases too.
Here’s how the app will work:
When the app gets launched, it starts activity TopLevelActivity.
This activity uses layout activity_top_level.xml. The activity displays a list of options for Drinks, Food, and Stores.
The user clicks on Drinks in TopLevelActivity, which launches activity DrinkCategoryActivity.
This activity uses layout activity_drink_category.xml and displays a list of drinks. It gets information about the drinks from the Drink.java class file.
The user clicks on a drink in DrinkCategoryActivity, which launches activity DrinkActivity.
The activity uses layout activity_drink.xml. This activity also gets details about the drinks from the Drink.java class file.
Here’s what we’re going to do
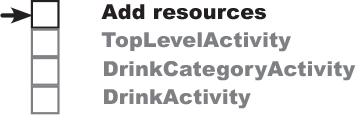
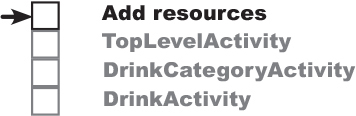
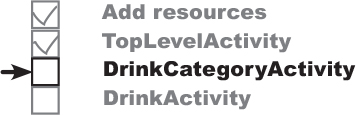
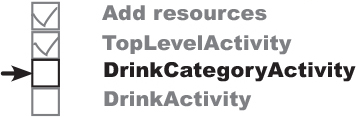
There are a number of steps we’ll go through to build the app:
Add the Drink class and image resources.
This class contains details of the available drinks, and we’ll use images of the drinks and Starbuzz logo in the app.

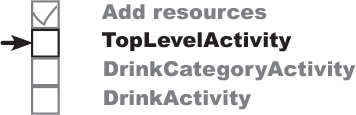
Create TopLevelActivity and its layout.
This activity is the entry point for the app. It needs to display the Starbuzz logo and include a navigational list of options.
TopLevelActivityneeds to launchDrinkCategoryActivitywhen the Drinks option is clicked.Create DrinkCategoryActivity and its layout.
This activity contains a list of all the drinks that are available. When a drink is clicked, it needs to launch
DrinkCategory.Create DrinkActivity and its layout.
This activity displays details of the drink the user clicked on in
DrinkCategoryActivity.
Create the project
You create the project for the app in exactly the same way you did in the previous chapters.
Create a new Android project for an application named “Starbuzz” with a company domain of “hfad.com”, making the package name com.hfad.starbuzz. The minimum SDK should be API 19. You’ll need an empty activity called “TopLevelActivity” and a layout called “activity_top_level”. Make sure you uncheck the Backwards Compatibility (AppCompat) checkbox.
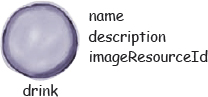
The Drink class
We’ll start by adding the Drink class to the app. Drink.java is a pure Java class file that activities will get their drink data from. The class defines an array of three drinks, where each drink is composed of a name, description, and image resource ID. Switch to the Project view of Android Studio’s explorer, select the com.hfad.starbuzz package in the app/src/main/java folder, then go to File→New...→Java Class. When prompted, name the class “Drink”, and make sure the package name is com.hfad.starbuzz. Then replace the code in Drink.java with the following, and save your changes.

The image files
The Drink code includes three image resources for its drinks with IDs of R.drawable.latte, R.drawable.cappuccino, and R.drawable.filter. These are so we can show the user images of the drinks. R.drawable.latte refers to an image file called latte, R.drawable.cappuccino refers to an image file called cappuccino, and R.drawable.filter refers to a file called filter.
We need to add these image files to the project, along with an image of the Starbuzz logo so that we can use it in our top-level activity. First, create the app/src/main/res/drawable folder in your Starbuzz project (if it doesn’t already exist). To do this, make sure you’ve switched to the Project view of Android Studio’s explorer, select the app/src/main/res folder, go to the File menu, choose the New... option, then click on the option to create a new Android resource directory. When prompted, choose a resource type of “drawable”, name the folder “drawable”, and click on OK.
Note
Android Studio may have already added this folder for you. If so, you don’t need to recreate it.
Once your project includes the drawable folder, download the files starbuzzlogo.png, cappuccino.png, filter.png, and latte.png from https://git.io/v9oet. Finally, add each file to the app/src/main/res/drawable folder.
When you add images to your apps, you need to decide whether to display different images for different density screens. In our case, we’re going to use the same resolution image irrespective of screen density, so we’ve put a single copy of the images in one folder. If you decide to cater to different screen densities in your own apps, put images for the different screen densities in the appropriate drawable* folders as described in Chapter 5.

When you save images to your project, Android assigns each of them an ID in the form R.drawable.image_name (where image_name is the name of the image). As an example, the file latte.png is given an ID of R.drawable.latte, which matches the value of the latte’s image resource ID in the Drink class.

Now that we’ve added the Drink class and image resources to the project, let’s work on the activities. We’ll start with the top-level activity.
The top-level layout contains an image and a list
When we created our project, we called our default activity TopLevelActivity.java, and its layout activity_top_level.xml. We need to change the layout so it displays an image and a list.

You saw how to display images in Chapter 5 using an image view. In this case, we need an image view that displays the Starbuzz logo, so we’ll create one that uses starbuzz_logo.png as its source.
Here’s the code to define the image view in the layout:

When you use an image view in your app, you use the android:contentDescription attribute to add a description of the image; this makes your app more accessible. In our case, we’re using a String value of "@string/starbuzz_logo", so add this to strings.xml:
<resources>

    ...
    <string name="starbuzz_logo">Starbuzz logo</string>
</resources>
That’s everything we need to add the image to the layout, so let’s move on to the list.
Use a list view to display the list of options
As we said earlier, a list view allows you to display a vertical list of data that people can use to navigate through the app. We’re going to add a list view to the layout that displays the list of options, and later on we’ll use it to navigate to a different activity.
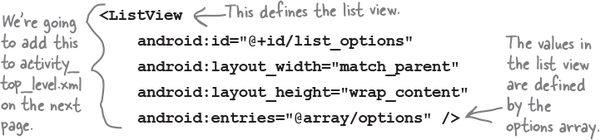
How to define a list view in XML
You add a list view to your layout using the <ListView> element. You then add an array of entries to the list view by using the android:entries attribute and setting it to an array of Strings. The array of Strings then gets displayed in the list view as a list of text views.
Here’s how you add a list view to your layout that gets its values from an array of Strings named options:
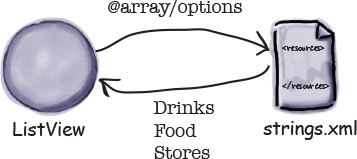
You define the array in exactly the same way that you did earlier in the book, by adding it to strings.xml like this:
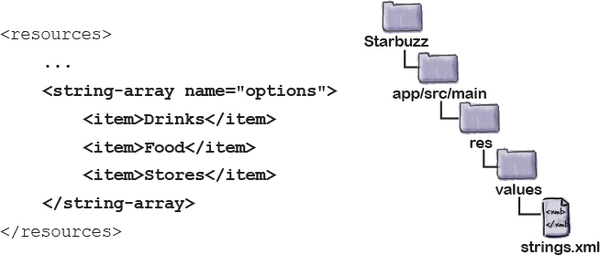
This populates the list view with three values: Drinks, Food, and Stores.

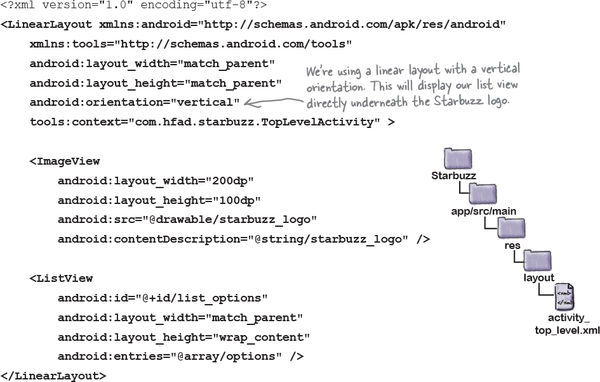
The full top-level layout code

Here’s the full layout code for our activity_top_level.xml; make sure you update your code to match ours:
Test drive

Make sure you’ve applied all the changes to activity_top_level.xml, and also updated strings.xml. When you run the app, you should see the Starbuzz logo displayed on the device screen with the list view underneath it. The list view displays the three values from the options array.
If you click on any of the options in the list, nothing happens, as we haven’t told the list view to respond to clicks yet. The next thing we’ll do is see how you get list views to respond to clicks and launch a second activity.

Get list views to respond to clicks with a listener
You make the items in a list view respond to clicks by implementing an event listener.
An event listener allows you to listen for events that take place in your app, such as when views get clicked, when they receive or lose the focus, or when the user presses a hardware key on their device. By implementing an event listener, you can tell when your user performs a particular action—such as clicking on an item in a list view—and respond to it.
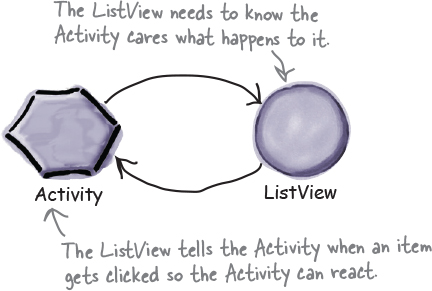
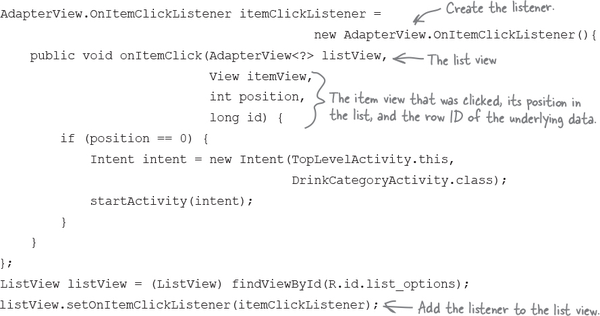
OnItemClickListener listens for item clicks
When you want to get items in a list view to respond to clicks, you need to create an OnItemClickListener and implement its onItemClick() method. The OnItemClickListener listens for when items are clicked, and the onItemClick() method lets you say how your activity should respond to the click. The onItemClick() method includes several parameters that you can use to find out which item was clicked, such as a reference to the view item that was clicked, the item’s position in the list view (starting at 0), and the row ID of the underlying data.
We want to start DrinkCategoryActivity when the first item in the list view is clicked—the item at position 0. If the item at position 0 is clicked, we need to create an intent to start

Once you’ve created the listener, you need to add it to the list view.
Set the listener to the list view

Once you’ve created the OnClickItemListener, you need to attach it to the list view. You do this using the ListView setOnItemClickListener() method, which takes one argument, the listener itself:
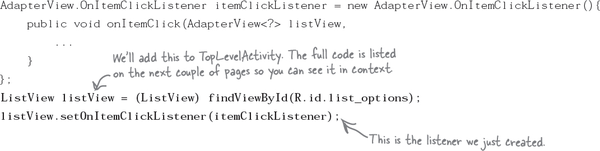
Adding the listener to the list view is crucial, as it’s this step that notifies the listener when the user clicks on items in the list view. If you don’t do this, the items in your list view won’t be able to respond to clicks.
You’ve now seen everything you need in order to get the
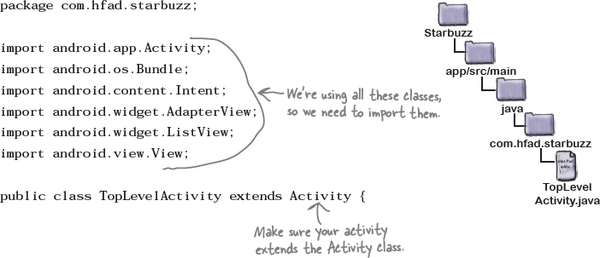
The full TopLevelActivity.java code
Here’s the complete code for TopLevelActivity.java. Replace the code the wizard created for you with the code below and on the next page, then save your changes:
TopLevelActivity.java (continued)

What the TopLevelActivity.java code does
The onCreate() method in TopLevelActivity creates an onItemClickListener and links it to the activity’s ListView.

When the user clicks on an item in the list view, the onItemClickListener’s onItemClick() method gets called.
If the Drinks item is clicked, the
onItemClickListenercreates an intent to startDrinkCategoryActivity.


A category activity displays the data for a single category

As we said earlier, DrinkCategoryActivity is an example of a category activity. A category activity is one that shows the data that belongs to a particular category, often in a list. You use the category activity to navigate to details of the data.
We’re going to use DrinkCategoryActivity to display a list of drinks. When the user clicks on one of the drinks, we’ll show them the details of that drink.

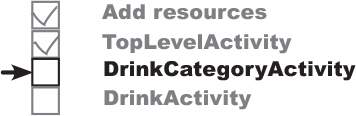
Create DrinkCategoryActivity
To work on the next step in our checklist, we’ll create an activity with a single list view that displays a list of all the drinks. Select the com.hfad.starbuzz package in the app/src/main/java folder, then go to File→New...→Activity→Empty Activity. Name the activity “DrinkCategoryActivity”, name the layout “activity_drink_category”, make sure the package name is com.hfad.starbuzz and uncheck the Backwards Compatibility (AppCompat) checkbox.
We’ll update the layout code on the next page.
Note
Some versions of Android Studio may ask you what the source language of your activity should be. If prompted, select the option for Java.
Update activity_drink_category.xml

Here’s the code for activity_drink_category.xml. As you can see, it’s a simple linear layout with a list view. Update your version of activity_drink_category.xml to reflect ours below:

There’s one key difference between the list view we’re creating here, and the one we created in activity_top_activity.xml: there’s no android:entries attribute here. But why?
In activity_top_activity.xml, we used the android:entries attribute to bind data to the list view. This worked because the data was held as a static String array resource. The array was described in strings.xml, so we could easily refer to it using:
android:entries="@array/options"
where options is the name of the String array.
Using android:entries works fine if the data is a static array in strings.xml. But what if it isn’t? What if the data is held in an array you’ve programmatically created in Java code, or held in a database? In that case, the android:entries attribute won’t work.
If you need to bind your list view to data held in something other than a String array resource, you need to take a different approach; you need to write activity code to bind the data. In our case, we need to bind our list view to the drinks array in the Drink class.
For nonstatic data, use an adapter

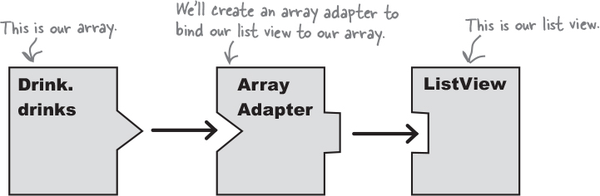
If you need to display data in a list view that comes from a source other than strings.xml (such as a Java array or database), you need to use an adapter. An adapter acts as a bridge between the data source and the list view:

An adapter acts as a bridge between a view and a data source. An ArrayAdapter is a type of adapter that specializes in working with arrays.
There are several different types of adapter. For now, we’re going to focus on array adapters.
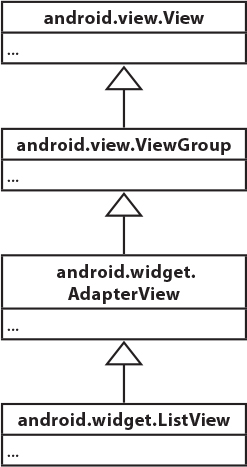
An array adapter is a type of adapter that’s used to bind arrays to views. You can use it with any subclass of the AdapterView class, which means you can use it with both list views and spinners.
In our case, we’re going to use an array adapter to display data from the Drink.drinks array in the list view.
We’ll see how this works on the next page.
Connect list views to arrays with an array adapter

You use an array adapter by initializing it and then attaching it to the list view.
To initialize the array adapter, you first specify what type of data is contained in the array you want to bind to the list view. You then pass the array adapter three parameters: a Context (usually the current activity), a layout resource that specifies how to display each item in the array, and the array itself.
Here’s the code to create an array adapter that displays drink data from the Drink.drinks array (you’ll add this code to DrinkCategoryActivity.java on the next page):

You then attach the array adapter to the list view using the ListView setAdapter() method:
ListView listDrinks = (ListView) findViewById(R.id.list_drinks);
listDrinks.setAdapter(listAdapter);
Behind the scenes, the array adapter takes each item in the array, converts it to a String using its toString() method, and puts each result into a text view. It then displays each text view as a single row in the list view.
Add the array adapter to DrinkCategoryActivity
We’ll change the DrinkCategoryActivity.java code so that the list view uses an array adapter to get drinks data from the Drink class. We’ll put the code in the onCreate() method so that the list view gets populated when the activity gets created.
Here’s the full code for the activity (update your copy of DrinkCategoryActivity.java to reflect ours, then save your changes):

These are all the changes needed to get your list view to display a list of the drinks from the Drink class. Let’s go through what happens when the code runs.
What happens when you run the code
When the user clicks on the Drinks option, DrinkCategoryActivity is launched.
Its layout has a
LinearLayoutthat contains aListView.
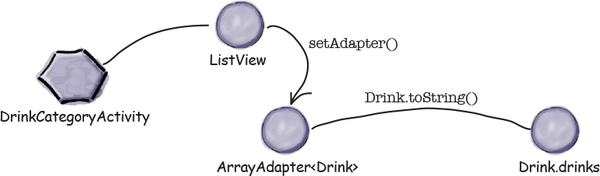
DrinkCategoryActivity creates an ArrayAdapter<Drink>, an array adapter that deals with arrays of Drink objects.

The array adapter retrieves data from the drinks array in the Drink class.
It uses the
Drink.toString()method to return the name of each drink.
DrinkCategoryActivity makes the ListView use the array adapter via the setAdapter() method.
The list view uses the array adapter to display a list of the drink names.
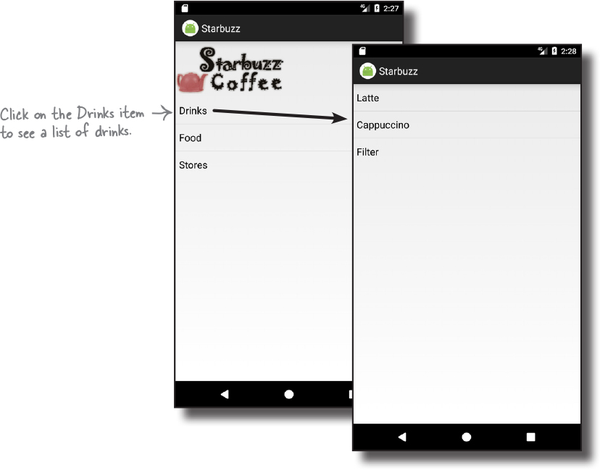
Test drive the app

When you run the app, TopLevelActivity gets displayed as before. When you click on the Drinks item, DrinkCategoryActivity is launched. It displays the names of all the drinks from the Drink Java class.
On the next page we’ll review what we’ve done in the app so far, and what’s left for us to do.
App review: where we are
So far we’ve added Drink.java to our app, and created activities TopLevelActivity and DrinkCategoryActivity along with their layouts.

Here’s what our app currently does:
When the app gets launched, it starts activity TopLevelActivity.
The activity displays a list of options for Drinks, Food, and Stores.
The user clicks on Drinks in TopLevelActivity.
This launches activity
DrinkCategoryActivity, which displays a list of drinks.DrinkCategoryActivity gets the values for its list of drinks from the Drink.java class file.
The next thing we’ll do is get DrinkCategoryActivity to launch DrinkActivity, passing it details of whichever drink was clicked.
How we handled clicks in TopLevelActivity

Earlier in this chapter, we needed to get TopLevelActivity to react to the user clicking on the first item in the list view, the Drinks option, by starting DrinkCategoryActivity. To do that, we had to create an OnItemClickListener, implement its onItemClick() method, and assign it to the list view. Here’s a reminder of the code:
We had to set up an event listener in this way because list views aren’t hardwired to respond to clicks in the way that buttons are.
So how should we get DrinkCategoryActivity to handle user clicks?
Pass the ID of the item that was clicked by adding it to an intent
When you use a category activity to display items in a list view, you’ll usually use the onItemClick() method to start another activity that displays details of the item the user clicked. To do this, you create an intent that starts the second activity. You then add the ID of the item that was clicked as extra information so that the second activity can use it when the activity starts.

In our case, we want to start DrinkActivity and pass it the ID of the drink that was selected. DrinkActivity will then be able to use this information to display details of the right drink. Here’s the code for the intent:

It’s common practice to pass the ID of the item that was clicked because it’s the ID of the underlying data. If the underlying data is an array, the ID is the index of the item in the array. If the underlying data comes from a database, the ID is the ID of the record in the table. Passing the ID of the item in this way means that it’s easier for the second activity to get details of the data, and then display it.
That’s everything we need to make DrinkCategoryActivity start DrinkActivity and tell it which drink was selected. The full activity code is on the next page.
The full DrinkCategoryActivity code

Here’s the full code for DrinkCategoryActivity.java (add the new method to your code, then save your changes):

A detail activity displays data for a single record

As we said earlier, DrinkActivity is an example of a detail activity. A detail activity displays details for a particular record, and you generally navigate to it from a category activity.
We’re going to use DrinkActivity to display details of the drink the user selects. The Drink class includes the drink’s name, description, and image resource ID, so we’ll display this data in our layout. We’ll include an image view for the drink image resource, and text views for the drink name and description.
To create the activity, select the com.hfad.starbuzz package in the app/src/main/java folder, then go to File→New...→Activity→Empty Activity. Name the activity “DrinkActivity”, name the layout “activity_drink”, make sure the package name is com.hfad.starbuzz, and uncheck the Backwards Compatibility (AppCompat) checkbox. Then replace the contents of activity_drink.xml with this:
Note
Make sure you create the new activity.
Note
If prompted for the activity’s source language, select the option for Java.

Now that you’ve created the layout of your detail activity, we can populate its views.
Retrieve data from the intent

As you’ve seen, when you want a category activity to start a detail activity, you have to make items in the category activity list view respond to clicks. When an item is clicked, you create an intent to start the detail activity. You pass the ID of the item the user clicked as extra information in the intent.
When the detail activity is started, it can retrieve the extra information from the intent and use it to populate its views. In our case, we can use the information in the intent that started DrinkActivity to retrieve details of the drink the user clicked.
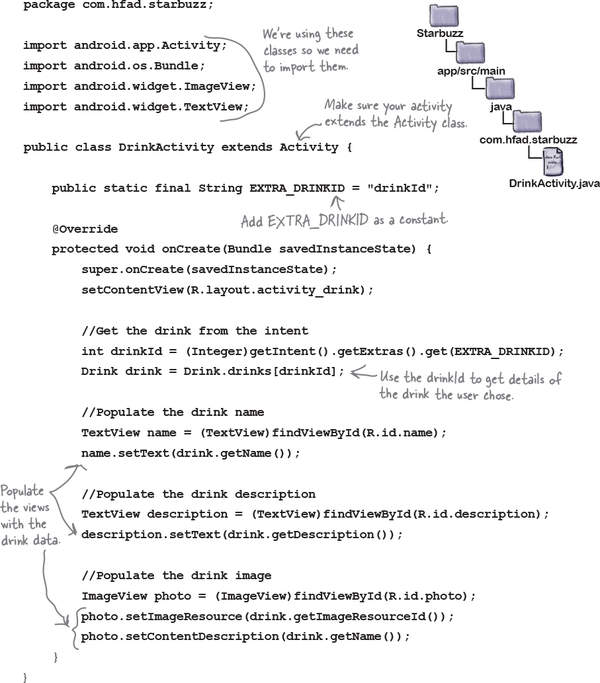
When we created DrinkCategoryActivity, we added the ID of the drink the user clicked as extra information in the intent. We gave it the label DrinkActivity.EXTRA_DRINKID, which we need to define as a constant in DrinkActivity.java:
public static final String EXTRA_DRINKID = "drinkId";
As you saw in Chapter 3, you can retrieve the intent that started an activity using the getIntent() method. If this intent has extra information, you can use the intent’s get*() methods to retrieve it. Here’s the code to retrieve the value of EXTRA_DRINKID from the intent that started DrinkActivity:
int drinkId = (Integer)getIntent().getExtras().get(EXTRA_DRINKID);
Once you’ve retrieved the information from the intent, you can use it to get the data you need to display in your detail record.
In our case, we can use drinkId to get details of the drink the user selected. drinkId is the ID of the drink, the index of the drink in the drinks array. This means that you can get details about the drink the user clicked on using:
Drink drink = Drink.drinks[drinkId];
This gives us a Drink object containing all the information we need to update the views attributes in the activity:

Update the views with the data
When you update the views in your detail activity, you need to make sure that the values they display reflect the data you’ve derived from the intent.
Our detail activity contains two text views and an image view. We need to make sure that each of these is updated to reflect the details of the drink. drink
The DrinkActivity code

Here’s the full code for DrinkActivity.java (replace the code the wizard gave you with the code below, then save your changes):
What happens when you run the app
When the user starts the app, it launches TopLevelActivity.

The onCreate() method in TopLevelActivity creates an onItemClickListener and links it to the activity’s ListView.

When the user clicks on an item in the ListView, the onItemClickListener’s onItemClick() method gets called.
If the Drinks item was clicked, the
onItemClickListenercreates an intent to startDrinkCategoryActivity.
DrinkCategoryActivity displays a single ListView.
The
DrinkCategoryActivitylist view uses anArrayAdapter<Drink>to display a list of drink names.
The story continues
When the user chooses a drink from DrinkCategoryActivity’s ListView, onItemClickListener’s onItemClick() method gets called.

The onItemClick() method creates an intent to start DrinkActivity, passing along the drink ID as extra information.

DrinkActivity launches.
It retrieves the drink ID from the intent, and gets details for the correct drink from the
Drinkclass. It uses this information to update its views.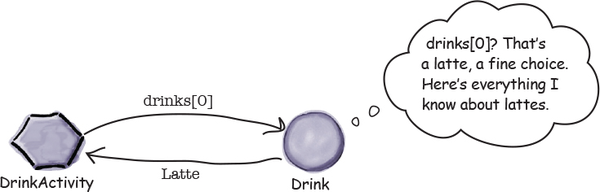
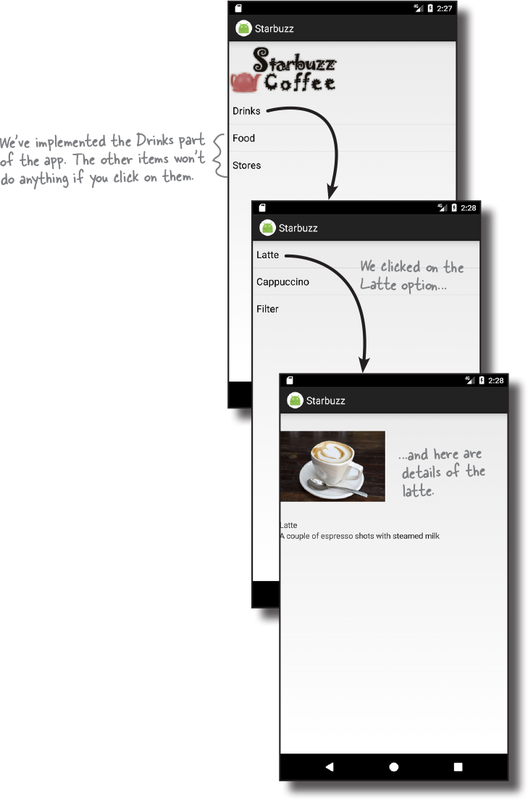
Test drive the app
When you run the app, TopLevelActivity gets displayed.
When you click on the Drinks item, DrinkCategoryActivity is launched. It displays all the drinks from the Drink java class.
When you click on one of the drinks, DrinkActivity is launched and details of the selected drink are displayed.
Using these three activities, you can see how to structure your app into top-level activities, category activities, and detail/edit activities. In Chapter 15, we’ll revisit the Starbuzz app to explain how you can retrieve the drinks from a database.
Chapter 7 Your Android Toolbox

You’ve got Chapter 7 under your belt and now you’ve added list views and app design to your toolbox.
Note
You can download the full code for the chapter from https://tinyurl.com/HeadFirstAndroid.