
Options for Display
AutoCAD’s display represents the look of your drawing session. By editing the settings found in the Display tab, you can control how AutoCAD looks, how layouts appear, and even increase performance.
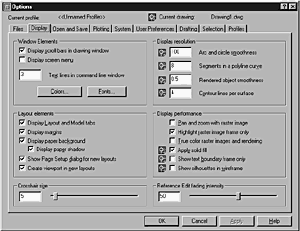
The Display tab is organized into six areas, as shown in Figure 3.4. The six areas are as follows:
Figure 3.4. The Display tab in the Options dialog box controls AutoCAD’s screen appearance.
Window Elements. This area controls different display settings in the AutoCAD Window, including the number of lines in the command-line window and the screen’s background color.
Layout elements. This area controls the appearance of paper space layouts.
Crosshair size. This area controls the size of the cursor’s crosshairs.
Display resolution. This area controls the appearance of objects onscreen.
Display performance. This area controls the display settings that affect AutoCAD’s performance.
Reference Editing fading intensity. This area specifies how much background objects fade during in-place reference editing.
Window Elements
In the Window Elements area, you can turn on or off the scrollbars that appear in each drawing window. The scrollbars allow you to pan the current view by sliding the buttons along the scrollbar. You can also depress the arrow keys at either end of the scrollbars, or click in the bar itself to pan the view. A handy feature of the scrollbars is that you can pan to a new view during a command.
The Window Elements area also allows you to control the display of the screen menu, which is a leftover relic from much earlier AutoCAD versions. The screen menu was used before pull-down menus were available, and well before toolbars were developed. The screen menu appears on the right side of the screen, and it’s still available for those who have been using AutoCAD for many years and prefer it as the main interface with AutoCAD commands. Although it is perfectly acceptable to execute commands in AutoCAD using the screen menu, if you’re new to AutoCAD, you should avoid using it since it is not as intuitive as the pull-down menus, nor as easy to use as the toolbars.
In the Window Elements area, you can also control the number of lines that appear in the command-line window at the bottom of AutoCAD’s screen. The default number of lines is three, and you can enter a new value in the text box. A value of three will show the previous two prompts, plus, provide another line for the active command-line prompt. You can also modify the number of lines on screen without using the Options dialog box by dragging the top of the command-line window up or down.
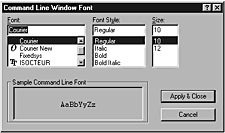
The Window Elements area also enables you to control the font that appears in the command-line window. By clicking the Font button, AutoCAD displays the Command Line Window Font dialog box, as shown in Figure 3.5. To change the font, choose the desired Font, Font Style, and Size, then click the Apply & Close button.
Figure 3.5. The Command Line Window Font dialog box controls the font that appears in the command-line window.
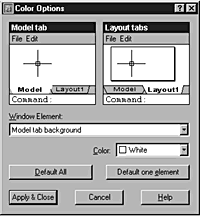
Finally, you can control AutoCAD’s screen colors by clicking the Color button, which displays the AutoCAD Color Options dialog box, as shown in Figure 3.6. From this dialog box, you independently control the background screen color of model space, paper space layouts, and the command-line window. You can also change the color of the crosshairs, and AutoCAD’s AutoTracking vectors.
Figure 3.6. The AutoCAD Color Options dialog box controls the color of AutoCAD’s screen.
By modifying the colors of the various elements, you can adjust the display of your drawings to make viewing more comfortable, and place less strain on your eyes, which is a real advantage if you spend eight hours a day or more working with AutoCAD.
After you have modified the screen’s colors, you can easily set them back to their original color scheme. By clicking the Default All button, you change all color settings back to their original mode. By clicking the Default One Element button, you change the currently selected item back to its original color.
Layout Elements
In the Layout Elements area, you control options for existing and new layouts. A layout is an individual paper space environment in which you set up drawings for plotting. The various options toggle features off or on. Paper space layouts are discussed in detail in Chapter 19, “Paper Space Layouts.”
Crosshair Size
The Crosshair Size area controls the size of AutoCAD’s crosshairs. The crosshairs appear on the cursor when you move the cursor into AutoCAD’s drawing area. The valid range is from 1% to 100% of the total screen. At 100%, the ends of the crosshairs extend to the edges of the drawing window. When the size is decreased to 99% or below, the crosshairs have a finite size, and the ends of the crosshairs are visible when situated at the edge of the drawing area. The default size is 5%. Some users find it helpful to set the size to 100% when visually aligning points using the cursor display.
Display Resolution
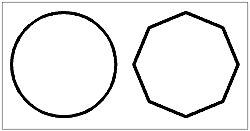
The Display Resolution area controls the number of segments AutoCAD uses when displaying curved objects or curved areas. When AutoCAD draws curved objects, it actually simulates the shape of the curve by drawing short, straight line segments. By using a high number of line segments, AutoCAD enhances the appearance of the curved object. The smaller the number, the fewer line segments used by AutoCAD, and the poorer the simulation of the curve. The advantage of using smaller numbers for the values is that regen times are shorter, and AutoCAD displays objects quicker. For example, Figure 3.7 shows the effect of changing the Arc and Circle Smoothness value. The circle on the left simulates the effect of a value of 100; the circle on the right simulates the effect of a value of 4. By setting the value to 100, the onscreen appearance of the circle is smooth.
Figure 3.7. A Display Resolution setting of 100 generates the smoother circle on the left, while the one generated with a setting of 4 is on the right.
Note
Because of the high speed of today’s processors, you may not experience much degradation in AutoCAD’s performance when setting high smoothness values.
Note
The number of line segments used by AutoCAD to display objects on screen does not affect the accuracy AutoCAD uses when creating or plotting the objects. The values in the Display Resolution area only affect how objects appear onscreen.
Display Performance
The Display Performance options control how AutoCAD deals with raster images (bitmaps) when panning or zooming, when editing them, and when displaying them in true color. By toggling these options off or on, you can dramatically affect your system’s performance. For example, by toggling off the Pan and Zoom with Raster Image option, AutoCAD displays only an outline of the raster image when you pan or zoom, thereby improving display performance. Otherwise, when this option is toggled on, as you pan or zoom, AutoCAD continuously redraws the image.
Similarly, by toggling on the Highlight Raster Image Frame Only option, you increase your system’s performance because it highlights only the image’s frame when you select it for editing. Otherwise, when this option is off, AutoCAD highlights the image’s frame and the entire area of the image.
You also affect display performance by toggling off the True Color Raster Images and Rendering option. When this option is off, you increase performance because AutoCAD does not use 16.7 million colors to display the image, but uses 256 colors instead. Although the number of colors is significantly reduced with this option toggled off, it is usually adequate for display purposes.
Other options include the Apply Solid Fill and Show Silhouettes in Wireframe options. The Apply Solid Fill option controls whether solid fills are displayed in objects like arrowheads on dimension lines, and in polylines in which a width greater than zero is assigned. By toggling off this feature, only a wireframe representation of the object is displayed. The Show Silhouettes in Wireframe option controls whether silhouette curves of 3D solid objects are displayed as wireframes. It also controls whether the wire mesh is drawn or suppressed when a 3D solid object is hidden. To increase performance, toggle off these two options. Silhouettes are discussed in Chapter 29, “Surfacing in 3D.”
One final option is the Show Text Boundary Frame Only option, which displays a box representing the location of text objects instead of displaying the text. If you have a drawing with numerous text objects, and you notice your system is performing slowly, toggle on this option. AutoCAD will then replace all text objects with rectangular outlines representing the limits of the text objects. When this feature is toggled off, the rectangular outlines are removed, and the original text reappears.
Reference Edit Fading Intensity
AutoCAD 2000 introduced a feature called In-Place Reference Editing. This feature allows you to edit blocks and external references from the drawing they’re inserted in, and save the changes back to their original location. The fading intensity value controls the visibility of objects that are not being edited, and displays them at a lesser display intensity than objects being edited. This makes focusing on the object(s) being edited much easier. The valid range is 0% through 90%. The default setting is 50%. This feature is discussed in detail in Chapter 14, “Working with Drawings and External References Productively.”