
Chapter 7. LuntBuild—A Web-Based Continuous Integration Server
An Introduction to LuntBuild
LuntBuild[7] is another open source Continuous Integration tool written in Java. It is quite easy to install and configure, and all server administration tasks are done via a simple but convenient web-based administration console. In fact, LuntBuild is designed to do more than just managing the continuous integration process: it also lets you store and manage generated artifacts, label and promote versions, and manage dependencies between builds. It supports a wide range of version control tools, and notifications can be diffused via email, instant message (IM), and even on a blog site. Indeed, it is one of the most feature-rich of the open source Continuous Integration tools.
LuntBuild is produced and maintained by a company called PMEase.[8] The source code is hosted on JavaForge. LuntBuild also has a commercial cousin, called QuickBuild, which is marketed by the same company. Quickbuild is a commercial open source product (the source code is provided at a cost), with some extra features such as enhanced user and group management, and functionality aimed at larger organizations managing a large number of projects.
Installing LuntBuild
Installing and configuring LuntBuild is relatively simple, and you can have a server up and running in less than an hour. The installation package comes in the form of a self-installing jar file. Download it from the LuntBuild web site and run the graphical installation program as follows:
$ java -jar LuntBuild-1.5.2-installer.jar
The installer takes you step-by-step through the installation process. LuntBuild is a very flexible tool, and can be configured to work with many external web servers and databases. It also works just fine all by itself as a standalone application. During the installation process, you can choose among various configuration options. If you leave the fields with their default values, LuntBuild will install and configure a fully functional standalone installation. For a production environment, you may want to modify some of the options, such as installing it on your own web application server or using your enterprise database. Some of the choices are described briefly here:
- Customizing the web server
LuntBuild is a web-based application. As such, you can either deploy it on your favorite Java web server (such as Apache Tomcat), or let LuntBuild run its own standalone web Jetty-based web server. If you want to deploy it onto your own J2EE-compliant application server, just specify the war deployment directory, and LuntBuild will do the rest.
- Configuring the database
LuntBuild uses a relational database to keep track of generated artifacts, build history, and so on. By default, LuntBuild uses an embedded HSQL DB database, but you can also configure it to use an external database such as MySQL, PostgreSQL, Oracle, or Microsoft SQL Server.
- Configuring authentication
If your company has an LDAP-based user directory, you can configure LuntBuild to use it for logins and passwords. LuntBuild supports some quite sophisticated options for LDAP integration: LuntBuild can import your LDAP users into the LuntBuild user directory where you can give them LuntBuild-specific access rights, you can give all the LDAP users read-only access to the site, you can reserve project administration rights to a selected few, you can map LuntBuild user IDs and email addresses to LDAP fields, and so on.
Once you’ve finished the installation, you can start the server. Go to the installation directory (here we have installed it in a directory called LuntBuild in our home directory) and run the LuntBuild.sh script:
$ cd /usr/local/luntbuild-1.5.2
$ bin/luntbuild.sh localhost 8080
bin/LuntBuild.sh localhost 8080
22:23:50.218 EVENT  Starting Jetty/4.2.23
22:23:50.726 EVENT  Started WebApplicationContext[/LuntBuild,LuntBuild]
LuntBuild : --> context initialization started
LuntBuild : --> context initialization finished
22:23:57.583 EVENT  Started SocketListener on 127.0.0.1:8080
22:23:57.583 EVENT  Started org.mortbay.jetty.Server@5ffb18
And to stop the server, just run the stop-LuntBuild.sh script, as shown here:
$ cd /usr/local/luntbuild-1.5.2
$ bin/stop-luntbuild.sh localhost 8889
Configuring the LuntBuild Server
Once you have started the server, you manage everything via the web administration console (the URL will be something like http://localhost:8080/LuntBuild). Logically enough, LuntBuild requires you to identify yourself before you can do anything interesting (see Figure 7-1). When you first install LuntBuild, you can use “LuntBuild/LuntBuild” to connect as an administrator. Anonymous users are also allowed to view certain parts of the site, but cannot modify anything.

The LuntBuild administration web site lets you view and manage different aspects of your server and of the projects you manage (see Figure 7-2). Here, you can manage build projects and build history, user accounts, server configuration properties, and perform other administrative tasks such as backing up and restoring build and artifact history.
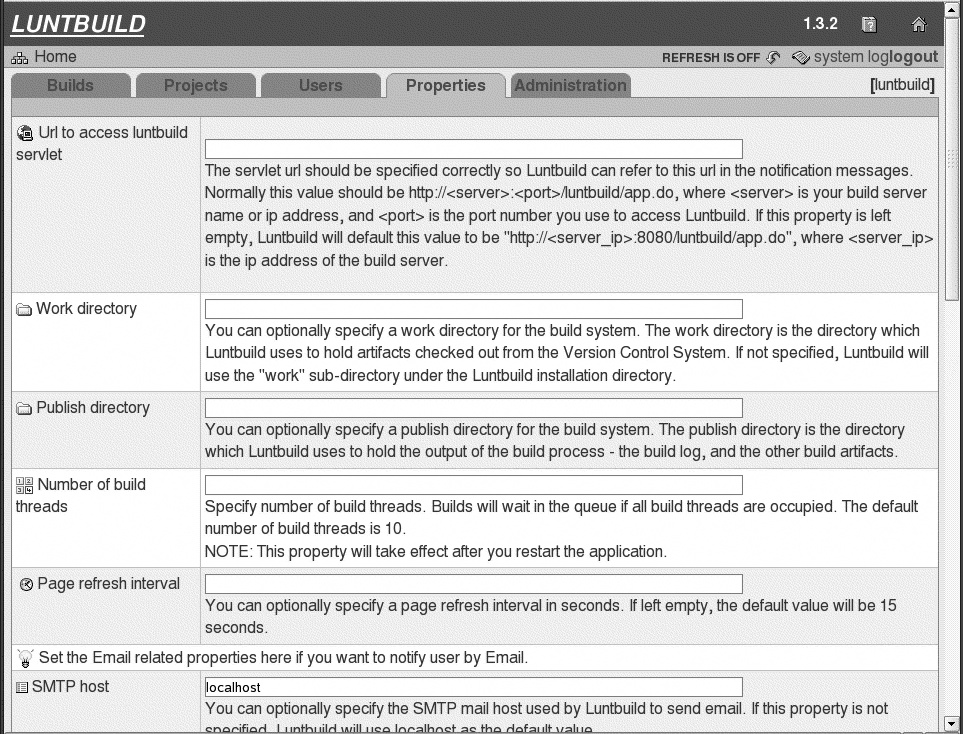
The first thing you need to do when you set up your server is to verify the server configuration properties. You do this in the “Properties” tab (see Figure 7-3). Many server configuration properties, such as the server URL and work directories, use sensible default values, which are well documented on the Properties page. Others, such as the SMTP server for mail notification, will need to be configured if you want to use these notification methods. LuntBuild supports a fairly limited range of notification methods, including SMTP email, MSN, Jabber, SameTime, and some blog sites. To use any one of these methods, you will need to provide information on the host server, as well as user account and password details.
If configuring one of the IM notification types (MSN or Jabber), you will need to create a special account for the LuntBuild server (e.g., [email protected]). Users will need to add this account to their list of contacts in their IM clients. Then users simply log on to their IM clients as usual.
To use blog notification, you will need to provide user account information, the URL of the blog web service, and also the type of blog. Several blog sites today let you submit posts via a web service interface. Unfortunately, there is no standard interface. At the time of this writing, LuntBuild supports the three main blogging application programming interfaces (API’s): the Blogger API (the oldest standard, used for sites like http://www.blogger.com), the Metaweblog API (an extension of the Blogger API, used for sites like http://www.jroller.com and http://wordpress.com), and the LiveJournal API (used by the http://www.livejournal.com blog site).
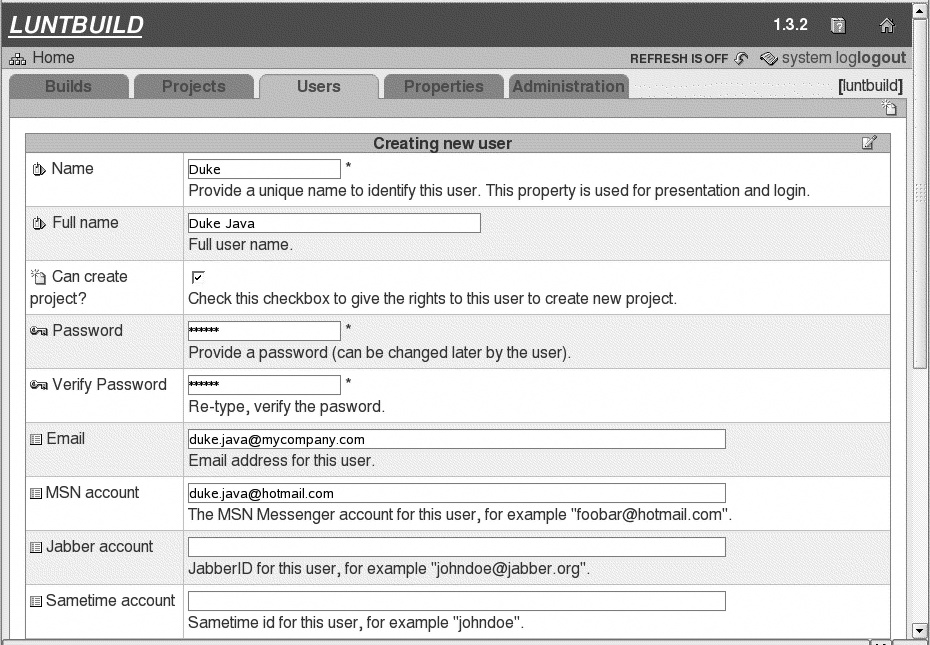
When you are happy with your server configuration, you can set up some user accounts for your team members. You do this in the “Users” tab (see Figure 7-4). User account management at this level is not particularly sophisticated, and users are basically separated into two categories: those who can create projects, and those who can’t. More detailed user-access rules are defined at the project level (see Adding a Project).
Configuring a LuntBuild server using the web administration site is simple and intuitive. Even if they wouldn’t win any prizes for graphical design, the screens are functional and well documented. The next step is to add some projects. And the judicious use of default values and optional fields means that you can be operational in very little time indeed!
Adding a Project
In LuntBuild, build schedules are organized around projects. LuntBuild provides a rich set of functions for managing project builds.
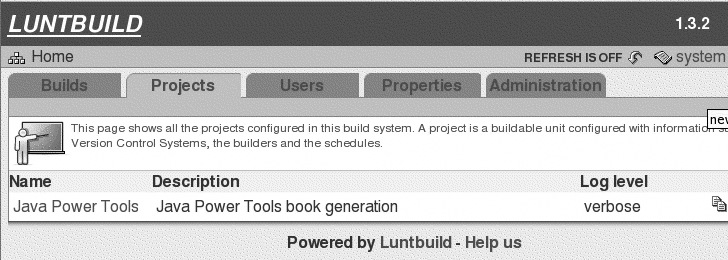
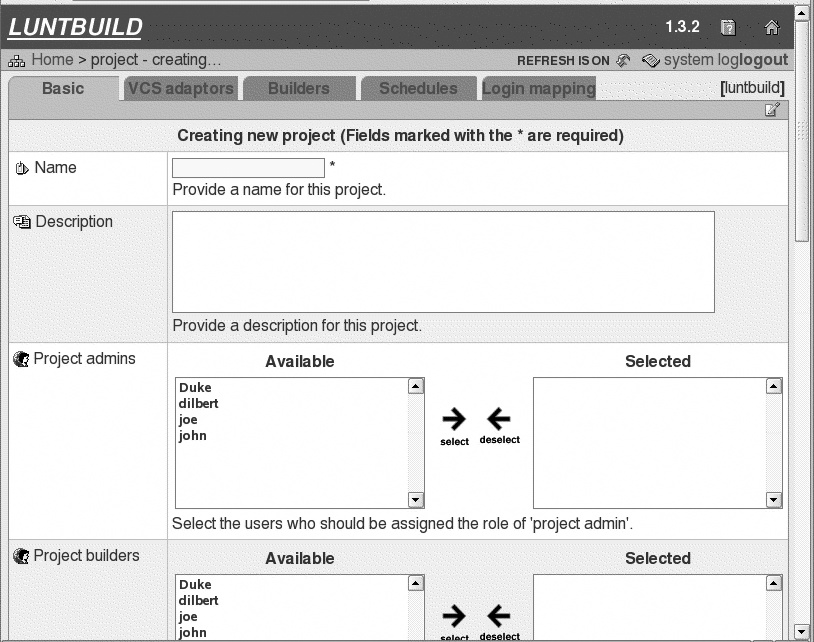
You add a new project in the “Project” tab (see Figure 7-5) by clicking on the “New Project” icon. LuntBuild lets you configure a number of different aspects of your project (see Figure 7-6). Don’t let the number of screens put you off, though; the screens are intuitive and well documented, and you can get a simple project up and running in very little time.
In LuntBuild, project information and management activities are organized into five areas, each represented by a tab:
- Basic
This is where you define general project details, user access rights, and notification methods.
- VCS Adaptors
Version control systems (also known as SCM, or Software Configuration Management, systems).
- Builders
The Builders page lets you configure one or more build scripts for this project.
- Schedulers
Schedulers let you specify when the build scripts will be run.
- Login mapping
This page lets you map your LuntBuild users to your VCS users.
In the remainder of this section, we will go through the steps involved in configuring a project in LuntBuild.
Configuring the Project Basics
The first thing to define are the general project details, user access rights, and notification methods, which are displayed in the “Basic” tab (see Figure 7-6). You will need to save this information before LuntBuild will let you proceed to the other screens.
An important part of this screen concerns user rights. In LuntBuild, you can assign different levels of access to different users for each project. There are three types of access:
- Project Admins
Project admins can manage all aspects of projects in LuntBuild, including project and SCM configuration, user management, and build management.
- Project builders
Project builders are restricted to build scheduling and build management activities.
- Project viewers
Project viewers can simply consult build results and download generated artifacts.
You also define notification methods here. LuntBuild supports several types of notification: Email, MSN Messager, Jabber, Sametime, and Blog sites. These notification types are configured in the server configuration pages (see Configuring the LuntBuild Server): in the project screens, you simply indicate which notification methods should be used for this project.
You also indicate who must be notified. In addition to being able to specify users by name, you can also tell LuntBuild to notify users who have made recent updates to the source repository. For example, you may want to systematically notify the lead developer (specify by name), as well as any other users who have committed any recent changes: this avoids wasting time for developers who haven’t made any updates, and therefore, who shouldn’t be concerned by integration issues.
Finally, you can define project variables. Project variables can be used in ONGL expressions that can in turn be used to build the names of successive build versions. This approach can be used to build sophisticated version naming strategies (see Using Project Variables for Version Numbering).
VCS Adaptors
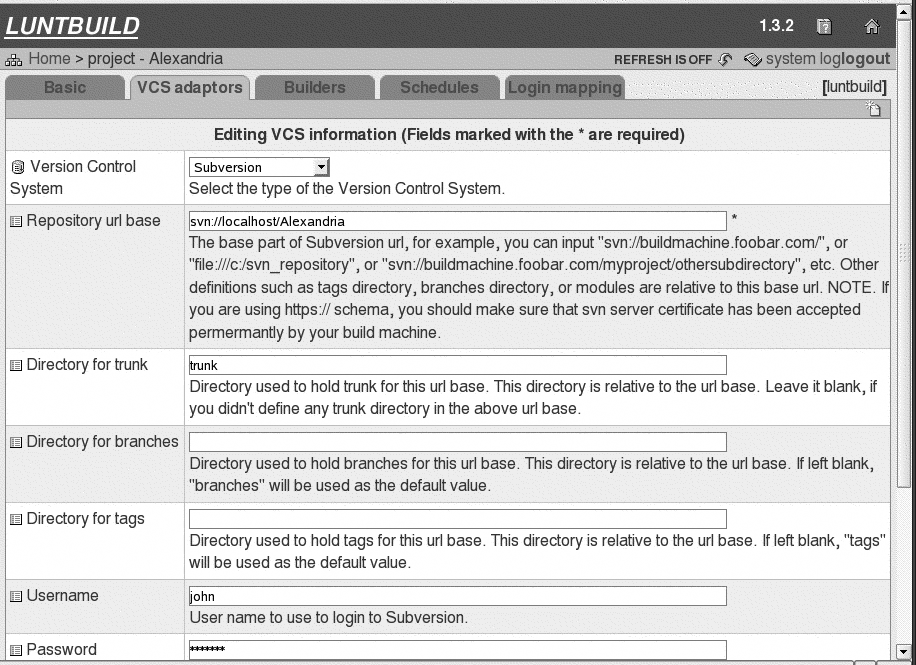
The next step involves configuring the VCS adaptors (see Figure 7-7). This is where you define where LuntBuild should look for the project source code. LuntBuild supports a wide range of VCS products, including CVS, Subversion, StarTeam, AccuRev, ClearCase, and even Visual SourceSafe. Since each VCS product has its own peculiarities, each VCS adaptor has its own specific configuration screen. The Subversion screen, for example, recognizes the Subversion convention of storing the main development trunk, separate branches, and revision tags in separate specific directories. If you are using a VCS product that does not support atomic commits, such as CVS, ClearCase, or Visual SourceSafe (just to name a few), you can also define a “quiet time.” This forces LuntBuild to wait until the VCS has been inactive for a certain period of time before it starts to check out a new version. The idea is to make sure any in-progress commits have been finished before LuntBuild starts its build.
Once you have configured the VCS adaptor, you need to define some modules. Modules let you check out different parts of the project from different areas in your source code repository. Depending on what VCS you are using, and how your source code repository is organized, this will be more or less useful. For example, if your project is stored on a dedicated Subversion repository, with no subprojects, modules will be of little use. By contrast, if you are using a Subversion repository that is shared among many projects, you will need to define a module corresponding to your project in the repository. If you are using CVS, the module will be your project directory on the repository server.
Although it is not a mandatory field, LuntBuild in fact expects you to define at least one. If you want to check out the entire project, just create a module with a dot (“.”) for the source path.
You can also define several VCS adaptors if you really need to; if different parts of your project come from different SCM repositories, for example.
Builders
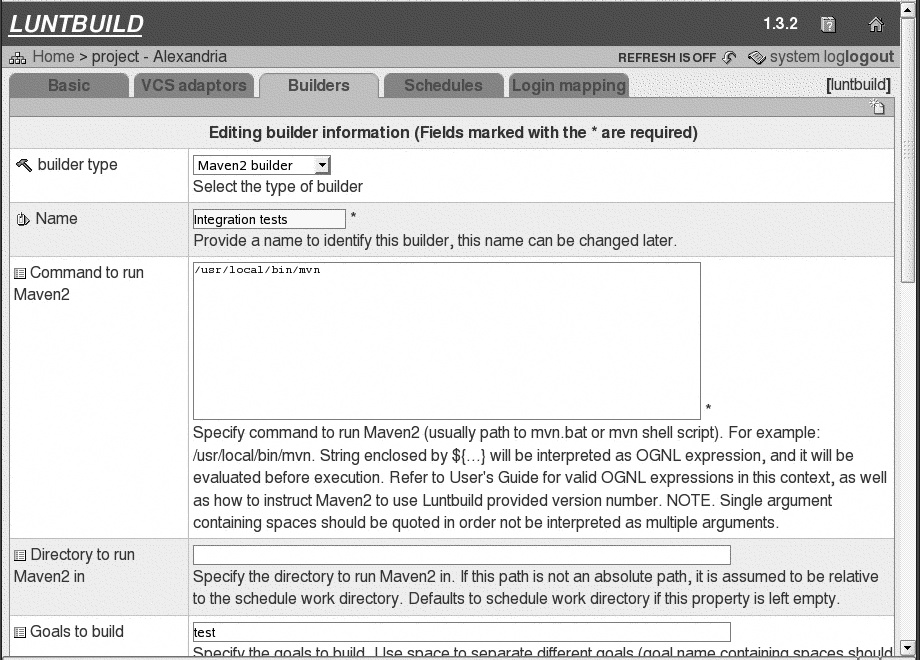
One of the distinctive features of LuntBuild is the way that it distinguishes between configuring the builds and scheduling them. The Builders page (see Figure 7-8) lets you configure one or more build scripts for a project. LuntBuild handles several different types of build scripts: Ant, Maven and Maven 2, command-line build scripts, and Rake (a build language similar to Ant for Ruby).
You should give your build a meaningful name (such as “Integration tests,” “Nightly build,” or “Maven site build”). LuntBuild lets you assign the same build to several different schedules, or several different builds may be assigned to the same schedule, so it is useful to be able to recognize your build configurations at a glance.
Configuring a build script is fairly intuitive. You need to provide the build script location, and (where appropriate) the goals or targets to be called. You can also provide build properties and environment variables, which can be used to customize the behavior of your build script.
Scheduling
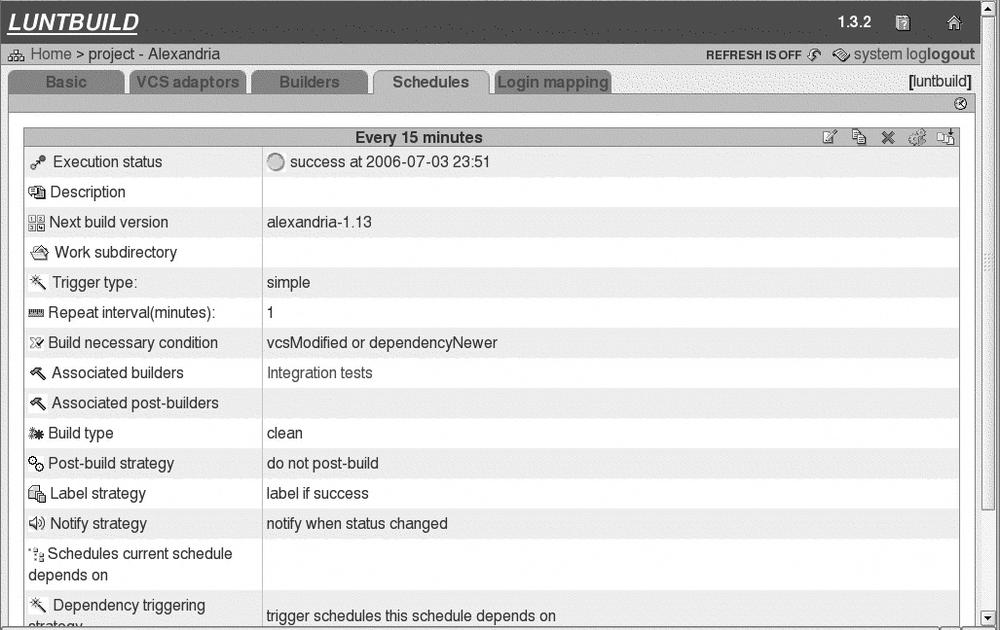
Builders let you tell LuntBuild how to build your project; schedulers let you specify when the build scripts will be run (see Figure 7-9). By providing a clean separation of concerns, LuntBuild lets you configure modular build scripts that can be used and reused in different schedules.
Once you have provided a meaningful name and description, you define a naming strategy for the builds generated by this scheduler, using the “Next build version” field. This field displays the label of the next planned build. Each build has a unique, automatically-generated label, such as “myproject-1.14” or “library-core-1.0 (build 123).” By default, LuntBuild will simply increment the last number in the expression: “myproject-1.14” will become “myproject-1.15,” and “library-core-1.0 (build 123)” will become “library-core-1.0 (build 124).” If you need a more sophisticated naming strategy, you can use project variables and OGNL expressions to build the version label programmatically (see Using Project Variables for Version Numbering).
The “Trigger Type” field lets you specify when and how a build is to be scheduled. You can schedule a build in one of three ways. “Manual” builds must be triggered by hand. “Simple” builds are run at regular intervals. And “cron” builds use a cron expression to determine when they should be run. LuntBuild does not support the polling approach.
By default, builds will be run only if an update is detected in the VCS. A build will also run if another build on which it depends has been rebuilt. This behavior suits most circumstances well. If it doesn’t suit yours, you can use the “Build necessary condition” field to modify or fine-tune this behavior. Typical alternatives are “always” (always run the build), “never” (ignore this build), or “alwaysIfFailed” (keep trying to rebuild after a build has failed, even if there are no updates in the VCS).
LuntBuild is a flexible tool, and you can assign builds to a scheduler in several ways. The most common is to use the “Associated builders” field: The builders listed here will be executed in turn whenever this scheduler is run. You can also define “postbuilders,” which will be run after the main builds, if certain conditions are met. A typical use of a postbuild would be to deploy an application to a test server if and only if the nightly build succeeded.
LuntBuild also lets you configure a number of other scheduling options. You can configure builds to be clean (working directories are deleted and the whole project is rebuilt) or incremental. New labels may be generated after every build, or only if the build succeeds. The “Notify Strategy” lets you decide when notification messages should be sent: always, only if the build fails, whenever the build status changes (i.e., one message when a build breaks, then another when it is fixed), and so on.
You can also define dependencies between schedules. Suppose that your project depends on other libraries or components, which are also handled in LuntBuild. You may want to add dependencies to these projects so that any rebuilds in these dependent projects will automatically trigger a build in your project.
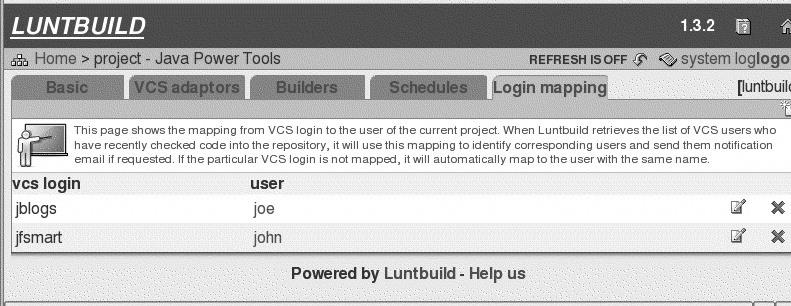
Login Mapping
As a rule, it is better if your LuntBuild logins correspond to your VCS account names. This allows LuntBuild to know automatically who has made modifications in the source code repository, and send notifications as appropriate.
However, there are times when this is just not practical. Your VCS accounts may be a strange combination of letters and numbers that only a systems administrator can understand (yes, I’ve seen it done), and you may prefer more user-friendly logins for your LuntBuild system. This is where the Login Mapping screen (see Figure 7-10) comes in handy. This screen lets you map VCS logins to your LuntBuild user names. So, you can keep your user-friendly LuntBuild logins, and LuntBuild will still manage to notify the right users when changes are made in the repository.
Using Project Variables for Version Numbering
Managing version numbers is an important part of configuration management. LuntBuild provides several easy ways to do this, via the “Next build version” field in the “Schedules” tab.
If all you need is a basic counter, you simply provide the initial version text in the “Next build version” field. For example, if you place “my-project-1.0” in the “Next build version” field, the next build will be labeled “my-project-1.0,” the following “my-project-1.1,” and so on. This method simply takes the last number in the version label field and increments it, so “my-project-1.5.0_07-b10” would become “my-project-1.5.0_07-b11.”
Now suppose you use a numbering system based on major and minor release numbers, followed by a build number; for example, “my-project-1.2.3.” You can do this using project variables, which you define in the “Basic” tab (see Configuring the Project Basics), and OGNL expressions.
OGNL, or Object-Graph Navigation Language, is an expression language for manipulating Java objects. It is often used in the open source Java world, in projects such as Tapestry and Webworks. It is similar but more expressive than the more well-known EL expression language used in JSTL, which only allows you to read object properties.
In LuntBuild, project variables are stored in a Map called project.var. So, to read a project variable called “versionNumber,” you would use the following expression:
${project.var["versionNumber"]}To define the “my-project-1.2.3” numbering strategy described above, you would define two variables in the project “Basic” tab called “majorVersionNumber” and “minorVersionNumber,” and use a version label like this:
myproject-${project.var["majorVersionNumber"]}-${project.var["minorVersionNumber"]}-1However, this won’t work. When you introduce OGNL, the trick of incrementing the last number in the build label no longer works—you need to do this yourself. That’s where OGNL expressions come in handy. Not only can you read object fields, but you can also modify them. Here, we need a third variable (say, “versionIterator”) to keep track of the final build number. You use the increaseAsInt() method to do this, as shown here:
${project.var["versionIterator"].increaseAsInt()}So, the final version label expression should look like this:
myproject-${project.var["majorVersionNumber"]}-${project.var["minorVersionNumber"]}
-${project.var["versionIterator"].increaseAsInt()}
Now suppose we want to keep track of nightly builds by using a date suffix, such as “project-1-2-nightly-2006-06-21.” LuntBuild provides a helper object called “system” for this kind of situation. This object has a number of date-related fields such as year, month, dayOfMonth, numericMonth, hour, minute and so on. To obtain the above expression, we could use an expression like this:
${system.(year+"-"+numericMonth+"-"+dayOfMonth)}So, the final expression would be:
myproject-${project.var["majorVersionNumber"]}-${project.var["minorVersionNumber"]}
-nightly-${system.(year+"-"+numericMonth+"-"+dayOfMonth)}
Build Results Diagnostics
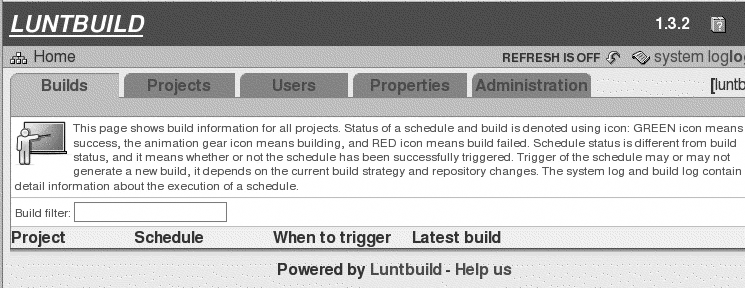
On the home page of your LuntBuild site, you get a dashboard summary of the latest builds, with green lights for successful builds, and red lights for failed ones (see Figure 7-11). What can be a little confusing is the fact that both schedules and builds have status lights: Both can fail, apparently independently of each other.
If the schedule is marked with a red light (like the “Java Power Tools” schedule in Figure 7-11), the schedule is not (or is no longer) running correctly. The build, if any, is the last successful build on record.
If the build is marked with a red light (like the “alexandria-1.0” build in Figure 7-11), this tells you that your schedule may be running just fine, but your build script (or the configuration thereof) is broken.
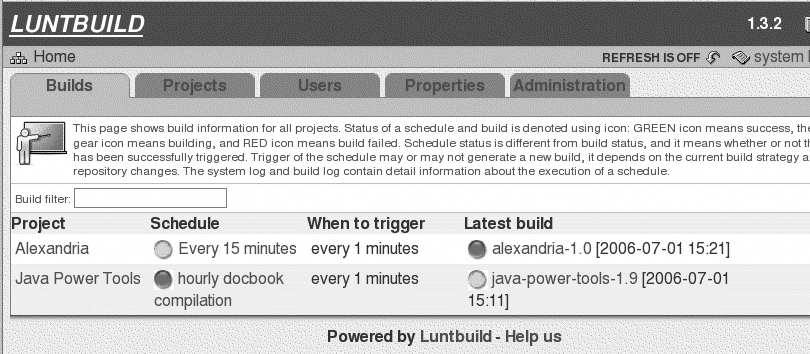
In both cases, something probably needs to be fixed. Just click on the broken schedule or build to investigate further.
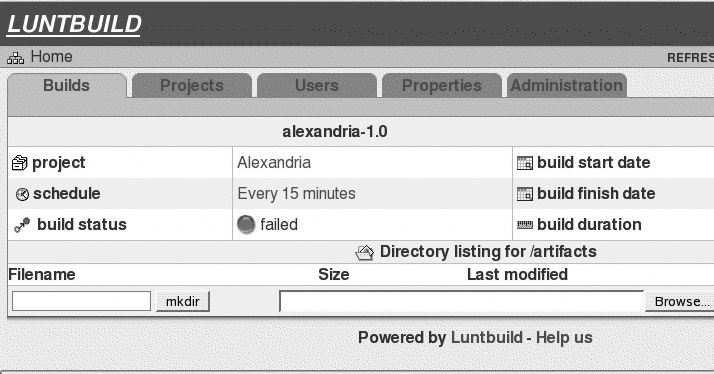
Finding out exactly what is wrong can be a little tricky, and sometimes needs some detective work. Let’s look at the broken build first. If you want to see details about what is broken, just click on the broken build. This will open a page containing a detailed description of the build results (see Figure 7-12). You can do a few things here, such as displaying logfiles, and forcing a rebuild when you think you’ve fixed the problem (the “hammer” icon).
You can also attach this build script to a different scheduler using the green arrow icon (the operation is called “move” in LuntBuild jargon). This could be useful for example if you realise that the build you have scheduled to run every 10 minutes actually takes 30 minutes, to complete, which is an excellent way to overload your build server and to incur the wrath of your system administrator.
The revision log contains the list of changes recorded in the VCS since the last build. The build log (see Figure 7-13) gives a detailed record of the build’s progress. Even if no error is explicitly mentioned here, you can generally figure out where the build got to. For example, in this case, we notice that the build stopped with the cryptic message “Seems that baseUrl ‘svn://localhost/Alexandria/tags’ does not exist, creating….” LuntBuild tries to create the Subversion tags directory, and stops there. This seems to indicate a problem with the Subversion connection.

In this case, it turned out that the Subversion user configured in the VCS entry had read-only access to the repository and so couldn’t update the repository: Indeed, LuntBuild creates a new tag in the VCS repository for every build, as illustrated here:
> svn list svn://localhost/Alexandria/tags
alexandria-1_1/
alexandria-1_2/
alexandria-1_3/
alexandria-1_4/
alexandria-1_5/
alexandria-1_6/
alexandria-1_7/
alexandria-1_8/
...
Once the problem is fixed, you can either wait for the next scheduled build to go ahead or trigger a build manually from the build page.
Schedule errors are often harder to isolate, as there are no easily accessible logfiles available from the web site. Errors often come from incorrect VCS configurations or other configuration issues. One thing that can help is to look at the LuntBuild logfiles, which live in the logs directory. In the following example, I use grep to list errors logged in this file (with the -C option to get a bit of surrounding context:.
$ cd ~/LuntBuild
$ grep -C 1 ERROR logs/LuntBuild_log.txt
2006.07.01-21:22:11 [DefaultQuartzScheduler_Worker-7] INFO
com.luntsys.LuntBuild.BuildGenerator
- Getting revisions for url: svn://localhost/Alexandria/trunk
2006.07.01-21:22:11 [DefaultQuartzScheduler_Worker-5] ERROR
com.luntsys.LuntBuild.BuildGenerator
- Exception catched during job execution
java.lang.RuntimeException: Unable to evaluate expression
"vcsModified or dependencyNewer".
Please make sure that your VCS server's time is in sync with your LuntBuild machine!
--
...
Using LuntBuild with Eclipse
LuntBuild integrates well with the Eclipse IDE, via the Luntclipse plug-in. This plug-in is a neat little tool that gives you a full view of the status of your LuntBuild projects without having to leave your IDE or open a browser. Let’s look at how to install and use the Luntclipse plug-in.
To install the plug-in, first download it from the LuntBuild web site (http://LuntBuild.javaforge.com/), unzip it into your Eclipse plug-ins directory, and then restart Eclipse. Alternatively, you can use the remote update site at http://LuntBuild.javaforge.com/luntclipse-release.
Once installed, Luntclipse provides a new view in which you can monitor your LuntBuild server. You can open this view by selecting “Window > Show View > Other... > Luntclipse > LuntBuild.”
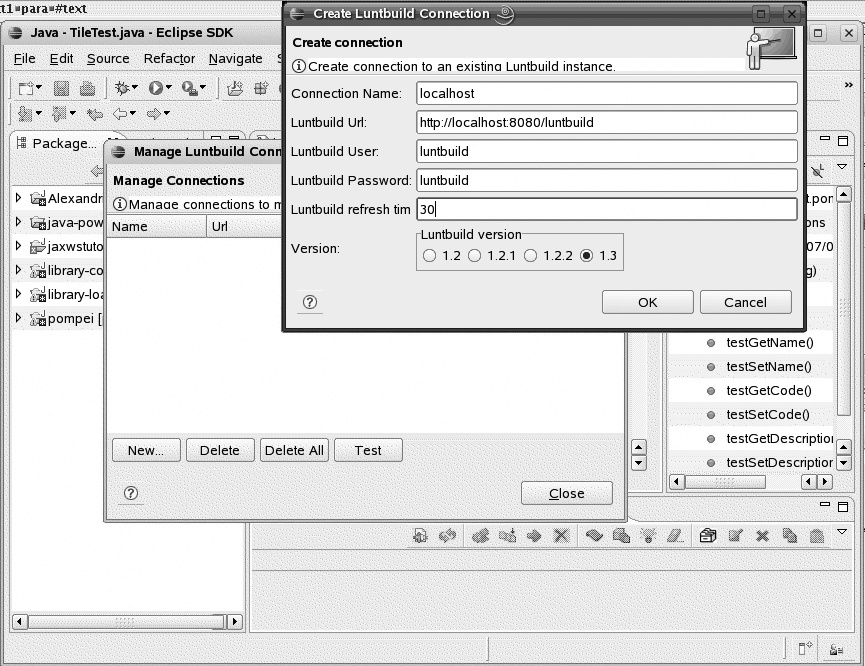
The first thing you need to do is to set up a connection to your LuntBuild server (see Figure 7-14). This is straightforward: you just need to specify the URL of your LuntBuild server, and a user name and password. You also need to provide the frequency at which the LuntBuild view will be updated from the server.
Once you have set up your connection, the LuntBuild view provides a convenient dashboard view of your projects and their builds (see Figure 7-15). Projects and builds are listed in a tree view, with the builds of a project being displayed as children of the project.
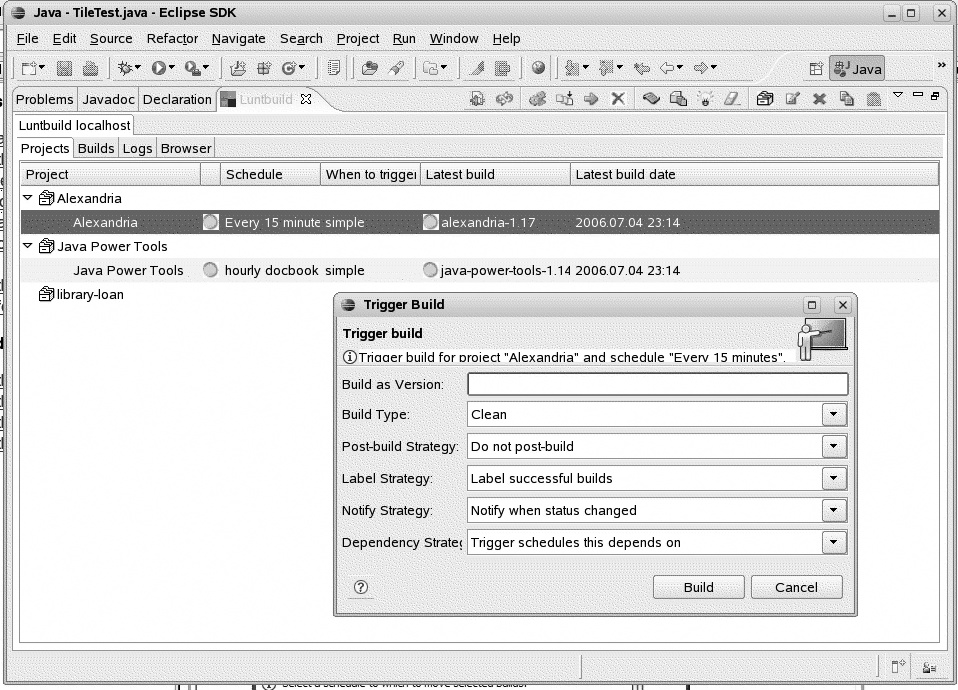
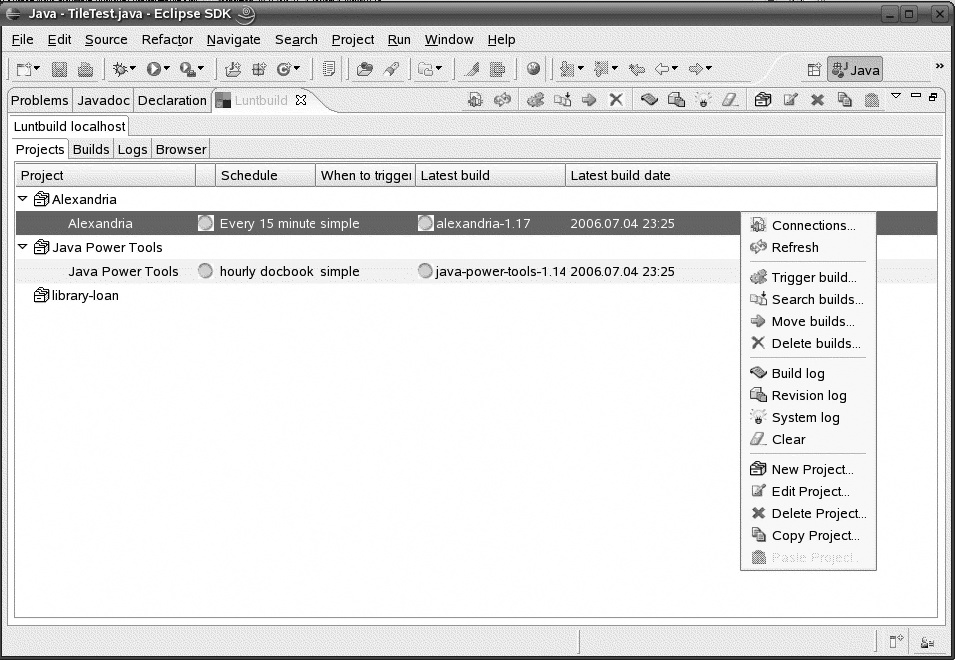
You can consult and manage virtually any aspect of your LuntBuild projects via this view. The contextual menu (see Figure 7-16) lets you perform a variety of tasks such as triggering, searching, moving or deleting builds, consulting logfiles, or even creating or modifying projects. The toolbar at the top of the view provides an alternative way of accessing these functionalities. You can also trigger a build by simply clicking on the build entry (see Figure 7-15).
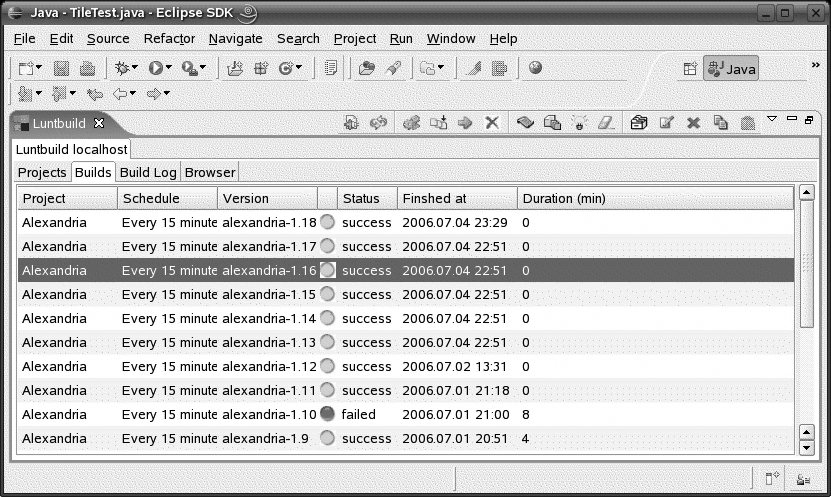
The search function lets you view a set of past builds. This is useful if you want to visualise build history for a certain project over a certain period of time. The list of matching builds is displayed in the “Builds” tab (see Figure 7-17).
You can also create a new project, or modify any of the fields of an existing project (see Figure 7-18).

And, if all else fails, the Browser tab provides an embedded web browser connection to the Luntbuild server.
Reporting on Test Coverage in Luntbuild Using Cobertura
Contributed by: Jettro Conradie
Introduction
Luntbuild comes out-of-the-box with Junit integration; if your project build runs any JUnit tests, the build view will provide a convenient link to the corresponding JUnit reports. Test coverage reports (Chapter 12) can complement these unit test results nicely. Code coverage reports let you investigate how much of your code is actually being tested by your unit tests, and can be an excellent means of improving the quality of your unit tests. There are several code coverage tools available, both open source and commercial. One of the best open source code coverage tools is Cobertura (see Chapter 9). In this section, we will discuss how to produce and display Cobertura code coverage reports directly from within your Luntbuild build results, right alongside the standard unit test reports. We will also see how to extend Luntbuild functionalities using JavaBeans and Luntbuild extension points.
Extending Luntbuild with Extension Points
You can extend Luntbuild functionalities fairly easily using simple JavaBean classes. You encapsulate your new functionalities in a standard JavaBean class. You can access your bean from within Luntbuild using OGNL expressions. However, you need to give this file to Luntbuild in a form that it can cope with. Each Luntbuild extension is presented in the form of a JAR file containing the relevant classes along with a special properties file that tells Luntbuild how to integrate this extension. You bundle your bean, and any other classes it needs, into a JAR file containing the special property file named “luntbuild_extension.properties.” This file must contain two property values:
- luntbuild.extension.name
The name of the extension, which you will use in Luntbuild to invoke the extension class.
- luntbuild.extension.class
The class that implements the extension.
Once you have bundled all this into a JAR file, you have your brand new Luntbuild extension! Note that you can only create one extension per JAR file.
Creating a Cobertura Luntbuild Extension
So creating a Luntbuild extension is quite an easy task. Now let’s have a look at the bean we will be using to integrate Cobertura reports into LuntBuild. This JavaBean will basically tell Luntbuild where it can find the coverage report generated by Cobertura:
package com.javapowertools.luntbuild.addon;

import java.io.File;

public class CoberturaIntegration {
  private final String coberturaReportDir = "cobertura_report_dir";

  public String getCoberturaReportDir(String publishDir) {
    return publishDir + "\\" + coberturaReportDir;
  }

  public String getCoberturaReportDir() {
    return coberturaReportDir;
  }

  public String getCoberturaSite(String publishDir) {
    File pathToFile = (new File(getCoberturaReportDir(publishDir)+
    File.separator + "index.html"));
    if(pathToFile.exists()) {
      return coberturaReportDir + "/index.html";
    } else {
      return null;
    }
  }
}
The methods are pretty straightforward; the harder part is when to use
which method. By providing the directory where all reports should be copied,
the getCoberturaReportDir() method
returns the exact path where to copy the Cobertura reports to. The other
method, getCoberturaSite(), points to
the path used by the Luntbuild web server to find the start page for all the
Cobertura reports.
Now let’s create the “luntbuild_extension.properties” file. This file must contain the following two lines:
luntbuild.extension.name=CoberturaIntegration
luntbuild.extension.class=com.javapowertools.luntbuild.addon.CoberturaIntegration
Now create a jar, with the bean and the property file. Luntbuild expects extension jars to be placed in the $LUNTBUILD_HOME/web/WEB-INF/lib directory. Copy your jar here and restart Luntbuild. Luntbuild will now be able to detect and use this extension. In the next section, we discuss how to use the new plug-in.
Using the Extension
The next step is to integrate the extension into the build process. In our case, we need to use this extension in the builder configuration screen of a project, and in the BuildView.html page which actually displays the build reports. You can however, use this bean in any OGNL expression throughout Luntbuild.
Luntbuild needs to know into which directory the Cobertura reports needs to be copied. You need to expose this information in the parameter coberturaHtmlReportDir. Have a look at the following image that shows the ant builder configuration (see Figure 7-19).
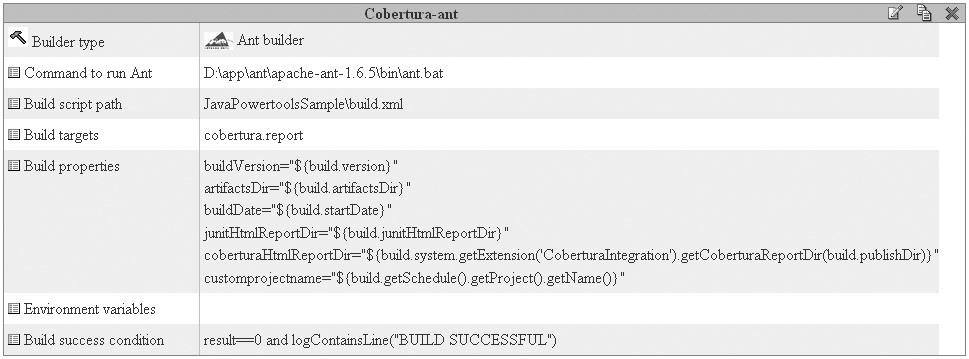
Note the value for the coberturaHtmlReportDir. This OGNL expression uses the current build object. This object has a system member variable, which you use to access the Luntbuild extensions. Here, we obtain the reference to the CoberturaIntegration object, using the name that is defined in the luntbuild_extension.properties file. From there on, we can just manipulate methods of our bean. The next section will show you what you can do with this parameter from ant. Now let’s have a look at the BuildViewer.html file that can be found in the WEB-INF folder.
The views use Tapestry. I am not giving you an introduction into Tapestry
because you do not need it for this adjustment. Actually you can copy part
of the junit example in this file. However, you need to know how to write
the ognl expression. Search for this
piece of code:
<td width="10%" align="center" class="buildTitleRight">
  <span jwcid="@Conditional" condition="ognl:junitHtmlReport!=null">
    <span jwcid="@GenericLink" href="ognl:'publish/'+build.schedule.project.name+'/'+
      build.schedule.name+'/'+build.version+ '/'+junitHtmlReport"
      title="junit report">junit report</span>
  </span>
</td>
Now add the following lines between the first “td” tag and the first “span”:
<span jwcid="@Conditional"
    condition="ognl:build.system.getExtension('CoberturaIntegration')
    .getCoberturaSite(build.publishDir)!=null">
  <span jwcid="@GenericLink"
    href="ognl:'publish/'+build.schedule.project.name+'/'+build.schedule.name+'/'
      +build.version+ '/'+build.system.getExtension('CoberturaIntegration').
      getCoberturaSite(build.publishDir)" title="maven site">cobertura report</span>
</span>
The construction of the path to the report resembles the method within the Luntbuild configuration screen. The second span that creates the href uses some other exposed properties to create the complete link. All these parameters are accessed through the BuildView object that contains a getBuild() method. From there on, you can find all the other objects as well. We have to use the ognl extension point as discussed before. Have a look at the following image (see Figure 7-20) to get the feeling how this all looks in a browser.
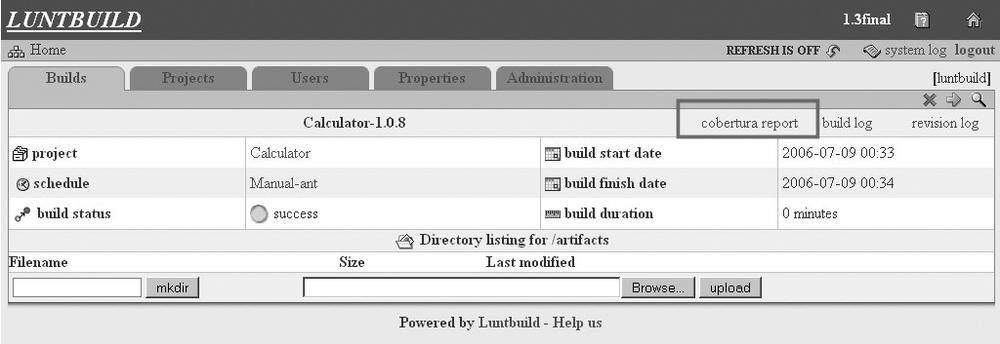
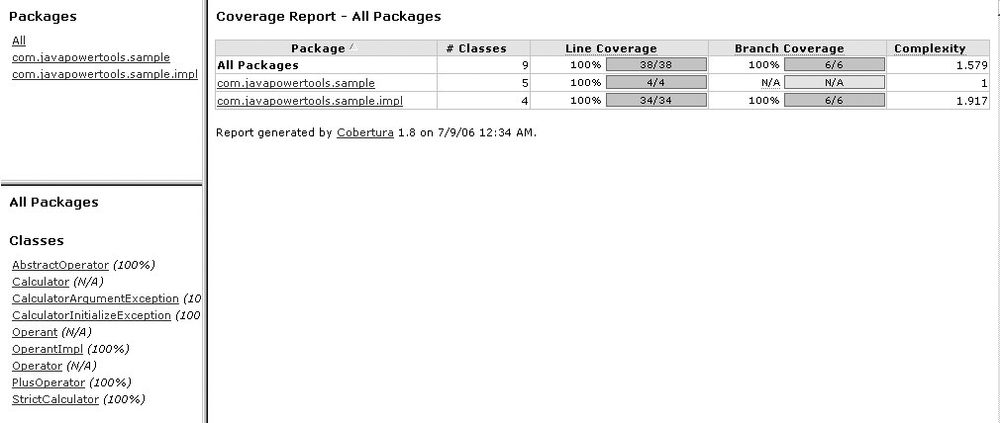
Clicking the link will show you the Cobertura screen (see Figure 7-21).
Running Cobertura with Ant
Until now, we did not show how to configure ant in order to create the Cobertura report. There are some steps to perform. This section will give you the different steps.
First, obtain the directories where to copy the junit and the Cobertura reports:
<property name="testdata"  location="${junitHtmlReportDir}"/>
<property name="coveragedata"  location="${coberturaHtmlReportDir}"/>
Then we must make Cobertura available to Ant:
<property name="cobertura.dir" value="D:/java/cobertura/cobertura-1.8"/>
<path id="cobertura.classpath">
    <fileset dir="${cobertura.dir}">
        <include name="cobertura.jar" />
        <include name="lib/**/*.jar" />
    </fileset>
</path>
<taskdef classpathref="cobertura.classpath" resource="tasks.properties" />
The next step is to instrument or post compile the classes. Cobertura adjusts the classes in a way that it can track which lines are called. This way it can calculate the code coverage and show you the nice reports. The instrumentation is shown in the next target:
<target name="cobertura.instrument" depends="compile"
    description="Create the isntrumented classes used by cobertura">
  <cobertura-instrument todir="${build.instrumented}">
    <ignore regex="org.apache.log4j.*" />
    <fileset dir="${build}">
      <include name="**/*.class" />
    </fileset>
  </cobertura-instrument>
</target>
Now we need to put the instrumented classes in front of the other classes while executing the junit test. This is done in the following part of the junit task. We also must tell junit where to find the Cobertura data file. This is done with a system property.
<target name="test" depends="compile,cobertura.instrument"
description="Runs JUnit tests">
  <junit printsummary="yes" fork="true" errorProperty="test.failed"
   failureProperty="test.failed">
    <sysproperty key="net.sourceforge.cobertura.datafile"
     file="${basedir}/cobertura.ser" />
    <classpath>

      <path location="${build.instrumented}"/>
      <path location="${build}"/>
      <path location="${buildtest}"/>
      <path location="lib/easymock-1.2_Java1.3.jar"/>
    </classpath>
    <classpath refid="cobertura.classpath" />
    <formatter type="xml"/>
    <batchtest todir="${testdata}">
      <fileset dir="${test}">
        <include name="**/*Test.java"/>
      </fileset>
    </batchtest>
  </junit>
  <fail if="test.failed">Unit tests failed.</fail>
</target>
Finally, you want to create the reports based on the gathered data. This is done with the following target:
<target name="cobertura.report" depends="clean,test">
  <cobertura-report format="html" datafile="${basedir}/cobertura.ser"
    destdir="${coveragedata}" srcdir="${src}"/>
</target>
Now you are done. You can do the complete build, junit, and Cobertura reports by issuing the following command:
ant cobertura.report
Before doing this you need the complete Ant file, including the following targets: init, compile, dist, clean, and some extra properties. These are all presented in the following code listing:
<property name="src" location="src/main/java"/>
<property name="build" location="build"/>
<property name="proplocation" location="src/main/resources"/>
<property name="dist"  location="dist"/>
<property name="test"  location="src/test/java"/>
<property name="testdata"  location="${junitHtmlReportDir}"/>
<property name="coveragedata"  location="${coberturaHtmlReportDir}"/>
<property name="buildtest" location="buildtest"/>
<property name="build.instrumented" location="instrumented"/>

<target name="init">
  <tstamp/>
  <mkdir dir="${build}"/>
  <mkdir dir="${buildtest}"/>
  <mkdir dir="${testdata}"/>
  <mkdir dir="${build.instrumented}"/>
</target>

<target name="compile" depends="init" description="compile the source " >
  <javac srcdir="${src}" destdir="${build}" debug="true"/>
  <javac srcdir="${test}" destdir="${buildtest}">
    <classpath>
      <path location="${build}"/>
      <path location="lib/easymock-1.2_Java1.3.jar"/>
    </classpath>
  </javac>
</target>

<target name="dist" depends="compile" description="generate the distribution" >
  <mkdir dir="${dist}/lib"/>
  <copydir dest="${build}" src="${proplocation}"/>
  <jar jarfile="${dist}/lib/JavaPowerToolsSample-${DSTAMP}.jar" basedir="${build}"/>
</target>

<target name="clean" description="clean up" >
  <delete dir="${build}"/>
  <delete dir="${buildtest}"/>
  <delete dir="${dist}"/>
  <delete dir="${testdata}"/>
  <delete dir="${coveragedata}"/>
  <delete dir="${build.instrumented}"/>
  <delete file="cobertura.ser" />
</target>
Integrating Luntbuild with Maven
Contributed by: Jettro Conradie
Introduction
Continuous Integration servers do a good job at, well, continuously building (and integrating) code. Another useful thing that you may want to do is to automatically generate and publish up-to-date project reports about different aspects of the project, such as javadoc, unit test reports, code coverage reports, and so on. You can use both Ant and Maven, both of which integrate well with Luntbuild (see Builders) to generate this type of report.
You can also use Luntbuild to publish these reports for each build, which allows you to automatically generate and publish updated reports on a regular basis, and also to keep track of the reports generated for previous builds. In this section, we will see how to generate and publish a Maven-generated web site, which contains a wide range of quite useful reports. First, we write a Maven Mojo (plug-in class) that enables us to copy the generated Maven web site to the appropriate folder for Luntbuild to pick it up. Then we look at how to add the new Mojo to Maven. Finally, we configure Luntbuild to use our new Mojo to display the Maven web site on the Luntbuild build results pages.
Extending Maven to Support LuntBuild
The Maven core is actually very small: Maven uses plug-ins, or extensions, to implement most of the heavy-duty functionality. In Maven parlance, these plug-ins are called Mojos, and take the form of annotated Java classes.
Writing your Mojo in Java is a big advantage. This way, you can use the programming language you are used to. You can use the tools you are used to and, of course, do junit testing. Reuse of the Mojo over the different projects that you are into is also easy.
It is actually quite easy to build your own. In this section, we will go through the steps required to build a simple Mojo plug-in, which will publish your LuntBuild build results on your Maven web site. This Mojo will simply copy the build results from the LuntBuild web site to a designated directory on your Maven site.
Setting up your project
First, you need to set up a project for your Mojo plug-in. Maven provides a convenient plug-in called maven archetype that helps you set up a standard project directory structure (http://maven.apache.org/plugins/maven-archetype-plugin). There are multiple archetypes available, including web projects, standard Java projects, and Maven Mojos. Use the following command to set up your environment:
mvn archetype:create
      -DgroupId=com.javapowertools.mojo
      -DartifactId=maven-copy-site-plugin
      -DarchetypeArtifactId=maven-archetype-mojo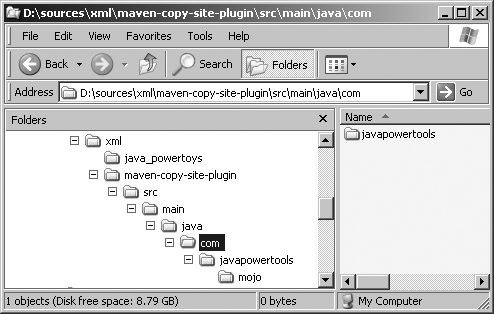
The directory contains the pom.xml file in the root of the folder and a sample mojo in the Mojo directory.
Creating the Mojo
A Mojo is basically just an annotated Java class. We create a class
that extends org.apache.maven.plugin.AbstractMojo. Our class needs to
implement the execute() method, as shown
here:
/**
 * @author Jettro Coenradie
 *
 * @goal copydirectory
 *
 * @description Copies the provided directory to the other provided directory
 */
public class CopyFolderMojo extends AbstractMojo {

   public void execute() throws MojoExecutionException, MojoFailureException {

   }
}
This class illustrates the basic structure of a simple Mojo. As promised, it is a pretty straightforward Java class. One thing that should catch your attention is a special javadoc tag “@goal.” This tells Maven to treat this class as a special maven plug-in. The value for goal (“copydirectory”) is used later to identify this plug-in.
The aim of this Mojo is to copy the LuntBuild build results to the Maven web site. So we need to be able to specify the source and destination directories. In a Mojo class, you do this by using the “@parameter” annotation, as shown in the following example:
/**
 * Location of the directory to copy from.
 * @parameter expression="${project.build.directory}"
 * @required
 */
private File inputDirectory;

/**
 * Location of the directory to copy to.
 * @parameter expression="${project.copyto.directory}"
 * @required
 */
private File outputDirectory;

/**
 * Name of the current project
 * @parameter expression="${project.name}"
 * @required
 */
private String projectName;
The “@parameter” annotation lets you specify what parameters this Mojo is expecting. A number of parameters, like “project.name” and “project.build.directory,” are automatically provided by Maven. Others (such as “project.copyto.directory”) are specific to this Mojo, and you will need to provide them in some other way, such as by using the -D command-line option. In our case, the “project.copyto.directory” environment variable is set in the Luntbuild configuration (see Luntbuild Configuration).
Finally, let’s have a look at the implementation of the execute() method:
public void execute() throws MojoExecutionException, MojoFailureException {
  getLog().info("Input directory : "+inputDirectory.toString()+"\site");
  getLog().info("Output directory : "+outputDirectory.toString());
  File in = new File(inputDirectory,"site");
  if (!in.exists()) {
    getLog().info("No site available to be copied");
    return;
  }
  File out = new File(outputDirectory,projectName);
  if (!out.exists()) {
    out.mkdirs();
  }
  in.renameTo(new File(out,in.getName()));
}
This pretty straightforward Java code checks if the input and output directories exist, and, if so, copies the contents from the “inputDirectory” to the “outputDirectory.” The getLog() method is provided by the super class.
Integrating the Mojo with Maven
Now that we have created the Mojo, it is time to package and install our new Mojo to the maven repository. We do this by issuing the command “mvn install.” This places the plug-in into our repository so we can use it in other projects.
You can invoke the new Mojo from the command line as follows:
mvn com.javapowertools.mojo:maven-copy-site-plugin:1.0-SNAPSHOT:copydirectory
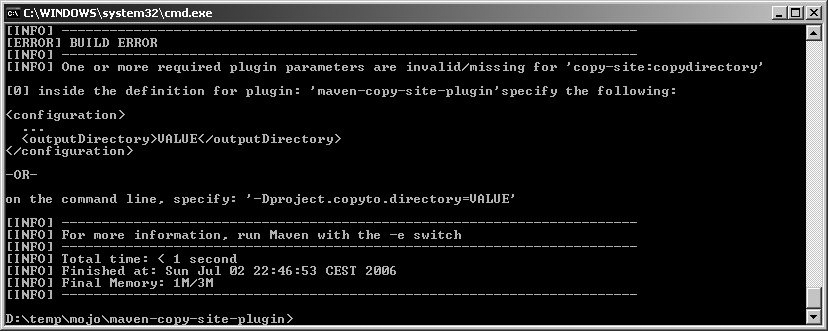
This should result in an error like the one in Figure 7-23, telling us that we are missing a required parameter outputDirectory:
In order to make it work, we provide the java environment variable like this:
mvn -Dproject.copyto.directory=D:/temp/output
       com.javapowertools.mojo:maven-copy-site-plugin:1.0-SNAPSHOT:copydirectory
This should get rid of the error, although the logfiles will tell you that there is no site available. That is OK for now. Move on to the Luntbuild configuration.
Luntbuild Configuration
Now that it is written, integrating this plug-in into Luntbuild is relatively easy, and is done in the build configuration page. Have a look at Figure 7-24.
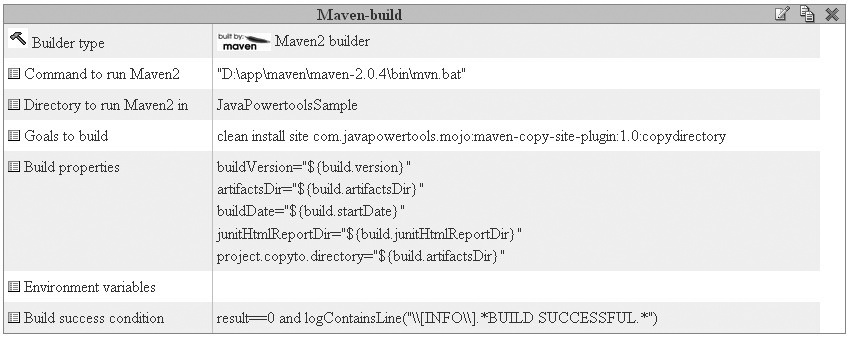
There are two things that you need to configure:
Add a call to your Mojo plug-in as part of the build target. Typically, you will add this to a build configuration that already builds the Maven site, so it may look something like this:
clean install site
com.javapowertools.mojo:maven-copy=site=plugin:1.0:copydirectory
Set up the build properties. The important thing here is to add the parameter “project.copyto.directory,” which points to the artifacts directory of the current build:
project.copyto.directory=${builds.artifactsDir}
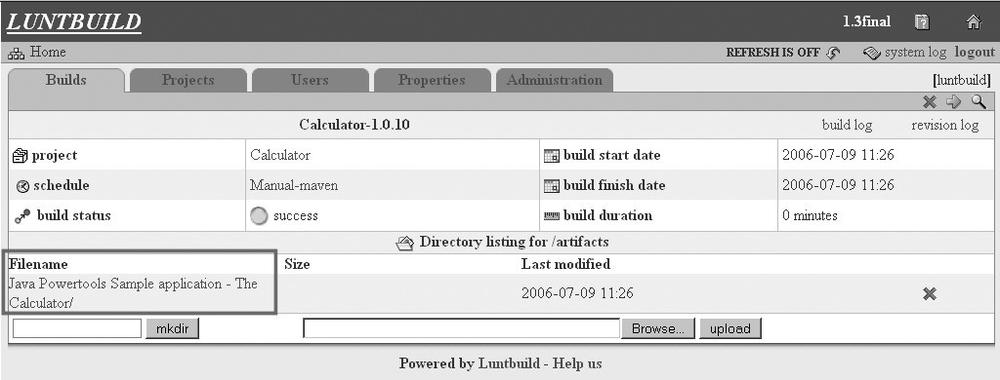
We’ll let the build run from Luntbuild, it should be running fine. Then have a look at the results of the build in Figure 7-25, and you see an additional artifact called “Java Powertools Sample application—The Calculator.” Click on the link and you can browse the uploaded reports. After the first artifacts link, click the link site and then index.html.
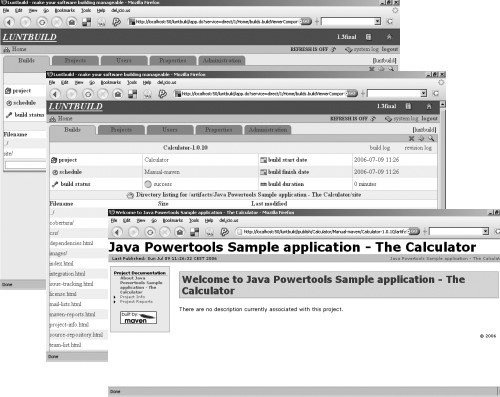
Now you can browse an automatically generated, up-to-date version of the Maven project site for each build of your project (see Figure 7-26).
Conclusion
Overall, Luntbuild is a solid, feature-rich Continuous Integration tool with a clean (albeit slightly clunky) web interface, support for a wide range of SCM tools, and a reasonable range of notification techniques.