
Chapter 29. Team Communication with the Maven 2 Project Web Site[30]
The Maven 2 Project Web Site As a Communication Tool
Team communication is an essential part of any project. Wasting time looking for technical project information can be costly and frustrating. Clearly, any IT project will benefit from having its own dedicated technical web site. That’s where the Maven2 site generator steps in. With little effort, you can have a professional-quality, low-maintenance project web site up and running in no time. Maven lets you generate a one-stop center of information about your project, including:
General project information such as source repositories, defect tracking, and team members
Unit test and test coverage reports
Automatic code reviews with Checkstyle and PMD
Configuration and versioning information
Dependencies
Javadocs
Source code in indexed and cross-referenced HTML format
And much more
Maven sites are frequently used on open source projects. A typical project site contains information about the project, largely derived from the pom.xml file, some generated reports (unit tests, Javadocs, Checkstyle code audits, etc.), as well as some project-specific content. In this chapter, we will look at how to generate different parts of the Maven web site.
Setting Up a Maven Site Project
Your Maven site will be one of the first places that newcomers will look to get to know your project, and the project information page is the place they will expect to find a summary of your project’s organization. Much of this web site is built using information found in the pom.xml file. In this section, we will go through the basics of building an informative Maven web site.
The standard way to create a Maven site is to use the mvn site command, as shown here:
$ mvn site
[INFO] Scanning for projects...
[INFO] ----------------------------------------------------------------------------
[INFO] Building Spitfire
[INFO]    task-segment: [site]
[INFO] ----------------------------------------------------------------------------
...
[INFO] Generate "Dependencies" report.
[INFO] Generate "Issue Tracking" report.
[INFO] Generate "Project License" report.
[INFO] Generate "Mailing Lists" report.
[INFO] Generate "About" report.
[INFO] Generate "Project Summary" report.
[INFO] Generate "Source Repository" report.
[INFO] Generate "Project Team" report.
[INFO] ------------------------------------------------------------------------
[INFO] BUILD SUCCESSFUL
[INFO] ------------------------------------------------------------------------
[INFO] Total time: 5 seconds
[INFO] Finished at: Thu Jan 04 09:55:59 NZDT 2007
[INFO] Final Memory: 11M/22M
[INFO] ------------------------------------------------------------------------
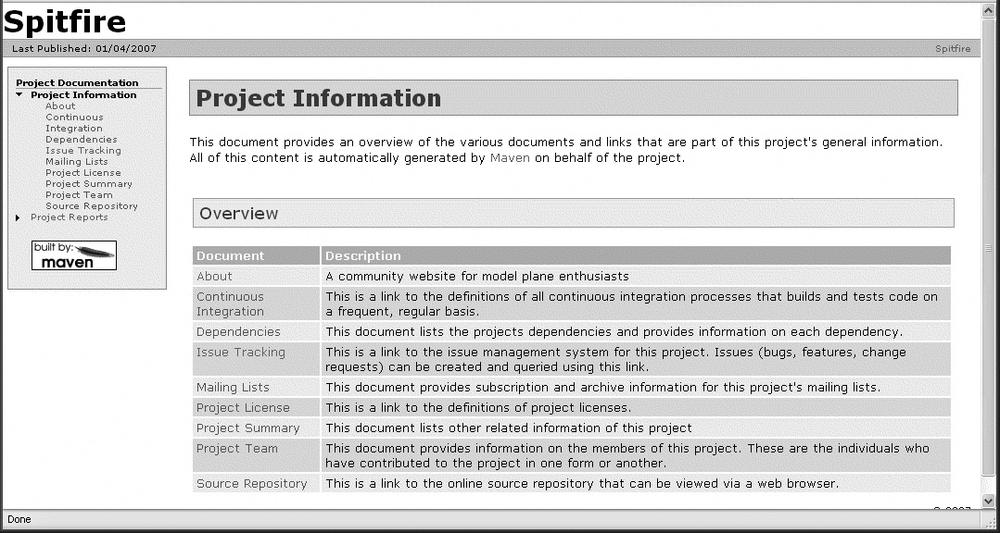
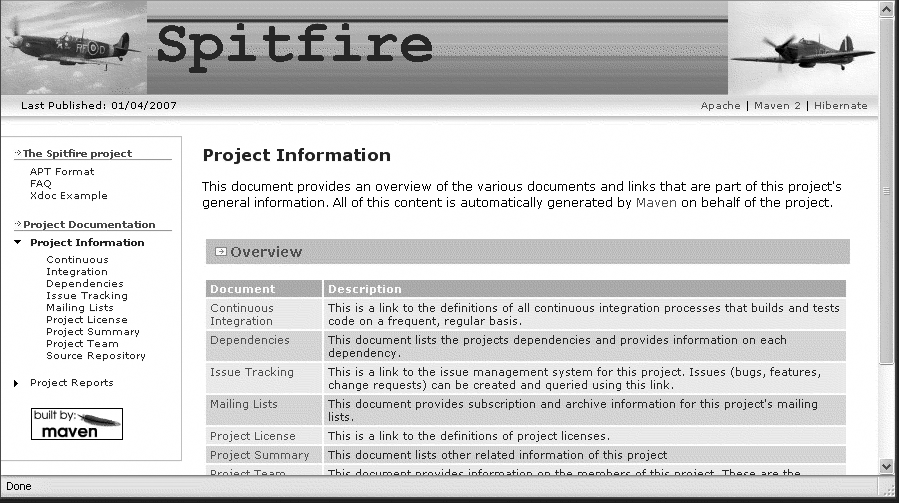
This will create a simple Maven site, shown in Figure 29-1.
A site like this will be pretty sparse. You will probably want to add some details about your project. All zones are optional, but it is a good idea to put as much information as is relevant to your project. The rest of this section will discuss some useful items to add.
Describing the Project
The Maven site is above all a communication tool, so it is important to let people know what your project is all about. The POM file lets you provide plenty of details about your project, such as an appropriate project name, a short description, the project home page, and your organization’s details. Here is a typical example:
  <name>Spitfire</name>
  <url>http://maven.mycompany.com/spitfire</url>
  <description>A community website for model plane enthusiasts</description>
  <organization>
    <name>Wakaleo Consulting Ltd</name>
    <url>http://www.wakaleo.com</url>
  </organization>
Most projects have an internal name, used within the organization, which is different to the formal artifactId. You can specify this in the <name> field.
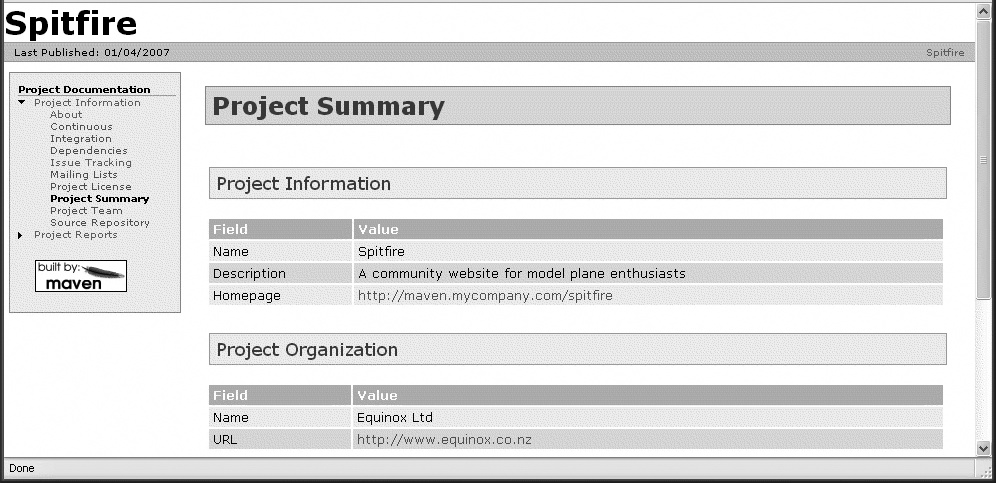
The URL is a handy link to the application home page. Of course, what you call the home page will vary depending on your project: for a public open source project, it might be the public URL to the project web site, whereas, for an internal site, it might point to the demonstration server. This URL appears on the Project Summary page, where it is called the “Homepage.”
All this appears on your project’s web site, in the “Project Summary” section (Figure 29-2).
Linking into the Issue Tracking System
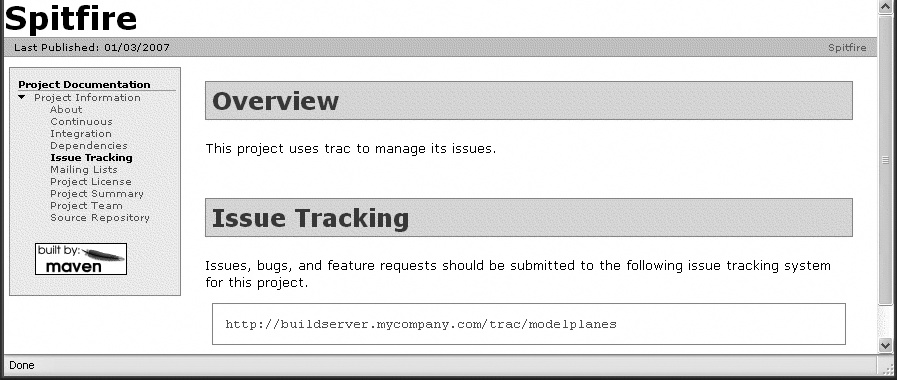
It is handy to have a link to your issue tracking system available on your Maven site. This way, people will know where to look for it when they forget the URL (or haven’t bothered asking…). Just put the name and URL of your project’s issue management system (Bugzilla, JIRA, Scarab, or your own favorite issue tracking system) in your pom.xml file, using the <issueManagement>, as shown here:
   <issueManagement>
      <system>trac</system>
      <url>http://buildserver.mycompany.com/trac/modelplanes</url>
   </issueManagement>
Maven’s integration with the defect tracking system is largely informative: the Issue Tracking page will tell users what sort of issue tracking system is used (including a short blurb boasting its merits for systems such as Bugzilla and JIRA that Maven has heard of), and, more importantly, the URL that users need to connect to the issue tracking web site (see Figure 29-3).
The Continuous Integration System
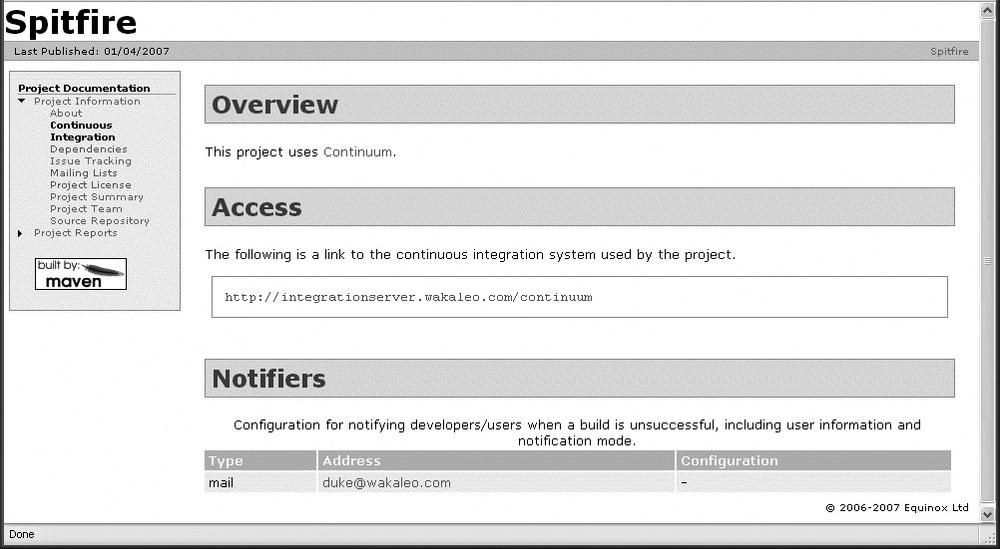
Continuous Integration (or CI) is an increasingly popular development best practice that promotes regular automatic builds on a dedicated build server. If your project uses a continuous integration tool of some sort, such as Continuum (see Chapter 5), CruiseControl (see Chapter 6), or LuntBuild (see Chapter 7), you can provide details in the ciManagement tag, as shown in the code below. These details are published on the “Continuous Integration” page (see Figure 29-4), which, like the link to the issue tracking system, can be a handy reminder for forgetful users:
  ...
   <ciManagement>
      <system>Continuum</system>
      <url>http://integrationserver.wakaleo.com/continuum</url>
      <notifiers>
         <notifier>
            <type>mail</type>
            <address>[email protected]</address>
         </notifier>
      </notifiers>
   </ciManagement>
Continuum (see Chapter 5) is a Continuous Integration system that integrates closely with Maven. Maven integration with Continuum is discussed in Adding a Maven Project. If you use Continuum, you can centralize a lot of the CI configuration details, such as the server URL and even notification rules, in the POM file.
The Project Team
People like to know who they are working with, especially these days, when a project team can be spread across organizations and continents. In the developers section, list team member details. This can be a useful summary of the team structure for newcomers or stake holders. The timezone field is useful for international teams; this field is offset from Greenwich Mean Time (GMT), or London time, and lets people see what time it is wherever the team member is located. For example, –5 is for New York time, +1 is for Paris time, and +10 is for Sydney time:
 ...
   <developers>
      <developer>
         <id>duke</id>
         <name>Duke Java</name>
         <email>[email protected]</email>
         <roles>
            <role>Project Manager</role>
            <role>Architect</role>
         </roles>
         <organization>Acme.com</organization>
         <timezone>-5</timezone>
       </developer>
   </developers>
For best results, the <id> field should be the user’s software configuration management (SCM) login. The project team members defined here are automatically used in other screens reports, such as change reports (see Change and Configuration Management).
Mailing Lists
If your project uses mailing lists, describe them in the mailingLists page. A typical mailing list configuration might look like this:
  ...
   <mailingLists>
     <mailingList>
       <name>HotelDatabase project mailing list</name>
       <subscribe>[email protected]</subscribe>
       <unsubscribe>[email protected]</unsubscribe>
      <post>[email protected]</post>
      <archive>http://mail-archives.wakaleo.com/modmbox/dev/</archive>
     </mailingList>
   </mailingLists>
The Source Repository
Another vital part of any project is the source repository. The scm tag lets you document the configuration of your source repository, both for the Maven web site and for use by other plug-ins. If you are using CVS or Subversion, the source repository page will also give detailed, tool-dependent instructions on how to use the repository (see Figure 29-5). Here is an example of a typical SCM configuration:
  ...
   <scm>
      <connection>scm:svn:http://svn.wakaleo.com/hoteldatabase/</connection>
      <developerConnection>scm:svn:http://svn.wakaleo.com/hoteldatabase/
      </developerConnection>
      <url>http://svn.wakaleo.com/viewcvs.cgi/hoteldatabase/</url>
</scm> 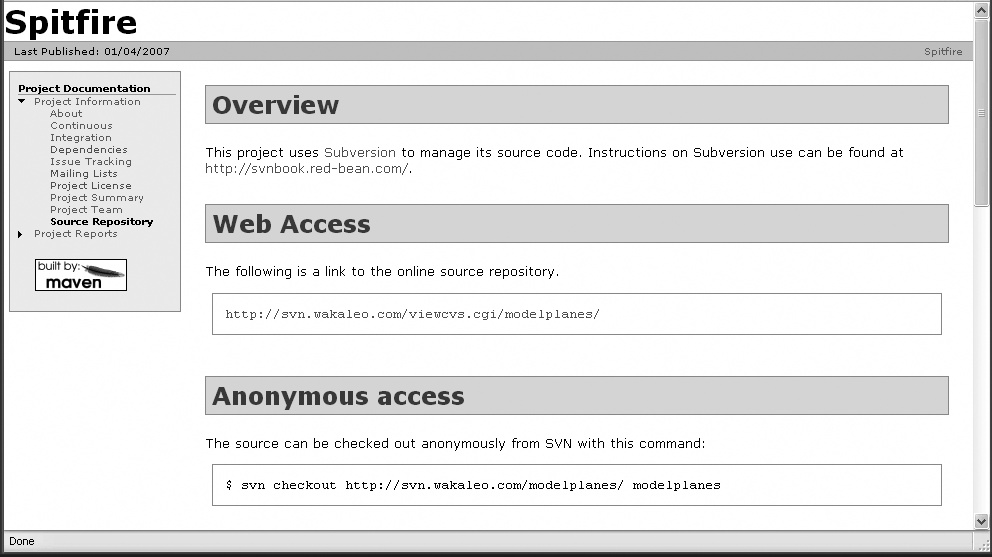
Generating the Site
Now you can try out your new Maven site! The command to generate the Maven site is:
$ mvn site
Your site will be generated in the target/site directory. Take a look at the project information link; you should find everything you just entered, and more!
Integrating Reports into Your Site
Maven also provides an extensive range of plug-ins for automatic report generation. Reports are a crucial part of the Maven web site, and can provide useful information on the state of the project from a technical point of view, as well as providing reference documentation such as Javadocs. Report generation in Maven 2 is easy: you just add the report plug-ins you need into the reporting section at the end of the pom.xml file.
Javadocs
Most likely, you will want to start by publishing your classes’ Javadocs. This is as simple as adding Javadoc to the reporting section of your pom.xml file. While you’re at it, add the jxr plug-in; this will generate an indexed and cross-referenced HTML version of your source code:
<project>
  <build>
    ...
  </build>
  <reporting>
    <plugins>
      <plugin>
        <artifactId>maven-javadoc-plugin</artifactId>
      </plugin>
      <plugin>
        <groupId>org.codehaus.mojo</groupId>
        <artifactId>jxr-maven-plugin</artifactId>
      </plugin>
    </plugins>
  </reporting>
  <dependencies>
    ...
  </dependencies>
</project>
Unit Test Reports
Writing unit tests for as much code as possible is highly recommended. Maven fully integrates unit testing into the build process—by default, all unit tests run at each build. Publishing test results for all to see is beneficial, since it tends to encourage developers to fix any broken unit tests. The Surefire plug-in runs all the unit tests and generates a detailed report:
 <reporting>
    <plugins>
      ...
      <plugin>
        <groupId>org.apache.maven.plugins</groupId>
        <artifactId>maven-surefire-report-plugin</artifactId>
      </plugin>
    </plugins>
  </reporting>
Test Coverage Reports
Test coverage can be a useful indication of the quality of your unit tests. Basically, it tells you how much of your code is actually run by your unit tests, which, in turn, can give you a good idea of the tests’ quality. In some projects, requiring a certain percentage of test coverage in all classes is recommended. Tools such as Clover (a vigorous commercial test coverage tool) or Cobertura (see Chapter 30) generate useful test coverage reports. We discussed how to integrate Cobertura reports into Maven in Generating Cobertura Reports in Maven.
Code Analysis Reports
Automatic code analysis is a useful way of improving code quality and encouraging good coding habits. Checkstyle (see Chapter 21) runs a wide range of tests aimed at enforcing coding standards and best practices. PMD (see Chapter 22) concentrates more on semantic errors and potential bugs. FindBugs (see Chapter 23) is another static analysis tool, which is more focused on detecting potential bugs and performance issues. All of these can provide useful information, although you may have to fine-tune them (especially Checkstyle) to obtain only the errors meaningful for your project.
We looked at how to integrate Checkstyle, PMD, and FindBugs into a Maven site in Using Checkstyle with Maven, Using PMD in Maven, and Using FindBugs in Maven, respectively.
Change and Configuration Management
Documenting changes is important in any project. Maven 2 provides a couple of useful features to make this task a little easier. The changes-maven-plugin plug-in uses a special XML file (src/changes/changes.xml) to track releases and changes in each release. This file looks something like this:
<?xml version="1.0" encoding="ISO-8859-1"?>
<document>
<properties>
<title>Spitfire model plane database application</title>
<author email="[email protected]">Duke Java</author>
</properties>
<body>
<release version="current" description="Current work version">
<action dev="duke" type="add">
A new cool feature.
</action>
<action dev="richard" type="add">
Another new cool feature.
</action>
</release>
<release version="1.0.1" date="2005-11-18" description="Release fix">
<action dev="duke" type="add">
Added a cool feature.
</action>
<action dev="keith" type="fix" issue="1254">
Fixed a nasty bug.
</action>
<action dev="jimmy" type="delete">
Removed a feature that nobody liked.
</action>
</release>
</body>
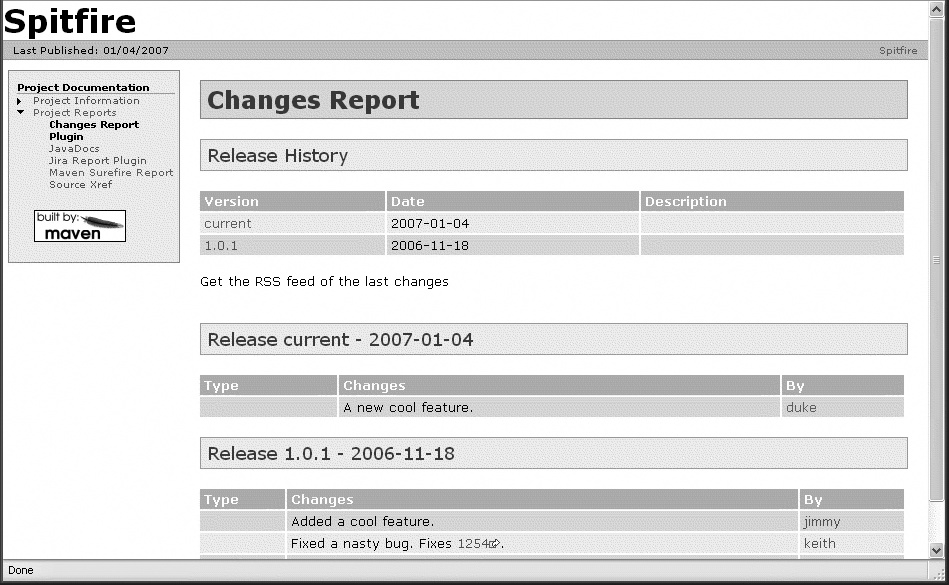
</document>Here, you list your releases and describe the actions associated with each release: a new feature or evolution (add), a bug fix (fix), or something removed (delete). You should detail the modification, who made the change, and what issue was addressed. Using this file gives a clearer and more readable record of changes and release history.
Now add the changes plug-in to the Maven 2 reports. The issueLinkTemplate configuration parameter allows you to integrate with your issue management web site, using a template:
 <reporting>
    <plugins>
      ...
      <plugin>
        <groupId>org.codehaus.mojo</groupId>
        <artifactId>changes-maven-plugin</artifactId>
      </plugin>
    </plugins>
  </reporting>
If you specify an issue number for the changes you describe in the change report, Maven can automatically generate a URL pointing to the issue in your issue management system. The default configuration works for JIRA. For all other systems, you need to tell Maven how to generate the URL pointing to the issue in the issue tracking system, using the link_template[*] configuration parameter. This template uses two variables:
- %URL%
The base URL specified in the <issueManagement> field, without the context path
- %ISSUE%
The issue identifier
If you are using Trac, issues can be displayed using a REST-style URL in the following form:
http://my.trac.server/myproject/tickets/123
This would display the Trac ticket # 123.
The plug-in configuration for our Trac issue management system would be the following:
      <plugin>
        <groupId>org.codehaus.mojo</groupId>
        <artifactId>changes-maven-plugin</artifactId>
        <configuration>
          <link_template>%URL%/modelplanes/tickets/%ISSUE%</link_template>
        </configuration>
      </plugin>
Figure 29-6 shows an example of a the generated change report.
Another more development-oriented option is to use your SCM repository to track changes. The changelog plug-in generates a nice report describing which files have been changed and by whom:
 <reporting>
    <plugins>
      ...
      <plugin>
        <groupId>org.codehaus.mojo</groupId>
        <artifactId>changelog-maven-plugin</artifactId>
      </plugin>
    </plugins>
  </reporting>
Finally, if you use @todo tags to remind you of things to be done (which is a good coding practice), the taglist report will generate a list of all the items marked @todo or TODO:
 <reporting>
    <plugins>
      ...
      <plugin>
        <groupId>org.codehaus.mojo</groupId>
        <artifactId>taglist-maven-plugin</artifactId>
      </plugin>
    </plugins>
  </reporting>
Creating a Dedicated Maven Site Project
Although any individual project can have its own site, it is often easier to manage a separate site project. In the following sections, we will look at how to build and customize a separate site project. However, all of this information can just as easily apply to a project that contains code as well.
The simplest way to bootstrap any Maven site development is to use the maven-archetype-site archetype, as shown here:
$ mvn archetype:create -DarchetypeGroupId=org.apache.maven.archetypes
                       -DarchetypeArtifactId=maven-archetype-site
                       -DarchetypeVersion=1.0
                       -DgroupId=com.mycompany
                       -DartifactId=my-site
This will generate a sample Maven site project, which may be built by
executing the site build lifecycle. The
structure of your new Maven site project should look like
this:
my-site
|-- pom.xml
`-- src
    `-- site
        |-- apt
        |   |-- format.apt
        |   `-- index.apt
        |-- fml
        |   `-- faq.fml
        |-- fr
        |   |-- apt
        |   |   |-- format.apt
        |   |   `-- index.apt
        |   |-- fml
        |   |   `-- faq.fml
        |   `-- xdoc
        |       `-- xdoc.xml
        |-- xdoc
        |   `-- xdoc.xml
        |-- site.xml
        `-- site_fr.xml
The
items to note in the above structure are the site.xml file and the directories under src/site: apt, fml and xdoc;
each representing a document notation type. You should have an index file
somewhere (for example, a file called index.apt in the site/apt
directory). This will be converted to a
file called index.html, which will become the
home page of your site. Without this file, Maven will generate a very boring
home page.
Finally, the site_fr.xml and src/site/fr subdirectories contain a French
language version of the documents, rounding out Maven’s commitment to built-in
internationalization. To activate this locale, you simply add the French
language version to the site plug-in’s configuration in the POM, as shown
here:
 <project>
   ...
   <build>
     <plugins>
       <plugin>
         <artifactId>maven-site-plugin</artifactId>
         <configuration>
           <locales>en,fr</locales>
         </configuration>
       </plugin>
     </plugins>
   </build>
 </project>
Defining the Site Outline
The site.xml file is responsible
for the structure of the site as a whole, defining the site’s banners, the links
(upper-right corner by default), and the left-hand side menu. A simple example
is shown
here:
<project name="Spitfire">
   <bannerLeft>
     <name>Spitfire</name>
     <src>/images/spitfire-logo.jpg</src>
     <href>http://spitfire.mycompany.com/</href>
   </bannerLeft>
   <bannerRight>
     <src>/images/hurricane-small.jpg</src>
   </bannerRight>
   <body>
     <links>
       <item name="Apache" href="http://www.apache.org/" />
       <item name="Maven 2" href="http://maven.apache.org/maven2/"/>
       <item name="Hibernate" href="http://www.hibernate.org/"/>
     </links>
      <menu name="The Spitfire project">
       <item name="Home" href="EB9780596527938_2.html"/>
       <item name="APT Format" href="format.html"/>
       <item name="FAQ" href="faq.html"/>
       <item name="Xdoc Example" href="xdoc.html"/>
     </menu>

     ${reports}

   </body>
 </project>
Note
that links in the menu defined below have similar names to the documents above,
yet end with .html. This is because each of
the document markups are converted to HTML by the site plug-in, more
specifically, by Doxia.
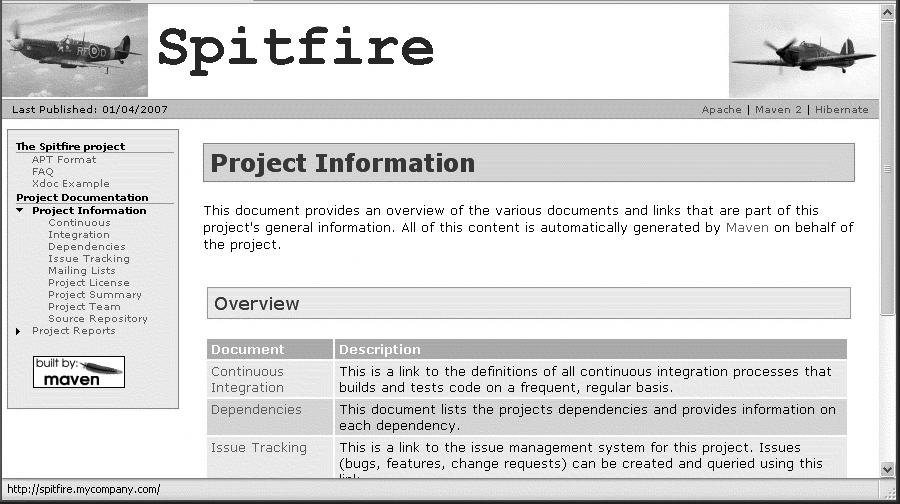
A common initial requirement is to incorporate project and/or company logos. This is easy to do. The <src> tag in each banner points to an image to be displayed there. You can either use an absolute URL, or refer to a local resource within your web site project. To do the latter, just place any images you need to access in the site/resources directory. From here, you can access them using a local reference such as the “/images/spitfire-logo.jpg” shown above.
You may or may not want to include the standard Maven project reports in your custom site. If you do, you need to include the ${reports} tag shown in the site.xml file above. This will be replaced by the “Project Information” and “Project Reports” menus that you have configured in your pom.xml file.
The resulting web site is illustrated in Figure 29-7.
The site phase can easily generate
sites of different languages. All you need to do is create a site descriptor
file similar to the file above, yet suffix the filename with the language code
of your choice. The archetype created a French language version for you,
site_fr.xml. At this point, Maven will
look for a matching language directory under src/site and generate that documentation for an audience of that
particular language (usually by a web browser’s language settings). If no
matching language is found, the site.xml’s
language is the default (presumed to be English).
The Maven Site Generation Architecture
You can use a number of different formats to build the content of your Maven 2 web site. This is largely a matter of taste. We will examine the basic architecture of the Maven 2 content generation system and run through the formats that you can use.
Doxia
The heart of the Maven site plug-in is the Doxia project, which
is a self-contained subproject of Maven (http://maven.apache.org/doxia). Doxia is responsible for
converting your chosen document markup to the html that can be deployed to a
web site. Doxia also has the ability to convert a document from any
supported markup to any other supported markup. It does this with
parsers and sinks. A Doxia
parser implements the org.apache.maven.doxia.parser.Parser Plexus role and is
responsible for converting the implemented markup into a given sink. A Doxia
sink implements the org.apache.maven.doxia.sink.Sink Plexus role and caters for a
particular output format, for example XHTML or PDF. This is important to
know if you ever decide to write your own modules for Doxia to
support.
APT
Almost Plain Text, or APT,
can be considered the default documentation method for Maven
projects. It is a simple wiki-like syntax that is easily converted to a
Doxia sink. If you built the site generated by maven-archetype-site,
navigate to target/site/format.html and
you will be treated to a comprehensive guide for using APT. A simple example
is shown
here:
   -----
   The Hotel Database Vision Statement
   -----
   The Wakaleo Team
   -----
   January 2006

Introduction


   One of the nicer features of Maven is the ability to create an internal
   technical web site at very little cost. Maven 2 extends this functionality,
   and gives you powerful new ways to generate site content...


* Sub-section title


   Team communication is an essential part of any project. And wasting time
   looking for technical project information can be costly and frustrating.
   Clearly, any IT project will benefit from having its own dedicated
   technical web site...

   * Item 1

   * Item 2

     * Item 2.1

     * Item 2.2
The APT format is documented in excruciating detail on the Maven site, so we will just take you through the main things that you should know to get started.
Your APT document typically begins with a heading. The heading starts with a line of dashes, and contains three parts—the document title, the author, and the date—separated by lines of dashes:
   -----
   The Hotel Database Vision Statement
   -----
   The Wakaleo Team
   -----
   January 2006
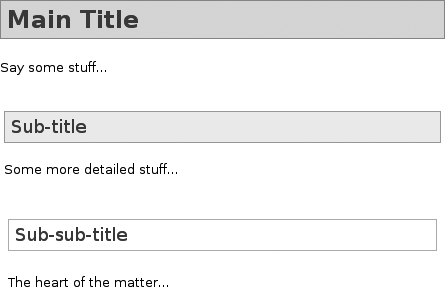
Indentation and line spacing is important for APT. For example, section titles and subtitles cannot have any indenting, whereas normal text does need to be indented (more precisely, the first line of a normal paragraph needs to be indented). Subtitles are indicated with asterisks. You need a blank line between every element (paragraph, title, list item, and so on):
Main Title

  Say some stuff...


* Sub-title

  Some more detailed stuff...


** Sub-sub-title

   The heart of the matter...
You can see this in action in Figure 29-8.
You can also include lists, tables, and other formatting niceties (see Figure 29-9). For example, the following listing illustrates a definition list and an ordinary bullet-point list:
  The application is comprised of several main packages:

    [com.mycompany.myapp.core] Core interface classes

    [com.mycompany.myapp.core.impl] Core implementation classes

    []

  These are cool packages for several reasons

    * The interfaces rock

    * The implementations are groovy

    * They are really well documented

    []
Note how lists need to be terminated by an empty list element (“[]”).

It is often useful to include snippets of code in your documentation, to show how to use or configure a class, for example. You can do this by surrounding the code listing with lines of dashes, as shown here:
You can configure this class in Spring as follows:

----------------------------------------
    <bean id="taxCalculator"
        class="com.mycompany.myapp.core.impl.TaxCalculatorImpl" >
        ...
    </bean>
----------------------------------------
If you want to include images in your APT files, you need to add them in
the resources
directory. For example, in the following directory structure, we have placed
a PNG image in the src/site/resources/images directory:
my-site
|-- pom.xml
`-- src
    `-- site
        |-- ...
        |-- resources
            `-- images
                `-- domain-model.png
        |-- site.xml
        `-- site_fr.xml
You can also refer to these images in your document as follows:
  The domain model is illustrated in the following class diagram:

[images/domain-model.png] The application domain model
FML
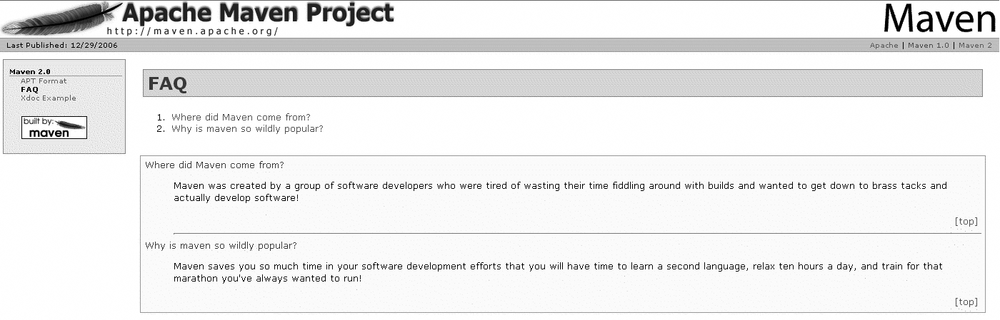
FML is FAQ (frequently asked questions) markup language, and it specializes in the creation of the ubiquitous FAQ document. An example is as follows:
<faqs id="faqs1">
     <part id="part1">
       <faq id="faq1">
         <question>What is a good question?</question>
         <answer>
           <p>Any valid XHTML can be placed in the <code>answer</code> element</p>
         </answer>
       </faq>
     </part>
   </faqs>
The FML document can have any number of parts, and each part may have any number of FAQs, each with one question and one answer. When the document is generated, it will place all questions at the top of the page as links, which anchor to the answers later in the page (see Figure 29-10).
XDoc
XDoc is an XML markup for writing documents, and has been around
since the early days of Maven 1 and Ant. It is similar to HTML, but it is
document-centric with extra elements for sections and more constraints. All
XDoc documents must be under the xdoc directory, with a .xml extension. Its support is mostly for
historical reasons, and it is recommended that you write new documentation
in APT format.
Using Snippets
A useful feature of Doxia are snippets. Snippets are macros that are given a file and an id. They can be a useful way of inserting or referencing key blocks of code from within your project in your technical documentation. You define a snippet as follows:
%{snippet|id=myID|file=some.file}You
define a snippet by encapsulating a block of code in specially formatted
comments. The macro will search the file for the comment START SNIPPET: myID and ending comment END SNIPPET:
myID. For example, add the following to your
POM:
<project>
   ...
   <!-- START SNIPPET: props -->
   <properties>
      <my.prop>value</my.prop>
   </properties>
   <!-- END SNIPPET: props -->
</project>
Then
add the following to your format.apt
file:
%{snippet|id=props|url=file:pom.xml}Now
run the site phase, and be amazed! The block
of code will now figure in the generated web page (see Figure 29-11).

Hint: rather than running the site
phase, try running the site:run goal. It will launch your documents under
a web container accessible from port 8080 that will show your changes in real
time.
Customizing the Look and Feel of Your Site
Whether it’s just the company logo in the corner of the screen, or the whole site repainted using your company fonts and colors, adding that personal touch to your Maven site can do wonders for its appeal. You’d be surprised how many people pay more attention when the site matches the company colors! Maven provides a number of ways for you to customize the look and feel of your Maven web site. Here, we look at several ways to add your own personal touch.
Changing Skins
Like many sites, the look-and-feel of a Maven site is determined by what
we call a “skin.” A skin is, in fact, a collection of CSS stylesheets and graphical
resources. Changing skins in Maven is easy. Just alter your POM, and voilà!
Your entire site’s look and feel has been altered. Better yet, it is all
consistent. To switch the my-site project
to use the Stylus theme, alter the site.xml file (not the
POM):
<project>
   ...
   <skin>
     <groupId>org.apache.maven.skins</groupId>
     <artifactId>maven-stylus-skin</artifactId>
     <version>1.0</version>
   </skin>
</project>
This style is illustrated in Figure 29-12.
The list of default skins available from the Maven Central Repository can be found at http://repo1.maven.org/maven2/org/apache/maven/skins/. At the time of this writing, the list is:
maven-classic-skin
maven-default-skin
maven-stylus-skin
As you probably guessed, maven-default-skin is the default.
Creating Your Own Style
The predefined Maven skins give you some flexibility, and they can help you learn how to customize your site’s look and feel. They are often just fine for internal sites with a limited, technically minded audience. However, there are times when the default skins just don’t cut it. Let’s see how to create your own personalized skin.
First, create a project with the following layout:
my-skin
 |-- pom.xml
 `-- src
     `-- main
         `-- resources
             |-- css
             |   `-- maven-theme.css
             `-- images
You
will also need a simple pom.xml:
<project>
   <modelVersion>4.0.0</modelVersion>
   <groupId>com.mycompany</groupId>
   <artifactId>my-skin</artifactId>
   <version>1.0-SNAPSHOT</version>
</project>
The
important file in a custom skin is the maven-theme.css. Also note the src/main/resource/images directory that allows you to add
images into your CSS, accessible as “/images/my-image.ext.” Most control of
the CSS is via the basics such as body or
a, but there are a few important CSS
ids generated by default:
breadcrumbs | a sequence of data at the top of the page |
leftColumn | represents the left column of the page |
navcolumn | wraps the navigation elements in the left column |
banner | contains the left and right banners defined in
the |
bodyColumn | wraps the contentBox of the page |
contentBox | contains the main content of the page |
footer | contains the data generated as a page footer |
Velocity Manipulation
Skin manipulation is nice to change the look of your site, but in order to
change the way the site is generated requires creating your own Velocity
(.vm) file. Apache Velocity is a templating engine that has been around for
years, has proven its metal in projects such as Apache Turbine, and is a
simple method for allowing users to overwrite the default templates.
Rather than starting from scratch, it is far simpler to download the
default default-site.vm file and
manipulate it. The default renderer is available under the
doxia-site-rendered project source code, available for download under the
Doxia project. Doxia is available from the subversion repository at
http://svn.apache.org/repos/asf/maven/doxia/trunk/ (if not
found there, check the Doxia web site at http://maven.apache.org/doxia. From there, the doxia-site
renderer project’s resource contains the template, at doxia-site-renderer/src/main/resources/org/apache/maven/doxia/siterenderer/resources/default-site.vm.
Copy this file to your project at src/site/my-site.vm, and point your my-site project’s pom.xml
to utilize
it:
<project>
   ...
   <build>
     <plugins>
       <plugin>
         <artifactId>maven-site-plugin</artifactId>
         <configuration>
           <templateFile>src/site/my-site.vm</templateFile>
         </configuration>
       </plugin>
     </plugins>
   </build>
If you look at the my-site.vm, you will notice the XHTML and CSS generated by it. This gives you the power to alter the structure of your generated Maven site, as well as allow your custom skins more control than merely the default (perhaps by adding more spans or more types of CSS classes).
Or, better yet, you can add the template to your skin to src/main/resources/META-INF/maven/site.vm.
This way, when a project uses your skin, it automatically uses your
template.
Distributing Your Site
The final step in site generation is publishing it to a location
from which a public web server can access it. There is a special element in the
distributionManagement element called
site, which gives the location and method
of distribution. In your my-site POM, you
will notice the element has been added for you. Now you merely need to set it
like any other Maven distribution. The example uses secure copy protocol
(scp):
<project>
   ...
   <distributionManagement>
     <site>
       <id>website</id>
       <url>scp://webhost.company.com/www/website</url>
     </site>
   </distributionManagement>
</project>
If you need to supply a username and password when you copy to the remote site, you will also need to provide this information in your settings.xml file (see Configuring Maven to Your Environment):
<settings>
  ...
  <servers>
    <server>
      <id>website</id>
      <username>scott</username>
      <password>tiger</password>
    </server>
  </servers>
</settings>
Setting up an enterprise repository was covered in Setting Up an Enterprise Repository with Archiva.
With a suitable distribution setup, you merely run the site-deploy phase (which has bound to it the
site:site.deploy
goal):
mvn site-deploy
That’s it! Maven will generate the documentation using your chosen template and skin, and copy those files to the specified location.