
Chapter 2. Setting Up a Project Using Maven 2
Maven and the Development Build Process
In this chapter, we look at the second major player in the Java build tools arena: Maven.[*] Maven is an increasingly popular open source build management tool for enterprise Java projects, designed to take much of the hard work out of the build process. Maven uses a declarative approach, in which the project structure and contents are described, rather then the task-based approach used in Ant or in traditional Make files or shell scripts. Maven also strongly promotes the use of standard directory structures and a well-defined build lifecycle. This helps enforce company-wide development standards and reduces the time needed to write and maintain build scripts.
Maven’s authors describe Maven as a “project management framework,” and it is indeed much more than just a simple build scripting tool. Maven’s declarative, standards-based approach to project build management simplifies many aspects of the project lifecycle. As well as catering for compiling, building, testing, and deploying your application with a minimum of effort, Maven offers a number of other key advantages:
Project dependencies are declared and managed in a clean, transparent way, which reduces the risk of dependency-related errors and makes for better documentation.
Maven lets you easily generate useful, high-quality, technical documentation and reports about the current state of the project and project team members. Note that we aren’t taking about a good user manual, which is an altogether different issue, but, rather, about technical documentation, written by developers for developers. In many technical projects, decent technical documentation is woefully inadequate. It is nevertheless a vital part of modern software development, especially when dislocated teams are involved.
Maven proposes a clear standard directory layout for source code, project resources and configuration files, generated output, and project documentation. This makes it easier to understand new Maven projects, and also makes the Maven build scripts cleaner and simpler.
Maven integrates smoothly with source code repositories, continuous integration servers, and issue tracking systems.
The Maven build cycle is flexible: it is easy to integrate additional build tasks, using existing Maven plug-ins or by writing Ant scriptlets.
All of these points make Maven an invaluable tool for Java development teams. Indeed, Maven touches so many parts of the SDLC that this book contains two distinct chapters on the subject. In this chapter, we will look at the basics of using Maven in the real world. In Chapter 29, we will focus on how to generate a technical web site for your project using Maven.
Maven and Ant
Without a doubt, the most popular and most well-known build tool in the Java sphere is Ant. Ant (see Chapter 1) is a fine tool and a hugely successful open source project. Millions of Java developers are familiar with it. And, as we will see throughout the rest of the book, there is hardly a Java tool in existence that doesn’t integrate with Ant.
However, when you write a lot of Ant build scripts, you find yourself asking yourself (and other teamg members) the same questions over and over again: Where will the source code go? What about the unit tests? How do we handle dependencies? How will we bundle up the deliverable application? What shall we call the main targets? Individually, Ant lets you deal with each of these tasks with a high degree of flexibility and power. However, you still have to write the tasks from scratch or duplicate and modify an Ant script from a previous project. And when you move to a new project or company, you need to ask these questions once again to (begin to) understand the build process in place.
Many (although not all) projects do follow fairly common and well-known patterns. A lot of what you need to configure in your build process is pretty much run-of-the-mill. It always seems a shame to redo the work again for each new project.
Maven can help you here. Maven takes a lot of the grunt work out of the build process, and tries to lever the combined experience and best practice of a large community of developers. By adhering to a certain number of conventions and best practices, Maven lets you remove the drudgery of all the low-level tasks in your build scripts. In the rest of this chapter, we will see how.
Installing Maven
In this chapter, we will go through how to install Maven 2 on various platforms. The basic installation process is straightforward, and is the same for all platforms. Maven is a pure Java tool, so first of all you need to ensure that there is a recent version of Java (1.4 or later) on your machine. Then, download the latest distribution from the Maven download site[*] and extract it into an appropriate directory. Finally, just add the bin subdirectory to the system path.
If you are familiar with installing Java tools, this should be enough to get you started. In the rest of this chapter, we discuss some more detailed environment-specific considerations.
Installing Maven on a Unix Machine
In this chapter, we run through how to install Maven into a Unix environment.
Installing Maven in a Unix-based environment is a relatively simple task. Download the latest version in the format of your choice, and extract it to an appropriate directory. Conventions vary greatly from one system to another, and from one system administrator to another: I generally place the maven installation in a nonuser-specific directory such as /usr/local, as shown here:
# cd /usr/local
# tar xvfz maven-2.0.7-bin.tar.gz
# ls
This
will extract the maven installation in a directory called maven-2.0.7. For convenience, on a Unix
system, I generally create a symbolic link to this directory to make
upgrades easier to manage:
# ln -s maven-2.0.7 maven
# ls -al
total 16
drwxr-xr-x  3 root root 4096 2006-08-06 13:18 .
drwxr-xr-x 53 root root 4096 2006-07-20 21:32 ..
lrwxrwxrwx  1 root root   11 2006-08-06 13:17 maven -> maven-2.0.7
drwxr-xr-x  6 root root 4096 2006-08-06 13:17 maven-2.0.7
Now just add the maven/bin directory to
your environment path. Typically, you will set this up in one of your
environment initialization scripts (for example, if you are using Bash, you
could place this configuration in the ~/.bashrc file if you just need to set it up for your
account, or in /etc/bashrc if you want to set it up for all users on this
machine). Don’t forget to make sure that the JAVA_HOME environment variable is defined as well. Here is a
typical example:
PATH=$PATH:/usr/local/maven/bin
JAVA_HOME=/usr/lib/jvm/java
export PATH JAVA_HOME
Now check that it works by running the maven command from the command line:
# mvn --version
Maven version: 2.0.7
Installing Maven on a Windows Machine
Installing Maven on a Windows machine is also relatively straightforward, although the application still lacks the graphical installation package familiar to Windows users. First, download and unzip the Maven distribution into an appropriate directory. Most Windows machines will have a graphical compression utility that you can use to extract the ZIP file, although if you are stuck, you can always use the Java jar command-line tool, as shown here:
C:> jar -xf maven-2.0.4-bin.zip
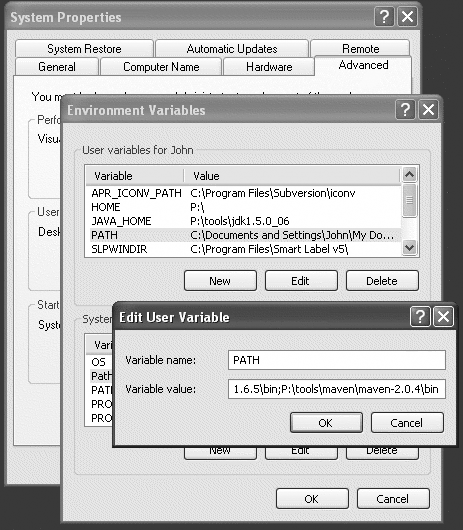
In Figure 2-1, Maven has been installed in the P: oolsmavenmaven-2.0.4 directory, although
of course you can install it anywhere that suits your particular needs. A
more conventional choice might be something like C:Program FilesApache Software Foundationmaven-2.0.4.
Because it is a Java application, Maven also expects the JAVA_HOME environment variable to be correctly
defined.
Next add the Maven bin directory to your PATH user variable (Figure 2-1). You will need to open a new console window to see the new path taken into account.
Now, check that Maven is correctly installed by running mvn --version:
C:>mvn --version
Maven version: 2.0.4
Now you should have a working Maven environment ready to go!
Declarative Builds and the Maven Project Object Model
An Introduction to Declarative Build Management
Before we look at how to create and work with projects in Maven, we need to discuss some of the basics. The most fundamental of these is the Maven Project Object Model, or POM, which we will look at in this chapter. In the process, we also will cover some important basic principles of Maven development, as well as a lot of the key features of Maven. As many, if not most, new Maven users are already familiar with Ant, we will look at how the Maven approach differs from the one used by Ant, and how this can help simplify your builds.
For Ant users, the Maven philosophy can take a little getting use to.
Unlike Ant, which is very much task-oriented, Maven uses a highly declarative approach to project builds. In Ant, for example, you
list the tasks that must be performed to compile, test, and deliver your
product. In Maven, by contrast, you describe your
project and your build process, relying on conventions and sensible default
values to do much of the grunt work. The heart of a Maven 2 project, the
POM, describes your project, its structure, and its dependencies. It
contains a detailed description of your project, including information about
versioning and configuration management, dependencies, application and
testing resources, team members and structure, and much more. The POM takes
the form of an XML file (called pom.xml
by default), which is placed in your project home directory.
Let’s look at a practical example. One of the most fundamental parts of any Java build process involves compiling your Java classes. In a typical Ant build, you would use the <javac> task (see Compiling Your Java Code in Ant) to compile your classes. This involves defining the directory or directories containing your Java source code, the directory into which the compiled classes will be placed, and creating a classpath that contains any dependencies needed to compile your classes. Before invoking the compiler, you need to be sure to create the target directory. The corresponding Ant script might look something like this:
<project name="killer-app">
    ...
    <property name="src.dir" location="src/main/java"/>
    <property name="target.dir" location="target/classes"/>
    ...
    <path id="compile.classpath">
        <fileset dir="lib">
            <include name="**/*.jar"/>
        </fileset>
    </path>
    ...
    <target name="init">
        <mkdir directory="${target.dir}"/>
    </target>

    <target name="compile" depends="init" description="Compile the application classes">
        <javac srcdir="${src.dir}"
               destdir="${target.dir}"
               classpathref="compile.classpath"
               source="1.5"
               target="1.5"
        />
    </target>
</project>
To compile your application, you would invoke the “compile” target:
$ ant compile
In Maven, the build file for this project would be somewhat different. First of all, you would not need to declare the source and target directories. If you do not say otherwise, Maven will assume that you intend to respect the standard Maven directory structure (see The Maven Directory Structure), using the well-known principle of “Convention Over Configuration.” Nor do you need to create the target directory manually before compiling your code—Maven will do this for you automatically. In fact, the only thing that we need to specify is that our project code is written using Java 5 language features, for a Java 5 JVM. Maven uses components called plug-ins to do most of the serious work. The plug-in that handles Java compilation is called maven-compiler-plugin. So, to set up Java compilation in our Maven script, all we need to do is to configure this plug-in, which we do as follows:
<project...>
    ...
    <build>
        <plug-ins>
            <!-- Using Java 5 -->
            <plugin>
                <artifactId>maven-compiler-plugin</artifactId>
                <configuration>
                    <source>1.5</source>
                    <target>1.5</target>
                </configuration>
            </plugin>
        </plug-ins>
    </build>
    ...
</project>
Note that had we been using the default javac source and target values, even this configuration would not have been needed.
The one thing that we glossed over here is the Maven equivalent of the
lib directory. In Ant, the libraries
required by a project are stored in a local project directory, often called
lib. In the above example, we defined
a classpath called compile.classpath,
which included all the JAR files in this directory.
Maven uses a totally different approach. In Maven, JAR files are rarely, if ever, stored in the project directory structure. Instead, dependencies are declared within the build script itself.
An extract from a list of Maven dependencies is shown here:
<project...>
    ...
    <!-- PROJECT DEPENDENCIES -->
    <dependencies>
        <!-- Hibernate -->
        <dependency>
            <groupId>org.hibernate</groupId>
            <artifactId>hibernate</artifactId>
            <version>3.2.4.</version>
        </dependency>
        <!-- Log4j -->
        <dependency>
            <groupId>log4j</groupId>
            <artifactId>log4j</artifactId>
            <version>1.2.14</version>
        </dependency>
        ...
    </dependencies>
</project>
Dependency management is a major feature of Maven 2, and we look at it in much more detail in Managing Transitive Dependencies“ in ch02-dependency-management.
The third part of our POM file contains information that is largely irrelevant for the task at hand (compiling our Java class), but will come in handy later on. At the start of each Maven POM file, you will find a list of descriptive elements describing things like the project name, version number, how it is to be packaged, and so on. This is shown here:
<project...>
    <!-- PROJECT DESCRIPTION -->
    <modelVersion>4.0.0</modelVersion>
    <groupId>com.mycompany</groupId>
    <artifactId>myapp</artifactId>
    <packaging>jar</packaging>
    <name>Killer application</name>
    <version>1.0</version>
    <description>My new killer app</description>
    ...
</project>
Here is the complete corresponding Maven build file:
<?xml version="1.0" encoding="UTF-8"?>
<project xmlns="http://maven.apache.org/POM/4.0.0"
    xmlns:xsi="http://www.w3.org/2001/XMLSchema-instance"
    xsi:schemaLocation="http://maven.apache.org/POM/4.0.0 http://maven.apache.org
    /maven-v4_0_0.xsd">

    <!-- PROJECT DESCRIPTION -->
    <modelVersion>4.0.0</modelVersion>
    <groupId>com.mycompany</groupId>
    <artifactId>myapp</artifactId>
    <packaging>war</packaging>
    <name>Killer application</name>
    <version>1.0</version>
    <description>My new killer app</description>

    <!-- BUILD CONFIGURATION -->
    <build>
        <plug-ins>
           <plugin>
                <artifactId>maven-compiler-plugin</artifactId>
                <configuration>
                    <source>1.5</source>
                    <target>1.5</target>
                </configuration>
            </plugin>
        </plug-ins>
    </build>

    <!-- PROJECT DEPENDENCIES -->
    <dependencies>
        <!-- Hibernate -->
        <dependency>
            <groupId>org.hibernate</groupId>
            <artifactId>hibernate</artifactId>
            <version>3.2.4.</version>
        </dependency>
        <!-- Log4j -->
        <dependency>
            <groupId>log4j</groupId>
            <artifactId>log4j</artifactId>
            <version>1.2.14</version>
        </dependency>
        ...
    </dependencies>
</project>
So a Maven build file is not necessarily any shorter than an Ant build file for an equivalent project. But the nature of the information it contains is very different. Ant users will notice that there is no sign of any target-like structures, or any indication of what goals can be run:[*]
$ mvn compile
In
a similar manner, this same build file can be used to run the application’s
unit tests, stored by convention in the src/test/java directory, by invoking the “test” goal:
$ mvn test
And this same build file can be used to bundle up a JAR file containing the compiled classes, via the “package” goal:
$ mvn package
There are many other goals. We will cover the main ones in the remainder of this chapter, and in the other Maven-related chapters of this book.
This illustrates another of Maven’s strong points: all of these goals are standard Maven goals and will work in a similar way on any Maven project.
As can be gleaned here, one of the guiding principles of Maven is to use
sensible default values wherever possible. This is where the Maven
conventions play an important role. Maven projects are expected to respect a
certain number of conventions, such as placing your main source code in the
src/main/java directory and your test
code in the src/main/test directory (see The Maven Directory Structure). These conventions are largely defined in a special POM file, the
so-called Super POM, from which every POM is extended. In practice, this
means that if you respect the standard Maven conventions, you can get away
with surprisingly little in your POM file.
Even so, a typical real-world POM file can get pretty complex. In the remainder of this chapter, we will go through the main areas of the POM file, in order of appearance. This approach is intentionally superficial: because of the central nature of the POM file in all Maven projects, we will be coming back to various sections in much more detail as we look at other topics later on.
Project Context and Artifacts
The first part of a POM file basically introduces the project and its context, including the group and artifact IDs that uniquely identify this project in the Maven world, as well as how the artifact is packaged (jar, war, ear…), and the current version number. This is a small but crucial part of the Maven POM file, in which you define many key aspects of your project. A typical example is shown here:
<project xmlns="http://maven.apache.org/POM/4.0.0"
  xmlns:xsi="http://www.w3.org/2001/XMLSchema-instance"
  xsi:schemaLocation="http://maven.apache.org/POM/4.0.0
  http://maven.apache.org/maven-v4_0_0.xsd">
   <modelVersion>4.0.0</modelVersion>
   <groupId>com.mycompany.accounting</groupId>
   <artifactId>accounting-core</artifactId>
   <packaging>jar</packaging>
   <version>1.1</version>
   ...
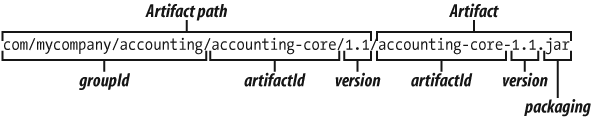
The information in this section is used to identify the project uniquely and, in particular, the artifact that it produces. This is one of the hallmarks of Maven, and it is what enables you to define very precisely your projects dependencies (see Managing Transitive Dependencies,” in Dependency Management in Maven 2). Indeed, the information in this section allows Maven to derive a unique path to the artifact generated by this project. For example, in this case, the unique path to this artifact is illustrated in Figure 2-2.
Let’s look at how Maven does this in a little more detail.
The <groupId> element is supposed to identify a particular project or set of libraries within a company or organization. By convention, it often corresponds to the initial part of the Java package used for the application classes (e.g., “org.apache.maven” for Maven projects, “org.springframework” for the Spring libraries, and so on), although this is not always the case. When the artifact is deployed to a Maven repository, the groupId is split out into a matching directory structure on the repository.
The artifactId represents the actual name of the project. This, combined with the groupId, should uniquely identify the project.
Every project also has a <version> element, which indicates the current version number. This number usually refers to major releases (“Hibernate 3.2.4,” “Spring 2.0.5,” and so on), as opposed to specific build numbers, which are different for each build. Each version has its own directory on the Maven repository, which is a subdirectory of the project directory.
So, in the above example, the generated artifact would be stored on the
Maven repository in a directory called com/mycompany/accounting/accounting-core/1.1.
When it comes to finally generating a deliverable package, Maven supports many different file formats.
At the time of this writing, supported package types included pom, jar,
maven-plugin, ejb, war, ear, rar, and par. As the name suggests, you use the
<packaging> element to indicate the packaging type. For
example, in this listing, Maven will generate a file called accounting-core-1.1.jar. The “jar” extension
comes from the <packaging> element.
Maven saves you the hassle of knowing exactly what files need to go into the
delivered package and what files were delivered. All you need to do is
provide the type and Maven will do the rest.
Finally, there is an optional element called <classifier> that can be used to distinguish different distributions of the same version of a product. For example, you might have a distribution for Java 1.4, and a different distribution for Java 5. The TestNG unit testing library does just this. The project description for the Java 5 version of this product might contain something like this:
  <groupId>org.testng</groupId>
  <artifactId>testng</artifactId>
  <packaging>jar</packaging>
  <version>5.5</version>
  <classifier>jdk15</classifier>
This would produce a file called testng-5.1-jdk15.jar. The equivalent version for Java 1.4
would be testng-5.1-jdk14.jar.
A Human-Readable Project Description
The next section of the POM file is largely for human consumption, and contains information that is primarily used to generate the Maven project web site. It can contain details such as the name of the project, the URL of the project home page (if one exists), details on the issue tracking system, the Continuous Integration system, and/or the SCM system, as well as details such as the year of inception and the development team:
   ...
   <name>Accounting Core API</name>
   <url>http://myproject.mycompany.com</url>
   <scm>
      <connection>scm:svn:http://devserver.mycompany.com/svn/accounting
       /accounting-core/trunk/accounting-core</connection>
      <developerConnection>scm:svn:http://devserver.mycompany.com/
       svn/accounting/accounting-core/trunk/accounting-core</developerConnection>
      <url>http://devserver.mycompany.com/trac/accounting-core/browser
       /accounting/accounting-core/trunk/accounting-core</url>
   </scm>
   <issueManagement>
      <system>trac</system>
      <url>http://devserver.mycompany.com/trac/accounting-core</url>
   </issueManagement>
   <inceptionYear>2006</inceptionYear>
   ...
Most of this information is project documentation, and it is a recommended practice to make it as complete as possible. Some of it, such as the Issue Tracking and CI system details, may be used by Maven to generate appropriate links in the Maven site. For common version control systems such as CVS and Subversion, Maven uses the SCM section to generate a page of instructions on how to check out the project, which is very useful for new team members. Also, Continuous Integration servers such as Continuum (see Chapter 5) can read the SCM and CI details when you import the project onto the Continuous Integration server.
Declaring your Continuous Integration Server
If your project uses a continuous integration tool of some sort, such as Continuum (see Chapter 5) CruiseControl (see Chapter 6), you can tell people about it in the <ciManagement> tag, as shown in the code below. (If your project does not using such a tool, consider using one!)
  <ciManagement>
      <system>Continuum</system>
      <url>http://integrationserver.wakaleo.com/continuum</url>
      <notifiers>
         <notifier>
            <type>mail</type>
            <address>[email protected]</address>
         </notifier>
      </notifiers>
   </ciManagement>
Maven 2 integrates well with Continuum: you can install a Maven 2 project
onto a Continuum server just by providing the pom.xml file (see Adding a Maven Project). Notifiers
declare ways that particular users can be sent notification of build results
on the CI server. In Continuum, they can be set up both from the Continuum
administration web site (Setting Up Notifiers) or from within
the Maven POM file.
Defining the Development Team
People like to know who they are working with, especially these days, when a project team can be spread across organizations and continents. In the developers section, you list details about your project team members. The time zone field is useful for international teams; this field is offset from Greenwich Mean Time (GMT), or London time, and lets people see what time it is wherever the team member is located. For example, –5 is for New York time, +1 is for Paris, and +10 is for Sydney.
A typical developer definition is shown here:
   ...
   <developers>
      <developer>
         <id>smartj</id>
         <name>John Smart</name>
         <email>[email protected]</email>
         <roles>
            <role>Developer</role>
         </roles>
         <organization>ACME NZ</organization>
         <timezone>+12</timezone>
       </developer>
       ...
   </developers>
   ...
Although totally optional, listing your development team in your POM file can be worthwhile for several reasons. This information will be used to create a team directory page on the Maven generated site. The Maven SCM plug-ins can use the developer id to map changes made in the source code repository against developer names. And, if you are using the Continuum Continuous Integration server (see Chapter 5), Continuum can pick up the developer email addresses and use them for email notifications.
Managing Dependencies
One of the most powerful Maven features is the way it handles dependencies. A typical medium-size Java project can require dozens, or even hundreds, of JAR files. Without a strict dependency management strategy, this can quickly become out of control. It can rapidly become difficult to know exactly what library versions a particular project is using, and conflicting dependency requirements can trigger hard-to-find errors. Maven addresses these issues using a two-pronged approach, based on the notions of declarative dependencies and a central repository of JAR files.
In Maven, a project’s dependencies are declared in the pom.xml file. The <dependencies> section, shown here, lets you list the libraries that your application needs to compile, be tested, and be run. Dependencies are defined using the Maven artifact naming schema (see Project Context and Artifacts,” earlier in this section), which allows you to precisely identify the exact version of each library you need. In addition, you usually only need to list the libraries you need directly to compile your code: with a feature called Transitive Dependencies (see Managing Transitive Dependencies” in Dependency Management in Maven 2) Maven 2 will discover and retrieve any additional libraries that those libraries need to work.
Here is a simple example of the dependencies section in a POM file:
  ...
  <dependencies>
    <dependency>
      <groupId>org.hibernate</groupId>
      <artifactId>hibernate</artifactId>
      <version>3.1</version>
    </dependency>
    <dependency>
       <groupId>junit</groupId>
       <artifactId>junit</artifactId>
       <version>3.8.1</version>
       <scope>test</scope>
    </dependency>
  </dependencies>
  ...
We are saying that our application requires Hibernate 3.1 (and, implicitly, all the other libraries that this version of Hibernate requires). And, to run our unit tests, we need JUnit 3.8.1.
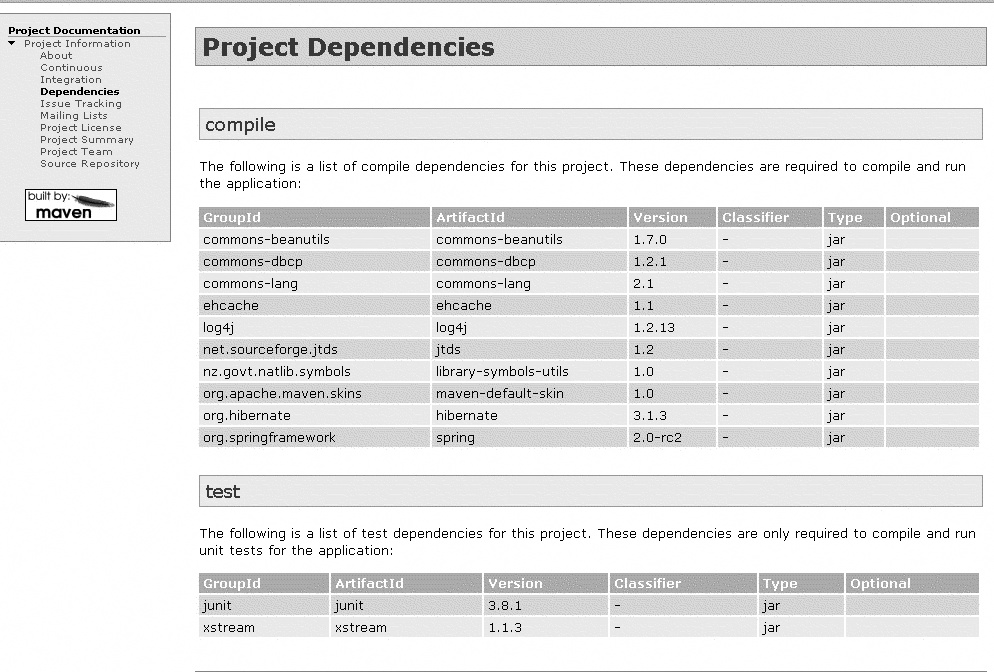
This section is not only used in the build lifecycle; it also can be used to generate reports listing the project dependencies (see Setting Up Reporting,” later in this section). We will look at dependencies in Maven in more detail in Managing Transitive Dependencies,” in Dependency Management in Maven 2.
Customizing Your Build Process
Although optional, the <build> section is a key part of any but the simplest of POM files. This section is where you tailor your Maven project build process to your exact needs, defining various plug-in configurations and setting up additional tasks that need to be performed at various points in the build lifecycle.
The Maven build process is very flexible, and it is easy to integrate new tasks by using plug-ins. Plug-ins are a powerful way to encapsulate build logic into reusable components, for use in future projects. You may use plug-ins to generate source code from a WSDL file or from Hibernate mappings, for example. Many plug-ins are available, both from the Maven web site and from other third-party providers such as Codehaus.[*]
Because they are used extensively in the standard Maven build lifecycle tasks, you also can use plug-ins to customize existing aspects of the Maven lifecycle. A common example of this type of configuration, shown in the example below, is to configure the maven-compiler-plugin, which compiles the project source code for use with Java 5 (by default, the Maven compiler generates code compatible with JDK 1.3).
The <build> section is also where
resource directories are defined. You also can define resources that will be
bundled into the final package produced by the project, and resources that
need to be on the classpath during unit tests. By default, any files placed
in the src/main/resources will be
packaged into the generated project artifact. Any files in src/test/resources will be made available on
the project classpath during unit tests.
You also can add additional resource directories. In the following example, we set up an additional resource directory for Hibernate mapping files. At build-time, these files automatically will be bundled into the resulting project artifact, along with the compiled classes and other resource files.
The following listing illustrates a typical build section, illustrating these examples:
  ...
  <build>
    <plug-ins>
        <plugin>
            <groupId>org.apache.maven.plug-ins</groupId>
            <artifactId>maven-compiler-plugin</artifactId>
            <configuration>
                <source>1.5</source>
                <target>1.5</target>
            </configuration>
         </plugin>
     </plug-ins>
     <resources>
        <resource>
            <directory>src/main/hibernate</directory>
        </resource>
     </resources>
  </build>
  ...
Setting Up Reporting
An important part of any project is internal communication. Although it is not a silver bullet, a centralized technical project web site can go a long way toward improving visibility within the team, especially with large or geographically dispersed teams. The site generation functionality in Maven 2 lets you set up a professional-quality project web site with little effort.
You use the <reporting> section to configure options for Maven site generation. In the absence of any reporting section, Maven will generate a simple site with information about the project derived from the information provided in the POM file. The <reporting> section lets you add many other additional reports, such as javadoc, unit test results, Checkstyle or PMD reports, and so on.
In this example, we add Checkstyle reporting to the generated site:
<reporting>
  <plug-ins>
    <plugin>
      <artifactId>maven-checkstyle-plugin</artifactId>
      <configuration>
        <configLocation>config/company-checks.xml</configLocation>
        <enableRulesSummary>false</enableRulesSummary>
        <failsOnError>true</failsOnError>
      </configuration>
    </plugin>
</reporting>
Defining Build Profiles
The final major section of the POM file is the <profiles> section. Profiles are a
useful way to customize the build lifecycle for different environments. They
let you define properties that change depending on your target environment,
such as database connections or filepaths. At compile time, these properties
can be inserted into your project configuration files. For example, you may
need to configure different database connections for different platforms. Suppose JDBC
configuration details are stored in a file called jdbc.properties, stored in the src/main/resources directory. In this file, you would use a
variable expression in the place of the property value, as shown
here:
jdbc.connection.url=${jdbc.connection.url}In this case, we will define two profiles: one for a development database, and one for a test database. The <profiles> section of the POM file would look like this:
<profiles>
   <!-- Development environment -->
   <profile>
      <id>development</id>
      <activation>
         <activeByDefault>true</activeByDefault>
     </activation>
     <properties>
        <!-- The development database -->
        <jdbc.connection.url>jdbc:mysql://localhost/devdb</jdbc.connection.url>
     </properties>
   </profile>
   <!-- Test environment -->
   <profile>
     <id>test</id>
     <properties>
        <!-- The test database -->
        <jdbc.connection.url>jdbc:mysql://localhost/testdb</jdbc.connection.url>
     </properties>
   </profile>
 </profiles>
Each profile has an identifier (<id>) that lets you invoke the profile by name, and a list of property values to be used for variable substitution (in the <properties> section). For variable substitution to work correctly, Maven needs to know which files are likely to contain variables. You do this by activating filtering on resource directories in the <build> section (see Customizing Your Build Process,” earlier in this section). To do this in our case, we need to activate filtering on the resource directory entry in the build section (see Customizing Your Build Process”), as shown here:
  ...
  <build>
     <resources>
        <resource>
            <directory>src/main/resources</directory>
            <filtering>true</filtering>
        </resource>
     </resources>
  </build>
  ...
Profiles can be activated in several ways. In this case, we use the activeByDefault property to define the development profile as the default profile. Therefore, running a standard Maven compile with no profiling options will use this profile:
$ mvn compile
In this case, the generated jdbc.properties file in the target/classes directory will look like this:
jdbc.connection.url=jdbc:mysql://localhost/devdb
To activate the test profile, you need to name it explicitly, using the -P command line option as shown here:
$ mvn compile -Ptest
Now, the generated jdbc.properties file, in the target/classes directory, will be configured for the test database:
jdbc.connection.url=jdbc:mysql://localhost/testdb
We look at how to use profiles in more detail in Defining Build Profiles.
Understanding the Maven 2 Lifecycle
Project lifecycles are central to Maven 2. Most developers are familiar with the notion of build phases such as compile, test, and deploy. Ant build scripts typically have targets with names like these. In Maven 2, this notion is standardized into a set of well-known and well-defined lifecycle phases (see Figure 2-3). Instead of invoking tasks or targets, the Maven 2 developer invokes a lifecycle phase. For example, to compile the application source code, you invoke the “compile” lifecycle phase:
$ mvn compile
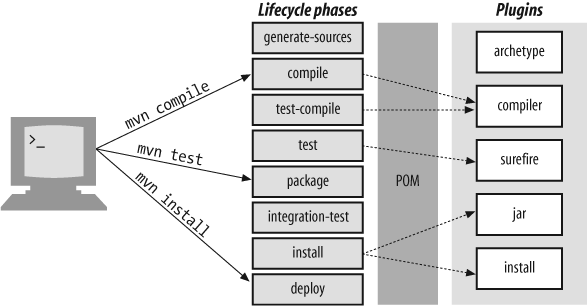
Some of the more useful Maven 2 lifecycle phases are the following (see Figure 2-3):
- generate-sources
Generates any extra source code needed for the application, which is generally accomplished using the appropriate plug-ins.
- compile
Compiles the project source code.
- test-compile
Compiles the project unit tests.
- test
Runs the unit tests (typically using JUnit) in the
src/testdirectory. If any tests fail, the build will stop. In all cases, Maven generates a set of test reports in text and XML test reports in thetarget/surefire-reportsdirectory (see Testing Your Code).- package
Packages the compiled code in its distributable format (JAR, WAR, etc.).
- integration-test
Processes and deploys the package if necessary into an environment in which integration tests can be run.
- install
Installs the package into the local repository for use as a dependency in other projects on your local machine.
- deploy
In an integration or release environment, this copies the final package to the remote repository for sharing with other developers and projects.
The full list is much longer than this, and can be found on the Maven web site.[*]
These phases illustrate the benefits of the recommended practices encouraged by Maven 2: once a developer is familiar with the main Maven lifecycle phases, he or she should feel at ease with the lifecycle phases of any Maven project. The lifecycle phase invokes the plug-ins it needs to do the job. Invoking a lifecycle phase automatically invokes any previous lifecycle phases as well. Because the lifecycle phases are limited in number, easy to understand, and well organized, becoming familiar with the lifecycle of a new Maven 2 project is easy.
Understanding the Maven lifecycle is also important when it comes to customizing your build process. When you customize your build process, you basically attach (or “bind,” to use the Maven terminology) plug-ins to various phases in the project lifecycle. This may seem more rigid than Ant, in which you basically can define any tasks you want and arrange them in any order you like. However, once you are familiar with the basic Maven phases, customizing the build lifecycle in this way is easier to understand and to maintain than the relatively arbitrary sequences of tasks that you need to implement in an Ant build process.
The Maven Directory Structure
Much of Maven’s power comes from the standard practices that it encourages. A developer who has previously worked on a Maven project immediately will feel familiar with the structure and organization of a new one. Time need not be wasted reinventing directory structures, conventions, and customized Ant build scripts for each project. Although you can override any particular directory location for your own specific ends, you really should respect the standard Maven 2 directory structure as much as possible, for several reasons:
It makes your POM file smaller and simpler.
It makes the project easier to understand and makes life easier for the poor guy who must maintain the project when you leave.
It makes it easier to integrate plug-ins.
The standard Maven 2 directory structure is illustrated in Figure 2-4.
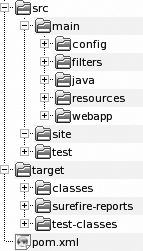
The POM (pom.xml) and two
subdirectories go into the project home directory: src for all source code and
target for generated artifacts. The src directory has a number of
subdirectories, each of which has a clearly defined purpose:
src/main/javaYour Java source code goes here (strangely enough!)
src/main/resourcesOther resources your application needs
src/main/filtersResource filters, in the form of properties files, which may be used to define variables only known at runtime
src/main/configConfiguration files
src/main/webappThe web application directory for a WAR project
src/test/javaSource code for unit tests, by convention in a directory structure mirroring the one in your main source code directory
src/test/resourcesResources to be used for unit tests, but that will not be deployed
src/test/filtersResources filters to be used for unit tests, but that will not be deployed
src/siteFiles used to generate the Maven project web site
Configuring Maven to Your Environment
One of the principal aims of Maven is to produce portable project build environments. Nevertheless, each work environment has its particularities, which need to be catered for. In this chapter, we investigate some common areas where you may need to tailor Maven to suit your particular work environment, such as configuring proxy servers, defining enterprise repositories, or specifying usernames and passwords.
When it comes to defining environment-specific configuration details, the most
important tool at your disposal is the settings.xml file. Each user can
have his or her own individual settings.xml
file, which should be placed in the $HOME/.m2
directory. This file is not placed under version control, and therefore can
contain details such as usernames and passwords, which should not be shared in
the source code repository.
Using a Proxy
If you are working in a company, you may well be accessing the
Internet via a proxy. Maven relies heavily on accessing the Internet to
download the libraries that it needs for your projects and for its own
purposes. Therefore, if you are behind a proxy, you will need to tell Maven
about it. Maven stores environment-specific parameters in a file called
$HOME/.m2/settings.xml. You will have
to create this file if it doesn’t already exist. To define a proxy, just add
a <proxy> element in this file, as
follows:
<settings>
  <proxies>
   <proxy>
      <active>true</active>
      <protocol>http</protocol>
      <host>proxy.mycompany.com</host>
      <port>8080</port>
      <username>user</username>
      <password>password</password>
      <nonProxyHosts>*.mycompany.com</nonProxyHosts>
    </proxy>
  </proxies>
</settings>
The <nonProxyHosts> element is useful to define servers that do not need proxy access, such as internal enterprise repositories.
Using a Local Mirror
Another common use of the settings.xml file is to configure mirror servers. This
typically is done to configure an organization-wide repository. Many
organizations use a local repository to store and share internal packages
and to act as a proxy to external repositories. This solution is faster and
more reliable than requiring users to go to the Internet whenever a new
dependency is required.
The following example shows how to configure a Maven installation to use an Artifactory repository exclusively:
<settings>
  <mirrors>
      <mirror>
        <id>artifactory</id>
        <mirrorOf>*</mirrorOf>
        <url>http://buildserver.mycomany.org:8080/artifactory/repo</url>
        <name>Artifactory</name>
      </mirror>
  </mirrors>
</settings>
Changing Your Maven Cache Location
Maven stores downloaded JAR files in a local directory on your
machine, known as the local repository. This directory generally is found at
$HOME/.m2/repository<localRepository> tag in your $HOME/.m2/settings.xml
<settings>
  <localRepository>C:/maven/repository</localRepository>
</settings>
Defining Arbitrary Environment-Specific Variables
The settings.xml file is also
a good place to let users tailor their environment variables if they really
need to. For example, you might need to specify the directory of some
locally installed product, which may vary from machine to machine. You do
this by defining a default profile in the settings.xml
file. Any properties defined here will override property values in the POM
file. Command-line tools like SchemaSpy (see Visualizing a Database Structure with SchemaSpy)
are a good example. This is a tool that needs to be downloaded and installed
on each local machine. Of course, you can get the Maven build process to do
this automatically. However, users who have already installed SchemaSpy, and
may not want to duplicate installations, can override the SchemaSpy-related
parameters by setting up properties in their local settings.xml file. In the following example, a user sets the
installation directory (the schemaspy.home property) to P: oolsschemaspy, which will override any property values
defined in the main POM
file:
<settings>
  ...
  <profiles>
   <profile>
      <id>development</id>
      <activation>
         <activeByDefault>true</activeByDefault>
     </activation>
     <properties>
        <schemaspy.home>P:	oolsschemaspy</schemaspy.home>
        <schemaspy.version>3.1.1</schemaspy.version>
     </properties>
   </profile>
  </profiles>
</settings>
Note that we still need to provide sensible default values in the POM file so that customizing your environment becomes optional, not mandatory. Users only need to modify their local file if they really want to (and, presumably, when they know what they are doing!). The best way to set up these default values is by using the <properties> element at the end of your POM file, as shown here:
<project>
  ...
  <properties>
        <schemaspy.home>${user.home}/.schemaspy</schemaspy.home>
        <schemaspy.version>3.1.1</schemaspy.version>
  </properties>
<project>
Don’t be tempted to put these default values in a default profile element in your POM file; in this case, the profile in the POM file would override the profile in your local settings.
Dependency Management in Maven 2
Dependency management is one of the more powerful features of Maven
2. Dependencies are the libraries you need to compile, test, and run your
application. In tools such as Ant, these libraries typically are stored in a
special directory (often called lib), and are
maintained either by hand or as project artifacts that are stored in the source
code repository along with the source code. Maven, by contrast, uses a
declarative approach. In a Maven project, you list the libraries your application needs, including the exact version number
of each library. Using this information, Maven will do its best to find,
retrieve, and assemble the libraries it needs during the different stages in the
build lifecycle. In addition, using a powerful feature called Transitive
Dependencies (see Managing Transitive Dependencies,” later in this
section), it will include not only the libraries that you declare but also all
the extra libraries that your declared libraries need to work correctly.
In this chapter, we will look at different aspects of how to handle dependencies in Maven 2.
Declaring Dependencies
One of the most powerful features of Maven 2 is its ability to
handle dependencies in a consistent and reliable manner. In the <dependencies> section of the POM file,
you declare the libraries that you need to compile, test, and run your
application. Dependencies are retrieved from local or remote repositories,
and cached locally on your development machine, in the $HOME/.m2/repository directory structure. If
you use the same jar in two projects, it will only be downloaded (and
stored) once, which saves time and disk space.
In Maven, dependencies are handled declaratively. Suppose that your project needs to use Hibernate, and that your unit tests are written in JUnit. In this case, the dependency section in your POM file might look something like the following:
  ...
  <dependencies>
    <dependency>
      <groupId>org.hibernate</groupId>
      <artifactId>hibernate</artifactId>
      <version>3.1</version>
    </dependency>
    <dependency>
       <groupId>junit</groupId>
       <artifactId>junit</artifactId>
       <version>3.8.1</version>
       <scope>test</scope>
    </dependency>
  </dependencies>
  ...
Each dependency is uniquely identified, using a Maven-style artifact reference (see Project Context and Artifacts,” in Declarative Builds and the Maven Project Object Model). Dependencies can refer both to other projects within your organization and to publicly available libraries on the public Maven repositories.
In some cases, libraries may have several different versions of a library with the same version number. The TestNG library, for example, has two versions for each release, one compiled for Java 1.4 and another compiled for Java 1.5:
testng-5.1-jdk14.jar       15-Aug-2006 08:55  817K
testng-5.1-jdk15.jar       15-Aug-2006 08:55  676K
When you declare your dependencies, Maven needs to know exactly which version you need. You do this by providing the <classifier> element, as shown here:
    <dependency>
      <groupId>org.testng</groupId>
      <artifactId>testng</artifactId>
      <version>5.1</version>
      <classifier>jdk15</classifier>
      <scope>test</scope>
    </dependency>
Dependencies declarations are not limited to precise version numbers. In fact, Maven is quite flexible about version numbers, and you can use a form of interval notation to define ranges of permissible version numbers. Interval notation comes from set theory, and is one of those things you probably learned at school or university and subsequently forgot. Here is a quick refresher. Interval notation is a flexible and succinct way of defining ranges of values using square brackets and parentheses to indicate boundary values. You use parentheses when the boundary value is not included in the set. For example, the following notation indicates a set of values greater than 1 (noninclusive) and less than 4 (noninclusive):
(1,4)
You use square brackets when the boundary values are included in the set. For example, the following notation indicates a set of values greater than or equal to 1 and less than or equal to 4:
[1,4]
You can combine different types of boundary values in the same expression. For example, this is how you would represent a set of values greater than or equal to 1, and strictly less than 4:
[1,4)
You can leave a value out to leave one side of the set unbounded. Here we include all values greater or equal to 2:
[2,)
You can even define a set made up of multiple intervals, simply by listing the intervals in a comma-separated list. The following example shows how you would define all the values between 1 and 10 inclusive, except for 5:
[1,5),(5,10]
Now that you have mastered the theory, let’s see how it applies to dependency management. By using interval notation, you can give Maven more flexibility in its dependency management, which means that you spend less time chasing the latest API updates. Maven will use the highest available version within the range you provide. For example, the following dependency will use the latest available version of Hibernate, but requires at least Hibernate 3.0:
    <dependency>
      <groupId>org.hibernate</groupId>
      <artifactId>hibernate</artifactId>
      <version>[3.0,)</version>
    </dependency>
Or you may want to limit the versions of an API to a particular range. Using the following dependency, Maven will look for the highest version of the commons-collections in the 2.x series, but will exclude any versions from 3.0 onward:
    <dependency>
      <groupId>commons-collections</groupId>
      <artifactId>commons-collections</artifactId>
      <version>[2.0,3.0)</version>
    </dependency>
Managing Transitive Dependencies
Transitive Dependencies are arguably one of the most useful features of Maven 2. If you have ever used a tool like urpmi or apt-get on a Linux box, you will be familiar with the concept of Transitive Dependencies. Simply put, if you tell Maven 2 that your project needs a particular library, it will try to work out what other libraries this library needs, and retrieve them as well.
Let’s look at how this works with a practical example. Suppose that our project uses Hibernate 3.1. We might declare this dependency as follows:
    <dependency>
      <groupId>org.hibernate</groupId>
      <artifactId>hibernate</artifactId>
      <version>3.1</version>
    </dependency>
Exactly where Maven looks for dependencies will depend on how your
repositories are set up. The default Maven 2 repository is located at
http://repo1.maven.org/maven2 (if in
doubt, this is actually defined in the Super POM file). In this case, Maven
will look for the Hibernate JAR file in the following directory:
http://repo1.maven.org/maven2/org/hibernate/hibernate/3.1/
If you look in this directory, you will see a list of files similar to the following:
hibernate-3.1-sources.jar        10-Jan-2006 07:05  1.2M
hibernate-3.1-sources.jar.md5    10-Jan-2006 07:06  148
hibernate-3.1-sources.jar.sha1   10-Jan-2006 07:07  156
hibernate-3.1.jar                15-Dec-2005 11:32  1.8M
hibernate-3.1.jar.md5            15-Dec-2005 11:32   32
hibernate-3.1.jar.sha1           15-Dec-2005 11:32   40
hibernate-3.1.pom                26-Dec-2005 06:22  3.8K
hibernate-3.1.pom.md5            04-Jan-2006 07:33  138
hibernate-3.1.pom.sha1           04-Jan-2006 07:33  146
maven-metadata.xml               15-Dec-2005 11:32  119
maven-metadata.xml.md5           09-Jul-2006 08:41  130
maven-metadata.xml.sha1          09-Jul-2006 08:41  138
Note that there is much more than just the JAR file: there is also a POM file and (for good measure) digest files that let Maven verify the consistency of the files it downloads. The POM file here is the POM file for the Hibernate project. If your project needs to use Hibernate, it also needs to include all the Hibernate dependencies in its distribution. These secondary dependencies are listed in this POM file. Maven uses the dependencies in this POM to work out what other library it needs to retrieve.
This is the main weakness of Maven Transitive Dependency management: it relies on the accuracy and completeness of the POM files stored on the public repository. However, in some cases, the dependencies in the POM file may not be up-to-date, and, in other cases, the POM file may actually be just an empty POM file with no dependencies at all! In these cases, you will need to supply the dependencies explicitly in your own POM file.
Dependency management can be a complicated beast, and sometimes you will want to understand exactly which libraries Maven is using and why. One option is to use the –X command-line option with any Maven command to produce (among many other things) very detailed dependency information. This option generates a lot of text, so it is useful to redirect output into a text file and to view the file in a text editor, rather than to wrestle with the command line:
$ mvn -X test > out.txt
The resulting output file will contain lines like the following, detailing the resolved dependencies and the corresponding dependency graphs:
[DEBUG]   org.hibernate:hibernate:jar:3.1.3:compile (setting version to: 3.1.3
from range: [3.0,))
[DEBUG]   org.hibernate:hibernate:jar:3.1.3:compile (selected for compile)
[DEBUG]     javax.transaction:jta:jar:1.0.1B:compile (selected for compile)
[DEBUG]     dom4j:dom4j:jar:1.6.1:compile (selected for compile)
[DEBUG]     cglib:cglib:jar:2.1_3:compile (selected for compile)
[DEBUG]       asm:asm:jar:1.5.3:compile (selected for compile)
[DEBUG]     asm:asm-attrs:jar:1.5.3:compile (selected for compile)
[DEBUG]     asm:asm:jar:1.5.3:compile (selected for compile)
[DEBUG]     commons-collections:commons-collections:jar:2.1.1:compile (removed -
nearer found: 2.1)
[DEBUG]     antlr:antlr:jar:2.7.6rc1:compile (selected for compile)
This is a representation of the dependency tree: you can see exactly which library versions were requested, and which were retained for the final dependency list. It also indicates which libraries were removed because a nearer dependency was found (look at the “commons-collections” library in the above listing). This can give useful clues if a library is not behaving as expected.
The other useful tool in understanding your project’s dependencies is the
Dependency report. This report is generated by default when you generate the
Maven site, and placed in the target/dependencies.html
file:
$ mvn site
This report displays lists of direct and transitive dependencies for each dependency scope (see Dependency Scope,” later in this section), as well as the full dependency tree (see Figure 2-5).
Dependency Scope
In a real-world enterprise application, you may not need to include all the dependencies in the deployed application. Some JARs are needed only for unit testing, while others will be provided at runtime by the application server. Using a technique called dependency scoping, Maven 2 lets you use certain JARs only when you really need them and excludes them from the classpath when you don’t. Maven provides several dependency scopes.
The default scope is the compile scope. Compile-scope dependencies are available in all phases.
    <dependency>
      <groupId>org.hibernate</groupId>
      <artifactId>hibernate</artifactId>
      <version>3.1</version>
    </dependency>
A provided dependency is used to compile the application but will not be deployed. You would use this scope when you expect the JDK or application server to provide the JAR. The servlet APIs are a good example:
    <dependency>
      <groupId>javax.servlet</groupId>
      <artifactId>servlet-api</artifactId>
      <version>2.4</version>
      <scope>provided</scope>
    </dependency>
The runtime dependency scope is used for dependencies that are not needed for compilation, only for execution, such as Java Database Connectivity (JDBC) drivers:
  <dependency>
     <groupId>mysql</groupId>
     <artifactId>mysql-connector-java</artifactId>
     <version>3.1.13</version>
     <scope>runtime</scope>
  </dependency>
You use the test dependency scope for dependencies that are only needed to compile and run tests, and that don’t need to be distributed (JUnit or TestNG, for example):
  <dependency>
     <groupId>junit</groupId>
     <artifactId>junit</artifactId>
     <version>3.8.1</version>
     <scope>test</scope>
  </dependency>
In some special cases, you may need to use system dependencies, such as the tools.jar file provided with the Java SDK. For example, you may need to use the Sun Apt or WSGen tools within your build process. You can do this using the system dependency scope. In this case (and in this case only), you need to provide a systemPath value that indicates the absolute path to this file. This is illustrated in the following code extract:
    <dependency>
        <groupId>com.sun</groupId>
        <artifactId>tools</artifactId>
        <version>1.5.0</version>
        <scope>system</scope>
        <systemPath>${java.home}/lib/tools.jar</systemPath>
     </dependency>
Handling Proprietary Dependencies
For commercial and copyright reasons, not all of the commonly used libraries are available on the public Maven repositories. A common example is the Oracle JDBC Driver, which is available free-of-charge on the Oracle web site,[*] but it cannot be redistributed via a public Maven repository. Another frequently encountered example is the Java Transaction API (JTA), which is notably required by Hibernate. The JTA library is produced by Sun, which requires you to agree to a license agreement before you are able to download the JAR.
If you need to use a proprietary library like these in your Maven project, you will need to add it manually to your local repository. Let’s see how this is done, using the Oracle driver as an example.
First, download the appropriate JAR file from the Oracle web site (for example, odbc14.jar). At the time of this writing, this corresponded to the “Oracle Database 10g Release 2 (10.2.0.2) JDBC Driver.” It is important to note the exact version, as it is not visible from the name of the file. This version number will be used to identify the JAR file in our repository. The dependency declaration would look something like this:
  <dependency>
      <groupId>oracle</groupId>
      <artifactId>oracle-jdbc</artifactId>
      <version>10.1.0.2.0</version>
      <scope>runtime</scope>
  </dependency>
To get this to work, we need to copy the JAR into the correct place in our Maven repository. There are several ways to do this. You may first want to test on your development machine before installing the JAR onto the organization repository. You can install the jar into your local repository by using the mvn install:install-file command, as shown here:
mvn install:install-file -DgroupId=oracle
     -DartifactId=oracle-jdbc
     -Dpackaging=jar
     -Dversion=10.1.0.2.0
     -DgeneratePom=true
     -Dfile=ojdbc14.jar
Installing the JTA jar is similar: download it from the Sun site[†] and use the mvn install command as follows:
mvn install:install-file -DgroupId=javax.transaction
     -DartifactId=jta
     -Dpackaging=jar
     -Dversion=1.0.1B
     -DgeneratePom=true
     -Dfile=jta-1_0_1B-classes.zip
Now you can test the installation, typically by running some unit tests and seeing if Maven correctly finds the dependency.
When you are happy, you can either deploy the file to using the mvn deploy:deploy-file command, or simply copy the appropriate directory onto your company Maven repository. When this is done, this dependency can be seamlessly downloaded by all the team members in exactly the same way as any other new dependency.
Refactoring Your Dependencies Using Properties
In large projects, even with the benefits of transitive dependency management, you will often end up with a lot of dependencies. Sometimes, it is useful to declare key version numbers in a central place, making them easier to find and update if necessary. One good way to do this is by using properties.
We saw in Defining Build Profiles” in Declarative Builds and the Maven Project Object Model
and Configuring Maven to Your Environment the ways in which you can define profile
or environment-specific properties in a profile or in the settings.xml file.
However, you also can declare properties directly at the root level in your
pom.xml file. Like constants
in a Java class, or Ant properties (see Customizing Your Build Script Using Properties) in
an Ant build script, this is a convenient way to define reusable values in
an easy-to-maintain manner. The actual <properties> block can appear anywhere in the build
file, but you may want to put it in an easy-to-find place such as near the
start or right at the end.
Let’s look at an example. Suppose that we are developing a web application using JSP and JSTL. In the following listing, we use two properties, somewhat unimaginatively named servlet-api.version and jstl.version, to identify what version of the Java Servlet and JSTL APIs we are using:
<project>
  ...
  <properties>
    ...
    <servlet-api.version>2.4</servlet-api.version>
    <jstl.version>1.1.2</jstl.version>
  </properties>
  ...
</project>
These properties can then be used to declare our dependencies in a more flexible manner. Now we can use these properties to declare our Servlet API and JSTL dependencies. Note that this makes it easier to ensure that the JSTL API and JSTL standard taglibs versions stay in sync:
<project>
  ...
  <properties>
    ...
    <servlet-api.version>2.4</servlet-api.version>
    <jstl.version>1.1.2</jstl.version>
  </properties>
  ...
  <dependencies>
    ...
    <dependency>
      <groupId>javax.servlet</groupId>
      <artifactId>servlet-api</artifactId>
      <version>${servlet-api.version}</version>
      <scope>provided</scope>
    </dependency>
    <dependency>
      <groupId>javax.servlet</groupId>
      <artifactId>jstl</artifactId>
      <version>${jstl.version}</version>
    </dependency>
    <dependency>
      <groupId>taglibs</groupId>
      <artifactId>standard</artifactId>
      <version>${jstl.version}</version>
    </dependency>
    ...
  </dependencies>
</project>
Looking for Dependencies with MvnRepository
When you are working with Maven, you often need to look up a particular dependency so that you can add it to your POM file. It can be quite tricky to remember and/or hunt down the precise group and artifact names and the latest version numbers for any but the most well-known artifacts. For example, do you remember the exact group and latest version of the Hibernate or Spring MVC libraries?
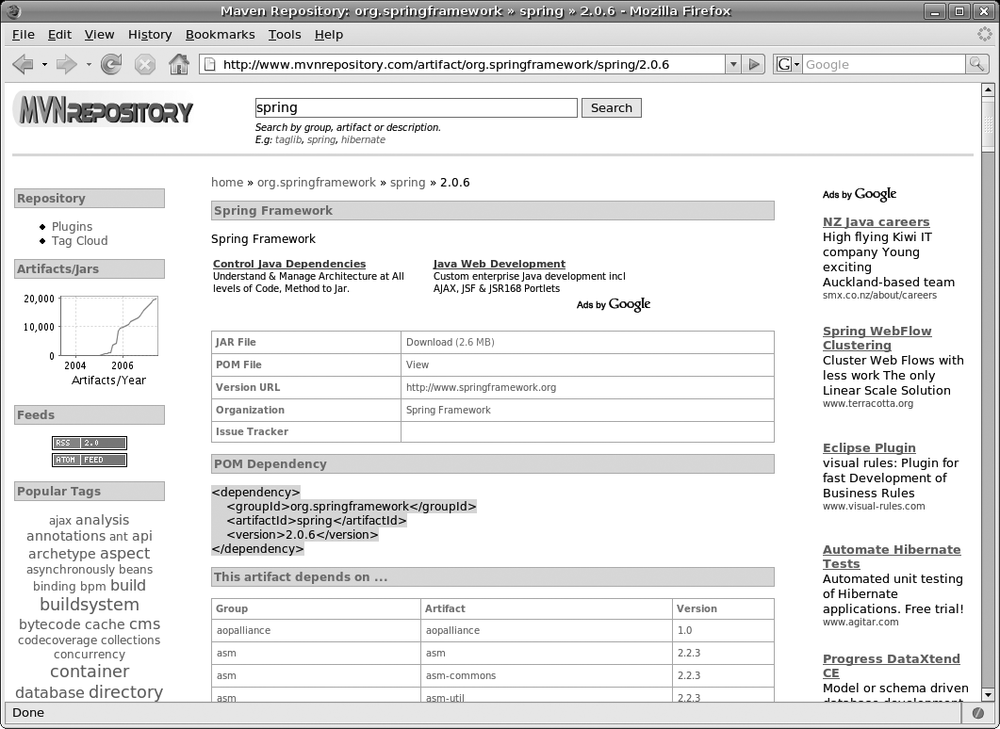
One useful resource that can help out here is the MvnRepository site[*] (see Figure 2-6). Using this site, you can search the central Maven repository for artifacts by name. When you find the version you are looking for, simply copy the displayed dependency block into your POM file. While you’re there, you also can list the dependencies of a particular library, view the latest updates to the repository, or browse the overall structure of the repository.
Project Inheritance and Aggregation
Maven actively encourages you to write your projects as a set of small, flexible, modules rather than as a monolithic block of code. Dependencies are one way that you can create well-defined relationships between a set of modules to form an overall project. Project inheritance is another.
Project inheritance lets you define project-wide properties and values that will be inherited by all of the child projects. This is most easily understood by an example.
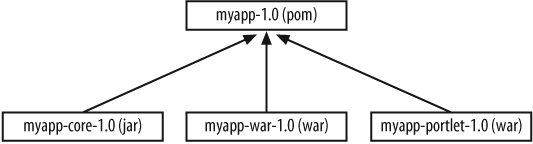
Suppose you are writing a simple web application, which will be deployed both as a traditional web application and as a portlet. One way that you might do this is to define three modules: a core module, containing the application business logic, and two user interface modules, one for each target platform. All three modules would have a common parent POM file, as illustrated in Figure 2-7.
Let’s see how you would implement this project structure.
Parent POM files are very much like any other POM file. The following listing shows a very simple one:
<project>
  <modelVersion>4.0.0</modelVersion>
  <groupId>com.mycompany</groupId>
  <artifactId>myapp</artifactId>
  <packaging>pom</packaging>
  <name>Killer application</name>
  <version>1.0</version>
</project>
The main distinguishing factor is the <packaging> element, which is declared as a POM, rather than the WAR or JAR values that we have seen in previous examples. Indeed, all parent POM files must use the pom packaging type.
Then, within each child project, you need to declare a <parent> element that refers, suprisingly enough, to the parent POM file:
<project>
  <parent>
    <groupId>com.mycompany</groupId>
    <artifactId>myapp</artifactId>
    <version>1.0</version>
  </parent>
  <modelVersion>4.0.0</modelVersion>
  <artifactId>debtcalculator-core</artifactId>
  ...
</project>
Note that you don’t need to define the version or groupId of the child project—these values are inherited from the parent.
The parent POM file is an excellent place to define project-wide properties or build configuration details. A typical use is to define the Java compile options in one central place. We can set the Java compiler to Java 1.5. This will be inherited by all the children projects, without any special configuration in their POM files:
<project>
  <modelVersion>4.0.0</modelVersion>
  <groupId>com.mycompany</groupId>
  <artifactId>myapp</artifactId>
  <packaging>pom</packaging>
  <name>Killer application</name>
  <version>1.0</version>
  <properties>
    <java-api.version>1.5</java-api.version>
  </properties>
  <build>
    <plugins>
      <plugin>
        <artifactId>maven-compiler-plugin</artifactId>
        <configuration>
          <source>${java-api.version}</source>
          <target>${java-api.version}</target>
        </configuration>
      </plugin>
    </plugins>
  </build>
</project>
In a similar way, you can define project-wide dependencies at this level:
<project>
  <modelVersion>4.0.0</modelVersion>
  <groupId>com.mycompany</groupId>
  <artifactId>myapp</artifactId>
  <packaging>pom</packaging>
  <name>Killer application</name>
  <version>1.0</version>
  <properties>
    <java-api.version>1.5</java-api.version>
    <junit.version>4.4</junit.version>
  </properties>
  ...
  <dependencies>
    <dependency>
      <groupId>junit</groupId>
      <artifactId>junit</artifactId>
      <version>${junit.version}</version>
      <scope>test</scope>
    </dependency>
  </dependencies>
</project>
All the children projects will now be able to use these dependencies without having to list them among their specific dependencies. This is also an excellent way to ensure that all of your children projects use the same versions of particular APIs.
The parent POM file is also an excellent place to set up reporting configurations. This way, you can define and configure the reports that you want generated for all the children projects in one central place.
<project>
  <modelVersion>4.0.0</modelVersion>
  <groupId>com.mycompany</groupId>
  <artifactId>myapp</artifactId>
  <packaging>pom</packaging>
  <name>Killer application</name>
  <version>1.0</version>
  ...
  <reporting>
    <plugins>
      <plugin>
        <artifactId>maven-surefire-report-plugin</artifactId>
      </plugin>
      <plugin>
        <artifactId>maven-checkstyle-plugin</artifactId>
      </plugin>
      ...
    </plugins>
  </reporting>
</project>
Although, at the time of this writing, multimodule reporting is still a bit dodgy, each child project will inherit the reporting configuration defined in the parent POM file, making these files simpler and easier to maintain.
You can also define the subprojects as modules. This is known as aggregation, and allows you to build all the child projects in one go from the parent directory.
<project>
  ...
  <modules>
    <module>myapp-core</module>
    <module>myapp-war</module>
    <module>myapp-portlet</module>
  </modules>
  ...
</project>
When you run mvn compile from the parent root directory, all of the child projects also would be compiled:
$ mvn compile
[INFO] Scanning for projects...
[INFO] Reactor build order:
[INFO]   Killer App
[INFO]   Killer App - Core
[INFO]   Killer App - Portlet
[INFO]   Killer App - Webapp
[INFO] ----------------------------------------------------------------------------
[INFO] Building Killer App
[INFO]    task-segment: [compile]
[INFO] ----------------------------------------------------------------------------
...
[INFO] ----------------------------------------------------------------------------
[INFO] Building Killer App - Core
[INFO]    task-segment: [compile]
[INFO] ----------------------------------------------------------------------------
...
[INFO] ----------------------------------------------------------------------------
[INFO] Building Killer App - Portlet
[INFO]    task-segment: [compile]
[INFO] ----------------------------------------------------------------------------
...
[INFO] ----------------------------------------------------------------------------
[INFO] Building Killer App - Webapp
[INFO]    task-segment: [compile]
[INFO] ----------------------------------------------------------------------------
...
[INFO] ------------------------------------------------------------------------
[INFO] Reactor Summary:
[INFO] ------------------------------------------------------------------------
[INFO] Killer App ............................................ SUCCESS [0.317s]
[INFO] Killer App - Core ..................................... SUCCESS [1.012s]
[INFO] Killer App - Portlet .................................. SUCCESS [0.602s]
[INFO] Killer App - Webapp ................................... SUCCESS [0.753s]
[INFO] ------------------------------------------------------------------------
[INFO] ------------------------------------------------------------------------
[INFO] BUILD SUCCESSFUL
[INFO] ------------------------------------------------------------------------
[INFO] Total time: 4 seconds
[INFO] Finished at: Sun Nov 18 02:54:32 GMT 2007
[INFO] Final Memory: 7M/80M
[INFO] ------------------------------------------------------------------------
Creating a Project Template with Archetypes
Even with a standardized directory structure, it is tiresome to have to create a full set of empty directories by hand whenever you start a new Maven project. To make life easier, Maven 2 provides the archetype plug-in, which builds an empty Maven 2—compatible project template, containing a standard directory structure as well as some sample files illustrating Maven conventions and best practices. This is an excellent way to get a basic project environment up and running quickly. The default archetype model will produce a JAR library project. Several other artifact types are available for other specific project types, including web applications, Maven plug-ins, and others.
Let’s take a quick tour to see what you can do with Maven Archetypes. Suppose that we want to create an online store using Maven. Following Maven’s recommendations, we will divide the project into several distinct modules. Our backend module will be called ShopCoreApi:
$ mvn archetype:create -DgroupId=com.acme.shop -DartifactId=ShopCoreApi
-Dpackagename=com.acme.shop
[INFO] Scanning for projects...
[INFO] Searching repository for plugin with prefix: 'archetype'.
[INFO] ----------------------------------------------------------------------------
[INFO] Building Maven Default Project
[INFO]    task-segment: [archetype:create] (aggregator-style)
[INFO] ----------------------------------------------------------------------------
...
[INFO] Archetype created in dir: /home/john/dev/projects/shop/ShopCoreApi
[INFO] ------------------------------------------------------------------------
[INFO] BUILD SUCCESSFUL
[INFO] ------------------------------------------------------------------------
[INFO] Total time: 2 seconds
[INFO] Finished at: Sun Oct 15 21:50:38 NZDT 2006
[INFO] Final Memory: 4M/8M
[INFO] ------------------------------------------------------------------------
This will create a complete, correctly structured, working, albeit minimalist, Maven project, including a simple POM file, a sample class, and a unit test. The POM file looks like this:
<project xmlns="http://maven.apache.org/POM/4.0.0" xmlns:xsi=
 "http://www.w3.org/2001/XMLSchema-instance"
  xsi:schemaLocation="http://maven.apache.org/POM/4.0.0
  http://maven.apache.org/maven-v4_0_0.xsd">
  <modelVersion>4.0.0</modelVersion>
  <groupId>com.acme.shop</groupId>
  <artifactId>ShopCoreApi</artifactId>
  <packaging>jar</packaging>
  <version>1.0-SNAPSHOT</version>
  <name>ShopCoreApi</name>
  <url>http://maven.apache.org</url>
  <dependencies>
    <dependency>
      <groupId>junit</groupId>
      <artifactId>junit</artifactId>
      <version>3.8.1</version>
      <scope>test</scope>
    </dependency>
  </dependencies>
</project>
The project will be created in a subdirectory with the same name of the artifact (in this case, “ShopCoreApi”). The groupId and the artifactId are used to identify the artifact produced by the project (see Project Context and Artifacts” in Declarative Builds and the Maven Project Object Model). The packagename is the root package for your project. More often than not, the packagename option will be the same at the groupId: in this case, you can drop the packagename option.
This project is now ready to try out. Switch to this directory and build the project using mvn package:
$ ls
ShopCoreApi
$ cd ShopCoreApi
$ mvn package
[INFO] Scanning for projects...
[INFO] ----------------------------------------------------------------------------
[INFO] Building Maven Quick Start Archetype
[INFO]    task-segment: [package]
[INFO] ----------------------------------------------------------------------------
...
-------------------------------------------------------
 T E S T S
-------------------------------------------------------
Running com.acme.shop.AppTest
Tests run: 1, Failures: 0, Errors: 0, Skipped: 0, Time elapsed: 0.039 sec

Results :
Tests run: 1, Failures: 0, Errors: 0, Skipped: 0
[INFO] [jar:jar]
[INFO] Building jar: /home/john/dev/projects/shop/ShopCoreApi/target
/ShopCoreApi-1.0-SNAPSHOT.jar
[INFO] ------------------------------------------------------------------------
[INFO] BUILD SUCCESSFUL
[INFO] ------------------------------------------------------------------------
[INFO] Total time: 4 seconds
[INFO] Finished at: Sun Oct 15 21:52:22 NZDT 2006
[INFO] Final Memory: 4M/10M
[INFO] ------------------------------------------------------------------------
So, now you have a working Maven project template, generated in just a few minutes!
The default Archetype template (the
maven-archetype-quickstart archetype) is designed to
produce a JAR file. There are also several other archetypes that can be used to
create templates for different types of projects. You can use a different
archetype by using the archetypeArtifactId
command-line option, as shown
here:
$ mvn archetype:create -DgroupId=com.acme.shop -DartifactId=ShopWeb
  -DarchetypeArtifactId=maven-archetype-webapp
This example uses the maven-archetype-webapp archetype,
which creates (surprisingly enough!) an empty WAR project. Following Maven’s
recommendations about Separation of Concerns, the WAR project is expected to
contain only dynamic web pages (JSPs), with the actual Java code being written
in another project.
Another useful archetype is the maven-archetype-site
archetype, which creates a template for a Maven web site for an existing project, including a full,
multilingual (well, bilingual) site structure with sample XDoc, APT, and FAQs
content. This archetype is the only one that you run on an existing project.
Although it provides none of the source code-based reporting features, such as
unit test reports, checkstyle reports, and so on (which need to be configured in
the main POM file), it does provide a good starting point for manually added
site
content:
$ mvn archetype:create -DgroupId=com.acme.shop -DartifactId=ShopCoreApi
  -DarchetypeArtifactId=maven-archetype-site
$ mvn site
[INFO] Scanning for projects...
[INFO] ----------------------------------------------------------------------------
[INFO] Building Maven Quick Start Archetype
[INFO]    task-segment: [site]
[INFO] ----------------------------------------------------------------------------
...
[INFO] Generate "Continuous Integration" report.
[INFO] Generate "Dependencies" report.
[INFO] Generate "Issue Tracking" report.
[INFO] Generate "Project License" report.
[INFO] Generate "Mailing Lists" report.
[INFO] Generate "Project Summary" report.
[INFO] Generate "Source Repository" report.
[INFO] Generate "Project Team" report.
[INFO] ------------------------------------------------------------------------
[INFO] BUILD SUCCESSFUL
[INFO] ------------------------------------------------------------------------
[INFO] Total time: 11 seconds
[INFO] Finished at: Sun Oct 15 22:47:04 NZDT 2006
[INFO] Final Memory: 11M/21M
[INFO] ------------------------------------------------------------------------
There is also an increasing number of third-party archetypes available for other types of web applications and web technology stacks, such as Struts, Spring, JSF, Hibernate, Ageci, and many more. A list of some of these can be found on the Codehaus web site.[*] Matt Raible’s AppFuse project[†] provides a large number of archetypes that you can use to create working application templates based on a wide range of open source architectures and libraries, such as JSF, Spring, Spring MVC, Struts, Hibernate, and Tapestry. For example, the appfuse-basic-spring archetype, shown here, will create a very complete web application prototype based on Hibernate, Spring, and JSF:
$ mvn archetype:create -DgroupId=com.jpt -DartifactId=shopfront
  -DarchetypeArtifactId=appfuse-basic-jsf -DarchetypeGroupId=org.appfuse.archetypes
...
[INFO] Archetype created in dir: /home/john/projects/shopfront
[INFO] ------------------------------------------------------------------------
[INFO] BUILD SUCCESSFUL
[INFO] ------------------------------------------------------------------------
[INFO] Total time: 1 minute 8 seconds
[INFO] Finished at: Wed Oct 10 20:46:27 GMT+12:00 2007
[INFO] Final Memory: 6M/65M
[INFO] ------------------------------------------------------------------------
This will create a executable web application, as well as a good example of a working, detailed POM file for a realBy default. It will try to connect to a local MySQL database (using the “root” user with no password). You can try it out by running the Jetty plug-in, as shown here:
$ cd shopfront
$ mvn jetty:run
...
 mvn jetty:run-war
[INFO] Scanning for projects...
[INFO] Searching repository for plugin with prefix: 'jetty'.
[INFO] ----------------------------------------------------------------------------
[INFO] Building AppFuse JSF Application
[INFO]    task-segment: [jetty:run-war]
[INFO] ----------------------------------------------------------------------------
...
2007-10-10 21:30:48.410::INFO:  Started [email protected]:8080
[INFO] Started Jetty Server
You can now view this application by going to http://localhost:8080. Log in using a username and password of “admin,” and check it out (see Figure 2-8).
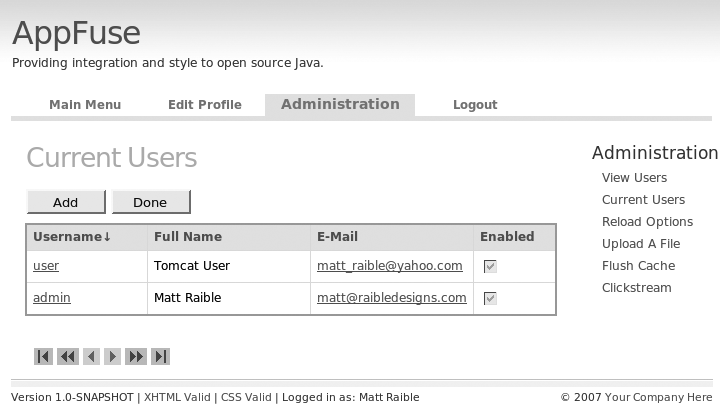
You also can create your own archetypes, which can be useful if you want to encourage organization-wide project conventions, or to support particular types of projects that you use often. We will discuss how to do this in Advanced Archetypes.
Compiling Code
A key part of any development lifecycle is compiling your source code. Compiling your project with Maven is easy—just run mvn compile:
$ mvn compile
Before compiling, Maven will check that all the project’s dependencies have been downloaded, and will fetch any that it doesn’t already have. It also will generate any source code or project resources that need to be generated and instantiate any variables in the resources and configuration files (see Defining Build Profiles” in Declarative Builds and the Maven Project Object Model). One of the nice things about Maven is that these tasks are done automatically, as part of the normal Maven lifecycle, without needing any particular configuration.
To be sure that there are no stale objects remaining in the target directories, you can also call the clean plug-in, which, as the name indicates, empties the output directories in preparation for a clean build:
$ mvn clean compile
By default, Java compilation in Maven 2 supports backward compatibility to JDK 1.3, which means that your generated artifacts will work fine with pretty much any modern version of Java. This is a useful thing to do if you are generating JAR files for community use, or for multiple JDKs. However, if you compile your brand-new Java class full of generics, for example, you’ll get a message like this:
[ERROR] BUILD FAILURE
[INFO] ----------------------------------------------------------------------------
[INFO] Compilation failure

/Users/jfsmart/chapters/caching/app/hibernateCaching/src/main/java/com/wakaleo/
chapters/caching/businessobjects/Country.java:[41,18] generics are not supported
in -source 1.3
(try -source 1.5 to enable generics)
        public Set getAirports() {
To get your code to compile correctly using the new Java 5 features (generics and so forth), you need to configure the special maven-compiler-plugin in your pom.xml file. This allows you to define the source and target parameters for the Java compiler. For Java 5, you could do the following:
<project...>
  ...
  <build>
    <plugins>
        <plugin>
            <groupId>org.apache.maven.plug-ins</groupId>
            <artifactId>maven-compiler-plugin</artifactId>
            <configuration>
                <source>1.5</source>
                <target>1.5</target>
            </configuration>
         </plugin>
     </plugins>
  </build>
</project>
Testing Your Code
Unit tests are an important part of any modern development
methodology, and they play a key role in the Maven development lifecycle. By
default, Maven will not let you package or deploy your application unless all
the unit tests succeed. Maven will recognize both JUnit 3.x, JUnit 4 (Using JUnit 4 with Maven 2) and TestNG unit tests (see Chapter 11), as long as they are
placed in the src/test directory
structure.
Running unit tests from Maven is done using the mvn test command, as shown here:
$ mvn test
[INFO] Scanning for projects...
.
.
.
[INFO] [surefire:test]
[INFO] Surefire report directory: /home/john/projects/java-power-tools/...
/target/surefire-reports


-------------------------------------------------------
 T E S T S
-------------------------------------------------------
Running com.javapowertools.taxcalculator.services.TaxCalculatorTest
Tests run: 10, Failures: 0, Errors: 0, Skipped: 0, Time elapsed: 0.036 sec
Running com.javapowertools.taxcalculator.domain.TaxRateTest
Tests run: 3, Failures: 0, Errors: 0, Skipped: 0, Time elapsed: 0.009 sec

Results :

Tests run: 13, Failures: 0, Errors: 0, Skipped: 0
Maven
will compile if necessary before running the application’s unit tests. By
default, Maven expects unit tests to be placed in the src/test directory, and will automatically pick up any test
classes with names that start or end with “Test” or that end with
“TestCase.”
Detailed test results are produced in text and XML form in the target/surefire-reports directory. Alternatively, you can generate the test results in HTML form using the surefire reporting feature:
$ mvn surefire-report:report
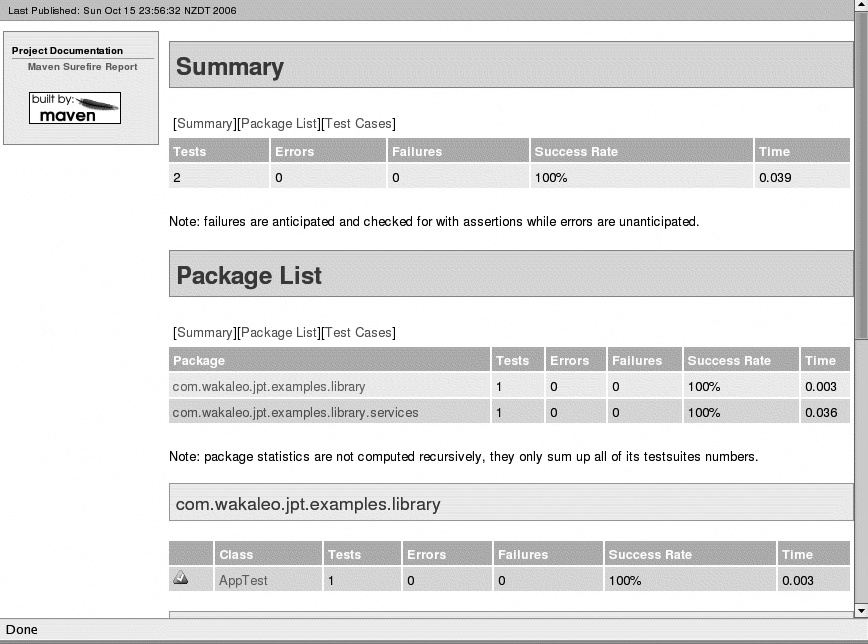
The HTML report will be generated in a file called target/site/surefire-report.html (see Figure 2-9).
Another important aspect of unit testing is Test Coverage, which makes sure that a high proportion of your code is actually being exercised by your tests. Although high test coverage is not sufficient in itself to prove that your code is being well tested, the opposite is probably true—poor test coverage is usually a reliable sign of poorly tested code.
Cobertura (see Chapter 12) is an open source coverage tool that integrates well with Maven. You can measure test coverage with Cobertura without any additional configuration by simply invoking the cobertura plug-in, as shown here:
$ mvn cobertura:cobertura
[INFO] Scanning for projects...
[INFO] Searching repository for plugin with prefix: 'cobertura'.
[INFO] ----------------------------------------------------------------------------
[INFO] Building Tax Calculator
[INFO]    task-segment: [cobertura:cobertura]
[INFO] ----------------------------------------------------------------------------
[INFO] Preparing cobertura:cobertura
...
Report time: 178ms

[INFO] Cobertura Report generation was successful.
[INFO] ------------------------------------------------------------------------
[INFO] BUILD SUCCESSFUL
[INFO] ------------------------------------------------------------------------
[INFO] Total time: 17 seconds
[INFO] Finished at: Wed Nov 28 09:25:55 GMT 2007
[INFO] Final Memory: 6M/81M
[INFO] ------------------------------------------------------------------------
This will generate a detailed HTML coverage report, which can be found in
target/site/cobertura/index.html (see
Figure 2-10). Cobertura gives a high-level
summary of code coverage across the whole project, and lets you drill down into
a package to individual classes where you can see which lines of code have not
been tested.
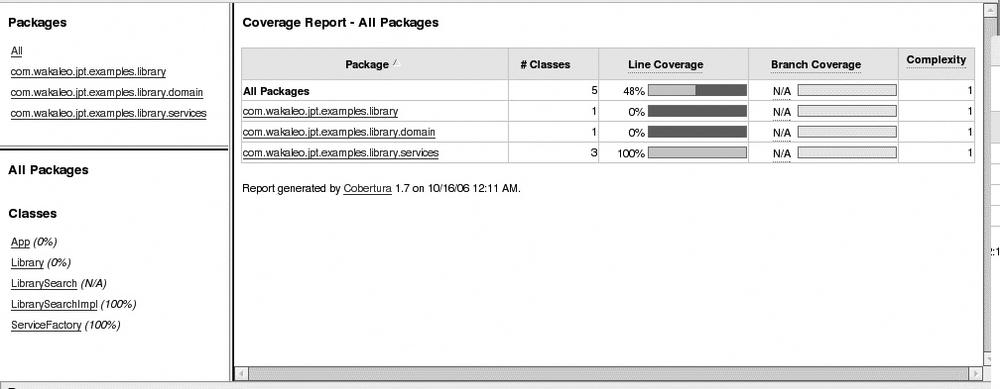
Both of these reports also can be easily integrated into the Maven-generated project web site.
Actually, at the time of writing, there is one slight hitch, and this won’t work as shown. In fact, you need to use version 2.0 or 2.2 of the Cobertura plug-in. You do this by overriding the standard Cobertura plug-in configuration in the <build> section of your pom.xml file, as shown here:
    <!-- BUILD CONFIGURATION -->
    <build>
        <plugins>
           ...
           <plugin>
                <groupId>org.codehaus.mojo</groupId>
                <artifactId>cobertura-maven-plugin</artifactId>
                <version>2.2</version>
            </plugin>
        </plugins>
    </build>
This is discussed in more detail in Generating Cobertura Reports in Maven.
During debugging, you often want to just run a single test. In Maven, you can do this using the -Dtest command-line option, specifying the name of your unit test class:
$ mvn -Dtest=ProductDAOTests test
Finally, if you need to, you can also skip tests entirely using the -Dmaven.test.skip option:
$ mvn -Dmaven.test.skip package
Packaging and Deploying Your Application
One of the fundamental principles of Maven is that each Maven project generates one, and only one, main artifact. The type of artifact generated by a Maven project is defined in the <packaging> section of the POM file. The main types of packaging are self-explanatory: jar, war, and ear. A typical example is shown here:
<project...>
   <modelVersion>4.0.0</modelVersion>
   <groupId>com.mycompany.accounting</groupId>
   <artifactId>accounting-webapp</artifactId>
   <packaging>war</packaging>
   <version>1.1</version>
   ...
The
packaging type will determine exactly how your project is bundled together:
compiled classes are placed at the root of a JAR file and in the WEB-INF/classes subdirectory in a WAR file, for
example.
The next step is to install and/or deploy your application. The install command will generate and deploy your project artifact to the local repository on your local machine, where it will become available to other projects on your machine:
$ mvn install
The deploy command will generate and deploy your project artifact to a remote server via one of the supported protocols (SSH2, SFTP, FTP, and external SSH), or simply to a local filesystem:
$ mvn deploy
Your application will be deployed to the remote repository defined in the <distributionManagement> section in your POM file. If you are deploying to a *NIX machine, you will probably need to use one of the network copying protocols: SSH2, SFTP, FTP, or external SSH, as in this example:
  <distributionManagement>
    <repository>
      <id>company.repository</id>
      <name>Enterprise Maven Repository</name>
      <url>scp://repo.acme.com/maven</url>
    </repository>
  </distributionManagement>
If you are deploying to a local filesystem, or to a Windows shared drive, you can use the file URL protocol, as shown here:
  <distributionManagement>
    <repository>
      <id>company.repository</id>
      <name>Enterprise Maven Repository</name>
      <url>file:///D:/maven/repo</url>
    </repository>
  </distributionManagement>
If you need to supply a username and password when you copy to the remote
repository, you also will need to provide this information in your settings.xml file (see Configuring Maven to Your Environment):
<settings>
  ...
  <servers>
    <server>
      <id>company.repository</id>
      <username>scott</username>
      <password>tiger</password>
    </server>
  </servers>
</settings>
Maven supports a variety of distribution protocols, including FTP, DAV, and
SCP. However, not all protocols are supported out-of-the-box. You often will
need to add an <extension> element to
the <build> section in your pom.xml file. This is illustrated here, where we
add support for FTP and deploy our application to an enterprise FTP
server:
    </build>
        ...
        <extensions>
          <extension>
            <groupId>org.apache.maven.wagon</groupId>
             <artifactId>wagon-ftp</artifactId>
             <version>1.0-beta-2</version>
          </extension>
        </extensions>
    </build>
    ...
    <distributionManagement>
      <repository>
        <id>ftp.repository</id>
        <name>Remote FTP Repository</name>
        <url>ftp://www.mycompany.com/public_html/repos</url>
      </repository>
      <site>
        <id>web site</id>
        <url>ftp://www.mycompany.com/public_html</url>
      </site>
    </distributionManagement>
Deploying an Application Using Cargo
There are also many third-party tools and libraries that can help you deploy your application. One of the most versatile is Cargo.[*] Cargo is a powerful tool that allows you to deploy your application to a number of different application servers, including Tomcat, JBoss, Geronimo, and Weblogic. It integrates well with both Maven and Ant. We don’t have room to explore all of its possibilities here. In this chapter, we will just look at how to configure Cargo to deploy a WAR application to a running remote Tomcat server.
Cargo provides a Maven plug-in that allows you to integrate Cargo functionalities smoothly into the Maven lifecycle. The configuration is a bit wordy, mainly as a result of the large degree of flexibity offered by the tool. The full plug-in configuration is shown here:
      <plugin>
        <groupId>org.codehaus.cargo</groupId>
        <artifactId>cargo-maven2-plugin</artifactId>
        <executions>
          <execution>
            <id>verify-deploy</id>
            <phase>pre-integration-test</phase>
            <goals>
              <goal>deployer-redeploy</goal>
            </goals>
          </execution>
        </executions>
        <configuration>
          <container>
            <containerId>tomcat5x</containerId>
            <type>remote</type>
          </container>
          <configuration>
            <type>runtime</type>
            <properties>
              <cargo.tomcat.manager.url>${tomcat.manager}</cargo.tomcat.manager.url>
              <cargo.remote.username>${tomcat.manager.username}</cargo.remote.username>
              <cargo.remote.password>${tomcat.manager.password}</cargo.remote.password>
            </properties>
          </configuration>
          <deployer>
            <type>remote</type>
            <deployables>
              <deployable>
                <groupId>nz.govt.ird.egst</groupId>
                <artifactId>egst-web</artifactId>
                <type>war</type>
                <pingURL>http://${tomcat.host}:${tomcat.port}/${project.build.finalName}
                 /welcome.do
                </pingURL>
              </deployable>
            </deployables>
          </deployer>
        </configuration>
      </plugin>
Let’s look at each section in more detail.
The first section simply declares the plug-in in the usual way:
      <plugin>
        <groupId>org.codehaus.cargo</groupId>
        <artifactId>cargo-maven2-plugin</artifactId>
        ...
In this example, we automatically deploy the packaged WAR file just before the integration tests phase. This section is optional and is designed to make it easier to run automatic integration or functional tests against the latest version of the application. The deployer-redeploy goal will, as you would expect, redeploy the application on the targetted Tomcat server:
        ...
        <executions>
          <execution>
            <id>verify-deploy</id>
            <phase>pre-integration-test</phase>
            <goals>
              <goal>deployer-redeploy</goal>
            </goals>
          </execution>
        </executions>
        ...
The next section is the <configuration> element. We define the type of application server (in this case, a remote Tomcat 5 server), and provide some server-specific configuration details indicating how to deploy to this server. For Tomcat, this consists of the URL for the Tomcat Manager application, as well as a valid Tomcat username and password that will give us access to this server:
        ...
        <configuration>
          <container>
            <containerId>tomcat5x</containerId>
            <type>remote</type>
          </container>
          <configuration>
            <type>runtime</type>
            <properties>
              <cargo.tomcat.manager.url>${tomcat.manager}</cargo.tomcat.manager.url>
              <cargo.remote.username>${tomcat.manager.username}</cargo.remote.username>
              <cargo.remote.password>${tomcat.manager.password}</cargo.remote.password>
            </properties>
          </configuration>
          ...
For this to work correctly, you need to have defined a Tomcat user with the
“manager” role. This is not the case by default, so you may have to modify your
Tomcat configuration manually. In a default installation, the simplest way is to
add a user to the Tomcat conf/tomcat-users.xml file, as shown here:
<?xml version='1.0' encoding='utf-8'?>
<tomcat-users>
  <role rolename="tomcat"/>
  <role rolename="manager"/>
  <user username="tomcat" password="tomcat" roles="tomcat"/>
  <user username="admin" password="secret" roles="tomcat,manager"/>
</tomcat-users>
This example uses a number of properties, among them are th*tomcat.manager, tomcat.manager.username, and tomcat.manager.password. These properties are typically by used both by Cargo and by functional testing tools such as Selenium (see Chapter 20). They allow you to tailor the build process to different environments without modifying the build script itself. Here, the tomcat.manager property indicates the URL pointing to the Tomcat manager application. Cargo uses this application to deploy the WAR file, so it needs to be installed and running on your Tomcat instance.
This URL is built using other more environment-specific properties. It can be
placed at the end of the pom.xml file, in the
<properties> element, as shown
here:
<project>
  ...
  <properties>
    <tomcat.manager>http://${tomcat.host}:${tomcat.port}/manager</tomcat.manager>
  </properties>
</project>
The other properties will vary depending on the target environment. Probably the best way to set this up is to use Maven profiles (see Defining Build Profiles” in Declarative Builds and the Maven Project Object Model).
Profiles can be placed either in the pom.xml file (where they will be available to all users), or in
the settings.xml file (for profiles that
contain sensitive information such as server passwords). You might place the
development profile directly in the pom.xml
file for convenience:
  ...
  <profiles>
    <!-- Local development environment -->
    <profile>
      <id>dev</id>
      <activation>
        <activeByDefault>true</activeByDefault>
      </activation>
      <properties>
        <tomcat.port>8080</tomcat.port>
        <tomcat.server>development</tomcat.server>
        <tomcat.host>localhost</tomcat.host>
        <tomcat.manager.username>admin</tomcat.manager.username>
        <tomcat.manager.password></tomcat.manager.password>
      </properties>
    </profile>
    ...
  <profiles>
  ...
</project>
A developer can then redeploy by using the cargo:redeploy goal:
$ mvn package cargo:redeploy
Cargo also comes with other similar goals, such as cargo:deploy and cargo:undeploy, which can be useful on occasions.
Deploying to the integration server, by contrast, requires a server password
that you may not want to place under version control. In addition, you may not
want developers deploying directly to the integration server from their own
machines—they may have to do this on the build server or through a Continuous
Integration tool. You can arrange this by defining an integration server profile
in the settings.xml file on the machine (or
machines) that will be deploying to this server (for example, on the build
server):
<settings>
  ...
  <profiles>
    ...
    <!-- Integration environment on a remote build server -->
    <profile>
      <id>integration</id>
      <activation>
        <property>
          <name>env</name>
          <value>integration</value>
        </property>
      </activation>
      <properties>
        <tomcat.port>10001</tomcat.port>
        <tomcat.server>integration</tomcat.server>
        <tomcat.host>buildserver.mycompany.com</tomcat.host>
        <tomcat.manager.username>admin</tomcat.manager.username>
        <tomcat.manager.password>secret</tomcat.manager.password>
      </properties>
    </profile>
    ...
  <profiles>
</settings>
Now, from these machines, you can redeploy your application onto the integration server, as shown here:
$ mvn package cargo:redeploy -Denv=integration
Using Maven in Eclipse
If you are using the Eclipse IDE, you can generate a new Eclipse project file (or synchronize an existing one) with a Maven project using the Maven Eclipse plug-in. The simplest approach is often to create a project skeleton using mvn:archetype, and then import this project into Eclipse as a simple Java project. However, Eclipse will not recognise the Maven dependencies without a bit of help. The main purpose of the Maven Eclipse plug-in is to synchronize the Eclipse build path with the dependencies defined in the Maven POM file. For this to work, Eclipse needs to use a classpath variable called M2_REPO, which points to your local Maven repository (see Figure 2-11). You can either set this up manually in Eclipse, or use the Maven plug-in to configure your workspace, using the add-maven-repo goal:
$ mvn -Declipse.workspace=/home/wakaleo/workspace eclipse:add-maven-repo
When you next open Eclipse, your classpath variables should be set correctly.
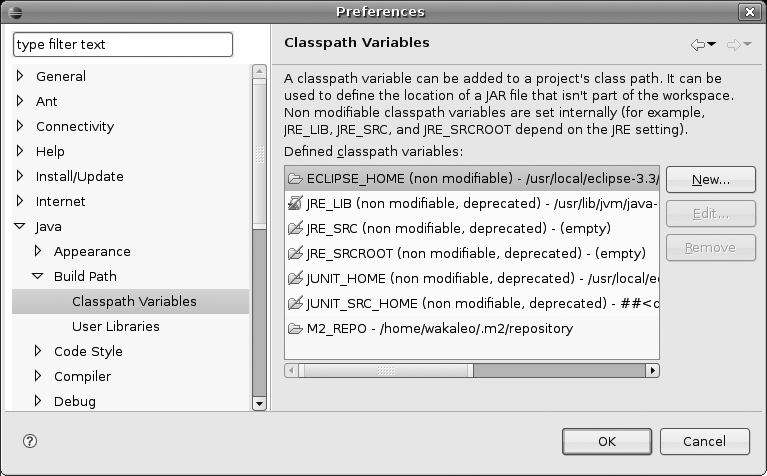
Next, you need to synchronize your Eclipse project dependencies with the ones defined in your Maven project. To do this, go to your project directory and run the mvn eclipse plug-in:
$ mvn eclipse:eclipse
This will update the Eclipse project file with your Maven project dependencies. All you need to do now is simply refresh your project in Eclipse, and the dependencies that you have defined in your Maven project will appear in Eclipse.
There is also a plug-in for Eclipse that provides excellent Maven support from within Eclipse itself. The Maven Integration for Eclipse plug-in[*] from Codehaus provides some very useful features in this area. You can install this plug-in using the following remote site:
http://m2eclipse.codehaus.org/update/
Once installed, you will need to activate Maven Support for the project. Click on the project and select “Maven→Enable Dependency Management.” If a POM file doesn’t already exist for this project, you will be able to create a new one. Otherwise, the existing POM file will be used.
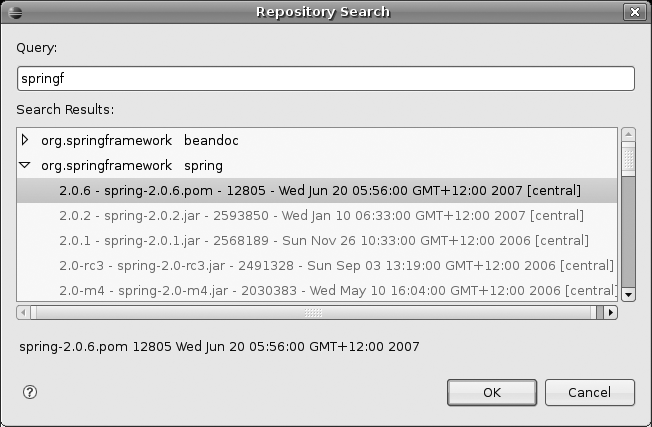
Now, whenever you need to add a new dependency to your project, click on the project and select “Maven →Add Dependency” in the contextual menu. This will open a window (see Figure 2-12), allowing you to search for artifacts on all of the repositories declared in your POM file. Type the name of the dependency that you need, then select the version that you want to use. Eclipse will automatically add this dependency to your POM file.
This plug-in also has the advantage of integrating your Maven dependencies with your Eclipse project—any new dependencies you add will automatically be downloaded and made available to your eclipse project.
The Maven Integration plug-in also lets you execute Maven goals from within Eclipse. On any Maven-enabled project, you can use the “Run As” contextual menu to execute Maven goals. This menu proposes several common Maven goals such as mvn clean, mvn install, and mvn test (see Figure 2-13), as well as the “Maven build” option, which can be configured to execute the goal of your choice.
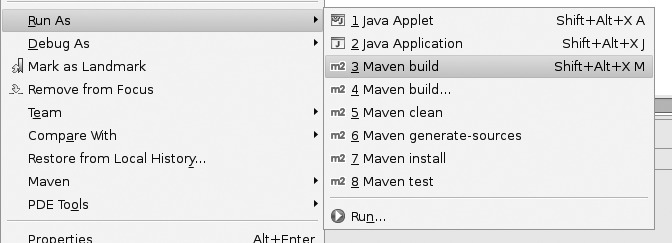
You can configure the default Maven build by selecting “Run As→Maven build...”) in the contextual menu. In a similar way, you can also configure more sophisticated Maven goals through the “External Tools...” menu (see Figure 2-14). In both cases, you can select the goal you want to execute, along with any required profiles, system variables, or command-line parameters.
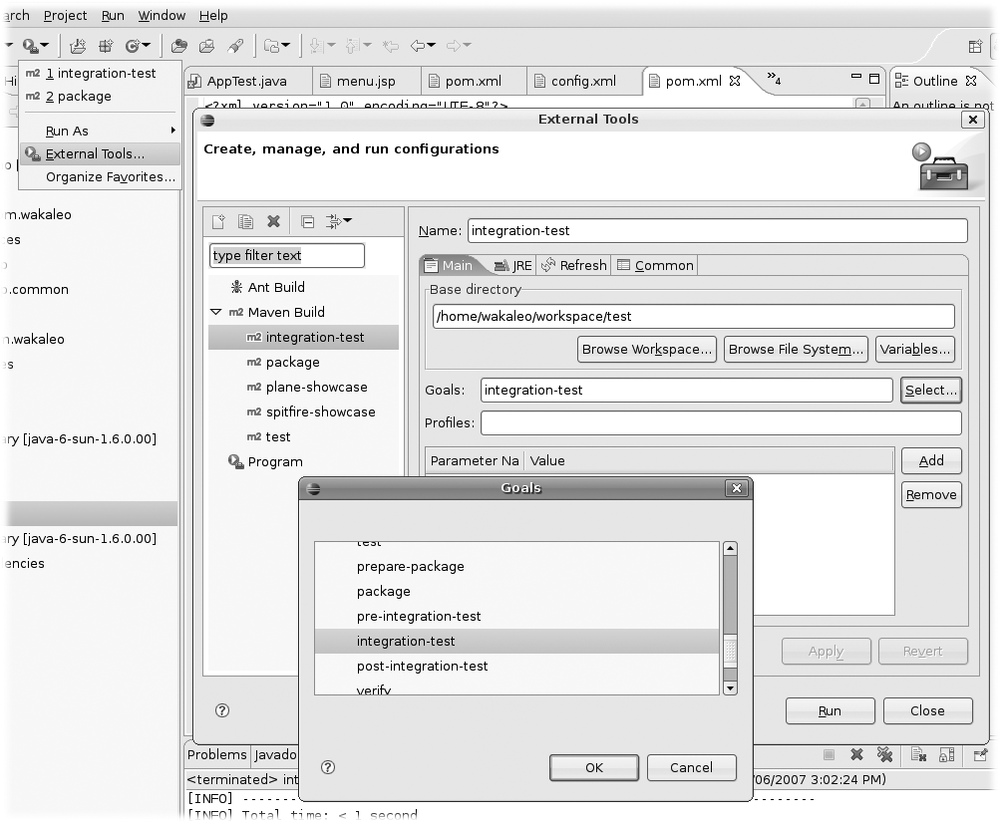
Using Maven in NetBeans
For a long time, Maven support in NetBeans was very limited. However, from NetBeans 6.0 onward, NetBeans provided excellent built-in Maven support, and Maven can now be used as its underlying build tool in the same way as previous versions used Ant. In NetBeans 6, you can add an existing Maven project directly into the workspace or create a new one using one of several Maven archetypes (see Figure 2-15).
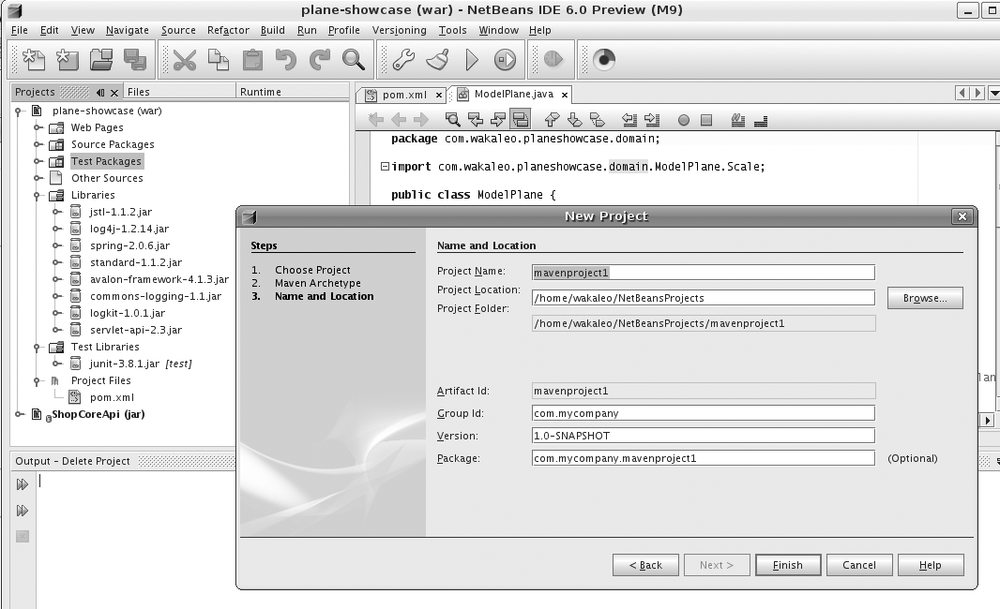
You also can add dependencies to your POM file using a graphical interface.
Using Plug-Ins to Customize the Build Process
If there has been one substantial improvement between Maven 1 and Maven 2, it is the simplicity and flexibility of extending the default execution set with custom plug-ins. One can even write plug-ins in other programming languages, such as JRuby, Groovy, or Ant. However, we will turn our focus to the most heavily used and supported default language: Java.
A Maven plug-in is a collection of goals and, as mentioned in previous sections of this chapter, a goal is a unit of work in the Maven build lifecycle. Maven comes with tools allowing you to easily create and install your own goals. This allows you to extend the default build lifecycle in any way you can imagine—like Ant tasks if you are so inclined to draw the comparison—but with the benefits of the well-defined lifecycle and network portability of Maven.
Creating a Plug-In
In order to create a simple plug-in through the archetype, type the following in your command line:
$ mvn archetype:create
    -DgroupId=my.plugin
    -DartifactId=maven-my-plugin
    -DarchetypeGroupId=org.apache.maven.archetypes
    -DarchetypeArtifactId=maven-archetype-mojo
In Maven, the implementation of a goal is done in a Mojo—a play on words meaning Maven POJO (Plain Old Java Object) and, well, mojo. All Java Maven
Mojos implement the org.apache.maven.plug-ins.Mojo interface. Without getting too
detailed, it is good to understand that Maven is built on the inversion of
control (IoC) container/dependency injection (DI) framework called
Plexus. If you are familiar with Spring, you are close to
understanding Plexus. Plexus is built around the concept that components
each play a role, and each role has an implementation.
The role name tends to be the fully qualified name of the interface. Like
Spring, Plexus components (think Spring beans) are defined in an XML file.
In Plexus, that XML file is named components.xml and lives in META-INF/plexus. The consumers of a component need not know
the role’s implementation, as that is managed by the Plexus DI framework.
When you create your own Mojo implementation, you effectively are creating
your own component that implements the org.apache.maven.plug-ins.Mojo role.
You may be thinking, what does this have to do with Maven goals? When you
create a Mojo class, you annotate the class with certain values; those
values are then used to generate a variant of the Plexus components.xml file named plugin.xml living under META-INF/maven. So, what translates those
annotations to a plugin.xml file? Maven
goals, of course! Your Maven plug-in packaging project’s build lifecycle
binds goals that generate the descriptor for you. In short, nonjargon speak:
Maven does that work for you.
In the plug-in that you generated above, navigate to the maven-my-plugin/src/main/java/my/plugin/MyMojo.java file and
set the contents to the
following:
package my.plugin;

import org.apache.maven.plugin.AbstractMojo;
import org.apache.maven.plugin.MojoExecutionException;

/**
 * A simple Mojo.
 * @goal my-goal
 */
public class MyMojo extends AbstractMojo
{
    /**
     * This populates the message to print.
     * @parameter required default-value="No message set"
     */
    private String  message;

    public void execute()throws MojoExecutionException
    {
        getLog().info( message );
    }
}
Now install the plug-in via the normal Maven method. Type:
$ mvn install
The execute method is solely responsible for executing the goal. Any other
methods that you encounter in a Mojo are just helper methods. Maven injects
values into the Mojo object directly into the project’s fields. In the
example above, the message field is a
valid Maven property and is printed out the logger returned by the getLog() method. Remember that Plexus is a
dependency injection framework. Because we
annotated the message field as a parameter, that parameter can now be
populated by Maven (via Plexus). You can populate your goal in the same way
as you do any goal, through the configuration element in the
POM:
<project>
  ...
  <build>
    ...
    <plugins>
      <plugin>
        <groupId>my.plugin</groupId>
        <artifactId>maven-my-plugin</artifactId>
        <configuration>
          <message>Hello World!</message>
        </configuration>
      </plugin>
      ...
    </plugins>
    ...
  </build>
  ...
</project>
This sets the configuration for all goals under maven-my-plugin. Remember, a plug-in can contain multiple
goals, one per Mojo in the project. If you wish to configure a
specific goal: you can create an execution. An execution is a configured set
of goals to be
executed:
<project>
  ...
  <build>
    ...
    <plugins>
      <plugin>
        <groupId>my.plugin</groupId>
        <artifactId>maven-my-plugin</artifactId>
        <executions>
          <execution>
            <goals>
              <goal>my-goal</goal>
            </goals>
            <configuration>
              <message>Hello World!</message>
            </configuration>
          </execution>
        </executions>
      </plugin>
      ...
    </plugins>
    ...
  </build>
  ...
</project>
In either case, you execute the goal in the same way:
$ mvn my.plugin:maven-my-plugin:my-goal
Hello World!
You
may wonder why we have to do so much typing when the create goal that we ran
was only archetype:create? That’s because
the archetype goal has the groupId org.apache.maven.plugins, which is prepended as a possible
prefix by default when none is provided. You can add more plug-in groups to
your system by adding this to your .m2/settings.xml
file:
<settings>
  ...
  <pluginGroups>
    <pluginGroup>my.plugin</pluginGroup>
  </pluginGroups>
</settings>
Furthermore,
if your plug-in name is surrounded by maven-*-plugin, Maven will allow you to simply type the name
represented by * in the middle. Because
we have already done this, you can now just run the much simpler
goal:
$ mvn my:my-goal
The final way to configure a goal is via a property. You can set an expression to populate the property rather than a direct value:
    /**
     ...
     * @parameter expression="${my.message}"
     */
This
gives you the flexibility to set the property within the POM, in the
settings.xml
$ mvn my:my-goal -Dmy.message=Hello
Hello
Manipulating the Build Lifecycle
Creating goals is great; however, that alone is hardly much better than just creating Ant tasks. To benefit from Maven’s well-defined build lifecycle, it often makes sense to put your goal into the lifecycle somehow. In rare cases, your plug-in may need to create its own lifecycle definition.
There are two major ways in which to bind a goal to a lifecycle. The first is to just add the goal to an execution phase, defined in your running project’s POM:
<project>
  ...
  <build>
    ...
    <plugins>
      <plugin>
        <groupId>my.plugin</groupId>
        <artifactId>maven-my-plugin</artifactId>
        <executions>
          <execution>
            <phase>validate</phase>
            <goals>
              <goal>my-goal</goal>
            </goals>
            <configuration>
              <message>I am validating</message>
            <configuration>
          </execution>
        </executions>
      </plugin>
      ...
    </plugins>
    ...
  </build>
  ...
</project>
Running
mvn validate will print the
configured message. Oftentimes, a goal will be created with a specific phase
in mind. When creating your Mojo, you can define a phase that the goal will
run in. Add the following annotation to the my-goal goal and install the plug-in via mvn
install:
    /**
     ...
     * @phase validate
     */
Now
you need add only the plug-in to your POM configuration, and the my:my-goal goal will be bound to the validate
phase for
you:
<project>
  ...
  <build>
    ...
    <plugins>
      <plugin>
        <groupId>my.plugin</groupId>
        <artifactId>maven-my-plugin</artifactId>
      </plugin>
    </plugins>
    ...
  </build>
  ...
</project>
Another way to manipulate the build lifecycle is to create your own forked lifecycle. You can tell the Mojo to execute the forked lifecycle up to a given phase. If you do not set the lifecycle, then the default is used. However, if you do, you must provide a definition of that new lifecycle:
    /**
     ...
     * @execute phase="validate" lifecycle="mycycle"
     */
You
define the mycycle build lifecycle in a
META-INF/maven/lifecycle.xml file.
The following lifecycle executes the my-goal goal (only once, not recursively) in the validate
phase:
<lifecycles>
  <lifecycle>
    <id>mycycle</id>
    <phases>
      <phase>
        <id>validate</id>
        <executions>
          <execution>
            <goals>
              <goal>my-goal</goal>
            </goals>
            <configuration>
              <message>I am forked</message>
            </configuration>
          </execution>
        </executions>
      </phase>
    </phases>
  </lifecycle>
</lifecycles>
When combined with the above POM configuration, it will execute two validate phases:
 I am forked
 No message set
Hooking into Maven
The simplest way to hook into the Maven runtime is to create parameters populated by Maven parameters. Some commonly used parameters are discussed in this section.
- The current project (the POM data)
This parameter lets you access data contained in the Maven POM file for your current project:
/** * @parameter expression="${project}" */ private org.apache.maven.project.MavenProject project;- The current project’s version
You can obtain the current version of the project (always handy for testing purposes!) as follows:
    /**
     * @parameter expression="${project.version}"
     */
    private String version;
A similar method may be used for getting simple properties from the POM, such as
project.groupId,project.artifactIdorproject.url.- The project’s build directory
It is often useful for a plug-in to know where the project should be placing any generated files. You can obtain this directory as follows:
/** * @parameter expression="${project.build.directory}" */ private java.io.File outputDirectory;- The local repository
You can find the local repository directory as follows:
    /**
     * @parameter expression="${localRepository}"
     */
    private org.apache.maven.artifact.repository.ArtifactRepository
    localRepository;
More complex values can be acquired with the following parameter names of the following types, as shown in Table 2-1.
Variable name | Class |
project.build | org.apache.maven.model.Build |
project.ciManagement | org.apache.maven.model.CiManagement |
project.dependency | org.apache.maven.model.Dependency |
project.dependencyManagement | org.apache.maven.model.DependencyManagement |
project.distributionManagement | org.apache.maven.model.DistributionManagement |
project.issueManagement | org.apache.maven.model.IssueManagement |
project.license | org.apache.maven.model.License |
project.mailingList | org.apache.maven.model.MailingList |
project.organization | org.apache.maven.model.Organization |
project.reporting | org.apache.maven.model.Reporting |
project.scm | org.apache.maven.model.Scm |
Using Plexus Components
As mentioned above, Maven is built on Plexus, which is an IoC container that manages components. There are components in Plexus that you may wish to use in your Mojos. For example, the following code would allow you to use the Plexus JarArchiver component in your plug-in:
    /**
     * @parameter expression="${component.org.codehaus.plexus.archiver.Archiver#jar}"
     * @required
     */
    private org.codehaus.plexus.archiver.jar.JarArchiver jarArchiver;
Just like other Maven expressions, these values can be injected from components when the parameter is prefixed with “component,” followed by the Plexus role name. If the role can play varying roles, you can pinpoint that role via the role-hint, specified by “#jar,” or “#zip,” or whatever that role-hint may be.
Many plexus components exist in the Maven repository, and can be used in a similar way. For example, the following code illustrates the Plexus i18n component:
    /**
     * @parameter expression="${component.org.codehaus.plexus.i18n.I18N}"
     * @required
     * @readonly
     */
    private org.codehaus.plexus.i18n.I18N i18n;
There is a full, up-to-date list of Plexus components in the Central Repository at http://repo1.maven.org/maven2/org/codehaus/plexus/.
Your goals can and probably will be more complicated than the examples shown, but you have been given the basic tools to start writing your own plug-ins, utilizing full control of Maven.
Setting Up an Enterprise Repository with Archiva
A large part of Maven’s power comes from its use of remote
repositories. When a project dependency is required or a plug-in is used,
Maven’s first task is to reach out to a set of remote repositories, defined in
the POM file and/or in the settings.xml, and
download required artifacts to its local repository. This local repository then
acts as a local cache. Maven’s Central Repository is a community-driven,
open-source set of projects available for download and is accessible by any
Maven installation with network access to it. You can browse the repository at
http://repo1.maven.org/maven2. Sometimes your organization
will wish to publish its own remote repository, either publicly to the rest of
the Internet, or privately in-house. There are two major methods for setting up
a repository: either through a dedicated repository manager—such as Archiva or
Artifactory—or through a standard server such as Apache HTTP or an FTP server.
The latter method is on the wane, so in the next couple of chapters, we will
focus on Maven’s recommended repository management tool, Archiva, and one
promising contender, Artifactory. First, let’s look at Archiva.
Installing Archiva
Download Archiva from http://maven.apache.org/archiva, and unpack the ZIP file to the desired installation location. This location need not have plenty of disk space, because you can set the local repositories to reside on different disks.
If you just wish to run the server, select the corresponding operating
system directory and run the run.bat or
run.sh script. If you are running
Windows, you can install Plexus as a service via the bin/windows-x86-32/InstallService.bat script
and find a new service installed in your Control Panel’s Services list. For
other operating systems, you can use the run.sh script as part of your server startup routine.
Alternatively, with a little more effort, you can deploy Archiva onto
another web application server such as Tomcat (see http://maven.apache.org/archiva/guides/getting-started.html).
Once you have the server installed and running, navigate your web browser of choice to http://localhost:8080/archiva. If this is the first time that you are running Archiva, you will be confronted with a screen requesting you to create an admin user (see Figure 2-16). After submission, you can log in as an administrator using the account you just created.
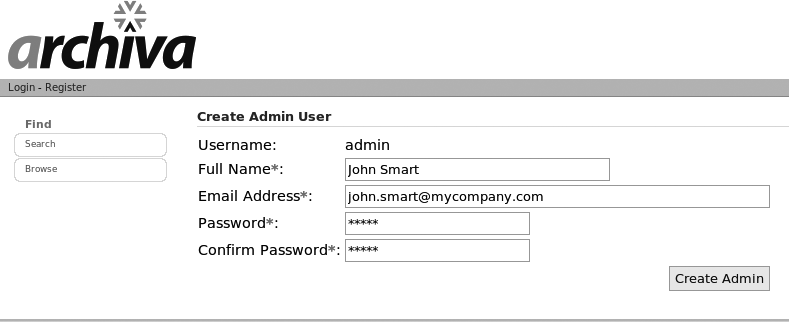
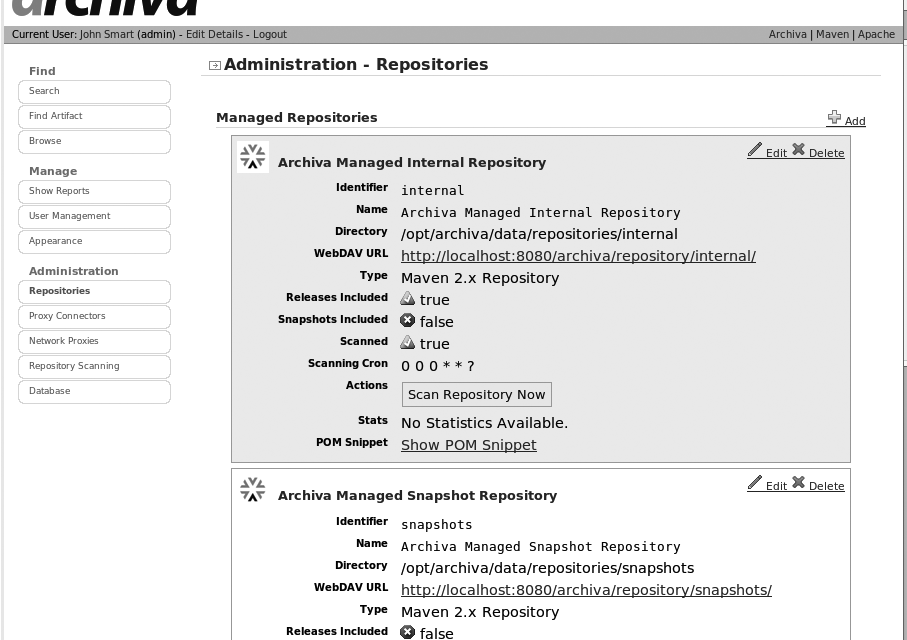
Configuring Repositories in Archiva
Once you are logged in, you will need to configure your repositories. You can do this fairly easily, directly from the web interface. By default, Archiva comes configured with two internal repositories (one for releases, and one for snapshots), and some public Maven repositories, including the main central Maven repository and the Java.net repository (see Figure 2-17). This follows the Maven standard, which is to create at least two repositories, one for development SNAPSHOT artifacts, and one for release artifacts. This is often quite enough to get you started. However, if you need to use libraries from other sources (such as Codehaus), you will have to add new repositories yourself.
You can create as many repositories as you wish, for example, testing and staging releases. We recommend giving the URL extensions and identifiers the same value, to avoid confusion. Note that you are not limited to Maven 2 repositories; you also can manage Maven 1-style repositories (see Figure 2-18).
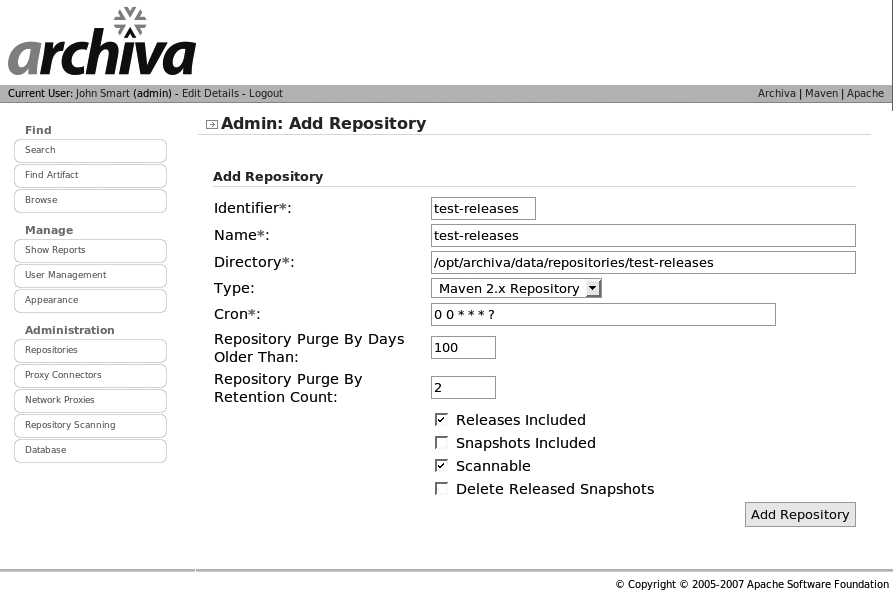
The Directory field refers to the OS-specific absolute path where this repository will place its artifacts. If you are installing on a Windows-based machine, note that because Windows has an upper limit on directory filenames, it is best to make the directory path fairly short. The “Snapshots Included” option does what you would expect; the repository will make snapshots available to end users.
In the “Repositories” entry in the LHS menu, you will be treated to the basic information about the repositories. A nice little feature is that if you select “Show POM Snippet,” a div will expand, revealing the correct values for connecting to the specific repository, as well as information for deploying built artifacts to this repository via WebDAV, which Archiva manages for you (see Figure 2-19).
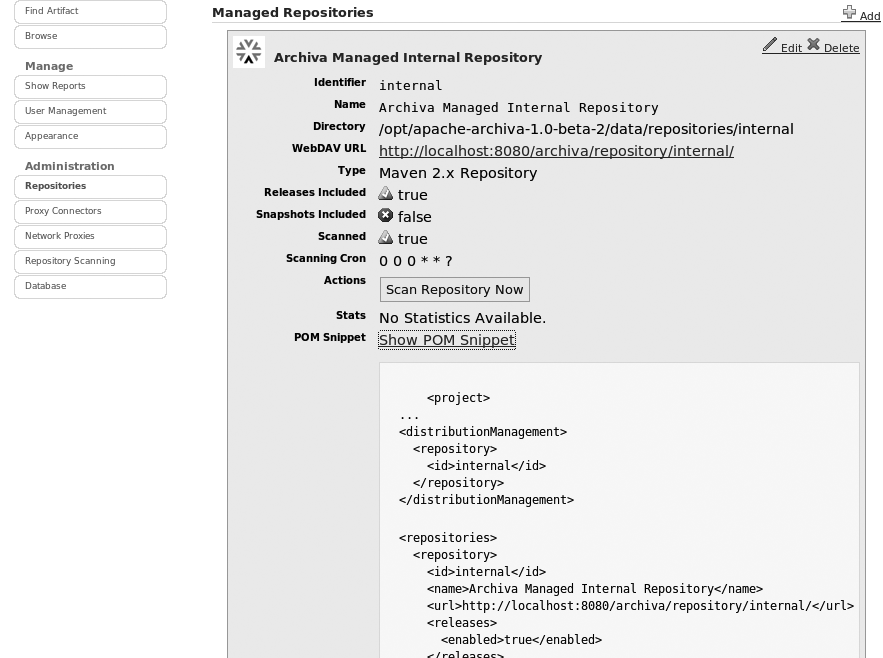
User Management
You also will need to set up your repository users. Archiva provides good support for user management, and you can set up access to your cached and proxied repositories to be as open or as restrictive as required. User accounts are managed from the User Management screen, shown in Figure 2-20, where you can display or search your user database in a variety of ways.
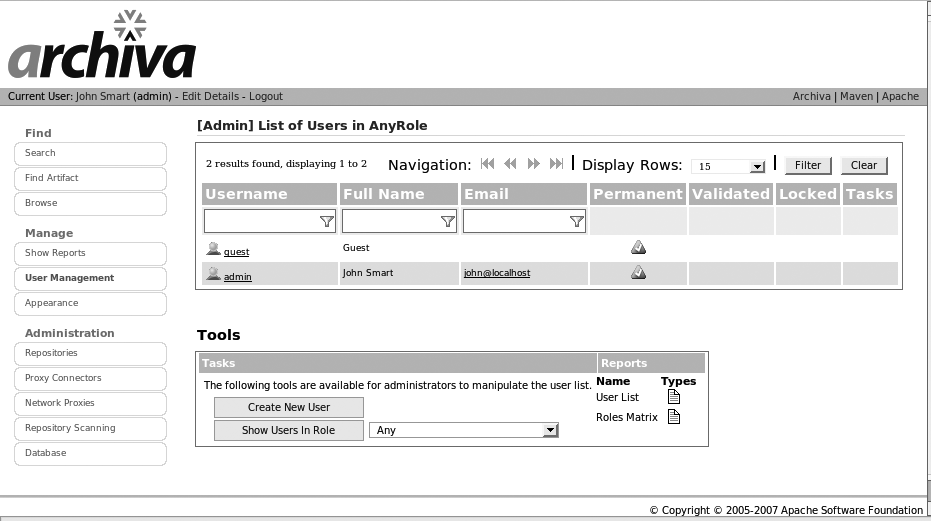
Archiva allows you to define fine-grained access rights for individual users, or simply allow all users to access the repository contents freely. If you want your repositories to be freely accessible to all users, you need to edit the “guest” user and provide them with at least the Global Repository Observer role (see Figure 2-21). The Observer role provides read-only access to a repository content, whereas the Manager role provides full read-write access. Users need to have the Manager role if they are to deploy libraries to a repository.
Alternatively, you can use these roles to set up Observer and/or Manager roles for individual repositories. For example, a developer may be allowed to deploy to the snapshots directory (Repository Manager) but only read from the internal repository (Repository Observer).
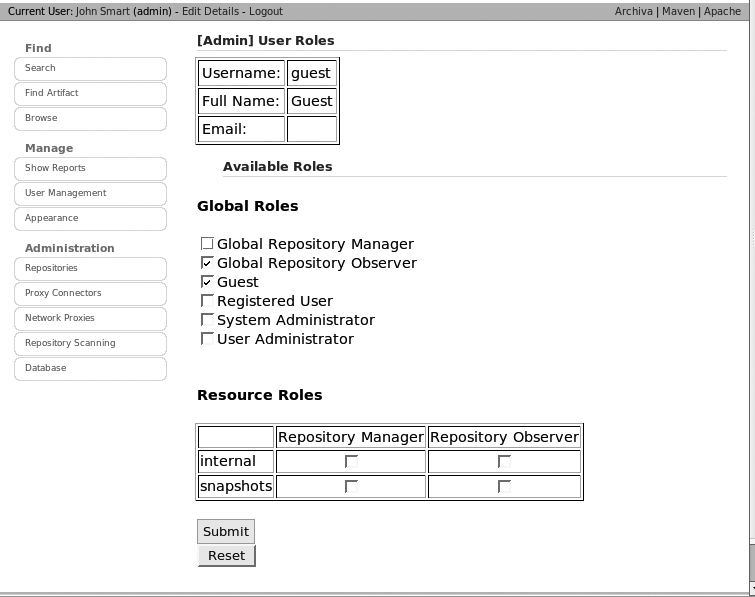
Browsing the Repository
Archiva lets you search or browse the repository using the Search and Browse screens, respectively. This gives you a convenient way to check the contents of your repository, both on a high level to know what libraries are currently stored in the repository and also at a detailed level to find out specific information about a particular library (see Figure 2-22).
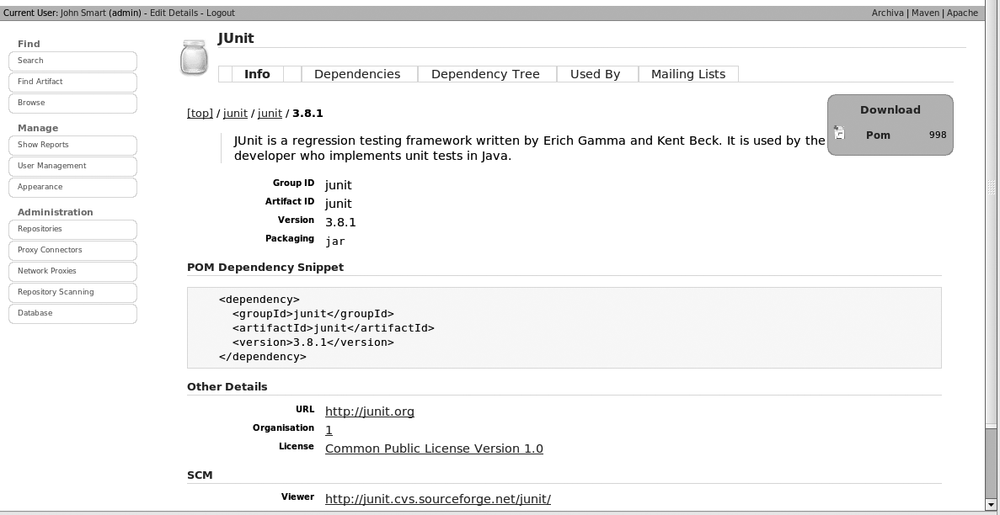
Running Archiva on Another Port
By default, Archiva runs on the 8080 port. To change this port,
you need to modify the value of the <port>
element in the apps/archiva/conf/application.xml file, as shown
here:
<application>
  <services>
    <service>
      ...
      <configuration>
        <webapps>
          <webapp>
            ...
            <listeners>
              <http-listener>
                <port>9090</port>
              </http-listener>
            ...
Archiva Proxy Connectors
In addition to caching repository JARs, you can configure Archiva to act as a proxy to Internet repositories. In an organizational context, this gives you better control over which external repositories can be accessed by project teams. In Archiva, you can manage repository proxies in the Proxy Connectors screen (see Figure 2-23). In the out-of-the-box configuration, the default internal repository acts as a proxy for the Ibiblio and Java.net repositories. In other words, whenever a user requests a publicly available library from the internal repository for the first time, Archiva will transparently download and cache the file from the Ibiblio or Java.net repositories. Note that you can modify the configuration of each connector, including details such as how often releases should be downloaded, whether snapshots should be allowed, and what to do if the checksum calculation is incorrect.
At the time of this writing, in certain environments the cache-failures policy option causes problems if it is set to anything except “ignore.” Because this is not the default value, you sometimes have to configure it by hand.
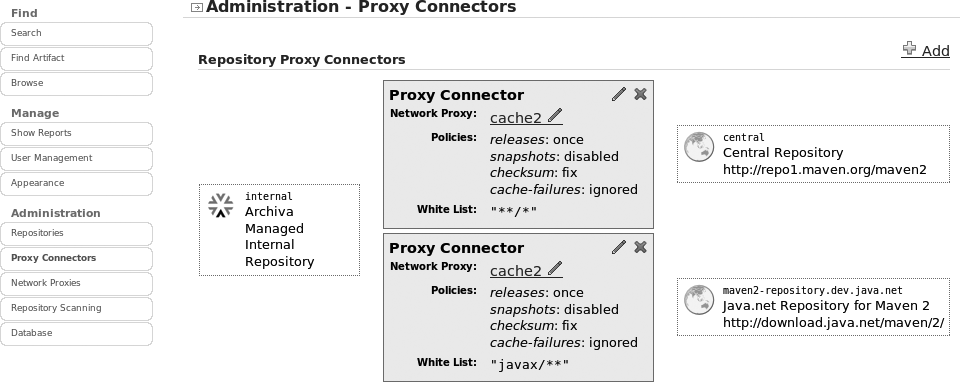
Setting Up Remote Repositories
Once you have configured your local repositories, you can proxy any number of remote repositories, such as the Codehaus repository. By default, Archive comes configured with the standard Maven repository, but you can add as many as you like (see Figure 2-24).
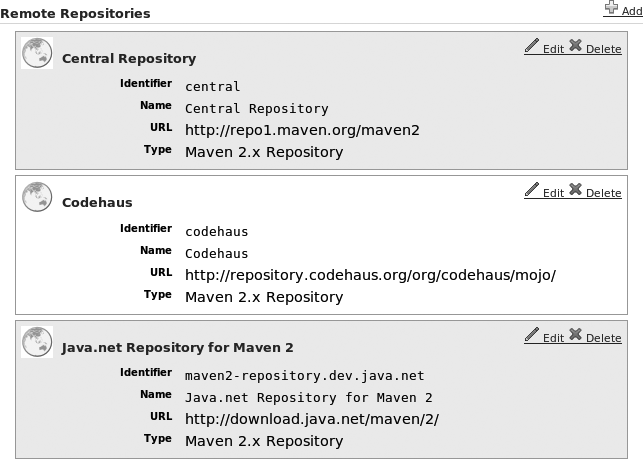
The benefit of this practice is threefold. One, it allows your build manager to control network access to remote repositories locally. Two, it allows a convenient single-access point repository across an organization (you can add any number of proxied repositories, but your user’s POMs need only point to the single managed repository). Three, if the proxied repositories are indexed, your builds are not bound to the remote repositories’ network access in order to succeed. I am certain that there are more.
For example, you also may want to add some other remote repositories, such as the Codehaus repository. This is a simple task: just provide an appropriate name and the repository URL (see Figure 2-25).
If you are using Archiva as a proxy repository, after you have added a new remote repository you will need to add a new proxy connector to provide users with access to this repository (see Figure 2-26). In this example, we configure the proxy connector to allow users to download both releases and snapshots from the Codehaus repository via the standard internal Archiva repository.
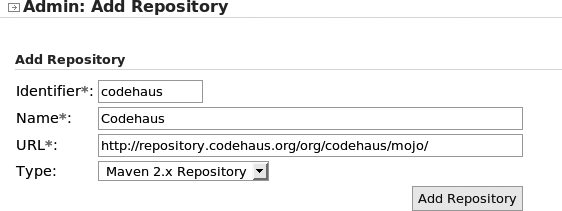
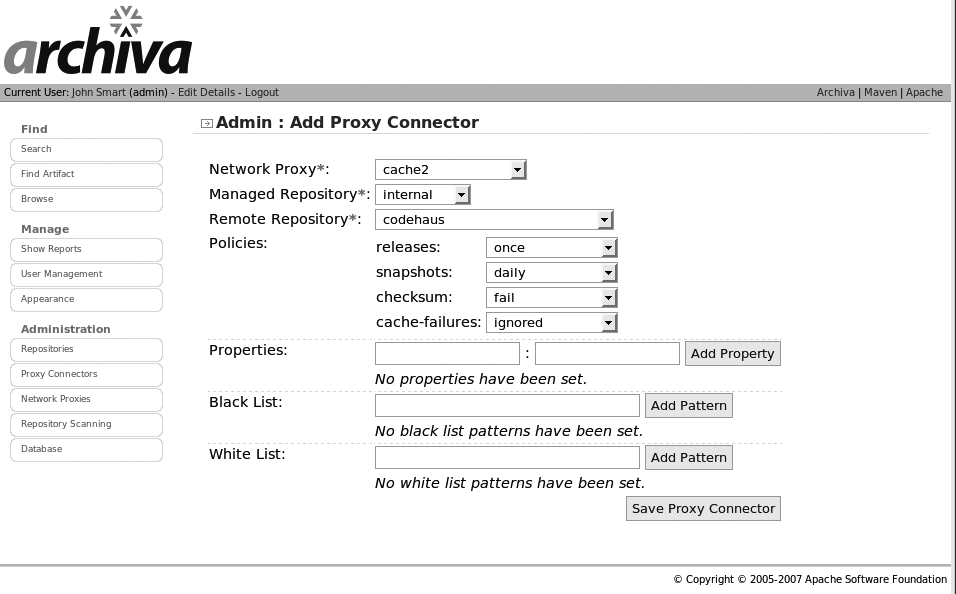
Configuring Archiva Behind a Proxy
In an enterprise environment, you will often need to install Archiva behind a proxy. Proxies are easy to configure in Archiva. First, go to the Network Proxies screen and add a new Network Proxy. Here, you can define a proxy that Archiva will use to access repositories on the Internet (see Figure 2-27).
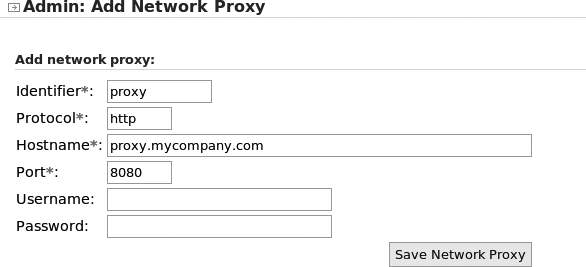
Once you have set up a network proxy, you need to configure your proxy connectors to use this proxy. You can do this in the Proxy Connectors screen (see Figure 2-23). Here, you simply edit the proxy connector of your choice and select the proxy you just created in the Network Proxy field.
Using Maven with Archiva
Using an Archiva repository from within Maven can be done in
several ways. Because a repository will usually be shared across several
projects, the most common approach is to define this in the user’s settings.xml file. The following
settings.xml file defines a default profile that
will access an Archiva repository running on a server called taronga:
  <settings>
    <profiles>
      <profile>
        <id>Repository Proxy</id>
        <activation>
          <activeByDefault>true</activeByDefault>
        </activation>
        <!-- ******************************************************* -->
        <!-- repositories for jar artifacts -->
        <!-- ******************************************************* -->
        <repositories>
          <repository>
            <id>internal</id>
            <name>Archiva Managed Internal Repository</name>
            <url>http://taronga:8080/archiva/repository/internal/</url>
            <releases>
              <enabled>true</enabled>
            </releases>
            <snapshots>
              <enabled>false</enabled>
           </snapshots>
          </repository>
        </repositories>
        <!-- ******************************************************* -->
        <!-- repositories for maven plug-ins -->
        <!-- ******************************************************* -->
        <pluginRepositories>
          <pluginRepository>
            <id>internal</id>
            <name>Archiva Managed Internal Repository</name>
            <url>http://taronga:8080/archiva/repository/internal/</url>
            <releases>
              <enabled>true</enabled>
            </releases>
            <snapshots>
              <enabled>false</enabled>
            </snapshots>
          </pluginRepository>
        </pluginRepositories>
      </profile>
    </profiles>
  </settings>
If you are using the Archiva server as the unique entry point to all
internal and external Maven repositories, you don’t need to explicitly
declare the Archiva repositories. A simpler solution is to add a <mirror> element at the end of your
settings.xml file. This will force
Maven to go through the Archiva server for any artifact, no matter what
repository it is stored in:
  <settings>
    ...
    <mirrors>
      <mirror>
        <id>artifactory</id>
        <mirrorOf>*</mirrorOf>
        <url>http://taronga:8080/archiva/repository/internal</url>
        <name>Artifactory</name>
      </mirror>
    </mirrors>
  </settings>
If you want to deploy your generated artifacts to this repository, you
need to set up the <distributionManagement> section in your pom.xml file. For the server we described
above, the corresponding <distributionManagement> section would look something
like this:
  <distributionManagement>
    <repository>
      <id>internal</id>
      <name>Internal Repository</name>
      <url>http://taronga:8080/archiva/repository/internal</url>
    </repository>
    <snapshotRepository>
      <id>snapshots</id>
      <name>Snapshots Repository</name>
      <url>http://taronga:8080/archiva/repository/snapshots</url>
    </snapshotRepository>
  </distributionManagement>
You can either allow all users to update the repository by giving the
guest user full repository manager rights, or you can set up individual user
accounts with repository manager rights for the users who will be updating
the repository. If you do this, you will need to add a <servers> section to your settings.xml file containing your username and
password for each server, as shown
here:
   <servers>
      <server>
        <id>internal</id>
        <username>john</username>
        <password>secret</password>
      </server>
      <server>
        <id>snapshots</id>
        <username>john</username>
        <password>secret</password>
      </server>
    </servers>
Finally, because Archiva uses WebDAV to deploy artifacts, you need to add the Wagon WebDAV extension to your pom.xml file:
    <build>
      ...
      <extensions>
        <extension>
          <groupId>org.apache.maven.wagon</groupId>
          <artifactId>wagon-webdav</artifactId>
          <version>1.0-beta-2</version>
        </extension>
      </extensions>
    </build>
Now you can deploy to this repository simply by using the mvn deploy command:
$ mvn deploy
...
[INFO] Uploading repository metadata for: 'artifact com.acme.shop:ShopCoreApi'
[INFO] Retrieving previous metadata from snapshots
[INFO] Uploading project information for ShopCoreApi 1.0-20071008.122038-3
[INFO] ------------------------------------------------------------------------
[INFO] BUILD SUCCESSFUL
[INFO] ------------------------------------------------------------------------
[INFO] Total time: 3 seconds
[INFO] Finished at: Tue Oct 09 00:20:39 GMT+12:00 2007
[INFO] Final Memory: 9M/81M
[INFO] ------------------------------------------------------------------------
Manually Deploying a File to an Archiva Repository
Sometimes you need to manually deploy a file to your enterprise repository. For example, many Java applications and libraries require the Sun JTA library. The Spring framework is a common example of an open source library that requires this dependency to run. Unfortunately, for licensing reasons the JTA library cannot be published on the public Maven repositories such as Ibiblio. You need to download it from the Sun web site (http://java.sun.com/products/jta/) and deploy it manually to your enterprise repository.
You can do this in Archiva, although the process is somewhat cumbersome. First, download the JTA library from the Sun web site and place it in a temporary directory. Then, create a pom.xml file in this directory, as follows:
<project>
   <modelVersion>4.0.0</modelVersion>
   <groupId>com.mycompany</groupId>
   <artifactId>webdav-deploy</artifactId>
   <packaging>pom</packaging>
   <version>1</version>
   <name>Webdav Deployment POM</name>

   <build>
      <extensions>
         <extension>
            <groupId>org.apache.maven.wagon</groupId>
            <artifactId>wagon-webdav</artifactId>
            <version>1.0-beta-2</version>
         </extension>
      </extensions>
   </build>

</project>
We only need this pom.xml file to leverage the Maven WebDAV libraries; it won’t be deployed to the enterprise repository. Now deploy the file using the mvn deploy:deploy-file command. You need to specify the file, the groupId, artifactId, and version number, and also the target repository URL. This is shown here:
$ mvn deploy:deploy-file
    -Dfile=./jta-1_1-classes.zip
    -DgroupId=javax.transaction
    -DartifactId=jta
    -Dversion=1.1
    -Dpackaging=jar
    -DrepositoryId=deployment.webdav
    -Durl=dav:http://taronga:8080/archiva/repository/internal

[INFO] Scanning for projects...
...
[INFO] [deploy:deploy-file]
Uploading: http://taronga:8080/archiva/repository/internal/javax/transaction/jta/1.1*
/jta-1.1.jar
...
[INFO] Uploading project information for jta 1.1
...
[INFO] Uploading repository metadata for: 'artifact javax.transaction:jta'
[INFO] ------------------------------------------------------------------------
[INFO] BUILD SUCCESSFUL
[INFO] ------------------------------------------------------------------------
[INFO] Total time: 19 seconds
[INFO] Finished at: Wed Oct 10 16:20:01 NZDT 2007
[INFO] Final Memory: 3M/5M
[INFO] ------------------------------------------------------------------------
Now your users will be able to refer to this dependency in the usual way.
Setting Up an Enterprise Repository Using Artifactory
Contributed by: Avneet Mangat[*]
The second enterprise repository tool that we will look at is Artifactory. The main purpose of Artifactory is twofold:
First, it acts as a proxy/cache for any dependencies that you download from repositories on the Internet. This is much faster and more reliable than having each developer download JARs directly from the Internet, and allows some control over which Internet repositories are used by projects in your organization.
Second, it can be used to store your own enterprise dependencies, or third-party libraries that cannot be published on public repositories (such as JDBC drivers). This makes it much easier for developers to set up new projects, as they don’t need to download and install any JARs manually.
Artifactory is a powerful, well-polished open source tool that provides a number of cool features, including:
A nice AJAX-based web interface, where you can search and browse the repository
The ability to perform bulk imports and exports of your repository
Automatic backups of your repository
Setting Up the Maven Repository Using Artifactory
To install Artifactory, just download the latest version from
the Artifactory web site[†] and extract it to a convenient place. In the following examples,
we have installed Artifactory to the /usr/local/artifactory directory.
Artifactory can be used out of box with little or no configuration.
Artifactory comes bundled with a Jetty web server, with default settings
that are sufficient for most users. To start Artifactory as a web
application inside Jetty, run the batch file or Unix shell script. On Unix,
you can use the artifactoryctl script to
start and stop the
server:
$ /usr/local/artifactory/bin/artifactoryctl start
On Windows, use the artifactory.bat
script.
You may want to change the default configuration or run Artifactory on under a different server. For example, an organization might have an Apache/Tomcat that it has configured and optimized and that it is comfortable with. In such circumstances, it might be easier and quicker to deploy the artifactory web application directly on the Tomcat server. Another example is if you need to have greater control over subrepositories created in the repository. The rest of this section deals with setting up an Artifactory web application inside a Tomcat server and setting up subrepositories inside the repository.
The Artifactory directory structure
First, download and extract the latest Artifactory distribution. The directory structure is shown in Figure 2-28.
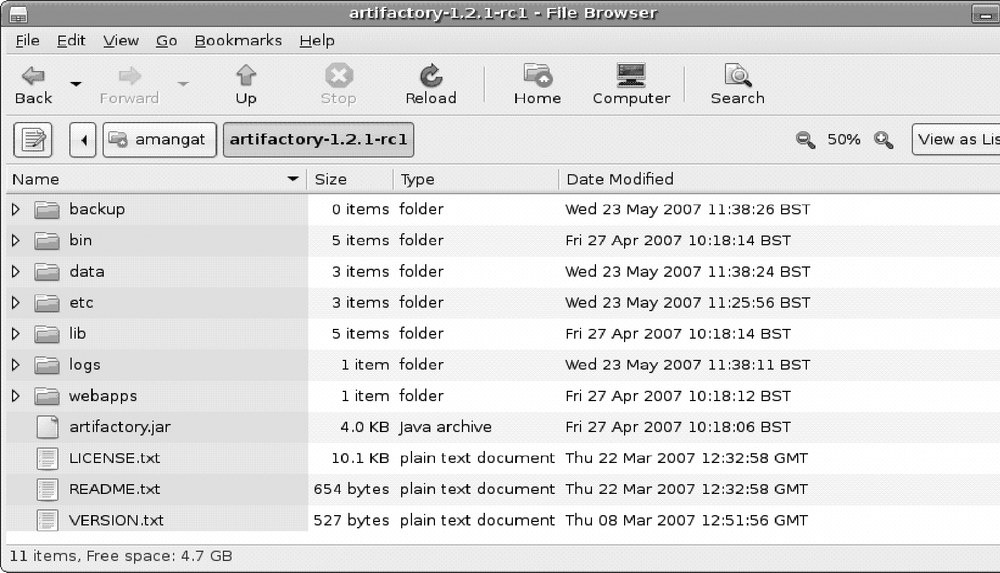
The folders are:
- backup
Repository backups are stored here. Backups are run at regular intervals, based on a cron expression that you set in the Artifactory configuration file.
- bin
Batch files used to run the embedded jetty web server.
- data
This directory contains the Derby database files. Artifactory uses an embedded Derby database to store artifacts. Everything in this folder can be deleted if you wish to start with a clean repository. In a new installation of artifactory, this folder is empty.
- etc
This directory contains the Artifactory configuration files, including “artifactory.config.xml” (the main configuration file), as well as “jetty.xml” and “log4j.properties.”
- lib
Dependent JAR files.
- logs
Artifactory logfiles go here.
- webapps
This directory contains the entire Artifactory application bundled into a WAR file. This WAR file can be directly deployed to another Java web application server.
Deploy in Tomcat 6
To deploy Artifactory on to an existing Tomcat server, you need to copy the WAR file mentioned above into the Tomcat webapps directory. The Artifactory web application needs some external parameters to work correctly:
The location of the database used to store the artifacts
The location of the artifactory config xml file
The location of backup folder
In fact, we only have to specify the location of the artifactory
installation folder during Tomcat startup and artifactory will be able
to work out the rest. An alternative to this approach is to set up a
connection to the derby database using jdbc and configure artifactory in
the web application (by including the artifactory.config.xml in the web
application). However, this approach is simpler. The location of the
artifactory installation folder can be specified as a environment
variable. For Linux, for example, you can configure the location of the
artifactory installation folder in your environment scripts as shown
below:
$ export JAVA_OPTS = -Dartifactory.home=/usr/local/artifactory-1.2.1
For Windows, it can be added to Tomcat startup options as shown in Figure 2-29.
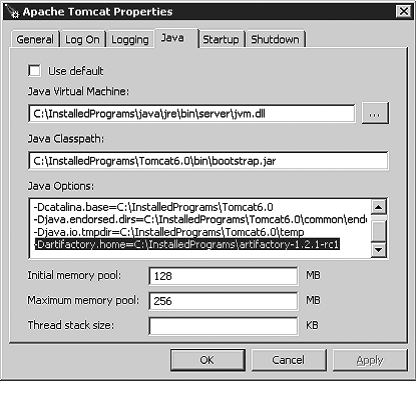
Set up the Maven repositories
There are many ways to organize your repositories. One suggested approach is to create three repositories (or subrepositories) in the maven repository. They are:
- Private-internal repository
This repository contains artifacts that are used only within the organization. These are manually uploaded by the development team. Because these artifacts are private to the organization, this repository does not need to synchronize with any remote repository such as ibiblio.
- Third-party repository
This repository contains artifacts that are publicly available, but not in the ibiblio repository. This could be the latest versions of libraries that are not yet available on ibiblio or proprietary jdbc drivers. This repository is not synchronized with ibiblio as ibiblio does not have these jars.
- Ibiblio-cache
This repository is synchronized with ibiblio repository and acts as a cache of the artifacts from ibiblio.
They are configured in the <ARTIFACTORY_INSTALLATION_FOLDER>/etc/artifactory.config.xml.
The configuration to setup these three repositories is shown below:
<config xmlns:xsi="http://www.w3.org/2001/XMLSchema-instance"
        xmlns="http://artifactory.jfrog.org/xsd/1.0.0"
        xsi:schemaLocation="http://artifactory.jfrog.org/xsd/1.0.0
        http://www.jfrog.org/xsd/artifactory-v1_0_0.xsd">

    <localRepositories>
        <localRepository>
            <key>private-internal-repository</key>
            <description>Private internal repository</description>
            <handleReleases>true</handleReleases>
            <handleSnapshots>true</handleSnapshots>
        </localRepository>
        <localRepository>
            <key>3rd-party</key>
            <description>3rd party jars added manually</description>
            <handleReleases>true</handleReleases>
            <handleSnapshots>false</handleSnapshots>
        </localRepository>
    </localRepositories>

    <remoteRepositories>
        <remoteRepository>
            <key>ibiblio</key>
            <handleReleases>true</handleReleases>
            <handleSnapshots>false</handleSnapshots>
            <excludesPattern>org/artifactory/**,org/jfrog/**</excludesPattern>
            <url>http://repo1.maven.org/maven2</url>
        </remoteRepository>
    </remoteRepositories>

</config>
To see this in action, start Tomcat and navigate to http://localhost:8080/artifactory. The artifactory home page is shown in Figure 2-30.
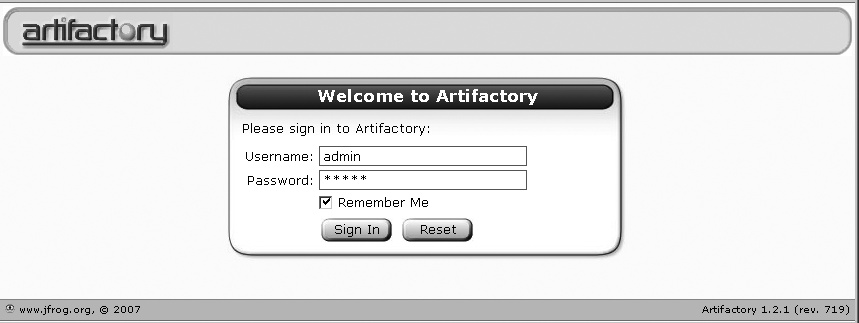
Sign in using username “admin” and password “password.” Click on the Browse repository link and you should be able to view the contents of the repository (see Figure 2-31).

Configuring Maven to Use the New Repository
Once the maven repository is set up, we have to change Maven settings so that it downloads artifacts from our new internal repository rather than the public Maven repository. Maven looks for repository settings in three locations, in this order of precedence:
Repository specified using the command line
The project pom.xml file
User settings defined in the ~.m2/settings.xml file
The first approach requires you to set properties at the command line each time you run Maven, so it is not appropriate for everyday use. Let’s look at the other two.
Configure Maven using project “pom.xml”
The setting in “pom.xml” is used to
specify a “per-project.” repository. This is useful if an organization
uses more than one maven repository. Specifying maven repository
settings in pom.xml also means that,
once a user checks out the code, he or she does not have to make any
changes to his or her settings.xml to
do a build.
A project setting also makes configuration easier with a continuous
integration server such as Apache Continuum. With Continuum, all the
user has to do is to specify the URL of the POM file in a version
control system (e.g., SVN) and Continuum will build the project using
the correct maven repository. If the project setting is not used, the
user has to manually add the maven repository location to the settings.xml file.
A simple pom.xml is shown below, using an Artifactory repository running on a server called “buildserver”:
<project xmlns="http://maven.apache.org/POM/4.0.0"
    xmlns:xsi="http://www.w3.org/2001/XMLSchema-instance"
    xsi:schemaLocation="http://maven.apache.org/POM/4.0.0
    http://maven.apache.org/maven-v4_0_0.xsd">
    <modelVersion>4.0.0</modelVersion>
    <groupId>test</groupId>
    <artifactId>test</artifactId>
    <packaging>jar</packaging>
    <version>1.0-SNAPSHOT</version>
    <name>test</name>
    <url>http://maven.apache.org</url>

    <repositories>
        <repository>
            <id>central</id>
            <url>http://buildserver:8080/artifactory/repo</url>
            <snapshots>
                <enabled>false</enabled>
            </snapshots>
        </repository>
        <repository>
            <id>snapshots</id>
            <url>http://buildserver:8080/artifactory/repo</url>
            <releases>
                <enabled>false</enabled>
            </releases>
        </repository>
    </repositories>
    <pluginRepositories>
        <pluginRepository>
            <id>central</id>
            <url>http://buildserver:8080/artifactory/repo</url>
            <snapshots>
                <enabled>false</enabled>
            </snapshots>
        </pluginRepository>
        <pluginRepository>
            <id>snapshots</id>
            <url>http://buildserver:8080/artifactory/repo</url>
            <releases>
                <enabled>false</enabled>
            </releases>
        </pluginRepository>
    </pluginRepositories>

    <dependencies>
        <dependency>
            <groupId>junit</groupId>
            <artifactId>junit</artifactId>
            <version>3.8.1</version>
            <scope>test</scope>
        </dependency>
    </dependencies>
</project>
Configure Maven using settings.xml
This should be used if there is only one repository used by the developer. This repository will be used for every project and every build. This is sufficient for most developers.
Maven uses the settings.xml file located at “~/.m2/settings.xml” to get the location of maven
repository. If no repository is specified, Maven uses the default
repository, which is at ibiblio.org. The settings.xml file has to be changed to use the new
repository. The settings are shown below:
<settings xmlns="http://maven.apache.org/POM/4.0.0"
    xmlns:xsi="http://www.w3.org/2001/XMLSchema-instance"
    xsi:schemaLocation="http://maven.apache.org/POM/4.0.0
                        http://maven.apache.org/xsd/settings-1.0.0.xsd">
    <profiles>
        <profile>
            <id>dev</id>
            <properties>
                <tomcat5x.home>C:/InstalledPrograms/apache-tomcat-5.5.20</tomcat5x.home>
            </properties>
            <repositories>
                <repository>
                    <id>central</id>
                    <url>http://buildserver:8080/artifactory/repo</url>
                    <snapshots>
                        <enabled>false</enabled>
                    </snapshots>
                </repository>
                <repository>
                    <id>snapshots</id>
                    <url>http://buildserver:8080/artifactory/repo</url>
                    <releases>
                        <enabled>false</enabled>
                    </releases>
                </repository>
            </repositories>
            <pluginRepositories>
                <pluginRepository>
                    <id>central</id>
                    <url>http://buildserver:8080/artifactory/repo</url>
                    <snapshots>
                        <enabled>false</enabled>
                    </snapshots>
                </pluginRepository>
                <pluginRepository>
                    <id>snapshots</id>
                    <url>http://buildserver:8080/artifactory/repo</url>
                    <releases>
                        <enabled>false</enabled>
                    </releases>
                </pluginRepository>
            </pluginRepositories>
        </profile>
    </profiles>
</settings>
Another approach is to use Artifactory as a mirror. Using a mirror is a convenient solution if you need to centralize access to the Internet repositories. This way, all downloaded artifacts will go through, and be cached on, the Artifactory server. Users do not need to set up proxy configurations for Maven on their individual machines. A simple mirror configuration is shown here:
<settings xmlns="http://maven.apache.org/POM/4.0.0"
    xmlns:xsi="http://www.w3.org/2001/XMLSchema-instance"
    xsi:schemaLocation="http://maven.apache.org/POM/4.0.0
                        http://maven.apache.org/xsd/settings-1.0.0.xsd">

    <mirrors>
        <mirror>
          <id>artifactory</id>
          <mirrorOf>*</mirrorOf>
          <url>http://buildserver:8080/artifactory/repo</url>
          <name>Artifactory</name>
        </mirror>
    </mirrors>
</settings>
Building using the new Maven repository
When building the Maven project, all of the repositories should be downloaded using the new repository. The console will show the server Maven uses, as shown below:
$ mvn compile
[INFO] Scanning for projects...
Downloading: http://buildserver:8080/artifactory/repo/org/apache/maven/wagon
/wagon-ssh-external/1.0-alpha-5/wagon-ssh-external-1.0-alpha-5.pom
5K downloaded
Downloading: http://buildserver:8080/artifactory/repo/org/codehaus/plexus
/plexus-utils/1.0.4/plexus-utils-1.0.4.pom
6K downloaded
Downloading: http://buildserver:8080/artifactory/repo/org/apache/maven
/wagon/wagon-provider-api/1.0-alpha-5/wagon-provider-api-1.0-alpha-5.pom
4K downloaded
Downloading: http://buildserver:8080/artifactory/repo/org/codehaus/plexus
/plexus-utils/1.1/plexus-utils-1.1.pom
767b downloaded
Downloading: http://buildserver:8080/artifactory/repo/org/codehaus/plexus
/plexus/1.0.4/plexus-1.0.4.pom
5K downloaded
...
Artifactory will automatically fetch any artifacts that are not already cached from the appropriate repository on the Internet. You can check this by browsing the repository using the Artifactory web console (see Figure 2-31).
Installing Artifacts to the Repository
Artifacts can be installed using the web UI or the Maven command
line. Installation using the web UI is simple and faster and does not
require any configuration changes. Installation using the command line
requires some initial configuration changes in settings.xml.
Installing artifacts using the web UI
It is easy to manually install a new artifact to the Artifactory repository. First, upload the artifact to deploy (usually a “jar” or “POM” file) using the “Deploy an artifact” link on the Artifactory web console. Artifactory will upload the file, and detect the groupId, artifactID, and version details if they are available (see Figure 2-32). You can choose the repository that you want to store the artifact in, and provide any missing details. When you are done, Artifactory will deploy your artifact to the appropriate place in the enterprise repository, where it can be accessed by all other users.
Installing artifacts from Maven command line
When using the “mvn clean install” command, Maven only packages and
installs the artifact to the local repository on your development
machine. To install it to your enterprise repository, you need to add an
additional <server> configuration section in
your settings.xml file, where you
specify the username and password required to access the Artifactory
repository:
<settings>
    <servers>
        <server>
            <id>organization-internal</id>
            <username>admin</username>
            <password>password</password>
        </server>
    </servers>
</settings>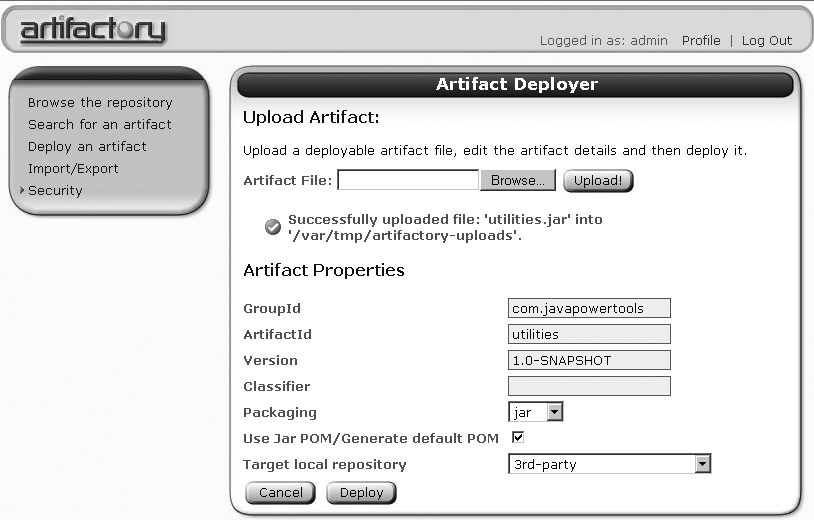
Then, to install an artifact to internal Maven repository, you run the mvn deploy command as shown here:
$ mvn deploy:deploy-file -DrepositoryId=organization-internal
  -Durl=http://buildserver:8080/artifactory/private-internal-repository
  DgroupId=test -DartifactId=test -Dversion=1.1 -Dpackaging=jar
-Dfile=target/test-1.1.jar
The repository id should match the server id defined in the settings.xml. The URL should include the
name of the repository into which the artifact is to be installed. Once
deployed, the artifact will appear on the Artifactory repository and be
available to other users.
Of course, if you want to save typing, you might want to configure your Continuous Build server to do this for you.
Running Artifactory Through a Proxy
Typically, in an enterprise environment, you will need to go
though a proxy server to access the Internet. Artifactory needs to know how
to do this to be able to fetch the JARs it needs from the Internet. You do
this by defining a <proxies> section in your
artifactory.config.xml file, as shown
here:
<config xmlns:xsi="http://www.w3.org/2001/XMLSchema-instance"
        xmlns="http://artifactory.jfrog.org/xsd/1.0.0"
        xsi:schemaLocation="http://artifactory.jfrog.org/xsd/1.0.0
        http://www.jfrog.org/xsd/artifactory-v1_0_0.xsd">
    ...
    <remoteRepositories>
      <remoteRepository>
          <key>ibiblio</key>
          <handleReleases>true</handleReleases>
          <handleSnapshots>false</handleSnapshots>
          <excludesPattern>org/artifactory/**,org/jfrog/**</excludesPattern>
          <url>http://repo1.maven.org/maven2</url>
          <proxyRef>proxy1</proxyRef>
      </remoteRepository>
    </remoteRepositories>
    <proxies>
        <proxy>
            <key>proxy1</key>
            <host>proxyhost</host>
            <port>8080</port>
            <username>proxy</username>
            <password>secret</password>
        </proxy>
    </proxies>
</config>
Adding Other Remote Repositories
Artifactory comes by default configured to access the standard
ibiblio repository, but you may well need to access other repositories, such
as Codehaus. You do this by simply adding extra
<remoteRepository> elements in the artifactory.config.xml file. If you are
accessing the Internet via a proxy, don’t forget the
<proxyRef> tag as well:
    <remoteRepositories>
      <remoteRepository>
          <key>ibiblio</key>
          <handleReleases>true</handleReleases>
          <handleSnapshots>false</handleSnapshots>
          <excludesPattern>org/artifactory/**,org/jfrog/**</excludesPattern>
          <url>http://repo1.maven.org/maven2</url>
          <proxyRef>proxy1</proxyRef>
      </remoteRepository>
      <remoteRepository>
          <key>codehaus</key>
          <handleReleases>true</handleReleases>
          <handleSnapshots>false</handleSnapshots>
          <url>http://repository.codehaus.org</url>
          <proxyRef>proxy1</proxyRef>
      </remoteRepository>
      <remoteRepository>
          <key>OpenQA</key>
          <handleReleases>true</handleReleases>
          <handleSnapshots>true</handleSnapshots>
          <url>http://maven.openqa.org</url>
          <proxyRef>proxy1</proxyRef>
      </remoteRepository>
      ...
    <remoteRepositories>
Backing Up the Repository
Artifactory lets you program regular backups of your repository.
Backup policy is specified in the artifactory.config.xml, using a “cron” expression. The backup
configuration element is illustrated
below:
<config xmlns:xsi="http://www.w3.org/2001/XMLSchema-instance"
        xmlns="http://artifactory.jfrog.org/xsd/1.0.0"
        xsi:schemaLocation="http://artifactory.jfrog.org/xsd/1.0.0
        http://www.jfrog.org/xsd/artifactory-v1_0_0.xsd">
    <!-- Backup every 12 hours -->
    <backupCronExp>0 0 /12 * * ?</backupCronExp>
    <localRepositories>
    ...
</config>
Backups are stored in “<ARTIFACTORY_INSTALLATION_FOLDER>/backups.” The backups are in the standard maven repository format. This is the same format as the local repository on developers, machine. This makes it very easy to migrate the repository contents to another implementation of maven repository.
Using Ant in Maven
Ant has had a good run. The past decade has been good for the undisputed Java build tool, but it is time for it to turn in its crown. Ant scripts have a few glaring problems—lack of built-in network portability (you must manually download and install Ant task jars—or perhaps write a script to do it for you); it does not handle dependencies; Ant script size is related to build complexity—i.e., it is procedural, not declarative like Maven; nor does it have any standard concept of a project. Ant is effectively an XML scripting language—Maven would be better described as a comprehensive build scripting platform.
But many organizations that wish to convert to Maven have spent considerable resources on creating Ant scripts. Maven has accounted for this and created tools to allow organizations to move forward with Maven, while continuing to utilize their Ant investment. And, to show what good sports that they are, they also have created a toolkit allowing Ant users to utilize some of Maven’s features, such as downloading from remote repositories.
Using Existing build.xml Files
The most straightforward way to move from Ant to Maven is to use the
existing Ant scripts, wholesale. This can be done by adding the Maven-antrun-plug-in to the POM, and binding it to a phase. What
you are actually doing here is embedding Ant code into the POM. However, for
the sake of using an existing Ant file, you execute Ant’s Ant task:
  <tasks>
    <ant antfile="${basedir}/build.xml" dir="${basedir}" inheritRefs="true"
     target="jar">
      <property name="ant.proj.version" value="${project.version}" />
    </ant>
  </tasks>
Note
dir actually defaults to the
project’s basedir, antfile defaults
to $basedir/build.xml, and target defaults to the project’s default. inheritRefs defaults to false, but you may
not require them. So if you stick to the defaults, you can get away with
something simpler:
 <tasks>
    <ant />
  </tasks>
Assuming that your build.xml file
executes steps to building a complete project, you may be best served by
setting the project packaging type as pom
via the project’s packaging element—this will stop Maven from attempting to
generate its own JAR artifact. Then you can bind the Ant file to the
package phase.
Embedding Ant Code in the POM
In addition to using an existing build.xml, you can embed other Ant code directly in the POM. Although this is not usually a great idea (it is better to use Maven proper and create a plug-in for any tasks you may need to execute), it can be useful to do a few odd tasks in a quick and simple way.
Execute external commands. For example, perhaps we wish to execute the
command java -version during the verify phase:
<project>
  ...
  <build>
    ...
    <plugins>
      <plugin>
        <artifactId>maven-antrun-plugin</artifactId>
        <executions>
          <execution>
            <phase>verify</phase>
            <goals>
              <goal>run</goal>
            </goals>
            <configuration>
              <tasks>
                <exec executable="java" failonerror="true">
                  <arg line="-version" />
                </exec>
              </tasks>
            </configuration>
          </execution>
        </executions>
      </plugin>
    </plugins>
  </build>
</project>
Another useful task is for simple debugging. For example, viewing the values of properties, echo is a very useful command:
  <tasks>
    <echo>Output will go to ${project.build.directory}</echo>
  </tasks>
External Dependencies
You must add dependencies of the tasks that you plan to
use—Maven makes such a demand. Just like adding dependencies to the project
itself through the dependencies element,
you also may add dependencies to a plug-in. For example, if you require the
ant-optional jar, just add the dependencies under the plug-in
declaration:
<project>
  ...
  <build>
    ...
    <plugins>
      <plugin>
        <artifactId>maven-antrun-plugin</artifactId>
        <configuration>
          <tasks>
            <ftp server="ftp.mycompany.com" userid="usr1" password="pass1" action="list"
             listing="${project.build.directory}/ftplist.txt">
              <fileset>
                <include name="*"/>
              </fileset>
            </ftp>
          </tasks>
        </configuration>
        <dependencies>
          <dependency>
            <groupId>ant</groupId>
            <artifactId>optional</artifactId>
            <version>1.5.4</version>
          </dependency>
          <dependency>
            <groupId>ant</groupId>
            <artifactId>ant-commons-net</artifactId>
            <version>1.6.5</version>
          </dependency>
          <dependency>
            <groupId>commons-net</groupId>
            <artifactId>commons-net</artifactId>
            <version>1.4.1</version>
          </dependency>
        </dependencies>
      </plugin>
    </plugins>
  </build>
</project>
Making Ant Plug-Ins
In addition to using existing Ant files to execute steps in
Maven, you also can create plug-ins in Ant, using them just as any Java
plug-in. Because Maven goals are defined through the concept of a mojo, any Ant script that you wish to
convert to a goal must be mapped to the mojo concept. Your Ant build script
must be named <something><<.build.xml>>, and the mojo is
then defined through a corresponding <something><<.mojos.xml>> file.
Create a simple project directory with a POM and two files under src/main/scripts: echo.build.xml and echo.mojos.xml.
my-ant-plugin
|-- pom.xml
`-- src
    `-- main
        `-- scripts
            |-- echo.build.xml
            `-- echo.mojos.xml
The
POM is a Maven plug-in like any other but slightly more complex than a
Java-based Maven plug-in. It requires two pieces of information. First
the
maven-plugin-plugin (the plug-in
responsible for creating plug-in descriptors) only defaults to Java. If you
wish it to know how to handle alternate plug-in styles, you must add that
alternate type as a dependency of the maven-plugin-plugin. Indeed, this will
set the org.apache.maven:maven-plugin-tools-ant project into the
descriptor generator’s runtime. Second, once the plug-in is installed, it
will not run without a mechanism for Maven to be able to interpret the Ant
scripts as though they were regular Java-based mojos. So we add the
dependency to our plug-in to require that mechanism in the form of the
org.apache.maven:maven-script-ant
project:
<project>
  <modelVersion>4.0.0</modelVersion>
  <groupId>com.mycompany</groupId>
  <artifactId>my-ant-plugin</artifactId>
  <version>1.0-SNAPSHOT</version>
  <packaging>maven-plugin</packaging>

  <build>
    <plugins>
      <plugin>
        <artifactId>maven-plugin-plugin</artifactId>
        <dependencies>
          <dependency>
            <groupId>org.apache.maven</groupId>
            <artifactId>maven-plugin-tools-ant</artifactId>
            <version>2.0.4</version>
          </dependency>
        </dependencies>
      </plugin>
    </plugins>
  </build>

  <dependencies>
    <dependency>
      <groupId>org.apache.maven</groupId>
      <artifactId>maven-script-ant</artifactId>
      <version>2.0.4</version>
    </dependency>
  </dependencies>
</project>
When you run the install phase later on, notice the lines:
[INFO] Applying extractor for language: Ant

[INFO] Extractor for language: Ant found 1 mojo descriptors.
This
is the maven-plugin-tools-ant project at
work.
Next, create a simple Ant build with a target named echo.build.xml. This is a plain old Ant
script, nothing special:
<project>
  <target name="echotarget">
    <echo>${echo.value}</echo>
  </target>
</project>
Our
plain old Ant script (or POAS, to coin a phrase) must be mapped to the Maven
world, and this is done through the echo.mojos.xml file. Its fairly self-explanatory. goal is this mojo’s goal name; description is a short blurb about the goal.
call is the name of the target to
execute when this goal is called:
<pluginMetadata>
  <mojos>
    <mojo>
      <goal>echo</goal>
      <description>Print out the echo.value property</description>
      <call>echotarget</call>
    </mojo>
  </mojos>
</pluginMetadata>
Now install this plug-in the normal way, via mvn
install (if something does not work, try
installing again with mvn -U install; the
-U flag tells Maven to update its
dependencies). After install, run
the new echo goal, giving it a property
value to print to the
screen:
$ mvn com.mycompany:my-ant-plugin:echo -Decho.value=Hello
echotarget:

     [echo] Hello
Using Maven in Ant
To bring home the Maven-and-Ant dance, we will finish with how to use Maven within Ant. Although I always recommend using Maven, it is not always a possibility. In these circumstances, you can embed useful tools such as Maven repository management. It is downloadable as a jar from the Maven site. Just place it in your Ant installation’s lib directory (or by any other method used to add tasks to Ant). The complete set of tasks can be found on the Maven site, but some of the more useful ones are described in this section.
One useful trick is letting Maven manage your dependencies via
artifact:dependencies. It’s a good idea to pass in a filesetId to keep a fileset reference for
later use. You also can use a pathId
attribute instead to get a classpath reference. A typical example is shown
here:
  <artifact:dependencies filesetId="dependency.fileset">
    <dependency groupId="commons-net" artifactId="commons-net" version="1.4.1"/>
  </artifact:dependencies>
If you wish to use a repository other than the default Maven Central repository, add the repository, and set the remoteRepositories under the dependencies set:
  <artifact:dependencies>
    ...
    <artifact:remoteRepository id="remote.repository"
     url="http://repository.mycompany.com/" />
  </artifact:dependencies>
You also can install or deploy an Ant-built
artifact just like any other Maven project, provided that you have a
pom.xml file
available:
  <artifact:pom id="project" file="pom.xml" />
  <artifact:install file="${project.build.directory}/my-artifact-1.0-SNAPSHOT.jar"
  pomRefId="project" />
There are more tasks than these concerned with POM access and authentication, but we will stop here so as not to get off track. This topic is dealt with in a little more detail in the Ant chapter (see Using Maven Dependencies in Ant with the Maven Tasks). Or check out the Maven web site documentation when you download the Ant lib.
Generating Ant Script from a POM
We began this chapter discussing the maven-antrun-plugin, which is used to bring Ant into Maven.
We will end with the
maven-ant-plugin, which is used to export
Maven into Ant. The ant:ant goal is run
within an existing Maven project and generates a build.xml file—an Ant representation of the Maven project.
Begin by creating a simple project with the quickstart
archetype:
$ mvn archetype:create -DgroupId=com.mycompany
    -DartifactId=my-project
    -Dversion=1.0-SNAPSHOT
In
that base directory, run mvn ant:ant,
which generates a fair-sized build.xml
Ant file with a good cross-section of tasks to compile, test, and package
the project. It even throws in clean, for good measure. You can test this by
new script by executing Ant in the base
directory, assuming that you have it installed. It may take a while,
depending on the size of your repository, if the build classpath is set to
your entire
repository:
  <property name="maven.repo.local" value="${user.home}/.m2/repository"/>
  <path id="build.classpath">
    <fileset dir="${maven.repo.local}"/>
  </path>
If this is the case, then you can change the fileset to be only the files you need. You can, it just makes more work for you.
Advanced Archetypes
Archetypes are a simple and useful way to bootstrap new development across your organization and urge your developers to follow a similar project pattern. Archetypes are a template of a Maven project used to generate skeleton layout for projects of any desired type in a consistent way.
The default archetype is called quickstart, and generates
a simple project with some “Hello World” Java code and a unit test. Running the
archetype:create goal as
follows:
$ mvn archetype:create -DgroupId=com.mycompany -DartifactId=my-proj
will yield a project with the following project structure:
my-proj
|-- pom.xml
`-- src
    |-- main
    |   `-- java
    |       `-- com
    |           `-- mycompany
    |               `-- App.java
    `-- test
        `-- java
            `-- com
                `-- mycompany
                    `-- AppTest.java
The
archetype that generates this simple project is outlined by two mechanisms: the
META-INF/maven/archetype.xml resource
definition file, and the archetype resources under the src/main/resources/archetype-resources
directory.
maven-quickstart-archetype
|-- pom.xml
`-- src
    `-- main
        `-- resources
            |-- META-INF
            |   `-- maven
            |       `-- archetype.xml
            `-- archetype-resources
                |-- pom.xml
                `-- src
                    |-- main
                    |   `-- java
                    |       `-- App.java
                    `-- test
                        `-- java
                            `-- AppTest.java
There are other archetypes available by default from Maven Central Repository. Check out the list at http://repo1.maven.org/maven2/org/apache/maven/archetypes. At the time of this writing, the following archetypes are supported:
maven-archetype-archetype
maven-archetype-bundles
maven-archetype-j2ee-simple
maven-archetype-marmalade-mojo
maven-archetype-mojo
maven-archetype-plugin-site
maven-archetype-plugin
maven-archetype-portlet
maven-archetype-profiles
maven-archetype-quickstart
maven-archetype-simple
maven-archetype-site-simple
maven-archetype-site
maven-archetype-webapp
Creating Your Own Archetypes
org.apache.maven.archetypes:maven-archetype-archetype is the
easiest way to start creating
archetypes:
$ mvn archetype:create -DarchetypeGroupId=org.apache.maven.archetypes
                     -DarchetypeArtifactId=maven-archetype-archetype
                     -DarchetypeVersion=1.0
                     -DgroupId=com.mycompany
                     -DartifactId=my-archetype
This
will generate a simple archetype that is built to generate a simple
project—similar to the maven-quickstart-archetype shown in the beginning of this
chapter, under the directory of the artifactId defined.
By default, an archetype cannot overwrite a project. A useful construct for converting your existing non-Maven projects to Maven is to create a simple archetype with a POM construct of your design. Let’s create a simple archetype that will be run over non-Maven projects to give them a pom.xml file with a custom MANIFEST.MF file.
Let’s begin by removing the extraneous files under the src/main/resources/archetype-resources/src
directory, leaving us just with a pom.xml
and create a file src/main/resources/archetype-resources/src/main/resources/META-INF/MANIFEST.MF.
This will leave the following project structure:
my-archetype
|-- pom.xml
`-- src
    `-- main
        `-- resources
            |-- META-INF
            |   `-- maven
            |       `-- archetype.xml
            `-- archetype-resources
                |-- pom.xml
                `-- src
                    `-- main
                        `-- resources
                            `-- META-INF
                                `-- MANIFEST.MF
Alter
the src/main/resources/archetype-resources/pom.xml to be a
project that contains a base MANIFEST.MF file to be packaged into a jar with
extra entries. Because most—if not every—non-Maven project places its source
code in a directory other than Maven’s default src/main/java, we also set the sourceDirectory build element to another directory, src. Set this directory to whatever your
legacy project structure requires:
<project xmlns="http://maven.apache.org/POM/4.0.0"
 xmlns:xsi="http://www.w3.org/2001/XMLSchema-instance"
  xsi:schemaLocation="http://maven.apache.org/POM/4.0.0
  http://maven.apache.org/maven-v4_0_0.xsd">
  <modelVersion>4.0.0</modelVersion>
  <groupId>${groupId}</groupId>
  <artifactId>${artifactId}</artifactId>
  <version>${version}</version>
  <name>Project - ${artifactId}</name>
  <url>http://mycompany.com</url>
  <build>
    <sourceDirectory>src</sourceDirectory>
    <resources>
      <resource>
        <directory>src/main/resources</directory>
        <excludes>
          <exclude>**/MANIFEST.MF</exclude>
        </excludes>
      </resource>
    </resources>
    <plugins>
      <plugin>
        <groupId>org.apache.maven.plug-ins</groupId>
        <artifactId>maven-jar-plugin</artifactId>
        <configuration>
          <archive>
            <manifestFile>src/main/resources/META-INF/MANIFEST.MF</manifestFile>
            <manifestEntries>
              <Built-By>${user.name}</Built-By>
              <Project-Name>${project.name}</Project-Name>
            </manifestEntries>
          </archive>
        </configuration>
      </plugin>
    </plugins>
  </build>

  <dependencies>
    <dependency>
      <groupId>junit</groupId>
      <artifactId>junit</artifactId>
      <version>3.8.1</version>
      <scope>test</scope>
    </dependency>
  </dependencies>
</project>
Fill
the src/main/resources/archetype-resources/src/main/resources/META-INF/MANIFEST.MF
file with whatever valid manifest values you wish. Mine contains the
following:
Manifest-Version: 1.1
Created-By: Apache Maven 2
Company-Name: My Company
Now
we need to set the src/main/resources/META-INF/maven/archetype.xml descriptor to
bundle up our MANIFEST.MF file as a resource and to allow us to run our
archetype over the top of an existing one via the allowPartial element. The archetype:create goal will not allow the creation of an
archetype, by default, when a project with the same artifactId already
exists in the current
directory.
<archetype>
  <id>my-archetype</id>
  <allowPartial>true</allowPartial>
  <resources>
    <resource>src/main/resources/META-INF/MANIFEST.MF</resource>
  </resources>
</archetype>
As with any other Maven project, you can install it by running in the base directory:
$ mvn install
This builds and installs the archetype to your local repository. To test
our new archetype, run the following command, which will generate a new
project with the pom.xml and MANIFEST.MF files. If you run the same command
again, it will work, only because we set allowPartial to true:
$ mvn archetype:create -DarchetypeGroupId=com.mycompany
                     -DarchetypeArtifactId=my-archetype
                     -DarchetypeVersion=1.0-SNAPSHOT
                     -DgroupId=com.mycompany
                     -DartifactId=my-project
Voilà! You can now outfit your legacy projects with a shiny new Maven 2 compliant version.
Using Assemblies
Creating Assemblies
Maven is built on the concept of conventions. It does so for a very good reason: if all Maven users follow the same conventions, then all Maven users can navigate and build other Maven-based projects without the need for further training. Tools such as Make and Ant can make no such boast. However, there are cases when the standard conventions cannot apply, for perhaps industrial or technological reasons. With this in mind, the Maven Assembly Plug-in was created.
Assemblies in Maven are a collection of files following a certain structure that are packaged for distribution as some artifact, for example, as a zip file. The “structure” is defined through an assembly descriptor xml file, which is pointed to through the project’s POM plug-in configuration and possibly bound to a phase:
<project>
  ...
  <build>
    ...
    <plugins>
      <plugin>
        <artifactId>maven-assembly-plugin</artifactId>
        <configuration>
          <descriptor>src/main/assembly/src.xml</descriptor>
        </configuration>
        <executions>
          <execution>
            <id>package-source</id>
            <phase>package</phase>
            <goals>
              <goal>attached</goal>
            </goals>
          </execution>
        </executions>
      </plugin>
    </plugins>
  </build>
The src/main/assembly/src.xml
<assembly>
  <id>src</id>
  <formats>
    <format>zip</format>
  </formats>
  <fileSets>
    <fileSet>
      <includes>
        <include>README*</include>
        <include>LICENSE*</include>
        <include>NOTICE*</include>
        <include>pom.xml</include>
      </includes>
    </fileSet>
    <fileSet>
      <directory>src</directory>
    </fileSet>
  </fileSets>
</assembly>
The example above has an ID of src.
When the package phase is run, it will still create the artifact of the
packaging type, for example, the target/artifactId-version.jar file, but in addition will
bundle up the source code into a target/artifactId-version-src.zip file. This assembly will
generate all the formats defined above. The possible archive types are
limited to the Plexus implementations of component.org.codehaus.plexus.archiver.Archiver role, in the
plexus-archiver component. The list
at the time of this writing is:
bzip2
dir
ear
gzip
jar
tar
tar.gz
tar.bz2
tbz2
war
zip
Everything beyond the id and formats define which files to package
up:
includeBaseDirectoryIncludes the base directory in the artifact if set to true (default), otherwise the directory will not be included as the root of the artifact.
baseDirectoryThe name of the base directory, if
includeBaseDirecctoryis set to true. Defaults to the POM’s artifacctId.includeSiteDirectorySet to true if you wish to assemble the project’s site into the artifact. Default is false.
moduleSetsConfigure modules to assemble if this project is a
pommultimodule project. Note that you must run the packaging phase for any added modules to succeed (mvn package assembly:assembly) because such modules must be packaged first.fileSetsA set of file sets (under directories) to include/exclude into the assembly, as well as other information, such as directory mode or output directory name.
filesA set of specific files to include/exclude into the assembly, as well as other information, such as file mode or output filename.
dependencySetsThis section manages the inclusion/exclusion of the project’s dependencies.
Built-in Descriptors
There are some descriptors that are so common that they were just built
into the maven-assembly-plugin for
convenience. They are:
- bin
Generates
zip,tar.gz,andtar.bz2files packaged withREADME*,LICENSE*, andNOTICE*files in the project’s base directory.- src
Generates
zip,tar.gz, andtar.bz2files packaged withREADME*,LICENSE*,NOTICE*, and thepom.xml, along with all files under the project’ssrcdirectory.- jar-with-dependencies
Explodes all dependencies of this project and packages the exploded forms into a
jaralong with the project’soutputDirectory.- project
Generates
zip,tar.gz,andtar.bz2files packaged with all files in the project, sans thetargetdirectory. Note that your project must use the default build directorytargetfor this to not package built files.
The above descriptors can be used on the command line with the given descriptorId:
$ mvn assembly:assembly -DdescriptorId=jar-with-dependencies
Or, as always, defined via plug-in configuration:
<project>
  ...
  <build>
    ...
    <plugins>
      <plugin>
        <artifactId>maven-assembly-plugin</artifactId>
        <configuration>
          <descriptorRefs>
            <descriptorRef>jar-with-dependencies</descriptorRef>
            <descriptorRef>bin</descriptorRef>
            <descriptorRef>src</descriptorRef>
          </descriptorRefs>
        </configuration>
      </plugin>
    </plugins>
  </build>
</project>
Assemblies are very useful for creating distributions for projects, be it by source or just binaries. The full assembly descriptor is a large beast, which you can find online with the maven assembly plug-in documentation at http://maven.apache.org/plugins/maven-assembly-plugin/assembly.html.
Assemblies with Profiles
A useful combination is assemblies that are chosen via profiles.
Oftentimes, a distribution will be different, depending on the operating
system run—especially if the project contains native code or is run by a
script. For example, suppose we have a project that contains two scripts,
run.bat for Windowss and run.sh for Linux:
my-native-project
|-- pom.xml
`-- src
    `-- main
        |-- assembly
        |   |-- windows.xml
        |   `-- linux.xml
        `-- scripts
            |-- run-windows.bat
            `-- run-linux.sh
In the project’s POM, we have two profiles—one for Windows and one for Linux:
<project>
  ...
  <profiles>
    <profile>
      <activation>
        <os>
          <family>Windows</family>
        </os>
      </activation>
      <build>
        <plugins>
          <plugin>
            <artifactId>maven-assembly-plugin</artifactId>
            <configuration>
              <descriptors>
                <descriptor>src/main/assembly/windows.xml</descriptor>
              </descriptors>
            </configuration>
          </plugin>
        </plugins>
      </build>
    </profile>
    <profile>
      <activation>
        <os>
          <family>Linux</family>
        </os>
      </activation>
      <build>
        <plugins>
          <plugin>
            <artifactId>maven-assembly-plugin</artifactId>
            <configuration>
              <descriptors>
                <descriptor>src/main/assembly/linux.xml</descriptor>
              </descriptors>
            </configuration>
          </plugin>
        </plugins>
      </build>
    </profile>
  </profiles>
</project>
The windows.xml assembly descriptor
will package the run-windows.bat file as
bin/run.bat in a zip artifact, filtering the batch script
first:
<assembly>
  <id>windows</id>
  <formats>
    <format>zip</format>
  </formats>
  <files>
    <file>
      <source>src/main/scripts/run-windows.bat</source>
      <destName>run.bat</destName>
      <outputDirectory>bin</outputDirectory>
      <filtered>true</filtered>
    </file>
  </files>
</assembly>
The linux.xml assembly descriptor will,
in turn, package the bin/run.sh file as a tar.gz artifact:
<assembly>
  <id>linux</id>
  <formats>
    <format>tar.gz</format>
  </formats>
  <files>
    <file>
      <source>src/main/scripts/run-linux.sh</source>
      <destName>run.sh</destName>
      <outputDirectory>bin</outputDirectory>
      <filtered>true</filtered>
    </file>
  </files>
</assembly>
Building the project with mvn
assembly:assembly will generate the assembly artifact of the
current operating system, Windows (target/artifactId-version-windows.zip) or Linux (target/artifactId-version-linux.tar.gz).
Better yet, you can bind the assembly:attached goal to the package phase to execute as mvn
package.
As the project grows in complexity, the project’s POM will not need to change—just the assembly for the desired operating system supported. This is a contrived example for certain, but it is very useful for more complex scenarios, such as native code compilation and distribution.
[*] In this book, we will be focusing exclusively on the most recent version of Maven, Maven 2, which is radically different from its predecessor, Maven 1.
[*] For Windows users: following a common Unix convention, I am using the “$” symbol to represent the command-line prompt. On a Windows machine, you might have something like “C:projectsmyproject> mvn compile.”
[*] This article is based on material originally published on TheServerSide in June 2007 (http://www.theserverside.com/tt/articles/article.tss?l=SettingUpMavenRepository).