
Chapter 11. Next-Generation Testing with TestNG
Introducing TestNG
TestNG is an innovative unit test framework, written by Cédric Beust and Alexandru Popescu, designed to overcome many of the perceived shortcomings of JUnit 3 (see JUnit 3.8 and JUnit 4). Like JUnit 4, TestNG improves on JUnit 3 in many ways, removing syntactical constraints and adding flexible, nonintrusive annotation-based testing. In addition, TestNG also supports many powerful features such as test groups, dependencies, and parallel testing—features that are not yet supported by JUnit 4 at the time of this writing. TestNG integrates well with IDEs such as Eclipse and build tools like Ant and Maven. All of these features make it easier to write better-designed, faster and more flexible unit tests.
Creating Simple Unit Tests with TestNG
Before discussing the more advanced features of TestNG, we will take a quick introductory tour. Let’s look at how to get started with TestNG.
TestNG classes are ordinary Java classes with ordinary methods: They don’t have to extend a particular class, nor do their methods have to follow any particular naming convention. You simply use the @Test annotation to flag unit test methods, and use Java 5 asserts to test calculated values against expected ones. Throughout this chapter, we will use the example of a class that calculates GST (goods and services tax, also known as a value added tax in some countries), which we introduced in JUnit 3.8 and JUnit 4. This class is supposed to calculate the net price of something, taking into account the current GST rate. Suppose that the standard GST rate is 12.5 percent. Our unit test class might look like this:
import org.testng.annotations.Test;

public class PriceCalculatorTests {

@Test
public void calculateGST() {
        PriceCalculator calculator = new PriceCalculator();
        double amountWithGst = calculator.calculateGST(100.00);
        assert (112.50 == amountWithGst) : "Standard GST should be 12.5%";
    }
}
You may prefer the old JUnit 3 assert methods (assertEquals(), and so on). TestNG via also supports these by
using static imports. This approach is also used by JUnit 4 (see Unit Testing with JUnit 4).
import org.testng.annotations.Test;
import static org.testng.Assert.assertEquals;

public class PriceCalculatorTests {

    @Test
    public void calculateGST() {
        PriceCalculator calculator = new PriceCalculator();
        double amountWithGst = calculator.calculateGST(100.00);
        assertEquals("Standard GST should be 12.5%", amountWithGst, 112.50 , 0.0);
    }
}
Test frameworks generally let you define code that needs to be run before
every test. In JUnit 3.x, you override the setUp() and tearDown()
methods. TestNG comes with a rich set of annotations for different types of
fixture code (see Managing the Test Lifecycle). In the following example,
we use the @BeforeMethod annotation to
ensure that the init() method is called
before each and every test case. Conversely, we use the @AfterMethod annotation to make
sure the tidyUp() function is called after
each
test:
import org.testng.annotations.Test;
import static org.testng.Assert.assertEquals;

public class PriceCalculatorTests {

    PriceCalculator calculator = new PriceCalculator();

    @BeforeMethod
    public void init() {
        calculator = new PriceCalculator();
    }

    @Test
    public void calculateGST() {
        double amountWithGst = calculator.calculateGST(100.00);
        assertEquals("Standard GST should be 12.5%", amountWithGst, 112.50 , 0.0);
    }

    @AfterMethod
        public void tidyUp() {
        ...
    }
}
There are several ways to run TestNG tests. You can run it directly from the command line, but this option is not very practical for anything other than toy examples. You can also run TestNG tests directly from within Eclipse using the TestNG plug-in (see The TestNG Eclipse Plug-In). Or you can integrate them into your build environment using Ant (see Using TestNG in Ant) or Maven (see Using TestNG with Maven 2). When you run a set of TestNG tests, it produces a report similar to the traditional JUnit reports, although, like JUnit 4 and unlike JUnit 3.x, no distinction is made between failed assertions and exceptions. The following listing is an example of running TestNG using the Ant task:
$ ant test
...
test:
[testng] [Parser] Running:
...
[testng] PASSED: findHotelsInCity
[testng] PASSED: calculateGST
[testng] PASSED: calculateReducedGST
[testng] PASSED: calculateStandardGST

[testng] ===============================================
[testng]     Ant test
[testng]     Tests run: 1037, Failures: 0, Skips: 0
[testng] ===============================================

[testng] ===============================================
[testng] Ant suite
[testng] Total tests run: 1037, Failures: 0, Skips: 0
[testng] ===============================================
This is just a quick overview of TestNG tests, which should let you get the feel of the API. There are many other annotations and features, such as groups and dependencies, which we will investigate later on in this chapter.
Defining TestNG Test Suites
Traditionally, TestNG unit tests are generally organized into test suites. In TestNG, a test suite is a logical set of tests that you expect to run together. You define TestNG test suites using a TestNG configuration file, an XML configuration file that tells TestNG how your tests are organized and where it needs to look for them. This is a little more complicated than a JUnit test configuration, where, if you are using Maven (see Using TestNG with Maven 2) or Ant (see Using TestNG in Ant), you can get away with just writing test classes and placing them in the test source code directory, without having to set up a TestNG configuration file. But it’s sometimes worth the extra effort of using TestNG configuration files for the flexibility and readability it gives you.
Here is a simple test suite configuration file. Here, we simply list the test classes we want to test:
<!DOCTYPE suite SYSTEM "http://testng.org/testng-1.0.dtd" >

<suite name="Suite" verbose="2" >
    <test name="Domain tests" annotations="JDK">
      <classes>
        <class name="com.wakaleo.jpt.hotel.domain.PriceCalculatorTests"/>
        <class name="com.wakaleo.jpt.hotel.domain.HotelTests"/>
        <class name="com.wakaleo.jpt.hotel.domain.CityTest"/>
        <class name="com.wakaleo.jpt.hotel.domain.CountryTest"/>
      </classes>
    </test>
</suite>
TestNG supports both Java 5 annotations and the older Javadoc-style annotations for JDK 1-4. The annotations=“JDK” attribute in the previous listing indicates that we are working with Java 5 annotations, which is what we will use throughout the rest of this chapter.
You can also specify a list of packages rather than a list of classes, which will run all the tests contained in the specified package:
<suite name="Suite" verbose="2" >
    <test name="Domain tests" annotations="JDK">
      <packages>
          <package name="com.wakaleo.jpt.hotel.domain" />
      </packages>
    </test>
</suite>
To make things even simpler, you can use wildcard characters in package and
class names. The following test suite includes any classes in any packages
directly or indirectly contained in the com.wakaleo.jpt
package:
<suite name="Suite" verbose="2" >
    <test name="Application tests" annotations="JDK">
        <packages>
            <package name="com.wakaleo.jpt.*" />
        </packages>
    </test>
</suite>
Using configuration files in TestNG is not obligatory. In many cases, it is more convenient to run TestNG against a set of classes, using test groups if necessary to decide which tests should or should not be executed (see Using Test Groups), which you can do fairly easily in Ant or directly from Eclipse (see The TestNG Eclipse Plug-In). However, configuration files are sometimes useful to organize your tests in a clear and readable manner.
The TestNG Eclipse Plug-In
One of the most effective ways to run unit tests is from within an IDE such as Eclipse or NetBeans. This approach allows a more seamless development process and a tighter testing cycle. At the time of this writing, TestNG plug-ins exist for Eclipse and IntelliJ. In this section, we will look at how to install and use the Eclipse TestNG plug-in. This excellent piece of software provides invaluable tools for writing, maintaining, and running your TestNG test cases from within Eclipse.
Installing the TestNG Plug-In
You install the TestNG plug-in from the Remote Update site in the usual way:
Open the “Install/Update” window (Help→Software updates→Find and Install) and select “Search for new features to install.”
Create a “New Remote Site.”
Enter http://beust.com/eclipse for the URL and “TestNG Plugin” (or some other appropriate name) for the name.
Make sure the “TestNG Plugin” checkbox is checked in the site list, and click “Finish.”
In the next window, check the “TestNG” box in the features to install, and step through the installation process.
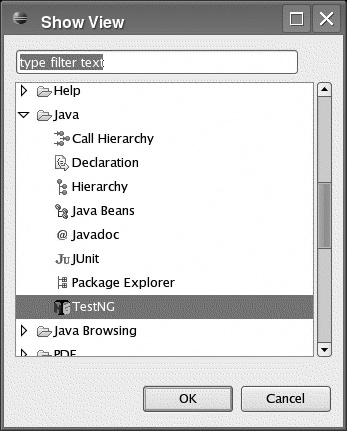
Once you have finished, you may need to restart Eclipse. You can verify the installation by opening the TestNG view (Windows→Show View→Other…), as shown in Figure 11-1. This will open the TestNG dashboard at the bottom of the screen.
Running TestNG Tests
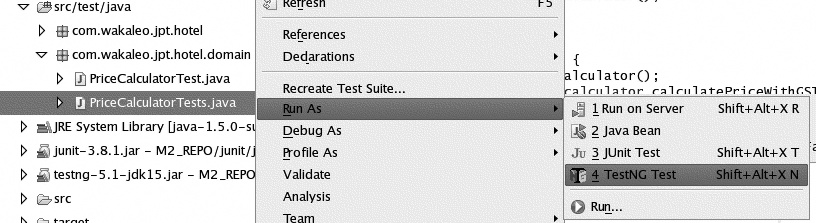
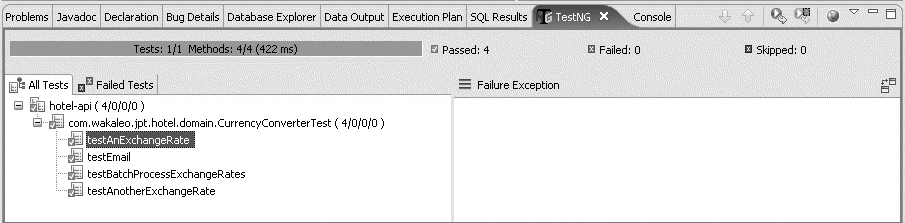
Running a TestNG test class, or an individual TestNG-annotated unit test in Eclipse is intuitive and easy, and very similar to what you would do for a JUnit test case: just select the class or method in the Outline view and select “Run As→TestNG Test” in the contextual menu (see Figure 11-2). This will run the corresponding tests and display the results in the Console view and in the TestNG results view (see Figure 11-3). If you want to step through the code using the IDE debugging perspective, select “Debug As→TestNG Test” instead.
Running multiple tests is a bit more involved. One way is to use a test suite (see Defining TestNG Test Suites). First of all, you need a TestNG configuration file which defines the tests you want to run. Then, just select the configuration file in the Outline view, and select “Run As→TestNG Suite” in the contextual menu. This will run all of the tests defined in this test suite.
When you execute TestNG tests in Eclipse, either by running the tests in an individual class or by executing the tests defined in a test suite, TestNG will display the test results in the TestNG view at the bottom of the screen (see Figure 11-3).
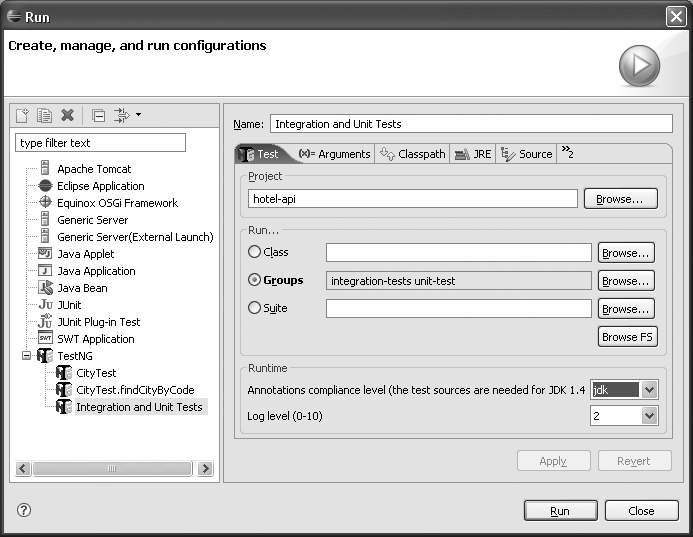
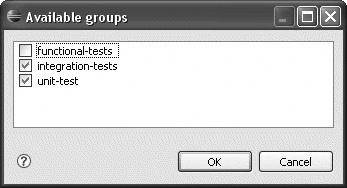
Another way to run multiple tests is to use TestNG run configurations. You can set up run configurations to also configure TestNG in Eclipse to run a particular group (or groups) of tests. Test groups (see Using Test Groups) are a particularly useful way of organizing your unit tests into meaningful subsets, which can be run at different times or under different circumstances. To run all of the tests in a group, you need to set up a new Test Configuration. Open the Configuration Management window ( “Run As→Run”) and create a new TestNG configuration (see Figure 11-4). From here, you can set up a configuration to run a particular unit test class, group or groups, or test suite. The Browse buttons make it easy to select the various test objects. Browsing for classes will list all known TestNG classes (that is, all classes containing TestNG-annotated test methods). Browsing the groups lets you select from the known test groups defined within the project (see Figure 11-5). And browsing for Suites will list all the known test suite configuration files within the current projects.
Run configurations are a useful and reasonably flexible way to identify a given set of tests that you need to run repeatedly. This can be useful to separate quick-running unit tests from heavier integration tests, or to factor out performance tests, for example. Once you have finished setting up your run configuration, you can easily come back and run (or debug) it again at any time.
Using TestNG in Ant
In a professional development environment, it is important to be able to run your tests in a reproducible and predictable manner. The best way to do this is to integrate your tests into your build process, whether it be using Ant, Maven, or some other build tool. TestNG works neatly with both Ant and Maven. Here we will look at how to use TestNG in Ant.
TestNG comes bundled with a convenient Ant task that lets you run TestNG tests, groups of tests, or test suites, in a very flexible manner. In the rest of this section, we will go through a practical example of what you can do with this task.
You define the TestNG task in a fairly standard manner, using the Ant <taskdef> task and indicating the location of the TestNG JAR file. In this example, I installed TestNG 5.3 in the /usr/local/testng directory, and we are interested in the JDK 1.5 version of TestNG. So we could set up the Ant <taskdef> as follows:
    <!-- TestNG resources  -->
    <property name="testng.home"  value="/usr/local/testng" />
    <property name="jdk15.testng.jar"  value="${testng.home}/testng-5.5-jdk15.jar" />

    <taskdef resource="testngtasks"  classpath="${jdk15.testng.jar}"/>
The <taskdef> instruction defines the <testng> task, which you can use to run your unit tests in a number of ways. First, however, you need to compile your classes and test classes in the usual way. In a real-world Ant project, the way you would do this can vary quite a bit, particularly with regards to directory structures. For completeness, an example of these tasks is shown here. The directory structure is represented by Ant properties: java.src is the root directory containing the application source code; test.src is the root directory containing the unit test source code; java.classes and test.classes contain the compiled application classes and unit tests, respectively:
    <target name="init" description="Create required work directories">
        <mkdir dir="${java.classes}"/>
        <mkdir dir="${test.classes}"/>
        <mkdir dir="${test.reports}"/>
    </target>

    <target name="compile" depends="init" description="Compile application classes">
        <javac srcdir="${java.src}" destdir="${java.classes}" includes="**/*.java" />
    </target>

    <path id="tests.classpath">
        <pathelement location="${jdk15.testng.jar}" />
        <pathelement location="${java.classes}" />
    </path>

    <target name="compiletests" depends="compile" description="Compile test classes">
        <javac srcdir="${test.src}" destdir="${test.classes}"
               classpathref="tests.classpath" includes="**/*.java" />
    </target>

    <path id="runtests.classpath">
        <path refid="tests.classpath"/>
        <pathelement location="${test.classes}" />
    </path>
This last classpath (runtests.classpath) is the one that we are going to use with the TestNG task. It contains, logically enough, all of the compiled application classes, test classes, dependencies, and the TestNG JAR file. Now we are ready to run our TestNG unit tests. The TestNG Ant task is flexible, and you can use it in many ways. The easiest way to get started is simply to run TestNG against a set of Java files. This is very easy to set up: all you need to define is the classpath that we set up earlier, and an output directory in which the test result reports will be generated (defined here by the test.reports property). Lots of other options are available: we also set the verbose attribute to see more details on the console, and we set the haltonfailure attribute to “true” to force the build to halt if there is a unit test failure:
<target name="runtests" depends="compiletests" description="Run TestNG unit tests">
    <testng classpathref="runtests.classpath" outputDir="${test.reports}"
            verbose="2" haltonfailure="true">
        <classfileset dir="${test.classes}" includes="**/*.class" />
    </testng>
</target>
Note that here you don’t need to define a TestNG configuration file: TestNG will figure out which classes contain unit tests by itself just fine. Let’s take it for a spin:
$ ant runtests
Buildfile: build.xml
...
runtests:
[testng] [Parser] Running:
[testng] Ant suite
[testng] PASSED: findCityByCode
[testng] PASSED: loadCity
[testng] PASSED: saveCity
[testng] PASSED: findCityByName
[testng] PASSED: findCountryByCode
[testng] PASSED: loadCountry
[testng] PASSED: loadHotel
...
[testng] java.lang.AssertionError
[testng] at com.wakaleo.jpt.hotel.domain.CountryTest.findCountryByName...
[testng] ... Removed 21 stack frames
[testng] FAILED: saveCountry
[testng] java.lang.AssertionError
[testng] at com.wakaleo.jpt.hotel.domain.CountryTest.saveCountry...
[testng] ... Removed 21 stack frames
[testng] ===============================================
[testng] Ant test
[testng] Tests run: 22, Failures: 2, Skips: 0
[testng] ===============================================
[testng] ===============================================
[testng] Ant suite
[testng] Total tests run: 22, Failures: 2, Skips: 0
[testng] ===============================================
BUILD SUCCESSFUL
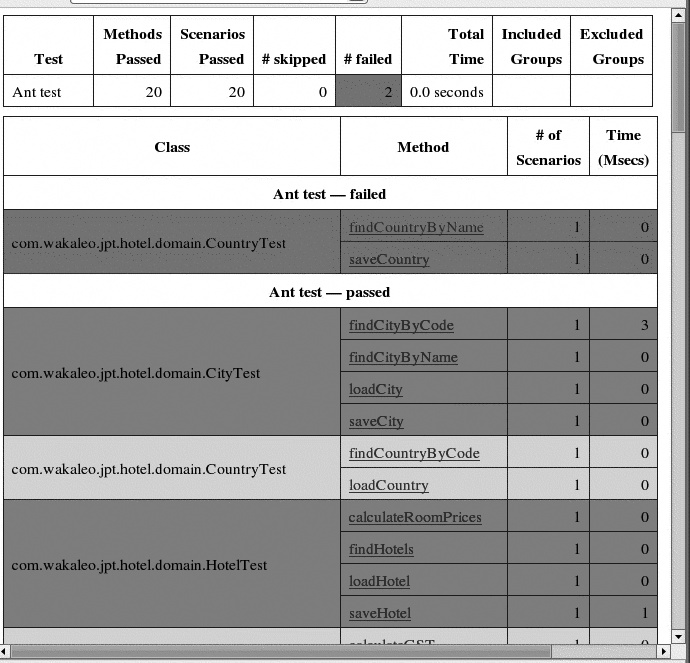
Total time: 1 secondThis task runs every TestNG-compatible unit test in the test class directory, and sends JUnit-style output to the console. It also generates HTML reports that can be sent by email or displayed on a project web site (see Figure 11-6). Although not particularly pretty, these reports are pragmatic and to the point. For example, any failed tests are listed at the top, because presumably that’s what the developer will be looking for first.
If you prefer to use a TestNG configuration file (or even several!), you can do that, too. Just use the <xmlfileset> nested element to tell TestNG which configuration files you want to use, as shown here:
<target name="runtests" depends="compiletests" description="Run TestNG unit tests">
    <testng classpathref="runtests.classpath" outputDir="${test.reports}"
            verbose="2" haltonfailure="true">
        <xmlfileset dir="src/test/resources" includes="testng.xml"/>
    </testng>
</target>
The TestNG task is very flexible and you can choose which tests to run in a variety of ways. For example, you can also run all the TestNG tests in a particular group or set of groups (see Using Test Groups), and/or exclude a group or set of groups, by using the groups or excludedgroups parameters:
<target name="unit-tests" depends="compiletests">
    <testng classpathref="runtests.classpath" outputDir="${test.reports}" verbose="2"
            haltonfailure="true" groups="unit">
        <classfileset dir="${test.classes}" includes="**/*.class"  />
    </testng>
</target>
Or you can run a set of tests simultaneously on several threads using the parallel parameter (see Parallel Testing), in order to test thread-safety or simulate load. Methods will be executed in parallel on separate threads (except tests with dependencies between them, which will be run in the same thread). For example, the following task will run the unit tests of the group “web” in separate, parallel threads:
<target name="loadtests" depends="compiletests" description="Run TestNG unit tests">
    <testng classpathref="runtests.classpath"
            outputDir="${test.reports}"
            verbose="2"
            haltonfailure="true"
            parallel="methods"
            groups="web">
       <classfileset dir="${test.classes}" includes="**/*.class"  />
    </testng>
</target>
Using TestNG with Maven 2
Maven (or, more precisely, Surefire) recognizes TestNG test cases. In other words, Maven should pick up TestNG tests in exactly the same way as JUnit 3 and JUnit 4 tests.
TestNG dependencies in Maven are a little quirky. There are actually two distributions of each version of TestNG: one compiled for JDK 1.5, and one compiled for JDK 1.4. The APIs are quite different: the first uses Java 5 annotations, whereas the second uses the old javadoc-style annotations.
In the Maven repository, the TestNG 5.1 jars (the latest at the time of this writing) are called testng-5.1-jdk15.jar and testng-5.1-jdk14.jar, for JDK 1.5 and JDK 1.4, respectively. When you add a TestNG dependency to your Maven POM file, you need to specify which version you need, using the <classifier> element. In the following example, we are using TestNG 5.1, compiled for JDK 1.5:
<dependencies>
    ...
    <dependency>
    <groupId>org.testng</groupId>
    <artifactId>testng</artifactId>
    <version>5.1</version>
    <classifier>jdk15</classifier>
    <scope>test</scope>
    </dependency>
    ...
</dependencies>
Managing the Test Lifecycle
When you write unit tests for real-world applications, you often find yourself writing a lot of supporting code, which is generally designed to prepare a clean, predicable test environment for your tests to run in, and to tidy up afterward. This code is often referred to as “fixture” code. Writing this code well is crucial to successful, efficient testing, and it often represents a sizeable and time-consuming part of your test classes. TestNG provides a powerful set of annotations that let you write flexible fixture code that can be executed at various moments during the test lifecycle.
Unit testing frameworks such as TestNG or JUnit are designed to run your tests in an organized, predictable manner. The test lifecycle defines the way and the order in which your test classes are instantiated and your unit tests executed. Understanding the test lifecycle can help you write better, faster, and more maintainable unit tests.
TestNG gives you a great deal of control over the test lifecycle. You can define methods which are executed at virtually any point in the unit test lifecycle: before and after the unit tests themselves, but also before and after executing the tests in a particular class or in a test suite. You can also set up methods which must be run before and after tests in a given group (see Using Test Groups) are executed. In this section, we will look at how to use these fixture annotations to improve the quality and speed of your unit tests.
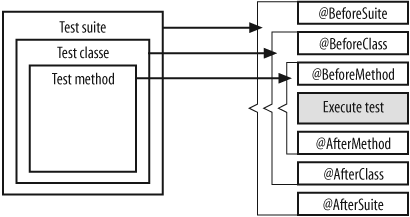
In TestNG, tests are organized into Test Suites. Each Test Suite is made up of test classes, which contain a number of unit tests, encoded within some test methods. TestNG provides annotations that let you insert fixture code before and after each of these components (see Figure 11-7).
Let’s look at a some concrete examples.
One of the main uses of fixture code is to prepare a clean test environment
for each unit test. In TestNG, methods tagged with the @BeforeTest and @AfterTest
annotations will be executed before and after each unit
test, respectively. This is the equivalent to the good old setUp() and tearDown() methods in JUnit 3.x, or the @Before annotation in JUnit 4. For example, suppose we need to
set up some test data before doing each test. And, as good citizens, after each
test we want to release any open database connections. We could do this using
the @BeforeMethod and @AfterMethod annotations, as
follows:
public class DataAccessTest {
    ...

    @BeforeMethod
    public void prepareTestData() {
        System.out.println("@BeforeMethod: prepareTestData");
        resetTestData();
    }

    @Test
    public void testSomething() {
        System.out.println("@Test: testSomething");
        ...
    }

    @Test
    public void testSomethingElse() {
        System.out.println("@Test: testSomethingElse");
        ...
    }

    @AfterMethod
    public void tidyUpAfterTest() {
        System.out.println("@AfterMethod: tidyUpAfterTest");
        releaseConnections();
    }
}
So, the prepareTestData() method will be
run before every unit test, and in the same way, tidyUpAfterTest() will be run after each unit test. I’ve added a
few messy System.out.printlns here, just to
illustrate the order in which the methods are
called:
$ ant runtests
Buildfile: build.xml
...
runtests:
[testng] [Parser] Running:
[testng]   .../src/sample-code/hotel-api/src/test/resources/testng.xml

[testng] @BeforeMethod: prepareTestData
[testng] @Test: testSomethingElse
[testng] @AfterMethod: tidyUpAfterTest
[testng] @BeforeMethod: prepareTestData
[testng] @Test: testSomething
[testng] @AfterMethod: tidyUpAfterTest
[testng] PASSED: testSomethingElse
[testng] PASSED: testSomething

[testng] ===============================================
[testng]     GST tests
[testng]     Tests run: 2, Failures: 0, Skips: 0
[testng] ===============================================


[testng] ===============================================
[testng] Suite
[testng] Total tests run: 2, Failures: 0, Skips: 0
[testng] ===============================================


BUILD SUCCESSFUL
Total time: 1 second
One
important detail is that within a lifecycle phase, methods are run in an
arbitrary order. For example, testSomethingElse() is executed before testSomething(). This isn’t usually an issue, as good unit tests
should be independent. However, if you had several @BeforeMethods or @AfterMethods, you couldn’t predict their execution order either.
There is a solution. If you really need one method to be executed before
another, you can do this declaratively using dependencies (see Managing Dependencies).
Sometimes you need to initialize data only once for the whole class, or do housekeeping functions once all of the tests have been executed. In JUnit 3.x, you would generally resort to static variables or lazy-loading to do this. TestNG provides a more elegant solution. The @BeforeClass and @AfterClass annotations are used for methods that are executed once before any of the tests in this class are run and once after they have all finished, respectively. For example, imagine creating a class that handles currency conversions. In a production environment, exchange rates are downloaded from an external web service. In a test environment, we need to use a predictable set of exchange rates for our tests. Setting this up is potentially a time- and resource-consuming operation. We would like to do it just once, before any tests are run. We also need to shut down the converter object cleanly once and for all at the end of the tests. And, as in the previous example, we need to set up some test data before each unit test, and tidy up afterward. Our test class might look like this:
public class CurrencyConverterTest {

    ...
    @BeforeClass public void setupExchangeRateTestData() {
        System.out.println("@BeforeClass: setupExchangeRateTestData");
        ...
    }

    @AfterClass public void tidyUpEnvironment() {
        System.out.println("@AfterClass : tidyUpEnvironment");
        ...
    }

    @BeforeMethod public void prepareTestData() {
        System.out.println("@BeforeMethod: prepareTestData");
        ...
    }

    @Test
    public void testAnExchangeRate() {
        System.out.println("@Test: testAnExchangeRate");
        ...
    }

    @Test
    public void testAnotherExchangeRate() {
        System.out.println("@Test: testAnotherExchangeRate");
        ...
    }

    @AfterMethod
    public void tidyUpTestData() {
        System.out.println("@AfterMethod: tidyUp");
        ...
    }
    ...
}
When we run this test class, as expected, our setupExchangeRateTestData()DownExchangeRateService() is executed once all the tests in the
class have been
completed:
$ ant runtests
Buildfile: build.xml
...
runtests:
[testng] [Parser] Running:
[testng]   .../src/sample-code/hotel-api/src/test/resources/testng.xml

[testng] @BeforeClass: setupExchangeRateTestData
[testng] @BeforeMethod: prepareTestData
[testng] @Test: testAnExchangeRate
[testng] @AfterMethod: tidyUpTestData
[testng] @BeforeMethod: prepareTestData
[testng] @Test: testAnotherExchangeRate
[testng] @AfterMethod: tidyUpTestData
[testng] @AfterClass : tidyUpEnvironment
[testng] PASSED: testAnExchangeRate
[testng] PASSED: testAnotherExchangeRate

[testng] ===============================================
[testng]     GST tests
[testng]     Tests run: 2, Failures: 0, Skips: 0
[testng] ===============================================


[testng] ===============================================
[testng] Suite
[testng] Total tests run: 2, Failures: 0, Skips: 0
[testng] ===============================================

BUILD SUCCESSFUL
Total time: 1 second
This is all useful stuff. However, TestNG lets you take fixtures even further! Suppose you need to use the currency converter service, initialized with the test data, in several other test classes in the same test suite. It would be nice to be able to initialize the test currency converter service just once, and only when these tests are run. TestNG provides annotations for this type of situation. @BeforeSuite and @AfterSuite methods are executed at the beginning and end of a test suite:
public class CurrencyConverterTest {
    ...
    @BeforeSuite public void setupTestExchangeRateService() {
        System.out.println("@BeforeSuite setupTestExchangeRateService");
    }
    @AfterSuite public void closeDownExchangeRateService() {
        System.out.println("@AfterSuite closeDownExchangeRateService");
    }
}
In the following example, we have added a second test class
(PriceCalculatorTest) to the test suite. This test
class contains unit tests (calculateDomesticPrice() and calculateForeignPrice()) that use the currency converter which
we set up in the CurrencyConverterTest test class. The @BeforeSuite annotation lets us guarantee that the service will
be correctly created and initialized whenever these tests are executed.
Conversely, the @AfterSuite annotation is run
after all of the test classes have been executed. This example now illustrates
the full TestNG
lifecycle:
$ ant runtests
Buildfile: build.xml
...
runtests:
[testng] [Parser] Running:
[testng]   .../src/sample-code/hotel-api/src/test/resources/testng.xml

[testng] @BeforeSuite setupTestExchangeRateService
[testng] @BeforeClass: setupExchangeRateTestData
[testng] @BeforeMethod: prepareTestData
[testng] @Test: testAnExchangeRate
[testng] @AfterMethod: tidyUpTestData
[testng] @BeforeMethod: prepareTestData
[testng] @Test: testAnotherExchangeRate
[testng] @AfterMethod: tidyUpTestData
[testng] @AfterClass : tidyUpEnvironment
[testng] @BeforeClass (PriceCalculatorTest)
[testng] @BeforeMethod
[testng] @Test calculateDomesticPrice
[testng] @AfterMethod
[testng] @BeforeMethod
[testng] @Test calculateForeignPrice
[testng] @AfterMethod
[testng] @AfterClass (PriceCalculatorTest)
[testng] PASSED: testAnExchangeRate
[testng] PASSED: testAnotherExchangeRate
[testng] PASSED: calculateReducedGST
[testng] PASSED: calculateStandardGST


[testng] ===============================================
[testng]     GST tests
[testng]     Tests run: 4, Failures: 0, Skips: 0
[testng] ===============================================

[testng] @AfterSuite closeDownExchangeRateService

[testng] ===============================================
[testng] Suite
[testng] Total tests run: 4, Failures: 0, Skips: 0
[testng] ===============================================


BUILD SUCCESSFUL
Total time: 2 seconds
Using Test Groups
One of the more popular features of TestNG is its support for test groups. Test groups are useful in many situations, and they provide a degree of flexibility that opens the door to a whole new way of thinking about testing strategies. A typical example is when you need to distinguish between fast, lightweight tests (using mock-objects, for example) that are to be run regularly on the developer’s machines, and longer, more complete integration and/or performance tests that need to be run on the server. You may need to distinguish between tests that must be run on a particular platform or environment. You may use groups to identify tests that run against certain parts of the system: database tests, user interface tests, and so on.
In TestNG, you can declare unit tests to belong to one or several groups. Then you can run certain groups of tests at different times or in different places. You add a method, or even an entire class, to a group by using the groups parameter in the @Test annotation. The syntax lets you add a class or method to one or several groups. Naming a group in a @Test annotation somewhere is all you need to do to bring it into existence—there is no “One File to Rule Them All”-style configuration file defining your groups:
    @Test(groups = "unit-test, integration-test" )
    public void testAnotherExchangeRate() {
        ...
    }

    @Test(groups = { "integration-test" })
    public void testBatchProcessExchangeRates() {
        ...
    }
Adding an entire class to a group is a good way of defining a default group for all the unit tests within that class (it saves typing and fits in well with the DRY [“Don’t Repeat Yourself”] principle). We could simplify the previous example by adding the class to the “integration-test” group, as shown here:
@Test(groups = { "integration-test" })
// All tests in this class should be considered as integration tests
public class CurrencyConverterTest {

    @Test(groups = "unit-test") // This one is a unit test too
    public void testAnotherExchangeRate() {
        ...
    }

    @Test
    public void testBatchProcessExchangeRates() {
        ...
    }
}
You can also set up test groups in your test suite, including or excluding particular groups. Using test groups lets you organize your testing strategy with a great deal of flexibility. For example, in the following test suite, we include all unit tests but exclude any unit tests that also belong to the integration test group:
<suite name="Suite" verbose="2" >
    <test name="Unit Tests" annotations="JDK">
        <groups>
            <run>
                <exclude name="integration-test"  />
                <include name="unit-test"  />
            </run>
        </groups>
        <packages>
            <package name="com.wakaleo.jpt.*" />
        </packages>
    </test>
</suite>
In TestNG, you can run all the tests in a group or set of groups, or alternatively, you can exclude tests in a particular group. For example, suppose you have written a class that sends email, but you can’t test it on your development machine because an anti-virus software prevents your machine from acting as an email server. It would be unwise to abandon unit tests on this module for such a light excuse! Just declare an “email-test” group, as shown here, and exclude this group from unit tests on the development machine:
   @Test(groups = "unit-test, email-test" )
    public void testEmailService() {
        ...
    }
Now it is an easy matter of excluding all tests in the “email-test” group. One way is to write a test suite entry that excludes this group, using the <exclude> element:
<suite name="Developer Unit Test Suite">
    <test verbose="2" name="Developer Unit Tests" annotations="JDK">
        <groups>
            <run>
                <include name="unit-test"/>
                <exclude name="email-test"/>
            </run>
        </groups>
        <classes>
            <class name="com.wakaleo.jpt.hotel.domain.CurrencyConverterTest"/>
            <class name="com.wakaleo.jpt.hotel.domain.PriceCalculatorTest"/>
        </classes>
    </test>
</suite>
This method will work fine. However, declaring test suites manually this way can be a bit long-winded. Luckily, there is an easier way to run (or exclude) groups of tests. If you are using Ant (see Using TestNG in Ant), you can run TestNG directly against a set of compiled unit test classes, without having to write an XML configuration file. You can use the groups attribute to indicate which groups you want to run. You can also use the excludedgroups to indicate test groups that are not to be executed:
<target name="unit-tests" depends="compiletests">
    <testng classpathref="runtests.classpath"
            outputDir="${test.reports}"
            verbose="2"
            haltonfailure="true"
            groups="unit-test"
            excludedgroups="email-tests">
        <classfileset dir="${test.classes}" includes="**/*.class"  />
    </testng>
</target>
Managing Dependencies
Test method dependencies are another area in which TestNG excels. Dependencies let you ensure that your test and fixture methods run in a particular order. This is clearly useful when you need to run your fixture methods in a certain order. For example, you may need to create an in-memory test database before filling it with test data. Another use is to create dependencies among tests. Sometimes, for example, if a particular key test in a test class fails, there is little point in running certain other tests. In this section, we look at how you can make the most out of test dependencies in TestNG.
One of the most common uses of TestNG dependencies is to coordinate test fixture code. Fixture code (see Managing the Test Lifecycle) is designed to set up and configure a predictable test environment before running your tests, and to clean up afterward. This sort of code plays an important role in any but the most trivial unit tests, and it is important that it be reliable and easily maintainable. For example, suppose that we need to run a series of tests against an in-memory database, with a predetermined set of test data. These tests are read-only, so we need to setup the database only once, at the start of the test class. One way of doing this would be to use the @BeforeClass annotation with some methods written to perform these two tasks. The code might look something like this:
    ...
    @BeforeClass
    public void createTestDatabase() {
        ...
    }

    @BeforeClass
    public void prepareTestData() {
        ...
    }
    ...
Now, it is fairly obvious that we need to create the database
before we insert the test data. At first glance, the
above code seems OK in this regard. However, there is actually no guarantee that
the createTestDatabase() method will be
called before the prepareTestData() method.
In TestNG, methods will respect the lifecycle-related ordering discussed in
Managing the Test Lifecycle, but, within a given phase (say, the
@BeforeClass methods) the order of
execution is not determined. And, in any case, it would be nicer to be able to
define this sort of dependency declaratively.
In TestNG, you can do just that. All of the TestNG methods take the dependsOnMethods
parameter, which you can use to list methods that must have been executed before
a particular method. This is a convenient, elegant way of defining dependencies
between test class methods. In the above example, we would simply indicate that
the prepareTestData() method depends on the
createTestDatabase() method, as shown
here:
    ...
    @BeforeClass
        public void createTestDatabase() {
        ...
    }

    @BeforeClass(dependsOnMethods = { "prepareTestData" })
    public void prepareTestData() {
        ...
    }
    ...
Dependencies have obvious uses for fixture code, but they can also be put to good use in test methods. In many cases, if a particular unit test fails, you can be sure that certain related subsequent tests will also fail. Running tests that are bound to fail is time-consuming, and pollutes your logfiles and reports without providing any useful information.
In TestNG, you can declare dependencies between test methods. Not only does
this guarantee that your tests will run in a particular order, it will also skip
a test if it depends on another test that has already failed. This lets you go
straight to the root cause of the error, without having to sift through error
messages generated by the failure of dependent tests. For example, in the
following tests, we load a configuration file and run a series of tests on the
data it contains. If the configuration file cannot be loaded correctly, than the
following tests are irrelevant. To avoid unnecessary testing, we specify that
the configuration data tests all depend on the initial loadConfigurationFile()
test.
...
@Test
public void loadConfigurationFile() {
    ...
}

@Test (dependsOnMethods = { "loadConfigurationFile" })
public void testConfigurationData1() {
    ...
}

@Test (dependsOnMethods = { "loadConfigurationFile" })
public void testConfigurationData2() {
    ...
}
...
Now,
if we run these tests, and the loadConfigurationFile() test fails, the subsequent tests on the
configuration data will be
skipped:
$ ant runtests
Buildfile: build.xml
...
runtests:
...
PASSED: testSomething
PASSED: testSomethingElse
FAILED: loadConfigurationFile
java.lang.AssertionError
at com.wakaleo.jpt.hotel.domain.DataAccessTest.loadConfigurationFile...
... Removed 21 stack frames
SKIPPED: testConfigurationData1
SKIPPED: testConfigurationData2

===============================================
com.wakaleo.jpt.hotel.domain.DataAccessTest
Tests run: 5, Failures: 1, Skips: 2
===============================================
You
can also set up dependencies on class groups. This is a neat trick if some of
your tests depend upon more than one method. For example, in the following
tests, we load the configuration file and verify its structure before testing
some access functions on this configuration data. The two initial methods
(loadConfigurationFile() and checkConfigurationFileStructure()) need to have
been successfully executed before we test the access functions (fetchConfigurationData1() and fetchConfigurationData2()). To enforce this, we
place the first two methods in a group called “init,” and then make the
subsequent tests depend on this
group:
...
@Test(groups = "init")
public void loadConfigurationFile() {
    ...
}

@Test(groups = "init", dependsOnMethods="loadConfigurationFile")
public void checkConfigurationFileStructure() {
    ...
}

@Test (dependsOnGroups = { "init" })
public void fetchConfigurationData1() {
    ...
}

@Test (dependsOnGroups = { "init" })
public void fetchConfigurationData2() {
    ...
}
...
Parallel Testing
Parallel testing is the ability to run unit tests simultaneously in several different threads. This fairly advanced testing technique can be useful in many situations. In web development, your application will typically be used by many concurrent users, and code may be required to run simultaneously on several threads. One of the best ways to check that your code supports this kind of simultaneous access is to run multithreaded unit tests against it. Multithreaded unit tests are also a good way to do low-level performance testing.
TestNG provides excellent built-in support for parallel testing. Multithreaded testing can be set up directly using the @Test annotation, using two main parameters:
threadPoolSize and
invocationCount. The threadPoolSize parameter lets you run unit tests
from a number of threads running in parallel. The invocationCount parameter determines the number of times a test
method will be executed in each thread. In the following example, TestNG will
set up five threads (the threadPoolSize
parameter). Each thread will run (or “invoke”) the testConcurrentHotelSearch() method 10 times (the invocationCount parameter):
@Test(threadPoolSize = 5, invocationCount = 10,  timeOut = 1000)
public void testConcurrentHotelSearch() {
    HotelSearchService hotelSearch = (HotelSearchService)
    beanFactory.getBean("hotelSearch");
    List<Hotel> hotels = hotelSearch.findByCity("Paris");
    ...
}
The timeOut parameter, which we see here, is useful for performance testing. It indicates the maximum time (in milliseconds) that a test method should take to run. If it takes any longer than this, the test will fail. You can use it with any test method, not just with multithreaded tests. However, when you are running multithreaded tests, you can use this parameter to guarantee that none of the threads will ever block the test run forever.
Test Parameters and Data-Driven Testing
Good testing involves more than simply exercising the code. You may also need to test your code against a wide range of input data. To make this easier, TestNG provides easy-to-use support for data-driven testing.
For example, suppose we want to test a business method that returns a list of hotels for a given city. We want to test this method using a number of different cities, making sure that the resulting list contains only hotels for that city. Let’s see how we could do this using TestNG.
First of all, you need to set up a data provider. A data provider is simply a
method which returns your test data, in the form of either a two-dimentional
array of Objects (Object[][]) or
an Iterator over a list of objects
(Iterator<Object[]>). You set up a data
provider by using (appropriately enough) the @DataProvider annotation, along with a unique name, as shown
here:
@DataProvider(name = "test-cities")
public Object[][] fetchCityData() {
    return new Object[][] {
        new Object[] { "London" },
        new Object[] { "Paris" },
        new Object[] { "Madrid" },
        new Object[] { "Amsterdam" }
    };
}
Next, you can use this data provider to provide parameters for your test cases. TestNG tests can take parameters, so writing a test case that works with a data provider is easy. You simply create a test method with the correct number of parameters, and specify the data provider using the dataProvider parameter in the @Test annotation:
@Test(dataProvider="test-cities")
public void findHotelsInCity(String city) {
    List<Hotel> results = hotelFinder.findInCity(city);
    // Check that every hotel in this list belongs to the specified city.
    ...
}
Now, if we run this, TestNG will invoke this method as many times as necessary for each data entry returned by the data provider:
$ ant runtests
Buildfile: build.xml
...
runtests:
...
PASSED: findHotelsInCity("London")
PASSED: findHotelsInCity("Paris")
PASSED: findHotelsInCity("Madrid")
PASSED: findHotelsInCity("Amsterdam")
...
Checking for Exceptions
Testing proper error handling is another aspect of unit testing.
Indeed, you sometimes need to check that a particular exception is correctly
thrown under certain circumstances (see Checking for Exceptions the Easy Way). In
TestNG, you can do this easily by using the expectedExceptions annotation parameter. You just specify the
Exception class which should be thrown by your test in this parameter, and
TestNG does the rest. If the exception is thrown, the test passes; otherwise, it
fails. In the following example, we test a method that searches for hotels in a
given country. The country code comes from a pre-defined list, and if an illegal
country code is provided, the method should throw an
UnknownCountryCodeException. We could test this error
handling process as
follows:
@Test(expectedExceptions = UnknownCountryCodeException.class)
public void lookupHotelWithUnknownCountryCode() {
    HotelSearchService hotelSearch
        = (HotelSearchService) beanFactory.getBean("hotelSearch");
    List<Hotel> hotels = hotelSearch.findByCountryCode("XXX");
}
Handling Partial Failures
One tricky case to test is when you know that a certain (generally small) percentage of test runs will fail. This often occurs in integration or performance testing. For example, you may need to query a remote web service. The response time will be dependant on many factors: network traffic, the amount of data sent over the network, the execution time of the remote request, and so on. However, according to your performance requirements, you need to be able to perform this operation in less than 50 milliseconds, at least 99 percent of the time.
So, how do you test this in TestNG? It’s actually pretty simple. TestNG provides a successPercentage parameter, which you use in conjunction with the invocationCount to verify that at least a given percentage of tests succeed. This is one way that we might test the performance requirements described above:
@Test(invocationCount=1000, successPercentage=99, timeOut=50)
public void loadTestWebserviceLookup() {
    ....
}
You obviously need the invocationCount parameter to be high enough to give statistically significant results. Ten tests are generally not enough, and even a hundred tests will still present a fair bit of statistical variation. Although it will depend on your application, you will usually need several hundred or thousand tests to be able to have any degree of statistical reliability.
It is also a good idea to place this sort of test in a special group reserved for long-running performance and load tests. And for more realistic testing, you can also toss in the threadPoolSize parameter (see Parallel Testing) to run your tests in parallel and simulate a multiuser environment.
Rerunning Failed Tests
Large real-world applications will often contain hundreds or thousands of test cases. And it can be particularly frustrating when you have to rerun the entire test suite just because two or three tests have failed. Wouldn’t it be nice if you could simply fix the code and only run the tests that failed? TestNG provides a neat little feature to do just this: You have the option of rerunning only the test methods that failed the last time round.
Whenever TestNG comes across a test failure, it creates (or appends to) a special test suite configuration file in the output directory called testng-failed.xml. Once all of the tests have been executed, this file will contain the complete list of the test methods which have failed. Then, once you have corrected your code, you just have to run TestNG using this configuration file and TestNG will rerun the failed tests. Needless to say, this can be an invaluable time-saver.
To run this from Ant (see Using TestNG in Ant), you could just add a simple target that runs TestNG against the testng-failed.xml configuration file, as shown here:
<target name="failed-tests" depends="compiletests" description="Run TestNG
unit tests">
    <testng classpathref="runtests.classpath" outputDir="${test.reports}"
     verbose="2"  haltonfailure="true">
        <xmlfileset dir="${test.reports}" includes="testng-failed.xml"/>
    </testng>
</target>
The practice of rerunning failed tests is not of course designed to replace comprehensive unit and regression tests. It is always possible that a correction somewhere may have broken a test somewhere else, so you should still run the entire test suite at some point to ensure that everything is still working. However, if you need to fix just one or two errors out of hundreds of test cases, this is a big time-saver.